length DATSUN 610 1969 Workshop Manual
[x] Cancel search | Manufacturer: DATSUN, Model Year: 1969, Model line: 610, Model: DATSUN 610 1969Pages: 171, PDF Size: 10.63 MB
Page 12 of 171

CYUNDER
HEAD
RECESS
DIAMETER
Standard
inoerts
Engine
L14
Ll6
and
Ll8
Inlet
41
000
41
016
1
6142
1
6148
in
45
000
45
016
mm
1
77l7
1
77231n
Engine
Ll4
Ll6
and
Ll8
Exhaust
37
000
37
016mm
1
4567
1
4573
in
37
000
37
016mm
l
4567
1
4573
in
CYLINDER
HEAD
RECESS
DIAMETER
Oversize
inserts
Engine
Ll4
Ll6andLl8
Inlet
41
500
41
516mm
l
6339
1
6345in
45
S00
45
516mm
I
7913
1
7920in
Engine
L14
Ll6andLl8
Exhaust
37
500
37
516mm
1
4764
14770in
37
500
37
516mm
1
4764
l4770in
Dimensions
for
the
standard
valve
inserts
are
shown
in
Fig
A
17
Heat
the
cylinder
head
to
a
temperature
of
ISO
20DOC
302
3920F
and
drive
in
the
inserts
making
sure
that
they
bed
down
correctly
The
inserts
should
be
caulked
at
more
than
four
positions
and
then
cuf
or
ground
to
the
specified
dimensions
shown
in
Fig
A
IS
Place
a
small
amount
of
fine
grinding
compound
on
the
seating
face
of
the
valve
and
insert
the
valve
into
the
valve
guide
Lap
the
valve
against
its
seat
by
rotating
it
backwards
and
forwards
approximately
half
a
revolution
in
each
direction
until
a
continous
seating
has
been
obtained
Remove
the
valve
and
clean
all
traces
of
the
grinding
compound
from
valve
and
seat
VALVE
SPRINGS
The
valve
springs
can
be
checked
for
squareness
using
a
steel
square
and
surface
plate
If
the
spring
is
out
of
square
by
more
than
1
6mm
0
063
in
it
must
be
replaced
Check
the
free
length
and
the
load
required
to
deflect
the
spring
to
its
assembled
height
Compare
the
figures
obtained
with
those
given
in
Technical
Data
and
replace
the
spring
if
the
specified
limits
are
exceeded
CAMSHAFT
AND
CAMSHAFT
BEARINGS
Checking
Measure
the
clearance
between
the
inner
diameter
of
the
camshaft
bearing
and
the
outer
diameter
of
the
camshaft
journal
If
the
wear
limit
for
the
bearing
clearance
exceeds
O
lmm
0
0039
in
it
will
be
necessary
to
replace
the
cylinder
block
assembly
See
Technical
Data
for
all
diameters
Check
the
camshaft
and
camshaft
journals
for
signs
of
wear
or
damage
ace
the
camshaft
in
V
Blocks
as
shown
in
Fig
A
19
and
position
the
dial
gauge
to
the
journal
The
run
out
of
the
cam
shaft
must
not
exceed
0
05
mm
0
0020in
It
should
be
noted
that
the
actual
run
out
will
be
half
the
the
value
indicated
on
the
dial
gauge
When
the
camshaft
is
turned
one
full
revolution
with
the
dial
gauge
positioned
against
the
second
and
third
journals
CYLINDER
BLOCK
Inspection
and
Overhaul
Ensure
that
the
cylinder
block
is
thoroughly
clean
and
check
it
for
cracks
and
flaws
Check
the
joint
face
of
the
block
for
distortion
using
a
straight
edge
and
feeler
gauge
as
shown
in
Fig
A
20
The
surface
must
be
reground
if
the
maximum
tolerance
of
O
lmm
0
0039
in
is
exceeded
Examine
the
cylinder
bores
for
out
of
round
or
taper
using
a
bore
gauge
as
shown
in
Fig
A
21
The
readings
must
be
taken
at
the
Top
middle
and
bottom
positions
indicated
in
Fig
A
22
The
standard
bore
diameters
are
83
000
83
050
rom
3
2677
3
3697
in
for
the
1400
and
1600cc
engines
and
85
000
85
050
mm
3
3465
3
3484
in
for
the
1800
cc
engine
with
a
wear
limit
of
0
2mm
0
0079
in
Out
of
round
and
taper
must
not
exceed
0
15mm
0
0006
in
If
the
bores
are
within
the
specified
limits
remove
the
carbon
ridge
at
the
top
of
the
cylinder
bores
wring
a
suitable
ridge
reamer
If
any
of
the
bores
are
in
excess
of
the
specified
limits
then
all
the
bores
must
be
rebored
at
the
same
time
Pistons
are
available
in
five
oversizes
See
Technical
Data
and
can
be
selected
in
accordance
with
the
amount
of
wear
of
the
cylinder
When
the
oversize
of
the
pistons
has
been
decided
it
will
be
necessary
to
measure
the
piston
at
the
piston
skirt
Fig
A
23
and
add
to
this
dimension
the
specified
piston
to
cylinder
bore
clearance
to
determine
the
final
honed
measurement
of
the
cylinder
Machine
the
cylinder
bores
in
gradual
stages
taking
only
a
0
5mm
0
002
in
cut
each
time
The
bores
must
be
brought
to
the
final
size
by
honing
and
the
block
thoroughly
cleaned
to
remove
all
traces
of
metal
Measure
the
finished
bore
and
check
the
clearance
between
each
piston
and
its
cylinder
The
clearance
can
be
checked
as
shown
in
Fig
A
24
with
the
aid
of
a
feeler
gauge
and
spring
scale
The
standard
clearance
is
0
023
0
043
mm
0
0009
0
0017
in
NOTE
Cylinder
liners
can
be
fitted
if
the
cylinder
bores
are
worn
beyond
the
maximum
limit
The
liners
are
an
interference
fit
in
the
block
and
must
be
bored
to
the
correct
inner
diameter
after
fitting
Three
undersize
liners
are
available
in
the
following
sizes
11
Page 14 of 171
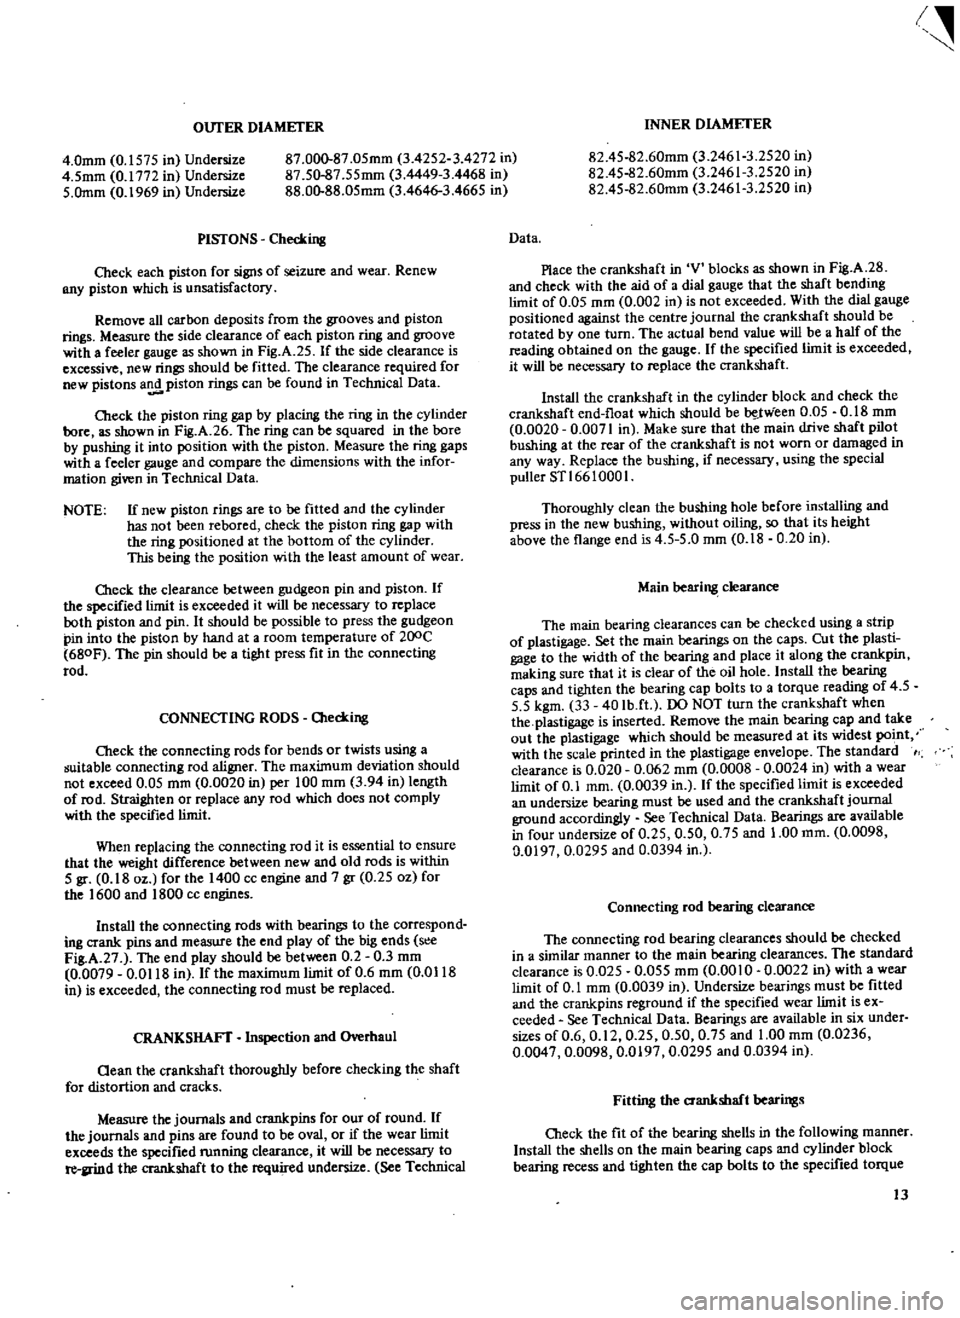
OUTER
DIAMETER
4
0mm
0
1575
in
Undersize
4
5mm
0
1772
in
Undersize
5
Omm
0
1969
in
Undersize
87
000
87
05mm
3
4252
3
4272
in
87
50
87
55mm
3
4449
3
4468
in
88
00
88
05mm
3
4646
3
4665
in
PISTONS
Checking
Check
each
piston
for
signs
of
seizure
and
wear
Renew
BIlY
piston
which
is
unsatisfactory
Remove
all
carbon
deposits
from
the
grooves
and
piston
rings
Measure
the
side
clearance
of
each
piston
ring
and
groove
with
a
feeler
gauge
as
shown
in
Fig
A
25
If
the
side
clearance
is
excessive
new
rings
should
be
fitted
The
clearance
required
for
new
pistons
a
piston
rings
can
be
found
in
Technical
Data
Check
the
piston
ring
gap
by
placing
the
ring
in
the
cylinder
bore
as
shown
in
Fig
A
26
The
ring
can
be
squared
in
the
bore
by
pushing
it
into
position
with
the
piston
Measure
the
ring
gaps
with
a
feeler
gauge
and
compare
the
dimensions
with
the
infor
mation
given
in
Technical
Data
NOTE
If
new
piston
rings
are
to
be
fitted
and
the
cylinder
has
not
been
rebafed
check
the
piston
ring
gap
with
the
ring
positioned
at
the
bottom
of
the
cylinder
This
being
the
position
with
the
least
amount
of
wear
O1eck
the
clearance
between
gudgeon
pin
and
piston
If
the
specified
limit
is
exceeded
it
will
be
necessary
to
replace
both
piston
and
pin
It
should
be
possible
to
press
the
gudgeon
pin
into
the
piston
by
hand
at
a
room
temperature
of
200C
680F
The
pin
should
be
a
tight
press
fit
in
the
connecting
rod
CONNECTING
RODS
O1ecking
Cleck
the
connecting
rods
for
bends
or
twists
using
a
guitable
connecting
rod
aligner
The
maximum
deviation
should
not
exceed
0
05
mm
0
0020
in
per
100
mm
3
94
in
length
of
rod
Straighten
or
replace
any
rod
which
does
not
comply
with
the
specified
limit
When
replacing
the
connecting
rod
it
is
essential
to
ensure
that
the
weight
difference
between
new
and
old
rods
is
within
5
gr
0
18
oz
for
the
1400
cc
engine
and
7
gr
0
25
oz
for
the
1600
and
1800
cc
engines
Install
the
connecting
rods
with
bearings
to
the
correspond
ing
crank
pins
and
measure
the
end
play
of
the
big
ends
s
e
Fig
A
27
The
end
play
should
be
between
0
2
0
3
mm
0
0079
0
0118
in
fthe
maximum
limit
of
0
6
mm
0
Ql18
in
is
exceeded
the
connecting
rod
must
be
replaced
CRANKSHAFT
Inspection
and
Overhaul
aean
the
crankshaft
thoroughly
before
checking
the
shaft
for
distortion
and
cracks
Measure
the
journals
and
crankpins
for
our
of
round
If
the
journals
and
pins
are
found
to
be
oval
or
if
the
wear
limit
exceeds
the
specified
fUnning
clearance
it
will
be
necessary
to
re
llrind
the
crankshaft
to
the
required
undersize
See
Technical
I
INNER
DIAMETER
82
45
82
60mm
3
24613
2520
in
82
4S
82
60mm
3
24613
2520
in
82
4S
82
60mm
3
24613
2520
in
Data
Place
the
crankshaft
in
V
blocks
as
shown
in
Fig
A
28
and
check
with
the
aid
of
a
dial
gauge
that
the
shaft
bending
limit
of
0
05
mm
0
002
in
is
not
exceeded
With
the
dial
gauge
positioned
against
the
centre
journal
the
crankshaft
should
be
rotated
by
one
turn
The
actual
bend
value
will
be
a
half
of
the
reading
obtained
on
the
gauge
If
the
specified
limit
is
exceeded
it
will
be
necessary
to
replace
the
crankshaft
Install
the
crankshaft
in
the
cylinder
block
and
check
the
crankshaft
end
float
which
should
be
be
J
Yieen
0
05
0
18
mm
0
0020
0
0071
in
Make
sure
that
the
main
drive
shaft
pilot
bushing
at
the
rear
of
the
crankshaft
is
not
worn
or
damaged
in
any
way
Replace
the
bushing
if
necessary
using
the
special
puller
STl
66
1000
I
Thoroughly
clean
the
bushing
hole
before
installing
and
press
in
the
new
bushing
without
oiling
so
that
its
height
above
the
flange
end
is
4
5
5
0
mm
0
18
0
20
in
Main
bearing
clearance
The
main
bearing
clearances
can
be
checked
using
a
strip
of
plastigage
Set
the
main
bearings
on
the
caps
Cut
the
plasti
gage
to
the
width
of
the
bearing
and
place
it
along
the
crankpin
making
sure
that
it
is
clear
of
the
oil
hole
Install
the
bearing
caps
and
tighten
the
bearing
cap
bolts
to
a
torque
reading
of
4
5
5
5
kgm
33
40
Ib
ft
DO
NOT
turn
the
crankshaft
when
the
plastigage
is
inserted
Remove
the
main
bearing
cap
and
take
out
the
plastigage
which
should
be
measured
at
its
widest
po
t
with
the
scale
printed
in
the
plastigage
envelope
The
standard
clearance
is
0
020
0
062
mm
0
0008
0
0024
in
with
a
wear
limit
of
0
1
mm
0
0039
in
If
the
specified
limit
is
exceeded
an
undersize
bearing
must
be
used
and
the
crankshaft
journal
ground
accordingly
See
Technical
Data
Bearings
are
available
in
four
undersize
of
0
25
0
50
0
75
and
1
00
mm
0
0098
0
0197
0
0295
and
0
0394
in
Connecting
rod
bearing
clearance
The
connecting
rod
bearing
clearances
should
be
checked
in
a
similar
manner
to
the
main
bearing
clearances
The
standard
clearance
is
0
025
0
055
mm
0
0010
0
0022
in
with
a
wear
limit
of
0
1
mm
0
0039
in
Undersize
bearings
must
be
fitted
and
the
crankpins
reground
if
the
specified
wear
limit
is
ex
ceeded
See
Technical
Data
Bearings
are
available
in
six
under
sizes
of
0
6
0
12
0
25
0
50
0
75
and
1
00
mm
0
0236
0
0047
0
0098
0
0197
0
0295
and
0
0394
in
Fitting
the
crankshaft
bearings
Cb
eck
the
fit
of
the
bearing
shells
in
the
following
manner
Install
the
shells
on
the
main
bearing
caps
and
cylinder
block
bearing
recess
and
tighten
the
cap
bolts
to
the
specified
torque
13
Page 20 of 171

VALVE
CLEARANCES
Adjusting
Incorrect
valve
clearance
will
affect
the
performance
of
the
engine
and
may
damage
the
valves
and
valve
seats
Insuf
ficient
valve
clearance
will
result
in
loss
of
power
and
may
prevent
the
valve
from
seating
properly
Excessive
clearance
causes
the
valve
to
seat
and
reduces
the
amount
of
valve
lift
This
will
result
in
noisy
operation
with
damage
to
the
valves
and
seats
Adjustment
is
made
with
the
engine
switched
off
and
should
be
carried
out
initially
with
the
engine
cold
to
allow
the
engine
to
run
Final
adjustments
are
made
after
wanning
up
the
engine
to
its
Donnal
operating
temperature
The
engine
can
be
rotated
by
removing
the
sparking
plugs
to
release
the
cylinder
compressions
then
selecting
top
gear
and
pushing
the
vehicle
backwards
and
forwards
The
cold
valve
clearances
should
be
set
to
0
20
mm
0
0079
in
for
the
inlet
valves
and
0
25
mm
0
0098
in
for
the
exhaust
valves
Check
the
clearance
between
the
valve
and
rocker
using
a
feeler
gauge
as
shown
in
Fig
A
40
Slacken
the
locknut
and
turn
the
adjusting
screw
until
the
specified
clearance
is
obtained
then
tighten
the
locknut
and
recheck
the
clearance
The
feeler
gauge
should
just
be
free
to
move
between
the
rocker
and
valve
When
the
cold
valve
clearances
have
been
set
run
the
engine
until
it
reaches
its
normal
operating
temperature
then
switch
off
and
adjust
the
valve
clearances
with
the
engine
warm
to
0
25
mm
0
0098
in
for
the
inlet
valves
and
0
30
mm
0
0118
in
for
the
exhaust
valves
ENGINE
LUBRICATION
SYSTEM
Fig
A
41
OIL
PUMP
Removal
and
Dismantling
The
rotor
type
oil
pump
is
mounted
at
the
bottom
of
the
front
timing
cover
and
driven
by
the
distributor
drive
shaft
assembly
Overhaul
of
the
pump
will
require
careful
measurement
of
the
various
clearances
to
determine
the
amount
of
wear
which
has
taken
place
If
any
part
is
found
to
be
worn
it
may
be
neces
sary
to
replace
the
entire
oil
pump
assembly
To
remove
the
oil
pump
from
the
engine
proceed
as
follows
1
Remove
the
distributor
assembly
as
described
in
the
section
IGNITION
SYSTEM
Remove
the
oil
sump
drain
plug
and
drain
off
the
engine
oil
See
under
the
heading
CHANGING
THE
ENGINE
OIL
2
Remove
the
front
stabiliser
and
the
splash
shield
board
3
Withdraw
the
securing
bolts
and
detach
the
oil
pump
body
together
with
the
drive
gear
spindle
Take
out
the
bolts
securing
the
pump
cover
to
the
pump
body
and
withdraw
the
rotors
and
drive
shaft
See
Fig
A
42
The
pin
securing
the
driven
shaft
and
inner
rotor
must
not
00
taken
out
as
the
shaft
is
press
fitted
to
the
rotor
and
the
pin
is
caulked
Unscrew
the
threaded
plug
and
withdraw
the
regulator
valve
and
spring
Oean
each
part
thoroughly
and
examine
for
signs
of
damage
or
wear
Use
a
feeler
gauge
to
check
the
side
clearances
between
the
outer
and
inner
rotors
the
clearances
at
the
tips
of
the
rotors
and
the
clearance
between
the
outer
rotor
and
the
pump
body
See
Technical
Data
for
the
relevant
clearances
The
clearances
can
be
checked
using
a
straight
edge
as
shown
in
Fig
A
43
OIL
PUMP
Assembly
and
Installation
Assembly
is
a
reversal
of
the
dismantling
procedure
Before
installing
the
oil
pump
in
the
engine
it
will
be
necessary
to
rotate
the
engine
until
the
No
1
piston
is
at
T
D
C
on
its
compression
stroke
Fill
the
pump
housing
with
engine
oil
and
align
the
punch
mark
on
the
spindle
with
the
hole
in
the
oil
pump
as
shown
in
Fig
A
44
Install
the
pump
with
a
new
gasket
and
tighten
the
securing
bolts
to
a
torque
reading
of
1
1
1
5
kgm
8
1
Ilb
ft
Replace
the
splash
shield
board
and
the
front
stabiliser
refill
the
engine
with
the
specified
amount
of
engine
oil
OIL
FILTER
The
cartridge
type
oil
filter
can
be
removed
with
the
special
tool
ST
19320000
or
a
suitable
filter
remover
Interior
cleaning
is
not
necessary
but
the
ftIter
body
and
element
must
be
repiaced
every
10
000
km
6000
miles
Be
care
ul
not
to
overtighten
the
filter
when
replacing
or
oil
leakage
may
occur
CHANGING
THE
ENGINE
OIL
After
the
fIrst
oil
change
which
should
take
place
at
1000
km
600
miles
the
oil
should
be
changed
regularly
at
5000
km
3000
miles
intervals
Draining
is
more
easily
accomplished
after
a
lengthy
run
when
the
oil
being
thoroughly
warm
will
flow
quite
freely
Stand
the
vehicle
on
level
ground
and
place
a
suitable
container
under
the
drain
plug
Remove
the
drain
plug
carefully
as
the
hot
oil
may
spurt
out
with
considerable
force
When
refIlling
the
engine
make
sure
that
the
oil
is
to
the
H
mark
on
the
dipstick
19
Page 21 of 171
Engine
model
Number
of
cylinders
Arrangement
of
cylinders
Cubic
capaci
ty
Bore
x
stroke
Arrangemen
t
of
valves
Max
B
H
P
Max
torque
Firing
order
eidlingspeed
Compression
ratio
Oil
pressure
Valve
clearance
hot
Inlet
Exhaust
Valve
clearance
cold
Inlet
Exhaust
Valve
head
diameter
Inlet
Exhaust
Valve
stem
diameter
Inlet
Exhaust
Valve
lift
Valve
spring
free
length
Valve
spring
fitted
length
Valve
spring
coil
diameter
Valve
guide
length
Inlet
Exhaust
Valve
guide
protrusion
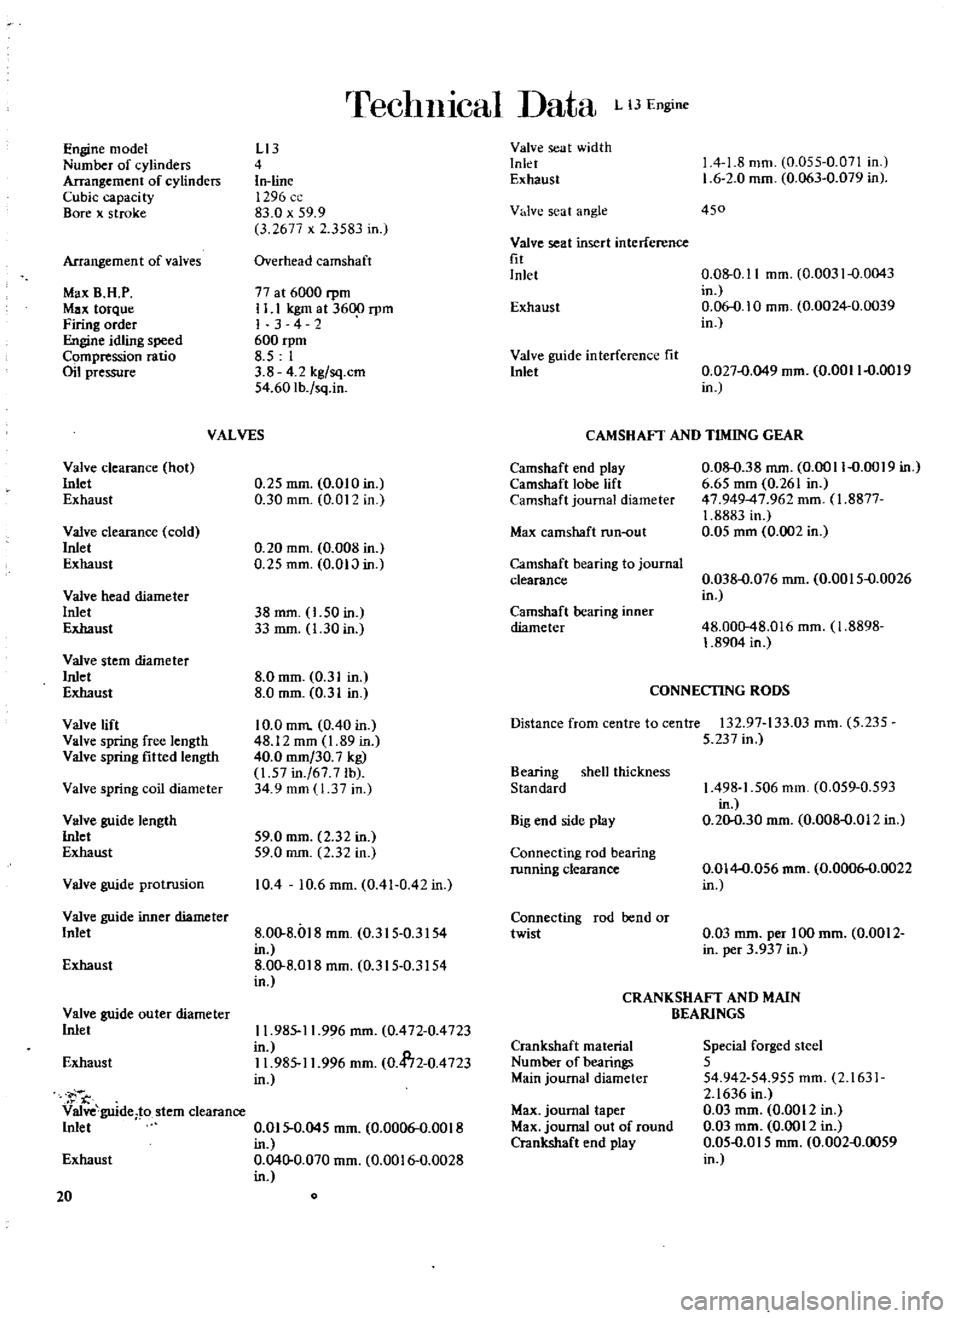
rreclll11cal
ata
L
lJEngine
LI3
4
In
line
1296
83
0
x
59
9
3
2677
x
3583
in
Overhead
camshaft
77
at
6000
rpm
II
1
kgm
at
3600
rpm
I
342
600
rpm
8
5
1
3
8
4
2
kg
sq
em
54
60Ib
sq
in
VALVES
0
25
mm
0
010
in
0
30
mm
0
01
in
0
20
mm
0
008
in
0
25
mm
O
OIJ
in
38
mm
1
50
in
33
mm
1
30
in
8
0
mm
0
31
in
8
0
mm
0
31
in
10
0
mm
0
40
in
48
12
mm
1
89
in
40
0
mm
30
7
kg
1
57
in
67
7
lb
34
9
mm
1
37
in
59
0
mm
2
32
in
59
0
mm
2
32
in
10
4
10
6
mm
0
41
0
42
in
Valve
guide
inner
diameter
Inlet
8
00
8
l
8
mm
0
315
0
3154
in
Exhaust
8
00
8
018
mm
0
315
0
3154
in
Valve
guide
outer
diameter
Inlet
Exhaust
Valve
guide
to
stem
clearance
Inlet
Exhaust
20
11
985
11
996
mm
0
472
0
4723
in
11
985
11
996
mm
0
4172
0
4723
in
0
015
0
045
mm
0
0006
0
0018
in
0
040
0
070
mm
0
0016
0
0028
in
Valve
seat
width
Inlet
Exhaust
V
lve
seat
angle
Valve
seat
insert
interference
fit
Inlet
Exhaust
Valve
guide
interference
fit
Inlet
1
4
1
8
mm
0
055
0
071
in
1
6
2
0
mm
0
063
0
079
in
450
0
08
0
11
mm
0
0031
0
0043
in
0
06
0
10
mm
0
0024
0
0039
in
0
027
0
049
mm
0
0011
0
0019
in
CAMSHAFT
AND
TIMING
GEAR
Camshaft
end
play
Camshaft
lobe
lift
Camshaft
journal
diameter
Max
camshaft
run
out
Camshaft
bearing
to
journal
clearance
Camshaft
bearing
inner
diameter
0
08
0
38
mm
0
0011
0
0019
in
6
65
mm
0
261
in
47
949
47
962
mm
fI
8877
1
8883
in
0
05
mm
0
002
in
0
038
0
076
mm
0
0015
0
0026
in
48
000
48
016
mm
1
8898
1
8904
in
CONNECTING
RODS
Distance
from
centre
to
centre
132
97
133
03
mm
5
235
5
237
in
Bearing
shell
thickness
Standard
Big
end
side
play
Connecting
rod
bearing
running
clearance
Connecting
rod
rend
or
twist
1
498
1
506
mm
0
059
0
593
in
0
20
0
30
mm
0
008
0
012
in
0
014
0
056
mm
0
0006
0
0022
in
0
03
mm
per
100
mm
0
0012
in
per
3
937
in
CRANKSHAFT
AND
MAIN
BEARINGS
Crankshaft
material
Number
of
bearings
Main
journal
diameter
Max
journal
taper
Max
journal
out
of
round
Crankshaft
end
play
Special
forged
steel
5
54
942
54
955
mm
2
1631
2
1636
in
0
03
mm
0
0012
in
0
03
mm
0
0012
in
0
05
0
015
mm
0
002
0
0059
in
Page 22 of 171
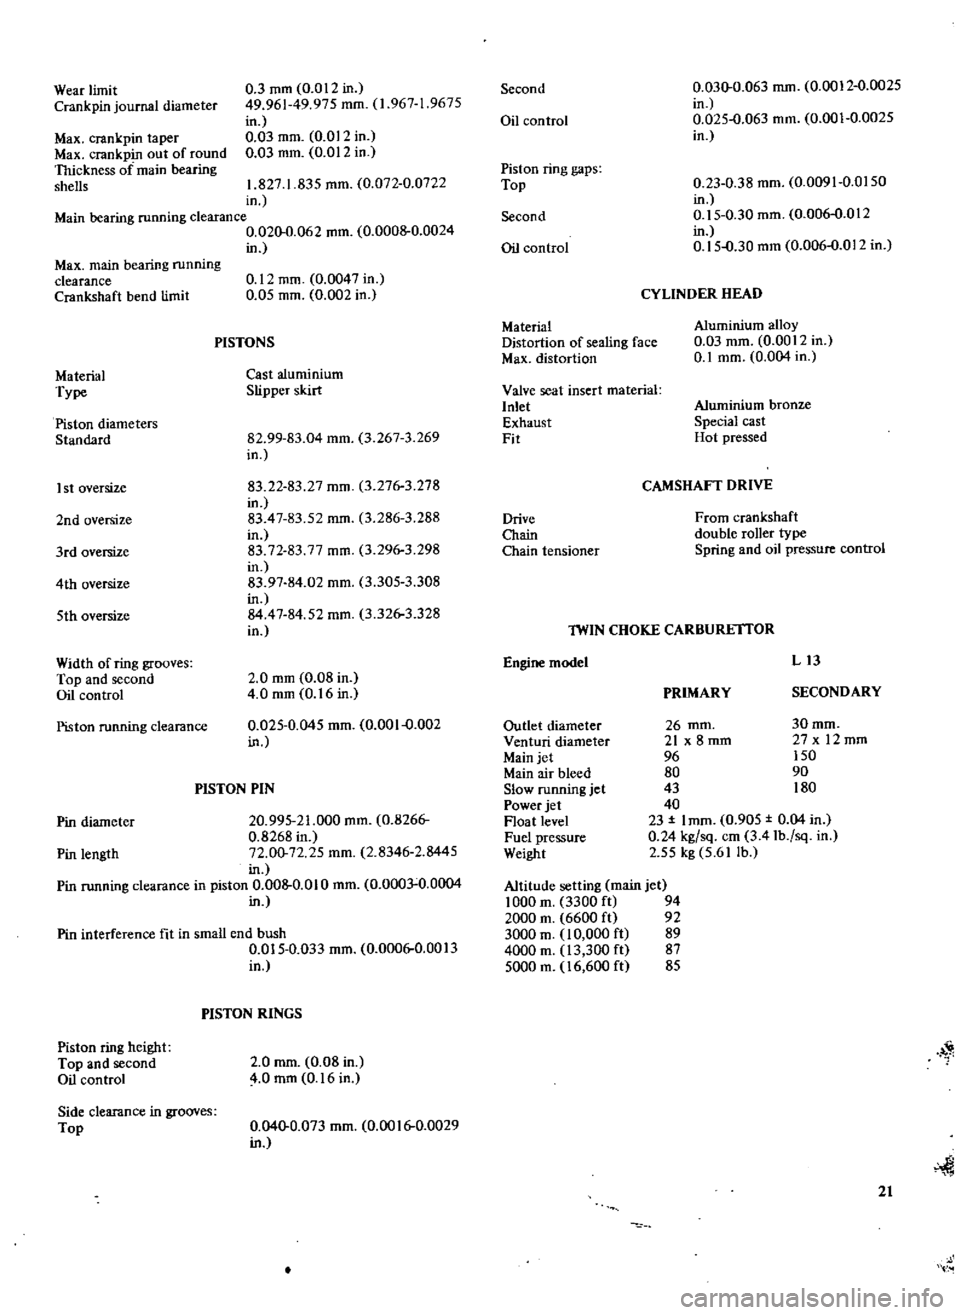
Wear
limit
Crank
pin
journal
diameter
Max
crankpin
taper
Max
crankpin
out
of
round
Thickness
of
main
bearing
shells
0
3
mm
0
012
in
49
961
49
975
mm
1
967
1
9675
in
0
03
mm
0
012
in
0
03
mm
0
012
in
1
827
1
835
mm
0
072
0
0722
in
Main
bearing
running
clearance
0
020
0
062
mm
0
0008
0
0024
in
Max
main
bearing
running
clearance
Crankshaft
bend
limit
Material
Type
Piston
diameters
Standard
I
st
oversize
2nd
oversize
3rd
oversize
4th
oversize
5th
oversize
Width
of
ring
grooves
Top
and
second
Oil
control
Piston
running
clearance
0
12
mm
0
0047
in
0
05
mm
0
002
in
PISTONS
Cast
aluminium
Slipper
skirt
82
99
83
04
mm
3
267
3
269
in
83
22
83
27
mm
3
276
3
278
in
83
47
83
52
mm
3
286
3
288
in
83
72
83
77
mm
3
296
3
298
in
83
97
84
02
mm
3
305
3
308
in
84
47
84
52
mm
3
326
3
328
in
2
0
mm
0
08
in
4
0
mm
0
16
in
0
025
0
045
mm
0
001
0
002
in
PISTON
PIN
Pin
diameter
20
995
21
000
mm
0
8266
0
8268
in
Pin
length
72
00
72
25
mm
2
8346
2
8445
in
Pin
running
clearance
in
piston
0
008
0
010
mm
0
0003
0
0004
in
Pin
interference
fit
in
small
end
bush
0
015
0
033
mm
0
0006
0
0013
in
Piston
ring
height
Top
and
second
Oil
control
Side
clearance
in
grooves
Top
PISTON
RINGS
2
0
mm
0
08
in
4
0
mm
0
16
in
0
040
0
073
mm
0
0016
0
0029
in
Second
Oil
control
Piston
ring
gaps
Top
Second
Oil
control
Material
Distortion
of
sealing
face
Max
distortion
Valve
seat
insert
material
Inlet
Exhaust
Fit
Drive
Chain
Chain
tensioner
0
030
0
063
mm
0
0012
0
0025
in
0
025
0
063
mm
0
001
0
0025
in
0
23
0
38
mm
0
0091
0
0150
in
0
15
0
30
mm
0
006
0
012
in
0
15
0
30
mm
0
006
0
012
in
CYLINDER
HEAD
Aluminium
alloy
0
03
mm
0
0012
in
0
1
mm
0
004
in
Aluminium
bronze
Special
cast
Hot
pressed
CAMSHAFT
DRIVE
From
crankshaft
double
roller
type
Spring
and
oil
pressure
control
Engine
model
lWIN
CHOKE
CARBURE
ITOR
Outlet
diameter
Venturi
diameter
Main
jet
Main
air
bleed
Slow
running
jet
Power
jet
Float
level
Fuel
pressure
Weight
Altitude
setting
main
jet
1000
m
3300
ft
94
2000
m
6600
ft
92
3000
m
10
000
ft
89
4000
m
13
300
ft
87
5000
m
16
600
ft
85
PRIMARY
L13
SECONDARY
30mm
27x
12mm
150
90
180
26
mm
21
x
8
mm
96
80
43
40
23
I
mm
0
905
0
04
in
0
24
kg
sq
em
3
41b
sq
in
2
55
kg
5
61
lb
1
21
Page 23 of 171
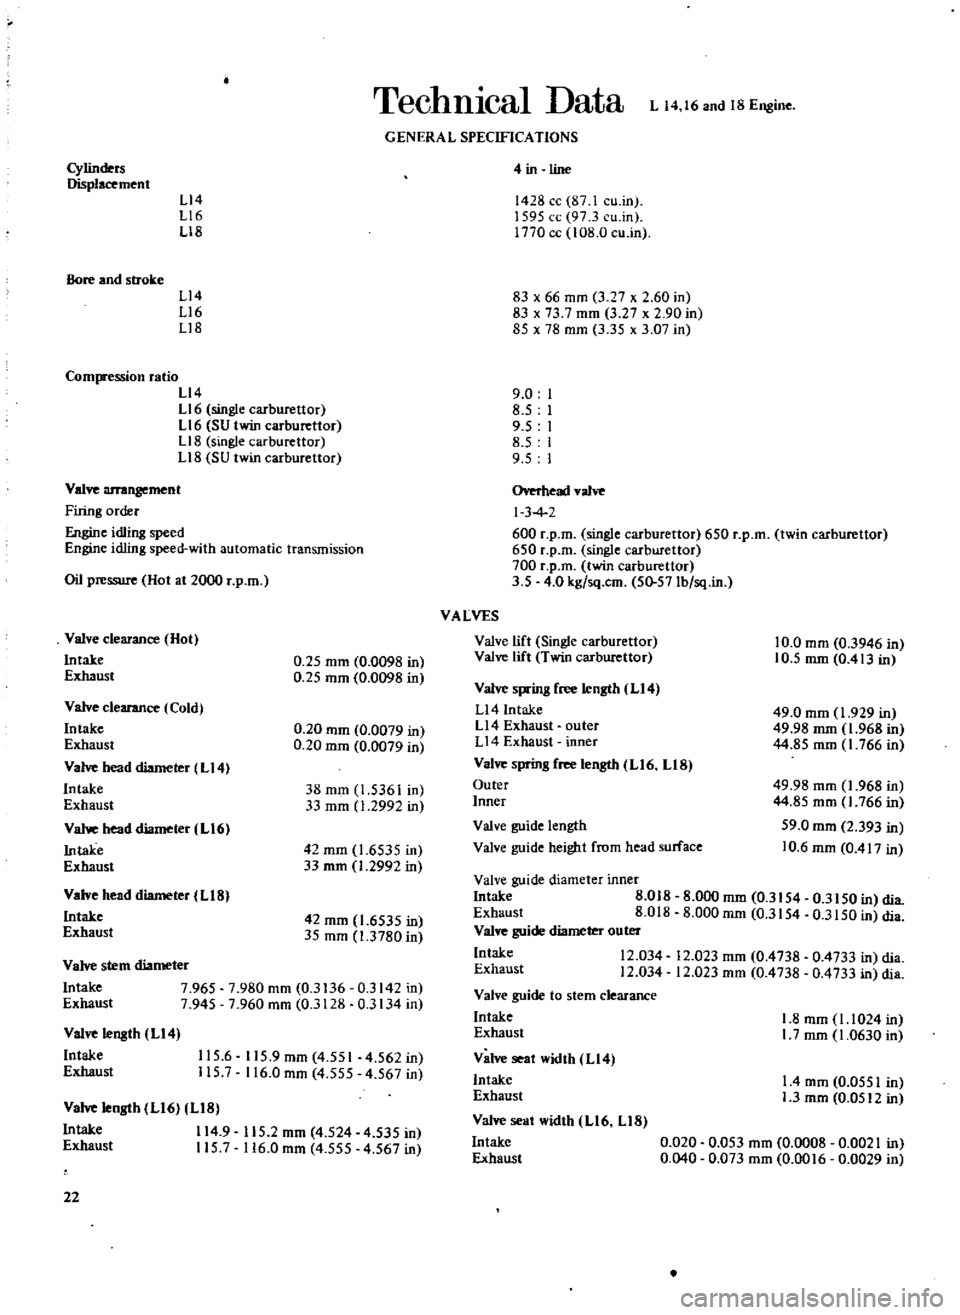
TechnIcal
Data
L
14
16
and
18
Engine
GENERAL
SPECIFICATIONS
Cylinders
Displacement
L14
L16
L18
Bore
and
stroke
L14
L16
Ll8
Compression
ratio
L14
L16
single
carburettor
L16
SU
twin
carburettor
L18
single
carburettor
Ll8
SU
twin
carburettor
Valve
arrangement
Firing
order
e
idling
speed
Engine
idling
speed
with
automatic
transmission
Oil
pressure
Hot
at
2000
r
p
m
Valve
clearance
Hot
Intake
Exhaust
0
25
mm
0
0098
in
0
25
mm
0
0098
in
Valve
clearance
Cold
Intake
Exhaust
Va
head
diameter
L14
Intake
Exhaust
Vahoe
head
diameter
L16
Intake
Exhaust
0
20
mm
0
0079
in
0
20
mm
0
0079
in
38
mm
1
5361
in
33
mm
1
2992
in
42
mm
1
6535
in
33
rom
1
2992
in
Valve
head
diameter
L18
Intake
Exhaust
42
mm
1
6535
in
35
mm
1
3780
in
Valve
stem
diameter
Intake
7
965
7
980
mm
0
3136
0
3142
in
Exhaust
7
945
7
960
mm
0
3128
0
3134
in
Valve
length
L14
Intake
Exhaust
115
6
115
9mm
4
551
4
562in
115
7
116
0
mm
4
555
4
567
in
Valve
length
L16
LIB
Intake
114
9
115
2
mm
4
524
4
535
in
Exhaust
115
7
116
0
mm
4
555
4
567
in
22
4
in
line
1428
cc
87
1
cu
in
1595
cc
97
3
cu
in
1770
cc
108
0
cu
in
83
x
66
mm
3
27
x
2
60
in
83
x
73
7
mm
3
27
x
2
90
in
85
x
7B
mm
3
35
x
3
07
in
9
0
8
5
9
5
8
5
9
5
Overhead
valve
I
3
4
600
r
p
m
single
carburettor
650
r
p
m
twin
carburettor
650
r
p
m
single
carburettor
700
r
p
m
twin
carburettor
3
5
4
0
kg
sq
cm
50
57Ib
sq
in
VALVES
Valve
lift
Single
carburettor
Valve
lift
Twin
carburettor
10
0
mm
0
3946
in
10
5
mm
0
413
in
Valve
spring
free
length
LI4
Ll4
Intake
Ll4
Exhaust
outer
L14
Exhaust
inner
Valve
sprin8
free
length
L16
LIB
Outer
Inner
49
0
mm
1
929
in
49
98
mm
1
968
in
44
85
mm
1
766
in
49
98
mm
1
968
in
44
85
mm
1
766
in
59
0
mm
2
393
in
10
6
mm
0
417
in
Valve
guide
length
Valve
guide
height
from
head
surface
Valve
guide
diameter
inner
Intake
8
018
Exhaust
8
018
Valve
guide
diameter
outer
Intake
12
034
Exhaust
12
034
Valve
guide
to
stem
clearance
Intake
Exhaust
Valve
seat
width
L14
Intake
Exhaust
Valve
seat
width
L16
LIB
Intake
Exhaust
8
000
mm
0
3154
0
3150
in
clia
8
000
mm
0
3154
0
3150
in
clia
12
023
mm
0
4738
0
4733
in
clia
12
023
mm
0
4738
0
4733
in
clia
1
8
mm
1
1024
in
I
7
mm
1
0630
in
I
4
mm
0
0551
in
1
3
mm
0
0512
in
0
020
0
053
mm
0
0008
0
0021
in
0
040
0
073
mm
0
0016
0
0029
in
Page 25 of 171
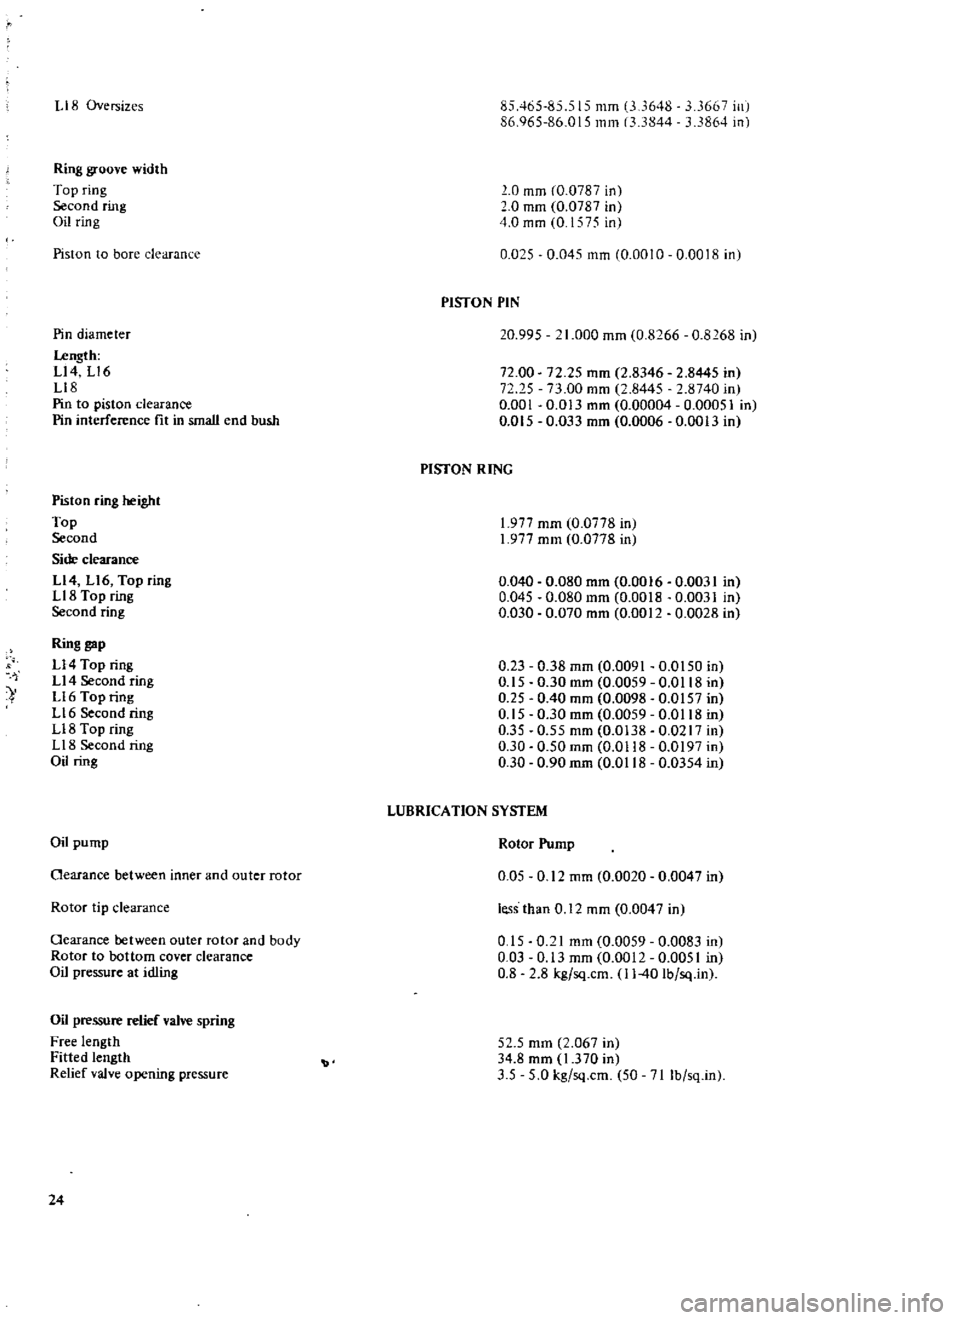
liB
Oversizes
Ring
groove
width
Top
ring
Second
ring
Oil
ring
Piston
to
bore
clearanl
e
Pin
diameter
I
ength
Ll4
Ll6
Ll8
Pin
to
piston
clearance
Pin
interference
fit
in
small
end
bush
Piston
ring
height
Top
Second
Side
clearance
Ll4
Ll6
Top
ring
LI8
Top
ring
Second
ring
Ring
gap
U4
Top
ring
U4
Second
ring
Ll6
Top
ring
L
16
Second
ring
U8
Top
ring
U8
Second
ring
Oil
ring
Oil
pump
Oearance
between
inner
and
outer
rotor
Rotor
tip
clearance
Oearance
between
outer
rotor
and
body
Rotor
to
bottom
cover
clearance
Oil
pressure
at
idling
Oil
pressure
relief
valve
spring
Free
length
Fitted
length
Relief
valve
opening
pressure
24
85465485
515
mm
3
648
667
ill
86
065
86
015
mm
13
3844
33864
in
0
mm
CO
0787
in
0
mm
0
0787
in
4
0
mm
0
1
q
c
in
0
025
0
045
mm
0
0010
0
0018
in
PISTON
PIN
20
995
1
000
mm
0
8266
0
8168
in
72
00
72
25
0
001
0
Dl5
72
25
mm
2
8346
2
8445
in
73
00
mm
2
8445
2
8740
in
0
013
mm
0
00004
0
00051
in
0
033
mm
0
0006
0
0013
in
PISTON
RING
1
977
mm
0
0778
in
1
977
mm
0
0778
in
0
040
0
080
mm
0
0016
0
0031
in
0
045
0
080
mm
0
0018
0
0031
in
0
030
0
070
mm
0
0012
0
0028
in
0
23
0
38
mm
0
0091
0
0150
in
0
15
0
30
mm
0
0059
0
0118
in
0
25
0
40
mm
0
0098
0
0157
in
0
15
0
30
mm
0
0059
0
0118
in
0
35
0
55
mm
0
0138
0
0217
in
0
30
0
50mm
0
0118
0
0197
in
0
30
0
90
mm
0
0118
0
0354
in
LUBRICATION
SYSTEM
Rotor
Pump
0
05
0
12
mm
0
0020
0
0047
in
less
than
0
12
mm
0
0047
in
0
15
0
21
mm
0
0059
0
0083
in
0
03
0
13
mm
0
0012
0
0051
in
0
8
2
8
kg
sq
cm
11
40
Ib
sq
ln
52
5
mm
2
067
in
34
8
mm
1
370
in
3
5
5
0
kg
sq
cm
50
71
Ib
sq
ln
Page 43 of 171
Connect
the
fuel
line
from
the
float
chamber
to
the
nozzle
nipple
and
tighten
the
retaining
clip
Pull
out
the
choke
lever
and
place
the
connecting
plaie
betw
n
the
washer
and
sleeve
collar
Screw
the
plate
to
the
nozzle
head
and
check
that
the
collar
is
installed
in
the
hole
in
the
plate
by
mo
ing
the
choke
lever
as
necessary
Recheck
the
piston
to
make
sure
that
it
falls
freely
without
binding
SU
TWIN
CARBURETTOR
Centering
the
jet
Remove
the
damper
oil
cap
nut
and
gradually
raise
the
lifter
pin
4
in
Fig
D
17
Continue
to
raise
the
lifter
pin
until
the
head
of
the
pin
raises
the
piston
by
approximately
8
mm
0
31
in
When
the
lifter
pin
is
released
the
piston
should
drop
freely
and
strike
the
venturi
with
a
light
metallic
click
If
the
pi
ston
does
not
fall
freely
it
will
be
necessary
to
dismantle
the
carburettor
in
the
manner
previously
described
SU
TWIN
CARBURETTOR
FLOAT
LEVEL
Inspection
and
Adjustment
The
fuel
level
in
the
float
chamber
can
be
checked
using
the
special
gauge
ST
19200000
Remove
the
float
chamber
drain
plug
and
install
the
special
gauge
as
shown
in
Fig
D
20
Start
the
engine
and
allow
it
to
run
at
idling
speed
The
fuel
level
is
conect
if
it
is
indicated
on
the
glass
tu
be
at
a
distance
of
22
24
mm
0
866
0
945
in
below
the
top
of
the
float
chamber
The
level
of
the
fuel
can
be
corrected
if
necessary
by
adjusting
the
float
level
in
the
following
manner
Take
out
the
float
chamber
coveT
securing
screws
and
lift
off
the
cover
and
attached
float
lever
Hold
the
cover
so
that
the
float
lev
r
is
facing
upwards
Lift
the
float
lever
and
then
lower
it
until
the
float
lever
seat
just
contacts
the
valve
stem
The
dimension
uH
in
Fig
D
1
should
be
11
12
mm
0
43
0
47
in
and
can
be
corrected
by
bending
the
float
lever
at
the
point
indicated
SU
TWIN
CARBURETTOR
Starting
interlock
valve
opening
adjustment
To
adjust
the
starting
interlock
opening
the
connecting
rod
4
in
Fig
D
22
1
must
be
bent
using
a
suitable
pair
of
pliers
The
throttle
opening
can
be
increased
by
lengthening
the
connecting
rod
or
reduced
by
shortening
the
rod
The
throttle
opening
is
correctly
adjusted
when
the
clearance
8
between
the
throttle
valve
and
throttle
chamber
is
set
to
0
6
mm
0
023
in
with
the
choke
lever
half
completely
out
HYDRAULIC
DAMPER
The
damper
oil
should
be
checked
approximately
every
5000
km
3000
miles
To
check
the
oil
level
remove
the
oil
cap
nut
as
shown
in
Fig
D
23
and
check
the
level
of
oil
against
the
two
grooves
on
the
plunger
rod
Top
up
with
SAE
20
engine
oil
if
the
oil
level
is
below
the
lower
of
the
two
grooves
Take
care
not
to
bend
the
plunger
rod
when
removing
and
replacing
the
oil
cap
nut
and
make
sure
that
the
nut
is
sufficiently
tightened
by
hand
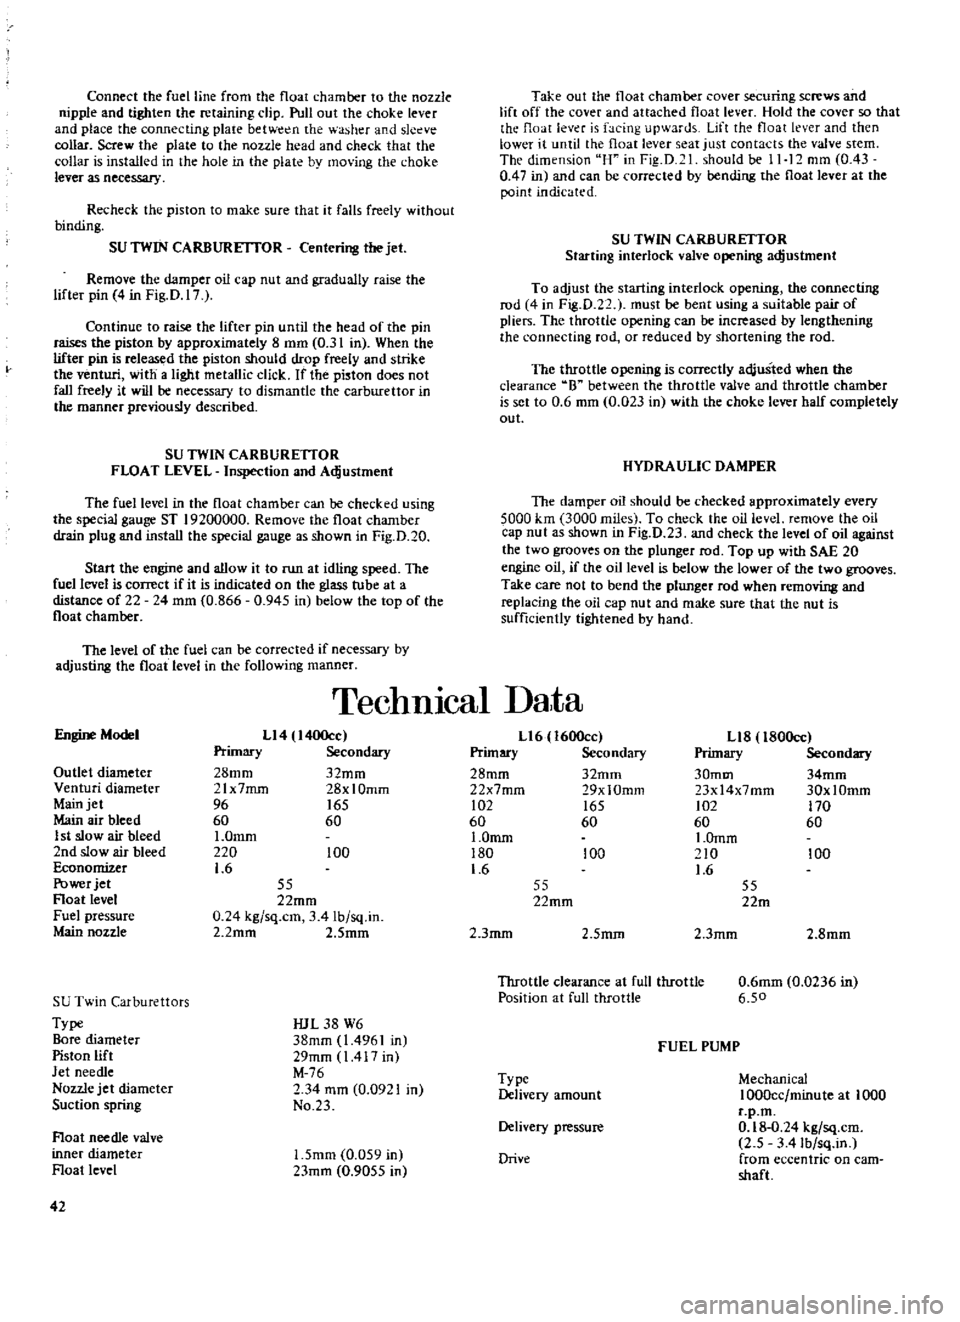
TechnIcal
Data
Engine
Model
Ll4
I400cc
Primary
Secondary
28mm
32mm
21x7mrn
28xlOmm
96
165
60
60
I
Omm
220
100
1
6
Outlet
diameter
Venturi
diameter
Main
jet
Main
air
bleed
1
st
slow
air
bleed
2nd
slow
air
bleed
Economizer
Power
jet
Float
level
Fuel
pressure
Main
nozzle
55
22mm
0
24
kg
sq
cm
3
41b
sq
in
2
2mm
2
Smm
SU
Twin
Carburettors
Type
Bore
diameter
Piston
lift
Jet
needle
Nozzle
jet
diameter
Suction
spring
IUL
38
W6
38mm
1
4961
in
29mm
1417
in
M
76
2
34
mm
0
0921
in
No
23
Float
needle
valve
inner
diameter
Float
level
1
5mm
0
059
in
23mm
0
9055
in
42
Ll6
1600cc
Primary
Secondary
28mm
32mm
22x7mm
29xlOmm
102
165
60
60
1
0mm
180
100
1
6
Ll8
l80Occ
Primary
Secondary
30mm
34mm
23x14x7mm
30xlOmm
102
170
60
60
I
Omm
210
100
1
6
55
22mm
55
22m
2
3mm
2
5mm
2
3mm
2
8mm
Throttle
clearance
at
full
throttle
Position
at
full
throttle
0
6mm
0
0236
in
6
50
FUEL
PUMP
Type
Delivery
amount
Mechanical
1000cc
minute
at
1000
r
p
m
0
18
0
24
kg
sq
cm
2
5
3
41b
sq
in
from
eccentric
on
cam
shaft
Delivery
pressure
Drive
Page 46 of 171
The
coil
spring
clutch
pressure
plate
can
be
lapped
with
a
surface
grinder
to
remove
dents
or
scratches
only
the
minimum
amount
of
metal
should
be
removed
to
restore
the
surface
Check
the
plate
for
distortion
by
placing
it
on
a
surface
plate
with
the
friction
face
towards
the
surface
plate
Press
the
pressure
plate
down
and
insert
a
feeler
gauge
of
1
0mm
0
0039
in
between
the
pressure
plate
and
surface
plate
If
it
is
possible
to
insert
the
feeler
gauge
then
the
pressure
plate
must
be
repaired
or
replaced
The
plate
can
be
skimmed
but
the
maximum
amount
of
metal
that
can
be
removed
is
1
0mm
0
0039in
CLUTCH
SPRING
Diaphragm
clutch
With
the
diaphragm
spring
assembled
to
the
pressure
plate
inspect
the
spring
height
and
load
in
the
following
manner
Place
distance
pieces
of
7
8
mm
0
307
in
on
the
base
plate
as
shown
in
Fig
E
3
and
bolt
down
the
clutch
cover
using
the
special
bolts
provided
with
the
kit
Meas
Jre
the
height
B
in
Fig
E
5
at
a
diameter
of
44mm
1
732
in
The
release
fingers
should
not
exceed
a
height
of
43
45
mm
1
693
1
772
in
from
the
base
plate
Replace
the
spring
if
the
height
is
in
excess
of
the
figures
quoted
Press
the
dutch
down
as
shown
in
Fig
E
6
to
a
depth
of
7
8mm
0
307
in
or
until
the
clutch
driven
plate
upper
surface
lines
up
with
the
clutch
cover
mounting
face
If
the
load
applied
is
less
than
350
kg
770
lbs
it
will
be
necessary
to
renew
the
diaphragm
spring
Do
not
press
the
clutch
disc
down
by
more
than
9mm
0
35
in
or
the
diaphragm
spring
may
be
broken
CLUTCH
SPRINGS
Coil
spring
clutch
The
clutch
springs
must
be
replaced
as
a
set
if
any
of
the
springs
are
found
to
be
defective
Specifications
for
the
springs
are
given
in
Technical
Data
at
the
end
of
this
section
Generally
a
spring
may
be
considered
faulty
if
when
assembled
the
load
is
reduced
by
more
than
15
or
if
the
free
length
has
altered
by
more
than
1
5mm
0
0590
in
or
if
the
deflection
B
to
A
in
Fig
E
7
exceeds
5mm
per
100mm
0
2
in
per
3
94
in
Release
Bearing
The
release
bearing
should
be
renewed
if
excessively
worn
or
if
roughness
can
be
felt
when
the
bearing
is
turned
by
hand
The
bearing
should
also
be
renewed
if
the
grease
has
leaked
away
or
if
the
clearance
between
the
clutch
cover
and
inner
diameter
of
the
sleeve
is
more
than
0
5
mm
0
0197
in
The
bearing
can
be
removed
using
a
conventional
puller
as
shown
in
Fig
E
8
Two
types
of
release
bearings
are
available
and
care
must
be
taken
when
fitting
onto
the
bearing
sleeve
The
release
bearing
should
be
pressed
into
place
on
the
diaphragm
spring
type
of
clutch
with
a
force
of
400
kg
880
lbs
applied
at
the
outer
race
as
shown
in
Fig
E
9
On
the
coil
spring
clutch
the
same
force
must
be
applied
at
the
inner
race
as
shown
in
Fig
E
IO
It
should
be
possible
to
turn
the
bearing
freely
and
smoothly
when
it
is
pressed
into
place
CLUTCH
Assembly
Coil
spring
type
Press
the
pin
into
the
eyebolt
and
through
the
lug
on
the
pressure
plate
Place
the
three
distance
pieces
on
the
surface
of
the
base
plate
of
the
special
tool
ST20050000
and
position
the
pressure
plate
pressure
springs
and
retainers
on
the
plate
Set
the
retracting
springs
on
the
cover
and
insert
the
release
levers
through
the
spring
Place
the
clutch
cover
over
the
pressure
plate
and
springs
making
sure
that
the
retracting
springs
do
not
become
dislodged
or
distorted
Compress
the
pressure
springs
by
screwing
the
special
set
bolts
into
the
holes
in
the
cover
Tighten
the
bolts
gradually
in
a
diagonal
pattern
to
avoid
distorting
the
cover
Place
the
release
levers
on
the
eye
bolts
and
screw
OR
the
securing
nuts
Place
retaining
hooks
under
the
release
levers
and
remove
the
clutch
assembly
from
the
base
plate
slackening
the
set
bolts
in
a
diagonal
pattern
COIL
SPRING
CLUTCH
Adjusting
Screw
the
centre
pillar
into
the
base
plate
and
place
the
high
finger
over
the
pillar
The
height
of
the
release
levers
must
be
adjusted
by
turning
the
eye
bolt
nuts
until
the
tops
of
the
release
levers
are
just
touching
the
tip
of
the
gauge
See
Fig
E
11
Remove
the
centre
pillar
when
the
release
levers
are
correctly
adjusted
and
screw
in
the
actuating
lever
Fig
E
12
Turn
the
actuating
mechanism
several
times
to
bed
down
the
parts
and
then
recheck
the
height
of
the
release
levers
Check
for
run
out
as
near
to
the
edge
as
possible
and
readjust
if
the
deviation
is
more
than
0
5
mrn
0
020
in
CLUTCH
InsWlation
Ensure
that
the
friction
faces
are
free
from
oil
and
grease
and
place
the
driven
plate
on
the
flywheel
The
longer
chamfered
splined
end
of
the
assembly
should
face
the
gearbox
Use
a
spare
drive
shaft
to
align
the
driven
plate
The
shaft
must
be
inserted
through
the
splined
hub
of
the
driven
plate
and
into
the
pilot
bearing
of
the
flywheel
Place
the
clutch
cover
into
position
on
the
flywheel
and
tighten
the
dutch
bolts
gradually
in
a
diagonal
pattern
to
a
torque
reading
of
1
5
2
2
kgm
11
16Ib
ft
Remove
the
dummy
shaft
and
the
restraining
hooks
from
the
release
levers
Refit
the
release
bearing
and
the
bell
housing
CLUTCH
PEDAL
Removal
and
Installation
Remove
the
clevis
pin
from
the
end
of
the
master
cylinder
pushrod
and
disconnect
the
pushrod
Remove
the
return
spring
Remove
the
pushrod
after
slackening
the
pushrod
adjuster
Coil
spring
clutch
only
Remove
the
pedal
lever
securing
bolt
slacken
the
handbrake
bracket
bolts
and
lift
out
the
pedal
Clean
all
parts
thoroughly
and
check
them
for
wear
or
damage
paying
particular
attention
to
the
rubber
parts
return
spring
and
pedal
lever
bush
Installation
of
the
clutch
pedal
is
a
reversal
of
the
removal
procedures
45
Page 48 of 171
CLUTCH
PEDAL
Adjusting
400
and
1600
cc
models
Adjust
the
pedal
height
to
209
mm
8
22
in
with
the
pedal
stop
slackened
off
by
altering
the
length
of
the
master
cylinder
push
rod
See
Fig
E
13
Tighten
the
pedal
stop
and
obtain
a
pedal
height
of
207
ffim
8
15
in
for
Left
Hand
drive
models
or
182
mID
7
I7
in
for
Right
Hand
drive
models
Secure
the
stop
by
tightening
the
locknut
and
make
sure
that
the
points
illustrated
are
correctly
greased
CLlTfCH
PEDAL
Adjusting
1800cc
models
Adjust
the
pedal
height
to
175
mm
6
89
in
by
adjusting
the
pedal
stop
See
Fig
E
13
then
retighten
the
locknut
A
to
a
torque
reading
of
0
79
1
07
kgm
6
8Ib
ft
Turn
the
master
cylinder
push
rod
to
obtain
a
play
between
1
Smm
0
04
0
2
in
at
the
clevis
pin
then
tighten
the
locknut
B
to
a
torque
reading
of
0
79
1
07
kgm
6
8
Ib
ft
Ensure
when
adjusting
the
play
that
the
port
on
the
master
cylinder
is
not
blocked
too
small
a
play
at
the
clevis
pin
may
block
the
port
Bend
the
clevis
pin
over
completely
CLlTfCH
MASTER
CYLINDER
Removal
and
Dismantling
Disconnect
the
push
rod
from
the
clevis
Fig
E
14
Detach
the
fluid
line
from
the
master
cylinder
and
pump
the
fluid
into
a
suitable
container
3
Withdraw
the
retaining
bolts
and
remove
the
master
cylinder
assembly
from
the
vehicle
To
dismantle
the
master
cylinder
remove
the
filler
cap
and
drain
away
the
fluid
Pull
back
the
dust
cover
and
remove
the
snap
ring
the
stopper
push
rod
piston
assembly
and
return
spring
Oean
the
components
in
brake
fluid
and
check
them
for
wear
or
damage
Renew
the
cylinder
and
piston
if
uneven
wear
has
taken
place
the
clearance
between
the
cylinder
and
piston
must
not
exceed
0
13
mm
0
005
in
Renew
the
dust
cover
oil
reservoir
filler
cap
and
fluid
line
if
necessary
Reassembly
of
the
master
cylinder
is
a
reversal
of
the
dismantling
procedure
take
care
to
soak
the
components
in
brake
fluid
and
assemble
them
while
still
wet
When
the
master
cylinder
is
installed
in
the
vehicle
make
sure
that
the
pedal
height
is
adjusted
as
previously
described
and
bleed
the
hydraulic
system
by
following
the
procedures
given
under
the
heading
CLlTfCH
SYSTEM
Bleeding
CLlTfCH
SLAVE
CYLINDER
Removal
and
Dismantling
Remove
the
return
spring
2
Disconnect
the
fluid
line
from
the
slave
cylinder
D
3
Disconnect
the
push
rod
from
the
clutch
withdrawal
lever
4
Take
out
the
mounting
bolts
and
withdraw
the
slave
cylinder
from
the
clutch
housing
To
dismantle
the
slave
cylinder
remove
the
dust
cover
and
snap
ring
and
withdraw
the
remaining
parts
from
the
cylinder
Oean
all
components
carefully
and
check
them
for
signs
of
damage
or
wear
renew
any
part
found
to
be
defective
and
fit
a
new
piston
seal
CLUTCH
SLAVE
CYLINDER
Assembly
and
Installation
Reassembly
is
a
reversal
of
the
dismantling
procedure
Ensure
that
the
parts
are
dipped
in
brake
flu
d
before
assembling
and
that
the
piston
seal
is
correctly
installed
When
the
slave
cylinder
is
installed
in
the
vehicle
bleed
the
hydraulic
system
by
following
the
procedures
given
under
the
heading
CLlTfCH
SYSTEM
Bleeding
The
push
rod
must
be
adjusted
so
that
the
withdrawal
lever
has
an
end
play
of
2
0
2
3
mm
0
078
0
091
in
details
of
this
operation
are
given
below
CLlTfCH
WITHDRAWAL
LEVER
Adjusting
The
correct
adjustment
of
the
clutch
withdrawal
lever
is
most
essential
as
insufficient
clearance
between
the
clutch
release
bearing
and
the
diaphragm
will
cause
the
clutch
to
slip
On
the
other
hand
an
excessive
clearance
will
prevent
the
clutch
from
disengaging
correctly
The
clearance
between
the
release
bearing
and
diaphragm
or
release
levers
can
be
adjusted
in
the
following
manner
Slacken
the
locknut
Fig
E
IS
and
screw
the
push
rod
fully
home
with
the
adjusting
nut
Return
the
adjusting
nut
I
3
4
turns
to
adjust
the
play
at
the
end
of
the
clutch
withdrawal
lever
to
2
0
2
3
mm
0
078
0
091
in
This
will
give
a
clear
ance
of
approximately
1
3
mm
0
051
in
between
the
release
bearing
and
the
diaphragm
spring
or
release
levers
NOTE
When
adjusting
clutch
pedal
free
travel
at
the
withdrawal
lever
it
is
essential
to
check
that
the
clutch
driven
plate
has
not
worn
by
more
than
2mm
0
08
in
otherwise
the
clutch
will
slip
even
if
it
is
correctly
adjusted
See
Technical
Data
for
the
relevant
clutch
driven
plate
thickness
CLUTCH
SYSTEM
Bleeding
The
clutch
system
must
be
bled
after
it
has
been
dismantled
or
if
any
part
of
the
circuit
has
been
opened
This
operation
should
also
be
carried
out
if
the
fluid
level
in
the
reservoir
has
been
allowed
to
fall
and
pennit
air
to
enter
the
system
The
presence
of
air
in
the
system
may
be
noticed
by
incorrect
disengagement
of
the
clutch
but
in
any
case
if
air
is
suspected
the
clutch
must
be
bled
in
the
following
manner
Remove
the
dust
cap
from
the
slave
cylinder
bleed
screw
Connect
a
length
of
tube
to
the
bleed
screw
and
immerse
the
47