differential DATSUN PICK-UP 1977 User Guide
[x] Cancel search | Manufacturer: DATSUN, Model Year: 1977, Model line: PICK-UP, Model: DATSUN PICK-UP 1977Pages: 537, PDF Size: 35.48 MB
Page 333 of 537
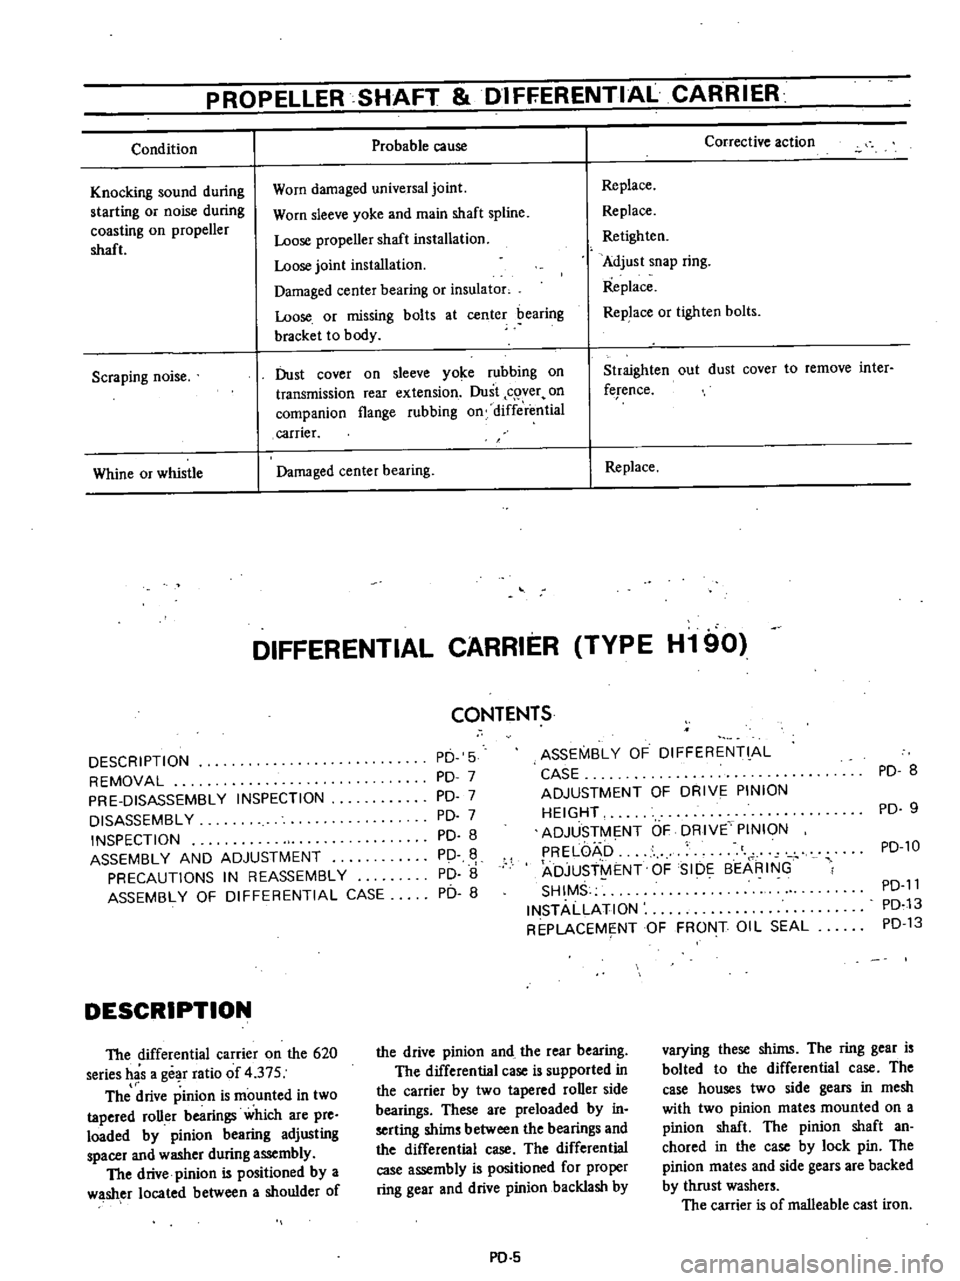
PROPELLER
SHAFT
DIFFERENTIAL
CARRIER
Condition
Probable
cause
Knocking
sound
during
starting
or
noise
during
coasting
on
propeller
shaft
Worn
damaged
universal
joint
Worn
sleeve
yoke
and
main
shaft
spline
Loose
propeller
shaft
installation
Loose
joint
installation
Damaged
center
bearing
or
insulator
Loose
or
missing
bolts
at
center
bearing
bracket
to
body
Scraping
noise
Dust
cover
on
sleeve
yoke
rubbing
on
transmission
rear
extension
Dust
c
ver
on
companion
flange
rubbing
on
differ
mtial
carrier
Whine
or
whistle
Damaged
center
bearing
Corrective
action
Replace
Replace
Retighten
Adjust
snap
ring
Replace
Replace
or
tighten
bolts
Straighten
out
dust
cover
to
remove
inter
ference
Replace
DIFFERENTIAL
CARRIER
TYPE
H190
CONTENTS
DESCRIPTION
REMOVAL
PRE
DISASSEMBLY
INSPECTION
DISASSEMBLY
INSPECTION
ASSEMBLY
AND
ADJUSTMENT
PRECAUTIONS
IN
REASSEMBLY
ASSEMBLY
OF
DIFFERENTIAL
CASE
PD
5
PD
7
PD
7
PD
7
PD
8
PD
PD
8
PD
8
DESCRIPTION
The
differential
carrier
on
the
620
series
has
a
gear
ratio
of
4
37S
The
drive
pinion
is
rnounted
in
two
tapered
roUer
bearings
which
are
pre
loaded
by
pinion
bearing
adjusting
spacer
and
washer
during
assembly
The
drive
pinion
is
positioned
by
a
washer
located
between
a
shoulder
of
ASSEMBl
Y
OF
DIFFERENT
Al
CASE
ADJUSTMENT
OF
DRIVE
PINION
HEIGHT
ADJUSTME
NT
OF
DRIVE
PINION
PRELOAD
t
ADJUST
ENT
OF
SIDE
8EARING
SHIMS
INSTAllATION
REPLACEME
NTOF
FRONT
Oil
SEAL
the
drive
pinion
and
the
rear
bearing
The
differential
case
is
supported
in
the
carrier
by
two
tapered
roller
side
bearings
These
are
preloaded
by
in
serting
shims
between
the
bearings
and
the
differential
case
The
differential
case
assembly
is
positioned
for
proper
ring
gear
and
drive
pinion
backlash
by
PO
5
PD
8
PD
9
PD
lO
PD
11
PD
13
PD
13
varying
these
shims
The
ring
gear
is
bolted
to
the
differential
case
The
case
houses
two
side
gears
in
mesh
with
two
pinion
mates
mounted
on
a
pinion
shaft
The
pinion
shaft
an
chored
in
the
case
by
lock
pin
The
pinion
mates
and
side
gears
are
backed
by
thrust
washers
The
carrier
is
of
malleable
cast
iron
Page 334 of 537
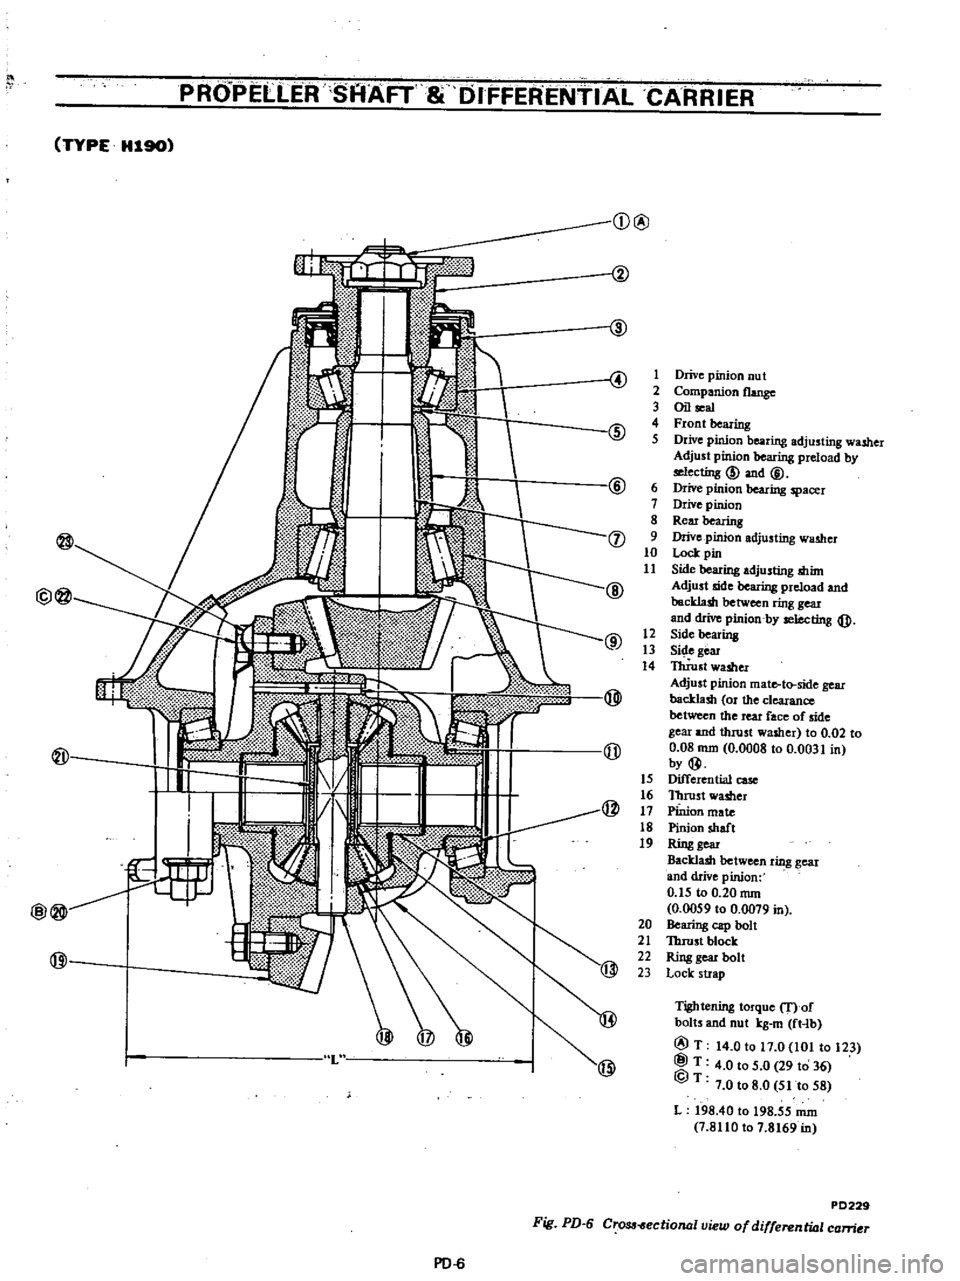
PROPEllEff
SAAFT
8
DifFERENTIAL
CARRIER
TYPE
H19O
Q
@
4
1
Drive
pinion
nu
t
2
Companion
flange
3
Oil
al
@
4
Front
bearing
5
DIive
pinion
bearing
adjusting
washer
Adjust
pinion
bearing
preload
by
@
ecting
@
and
@
6
Drive
pinion
beating
spacer
1
Drive
pinion
8
Rem
bearing
@
9
Drive
pinion
adjusting
wamer
10
loci
pin
11
Side
bearing
adjusting
mint
@
Adjust
side
bearing
preload
and
@@
backlash
betwam
ring
geu
and
cIrive
pinion
by
ting
@
@
12
Side
bearing
13
Side
gear
14
nUust
washer
Adjust
pinion
mate
to
side
gear
backlash
Of
the
clearance
between
the
teat
face
of
side
gear
and
ttuust
washer
to
0
02
to
@
0
08
nun
0
0008
10
0
0031
in
by@
15
Differential
cast
16
Thrust
washer
@
17
Pinion
mate
18
Pinion
sbaft
19
Ring
gear
Backlam
between
ring
gear
and
drive
pinion
0
t5
to
0
20
nun
0
0059
10
0
0079
in
20
Bearing
cap
boll
21
Thrust
block
22
Ring
gear
bolt
23
Lock
strap
Tightening
torque
f
of
@
bollS
and
nut
kg
m
ft
lb
@T
14
0
to
t7
0
101
to
123
L
@T
4
0
to
5
0
29
10
36
@T
7
0108
0
5110
58
L
198
4010
198
55
nun
1
8110107
8169
in
P0229
Fig
PD
6
cro
ectional
uiew
of
differenwl
carner
PD
6
Page 335 of 537
PROPELLER
SHAFT
DIFFERENTIAL
CARRIER
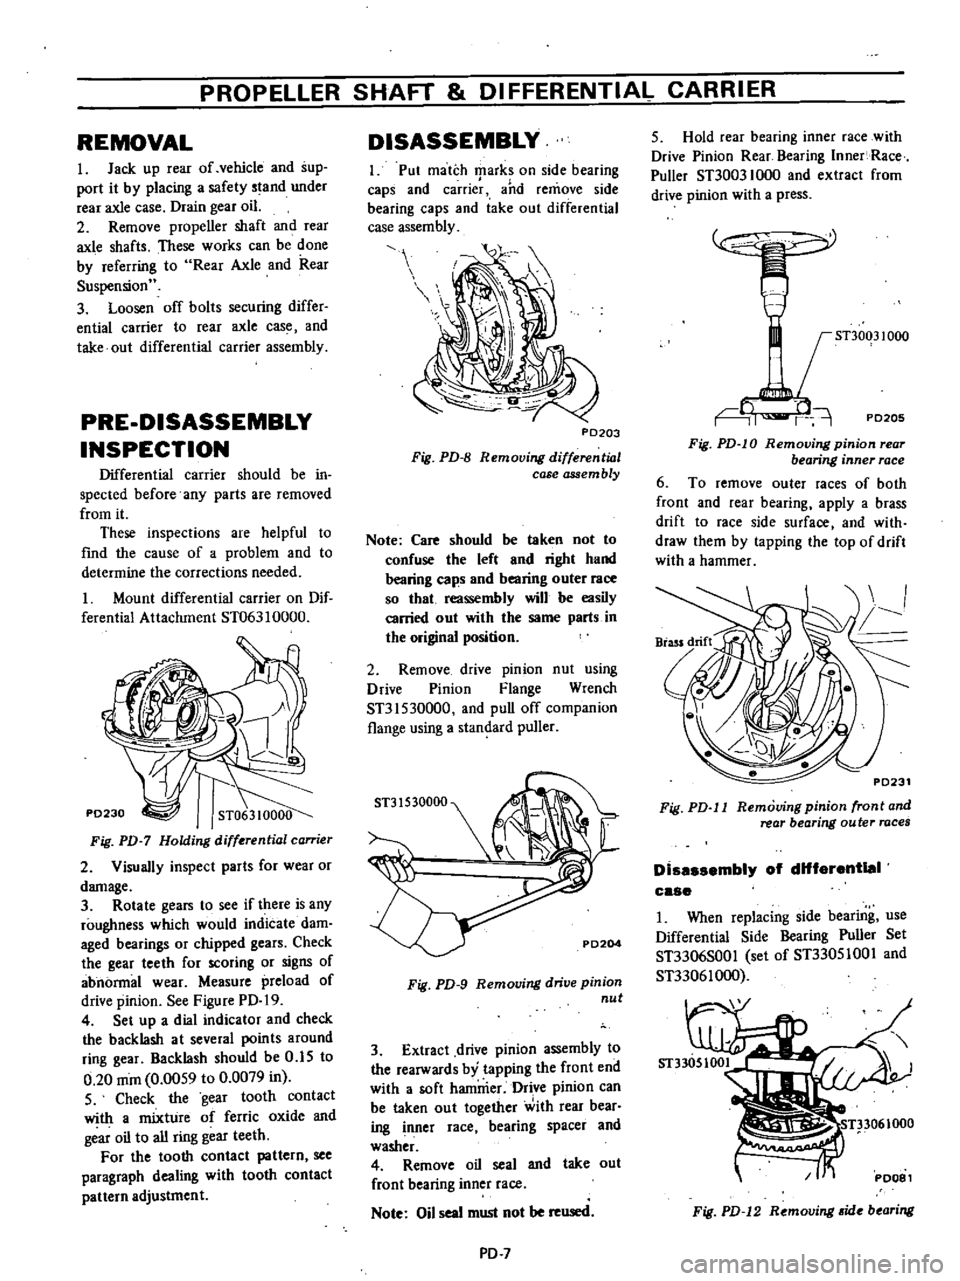
REMOVAL
I
Jack
up
rear
of
vehicle
and
sup
port
it
by
placing
a
safety
stand
under
rear
axle
case
Drain
gear
oil
2
Remove
propeller
shaft
and
rear
axle
shafts
These
works
can
be
done
by
referring
to
Rear
Axle
and
Rear
Suspension
3
Loosen
off
bolts
securing
differ
ential
carrier
to
rear
axle
cas
and
take
out
differential
carrier
assembly
PRE
DISASSEMBLY
INSPECTION
Differential
carrier
should
be
in
spected
before
any
parts
are
removed
from
it
These
inspections
are
helpful
to
fmd
the
cause
of
a
problem
and
to
determine
the
corrections
needed
I
Mount
differential
carrier
on
Dif
ferential
Attachment
ST063
I
0000
ST063
10000
Fig
PD
7
Holding
differential
can
ier
2
Visually
inspect
parts
for
wear
or
damage
3
Rotate
gears
to
see
if
there
is
any
roughness
which
would
indicate
dam
aged
bearings
or
chipped
gears
Check
the
gear
teeth
for
scoring
or
signs
of
abnormal
wear
Measure
preload
of
drive
pinion
See
Figure
PD
19
4
Set
up
a
dial
indicator
and
check
the
backlash
at
several
points
around
ring
gear
Backlash
should
be
0
15
to
0
20
mOl
0
00S9
to
0
0079
in
S
Check
the
gear
tooth
contact
with
a
mixture
of
ferric
oxide
and
g
ar
oil
to
all
ring
gear
teeth
For
the
tooth
contact
pattern
see
paragraph
dealing
with
tooth
contact
pattern
adjustment
DISASSEMBLY
I
Put
match
tpark
on
side
bearing
caps
and
carrier
and
remove
side
bearing
caps
and
take
out
differential
case
assembly
P0203
Fig
PD
B
Removing
differenlwl
case
assem
bly
Note
Care
should
be
taken
not
to
confuse
the
left
and
right
hand
bearing
caps
and
bearing
outer
race
so
that
reassembly
will
be
easily
carried
out
with
the
same
parts
in
the
original
position
2
Remove
drive
pinion
nut
using
Drive
Pinion
Flange
Wrench
ST31530000
and
pull
off
companion
flange
using
a
standard
puller
Fig
PD
9
Removing
drive
pinion
nul
3
Extract
drive
pinion
assembly
to
the
rearwards
by
tapping
the
front
end
with
a
soft
hammer
Drive
pinion
can
be
taken
out
together
with
rear
bear
ing
nner
race
bearing
spacer
and
washer
4
Remove
oil
seal
and
take
out
front
bearing
inner
race
Note
Oil
seal
must
not
be
used
PD
7
5
Hold
rear
bearing
inner
race
with
Drive
Pinion
Rear
Bearing
Inner
Race
Puller
ST30031000
and
extract
from
drive
pinion
with
a
press
STJ0031000
PD205
Fig
PD
10
Removing
pinion
rear
bearing
inner
race
6
To
remove
outer
races
of
both
front
and
rear
bearing
apply
a
brass
drift
to
race
side
surface
and
with
draw
them
by
tapping
the
top
of
drift
with
a
hammer
Fig
PD
l1
Removing
pinion
front
and
rear
bearing
outer
races
Dissssembly
of
dHferentIeI
case
1
When
replacing
side
bearing
use
Differential
Side
Bearing
Puller
Set
ST3306S00
I
set
of
ST330S100
I
and
ST33061000
Fig
PD
12
Removing
ide
bearing
Page 336 of 537
PROPElli
ER
SHAfT
DIFFERENTIAL
G
ARRIERf
Notes
a
PUller
should
be
handled
with
care
in
catchins
the
edge
of
bearing
inner
race
b
Be
careful
not
to
confuse
left
and
right
hand
parts
2
Remove
ring
gear
by
spreading
out
lock
strap
and
loosening
ring
gear
bolts
in
diagonally
3
Punch
off
pinion
mate
shaft
lock
pin
from
ring
gear
side
using
Solid
Punch
ICV31100300
KV31100300
PD022
Fig
PD
13
Removing
lock
pin
Note
Lock
pin
i
cauIked
at
pin
hole
mouth
on
differential
case
Do
not
punch
it
off
forCibly
without
checkins
how
it
is
uIked
4
Draw
out
pinion
shaft
and
re
move
thrust
block
pinion
mates
side
gears
and
thrust
washers
Note
Put
marks
on
gear
and
thrust
Wasliersotliat
they
can
be
reinstaD
ed
in
their
original
positions
from
which
they
were
removed
INSPECTION
Thoroughly
clean
all
disassembled
parts
and
examine
them
to
see
if
they
8re
worn
damaged
or
otherwise
faulty
and
how
they
are
affected
Repair
or
replace
ail
faulty
parts
whichever
is
necessaiy
I
Check
gear
teeth
for
scoring
cracking
and
chipping
and
make
sure
that
tooth
contact
pattern
indicates
correct
meshing
depth
If
any
fault
is
evident
replace
parts
as
required
Note
Drive
pinion
and
ring
gear
are
supplied
for
replacement
as
a
set
therefore
should
either
part
be
damaged
replace
as
a
set
2
Check
pinion
shaft
and
pinic
m
mate
for
scores
and
signs
of
wear
and
replace
as
required
Follow
the
same
procedure
for
side
gear
and
their
seats
on
differential
case
3
Inspect
all
bearing
races
and
rollers
for
scoring
chipping
or
evi
dence
of
excessive
wear
They
should
be
in
tiptop
condition
such
as
not
worn
and
with
mirror
like
surfaces
Replace
if
there
is
a
shadow
of
doubt
oil
their
efficiency
as
an
incorrect
bearing
operation
may
result
in
noises
and
gear
seizure
4
Inspect
thrust
washer
faces
Small
faults
can
be
corrected
with
sand
paper
If
pinion
mate
to
ide
gear
backlash
or
the
clearance
between
side
gear
and
thrust
washer
exceeds
limits
0
02
to
0
08
nun
0
0008
to
0
0031
in
replace
thrust
washers
S
Inspect
carrier
and
differential
case
for
cracks
or
distortion
If
either
condition
is
evident
replace
faulty
parts
6
As
a
general
rule
oil
seal
should
be
replaced
at
each
disassembly
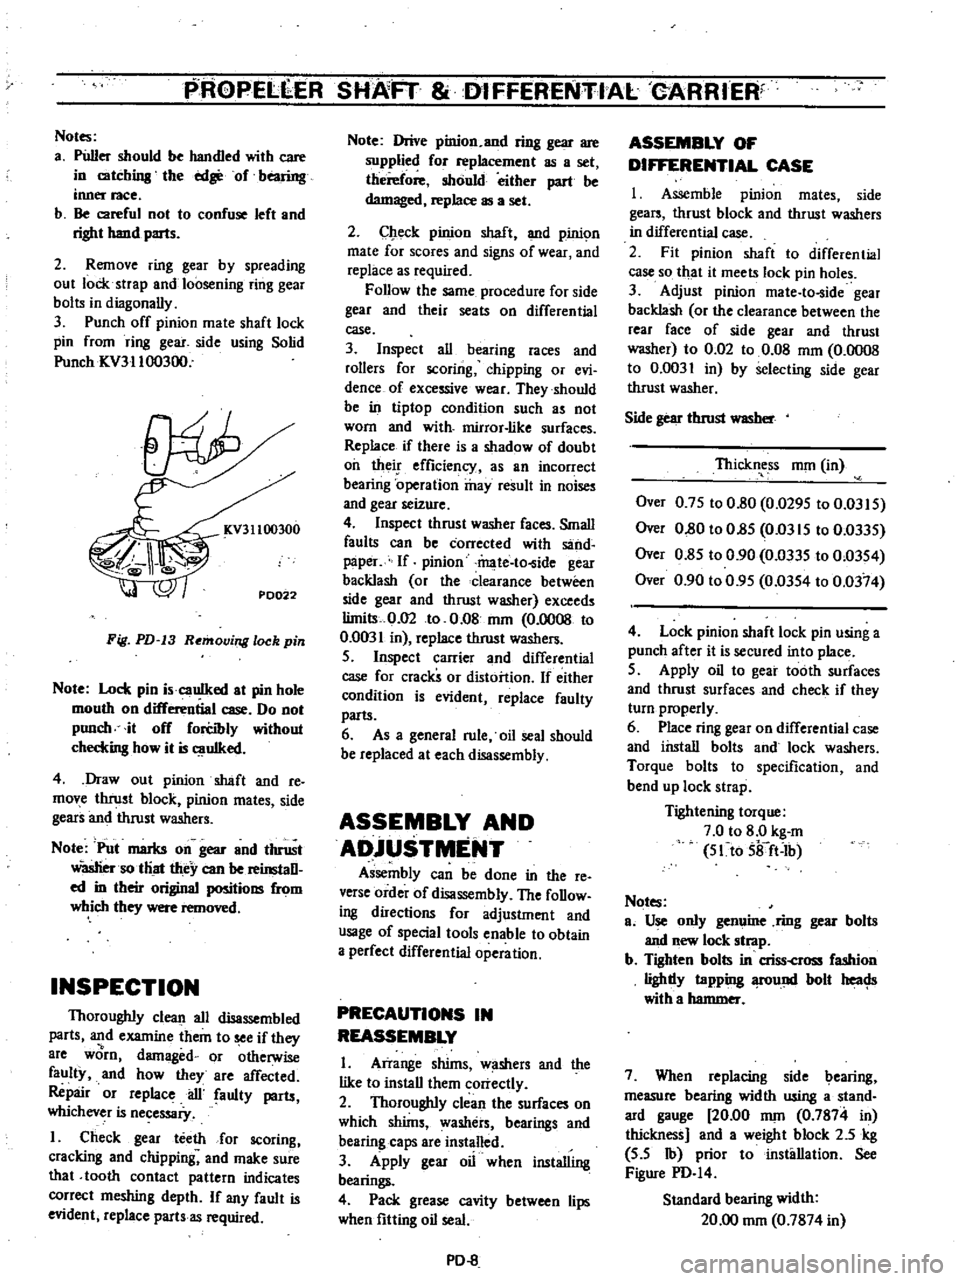
ASSEMBLY
AND
ADjUSTMENT
Assembly
can
be
done
in
the
reo
verse
order
of
disassembly
The
foDow
ing
directions
for
adjustment
and
usage
of
special
tools
enable
to
obtain
a
perfect
differential
operation
PRECAUTIONS
IN
REASSEMBLY
I
Arrange
shims
w
shers
and
the
like
to
install
them
correctly
2
Thoroughly
clean
the
surfaces
on
which
shims
washers
bearings
and
bearing
caps
are
installed
3
Apply
gear
oil
when
installing
bearings
4
Pack
grease
cavity
between
lips
when
fitting
oil
seal
PD
8
ASSEMBLY
OF
DIFFERENTIAL
CASE
I
Assemble
pinion
mates
side
gears
thrust
block
and
thrust
washers
in
differential
case
2
Fit
pinion
shaft
to
differential
case
so
that
it
meets
lock
pin
holes
3
Adjust
pinion
mate
to
ide
gear
backlash
or
the
clearance
between
the
rear
face
of
side
gear
and
thrust
washer
to
0
02
to
0
08
mOl
0
0008
to
0
0031
in
by
selecting
side
gear
thrust
washer
Side
gear
thrust
WlISber
Thickness
nun
in
Over
0
7S
to
0
80
0
029S
to
0
03IS
Over
0
80
to
O
8S
Om
IS
to
0
033S
Over
0
8S
to
0
90
0
033S
to
0
03S4
Over
0
90
to
0
9S
0
03S4
to
0
0374
4
Lock
pinion
shaft
lock
pin
using
a
punch
after
it
is
secured
into
place
S
Apply
oil
to
gear
tooth
surfaces
and
thrust
surfaces
and
check
if
they
turn
properly
6
Place
ring
gear
on
differential
case
and
install
bolts
and
lock
washers
Torque
bolts
to
specification
and
bend
up
lock
strap
Tightening
torque
7
0
to
8
0
kg
m
S1to
Sifft
Ib
Notes
ao
Use
only
genuine
ring
gear
bolts
and
new
lock
strap
b
Tighten
bolts
in
criss
cross
fashion
lighdy
tapping
fOund
bolt
heac
Js
with
a
hammer
7
When
replacing
side
bearing
measure
bearing
width
using
a
stand
ard
gauge
20
00
nun
0
7874
in
thickness
and
a
weight
block
2
5
kg
S
S
Ib
prior
to
installation
See
Figure
PD
I4
Standard
bearing
width
20
00
nun
0
7874
in
Page 337 of 537
PROPELLER
SHAFT
DifFERENTIAL
CARRIER
Standard
gauge
I
1
Fig
PD
14
Me
uring
bearing
width
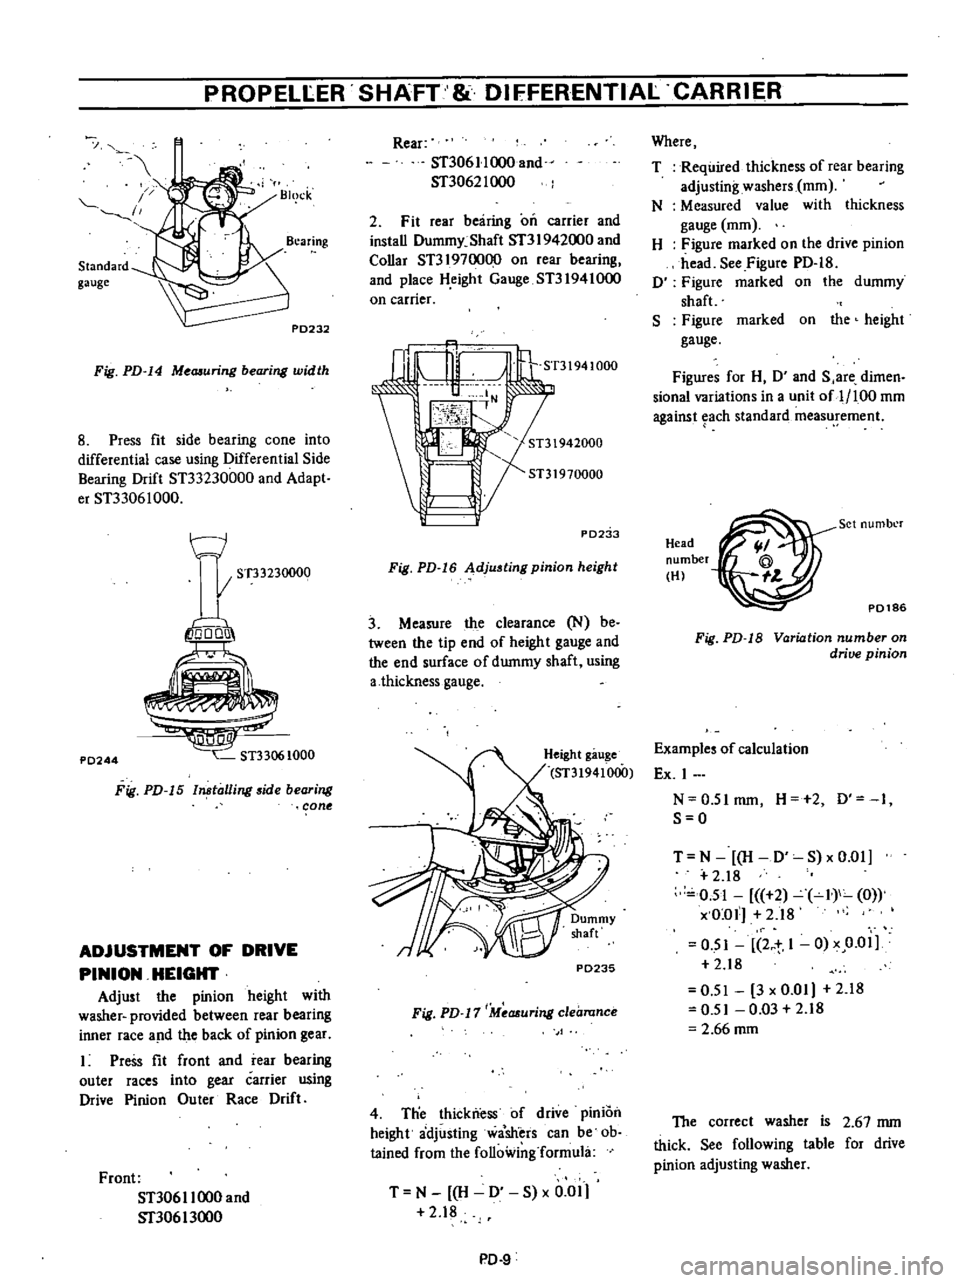
8
Press
fit
side
bearing
cone
into
differential
case
using
Differential
Side
Bearing
Drift
ST33230000
and
Adapt
er
ST33061000
t
J
I
ST33230000
io
o1
P0244
Fig
PD
15
ln
talling
side
bearing
cone
ADJUSTMENT
OF
DRIVE
PINION
HEIGHT
Adjust
the
pinion
height
with
washer
provided
between
rear
bearing
inner
race
a
ld
the
back
of
pinion
gear
Press
fit
front
and
rear
bearing
outer
races
into
gear
carrier
using
Drive
Pinion
Ou
ter
Race
Drift
Front
ST306
I
1000
and
Sf30613oo0
Rear
ST306
II
000
and
ST3062I
000
2
Fit
rear
bearing
on
carrier
and
install
Dummy
Shaft
Sf3
I
942000
and
Collar
ST3197oo00
on
rear
bearing
and
place
H
eight
Gauge
ST31941000
on
carrier
ST31941000
PD2
b
Fig
PD
16
Adjusting
pinion
height
3
Measure
the
clearance
N
be
tween
the
tip
end
of
height
gauge
and
the
end
surface
of
dummy
shaft
using
a
thickness
gauge
P0235
Fig
PD
17
Measuring
clearance
4
Tlie
thickness
of
drive
pInIOn
height
adjusting
wa
sh
ers
can
be
ob
tained
from
the
following
formula
T
N
H
0
S
x
0
01
2
18
PD
9
Where
T
Required
thickness
of
rear
bearing
adjusting
washers
mOl
N
Measured
value
with
thickness
gauge
mOl
H
Figure
marked
on
the
drive
pinion
head
See
Figure
PD
18
0
Figure
marked
on
the
dummy
shaft
S
Figure
marked
on
the
height
gauge
Figures
for
H
0
and
S
are
dimen
sional
variations
in
a
unit
of
1
100
mOl
against
each
standard
measurement
Head
number
HI
P0186
Set
numbl
r
Fig
PD
18
Variation
number
on
drive
pinion
Examples
of
calculation
Ex
I
N
0
5Imm
H
2
0
1
S
O
T
N
H
D
S
xO
01
2
18
0
51
2
I
0
x
O
ol
2
18
O
SI
2
t
1
0
x
0
01
2
18
0
51
3
x
0
01
2
18
0
51
0
03
2
18
2
66
mOl
The
correct
washer
is
2
67
mm
thick
See
following
table
for
drive
pinion
adjusting
washer
Page 338 of 537
PROPELLER
SHAFT
DIFFERENTIAL
CARRIER
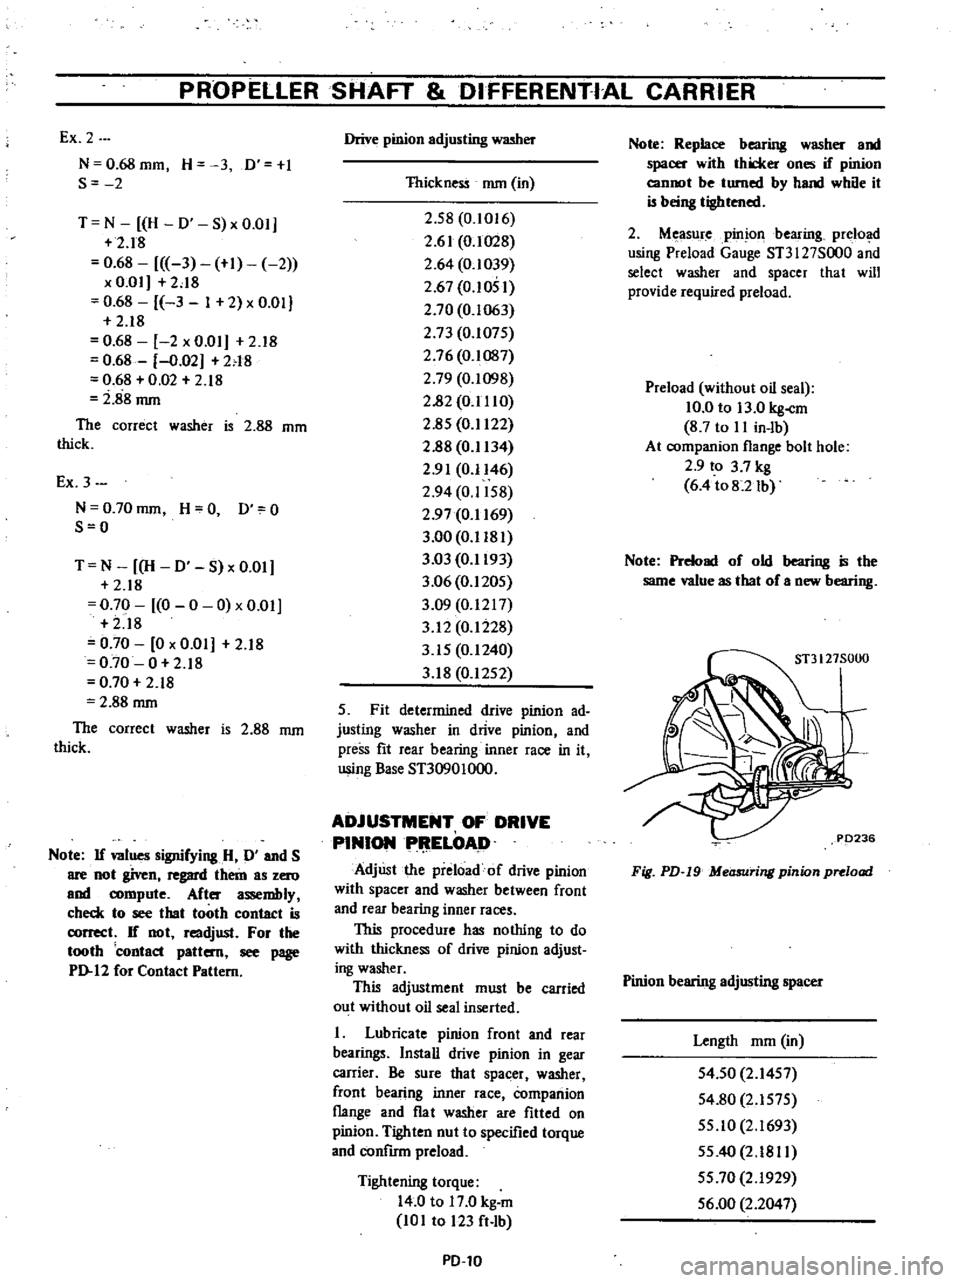
Ex
2
N
O
68mm
H
3
D
I
S
2
T
N
H
0
S
x
0
01
2
18
0
68
3
1
2
x
Om
2
18
0
68
3
1
2
x
0
01
2
18
0
68
2
x
0
01
2
18
0
68
0
02
N8
0
68
0
02
2
18
i
88
mm
The
correct
washer
is
2
88
mm
thick
Ex
3
N
0
70mm
H
O
0
0
S
O
T
N
H
0
S
x
0
01
2
18
0
70
0
0
0
x
0
01
2
18
0
70
0
x
0
01
2
18
0
70
0
2
18
0
70
2
18
2
88
mm
The
correct
washer
is
2
88
mm
thick
Note
If
lues
signifying
H
D
and
S
are
not
given
regard
them
as
zero
and
n
C
r
e
After
assembly
check
to
see
that
tooth
contact
is
correct
If
not
readjust
For
the
tooth
contact
pattern
see
page
PJ
12
for
Contact
Pattern
Drive
pinion
adjusting
washer
Thickness
mm
in
2
58
0
1016
2
61
0
1028
2
64
0
1039
2
67
0
1051
2
70
0
1063
2
73
0
107S
2
76
0
1087
2
79
0
1098
2
82
0
1110
2
85
OJ
122
2
88
OJ
134
2
91
0
1146
2
94
0
1IS8
2
97
0
1169
3
00
0
1181
3
03
0
1
193
3
06
0
1205
3
09
0
1217
3
12
0
1228
3
IS
0
1240
3
18
0
I2S2
S
Fit
determined
drive
pinion
ad
justing
washer
in
drive
pinion
and
preSs
fit
rear
bearing
inner
race
in
it
using
Base
ST30901000
ADJUSTMENT
OF
DRIVE
PINIONPI
IELOAD
AdjUst
the
preload
of
drive
pinion
with
spacer
and
washer
between
front
and
rear
bearing
inner
races
This
procedure
has
nothing
to
do
with
thickness
of
drive
pinion
adjust
ing
washer
This
adjustment
must
be
carried
out
without
oil
seal
inserted
I
Lubricate
pinion
front
and
rear
bearings
Install
drive
pinion
in
gear
carrier
Be
sure
that
spacer
t
washer
front
bearing
inner
race
Companion
flange
and
flat
washer
are
fitted
on
pinion
Tighten
nut
to
specified
torque
and
confum
preload
Tightening
torque
14
0
to
17
0
kg
m
101
to
123
ft
lb
PD
l0
Note
Replace
bearing
washer
and
spacer
with
thicker
ones
if
pinion
cannot
be
turned
by
hand
while
it
is
heing
tightened
2
Measure
pinion
bearing
prelo
d
using
Preload
Gauge
ST3I
27S000
and
select
washer
and
spacer
that
will
provide
required
preload
Preload
without
oil
seal
10
0
to
13
0
kg
cm
8
7
to
II
in
lb
At
companion
flange
bolt
hole
2
9
to
3
7
kg
6
4
to8
2Ib
Note
Preload
of
old
bearing
is
the
same
value
as
that
of
a
new
bearing
Fig
PD
19
Measuring
pinion
preload
Pinion
bearing
adjusting
spacer
Length
mOl
in
S4
50
2
14S7
S4
80
2
IS7S
SS
IO
2
1693
5S
40
2
1811
SS
70
2
1929
S6
00
2
2047
Page 339 of 537
PROPELLER
SHAFT
DIFFERENTIAL
CARRIER
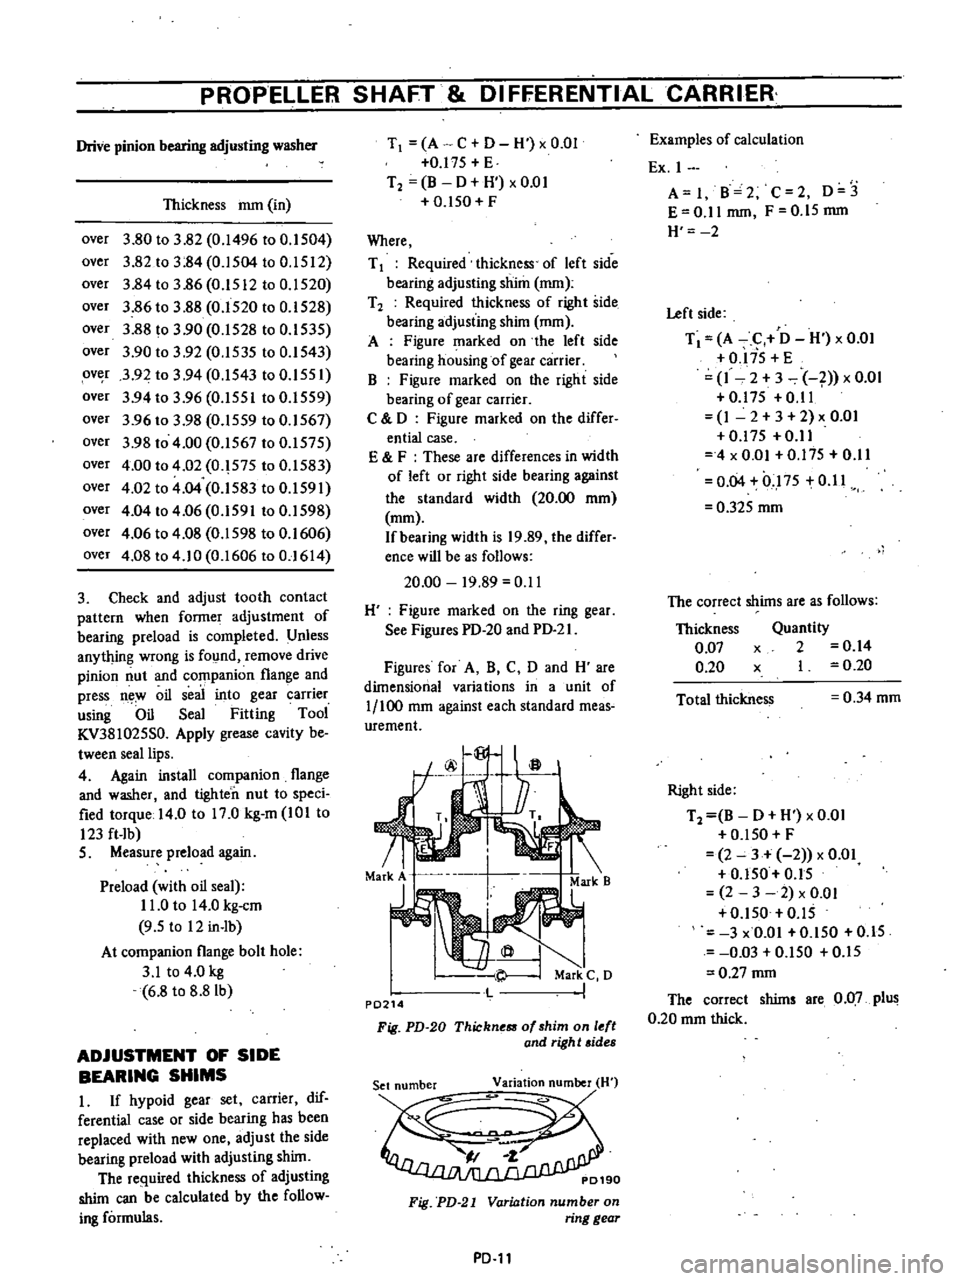
Drive
pinion
bearing
adjusting
washer
Thickness
mm
in
over
3
80
to
3
82
0
1496
to
O
lS04
over
3
82
to
3
84
O
lS04
to
0
ISI2
over
3
84
to
3
86
O
lSI2
to
0
IS20
over
3
86
to
3
88
O
lS20
to
O
IS28
over
3
88
to
3
90
O
lS28
to
0
IS3S
over
3
90
to
3
92
0
IS3S
to
O
IS43
over
3
92
to
3
94
0
IS43
to
O
lSS
I
over
3
94
to
3
96
O
lSSI
to
O
lS59
over
3
96
to
3
98
O
lSS9
to
0
IS67
over
3
98
to
4
00
O
lS67
to
O
lS7S
over
4
00
to
4
02
0
S7S
to
O
lS83
over
4
02
to
4
04
O
lS83
to
0
IS91
over
4
04
to
4
06
O
lS9I
to
0
IS98
over
4
06
to
4
08
O
lS98
to
0
1606
over
4
08
to
4
10
0
1606
to
0
1614
3
Check
and
adjust
tooth
contact
pattern
when
former
adjustment
of
bearing
preload
is
completed
Unless
anything
wrong
is
found
remove
drive
pinion
nut
and
companion
flange
and
press
n
oil
seal
into
gear
carrier
using
Oil
Seal
Fitting
Tool
KV38I02SS0
Apply
grease
cavity
be
tween
seal
lips
4
Again
install
companion
flange
and
washer
and
tighteh
nut
to
speci
fied
torque
14
0
to
17
0
kg
m
IO
to
123
ft
lb
S
Measure
preload
again
Preload
with
oil
seal
I
1
0
to
14
0
kg
cm
9
S
to
12
in
lb
At
companion
flange
bolt
hole
3
1
to
4
0
kg
6
8
to
8
81b
ADJUSTMENT
OF
SIDE
BEARING
SHIMS
I
If
hypoid
gear
set
carrier
dif
ferential
case
or
side
bearing
has
been
replaced
with
new
one
adjust
the
side
bearing
preload
with
adjusting
shim
The
required
thickness
of
adjusting
shim
can
be
calculated
by
the
follow
ing
formulas
T
A
C
D
H
xO
OI
O
l7S
E
T2
B
D
H
xO
OI
O
ISO
F
Where
T
1
Required
thickness
of
left
side
bearing
adjusting
shim
mm
T
2
Required
thickness
of
right
side
bearing
adjusting
shim
mm
A
Figure
marked
on
the
left
side
bearing
housing
of
gear
carrier
B
Figure
marked
on
the
right
side
bearing
of
gear
carrier
C
0
Figure
marked
on
the
differ
entia
case
E
F
These
are
differences
in
width
of
left
or
right
side
bearing
against
the
standard
width
20
00
mOl
mOl
If
bearing
width
is
19
89
the
differ
ence
will
be
as
follows
20
00
19
89
0
11
H
Figure
marked
on
the
ring
gear
See
Figures
PD
20
and
PD
2
I
Figures
for
A
B
C
0
and
H
are
dimensional
varia
tions
in
a
unit
of
1
100
mm
against
each
standard
meas
urement
f
@
a
rj
71
Markj
Mark
B
Mark
C
0
P0214
Fig
PD
20
Thickn
of
shim
on
l
ft
and
righ
t
sides
Fig
PD
21
Variation
number
on
ring
gear
PD
ll
Examples
of
calculation
Ex
I
A
I
B
2
C
2
0
3
E
0
11
mm
F
O
IS
mm
H
2
Left
side
T
A
C
0
H
x
0
01
O
liS
E
1
2
3
1
x
0
01
0
17S
0
11
1
2
3
2
x
O
O
O
l7S
0
11
4
x
0
01
0
175
0
11
0
04
0
1
7S
0
11
0
32S
mOl
The
correct
shims
are
as
follows
Thickness
0
07
0
20
Quantity
x
2
0
14
x
I
0
20
Total
thickness
0
34
mOl
Right
side
T2
B
0
H
x
0
01
O
lSO
F
2
3
2
x
0
01
O
ISO
0
15
2
3
2
x
0
01
O
ISO
0
15
3
x
O
OI
O
ISO
O
IS
0
03
O
lSO
O
lS
0
27
mm
The
correct
shims
are
0
07
plus
0
20
mm
thick
Page 340 of 537
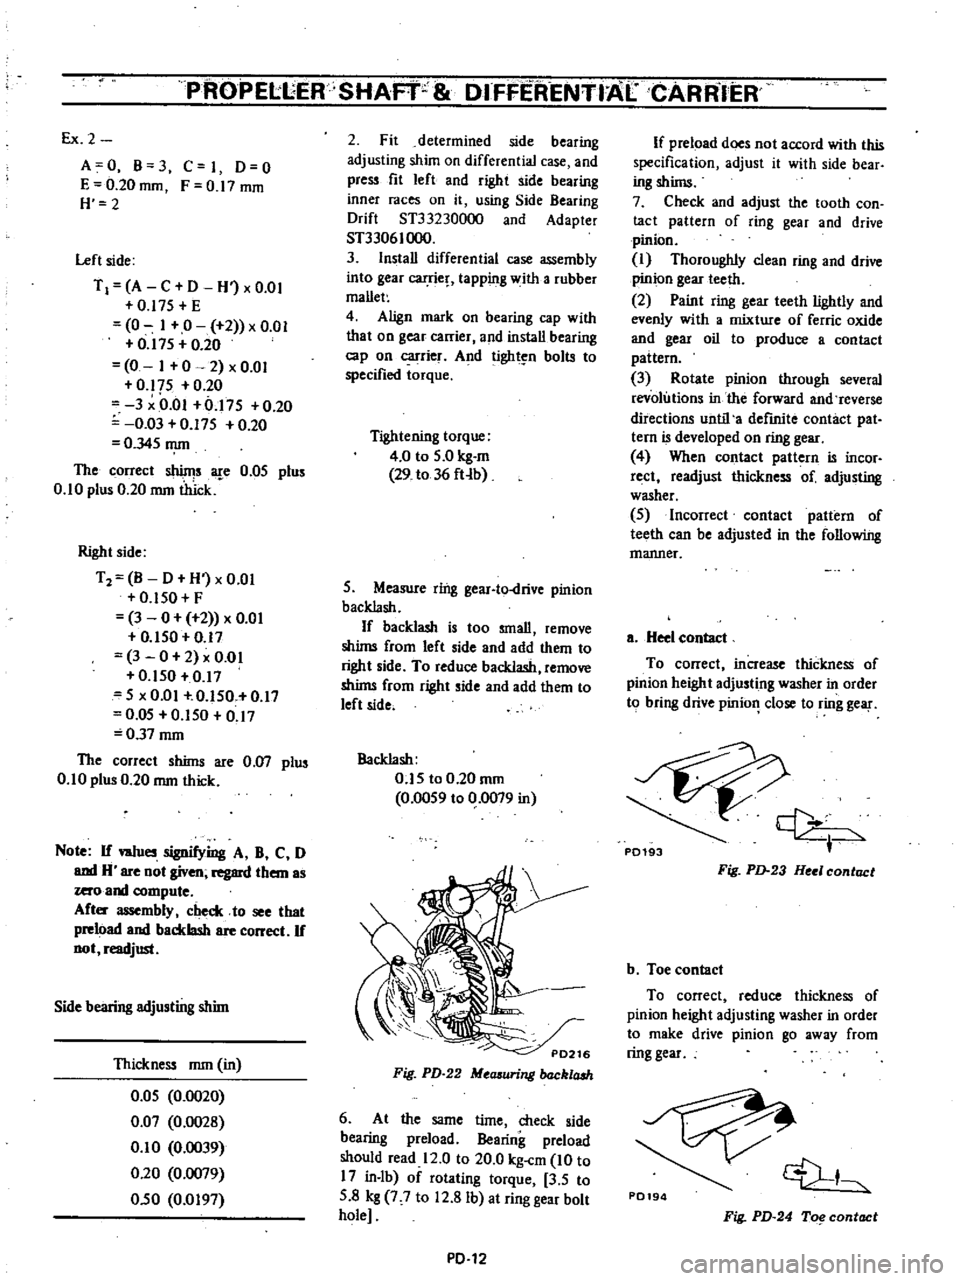
PROPELLER
SHAFf
DIFFERENTIAL
CARR
IER
Ex
2
A
0
B
3
C
I
0
0
E
0
20
mOl
F
0
17
mOl
H
2
Left
side
T
I
A
C
D
H
x
om
0
17S
E
0
I
0
2
x
0
01
0
I7S
0
20
0
I
0
2
x
0
01
0
17S
0
20
3
Om
0
17S
0
20
0
03
0
17S
0
20
O
34S
mrn
The
correct
shinjs
are
O
OS
plus
0
10
plus
0
20
mrn
thick
Right
side
T2
B
D
H
xO
0l
O
ISO
F
3
0
2
x
om
O
ISO
0
17
3
0
2
x
om
0
150
0
17
S
x
0
01
0
ISO
0
I7
O
OS
0
1S0
0
17
0
37
mrn
The
correct
shims
are
0
07
plus
0
1
0
plus
0
20
mm
thick
Note
If
w1ues
signifying
A
B
C
0
and
H
are
not
given
regard
them
as
zero
and
compute
Aft
assembly
check
to
see
that
preload
and
backlash
are
correct
If
not
readjust
Side
bearing
adjusting
shim
Thickness
mm
in
O
OS
0
0020
0
07
0
0028
0
1
0
0
0039
0
20
0
0079
0
50
0
0197
2
Fit
determined
side
bearing
adjusting
shim
on
differential
case
and
press
fit
left
and
right
side
bearing
inner
races
on
it
using
Side
Bearing
Drift
ST33230000
and
Adapter
ST33061000
3
Install
differential
case
assembly
into
gear
carrie
tapping
with
a
rubber
mallet
4
Align
mark
on
bearing
cap
with
that
on
gear
carrier
and
install
bearing
cap
on
carrier
And
tight
n
bolts
to
specified
torque
Tightening
torque
4
0
to
S
O
kg
m
29
to
36
fHb
S
Measure
ring
gear
to
drive
pinion
backlash
If
backlash
is
too
small
remove
shims
from
left
side
and
add
them
to
right
side
To
reduce
backlash
remove
shims
from
right
side
and
add
them
to
left
side
Backlash
O
1S
to
0
20
mrn
0
00S9
to
0
0079
in
Fig
PD
22
Mccuuring
back1aah
6
At
the
same
time
check
side
bearing
preload
Bearing
preload
should
read
12
0
to
20
0
kg
cm
10
to
17
in
lb
of
rotating
torque
3
S
to
S
8
kg
7
7
to
12
8
Ib
at
ring
gear
bolt
hole
PD
12
If
preload
does
not
accord
with
this
specification
adjust
it
with
side
bear
ing
shims
7
Check
and
adjust
the
tooth
con
tact
pattern
of
ring
gear
and
drive
pinion
I
Thoroughly
clean
ring
and
drive
pinion
gear
teeth
2
Paint
ring
gear
teeth
lightly
and
evenly
with
a
mixture
of
ferric
oxide
and
gear
oil
to
produce
a
contact
pattern
3
Rotate
pinion
through
several
revolutions
in
the
forward
and
reverse
directions
until
a
defmite
contact
pat
tern
is
developed
on
ring
gear
4
When
contact
pattern
is
incor
rect
readjust
thickness
of
adjusting
washer
S
Incorrect
contact
pattern
of
teeth
can
be
adjusted
in
the
following
manner
a
Heel
contact
To
correct
increase
thickness
of
pinion
height
adjusting
washer
in
order
to
bring
drive
pinio
close
to
ring
gear
P0193
Fig
PD
23
Hul
contact
b
Toe
contact
To
correct
reduce
thickness
of
pinion
height
adjusting
washer
in
order
to
make
drive
pinion
go
away
from
ring
gear
P0194
1
Fig
PD
24
To
contact
Page 341 of 537
P
ROPELLER
SHAFT
DIFFERENTIAL
CARRIER
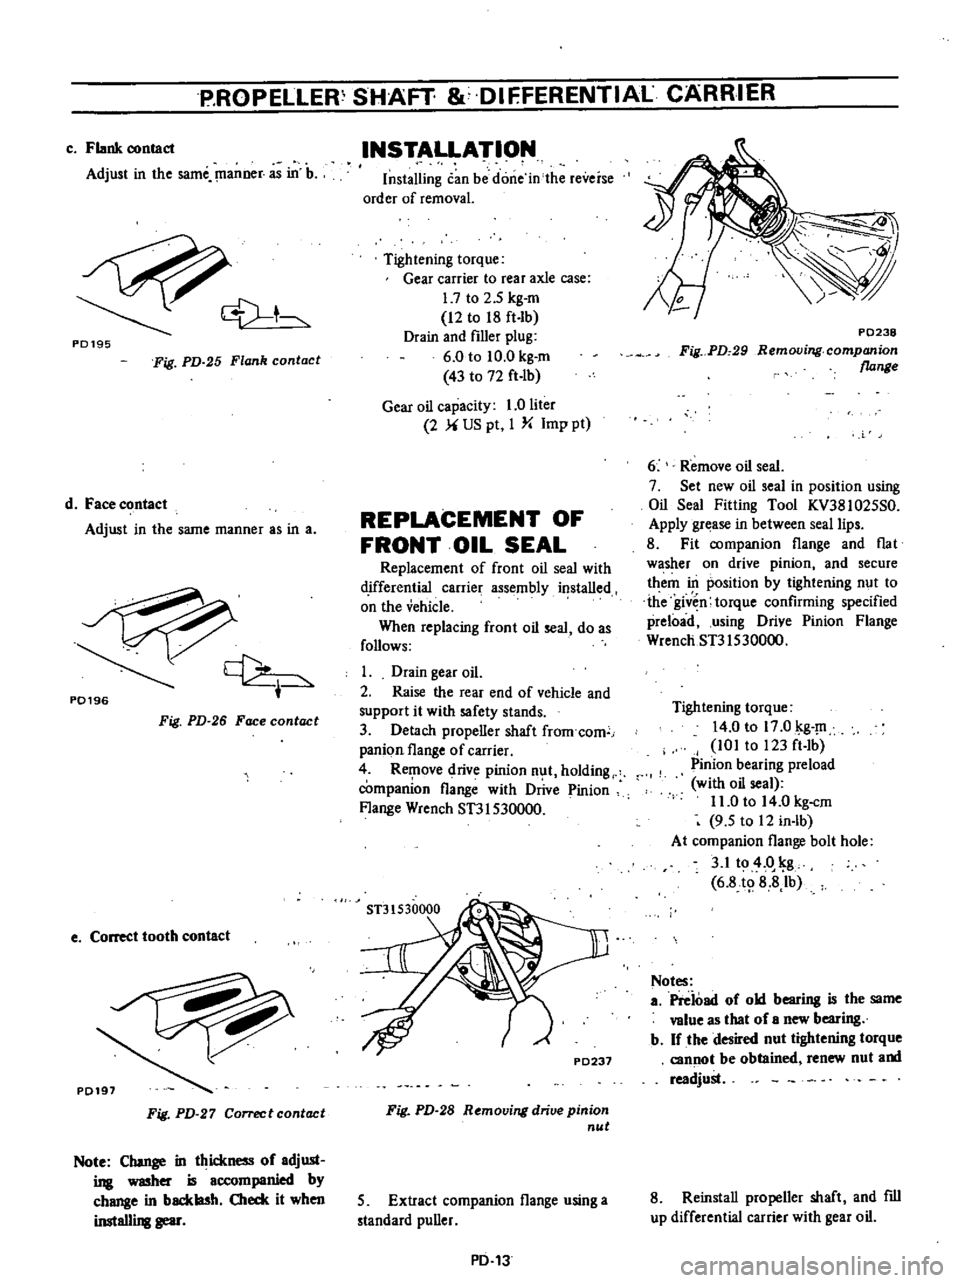
c
Flank
oontact
Adjust
in
the
same
manner
as
in
b
cV
t
PD195
Fig
PD
25
Flank
contact
d
Face
contact
Adjust
in
the
same
manner
as
in
a
P0196
t
Fig
PD
26
Face
contact
e
Correct
tooth
contact
Fig
PD
27
Correct
contact
Note
Change
in
thickness
of
adjWll
ing
washer
is
accompanied
by
change
in
backlash
Oled
it
when
instaIIi
gear
INSTALLATION
Installing
can
be
done
in
the
reverse
order
of
removal
Tightening
torque
Gear
carrier
to
rear
axle
case
1
7
to
2
5
kg
m
12
to
18
ft
lb
Drain
and
filler
plug
6
0
to
10
0
kg
m
43
to
72
ft
lb
Gear
oil
capacity
1
0
liter
2
US
pt
I
Y
Imp
pt
REPLACEMENT
OF
FRONT
OIL
SEAL
Replacement
of
front
oil
seal
with
d
ifferential
carrier
assembly
installed
on
the
vehicle
When
replacing
front
oil
seal
do
as
follows
1
Drain
gear
oil
2
Raise
the
rear
end
of
vehicle
and
support
it
with
safety
stands
3
Detach
propeller
shaft
from
com
panion
flange
of
carrier
4
R
1
ove
drive
pinion
n
t
holding
companion
flange
with
Drive
Pinion
Flange
Wrench
ST31S30000
P0238
Fig
PD
29
Removing
companion
flange
6
Remove
oil
seal
7
Set
new
oil
seal
in
position
using
Oil
Seal
Fitting
Tool
KV38102SS0
Apply
grease
in
between
seal
lips
8
Fit
companion
flange
and
flat
w
sher
on
drive
pinion
and
secure
them
in
position
by
tightening
nut
to
the
given
torque
confirming
specified
preload
using
Drive
Pinion
Flange
WrencliST31530000
Tightening
torque
14
0
to
17
0
kg
101
to
123
ft
Ib
Pinion
bearing
preload
with
oil
seal
11
0
to
14
0
kg
cm
9
5
to
12
in
lb
At
companion
flange
bolt
hole
3
1
to
4
o
g
6
8
8
8Ib
Notes
a
Preioad
of
old
bearing
is
the
same
value
as
that
of
a
new
bearing
b
If
the
desired
nut
tightening
torque
P0237
can
ot
be
obtained
renew
nut
and
readjust
Fig
PD
28
R
moving
drive
pinion
nut
S
Extract
companion
flange
using
a
standard
puller
PD
13
8
Reinstall
propeller
shaft
and
fill
up
differential
carrier
with
gear
oil
Page 342 of 537
PROPELLER
SHAFT
DIFFERENTIAl
CARRIER
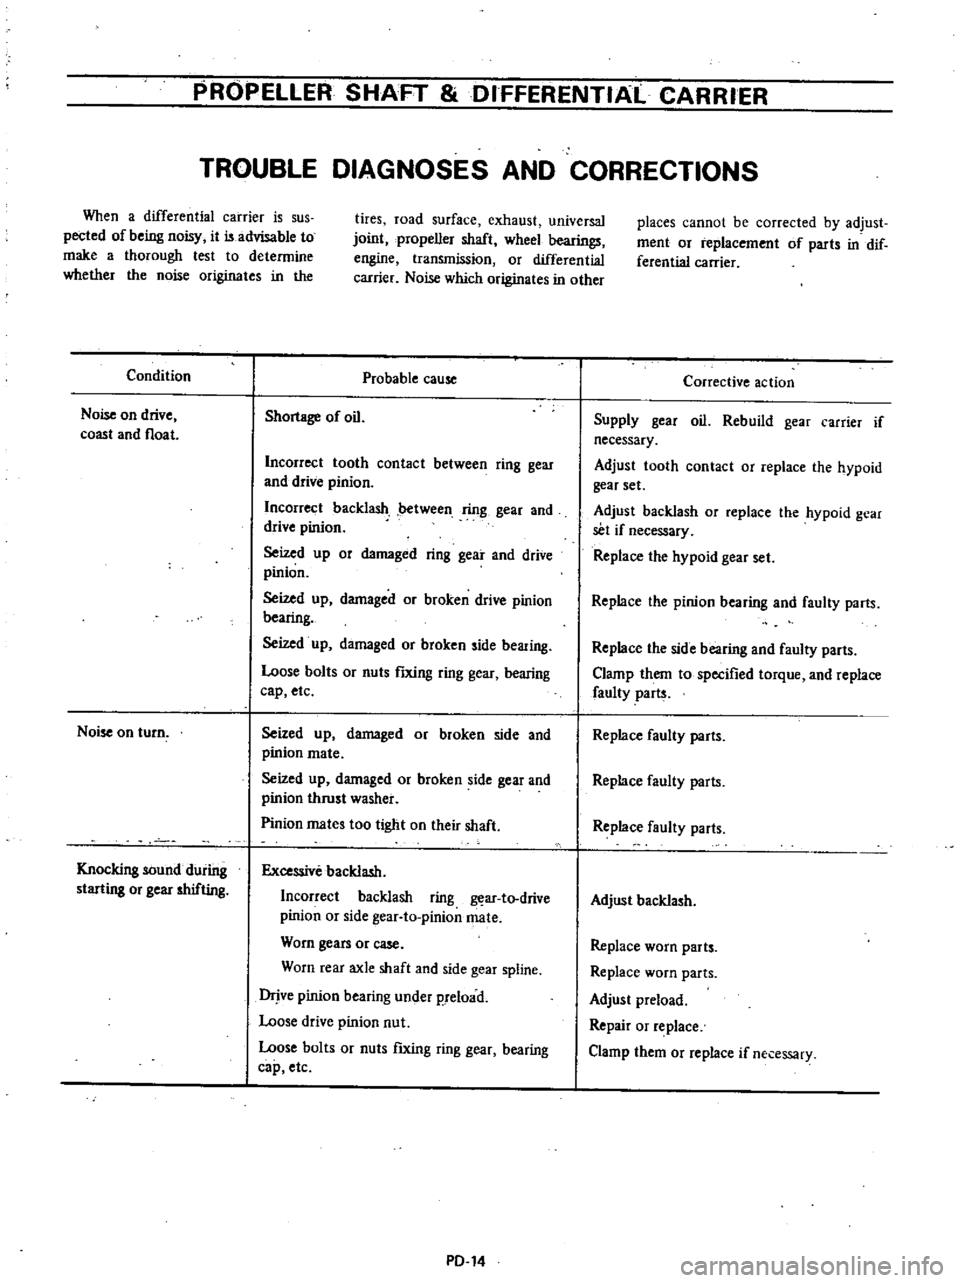
TROUBLE
DIAGNOSES
AND
CORRECTIONS
When
a
differential
carrier
is
sus
pected
of
being
noisy
it
is
advisable
to
make
a
thorough
lest
to
determine
whether
the
noise
originates
in
the
Condition
Noise
on
drive
coast
and
float
Noise
on
turn
Knocking
sound
during
starting
or
gear
shifting
tires
road
surface
exhaust
universal
joint
propeller
shaft
wheel
bearings
engine
transmission
or
differential
carrier
Noise
which
originates
in
other
Probable
cause
Shortage
of
oil
Incorrect
tooth
contact
between
ring
gear
and
drive
pinion
Incorrect
backlash
between
ring
gear
and
drive
pinion
Seized
up
or
damaged
ring
gear
and
drive
pinion
Seized
up
damaged
or
broken
drive
pinion
bearing
Seized
up
damaged
or
broken
side
bearing
Loose
bolts
or
nuts
fIXing
ring
gear
bearing
cap
etc
Seized
up
damaged
or
broken
side
and
pinion
mate
Seized
up
damaged
or
broken
side
gear
and
pinion
thrust
washer
Pinion
mates
too
tight
on
their
shaft
Excessive
backlash
Incorrect
backlash
ring
ar
to
drive
pinion
or
side
gear
to
pinionmate
Worn
gears
or
case
Worn
rear
axle
shaft
and
side
gear
spline
Drjve
pinion
bearing
under
p
reload
Loose
drive
pinion
nut
Loose
bolts
or
nuts
ftxing
ring
gear
bearing
cap
etc
PD
14
places
cannot
be
corrected
by
adjust
ment
or
replacement
of
parts
in
dif
ferential
carrier
Corrective
action
Supply
gear
oil
Rebuild
gear
carrier
if
necessary
Adjust
tooth
contact
or
replace
the
hypoid
gear
set
Adjust
backlash
or
replace
the
hypoid
gear
set
if
necessary
Replace
the
hypoid
gear
set
Replace
the
pinion
bearing
and
faulty
parts
Replace
the
side
bearing
and
faulty
parts
Clamp
them
to
specified
torque
and
replace
faulty
parts
Replace
faulty
parts
Replace
faulty
parts
Replace
faulty
parts
Adjust
backlash
Replace
worn
parts
Replace
worn
parts
Adjust
preload
Repair
or
replace
Clamp
them
or
replace
if
necessary