air filter DATSUN PICK-UP 1977 Owner's Manual
[x] Cancel search | Manufacturer: DATSUN, Model Year: 1977, Model line: PICK-UP, Model: DATSUN PICK-UP 1977Pages: 537, PDF Size: 35.48 MB
Page 164 of 537

J
1
Fuel
tank
2
Fuel
f1l1er
cap
with
vacuum
relief
valve
3
Liquid
vapor
separator
4
Vapor
vent
line
5
Vacuum
signalUne
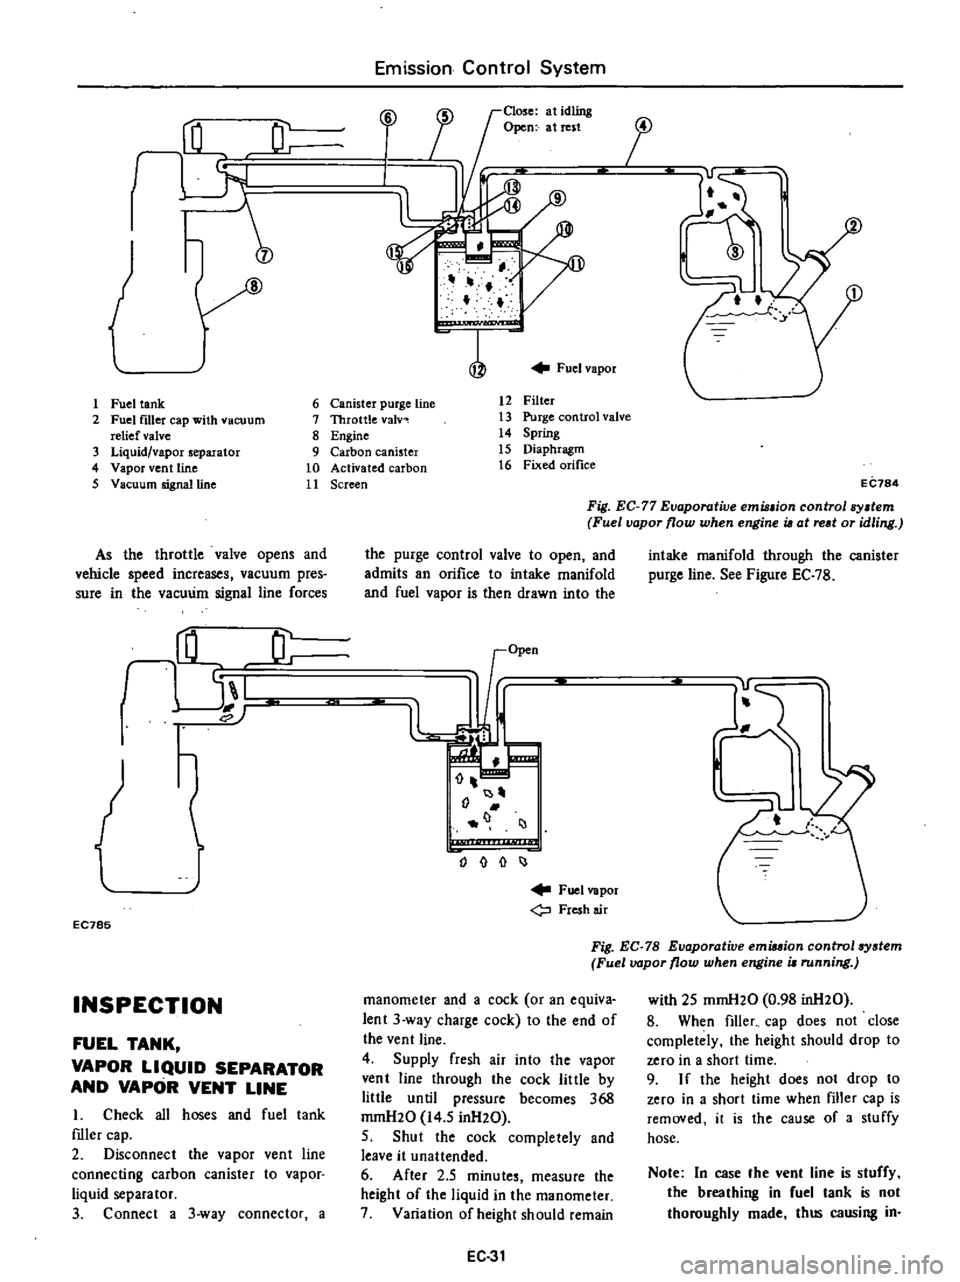
As
the
throttle
valve
opens
and
vehicle
speed
increases
vacuum
pres
sure
in
the
vacuum
signal
line
forces
rHL
JL
I
EC785
INSPECTION
FUEL
TANK
VAPOR
LIQUID
SEPARATOR
AND
VAPOR
VENT
LINE
I
Check
all
hoses
and
fuel
tank
mler
cap
2
Disconnect
the
vapor
vent
line
connecting
carbon
canister
to
vapor
liquid
separator
3
Connect
a
3
way
connector
a
Emission
Control
System
Close
at
idling
Open
at
rest
i
J
17
f
Fuel
vapor
6
Canister
purge
line
7
Throttle
valv
8
Engine
9
Carbon
canister
10
Activated
carbon
11
Screen
12
Filter
13
Purge
control
valve
14
Spring
15
Diaphragm
16
Fixed
orifice
i
j
EC784
Fig
EC
77
Evaporative
emu
ion
control
sy
tem
Fuel
vapor
flow
when
engine
i6
at
red
or
idling
the
purge
control
valve
to
open
and
admits
an
orifice
to
intake
manifold
and
fuel
vapor
is
then
drawn
into
the
I
J
o
I
Fuel
vapor
Fresh
air
intake
manifold
through
the
canister
purge
line
See
Figure
EC
7B
Fig
EC
78
Evaporative
emiuion
control
system
Fuel
vapor
flow
when
engine
i
running
manometer
and
a
cock
or
an
equiva
lent
3
way
charge
cock
to
the
end
of
the
vent
line
4
Supply
fresh
air
into
the
vapor
vent
line
through
the
cock
little
by
little
until
pressure
becomes
368
mrnH20
14
5
inH20
5
Shut
the
cock
completely
and
leave
it
unattended
6
After
2
5
minutes
measure
the
height
of
the
liquid
in
the
manometer
7
Variation
of
height
should
remain
EC
31
with
25
mmH20
0
98
inH20
8
When
filler
cap
does
not
close
completely
the
height
should
drop
to
zero
in
a
short
time
9
I
f
the
height
does
not
drop
to
zero
in
a
short
time
when
filler
cap
is
removed
it
is
the
cause
of
a
stuffy
hose
Note
In
case
the
vent
line
is
stuffy
the
breathing
in
fuel
tank
is
not
thoroughly
made
thus
causing
in
Page 165 of 537

sufficient
delivery
of
fuel
to
engine
or
vapor
lock
It
must
therefore
be
1
3
connectur
COCk
Air
Manometer
Emission
Control
System
repaired
or
replaced
368
mmH20
14
5
inH20
LL
IPO
liqUid
epo
o
36
r
@
Carbon
canister
EC786
Fig
EC
79
Checking
evaporative
emmion
control
syatem
CARBON
CANISTER
PURGE
CONTROL
VALVE
Check
for
fuel
vapor
leakage
in
the
distributor
vacuum
line
at
diaphragm
of
carbon
canister
purge
control
valve
To
check
for
leakage
proceed
as
follows
I
Disconnect
rubber
hose
in
the
line
between
T
connector
and
carbon
canister
at
T
connector
2
Inhale
air
into
the
opening
of
rubber
hose
running
to
vacuum
hole
in
carbon
canister
and
ensure
that
there
is
no
leak
ET349
Fig
EC
so
Checking
carbon
canuter
purge
control
valve
3
If
there
is
a
leak
remove
top
cover
from
purge
control
valve
and
check
for
dislocated
or
cracked
dia
phragm
If
necessary
replace
dia
phragm
kit
which
is
made
up
of
a
retainer
a
diaphragm
and
a
spring
@
@
1
Cover
2
Diaphragm
3
Retainer
4
Spring
ET350
Fig
EC
81
Carbon
catU
ter
purge
control
valve
CARBON
CANISTER
FILTER
Check
for
a
contaminated
element
Element
can
be
removed
at
the
bottom
of
canister
installed
on
vehicle
body
EC
32
ET37Q
Fig
EC
s2
Replacing
carbon
canuter
filter
FUEL
TANK
VACUUM
RELIEF
VALVE
Remove
fuel
filler
cap
and
see
it
functions
properly
I
Wipe
clean
valve
housing
and
have
it
in
your
mouth
2
Inhale
air
A
slight
resistance
ac
companied
by
valve
indicates
that
valve
is
in
good
mechanical
condition
Note
also
that
by
further
inhaling
air
the
resistance
should
be
disappeared
with
valve
clicks
3
If
valve
is
clogged
or
if
no
resist
ance
is
felt
replace
cap
as
an
assem
bled
uni
t
l
u
ET369
Fig
EC
83
Fuel
filler
cap
Page 381 of 537

DISASSEMBLY
AND
ASSEMBLY
1
00
11I
1
Reservoir
cap
2
Oil
mter
3
Oil
reservoir
4
Packing
5
Valve
cap
Brake
System
00
oC
1
O
b
0
1
r
r
L
BA927
6
Secondary
piston
stopper
7
Bleeder
screw
8
Secondary
return
spring
9
Secondary
piston
10
Primary
return
spring
11
Primary
piston
12
Piston
stopper
13
Piston
stopper
ring
1
Remove
reservoir
cap
and
filter
and
drain
out
brake
fluid
2
Pry
off
stopper
ring
using
a
screwdriver
3
Remove
stopper
screw
and
take
out
stopper
primary
piston
assembly
spring
and
secondary
piston
assembly
in
the
order
shown
Note
Discard
piston
cup
if
it
is
re
moved
from
piston
sembly
and
use
a
new
one
4
Unscrew
plugs
to
gain
access
to
check
valve
for
disassembling
Note
Never
detach
reservoir
tank
U
it
is
removed
for
any
reason
dis
canI
it
and
install
a
new
one
S
Assemble
master
cylinder
in
the
reverse
sequence
of
disassembly
pay
ing
particular
attention
to
the
follow
ing
notes
Fig
BR
10
Master
cylinder
Tightening
torque
Valve
cap
T
okico
8
t09
kg
m
S8
to
6S
ft
Ib
Nabco
2
5
to
3
S
kg
m
18
to
2S
ft
Ib
Bleeder
0
7
to
0
9
kg
m
S
to
7
ft
lb
Notes
a
Replace
gaskets
and
packings
with
new
ones
b
Apply
brake
fluid
or
rubber
grease
to
sliding
contact
surfaces
of
parts
to
facilitate
assembly
of
master
cylinder
c
The
blllke
master
cylinder
is
avail
able
in
both
NABCO
make
and
TOKlCO
make
There
is
no
inter
changeability
of
repair
kits
or
com
ponent
parts
between
NABCO
and
TOKlCO
JIIlkes
When
replacing
the
repair
kit
or
component
parts
BR
6
ascertain
the
brand
of
the
brake
master
cylinder
body
Be
sure
to
use
parts
of
the
same
make
as
the
former
ones
INSPECTION
Thoroughly
clean
all
parts
in
a
suitable
solvent
and
check
for
WOol
or
damaged
parts
Replace
any
part
that
is
faulty
Note
Do
not
clean
robber
parts
with
minerai
oil
since
this
will
be
the
sure
way
of
deteriolllting
parts
Use
brake
fluid
or
alcohoL
When
alco
hol
is
used
for
leaning
these
parts
do
not
immerse
them
in
it
longer
than
30
seconds
After
parts
are
cIeaned
dry
with
compressed
air
I
Check
cylinder
and
position
for
evidence
of
abnonnaI
wear
or
damage
Replace
if
found
faulty
2
Check
piston
to
cylinder
clear
ance
If
it
is
more
than
O
IS
mm
0
OOS9
in
replace
either
piston
or
cylinder
Master
cylinder
inner
diameter
19
0S
mm
Yoin
3
Check
for
weakened
fatigued
or
damaged
springs
and
replace
if
neces
sary
4
When
master
cylioder
is
disassem
bled
be
sure
to
discard
cups
and
valves
Replace
any
other
part
which
shows
evidence
of
deformation
wear
or
damage
S
Replace
damaged
oil
reservoirs
and
caps
INSTALLATION
Install
master
cylinder
in
the
re
verse
sequence
of
removal
Bleed
air
out
of
master
cylinder
by
loosening
bleeder
screw
after
it
is
installed
in
its
original
position
Tightening
torque
Brake
master
cylinder
attaching
nut
0
8
to
1
1
kg
m
6
to
8
ft
Ib
Brake
tube
connector
I
S
to
1
8
kg
m
II
to
13
ft
Ib
Page 389 of 537

f
BR317
Fig
BR
23
Gre
ing
point
4
Tightening
torque
Wheel
cylinder
J
S
to
1
8
kg
m
II
to
13ft
Ib
Connector
bolt
1
9
to
2
5
kg
m
14
to
18
ft
Ib
Brake
tube
1
5
to
1
8
kg
m
II
to
13
ft
Ib
Air
bleeder
0
7
to
0
9
kg
m
S
to
7
ft
Ib
Brake
disc
5
4
to
6
4
kg
m
39
to
46
ft
Ib
S
Adjust
brake
shoe
clearance
and
bleed
brake
system
Upon
completion
of
the
above
adjustments
make
sure
that
brake
operates
correctly
and
no
brake
fluid
leaks
MASTER
VAC
DESCRIPTION
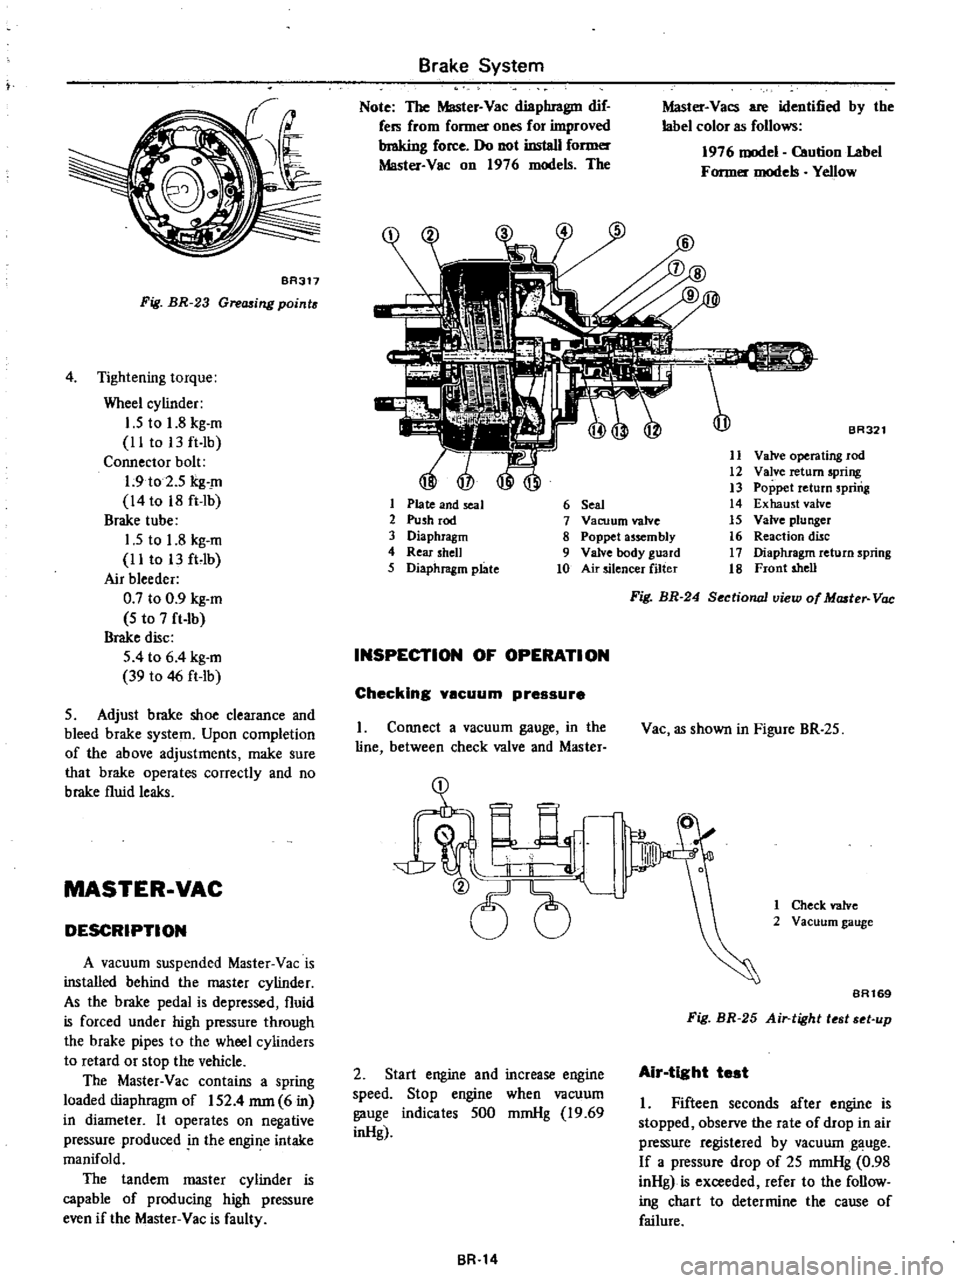
A
vacuum
suspended
Master
Vac
is
installed
behind
the
master
cylinder
As
the
brake
pedal
is
depressed
fluid
is
forced
under
high
pressure
through
the
brake
pipes
to
the
wheel
cylinders
to
retard
or
stop
the
vehicle
The
Master
Vac
contains
a
spring
loaded
diaphragm
of
IS2
4
mm
6
in
in
diameter
It
operates
on
negative
pressure
produced
n
the
engine
intake
manifold
The
tandem
master
cylinder
is
capable
of
producing
high
pressure
even
if
the
Master
Vac
is
faulty
Brake
System
Note
The
Master
Vac
diaphragm
dif
fers
from
fonner
ones
for
improved
braking
force
Do
not
install
fonner
Master
Vac
on
1976
models
The
1
Plate
and
seal
2
Push
rod
3
Diaphragm
4
Rear
shell
5
Diaphragm
plate
Master
Vacs
are
identified
by
the
label
color
as
follows
1976
model
Caution
Label
Former
models
YeJlow
BR321
11
Valve
operating
rod
12
Valve
return
spring
13
Poppet
return
spring
14
Exhaust
valve
15
Valve
plunger
16
Reaction
disc
17
Diaphragm
return
spring
18
Front
shell
6
Seal
7
Vacuum
valve
8
Poppet
assembly
9
Valve
body
guard
10
Air
silencer
filter
INSPECTION
OF
OPERATION
Checking
yscuum
pressure
I
Connect
a
vacuum
gauge
in
the
line
between
check
valve
and
Master
2
Start
engine
and
increase
engine
speed
Stop
engine
when
vacuum
gauge
indicates
SOO
mmHg
19
69
inHg
BR
14
Fig
BR
24
Sectionall1iew
of
Master
Vac
Vac
as
shown
in
Figure
BR
25
1
Check
valve
2
Vacuum
gauge
BA169
Fig
BR
25
Air
tight
t
t
t
up
Air
tight
test
I
Fifteen
seconds
after
engine
is
stopped
observe
the
rate
of
drop
in
air
pressure
registered
by
vacuum
gauge
If
a
pressure
drop
of
25
mmHg
0
98
inHg
is
exceeded
refer
to
the
follow
ing
chart
to
determine
the
cause
of
failure
Page 518 of 537

INSPECTION
Evaporator
Check
evaporator
for
leakage
or
damage
If
damaged
replace
Expansion
valve
Check
expansion
valve
for
leakage
or
clogging
If
clogged
clean
filter
in
expansion
valve
If
damaged
replace
RECEIVER
DRYER
AND
PIPING
REMOVAL
AND
INSTAUATION
Receiver
dryer
I
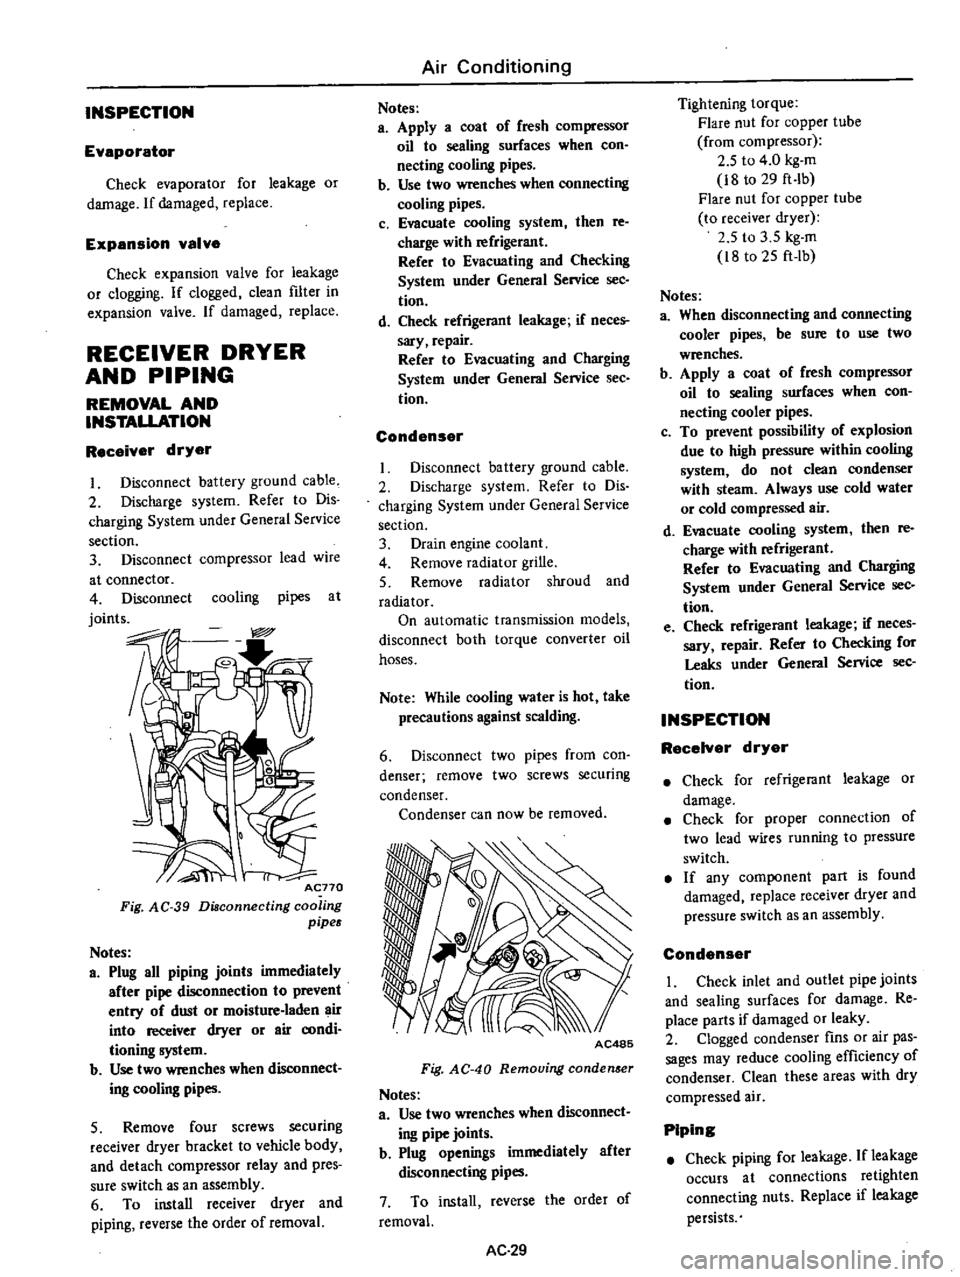
Disconnect
battery
ground
cable
2
Discharge
system
Refer
to
Dis
charging
System
under
General
Service
section
3
Disconnect
compressor
lead
wire
at
connector
4
Disconnect
cooling
pipes
at
joints
Acno
Fig
AC
39
Diaconnecting
coo
ing
pipes
Notes
a
Plug
all
piping
joints
immediately
after
pipe
disconnection
to
prevent
entry
of
dust
or
moisture
laden
air
into
receiver
dryer
or
air
aJOdi
tioning
system
b
Use
two
wrenches
when
dIsconnect
ing
cooling
pipes
5
Remove
four
screws
securing
receiver
dryer
bracket
to
vehicle
body
and
detach
compressor
relay
and
pres
sure
switch
as
an
assembly
6
To
install
receiver
dryer
and
piping
reverse
the
order
of
removal
Air
Conditioning
Notes
a
Apply
a
coat
of
fresh
compressor
oil
to
sealing
surfaces
when
con
necting
cooling
pipes
b
Use
two
wrenches
when
connecting
cooling
pipes
c
Evacuate
cooling
system
then
re
charge
with
refrigerant
Refer
to
Evacuating
and
Checking
System
under
General
Service
sec
tion
d
Check
refrigerant
leakage
if
neces
sary
repair
Refer
to
Evacuating
and
Charging
System
under
General
Service
See
tion
Condenser
Disconnect
battery
ground
cable
2
Discharge
system
Refer
to
Dis
charging
System
under
General
Service
section
3
Drain
engine
coolant
4
Remove
radiator
grille
5
Remove
radiator
shroud
and
radiator
On
automatic
transmission
models
disconnect
both
torque
converter
oil
hoses
Note
While
cooling
water
is
hot
take
precautions
against
scalding
6
Disconnect
two
pipes
from
con
denser
remove
two
screws
securing
condenser
Condenser
can
now
be
removed
AC485
Fig
AC
40
Removing
conden
er
Notes
a
Use
two
wrenches
when
disconnect
ing
pipe
joints
b
Plug
openings
immediately
after
disconnecting
pipes
7
To
install
reverse
the
order
of
removal
AC
29
Tightening
torque
Flare
nut
for
copper
tube
from
compressor
2
5
to
4
0
kg
m
i8
to
29
ft
Ib
Flare
nut
for
copper
tube
to
receiver
dryer
2
5
to
3
5
kg
m
i8
to
25
ft
lb
Notes
a
When
disconnecting
and
connecting
cooler
pipes
be
sure
to
use
two
wrenches
b
Apply
a
coat
of
fresh
compressor
oil
to
sealing
surfaces
when
con
necting
cooler
pipes
c
To
prevent
possibility
of
explosion
due
to
high
pressure
within
cooling
system
do
not
clean
condenser
with
steam
Always
use
cold
water
or
cold
compressed
air
d
Evacuate
cooling
system
then
re
charge
with
refrigerant
Refer
to
Evacuating
and
Charging
System
under
General
Service
sec
tion
e
Check
refrigerant
leakage
if
neces
sary
repair
Refer
to
Checking
for
Leaks
under
General
Service
sec
tion
INSPECTION
RecelYer
dryer
Check
for
refrigerant
leakage
or
damage
Check
for
proper
connection
of
two
lead
wires
running
to
pressure
switch
If
any
component
part
is
found
damaged
replace
receiver
dryer
and
pressure
switch
as
an
assembly
Condenser
I
Check
inlet
and
outlet
pipe
joints
and
sealing
surfaces
for
damage
Re
place
parts
if
damaged
or
leaky
2
Clogged
condenser
fins
or
air
pas
sages
may
reduce
cooling
efficiency
of
condenser
Clean
these
areas
with
dry
compressed
air
Piping
Check
piping
for
leakage
If
leakage
occurs
at
connections
retighten
connecting
nuts
Replace
if
leakage
persists
Page 532 of 537

Service
Equipment
TOOL
LIST
ENGINE
TOOL
Tool
Number
Tool
Name
Newly
added
Class
Remarks
ST050
I
SODa
Engine
stand
assembly
5
FIO
B2iO
610
710
S30
tST05011000
Engine
stand
ST050
I
2000
Base
ST05260001
Engine
attachment
5
610
710
STlOl20000
Cylinder
head
bolt
wrench
2
610
710
S30
STl
0640001
Pivot
adjuster
I
610
710
S30
KVIOI039S0
Valve
guide
reamer
set
3
FiO
B210
610
710
S30
STl1081
000
Reamer
12
2
mffi
0
480
in
dia
J
STl1032000
Reamer
8
0
mffi
0
315
in
dia
STl1320000
Drift
STll650001
Valve
seat
cutter
set
2
610
710
S30
STl2070000
Valve
lifter
5
B210
610
710
S30
STl3030001
Piston
pin
press
stand
2
610
710
S30
STl53
10000
Crankshaft
rear
oil
seal
drift
2
610
710
S30
KVI01041S0
Crankshaft
main
bearing
cap
puller
2
610
710
S30
KVIOI04110
Crankshaft
main
bearing
puller
STl6512001
Adapter
STl6701001
Adapter
STl6610001
Pilot
bushing
puller
3
610
710
S30
STl7420001
Chain
stopper
2
610
710
S30
STl9320000
Oil
filter
wrench
FIO
B210
610
710
S30
STl9870000
Air
pump
test
gauge
FI0
B210
610
710
STl98
10000
Hexagonal
wrench
3
FIO
B2iO
610
710
STl9890000
Rotor
adapter
2
FIO
B210
610
710
STl9900000
Dummy
shaft
2
FIO
B210
610
710
STl99
10000
Bearing
drift
2
FIO
B210
610
710
STl9920000
Rotor
stand
2
FIO
B210
610
710
STl9930000
Bearing
adapter
2
FIO
B210
610
710
ST
I
9940000
Bearing
pressing
tool
3
FIO
B210
610
710
EM03470000
Piston
ring
compressor
2
FIO
B210
610
710
S30
SE
3