cooling DATSUN PICK-UP 1977 Owner's Manual
[x] Cancel search | Manufacturer: DATSUN, Model Year: 1977, Model line: PICK-UP, Model: DATSUN PICK-UP 1977Pages: 537, PDF Size: 35.48 MB
Page 474 of 537
HEATER
UNIT
ASSEMBLY
Removal
L
Disconnect
battery
ground
cable
2
Drain
engine
coolant
3
Remove
defroster
hoses
4
Remove
three
cable
retaining
clips
and
disconnect
control
cables
from
valves
and
water
cock
5
Disconnect
two
fan
motor
lead
wires
from
each
connector
6
Disconnect
two
resistor
lead
wires
from
each
connector
7
Disconnect
water
hoses
from
core
and
water
cock
8
Remove
three
heater
housing
mounting
bolts
and
dismount
heater
unit
from
vehicle
Installation
1
Position
heater
unit
under
instru
ment
panel
and
install
three
heater
unit
securing
bolts
2
Install
water
hoses
3
Position
heater
control
cables
to
room
valve
air
intake
valve
and
water
cock
4
Adjust
control
cable
length
for
proper
operation
as
outlined
in
Adjust
ment
5
Connect
fan
motor
wires
and
resistance
wires
to
each
connector
plug
6
Install
defroster
hoses
7
Connect
battery
ground
cable
8
Fill
cooling
systeIT
9
Run
engine
at
2
000
rpm
with
AIR
lever
in
the
HOT
position
Make
sure
that
engine
coolant
is
fIlled
up
to
correct
level
HEATER
CORE
Removal
and
installation
L
Drain
engine
coolant
2
Remove
defroster
hoses
3
Disconnect
water
hoses
from
inlet
and
outlet
pipes
of
heater
core
4
Remove
four
clips
and
front
cover
Body
Electrical
System
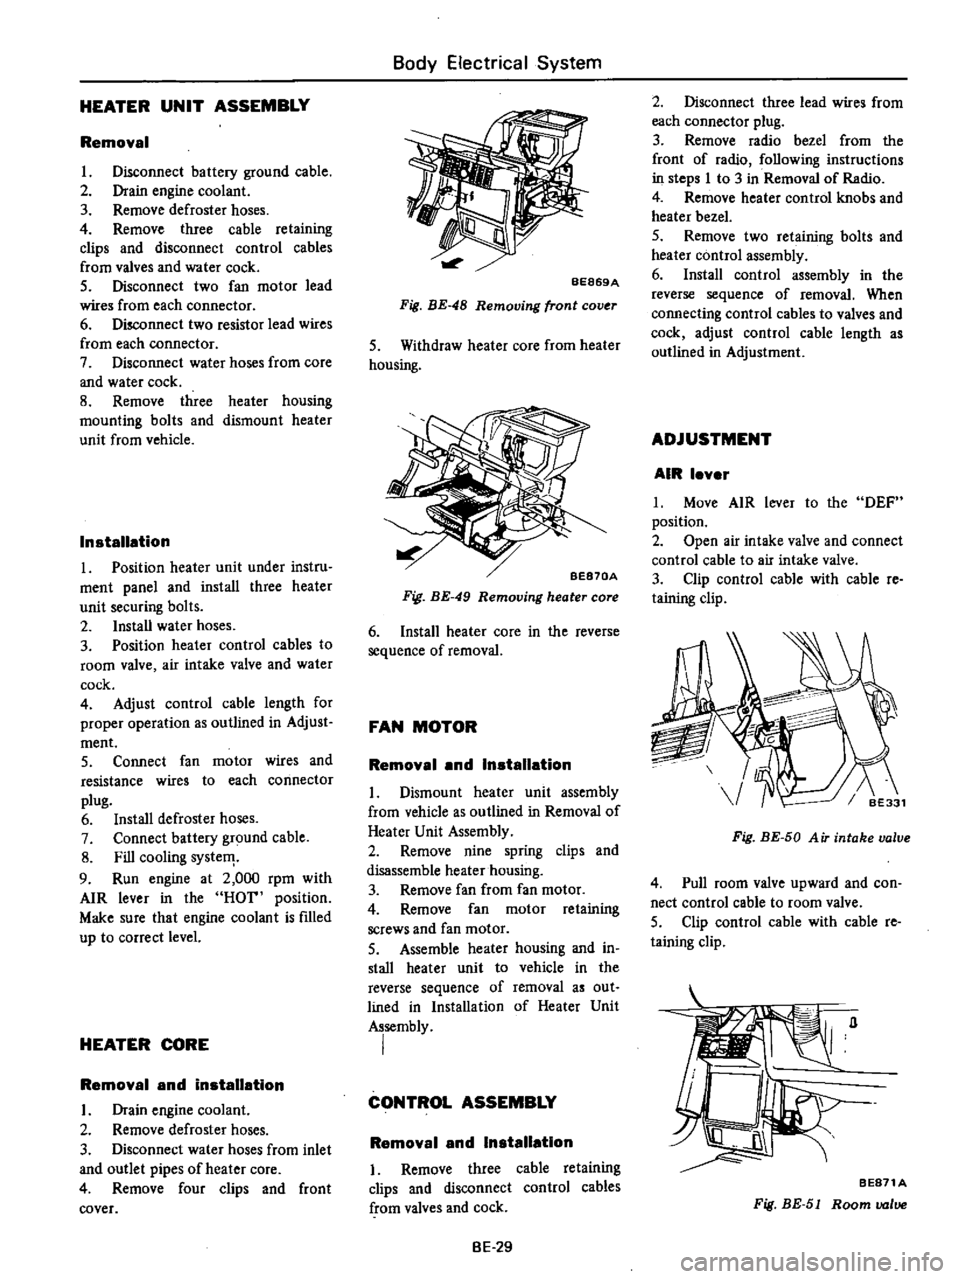
BE869A
Fig
BE
48
Removing
front
cov
r
S
Withdraw
heater
core
from
heater
housing
BE870A
Fig
BE
49
Removing
heater
core
6
Install
heater
core
in
the
reverse
sequence
of
removal
FAN
MOTOR
Removal
and
Installation
L
Dismount
heater
unit
assembly
from
vehicle
as
outlined
in
Removal
of
Heater
Unit
Assembly
2
Remove
nine
spring
clips
and
disassemble
heater
housing
3
Remove
fan
from
fan
motor
4
Remove
fan
motor
retaining
screws
and
fan
motor
S
Assemble
heater
housing
and
in
stall
heater
unit
to
vehicle
in
the
reverse
sequence
of
removal
as
out
lined
in
Installation
of
Heater
Unit
Assembly
I
CONTROL
ASSEMBLY
Removal
and
Installation
I
Remove
three
cable
retaining
clips
and
disconnect
control
cables
from
valves
and
cock
BE
29
2
Disconnect
three
lead
wires
from
each
connector
plug
3
Remove
radio
bezel
from
the
front
of
radio
following
instructions
in
steps
I
to
3
in
Removal
of
Radio
4
Remove
heater
control
knobs
and
heater
bezel
5
Remove
two
retaining
bolts
and
heater
control
assembly
6
Install
control
assembly
in
the
reverse
sequence
of
removal
When
connecting
control
cables
to
valves
and
cock
adjust
control
cable
length
as
outlined
in
Adjustment
ADJUSTMENT
AIR
lever
L
Move
AIR
lever
to
the
DEF
position
2
Open
air
intake
valve
and
connect
control
cable
to
air
intake
valve
3
Clip
control
cable
with
cable
re
taining
clip
Fig
BE
50
A
iT
intake
valve
4
Pull
room
valve
upward
and
con
nect
control
cable
to
room
valve
5
Clip
control
cable
with
cable
re
taining
clip
BE871A
Fig
BE
51
Room
valve
Page 491 of 537
OUTLINE
OF
AIR
CONDITIONER
REFRIGERATION
SYSTEM
CONDENSER
COMPRESSOR
RECEIVER
DRYER
COOLING
UNIT
ELECTRICAL
CIRCUIT
OUTLINE
OF
AIR
CONDITIONER
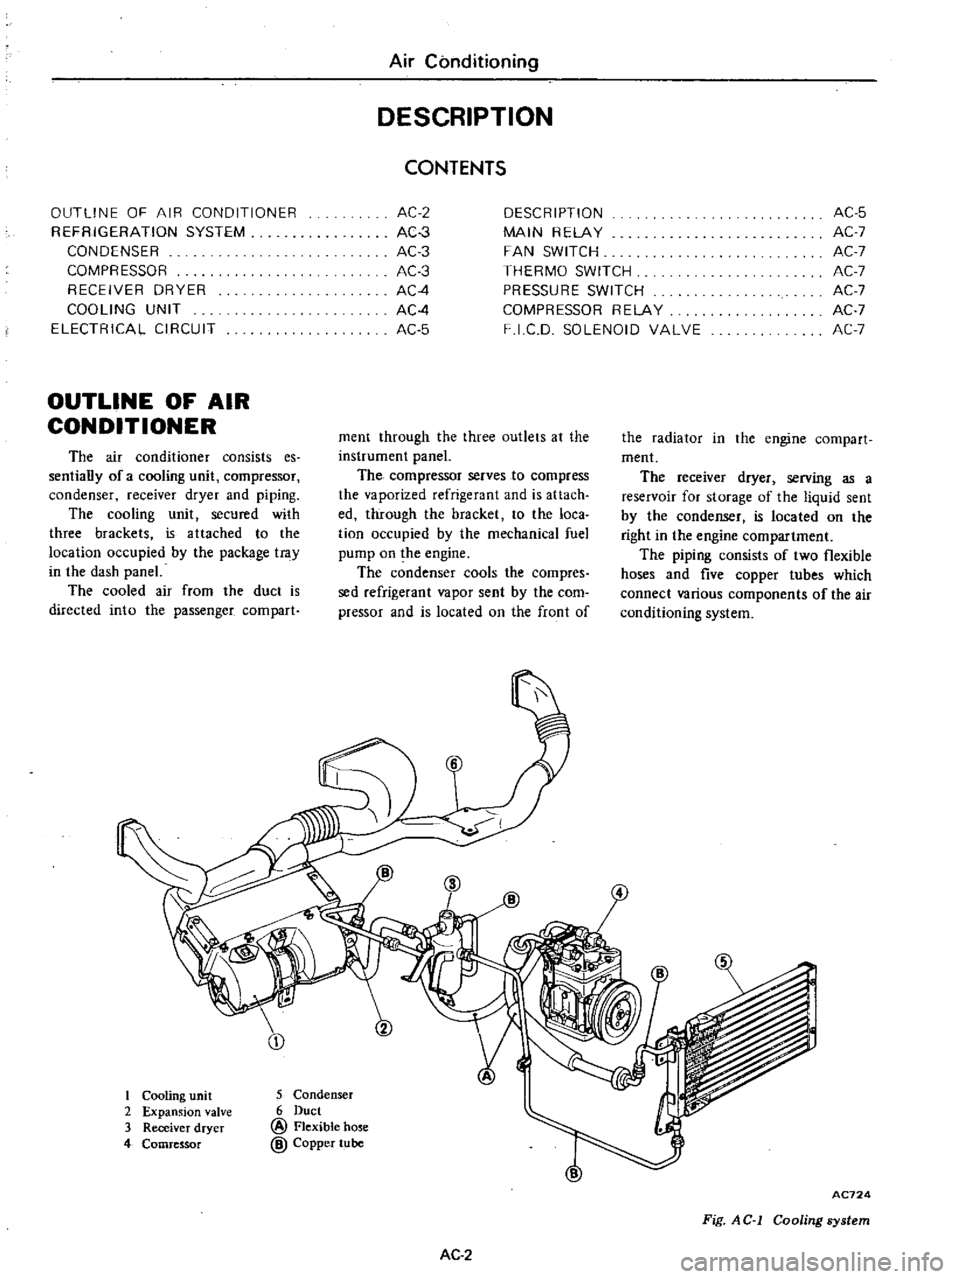
The
air
conditioner
consists
es
sentially
of
a
cooling
unit
compressor
condenser
receiver
dryer
and
piping
The
cooling
unit
secured
with
three
brackets
is
a
ttached
to
the
location
occupied
by
the
package
tray
in
the
dash
panel
The
cooled
air
from
the
duct
is
directed
into
the
passenger
compart
Air
Conditioning
DESCRIPTION
CONTENTS
AC
2
AC3
AC
3
AC3
AC4
AC4
AC
5
DESCRIPTION
MAIN
RELAY
FAN
SWITCH
THERMO
SWITCH
PRESSURE
SWITCH
COMPRESSOR
RELAY
F
I
C
D
SOLENOID
VALVE
AC
5
AC
7
AC
7
AC
7
AC
7
AC
7
AC
7
ment
through
the
three
outlets
at
the
instrument
panel
The
compressor
serves
to
compress
the
vaporized
refrigerant
and
is
attach
ed
through
the
bracket
to
the
loca
tion
occupied
by
the
mechanical
fuel
pump
on
the
engine
The
condenser
cools
the
compres
sed
refrigerant
vapor
sent
by
the
com
pressor
and
is
located
on
the
front
of
the
radiator
in
the
engine
compart
ment
The
receiver
dryer
serving
as
a
reservoir
for
storage
of
the
liquid
sent
by
the
condenser
is
located
on
the
right
in
the
engine
compartment
The
piping
consists
of
two
flexible
hoses
and
five
copper
tubes
which
connect
various
components
of
the
air
conditioning
system
I
Cooling
unit
2
Expansion
valve
3
Receiver
dryer
4
Comressor
5
Condenser
6
Duct
@
Flexible
hose
@
Copper
tube
AC
2
AC724
Fig
AC
1
Cooling
system
Page 493 of 537

Air
Conditioning
RECEIVER
DRYER
The
receiver
dryer
serves
the
pur
pose
of
storing
the
liquid
refrigerant
The
amount
of
the
liquid
refrigerant
flowing
through
the
system
varies
with
the
operating
condition
of
the
air
conditioner
To
be
accurate
the
receiver
dryer
stores
excess
amount
of
refrigerant
when
the
heat
load
is
lowered
It
also
releases
stored
refriger
ant
when
additional
cooling
is
needed
thus
maintaining
the
optimum
flow
of
refrigerant
within
the
system
The
receiver
dryer
includes
a
strainer
and
desiccant
They
have
the
job
of
removing
moisture
and
foreign
particles
as
the
refrigerant
circulates
within
the
system
The
pressure
switch
is
installed
beside
sight
glass
of
receiver
dryer
The
purpose
of
the
switch
is
to
stop
the
compressor
operation
in
the
event
an
excessive
system
pressure
builds
up
on
the
high
pressure
lines
AC728
Fig
A
C
4
Compressor
To
e
ran
ion
alve
From
condenser
5
c
FJi
i
1
Z
i
3
c
o
I
COOLING
UNIT
o
L
o
W
7
R
o
3
J
J
r
t
AC230
I
Prc
surc
switch
2
Sight
glass
3
Strainer
4
De
kcant
Fig
AC
5
Receiver
dryer
The
liquid
refrigerant
evaporates
in
the
evaporator
with
the
aid
of
the
expansion
valve
Consequently
the
air
drawn
by
the
blower
motor
is
cooled
in
passing
through
the
evaporator
The
expansion
valve
restricts
the
liquid
refrigerant
as
it
passes
through
it
and
delivers
sprayed
refrigerant
to
the
evaporator
for
facilitating
refrigerant
evaporation
The
cooling
unit
includes
an
evapo
rator
and
an
expansion
valve
From
the
electrical
point
of
view
the
cooling
unit
consists
of
a
blower
motor
a
resistor
for
fan
speed
control
and
some
switches
and
relays
AC
4
Page 494 of 537

The
refrigerant
within
the
thermo
bulb
changes
in
pressure
through
the
super
heat
condition
of
vaporized
re
frigerant
gas
which
comes
out
of
the
evaporator
causing
the
deflection
of
the
diaphragm
The
lift
of
the
ball
valve
attached
to
the
diaphragm
is
changed
by
the
deflection
of
the
dia
phragm
thus
controlling
the
amount
of
refrigerant
passing
the
orifice
ELECTRICAL
CIRCUIT
DESCRIPTION
The
electrical
circuit
of
the
air
conditioner
consists
of
four
switches
two
relays
a
solenoid
valve
a
fan
motor
and
a
compressor
magnetic
clutch
Air
Conditioning
Diaphragm
Orifice
Valve
ball
AC729
4
Sensing
bulb
Fig
A
C
6
Expansion
value
The
following
wiring
diagram
pro
vides
a
complete
description
of
the
whole
circuit
When
the
ignition
switch
and
the
fan
switch
are
ON
the
main
relay
is
activated
causing
battery
power
to
flow
through
the
fan
motor
and
the
magnetic
clutch
The
magnetic
clutch
is
activated
by
the
thermo
switch
AC
5
000
l
1
Motor
2
Fan
3
Lower
case
4
Cooler
duct
5
Evaporator
6
Expansion
valve
7
Upper
case
8
Resistor
9
Main
relay
10
Thermo
switch
II
Cable
clamp
12
Cable
13
Harness
AC725
Fig
AC
7
Cooling
unit
pressure
switch
and
compressor
relay
The
blower
motor
fan
speed
is
con
trolled
by
the
fan
switch
and
resistor
The
solenoid
valve
is
also
activated
This
in
turn
causes
the
fast
idle
control
device
F
l
C
D
to
increase
engine
speed
when
the
vehicle
is
at
rest
with
the
engine
ON
Page 496 of 537

MAIN
RELAY
The
main
relay
is
located
on
the
cooling
unit
When
the
ignition
switch
and
fan
switch
are
both
turned
on
the
COll
@
FAN
SWITCH
The
fan
switch
serving
as
a
control
unit
is
installed
on
the
center
console
This
switch
controls
the
blower
motor
speed
through
the
resistor
It
is
also
used
as
a
main
relay
switch
Fig
AC
I0
Fan
switch
THERMO
SWITCH
The
thermo
switch
is
located
on
the
upper
side
of
the
cooling
unit
and
is
controlled
by
the
cable
and
the
con
trollever
attached
to
the
console
box
It
is
so
designed
that
when
the
air
passing
through
the
evaporator
core
is
cooled
down
to
the
predetermined
Air
Conditioning
tacts
in
the
relay
are
closed
Then
electrical
power
from
the
battery
is
supplied
to
the
blower
motor
and
the
electrical
clutch
for
the
compressor
@
Dc
IDe
ID
1
1
l@
@
e
L
J
AC465
Fig
A
C
9
Main
relay
temperature
set
by
the
control
lever
it
automatically
turns
off
When
the
switch
is
turned
off
the
magnetic
clutch
is
turned
off
stopping
the
flow
of
refrigerant
inside
the
cooling
system
and
increasing
the
cooling
system
tem
perature
When
the
air
rises
to
the
pre
determined
temperature
the
thermo
switch
automatically
turns
on
In
this
way
the
temperature
of
the
air
dis
charged
from
the
cooling
unit
is
auto
matically
controlled
as
desired
PRESSURE
SWITCH
The
pressure
switch
is
turned
off
when
refrigerant
pressure
in
the
cooling
system
rises
to
an
abnormally
high
level
28
kg
cm2
398
psi
This
in
turn
turns
off
the
compressor
magnetic
clutch
actuating
the
com
pressor
relay
and
gradually
decreasing
pressure
in
the
cooling
system
When
the
pressure
drops
to
or
below
24
kg
cm2
341
psi
the
pressure
switch
again
turns
on
Thus
cooling
system
refrigerant
pressure
is
automatically
maintained
at
the
proper
value
a
t
all
times
AC
7
COMPRESSOR
RERAY
The
compressor
relay
is
attached
to
the
receiver
dryer
bracket
on
the
right
side
of
the
engine
compartment
This
relay
is
actuated
by
the
fan
switch
thermo
switch
and
pressure
switch
to
turn
on
and
off
the
compressor
magnetic
clutch
cv
1
2
AC731
Fig
A
C
11
Pressure
switch
and
compressor
relay
F
I
C
D
SOLENOID
VALVE
The
F
l
C
D
solenoid
valve
is
at
tached
to
the
dash
panel
in
the
engine
compartment
This
valve
supplies
vacu
um
to
the
F
I
C
D
diaphragm
through
the
vacuum
hose
connected
to
the
engine
intake
manifold
when
the
engine
is
at
idle
and
the
cooling
system
is
ON
thereby
raising
idle
speed
to
the
predetermined
rpm
800
IW
r
e
I
1
s
AC132
Fig
AC
12
F
l
C
D
solenoid
value
Page 506 of 537

Notes
a
The
bubbles
seen
through
the
sight
glass
are
influenced
by
the
ambient
temperature
Since
the
bubbles
are
hard
to
show
up
in
comparatively
low
temperatures
below
200C
6S0
F
it
is
possible
that
a
slightly
larger
amount
of
refrigerant
would
be
filled
if
supplied
according
to
the
sight
glass
Be
sure
to
recheck
the
amount
when
it
exceeds
200C
680F
In
higher
temperature
the
bubbles
are
easy
to
show
up
b
When
the
screen
in
the
receiver
dryer
is
clogged
the
bubbles
will
appear
even
if
the
amount
of
refrig
erant
is
normal
In
this
case
the
outlet
side
pipe
of
the
receiver
dryer
becomes
considerably
cold
PERFORMANCE
TEST
Check
for
the
amount
of
refrigerant
in
the
system
can
be
made
by
meas
uring
pressure
on
discharge
side
The
correct
amount
of
refrigerant
is
in
the
system
if
pressure
on
the
discharge
side
is
within
the
specified
range
For
details
refer
to
Perform
ance
Test
described
later
Overcharging
will
show
up
in
higher
pressure
on
discharge
side
COMPRESSOR
OIL
LEVEL
CHECK
The
oil
used
to
lubricate
compres
sor
circulates
into
system
from
the
oil
sump
while
c9mpressor
is
operating
The
efore
to
correctly
measure
com
pressor
oil
the
amount
of
oil
flowing
to
system
must
be
considered
If
a
considerable
amount
of
leakage
of
refrigerant
gas
happens
the
leakage
of
compressor
oil
is
also
considered
There
will
be
no
compressor
oil
leak
age
from
a
completely
sealed
system
When
system
operates
under
satisfying
condition
the
compressor
oil
level
check
is
unnecessary
When
checking
the
level
of
com
pressor
oil
or
when
replacing
any
component
part
of
the
system
use
the
following
service
procedure
This
fa
cilitates
to
return
oil
to
compressor
I
Operate
compressor
at
engine
idling
speed
1
000
rpm
or
below
with
controls
set
for
maximum
cooling
Air
Conditionin
j
and
high
blower
speed
for
10
to
15
minutes
in
order
to
return
compressor
oil
to
compressor
2
Stop
the
engine
and
discharge
refrigerant
of
system
and
then
remove
compressor
from
the
vehicle
3
Remove
compressor
fIller
plug
Drain
compressor
oil
from
compres
sor
oil
sump
and
measure
the
amount
4
Compressor
oil
is
satisfactory
if
the
following
amount
of
oil
remains
in
the
compressor
Residual
oil
S5
to
128
gr
3
to
4
oz
5
Check
the
cleanliness
of
the
oil
If
the
oil
contains
chips
or
other
foreign
material
clean
oil
5ump
with
new
oil
6
Discard
the
used
oil
and
fili
with
the
same
amount
of
new
oil
Add
oil
if
found
less
than
above
amount
Fig
AC
27
Filler
plug
If
compressor
is
inoperative
due
to
faulty
compressor
or
heavy
loss
of
refrigerant
remove
compressor
and
repair
as
necessary
Then
pour
oil
up
to
correct
level
and
install
on
engine
After
above
steps
have
been
complet
ed
recheck
oil
level
drain
oil
to
correct
level
if
level
is
excessively
high
PERFORMANCE
TEST
The
cooling
performance
of
the
air
conditioner
changes
considerably
with
changes
in
surrounding
conditions
Testing
must
be
performed
using
the
correct
method
This
test
is
used
to
judge
whether
system
is
operating
cor
rectly
and
can
also
be
used
as
a
guide
in
checking
for
problems
I
Park
the
vehicle
indoors
or
in
the
shade
AC
17
2
Open
all
the
windows
of
the
vehicle
fully
However
close
the
doors
3
Open
the
hood
4
Connect
manifold
gauge
to
high
and
low
side
service
valves
of
the
system
Refer
to
Handling
Manifold
Ga
uge
5
Set
fan
control
lever
to
maxi
mum
6
Set
temperature
control
lever
to
max
cool
position
7
Start
the
engine
and
hold
engine
speed
at
1
500
rpm
S
After
the
air
conditioner
has
been
operated
for
about
10
minutes
measure
system
pressures
at
high
pres
sure
discharge
side
and
low
pressure
suction
side
9
Measure
the
temperature
of
dis
charge
air
at
outlet
grille
10
Measure
the
temperature
of
capin
11
Measure
ambient
temperature
and
humidity
one
meter
3
3
ft
away
from
condenser
front
Be
careful
not
to
expose
dry
buib
and
wet
bulb
to
direct
sunlight
12
Check
for
any
abnormalities
by
comparing
the
test
results
with
stand
ard
pressure
in
Performance
Chart
Notes
a
The
pressure
will
change
in
the
followi
g
manner
with
changes
in
conditions
When
blower
speed
is
low
dis
charge
pressure
will
drop
When
the
relative
humidity
of
in
take
air
is
low
discharge
pressure
will
drop
b
The
temperature
will
change
in
the
following
manner
with
changes
in
conditions
When
the
ambient
air
temperature
is
low
the
outlet
air
temperature
will
become
low
If
the
test
reveals
that
there
is
any
abnormality
in
system
pressure
isolate
the
cause
and
repair
by
reference
to
the
Trouble
Diagnoses
and
Cor
rections
Page 508 of 537
Air
Conditioning
TROUBLE
DIAGNOSES
AND
CORRECTION
CONTENTS
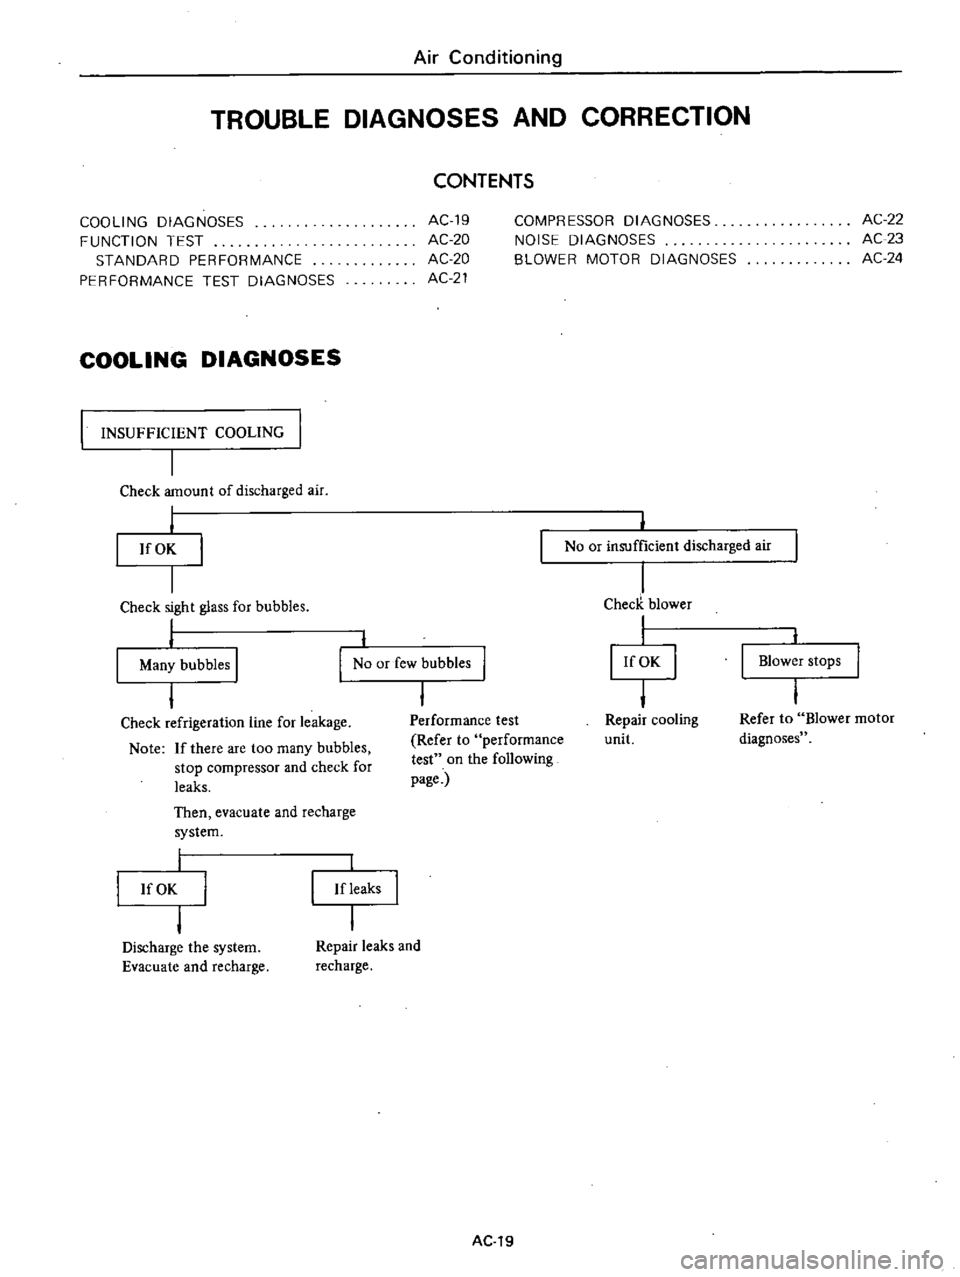
COOLING
DIAGNOSES
FUNCTION
TEST
STANDARD
PERFORMANCE
PERFORMANCE
TEST
DIAGNOSES
AC19
AC
20
AC
20
AC21
COMPRESSOR
DIAGNOSES
NOISE
DIAGNOSES
BLOWER
MOTOR
DIAGNOSES
AC
22
AC23
AC24
COOLING
DIAGNOSES
INSUFFICIENT
COOLING
I
I
Check
amount
of
discharged
air
j
If
OK
No
or
insufficient
discharged
air
Performance
test
Refer
to
performance
test
on
the
following
page
1
ChecK
blower
I
I
I
If
OK
I
I
Repair
cooling
unit
Blower
stops
Check
sight
glass
for
bubbles
I
I
Many
bubbles
I
I
No
or
few
bubbles
Check
refrigeration
line
for
leakage
Note
If
there
are
too
many
bubbles
stop
compressor
and
check
for
leaks
Then
evacuate
and
recharge
system
Refer
to
Blower
motor
diagnoses
I
If
OK
lfleaks
Discharge
the
system
Evacuate
and
recharge
Repair
leaks
and
recharge
AC
19
Page 510 of 537
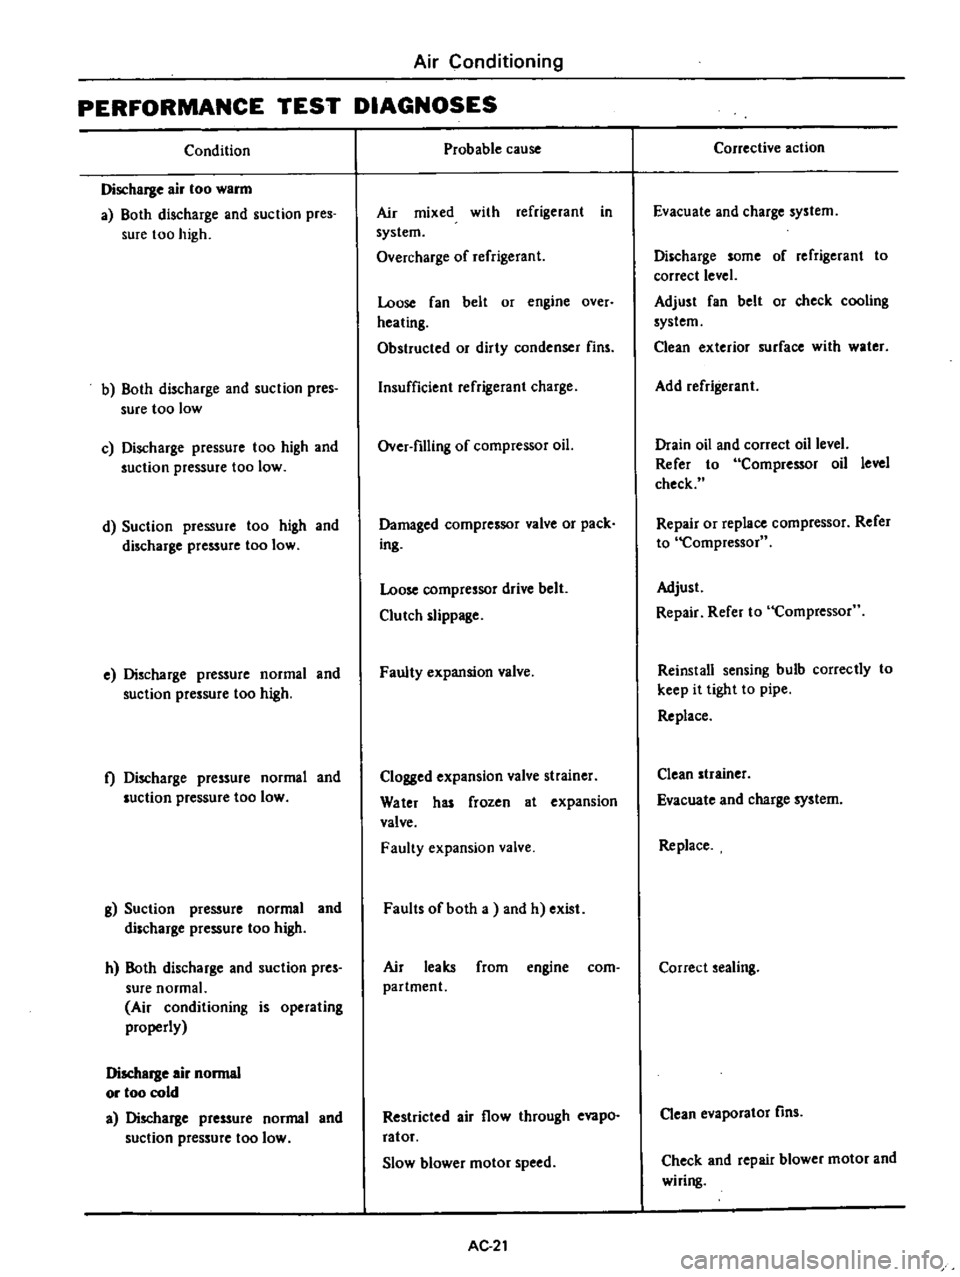
Air
Conditioning
PERFORMANCE
TEST
DIAGNOSES
Condition
Discharge
air
too
warm
a
Both
discharge
and
suction
pres
sure
too
high
b
Both
discharge
and
suction
pres
sure
too
low
c
Discharge
pressure
too
high
and
suction
pressure
too
low
d
Suction
pressure
too
high
and
discharge
pressure
too
low
e
Discharge
pressure
normal
and
suction
pressure
too
high
t
Discharge
pressure
normal
and
luction
pressure
too
low
g
Suction
pressure
normal
and
discharge
pressure
too
high
h
Both
discharge
and
suction
pres
sure
normal
Air
conditioning
is
operating
properly
Discharge
air
normal
or
too
cold
a
Discharge
pressure
normal
and
suction
pressure
too
low
Probable
cause
Air
mixed
with
refrigerant
in
system
Overcharge
of
refrigerant
Loose
fan
belt
or
engine
over
heating
Obstructed
or
dirty
condenser
fins
Insufficient
refrigerant
charge
Over
filling
of
compressor
oil
Damaged
compressor
valve
or
pack
ing
Loose
compressor
drive
belt
Clutch
slippage
Faulty
expansion
valve
Clogged
expansion
valve
strainer
Water
has
frozen
at
expansion
valve
Faulty
expansion
valve
Faults
of
both
a
and
h
exist
Air
leaks
from
engine
com
partment
Restricted
air
flow
through
evapo
ratof
Slow
blower
motor
speed
AC
21
Corrective
action
Evacuate
and
charge
system
Discharge
some
of
refrigerant
to
correct
level
Adjust
fan
belt
or
check
cooling
system
Clean
exterior
surface
with
water
Add
refrigerant
Drain
oil
and
correct
oil
level
Refer
to
Compressor
oil
level
check
Repair
or
replace
compressor
Refer
to
Compressor
Adjust
Repair
Refer
to
Compressor
Reinstall
sensing
bulb
correctly
to
keep
it
tight
to
pipe
Replace
Clean
strainer
Evacuate
and
charge
system
Replace
Correct
sealing
Clean
evaporator
fins
Check
and
repair
blower
motor
and
wiring
Page 512 of 537
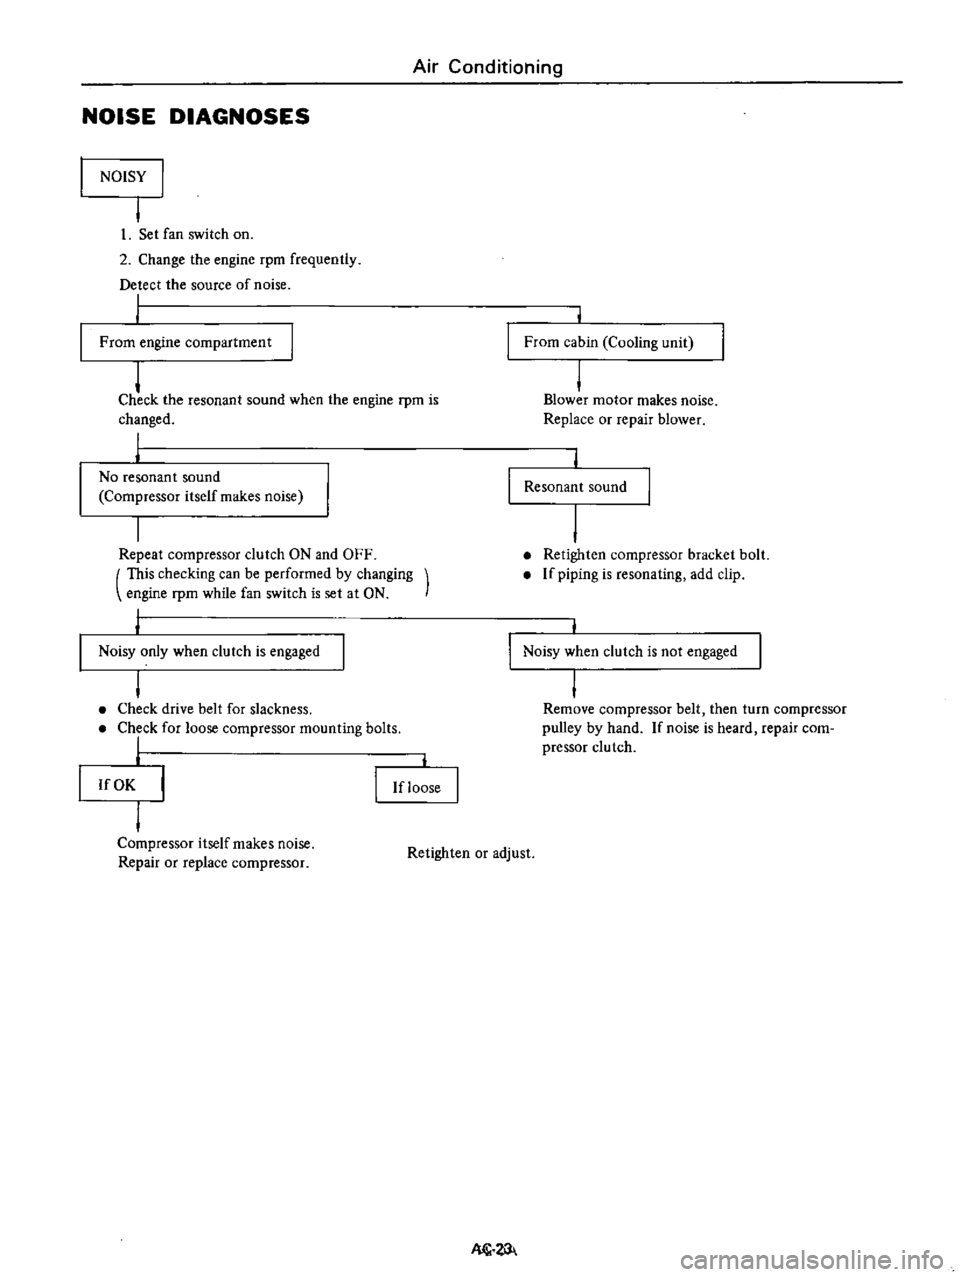
Air
Conditioning
NOISE
DIAGNOSES
NOISY
I
I
I
Set
fan
switch
on
2
Change
the
engine
rpm
frequently
Detect
the
source
of
noise
I
From
engine
compartment
From
cabin
Cooling
unit
j
Check
the
resonant
sound
when
the
engine
rpm
is
changed
I
I
No
resonant
sound
Compressor
itself
makes
noise
j
Blower
motor
makes
noise
Replace
or
repair
blower
Resonant
sound
Repeat
compressor
clutch
ON
and
OFF
This
checking
can
be
performed
by
changing
engine
rpm
while
fan
switch
is
set
at
ON
Retighten
compressor
bracket
bolt
If
piping
is
resonating
add
clip
Noisy
only
when
clutch
is
engaged
Noisy
when
clutch
is
not
engaged
I
Check
drive
belt
for
slackness
Check
for
loose
compressor
mounting
bolts
I
I
Remove
compressor
belt
then
turn
compressor
pulley
by
hand
If
noise
is
heard
repair
com
pressor
clutch
If
OK
If
loose
Compressor
itself
makes
noise
Repair
or
replace
compressor
Retighten
or
adjust
Nl1
Page 513 of 537

Air
Conditioning
BLOWER
MOTOR
DIAGNOSES
Blower
motor
inoperative
Check
fuse
In
fuse
block
15A
W
Single
fuse
15A
at
cooling
unit
I
j
If
OK
Check
the
continuity
and
fitting
of
fan
switch
I
I
If
OK
I
I
Connect
fan
switch
to
wiring
harness
2
Turn
the
ignition
switch
ON
IG
3
Set
fan
switch
at
ON
1
2
or
3
position
Check
the
voltage
for
blower
motor
Blue
lead
wire
is
poweI
source
Blue
wire
with
white
stripe
is
for
grounding
I
I
Voltage
I
I
Check
the
continuity
and
fitting
of
resistance
on
cooling
unit
I
I
If
OK
If
damaged
I
I
Replace
blower
motor
Replace
resistance
AC
24
mown
fuse
Replace
fuse
j
If
damaged
I
I
Replace
fan
switch
No
voltage
Replace
main
relay