automatic transmission fluid DATSUN PICK-UP 1977 Service Manual
[x] Cancel search | Manufacturer: DATSUN, Model Year: 1977, Model line: PICK-UP, Model: DATSUN PICK-UP 1977Pages: 537, PDF Size: 35.48 MB
Page 12 of 537
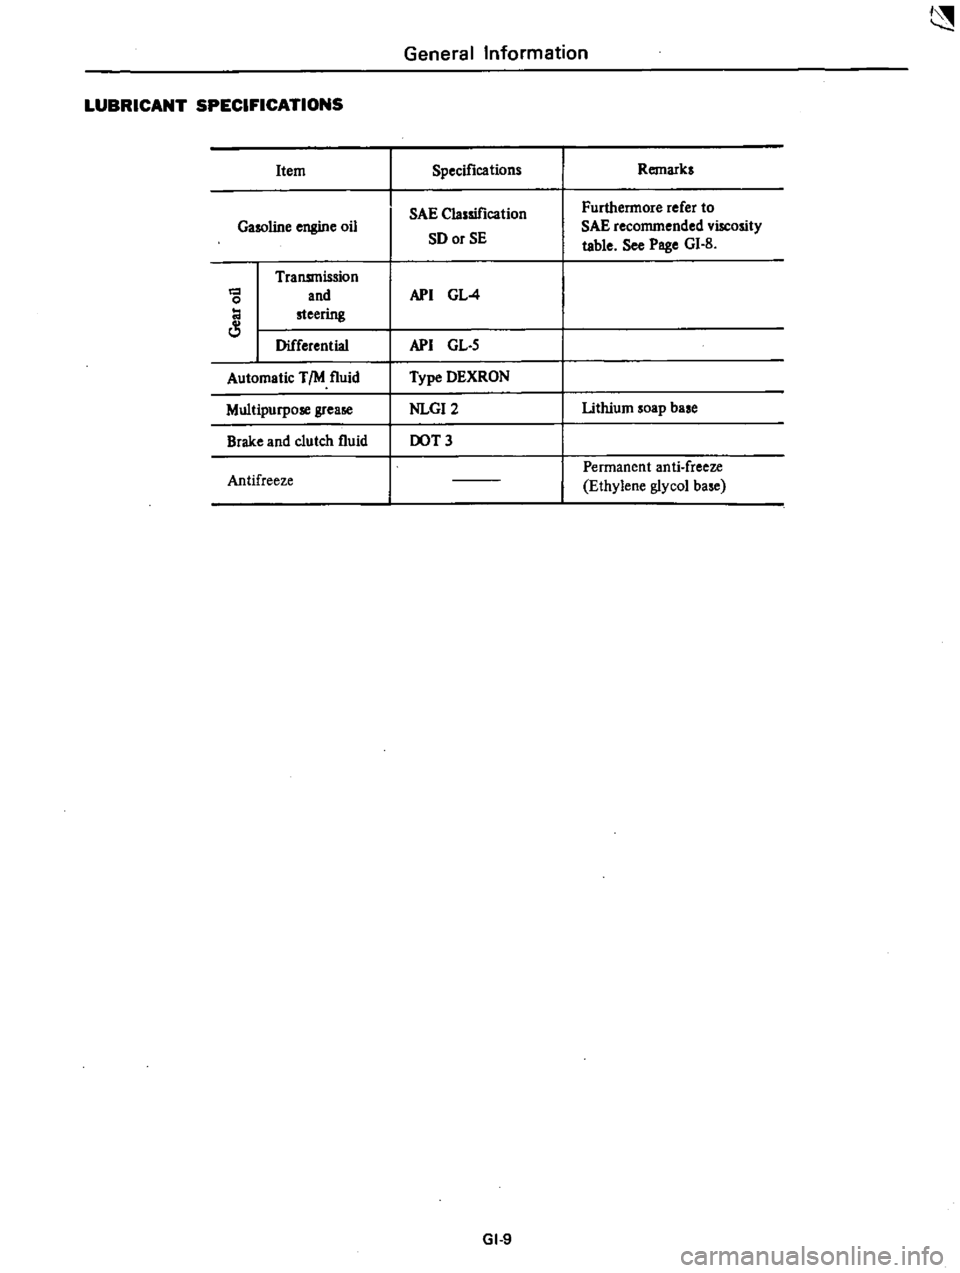
General
Information
LUBRICANT
SPECIFICATIONS
Item
Specifications
Remarks
SAE
Classification
Furthermore
refer
to
Gasoline
engine
oil
SD
or
SE
SAE
recommended
viscosity
table
See
Poge
GI
B
Transmission
and
API
GL
4
0
steering
Differential
API
GL
S
Automatic
TIM
fluid
Type
DEXRON
Multipurpose
grea
NLGI2
lithium
soap
base
Brake
and
clutch
fluid
DOT
3
Permanent
anti
freeze
Antifreeze
Ethylene
glycol
ba
e
GI
9
Page 26 of 537
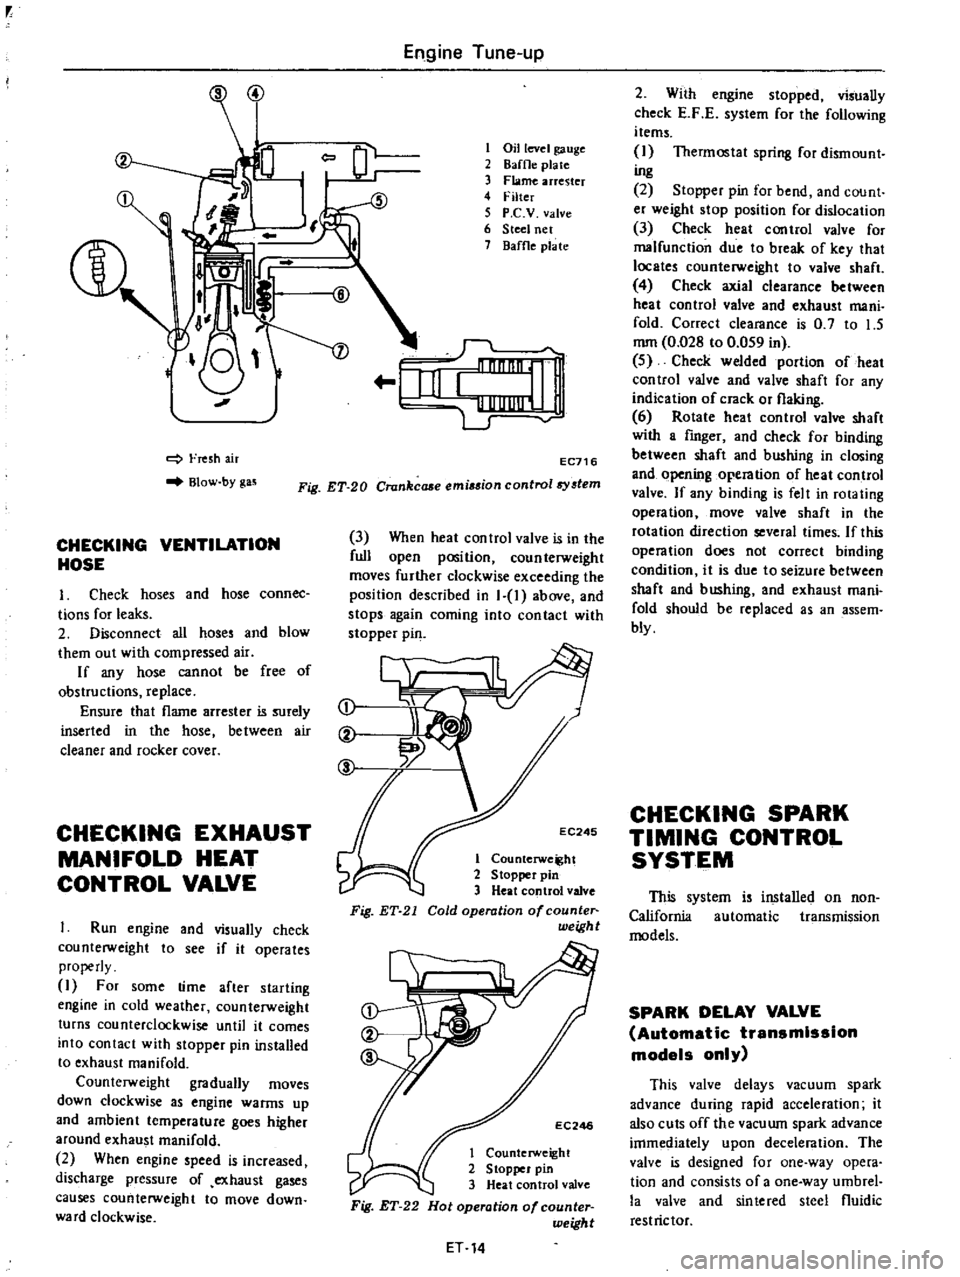
Fresh
air
Blow
by
gas
CHECKING
VENTILATION
HOSE
1
Check
hoses
and
hose
connec
tions
for
leaks
2
Disconnect
all
hoses
and
blow
them
out
with
compressed
air
If
any
hose
cannot
be
free
of
obstructions
replace
Ensure
that
flame
arrester
is
surely
inserted
in
the
hose
between
air
cleaner
and
rocker
cover
CHECKING
EXHAUST
MANIFOLD
HEAT
CONTROL
VALVE
Run
engine
and
visually
check
counterweight
to
see
if
it
operates
properly
I
For
some
time
after
starting
engine
in
cold
weather
counterweight
turns
counterclockwise
until
it
comes
into
contact
with
stopper
pin
installed
to
exhaust
manifold
Counterweight
gradually
moves
down
clockwise
as
engine
warms
up
and
ambient
temperature
goes
higher
around
exhaust
manifold
2
When
engine
speed
is
increased
discharge
pressure
of
exhaust
gases
causes
counterweight
to
move
down
ward
clockwise
Engine
Tune
up
CoOl
1
Oil
level
gauge
2
8affle
pia
te
3
Flame
arrester
4
Filter
5
P
C
V
valve
6
Steel
net
7
Baffle
plate
1fiI
o
EC716
Fig
ET
20
Crankcaae
emi
ion
control8
tem
3
When
heat
control
valve
is
in
the
full
open
position
counterweight
moves
further
clockwise
exceeding
the
position
described
in
1
1
above
and
stops
again
coming
into
contact
with
stopper
pin
ct
t
C
EC245
1
Counterwe
ht
2
Stopper
pin
3
Heat
control
valve
Fig
ET
21
Cold
operation
of
counte
weigh
t
EC246
1
Counterweight
2
Stopper
pin
3
Heat
control
valve
Fig
ET
22
Hot
operation
of
counter
weight
ET
14
2
With
engine
stopped
visually
check
E
F
E
system
for
the
following
items
I
Thermostat
spring
for
dismount
ing
2
Stopper
pin
for
bend
and
count
er
weight
stop
position
for
dislocation
3
Check
heat
control
valve
for
malfunction
due
to
break
of
key
that
locates
counterweight
to
valve
shaft
4
Check
axial
clearance
between
heat
control
valve
and
exhaust
mani
fold
Correct
clearance
is
0
7
to
1
5
mm
0
028
to
0
059
in
5
Check
welded
portion
of
heat
control
valve
and
valve
shaft
for
any
indication
of
crack
or
flaking
6
Rotate
heat
control
valve
shaft
with
a
fmger
and
check
for
binding
between
shaft
and
bushing
in
closing
and
opening
operation
of
heat
control
valve
If
any
binding
is
felt
in
rotating
operation
move
valve
shaft
in
the
rotation
direction
several
times
If
this
operation
does
not
correct
binding
condition
it
is
due
to
seizure
between
shaft
and
bushing
and
exhaust
mani
fold
should
be
replaced
as
an
assem
bly
CHECKING
SPARK
TIMING
CONTROL
SYSTEM
This
system
is
installed
on
non
California
automatic
transmission
models
SPARK
DELAY
VALVE
Automatic
transmission
models
only
This
valve
delays
vacuum
spark
advance
during
rapid
acceleration
it
also
cuts
off
the
vacuwn
spark
advance
imme
iately
upon
deceleration
The
valve
is
designed
for
one
way
opera
tion
and
consists
of
a
one
way
umbrel
la
valve
and
sintered
steel
fluidic
restrictor
Page 140 of 537
REMOVAL
AND
INSTAUATION
Emission
Control
System
EC533
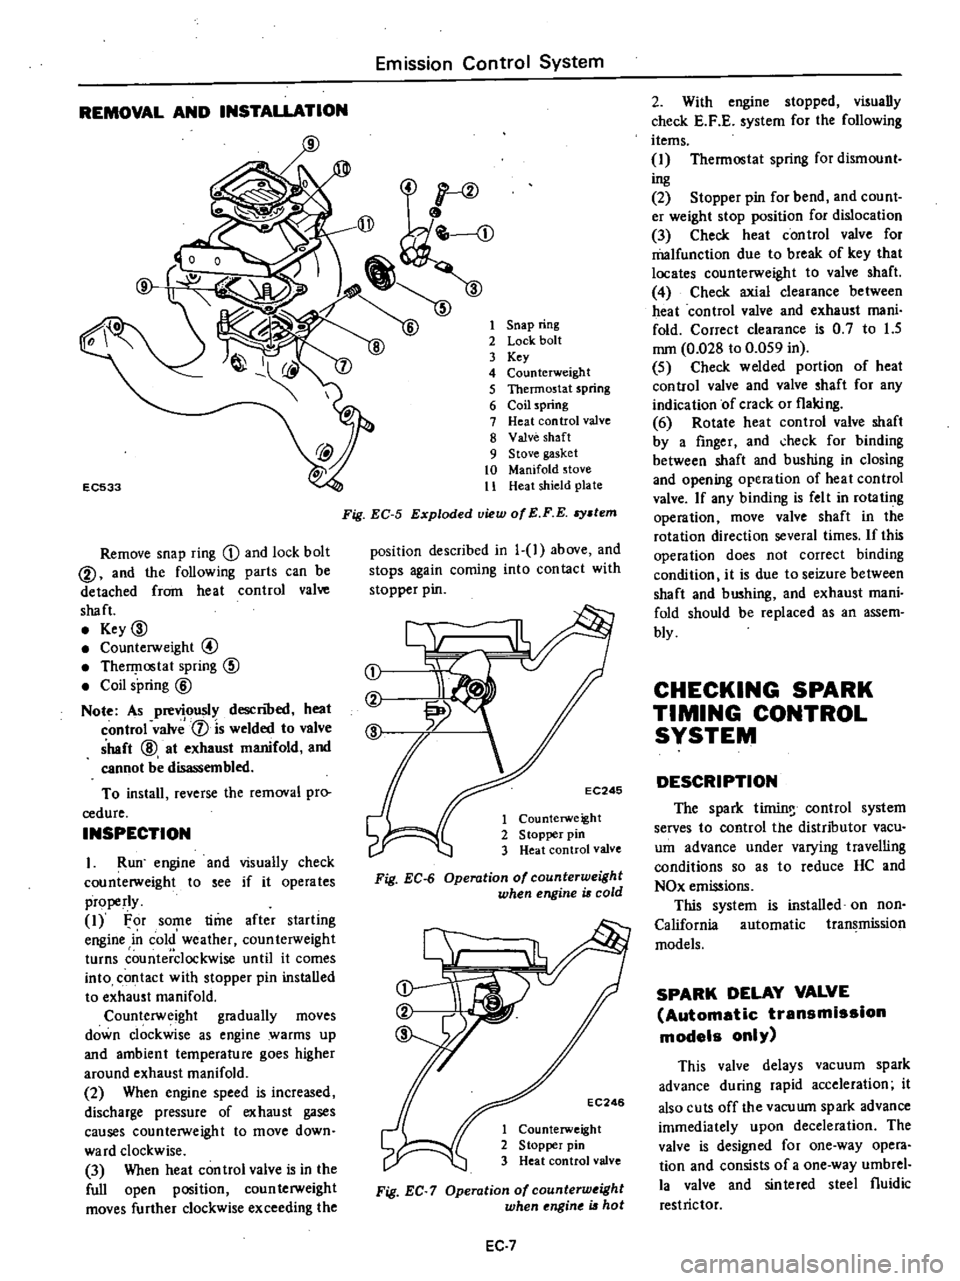
Remove
snap
ring
D
and
lock
bolt
@
and
the
following
parts
can
be
detached
from
heat
control
valve
shaft
Key
00
Counterweight
@
TherI
lostat
spring
CID
Coil
spring
@
Note
As
previously
descnoed
heat
control
valv
1
is
welded
to
valve
shaft
@
at
exhaust
manifold
and
cannot
be
disassembled
To
install
reverse
the
removal
pro
cedure
INSPECTION
I
Run
engine
and
visually
check
counterweight
to
see
if
it
operates
properly
1
For
some
time
after
starling
engine
in
cold
weather
counterweight
turns
counterclockwise
until
it
comes
into
contact
with
stopper
pin
installed
to
exhaust
manifold
Counterweight
gradually
moves
down
clockwise
as
engine
warms
up
and
ambient
temperature
goes
higher
around
exhaust
manifold
2
When
engine
speed
is
increased
discharge
pressure
of
exhaust
gases
causes
counterweight
to
move
down
ward
clockwise
3
When
heat
con
trol
valve
is
in
the
full
open
position
coun
terweight
moves
further
clockwise
exceeding
the
1
Snap
ring
2
Lock
bolt
3
Key
4
Counterweight
5
Thermostat
spring
6
Coil
spring
7
Heat
control
valve
8
Valve
shaft
9
Stove
gasket
10
Manifold
stove
11
Heat
shield
plate
Fig
EC
5
Exploded
view
of
E
F
E
stem
position
described
in
1
1
above
and
stops
again
coming
into
con
tact
with
stopper
pin
j
EC246
1
Counterweight
2
S
topper
pin
3
Heat
control
valve
Fig
EC
6
Operation
of
counterweight
when
engine
is
cold
EC246
1
Counterweight
2
Stopper
pin
3
Heat
control
valve
Fig
EC
7
Operation
of
counterw
ight
when
ngine
is
hot
EC
7
2
With
engine
stopped
visually
check
E
F
E
system
for
the
following
items
1
Thermostat
spring
for
dismount
ing
2
Stopper
pin
for
bend
and
count
er
weight
stop
position
for
dislocation
3
Check
heat
control
valve
for
malfunction
due
to
break
of
key
that
locates
counterweight
to
valve
shaft
4
Check
axial
clearance
between
heat
control
valve
and
exhaust
mani
fold
Correct
clearance
is
0
7
to
1
5
mm
0
028
to
0
059
in
5
Check
welded
portion
of
heat
control
valve
and
valve
shaft
for
any
indication
of
crack
or
flaking
6
Rotate
heat
control
valve
shaft
by
a
finger
and
check
for
binding
between
shaft
and
bushing
in
closing
and
opening
operation
of
heat
control
valve
If
any
binding
is
felt
in
rotating
operation
move
valve
shaft
in
the
rotation
direction
several
times
If
this
operation
does
not
correct
binding
condition
it
is
due
to
seizure
between
shaft
and
bushing
and
exhaust
mani
fold
should
be
replaced
as
an
assem
bly
CHECKING
SPARK
TIMING
CONTROL
SYSTEM
DESCRIPTION
The
spark
tirnin
control
system
serves
to
control
the
distributor
vacu
um
advance
under
varying
travelling
conditions
so
as
to
reduce
HC
and
NOx
emissions
This
system
is
installed
on
non
California
automatic
transmission
models
SPARK
DELAY
VALVE
Automatic
transmission
models
only
This
valve
delays
vacuum
spark
advance
during
rapid
acceleration
it
also
cuts
off
the
vacuwn
spark
advance
immediately
upon
deceleration
The
valve
is
designed
for
one
way
opera
tion
and
consists
of
a
one
way
umbrel
la
valve
and
sinlered
steel
fluidic
restrictor
Page 226 of 537
Release
bearing
and
sleeve
Check
for
abnormal
wear
on
con
tact
surface
of
withdrawal
lever
ball
pin
and
bearing
sleeve
DESCRIPTION
CLUTCH
PEDAL
Removal
and
installation
I
nspection
and
adjustment
CLUTCH
MASTER
CYLINDER
Removal
and
installation
Disassembly
and
assembly
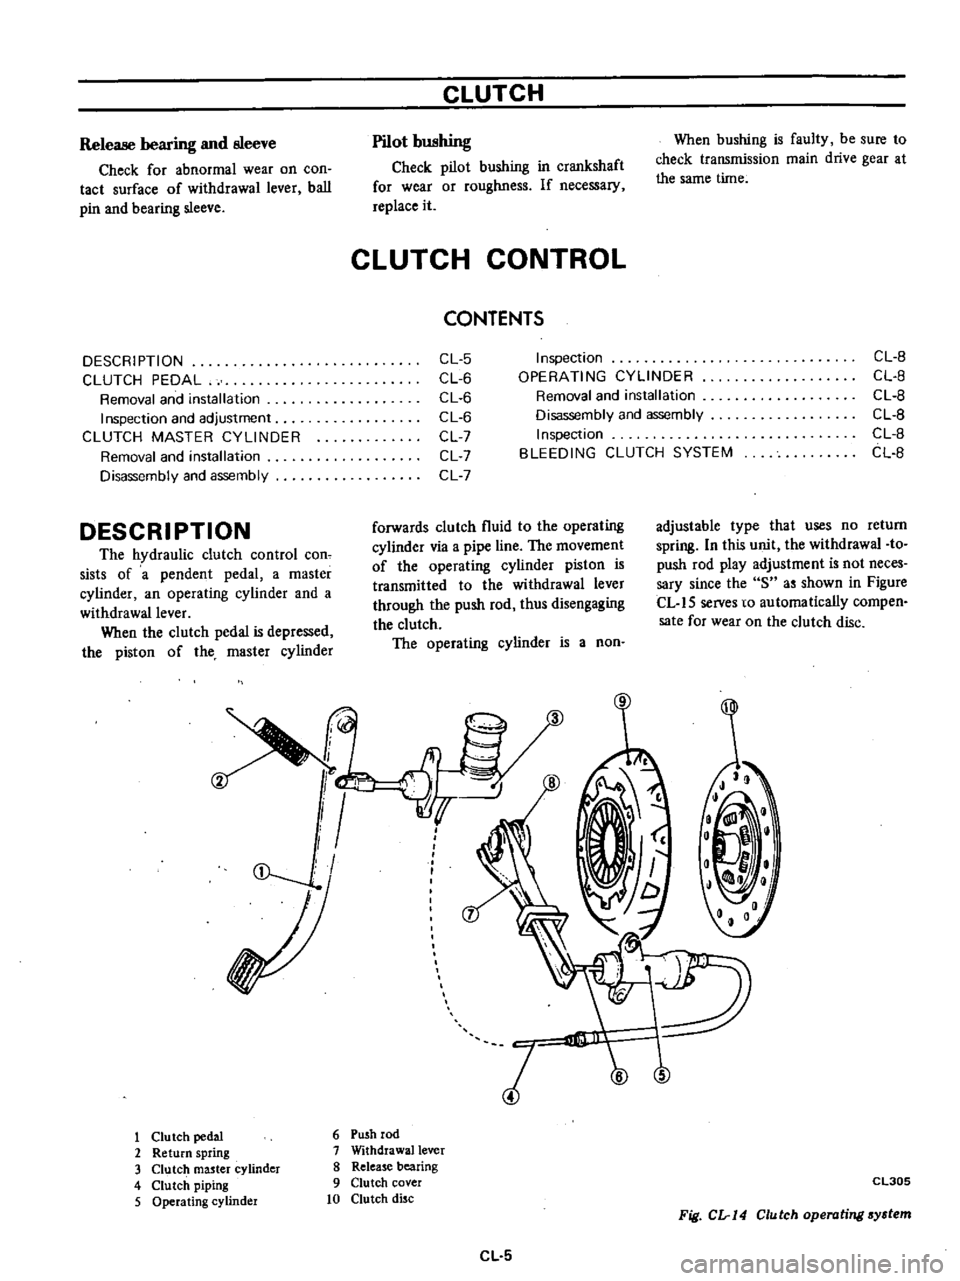
DESCRIPTION
The
hydraulic
clutch
control
con
sists
of
a
pendent
pedal
a
master
cylinder
an
operating
cylinder
and
a
withdrawal
lever
When
the
clutch
pedal
is
depressed
the
piston
of
the
master
cylinder
CLUTCH
Pilot
bushing
Check
pilot
bushing
in
crankshaft
for
wear
or
roughness
If
necessary
replace
it
CLUTCH
CONTROL
CONTENTS
When
bushing
is
faulty
be
sure
to
check
transmission
main
drive
gear
at
the
same
time
CL
5
CL
6
CL
6
CL
6
CL
7
CL
7
CL
7
Inspection
OPERATING
CYLINDER
Removal
and
installation
Disassembly
and
assembly
Inspection
BLEEDING
CLUTCH
SYSTEM
CL
B
CL
B
CL
B
CL
B
CL
B
CL
B
forwards
clutch
fluid
to
the
operating
cylinder
via
a
pipe
line
The
movement
of
the
operating
cylinder
piston
is
transmitted
to
the
withdrawal
lever
through
the
push
rod
thus
disengaging
the
clutch
The
operating
cylinder
is
a
non
adjustable
type
that
uses
no
return
spring
In
this
unit
the
withdrawal
to
push
rod
play
adjustment
is
not
neces
sary
since
the
8
as
shown
in
Figure
CL
15
serves
to
automatically
compen
sate
for
wear
on
the
clutch
disc
2
I
l
1
Clu
tch
pedal
6
Push
rod
2
Return
spring
7
Withdrawal
lever
3
Clutch
master
cylinder
8
Release
bearing
4
Clutch
piping
9
Clutch
cover
5
Operating
cylinder
10
Clutch
disc
CL
5
5
Cl305
Fig
CL
14
Clutch
operating
system
Page 262 of 537
The
model
3N7l
B
automatic
trans
mission
is
a
fully
automatic
unit
con
sisting
primarily
of
3
element
hydrau
lic
torque
converter
and
two
planetary
gear
sets
Two
multiple
disc
clutches
a
multiple
disc
brake
a
band
brake
and
a
one
way
sprag
clutch
provide
the
friction
elements
required
to
obtain
the
desir
d
function
of
lhe
two
plane
tary
gear
sets
The
two
planetary
gear
sets
give
three
forward
ratios
and
one
reverse
Changing
of
the
gear
ratios
is
fully
automatic
in
relation
to
vehicle
speed
and
engine
torque
input
V
chide
speed
and
engine
manifold
vacuum
signals
are
constantly
fed
to
the
transmission
to
provide
the
proper
gear
ralio
for
maximum
efficiency
and
performance
at
all
throttle
openings
The
model
3N71
B
has
six
selector
1
9sition
LP
R
N
D
2
1
I
Park
position
positively
locks
the
output
shaft
to
the
transmission
case
by
means
of
a
locking
pawl
to
prevent
the
vehicle
from
rolling
in
either
direction
This
position
should
be
selected
whenever
the
driver
leaves
Ihe
vehicle
Thc
engine
may
be
slarted
in
Park
position
R
Reverse
range
enables
the
vehicle
to
be
operated
in
a
reverse
direction
N
Neutral
position
enables
the
engine
to
be
started
and
run
without
driving
the
vehicle
0
Drive
range
is
used
for
all
normal
driving
conditions
Drive
range
has
three
gear
ratios
from
the
starting
ratio
to
direct
drive
Automatic
Transmission
DESCRIPTION
2
2
range
provides
performance
for
driving
on
slippery
surfaces
2
range
can
also
be
used
for
engine
braking
2
range
can
be
selected
at
any
vehicle
speed
and
prevents
the
trans
mission
from
shifting
out
of
second
gear
I
I
range
can
be
selected
at
any
vehicle
speed
and
the
transmission
will
shift
to
second
gear
and
remain
in
second
until
v
hicle
speed
is
reduced
10
approximately
40
to
50
kmfh
25
to
30
MPH
I
range
position
prevents
the
transmission
from
shifting
out
of
low
gear
This
is
particularly
beneficial
for
maintaining
maximum
engin
braking
when
continuous
low
gear
operation
is
desirable
The
torque
converter
assembly
is
of
welded
construction
and
can
nOlbe
disassembled
for
service
FLUID
RECOMMENDATION
Use
automatic
transmission
fluid
having
DEXRON
identifications
only
in
the
3N71
B
automatic
transmis
sion
IDENTIFICATioN
NUMBER
Stamped
position
The
plate
is
attached
to
the
right
hand
side
of
transmission
case
as
shown
io
Figure
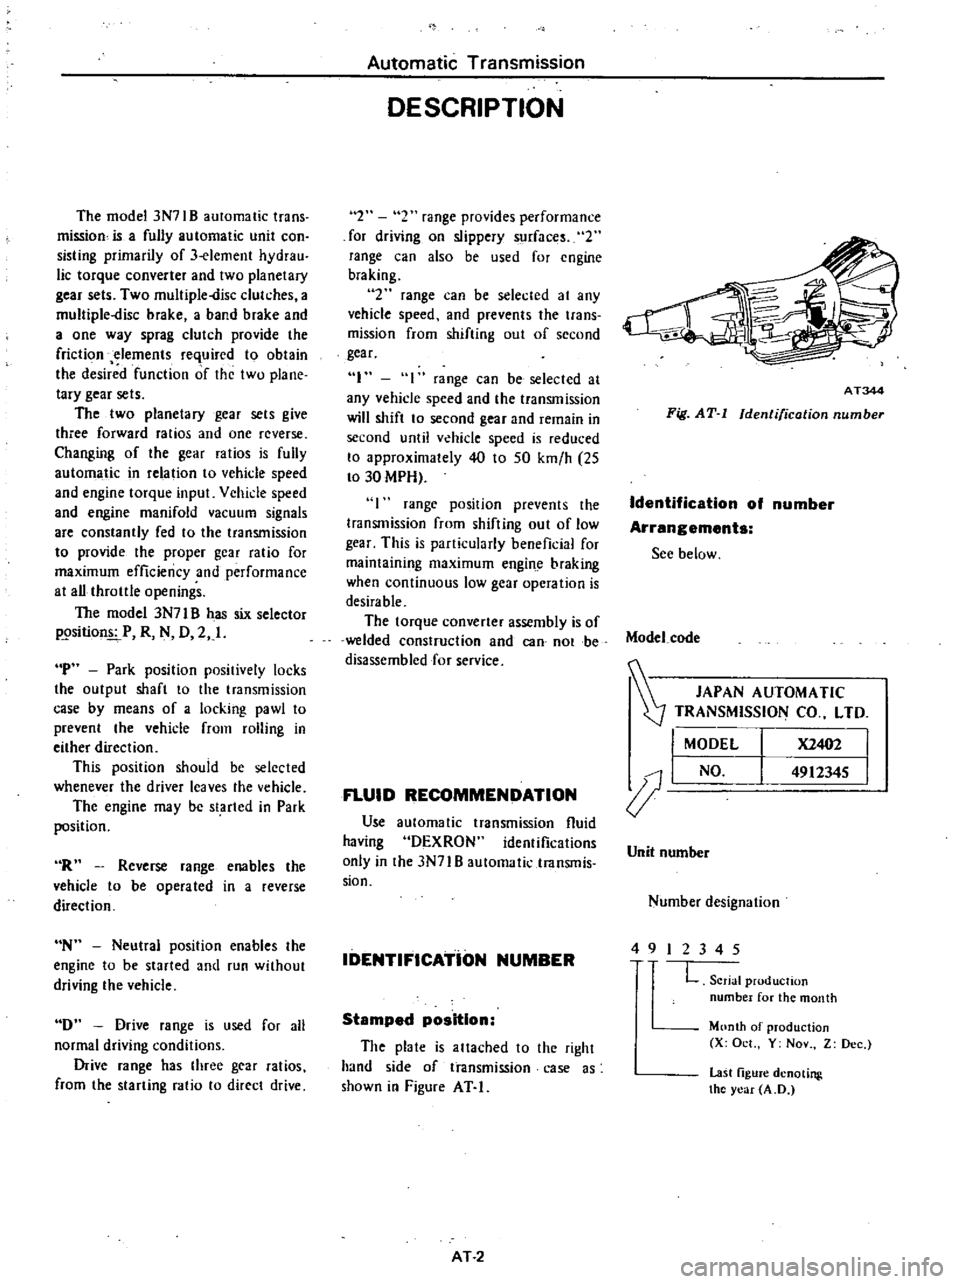
AT
I
AT
2
AT344
Fig
AT
I
Identification
number
Identification
of
number
Arrangements
See
below
Model
code
JAPAN
AUTOMATIC
0J
TRANSMISSION
CO
LTD
I
MODEL
X2402
I
J
I
NO
4912345
I
Unit
number
Number
designation
4
9
I
234
5
L
Serial
production
number
for
the
month
Month
of
production
X
Oct
Y
Nov
Z
Dec
last
figure
denoting
the
year
A
D
Page 298 of 537
Starter
should
be
brought
into
op
eration
only
when
selector
lever
is
in
P
and
N
positions
it
should
not
be
started
when
lever
is
in
D
2
I
and
R
positions
Back
up
lamp
should
also
light
when
selector
lever
is
placed
in
R
position
S
After
converter
is
installed
rotate
10
Check
level
of
oil
in
transmis
crankshaft
several
turns
and
check
to
be
sure
that
transmission
rotates
freely
sion
For
detailed
procedure
see
page
AT48
without
binding
6
Pour
recommended
automatic
II
Move
selector
lever
through
aU
positions
to
be
sure
that
transmission
transmission
fluid
up
to
correct
level
operates
correctly
through
oil
charge
pipe
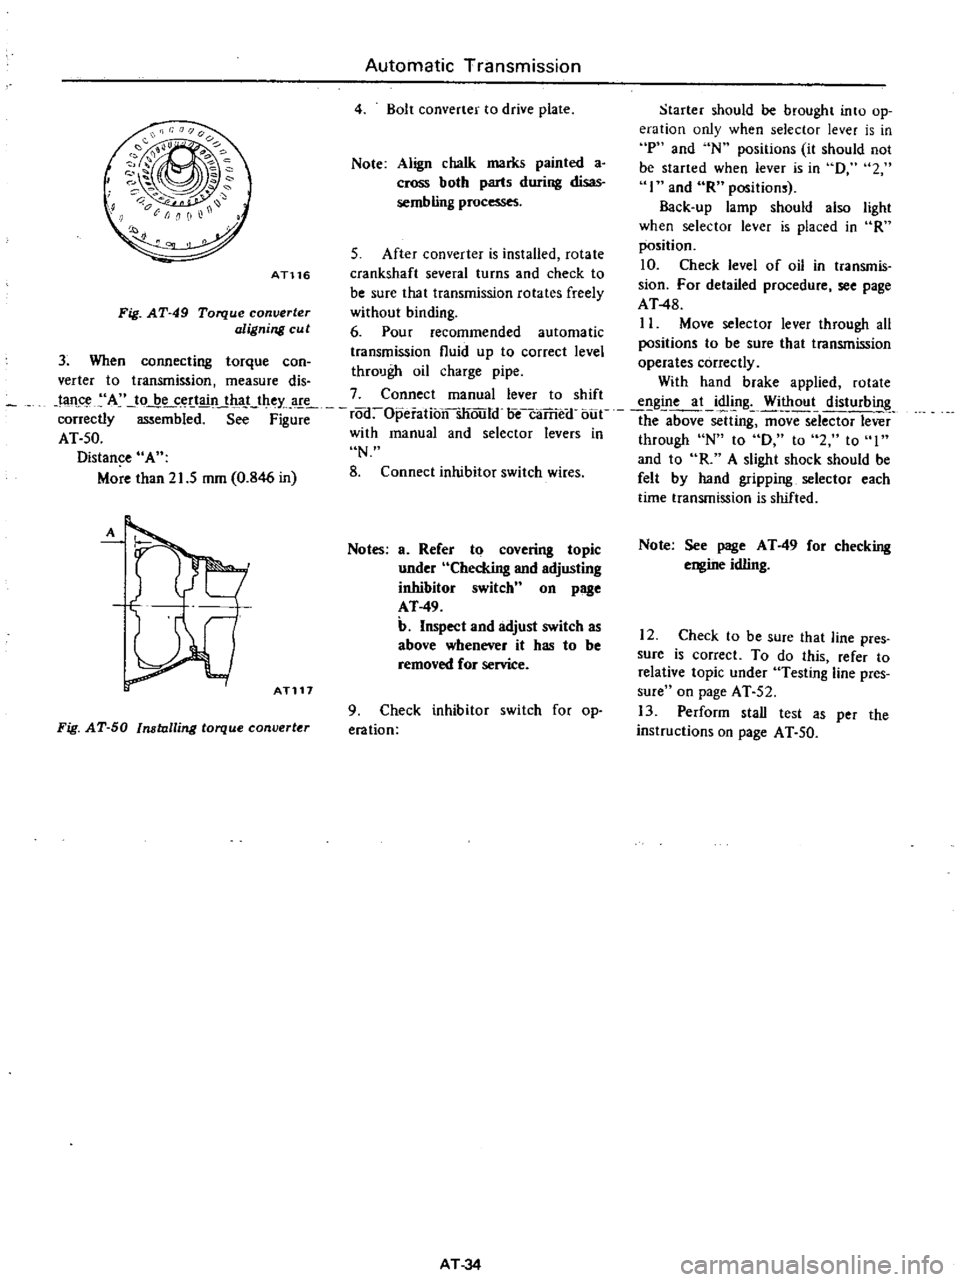
verter
to
transmission
measure
dis
With
hand
brake
applied
rotate
tan
A
to
be
certain
that
they
are
7
Connect
manual
lever
to
shift
engine
at
idling
Without
disturbing
correctly
mbi
d
S
F
rod
Opeiationsliould
oecaTrie
f
bue
the
above
sclUng
ffiovTSelector
lever
AT
50
with
manual
and
selector
levers
in
through
N
to
D
to
2
to
I
Distance
A
N
and
to
R
A
slight
shock
should
be
More
than
21
5
mm
0
846
in
8
Connect
inhibitor
switch
wires
felt
by
hand
gripping
selector
each
time
transmission
is
shifted
Automatic
Transmission
4
Bolt
converter
to
drive
plate
Note
Align
chalk
marks
painted
a
cross
both
parts
during
disas
sembling
processes
AT116
Fig
AT
49
Torque
converter
aligning
cu
t
3
When
connecting
torque
can
A
ATl17
Notes
a
Refer
to
covering
topic
under
Checking
and
adjusting
inhibitor
switch
n
on
page
AT
49
b
Inspect
and
adjust
switch
as
above
whenever
it
has
to
be
removed
for
service
Fig
AT
50
Installing
torque
converter
9
Check
inhibitor
switch
for
op
eration
AT
34
Note
See
page
AT
49
for
checking
engine
idling
12
Check
to
be
sure
that
line
pres
sure
is
correct
To
do
this
refer
to
relative
topic
under
Testing
line
pres
sure
on
page
AT
52
13
Perform
stall
test
as
per
the
instructions
on
page
AT
50
Page 305 of 537
Automatic
Transmission
L
1
r
E
5
Eo
1
20
mm
l
AT148
3
0
079
in
Cut
off
hatched
portion
Fig
AT
SO
Modifying
coil
spring
compres
or
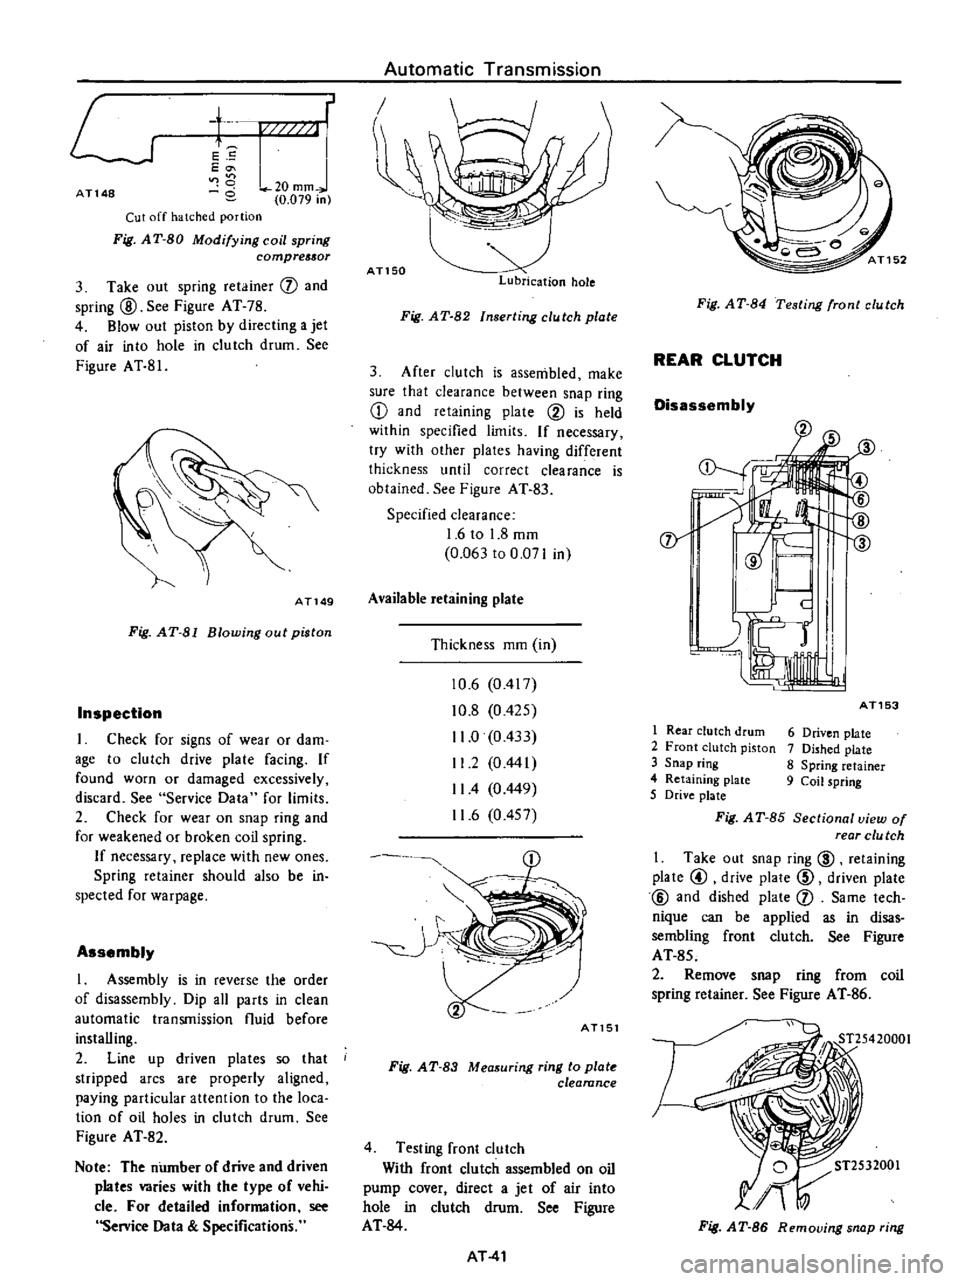
3
Take
out
spring
retainer
f
and
spring
@
See
Figure
AT
78
4
Blowout
piston
by
directing
a
jet
of
air
inlO
hole
in
clutch
drum
See
Figure
A
T
8l
AT149
Fig
AT
81
Blowing
out
piston
Inspection
I
Check
for
signs
of
wear
or
dam
age
to
clutch
drive
plate
facing
If
found
worn
or
damaged
excessively
discard
See
Service
Data
for
limits
2
Check
for
wear
on
snap
ring
and
for
weakened
or
broken
coil
spring
If
necessary
replace
with
new
ones
Spring
retainer
should
also
be
in
spected
for
warpage
Assembly
I
Assembly
is
in
reverse
the
order
of
disassembly
Dip
all
parts
in
clean
automatic
transmission
fluid
before
installing
2
Line
up
driven
plates
so
that
stripped
arcs
are
properly
aligned
paying
particular
attention
to
the
loca
tion
of
oil
holes
in
clutch
drum
See
Figure
AT
82
Note
The
number
of
drive
and
driven
plates
varies
with
the
type
of
vehi
cle
For
detailed
information
see
Service
Data
Specifications
AT150
Lub
ication
hole
Fig
AT
82
Inserting
clutch
plate
3
After
clutch
is
assembled
make
sure
that
clearance
between
snap
ring
CD
and
retaining
plate
@
is
held
within
specified
limits
If
necessary
try
with
other
plates
having
different
thickness
until
correct
clearance
is
obtained
See
Figure
AT
83
Specified
clearance
I
6
to
1
8
mm
0
063
to
0
071
in
Available
retaining
plate
Thickness
mm
in
10
6
0417
10
8
0425
11
0
0
433
11
2
0441
II
4
0
449
11
6
0457
AT151
Fig
AT
83
Measuring
ring
to
plate
clearance
4
Testing
front
clutch
With
front
clutch
assembled
on
oil
pump
cover
direct
a
jet
of
air
into
hole
in
clutch
drum
See
Figure
AT
84
AT
41
Fig
AT
B4
Testing
front
clutch
REAR
CLUTCH
Disassembly
AT153
1
Rear
clutch
drum
2
Front
clutch
piston
3
Snap
ring
4
Retaining
plate
5
Drive
plate
Fig
A
T
85
Sectional
view
of
rear
clu
tch
6
Driven
plate
7
Dished
plate
8
Spring
retainer
9
Coil
spring
I
Take
out
snap
ring
@
retaining
plate
@
drive
plate
@
driven
plate
@
and
dished
plate
f
Same
tech
nique
can
be
applied
as
in
disas
sembling
front
clutch
See
Figure
AT
85
2
Remove
snap
ring
from
coil
spring
retainer
See
Figure
AT
86
ST2532001
Xf
Fig
AT
86
Remolling
snap
ring
Page 306 of 537
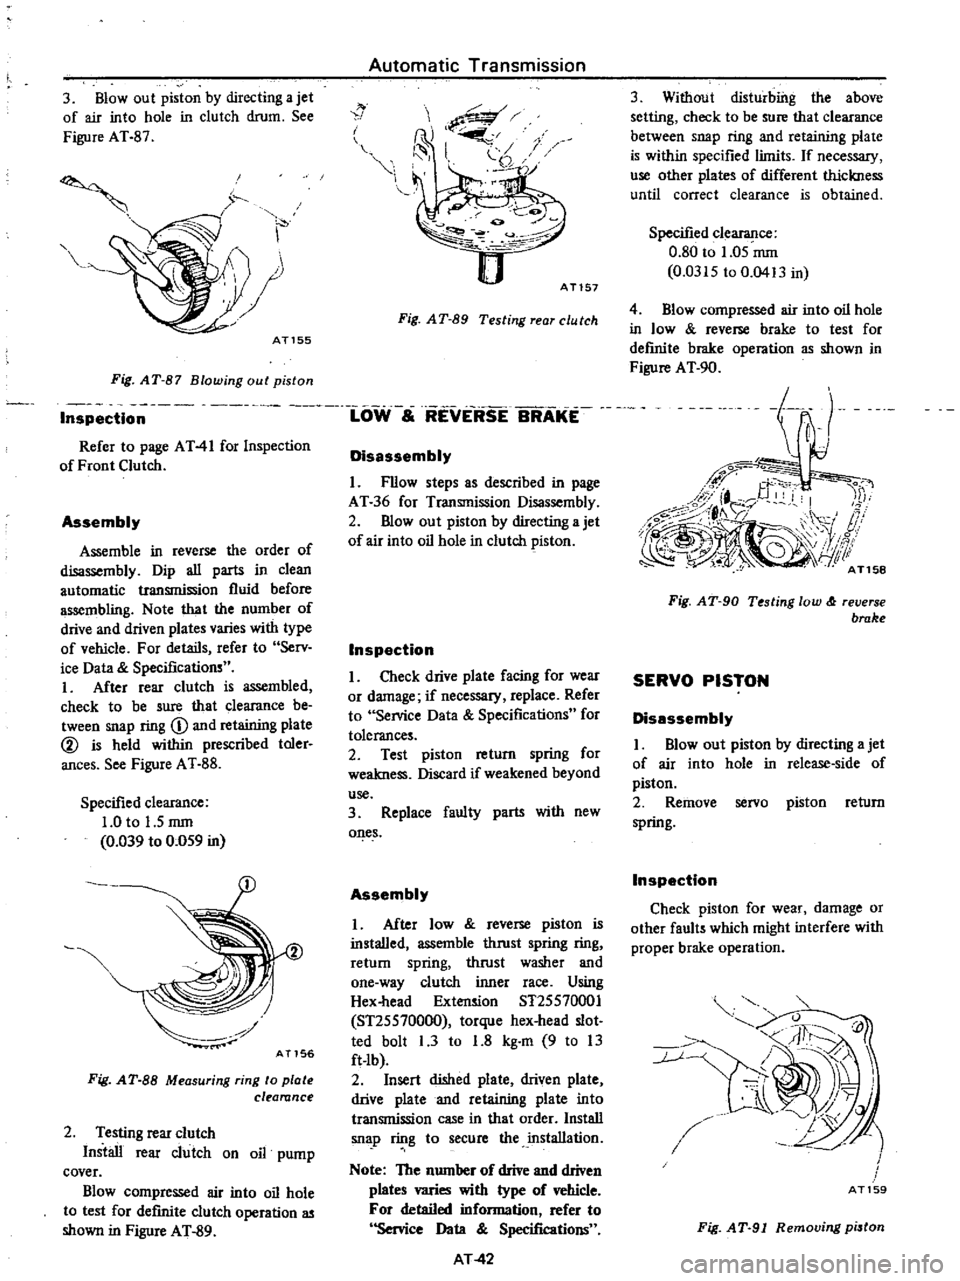
3
Blowout
piston
by
directing
a
jet
of
air
into
hole
in
clutch
drum
See
Figure
AT
87
AT155
V
i
J
i
j
Fig
AT
87
Blowing
out
piston
Automatic
Transmission
1
w
Ai
I
i
1
i
3
j
P2
0
AT157
Fig
A
T
89
Testing
rear
C
U
tch
Inspectl
ioW
S
REVERSE
BRAKE
Refer
to
page
AT41
for
Inspection
of
Front
Clutch
Assembly
Assemble
in
reverse
the
order
of
disassembly
Dip
all
parts
in
clean
automatic
transmission
fluid
before
assembling
Note
that
the
number
of
drive
and
driven
plates
varies
with
type
of
vehicle
F
or
details
refer
to
Serv
ice
Data
Specifications
I
After
rear
clutch
is
assembled
check
to
be
sure
that
clearance
be
tween
snap
ring
D
and
retaining
plate
l
is
held
within
prescribed
toler
ances
See
Figure
AT
88
Specified
clearance
1
0
to
1
5
rom
0
039
to
0
059
in
AT156
Fig
AT
SS
Measuring
ring
to
plate
clearance
2
Testing
rear
clutch
Install
rear
clutch
on
oil
pump
cover
Blow
compressed
air
into
oil
hole
to
test
for
defInite
clutch
operation
as
shown
in
Figure
AT
89
Disassembly
1
Fllow
steps
as
described
in
page
AT
36
for
Transmission
Disassembly
2
mow
out
piston
by
directing
a
jet
of
air
into
oil
hole
in
clutch
piston
Inspection
I
Check
drive
plate
facing
for
wear
or
damage
if
necessary
replace
Refer
to
Service
Data
Specifications
for
tolerances
2
Test
piston
return
spring
for
weakness
Discard
if
weakened
beyond
use
3
Replace
faulty
parts
with
new
ones
Assembly
I
After
low
reverse
piston
is
installed
assemble
thrust
spring
ring
retum
spring
thrust
washer
and
one
way
clutch
inner
race
Using
Hex
head
Extension
ST25570001
ST25570000
torque
hex
head
slot
ted
bolt
I
3
to
1
8
kg
m
9
to
13
ft
lb
2
Insert
dished
plate
driven
plate
drive
plate
and
retaining
plate
into
transmission
case
in
that
order
Install
sn
p
ring
to
secure
the
installation
Note
The
number
of
drive
and
driven
plates
wries
with
type
of
vehicle
For
detailed
information
refer
to
Service
Data
Specifications
AT42
3
Without
disturbiilg
the
above
setting
check
to
be
sure
that
clearance
between
snap
ring
and
retaining
plate
is
within
specified
limits
If
necessary
use
other
plates
of
different
thickness
until
correct
clearance
is
obtained
Specified
clearance
0
80
to
1
05
rom
0
0315
to
0
0413
in
4
Blow
compressed
air
into
oil
hole
in
low
reverse
brake
to
test
for
definite
brake
operation
as
shown
in
Figure
AT
90
Fig
AT
90
Testing
low
reverse
brake
SERVO
PISTON
Disassembly
I
Blowout
piston
by
directing
a
jet
of
air
into
hole
in
release
side
of
piston
2
Remove
servo
piston
return
spring
Inspection
Check
piston
for
wear
damage
or
other
faults
which
might
interfere
with
proper
brake
operation
v
r
0
111
Ll
7
J
I
AT159
Fig
AT
91
Removing
pi3ton
Page 307 of 537
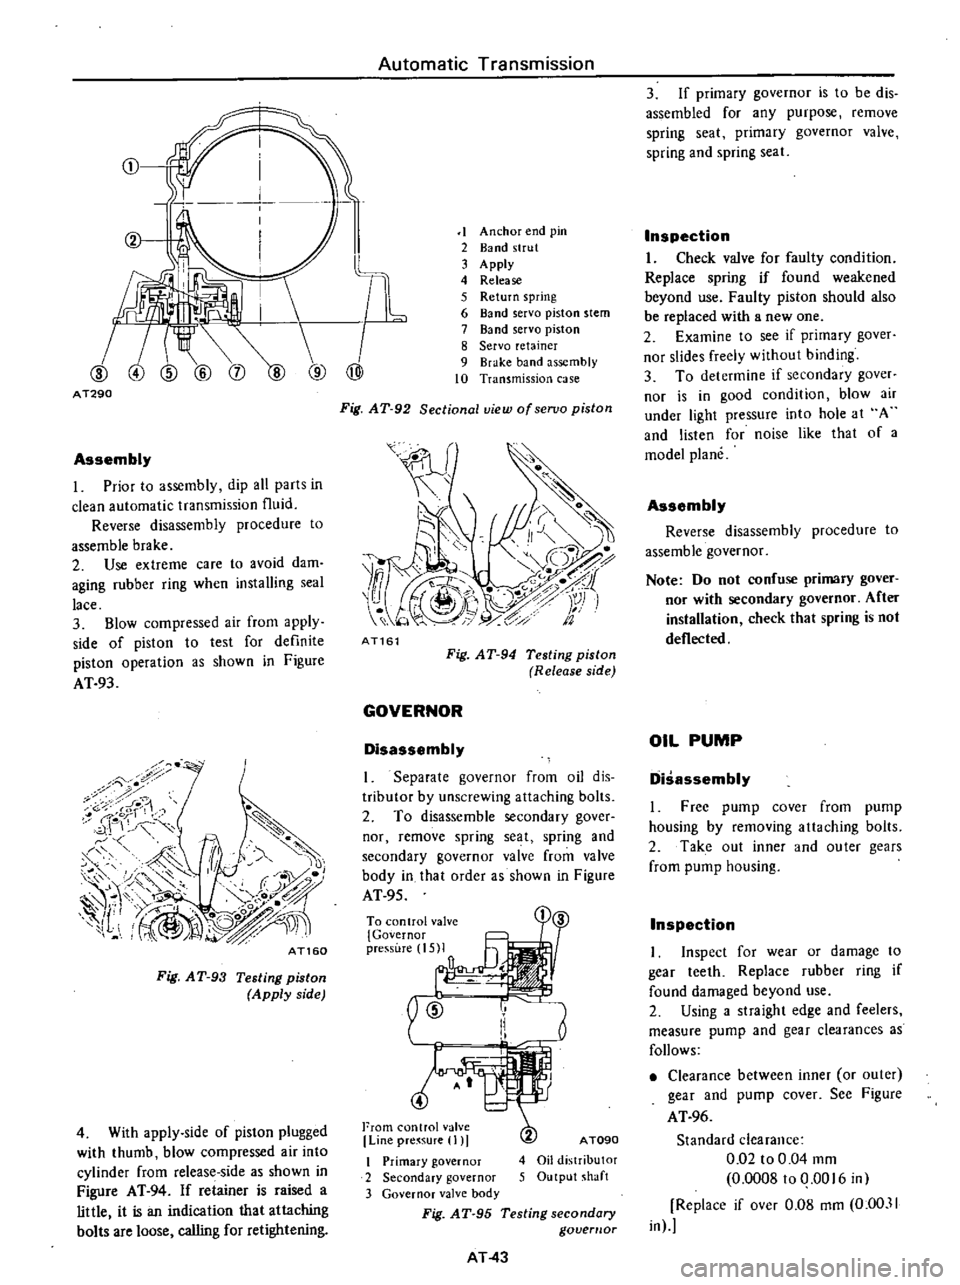
Automatic
Transmission
i
r
11
I
@
@
j
A
T290
Assembly
I
Prior
to
assembly
dip
all
parts
in
clean
automatic
transmission
fluid
Reverse
disassembly
procedure
to
assemble
brake
2
Use
extreme
care
to
avoid
dam
aging
rubber
ring
when
installing
seal
lace
3
Blow
compressed
air
from
apply
side
of
piston
to
test
for
definite
piston
operation
as
shown
in
Figure
AT
93
7
i
8
ror
1
1
r
c
f
f
A
J
II
1
0
c
r
1
1
I
@
L
O
j
0
n
iJ
fl
IV
I
AT160
Fig
AT
93
Testing
piston
Apply
side
4
With
apply
side
of
piston
plugged
with
thumb
blow
compressed
air
into
cylinder
from
release
side
as
shown
in
Figure
AT
94
If
retainer
is
raised
a
little
it
is
an
indication
that
attaching
bolts
are
loose
calling
for
retightening
1
Anchor
end
pin
2
Band
strut
3
Apply
4
Release
5
Return
spring
6
Band
servo
piston
stem
7
Band
servo
piston
8
Servo
retainer
9
Brake
band
assembly
10
Transmission
case
Fig
AT
92
Sectional
view
ofseruo
piston
7
o
i
J
1S
I
z
1
Y
i
1
t
9
c
fa
AT161
Fig
AT
94
Testing
piston
Release
side
GOVERNOR
Disassembly
I
Separate
governor
from
oil
dis
tributor
by
unscrewing
attaching
bolts
2
To
disassemble
secondary
gover
nor
remove
spring
seat
spring
and
secondary
governor
valve
from
valve
body
in
that
order
as
shown
in
Figure
AT
95
To
control
val
i
1
3
5MI
n
ID
r
Ii
I
4
From
control
valve
Line
pre
sure
I
I
A
TOgO
4
Oil
distributor
5
Output
shaft
I
Primary
governor
2
Secondary
governor
3
Governor
valve
body
Fig
AT
95
Testing
secondary
govemor
AT
43
3
If
primary
governor
is
to
be
dis
assembled
for
any
purpose
remove
spring
seat
primary
governor
valve
spring
and
spring
seat
Inspection
I
Check
valve
for
faulty
condition
Replace
spring
if
found
weakened
beyond
use
Faulty
piston
should
also
be
replaced
with
a
new
one
2
Examine
to
see
if
primary
gover
nor
slides
freely
without
binding
3
To
determine
if
secondary
gaver
nor
is
in
good
condition
blow
air
under
light
pressure
into
hole
at
A
and
listen
for
noise
like
that
of
a
model
plane
Assembly
Reverse
disassembly
procedure
to
assemble
governor
Note
Do
not
confuse
primary
gover
nor
with
secondary
governor
After
installation
check
that
spring
is
not
deflected
OIL
PUMP
Disassembly
I
Free
pump
cover
from
pump
housing
by
removing
attaching
bolts
2
Take
out
inner
and
outer
gears
from
pump
housing
Inspection
I
Inspect
for
wear
or
damage
to
gear
teeth
Replace
rubber
ring
if
found
damaged
beyond
use
2
Using
a
straight
edge
and
feelers
measure
pump
and
gear
clearances
as
follows
Clearance
between
inner
or
outer
gear
and
pump
cover
See
Figure
AT
96
Standard
clearance
0
02
to
0
04
mm
0
0008100
0016
in
Replace
if
over
0
08
mm
0
00
11
in
Page 308 of 537
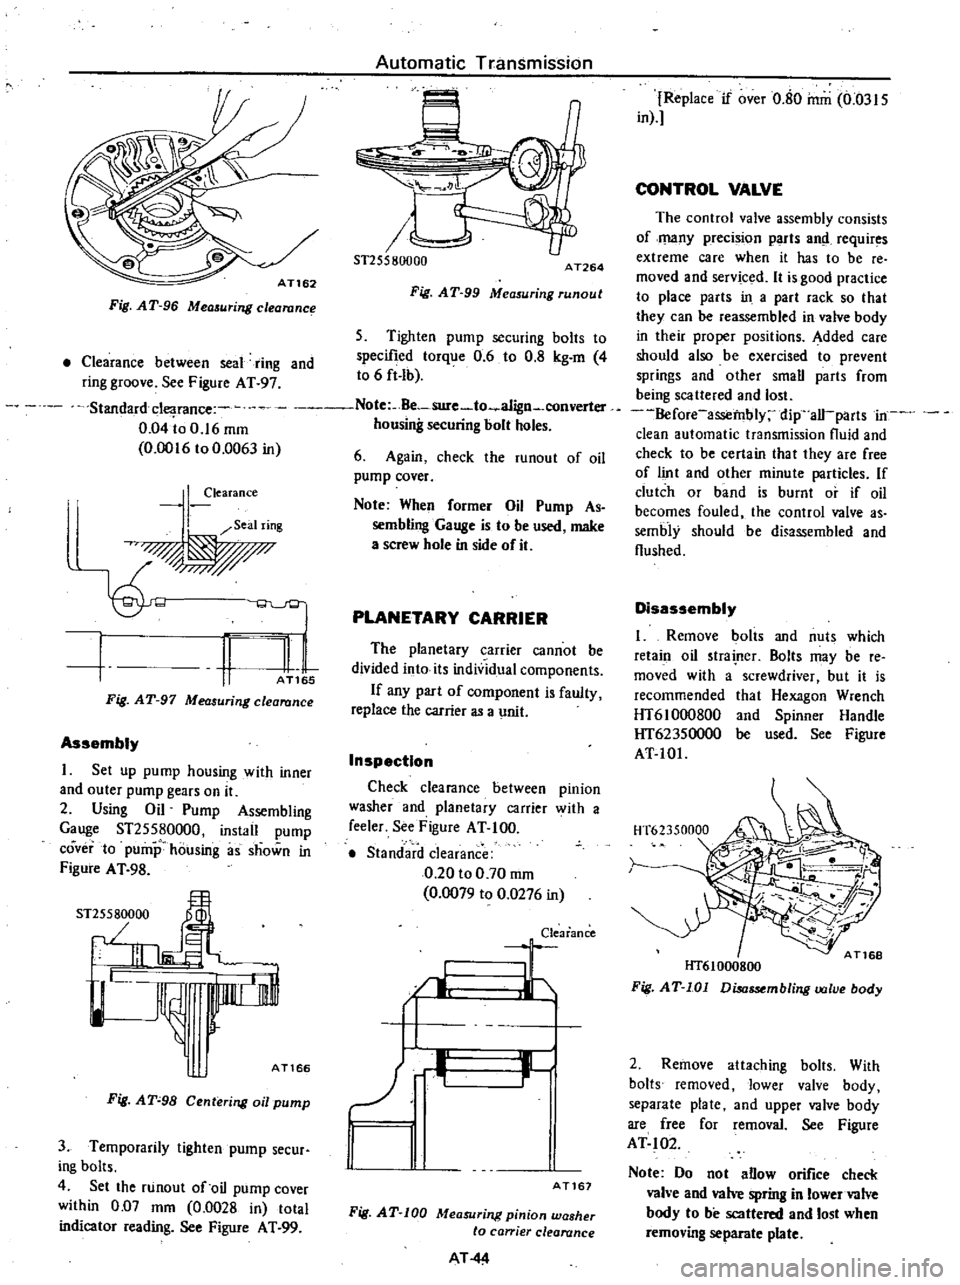
Fig
AT
96
Measuring
clearanc
Automatic
Transmission
6
u
ST255801JOO
AT264
Fig
AT
99
Measuring
runout
5
Tighten
pump
securing
bolts
to
specified
torque
0
6
to
0
8
kg
m
4
to
6
ft
Ib
Clearance
between
seal
ring
and
ring
groove
See
Figure
AT
97
Standarddearance
Note
Be
sure
to
a1ign
converter
0
04
io
0
16
mm
housing
securing
bolt
holes
0
0016
to
0
0063
in
6
Again
check
the
runout
of
oil
pump
cover
I
learance
Seal
ring
q
I
n
l
1
AT
5
Fig
AT
97
Measuring
clearance
Assembly
I
Set
up
pump
housing
with
inner
and
outer
pump
gears
on
it
2
Using
Oil
Pump
Assembling
Gauge
ST25580000
instail
pump
coverta
pump
housing
as
shown
in
Figure
A
T
98
ST
5
000
J
I
I
JL
AT166
Fig
AT
98
Centering
oil
pump
3
Temporarily
lighten
pump
secur
ing
bolts
4
Set
the
runout
of
oil
pump
cover
within
0
D7
mm
0
0028
in
total
indicator
reading
See
Figure
AT
99
Note
When
former
Oil
Pump
As
sembling
Gauge
is
to
be
used
make
a
screw
hole
in
side
of
it
PLANETARY
CARRIER
The
planetary
carrier
cannot
be
divided
into
its
individual
components
If
any
part
of
component
is
faulty
replace
the
carrier
as
a
unit
Inspection
Check
clearance
between
pinion
washer
and
planetary
carrier
with
a
feeler
See
Figure
AT
100
Standard
clearance
0
20
to
0
70
mm
0
0079
to
0
0276
in
Clearance
I
Jr
I
1
11
r
AT167
Fig
AT
100
Measuring
pinion
washer
to
ca
ier
clearance
AT
44
Replace
if
over
0
80
mm
0
0315
in
CONTROL
VALVE
The
control
valve
assembly
consists
of
many
preci
ion
parts
and
requir
s
extreme
care
when
it
has
to
be
reo
moved
and
serviced
It
is
good
practice
to
place
parts
in
a
part
rack
so
that
they
can
be
reassembled
in
valve
body
in
their
proper
positions
Added
care
should
also
be
exercised
to
prevent
springs
and
other
small
parts
from
being
scattered
and
lo
t
Before
assembly
dip
all
parts
in
clean
automatic
transmission
fluid
and
check
to
be
certain
that
they
are
free
of
lint
and
other
minute
particles
If
clutch
or
band
is
burnt
or
if
oil
becomes
fouled
the
control
valve
as
sembly
should
be
di
ssembled
and
flushed
Disassembly
I
Remove
bolts
and
nuts
which
retain
oil
trainer
Bolts
may
be
re
moved
with
a
screwdriver
but
it
is
recommended
that
Hexagon
Wrench
HT610oo800
and
Spinner
Handle
HT62350000
be
used
See
Figure
AT
101
HT61000800
Fig
AT
101
Disassembling
valve
body
2
Remove
attaching
bolts
With
bolts
removed
lower
valve
body
separate
plate
and
upper
valve
body
are
free
for
removal
See
Figure
AT
102
Note
Do
not
allow
orifice
check
vah
e
and
valve
spring
in
lower
valve
body
to
be
scattered
and
lost
when
removing
separate
plate