battery replacement DATSUN PICK-UP 1977 Service Manual
[x] Cancel search | Manufacturer: DATSUN, Model Year: 1977, Model line: PICK-UP, Model: DATSUN PICK-UP 1977Pages: 537, PDF Size: 35.48 MB
Page 420 of 537
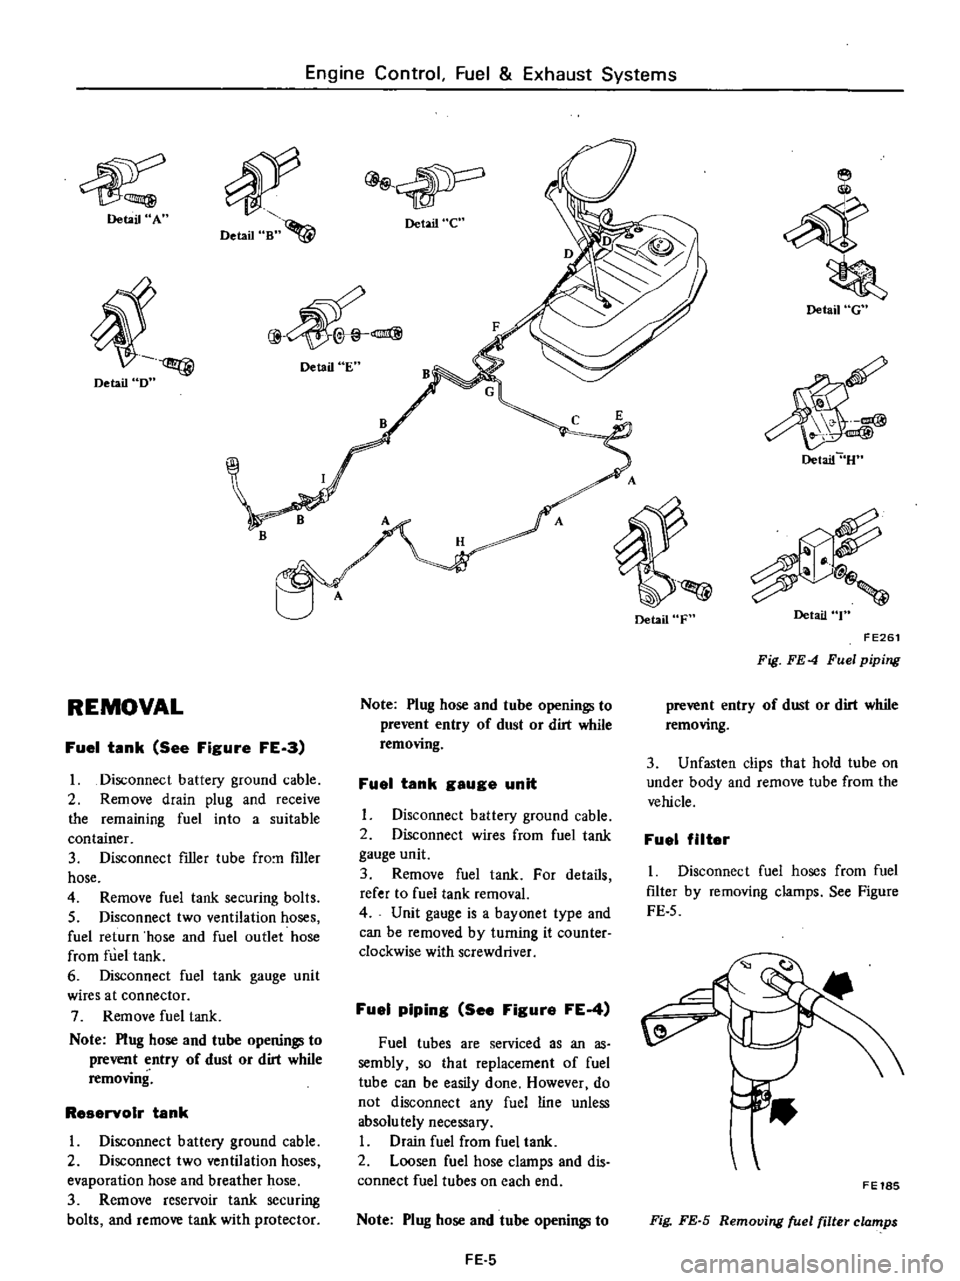
Detail
A
Detail
D
REMOVAL
Engine
Control
Fuel
Exhaust
Systems
Detail
Bn
4
Detail
e
@
Detail
E
B
Fuel
tank
See
Figure
FE
a
I
Disconnect
battery
ground
cable
2
Remove
drain
plug
and
receive
the
remaining
fuel
into
a
suitable
container
3
Disconnect
filler
tube
fro
filler
hose
4
Remove
fuel
tank
securing
bolts
5
Disconnect
two
ventilation
hoses
fuel
return
hose
and
fuel
outlet
hose
from
fuel
tank
6
Disconnect
fuel
tank
gauge
unit
wires
at
connector
7
Remove
fuel
tank
Note
Plug
hose
and
tube
opening
l
to
prevent
entry
of
dust
or
dirt
while
removing
ReservoIr
tank
1
Disconnect
battery
ground
cable
2
Disconnect
two
ventilation
hoses
evaporation
hose
and
breather
hose
3
Remove
reservoir
tank
securing
bolts
and
remove
tank
with
protector
Note
Plug
hose
and
tube
opening
l
to
prevent
entry
of
dust
or
dirt
while
removing
Fuel
tank
gauge
unit
Disconnect
battery
ground
cable
2
Disconnect
wires
from
fuel
tank
gauge
unit
3
Remove
fuel
tank
For
details
refer
to
fuel
tank
removal
4
Unit
gauge
is
a
bayonet
type
and
can
be
removed
by
turning
it
counter
clockwise
with
screwdriver
Fuel
piping
See
Figure
FE
4
Fuel
tubes
are
serviced
as
an
as
sembly
so
that
replacement
of
fuel
tube
can
be
easily
done
However
do
not
disconnect
any
fuel
line
unless
absolu
tely
necessary
I
Drain
fuel
from
fuel
tank
2
Loosen
fuel
hose
clamps
and
dis
connect
fuel
tubes
on
each
end
Note
Plug
hose
and
tube
openings
to
FE
5
Detail
F
Detail
G
Detail
U
Detail
T
FE261
Fig
FE
4
Fuel
piping
prevent
entry
of
dust
or
dirt
while
removing
3
Unfasten
clips
that
hold
tube
on
under
body
and
remove
tube
from
the
vehicle
Fuel
filter
I
Disconnect
fuel
hoses
from
fuel
filter
by
removing
clamps
See
Figure
FE
5
FE18S
Fig
FE
S
Removing
fuel
filter
clamps
Page 444 of 537
Body
Frame
Removal
and
installation
assembly
2
To
install
seat
reverse
above
re
moval
procedure
1
Remove
four
bolts
retaining
seat
slide
assembly
to
floor
take
out
seat
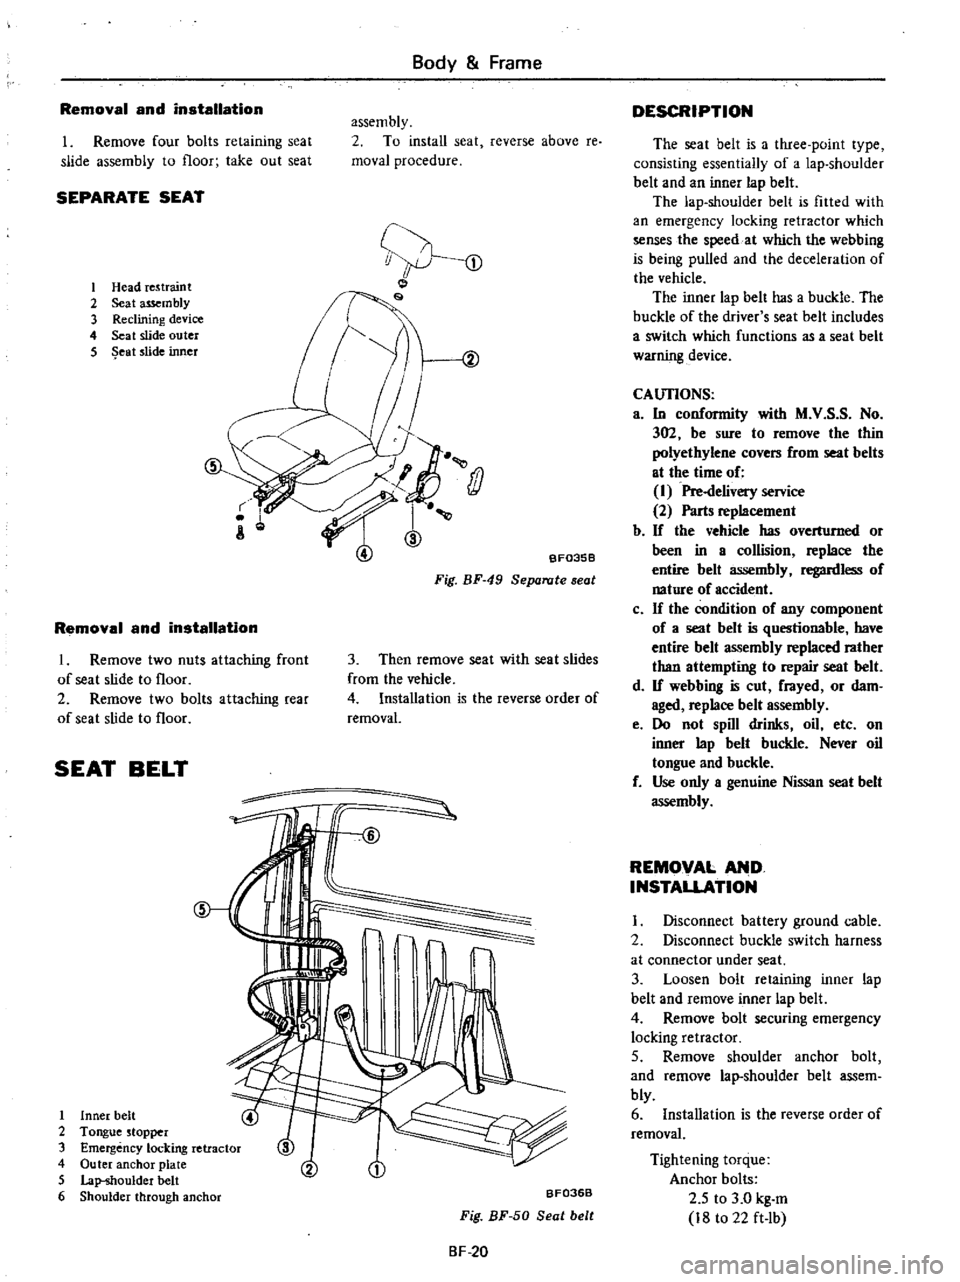
SEPARATE
SEAT
1
Head
re5traint
2
Seat
assembly
3
Reclining
device
4
Seat
slide
outer
5
eat
slide
inner
s
J
j
BF0358
Fig
BF
49
Separate
seat
Removal
and
installation
I
Remove
two
nuts
attaching
front
of
seat
slide
to
floor
2
Remove
two
bolts
attaching
rear
of
seat
slide
to
floor
3
Then
remove
seat
with
seat
slides
from
the
vehicle
4
Installation
is
the
reverse
order
of
removal
SEAT
BELT
1
Inner
belt
2
Tongue
stopper
3
Emergency
locking
retractor
4
Outer
anchor
plate
5
Lap
shoulder
belt
6
Shoulder
through
anchor
BF036B
Fig
BF
50
Seat
belt
BF
20
DESCRIPTION
The
seat
belt
is
a
three
point
type
consisting
essentiaily
of
a
lap
shoulder
belt
and
an
inner
lap
belt
The
lap
shoulder
belt
is
fitted
with
an
emergency
locking
retractor
which
senses
the
speed
at
which
the
webbing
is
being
pulled
and
the
deceleration
of
the
vehicle
The
inner
lap
belt
has
a
buckle
The
buckle
of
the
driver
s
seat
belt
includes
a
switch
which
functions
as
a
seat
belt
warning
device
CAlJI10NS
a
In
conformity
with
M
V
S
S
No
302
be
sure
to
remove
the
thin
polyethylene
covers
from
seat
belts
at
the
time
of
I
Pre
delivery
service
2
Parts
replacement
b
If
the
vehicle
has
overturned
or
been
in
a
collision
replace
the
entire
belt
assembly
regardless
of
nature
of
accident
c
If
the
condition
of
any
component
of
a
seat
belt
is
questionable
have
entire
belt
assembly
replaced
rather
than
attempting
to
repair
seat
belt
d
If
webbing
is
cut
frayed
or
dam
aged
replace
belt
assembly
e
Do
not
spill
drinks
oil
etc
on
inner
lap
belt
buckle
Never
oil
tongue
and
buckle
f
Use
only
a
genuine
Nissan
seat
belt
assembly
REMOVAL
AND
INSTAUATION
I
Disconnect
battery
ground
cable
2
Disconnect
buckle
switch
harness
at
connector
under
seat
3
Loosen
bolt
retaining
inner
lap
belt
and
remove
inner
lap
belt
4
Remove
bolt
securing
emergency
locking
retractor
5
Remove
shoulder
anchor
bolt
and
remove
lap
shoulder
belt
assem
bly
6
Installation
is
the
reverse
order
of
removal
Tightening
torque
Anchor
bolts
2
5
to
3
0
kg
m
18
to
22
ft
lb
Page 447 of 537
DESCRIPTION
Cables
are
covered
with
color
coded
vinyl
for
easy
identification
In
the
wiring
diagram
colors
are
indicated
by
one
or
two
alphabetical
letters
It
is
recommended
that
the
battery
be
disconnected
before
performing
any
electrical
service
other
than
bulb
or
fuse
replacement
In
addition
to
fuses
a
fusible
link
has
been
installed
to
protect
wiring
The
fusible
link
functions
almost
the
same
as
a
fuse
though
its
eharac
teristics
are
slightly
different
than
normal
fuses
CABLE
COLORS
Cable
colors
are
indicated
by
one
or
two
alphabetical
letters
B
Black
Be
Brown
G
Green
L
Blue
Lg
Light
green
R
Red
W
White
Y
Yellow
The
main
cable
is
generally
coded
with
a
single
color
The
others
are
coded
with
a
two
tone
color
as
follows
BW
Black
with
white
stripe
gR
Light
green
with
red
stripe
INSPECTION
Inspect
all
electrical
circuits
refer
ring
to
wiring
or
circuit
diagrams
Circuits
should
be
tested
for
conti
nuity
or
short
circuit
with
a
conven
tional
test
lamp
or
low
reading
volt
meter
Before
inspection
of
circuit
ensure
that
I
Each
electrical
component
part
or
cable
is
securely
fastened
to
its
con
nector
or
terminal
2
Each
connection
is
firmly
in
place
and
free
from
rust
and
dirt
3
No
cable
covering
shows
any
evidence
of
cracks
deterioration
or
other
damage
4
Each
terminal
is
at
a
safe
distance
away
from
any
adjacent
metal
parts
5
Each
cable
is
fastened
to
its
proper
connector
or
terminal
Body
Electrical
System
BODY
ELECTRICAL
WIRING
6
Each
grounding
bolt
is
firmly
pbnted
7
Wiring
is
kept
away
from
any
adjacent
parts
with
sharp
edges
or
high
temperature
parts
such
as
exhaust
pipe
8
Wiring
is
kept
away
from
any
rotating
or
working
parts
fan
pulley
fan
belt
etc
9
Cables
between
ftxed
portions
and
moving
parts
are
long
enough
to
withstand
shocks
and
vibratory
forces
Notes
a
Before
starting
to
inspect
and
repair
any
part
of
electrical
system
or
other
parts
which
may
lead
to
a
short
circuit
disconnect
cables
at
battery
terminals
as
follows
Disconnect
cable
at
negative
terminal
and
then
disconnect
cable
at
positive
terminal
Before
connecting
cables
to
battery
terminal
be
sure
to
clean
terminals
with
a
rag
Fasten
cable
at
positive
terminal
and
then
ground
cable
at
negative
terminal
Apply
grease
to
top
of
these
terminals
to
prevent
rust
from
developing
on
them
b
Never
use
a
screwdriver
or
senrice
tool
to
conduct
a
continuity
test
Use
test
leads
c
Never
ground
an
open
circuit
or
circuits
under
no
load
Use
a
test
lamp
12V
3W
or
circuit
tester
as
a
load
FUSE
AND
FUSIBLE
LINK
DESCRIPTION
The
fuse
and
fusible
link
are
protec
tive
devices
used
in
an
electrical
cir
cuit
When
current
increases
beyond
rated
amperage
fusible
metal
melts
and
the
circuit
is
broken
BE
2
MAINTENANCE
INSTRUCTIONS
Fuse
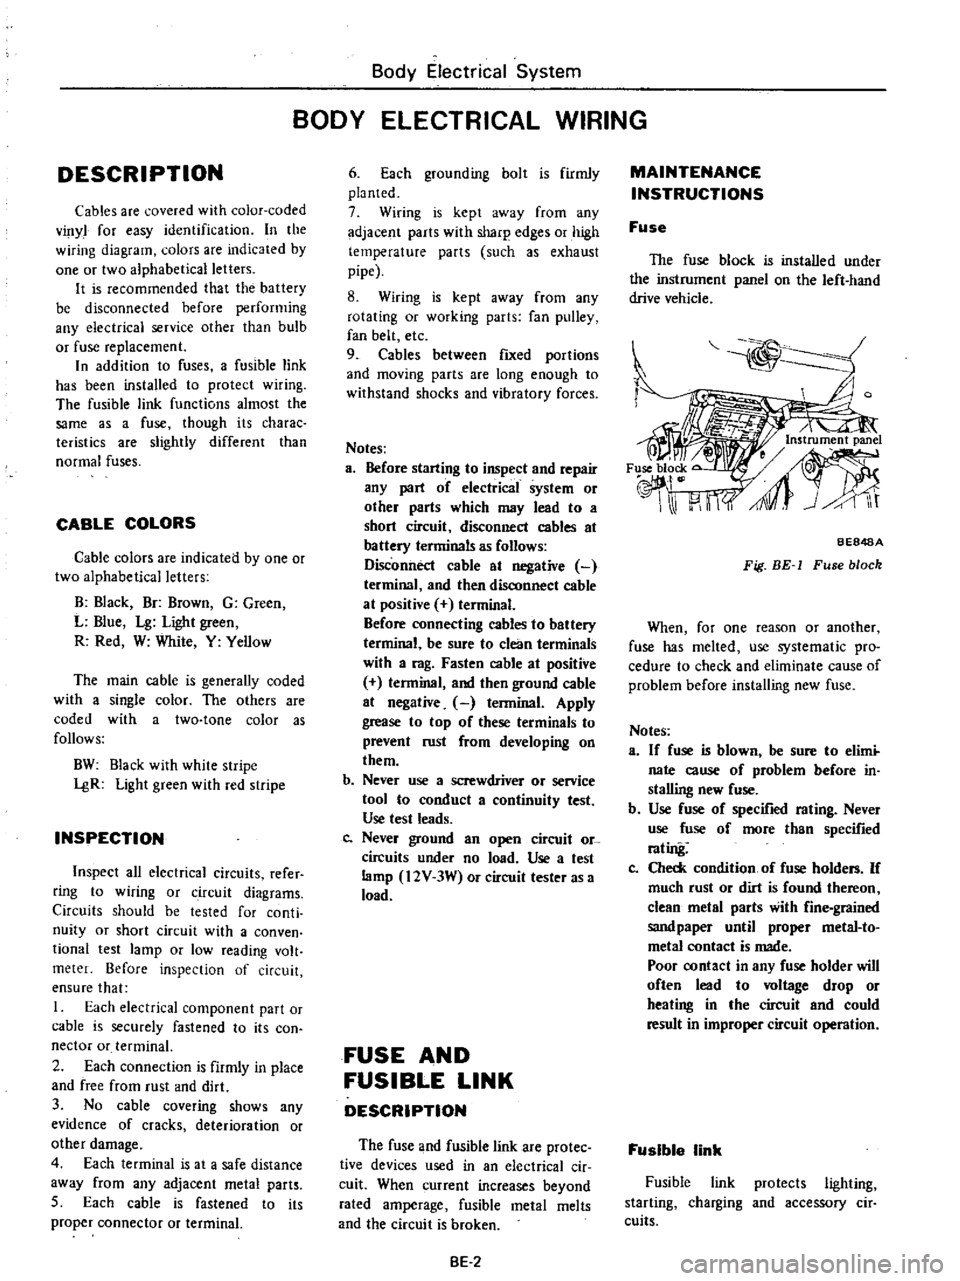
The
fuse
block
is
installed
under
the
instrument
panel
on
the
left
hand
drive
vehicle
BE848A
Fig
BE
1
Fuse
block
When
for
one
reason
or
another
fuse
has
melted
use
systematic
pro
cedure
to
check
and
eliminate
cause
of
problem
before
installing
new
fuse
Notes
a
If
fuse
is
blown
be
sure
to
elimi
nate
cause
of
problem
before
in
stalling
new
fuse
b
Use
fuse
of
specified
rating
Never
use
fuse
of
more
than
specified
rating
Co
Check
condition
of
fuse
holders
If
much
rust
or
dirt
is
found
thereon
clean
metal
parts
with
fine
grained
sandpaper
until
proper
metal
to
metal
contact
is
made
Poor
contact
in
any
fuse
holder
will
often
lead
to
voltage
drop
or
heating
in
the
circuit
and
could
result
in
improper
circuit
operation
Fusible
link
Fusible
link
protects
lighting
starting
charging
and
accessory
cir
cuits
Page 450 of 537
Body
Electrical
System
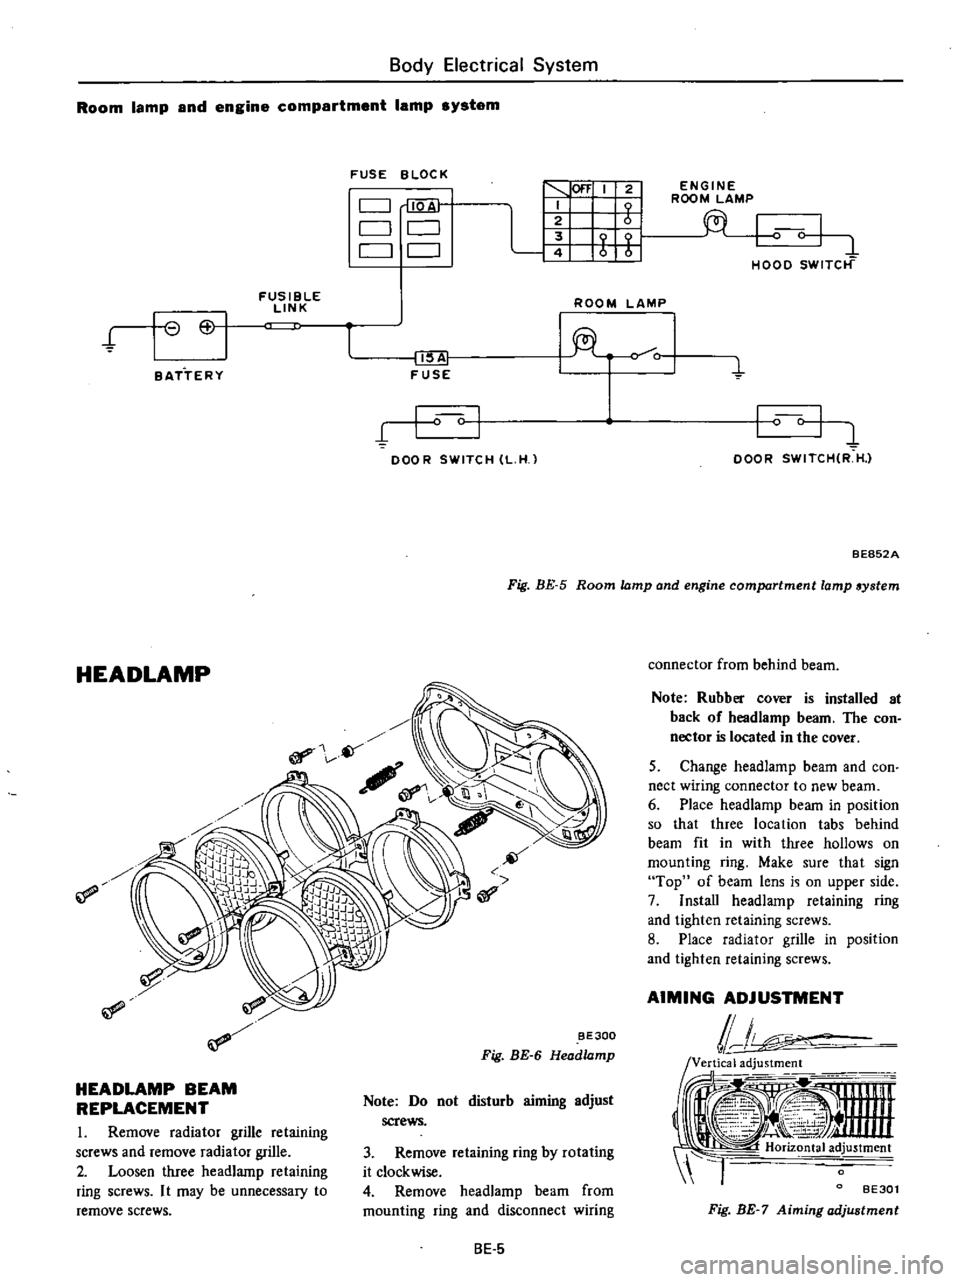
Room
lamp
and
engine
compartment
lamp
system
FUSE
BLOC
K
C
J
QA
C
J
CJ
CJ
CJ
1
100
I
2
I
I
t1
Wf
t
fi
FUSIBLE
LINK
ROOM
LAMP
t
I
6
I
II
lA
FUSE
o
C
1
BATTERY
I
I
DOOR
SWITCH
L
H
l
ENGINE
ROOM
LAMP
I
0
I
1
HOOD
SWITCt
f
I
c
I
DOOR
SWITCHIR
H
l
Fig
BE
5
Room
lamp
and
engine
compartment
lamp
system
BE852A
HEADLAMP
if
BE300
Fig
BE
6
Head
amp
HEADLAMP
BEAM
REPLACEMENT
I
Remove
radiator
grille
retaining
screws
and
remove
radiator
grille
2
Loosen
three
headlamp
retaining
ring
screws
I
t
may
be
unnecessary
to
remove
screws
Note
Do
not
disturb
aiming
adjust
screws
3
Remove
retaining
ring
by
rotating
it
clockwise
4
Remove
headlamp
beam
from
mounting
ring
and
disconnect
wiring
8E
5
connector
from
behind
beam
Note
Rubber
cover
is
installed
at
back
of
headlamp
beam
The
con
nector
is
located
in
the
cover
5
Change
headlamp
beam
and
con
nect
wiring
connector
to
new
beam
6
Place
headlamp
beam
in
position
so
that
three
location
tabs
behind
beam
fit
in
with
three
hollows
on
mounting
ring
Make
sure
that
sign
Top
of
beam
lens
i
i
on
upper
side
7
Install
headlamp
retaining
ring
and
tighten
retaining
screws
8
Place
radIator
grille
in
position
and
tighten
retaining
screws
AIMING
ADJUSTMENT
lJ
ii
i
tooi
1
Ji
Y
4
nnn
4
I
Horiz
tal
ad
justment
l
BE30l
Fig
BE
7
Aiming
adjustment
Page 453 of 537
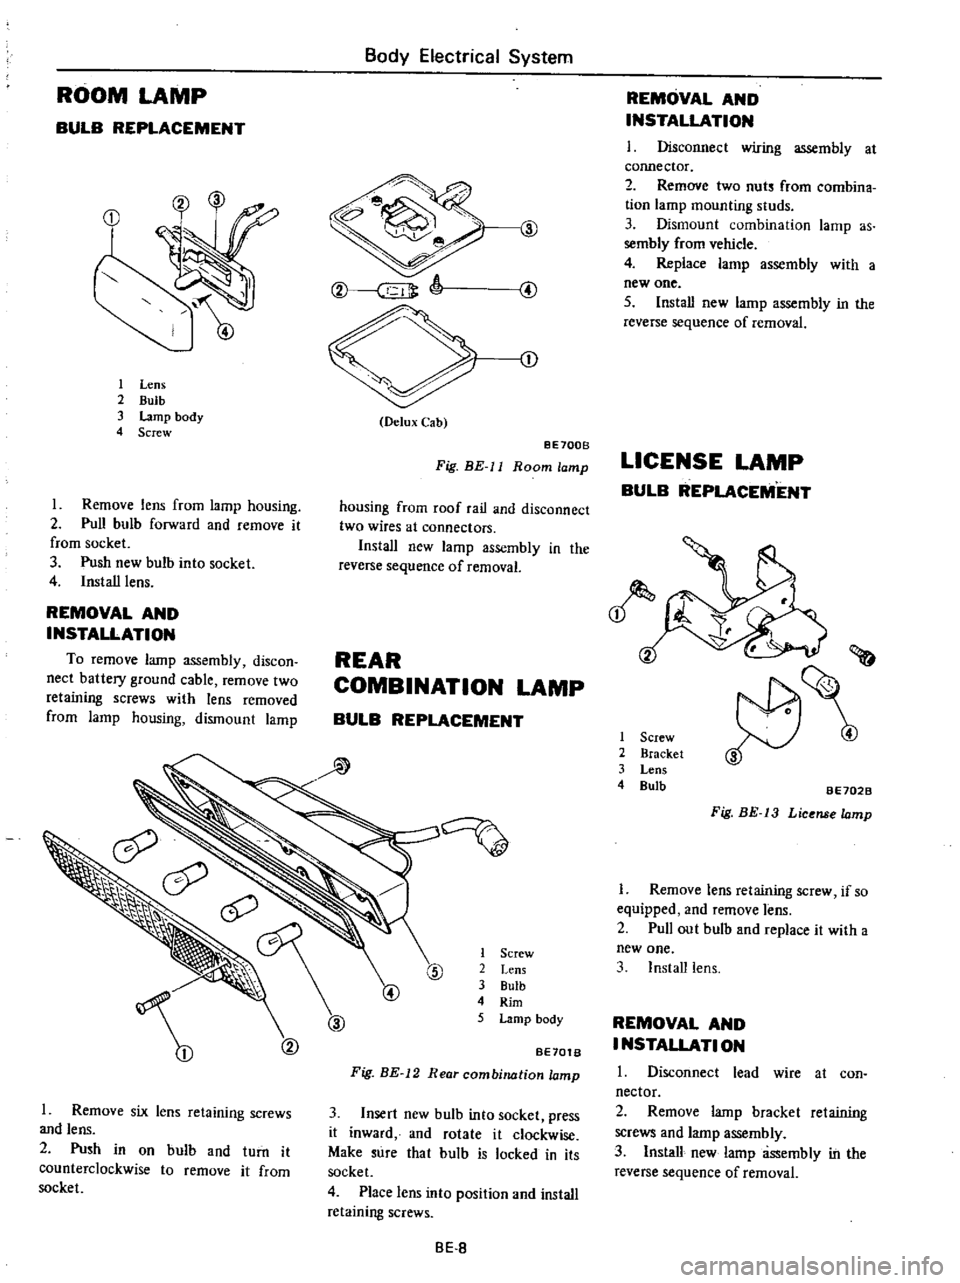
ROOM
LAMP
BULB
REPLACEMENT
1
Lens
2
Bulb
3
Lamp
body
4
Screw
Remove
lens
from
lamp
housing
2
Pull
bulb
forward
and
remove
it
from
socket
3
Push
new
bulb
into
socket
4
Install
lens
REMOVAL
AND
INSTALLATION
To
remove
lamp
assembly
discon
nect
battery
ground
cable
remove
two
retaining
screws
with
lens
removed
from
lamp
housing
dismount
lamp
1
Remove
six
lens
retaining
screws
and
lens
2
Push
in
on
bulb
and
turn
it
counterclockwise
to
remove
it
from
socket
Body
Electrical
System
J
CD
O
lux
Cab
8E700B
Fig
HE
ll
Room
lamp
housing
from
roof
rail
and
disconnect
two
wires
at
connectors
Install
new
lamp
assembly
in
the
reverse
sequence
of
removal
REAR
COMBINATION
LAMP
BULB
REPLACEMENT
1
Screw
2
Lens
3
Bulb
4
Rim
5
Lamp
body
@
BE70tB
Fig
BE
12
Rear
combination
lamp
3
Insert
new
bulb
into
socket
press
it
inward
and
rotate
it
clockwise
Make
sure
that
bulb
is
locked
in
its
socket
4
Place
lens
into
position
and
install
retaining
screws
8E
8
REMOVAL
AND
INSTALLATION
I
Disconnect
wiring
assembly
at
cormector
2
Remove
two
nuts
from
combina
tion
lamp
mounting
studs
3
Dismount
combination
lamp
as
sembly
from
vehicle
4
Replace
lamp
assembly
with
a
new
one
5
Install
new
lamp
assembly
in
the
reverse
sequence
of
removal
LICENSE
LAMP
BULB
REPLACEMENT
1
Screw
2
Bracket
3
Lens
4
Bulb
i
J
BE702B
Fig
HE
13
License
Iomp
1
Remove
lens
retaining
screw
if
so
equipped
and
remove
lens
2
Pull
out
bulb
and
replace
it
with
a
new
one
3
Install
lens
REMOVAL
AND
I
NSTALlATI
ON
1
Disconnect
lead
wire
at
con
nector
2
Remove
lamp
bracket
retaining
screws
and
lamp
assembly
3
Install
new
lamp
assembly
in
the
reverse
sequence
of
removal
Page 455 of 537
KNOB
ILLUMINATION
LAMP
The
illumination
lamp
is
located
on
the
illumination
control
rheostat
This
lamp
illuminates
the
knob
of
the
wiper
switch
and
lighting
switch
with
fiberscopes
The
fiberscopes
between
the
knobs
and
cap
of
the
illumination
lamp
carry
the
light
through
their
tubes
with
the
inner
reflective
walJ
CID
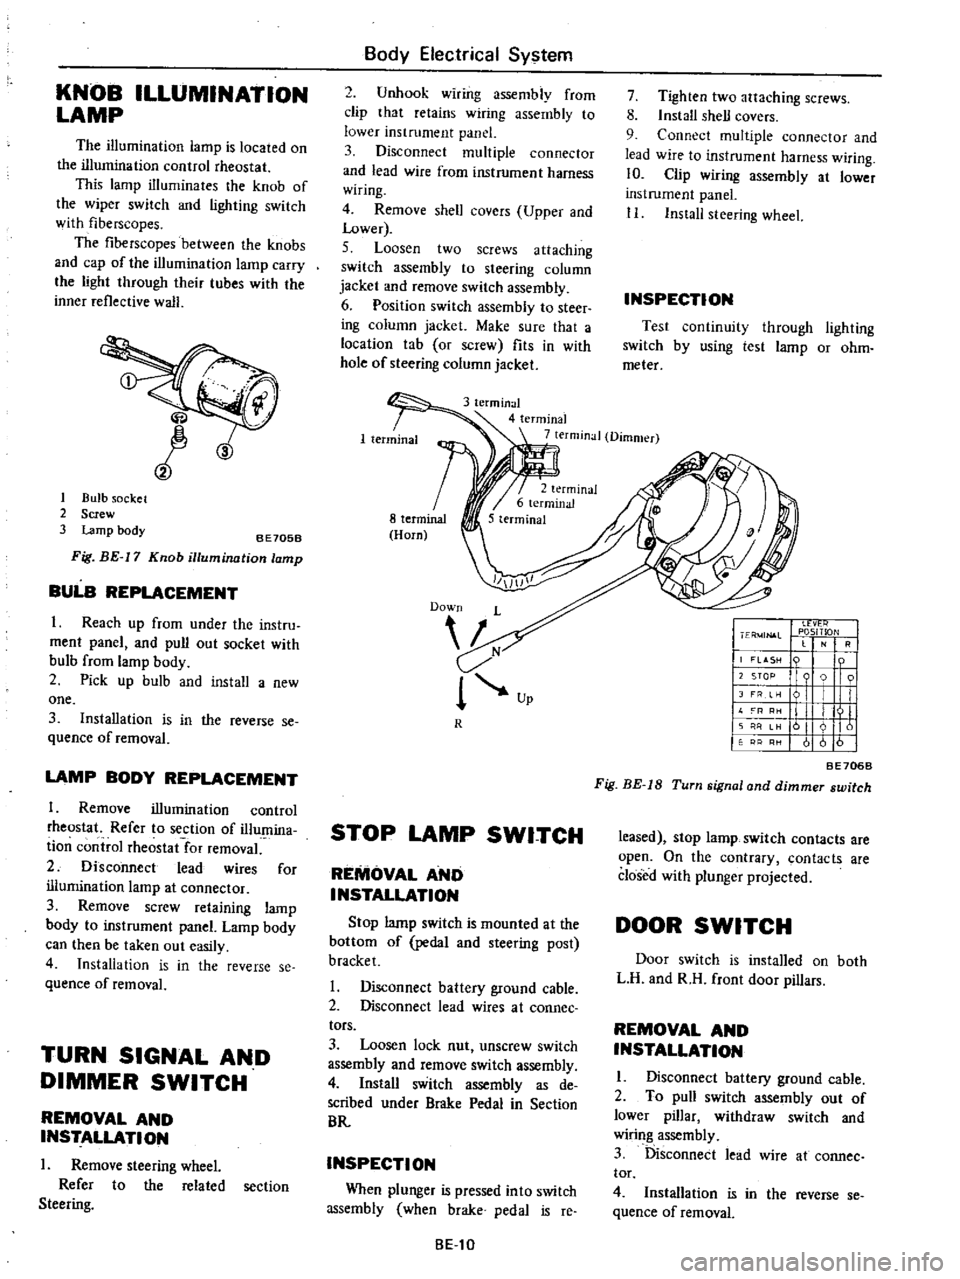
1
Bulb
socket
2
Screw
3
Lamp
body
8E705B
Fig
BE
17
Knob
illumination
lamp
BULB
REPLACEMENT
I
Reach
up
from
under
the
instru
ment
panel
and
pull
out
socket
with
bulb
from
lamp
body
2
Pick
up
bulb
and
install
a
new
one
3
Installation
is
in
the
reverse
se
quence
of
removal
LAMP
BODY
REPLACEMENT
1
Remove
illumination
control
rheostat
Refer
to
section
of
illumina
ti
on
control
rheostat
for
removal
2
Disconnect
lead
wires
for
illumination
lamp
at
connector
3
Remove
screw
retaining
lamp
body
to
instrument
panel
Lamp
body
can
then
be
taken
out
easily
4
Installation
is
in
the
reverse
se
quence
of
removal
TURN
SIGNAL
AND
DIMMER
SWITCH
REMOVAL
AND
INSTALLATION
I
Remove
steering
wheel
Refer
to
the
related
section
Steering
Body
Electrical
System
2
Unhook
wiring
assembly
from
clip
that
retains
wiring
assembly
to
lower
instrument
panel
3
Disconnect
multiple
connector
and
lead
wire
from
instrument
harness
wiring
4
Remove
shell
covers
Upper
and
Lower
5
Loosen
two
screws
attaching
switch
assembly
to
steering
column
jacket
and
remove
switch
assembly
6
Position
switch
assembly
to
steer
ing
column
jacket
Make
sure
that
a
location
tab
or
screw
fits
in
with
hole
of
steering
column
jacket
7
Tighten
two
attaching
screws
8
Install
shell
covers
9
Connect
multiple
connector
and
lead
wire
to
instrument
harness
wiring
10
Clip
wiring
assembly
at
lower
instrument
panel
II
Install
steering
wheel
INSPECTION
Test
continuity
through
lighting
switch
by
using
test
lamp
or
ohm
meter
3
terminal
4
terminal
7
terminal
Dimmer
R
STOP
LAMP
SWITCH
REMOVAL
AND
INSTALLATION
Stop
lamp
switch
is
mounted
at
the
bottom
of
pedal
and
steering
post
bracket
I
Disconnect
battery
ground
cable
2
Disconnect
lead
wires
at
coonee
tors
3
Loosen
lock
nut
unscrew
switch
assembly
and
remove
switch
assembly
4
Install
switch
assembly
as
de
scribed
under
Brake
Pedal
in
Section
BR
INSPECTION
When
plunger
is
pressed
into
switch
assembly
when
brake
pedal
is
reo
8El0
I
Ll
vt
r
I
ER
4JN
l
L
PlOSITlON
RI
j
LASH
n
I
I
12
STOP
9
91
I
JFRe
I
I
II
L
I
III
11
I
I
II
161
I
61616
BE706B
Fig
BE
IS
Turn
signal
and
dimmer
switch
leased
stop
lamp
switch
contacts
are
open
On
the
contrary
contacts
are
closed
with
plunger
projected
DOOR
SWITCH
Door
switch
is
installed
on
both
L
H
and
R
H
front
door
pillars
REMOVAL
AND
INSTALLATION
I
Disconnect
battery
ground
cable
2
To
pull
switch
assembly
out
of
lower
pillar
withdraw
switch
and
wiring
assembly
3
Disconnect
lead
wire
at
cannee
tor
4
Installation
is
in
the
reverse
se
quence
of
removal
Page 456 of 537
INSPECTION
through
door
lamp
or
ohm
Test
continuity
switch
by
using
test
meter
When
plunger
is
pressed
into
switch
assembly
door
switch
contacts
are
open
Contacts
are
closed
when
plunger
is
projected
HAZARD
SWITCH
REMOVAL
AND
INSTALLATION
1
Disconnect
multiple
connector
and
lead
wire
from
instrwnent
harness
wiring
3
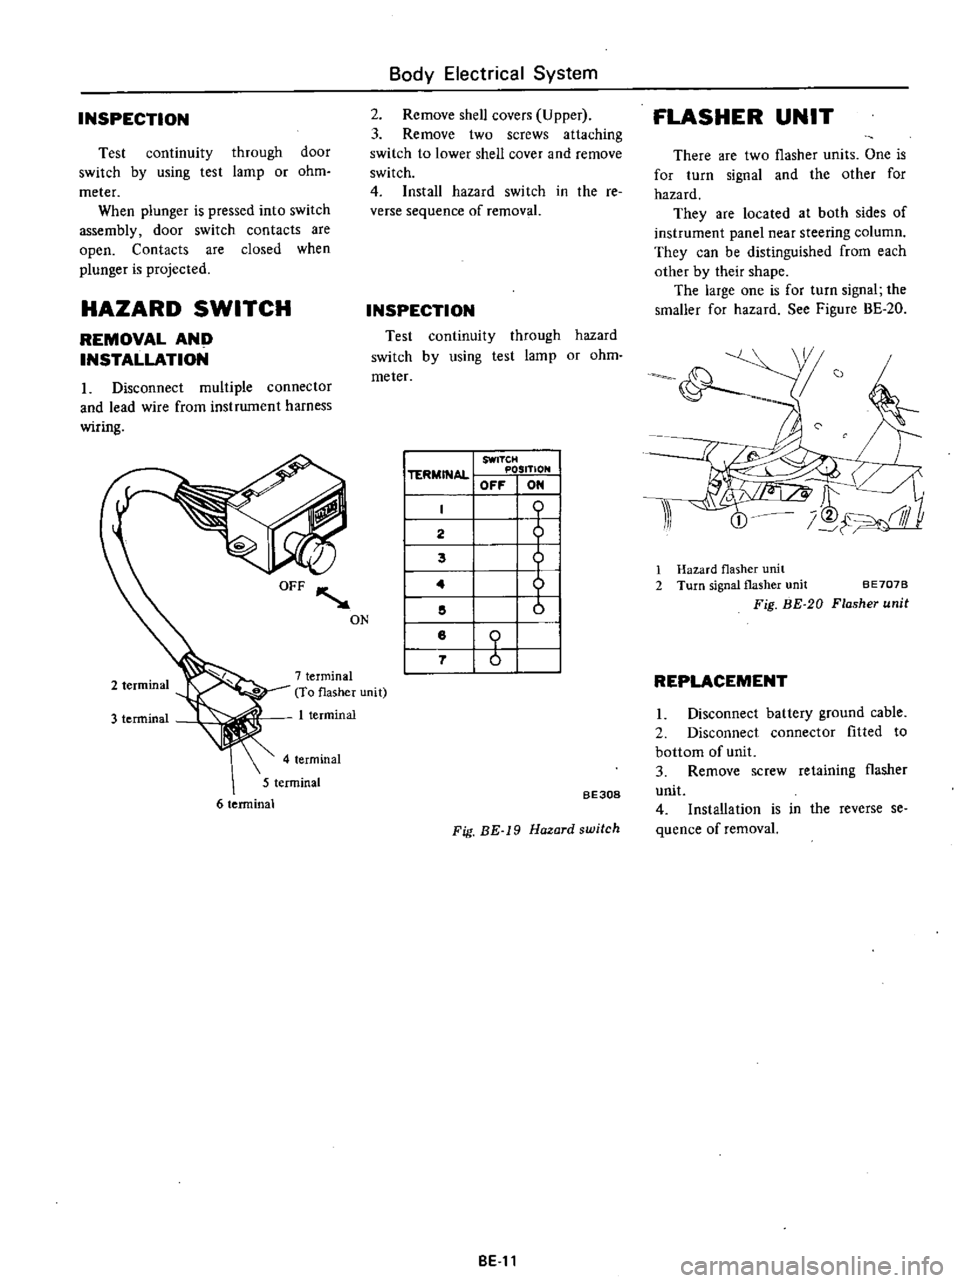
terminal
7
terminal
To
flasher
unit
1
terminal
4
terminal
5
terminal
6
terminal
I
TERMINAL
SWITCH
POSITION
OFF
ON
I
lli
ill
I
2
I
5
1
Hazard
flasher
unit
I
4
2
Turn
signal
flasher
unit
BE707B
I
5
Fig
BE
20
Flasher
unit
I
8
I
7
I
REPLACEMENT
Body
Electrical
System
2
Remove
shell
covers
Upper
3
Remove
two
screws
attaching
switch
to
lower
shell
cover
and
remove
switch
4
Install
hazard
switch
in
the
re
verse
sequence
of
removal
INSPECTION
Test
continuity
through
hazard
switch
by
using
test
lamp
or
ohm
meter
ON
BE308
Fig
BE
19
Hazard
switch
BE
11
FLASHER
UNIT
There
are
two
flasher
units
One
is
for
turn
signal
and
the
other
for
hazard
They
are
located
at
both
sides
of
instrument
panel
near
steering
column
They
can
be
distinguished
from
each
other
by
their
shape
The
large
one
is
for
turn
signal
the
smaller
for
hazard
See
Figure
BE
20
I
Disconnect
battery
ground
cable
2
Disconnect
connector
fitted
to
bottom
of
unit
3
Remove
screw
retaining
flasher
unit
4
Installation
is
in
the
reverse
se
quence
of
removal
Page 466 of 537
Body
Electrical
System
ELECTRICAL
ACCESSORIES
CONTENTS
HORN
DESCRIPTION
REMOVAL
AND
INSTALLATION
IGNITION
SWITCH
REMOVAL
AND
INSTALLATION
INSPECTION
WINDSHIELD
WIPER
AND
WASHER
REMOVAL
AND
INSTALLATION
INSPECTION
RADIO
REMOVAL
AND
INSTALLATION
ADJUSTMENT
CLOCK
REMOVAL
I
NST
ALLA
TION
HEATER
DESCRIPTION
AIRFLOW
HEATER
UNIT
ASSEMBLY
BE
21
BE
21
BE
21
8E
n
BE
22
BE
22
BE
23
BE
23
BE
23
BE
25
BE
25
BE
25
BE
25
BE
25
BE
26
BE
26
BE
26
BE
28
BE
29
HORN
DESCRIPTION
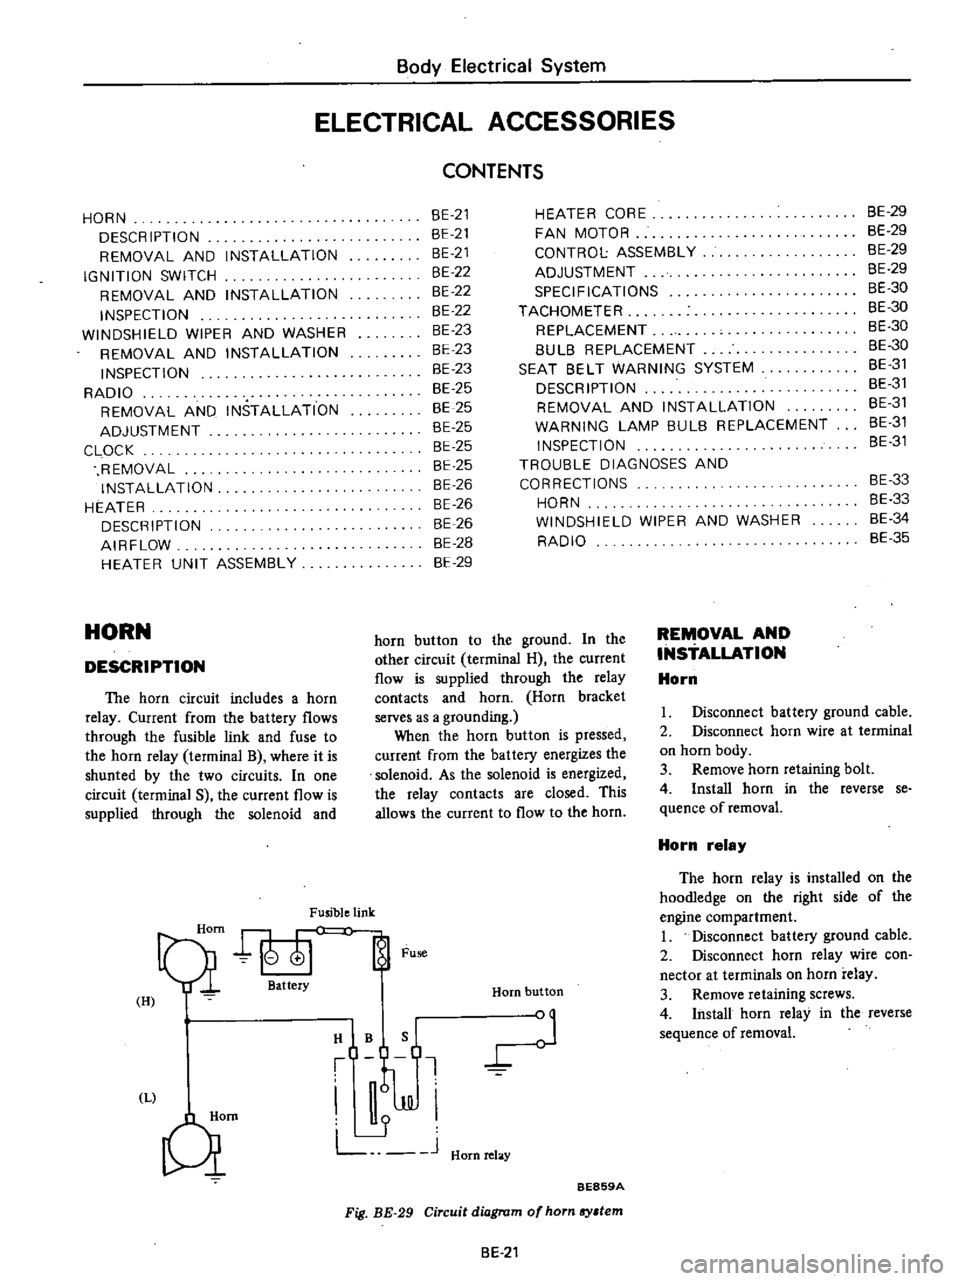
The
horn
circuit
includes
a
horn
relay
Current
from
the
battery
flows
through
the
fusible
link
and
fuse
to
the
horn
relay
terminal
B
where
it
is
shunted
by
the
two
circuits
In
one
circuit
terminal
S
the
current
flow
is
supplied
through
the
solenoid
and
Fusible
link
Qi
att
Fu
H
I
HIBQ
t
J
JJI
L
J
Hornrelay
Qm
HEATER
CORE
FAN
MOTOR
CONTROL
ASSEMBLY
ADJUSTMENT
SPECIFICATIONS
TACHOMETER
REPLACEMENT
8UL8
REPLACEMENT
SEAT
8ELT
WARNING
SYSTEM
DESCRIPTION
REMOVAL
AND
INSTALLATION
WARNING
LAMP
BULB
REPLACEMENT
INSPECTION
TROUBLE
DIAGNOSES
AND
CORRECTIONS
HORN
WINDSHIELD
WIPER
AND
WASHER
RADIO
Horn
button
BE859A
Fig
BE
29
Circuit
diagram
of
horn
sy
tem
horn
button
to
the
ground
In
the
other
circuit
terminal
H
the
current
flow
is
supplied
through
the
relay
contacts
and
horn
Horn
bracket
serves
as
a
grounding
When
the
horn
button
is
pressed
current
from
the
battery
energizes
the
solenoid
As
the
solenoid
is
energized
the
relay
contacts
are
closed
This
allows
the
current
to
flow
to
the
horn
BE
21
REMOVAL
AND
INSTALLATION
Horn
8E
29
BE
29
BE
29
8E
29
BE
30
BE
30
BE
30
8E
30
8E
31
BE
31
BE
31
8E
31
8E
31
BE
33
8E
33
8E
34
BE
35
I
Disconnect
battery
ground
cable
2
Disconnect
horn
wire
at
terminal
on
horn
body
3
Remove
horn
retaining
bolt
4
Install
horn
in
the
reverse
se
quence
of
removal
Horn
relay
The
horn
relay
is
installed
on
the
hoodIedge
on
the
right
side
of
the
engine
compartment
I
Disconnect
battery
ground
cable
2
Disconnect
horn
relay
wire
con
nector
at
terminals
on
horn
relay
3
Remove
retaining
screws
4
Install
horn
relay
in
the
reverse
sequence
of
removal
Page 475 of 537
TEMP
lever
1
Move
TEMP
lever
to
the
OFF
position
2
Connect
control
cable
to
the
lever
of
water
ock
when
water
cock
lever
is
pulled
forward
fully
closed
3
Install
control
cable
on
water
cock
bracket
with
cable
retaining
clip
SPECIFICATIONS
Item
FAN
MOTOR
Rated
power
consumption
Revolution
rpm
Fan
dia
mm
in
TACHOMETER
The
tachometer
is
optional
on
model
HL620
It
is
an
integral
part
of
the
ignition
system
It
counts
the
pulses
entering
the
ignition
coil
and
indicates
the
number
of
engine
revolu
tions
REPLACEMENT
I
Remove
battery
ground
cable
2
Remve
cluster
lid
following
instructions
iri
steps
I
to
4
of
Removal
in
Combination
Meter
Body
Electrical
System
BE872A
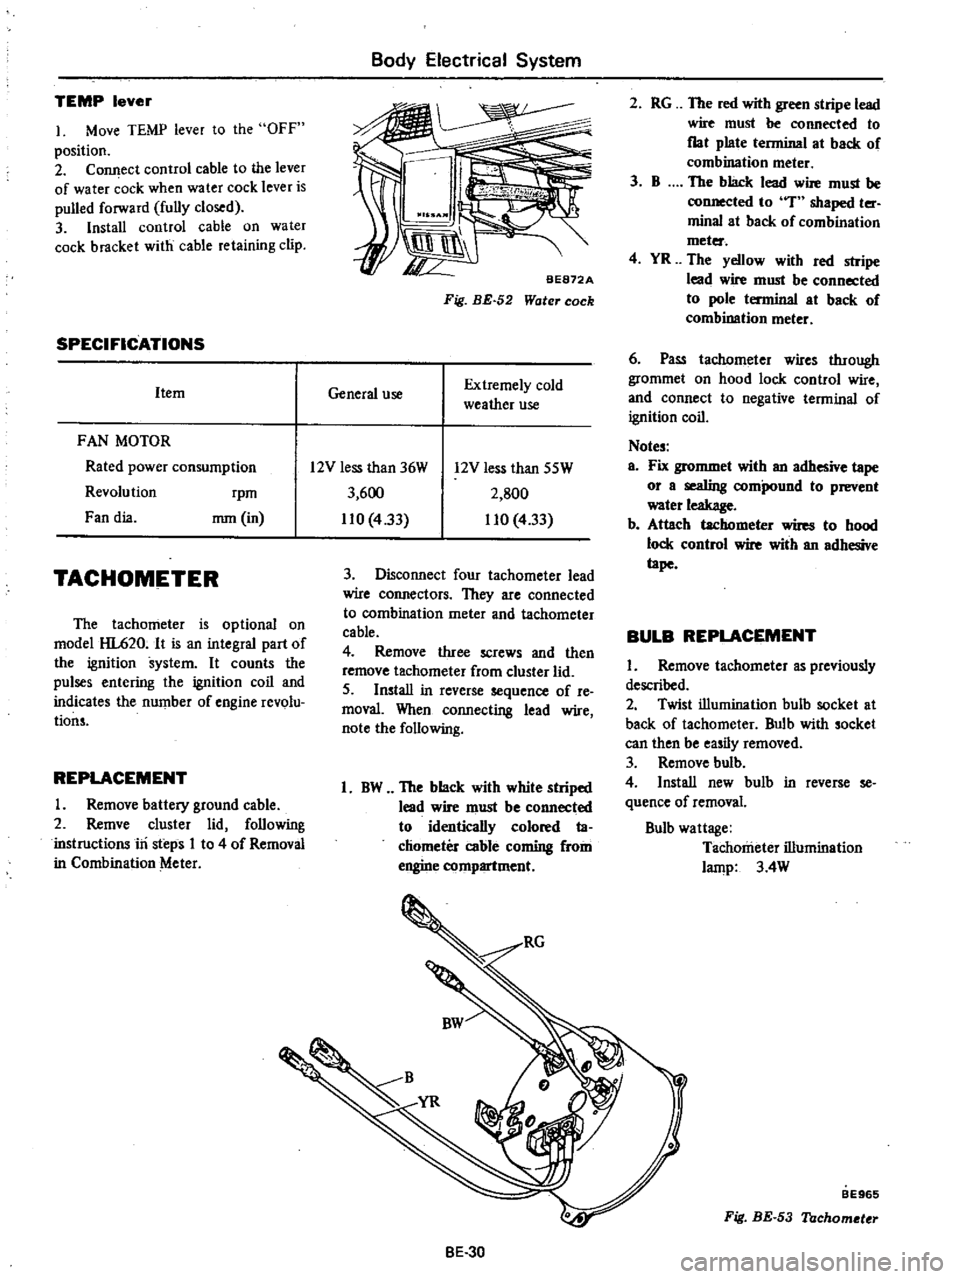
Fig
BE
52
Water
cock
General
use
Extremely
cold
weather
use
2
RG
The
red
with
green
stripe
lead
wire
must
be
connected
to
flat
plate
terminal
at
back
of
combination
meter
3
B
The
black
lead
wire
must
be
connected
to
T
shaped
ter
minal
at
back
of
combination
meter
4
YR
The
yellow
with
red
stripe
lead
wire
must
be
connected
to
pole
terminal
at
back
of
combination
meter
6
Pass
tachllmeter
wires
through
grommet
on
hood
lock
control
wire
and
connect
to
negative
terminal
of
ignition
coil
Notes
a
Fix
grommet
with
an
adhesive
tape
or
a
sealing
compound
to
prevent
water
leakage
b
Attach
tachometer
wires
to
hood
lock
control
wire
with
an
adhesive
tape
BULB
REPLACEMENT
I
Remove
tachometer
as
previously
described
2
Twist
illumination
bulh
socket
at
back
of
tachometer
Bulb
with
socket
can
then
be
easily
removed
3
Remove
bulb
4
Install
new
bulb
in
reverse
se
quence
of
removal
Bulb
wattage
Tachometer
illumination
lamp
3
4W
12V
less
than
36W
3
600
110
433
12V
less
than
SSW
2
SOO
110
4
33
3
Disconnect
four
tachometer
lead
wire
connectors
They
are
connected
to
combination
meter
and
tachometer
cable
4
Remove
three
screws
and
then
remove
tachometer
from
cluster
lid
5
Install
in
reverse
sequence
of
re
moval
When
connecting
lead
wire
note
the
following
1
BW
The
black
with
white
striped
lead
wire
must
be
connected
to
identically
colored
ta
chometer
cable
coming
from
engine
compartment
BE
30
BE965
Fig
BE
53
Tachometer
Page 476 of 537
SEAT
BELT
WARNING
SYSTEM
DESCRIPTION
Except
Canada
When
the
ignition
switch
is
turned
to
the
ON
position
the
warning
lamp
comes
on
and
remains
on
for
4
to
8
seconds
The
warning
buzzer
sounds
for
4
to
8
seconds
intermittent
ly
if
the
driver
s
seat
belt
is
not
fastened
properly
The
seat
belt
warning
system
con
sists
of
a
driver
s
belt
switch
a
warning
buzzer
a
warning
lamp
a
timer
unit
and
an
ignition
switch
For
Canada
When
the
ignition
switch
is
turned
Body
Electrical
System
to
the
ON
position
the
warning
lamp
comes
on
and
the
warning
buz
zer
sounds
if
the
driver
s
seat
belt
is
not
fastened
properly
The
seat
belt
warning
system
con
sists
of
a
driver
s
belt
switch
a
warning
buzzer
a
warning
lamp
and
an
igni
tion
switch
REMOVAL
AND
INSTALLATION
Ignition
switch
Refer
to
page
BE
22
for
Removal
and
Installation
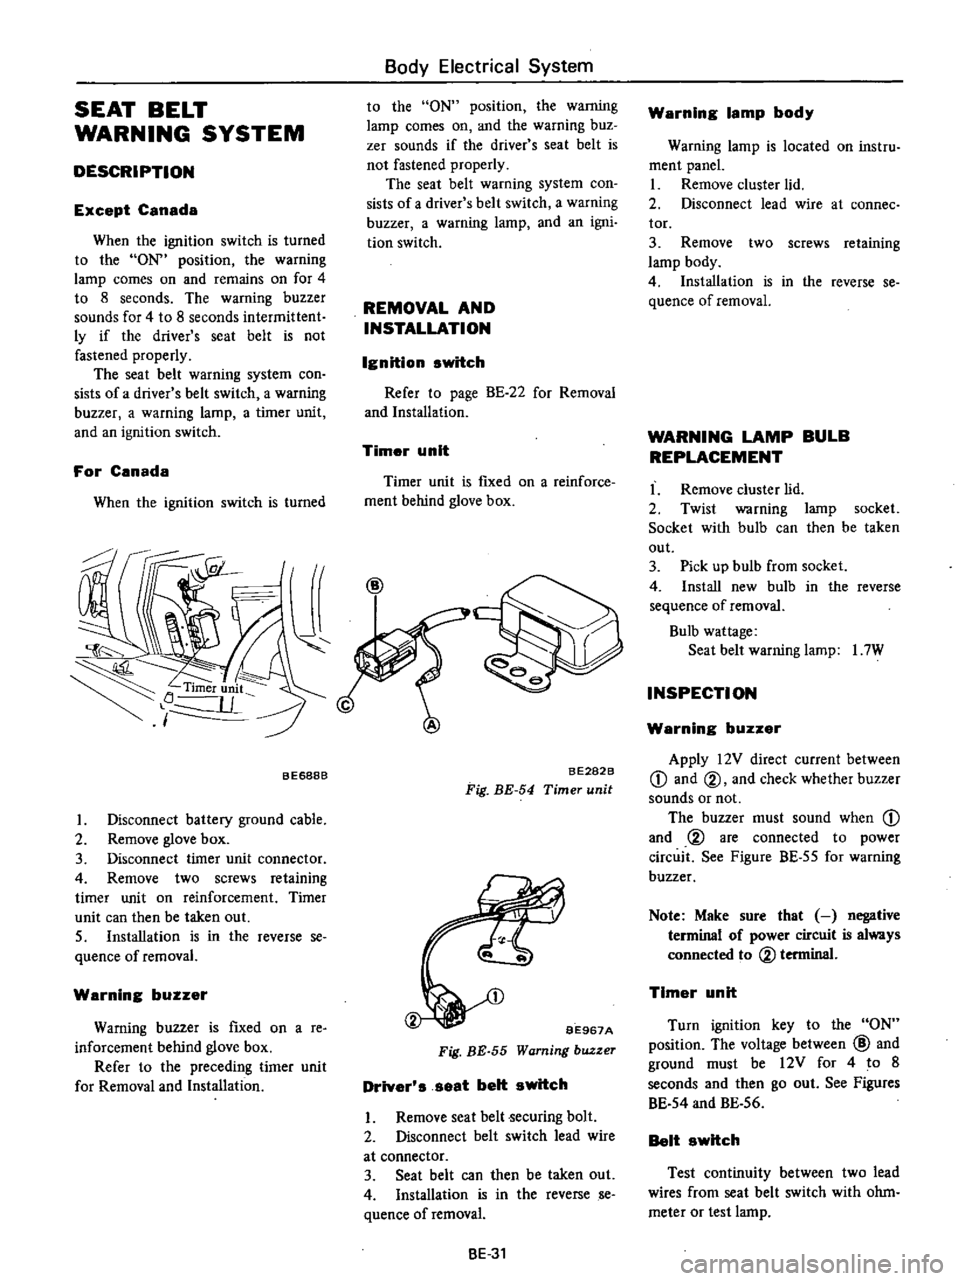
Timer
unit
Timer
unit
is
fIXed
on
a
reinforce
ment
behind
glove
box
BE688B
I
Disconnect
battery
ground
cable
2
Remove
glove
box
3
Disconnect
timer
unit
connector
4
Remove
two
screws
retaining
timer
unit
on
reinforcement
Timer
unit
can
then
be
taken
out
S
Installation
is
in
the
reverse
se
quence
of
removal
Warning
buzzer
Warning
buzzer
is
fIxed
on
a
re
inforcement
behind
glove
box
Refer
to
the
preceding
timer
unit
for
Removal
and
Installation
BE282B
Fig
BE
54
Timer
unit
BE967A
Fig
BE
55
Warning
buzzer
Driver
s
seat
belt
switch
I
Remove
seat
belt
ecuring
bolt
2
Disconnect
belt
switch
lead
wire
at
connector
3
Seat
belt
can
then
be
taken
out
4
Installation
is
in
the
reverse
se
quence
ofremoval
BE
31
Warning
lamp
body
Warning
lamp
is
located
on
instru
ment
panel
I
Remove
cluster
lid
2
Disconnect
lead
wire
at
connee
tor
3
Remove
two
screws
retaining
lamp
body
4
Installation
is
in
the
reverse
se
quence
of
removal
WARNING
LAMP
BULB
REPLACEMENT
I
Remove
cluster
lid
2
Twist
warning
lamp
socket
Socket
with
bulb
can
then
be
taken
out
3
Pick
up
bulb
from
socket
4
Install
new
bulb
in
the
reverse
sequence
of
removal
Bulb
wattage
Seat
belt
warning
lamp
I
7W
INSPECTION
Warning
buzzer
Apply
12V
direct
current
between
CD
and
@
and
check
whether
buzzer
sounds
or
not
The
buzzer
must
sound
when
CD
and
@
are
connected
to
power
circuit
See
Figure
BE
55
for
warning
buzzer
Note
Make
sure
that
negative
terminal
of
power
circuit
is
always
connected
to
@
terminal
Timer
unit
Turn
ignition
key
to
the
ON
position
The
voltage
between
@
and
ground
must
be
12V
for
4
to
8
seconds
and
then
go
out
See
Figures
BE
54
and
BE
56
Belt
switch
Test
continuity
between
two
lead
wires
from
seat
belt
switch
with
ohm
meter
or
test
lamp