change time DATSUN PICK-UP 1977 Service Manual
[x] Cancel search | Manufacturer: DATSUN, Model Year: 1977, Model line: PICK-UP, Model: DATSUN PICK-UP 1977Pages: 537, PDF Size: 35.48 MB
Page 30 of 537
r
ADJUSTMENT
OF
SET
PRESSURE
OF
BOOST
CONTROLLED
DECELERATION
DEVICE
B
C
D
D
Generally
it
is
unnecessary
to
ad
just
the
B
C
D
D
however
if
it
should
become
necessary
to
adjust
it
the
procedure
is
as
follows
Prepare
the
foUowlnB
tools
I
Tachometer
to
measure
the
en
gine
speed
while
idling
and
a
screw
driver
2
A
vacuum
gauge
connecting
pipe
Note
A
qui
k
response
type
boost
gauge
such
as
Bourdon
s
type
is
recommended
a
mercury
type
manometer
should
not
be
used
To
properly
set
the
B
C
D
D
set
pressure
proceed
as
follows
I
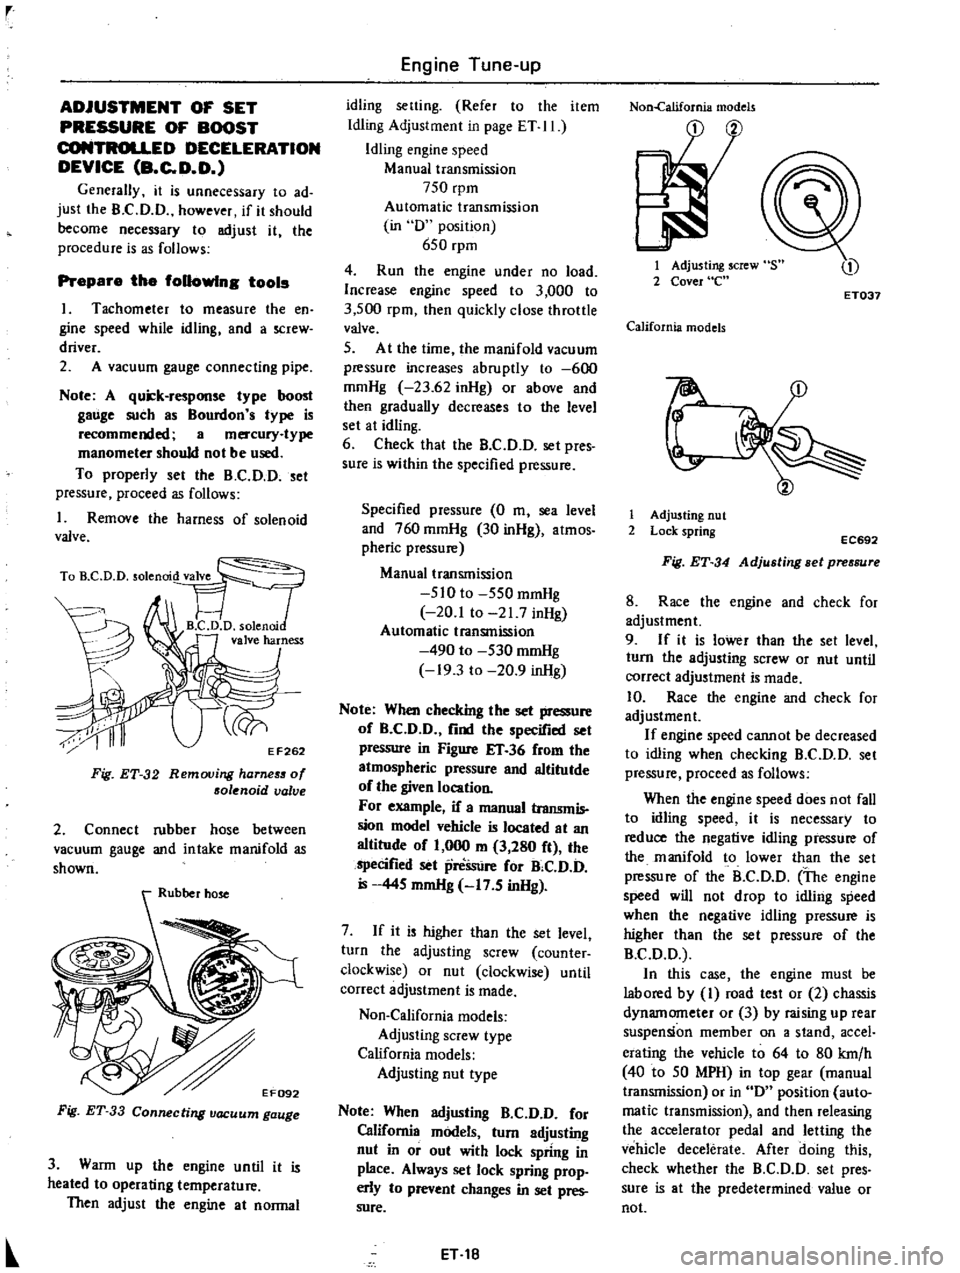
Remove
the
harness
of
solenoid
valve
TO
D
D
solenrod
VT
FJ
1
B
C
D
D
solenni
valve
harness
J
ri
y
EF262
F
g
ET
32
Removing
harneS5
of
solenoid
valve
2
Connect
rubber
hose
between
vacuum
gauge
and
intake
manifold
as
shown
Fig
ET
33
Connecting
vacuum
gauge
3
Warm
up
the
engine
until
it
is
heated
to
operating
temperature
Then
adjust
the
engine
at
normal
Engine
Tune
up
idling
setting
Refer
to
the
item
Idling
Adjustment
in
page
ET
II
Idling
engine
speed
Manual
transmission
750
rpm
Automatic
transmission
in
D
position
650
rpm
4
Run
the
engine
under
no
load
Increase
engine
speed
to
3
000
to
3
500
rpm
then
quickly
close
throttle
valve
5
At
the
time
the
manifold
vacuum
pressure
increases
abruptly
to
600
mmHg
23
62
inHg
or
above
and
then
gradually
decreases
to
the
level
set
at
idling
6
Check
that
the
B
C
D
D
set
pres
sure
is
within
the
specified
pressure
Specified
pressure
0
m
sea
level
and
760
mmHg
30
inHg
atmos
pheric
pressure
Manual
transmission
510
to
550
mmHg
20
1
to
21
7
inHg
Automatic
transmission
490
to
530
mmHg
19
3
to
20
9
inHg
Note
When
checking
the
set
pressure
of
B
C
D
D
find
the
specified
set
pressure
in
Figure
IT
36
from
the
atmospheric
pressure
and
altitutde
of
the
given
location
For
example
if
a
manual
transmis
sion
model
vehicle
is
located
at
an
altitude
of
1
000
m
3
280
ft
the
specified
set
preSsure
for
B
C
D
D
445
mmHg
17
5
inHg
7
If
it
is
higher
than
the
set
level
turn
the
adjusting
screw
counter
clockwise
or
nut
clockwise
until
correct
adjustment
is
made
Non
California
models
Adjusting
screw
type
California
models
Adjusting
nut
type
Note
When
adjusting
B
C
D
D
for
California
models
turn
adjusting
nut
in
or
out
with
lock
spring
in
place
Always
set
lock
spring
prop
erly
to
prevent
changes
in
set
pres
sure
ET
18
Non
california
models
1
Adjusting
screw
2
Cover
e
ET037
California
models
r
1
Adjusting
nut
2
Lock
spring
EC692
Fig
ET
34
Adjusting
Bet
pressure
8
Race
the
engine
and
check
for
adjustment
9
If
it
is
lower
than
the
set
level
turn
the
adjusting
screw
or
nut
until
correct
adjustment
is
made
10
Race
the
engine
and
check
for
adjustment
If
engine
speed
cannot
be
decreased
to
idling
when
checking
B
C
D
D
set
pressure
proceed
as
follows
When
the
engine
speed
does
not
fall
to
idling
speed
it
is
necessary
to
reduce
the
negative
idling
pressure
of
the
manifold
to
lower
than
the
set
pressure
of
the
B
C
D
D
The
engine
speed
will
not
drop
to
idling
speed
when
the
negative
idling
pressure
is
higher
than
the
set
pressure
of
the
B
C
D
D
In
this
case
the
engine
must
be
labored
by
I
road
test
or
2
chassis
dynamometer
or
3
by
raising
up
rear
suspension
member
on
a
stand
accel
erating
the
vehicle
to
64
to
80
krn
h
40
to
50
MPH
in
top
gear
manual
transmission
or
in
D
position
auto
matic
transmission
and
then
releasing
the
accelerator
pedal
and
letting
the
vehicle
decelerate
After
doing
this
check
whether
the
B
C
D
D
set
pres
sure
is
at
the
predetermined
value
or
not
Page 117 of 537
Notes
a
The
idle
rpm
and
CO
vary
accord
ing
to
the
altitude
Therefore
they
should
be
properly
adjusted
when
the
position
of
the
H
L
lever
is
changed
EF729
ADJUSTMENT
AND
INSPECTION
CARBURETOR
IDLE
R
P
M
AND
MIXTURE
RATIO
Cautions
3
On
automatic
transmission
equi
ped
models
check
should
be
per
formed
in
the
0
position
Be
sure
to
engage
parking
brake
and
to
lock
both
front
and
rear
wheels
with
wheel
chocks
b
Keep
your
foot
down
on
the
brake
pedal
while
depressing
the
accelera
tor
pedal
Otherwise
vehicle
surges
forward
dangerously
Notes
a
00
not
attempt
to
screw
the
idle
adjusting
screw
down
completely
Ooing
so
could
cause
damage
to
tip
which
in
turn
will
tend
to
cause
malfunctio11ll
b
If
idle
limiter
cap
obstructs
proper
adjustment
remove
it
To
install
idle
limiter
cap
refer
to
Idle
Limiter
Cap
c
After
idle
adjustment
has
been
made
shift
the
lever
to
the
N
or
P
position
for
automatic
trans
mission
d
When
measuring
CO
percentage
in
Engine
Fuel
b
Counties
1
219
m
4
000
ft
or
more
above
sea
level
have
been
designated
by
law
as
High
Altitude
Counties
For
further
details
refer
to
1977
OATSUN
PICK
UP
Service
Bulletin
Pub
No
257
0
I
Air
cleaner
rID
mOl
If
Low
altitude
Ll
n
n
L
n
Fig
EF
34
sert
probe
into
tail
pipe
more
than
40
em
15
7
in
CO
Idle
adjustment
with
CO
meter
Idle
mixture
adjustment
requires
the
use
of
a
CO
meter
especially
for
California
models
When
preparing
to
adjust
idle
mixture
it
is
essential
to
have
the
meter
thoroughly
warmed
up
and
calibrated
I
Check
carburetor
pipes
for
proper
connection
2
Warm
up
engine
until
water
tem
perature
indicator
points
to
the
middle
of
gauge
The
procedure
to
warm
up
engine
is
not
specifically
recom
mended
Either
driving
vehicle
or
oper
ating
engine
at
no
load
will
be
good
3
Make
sure
that
water
tempera
ture
indicator
points
to
the
middle
Further
keep
engine
running
at
about
2
000
rpm
for
about
5
minutes
with
out
applying
load
to
engine
in
order
to
stabilize
engine
condition
Engine
hood
should
be
open
4
Run
engine
for
about
10
minutes
at
idling
speed
Ouring
this
10
minutes
proceed
as
described
in
steps
5
to
9
below
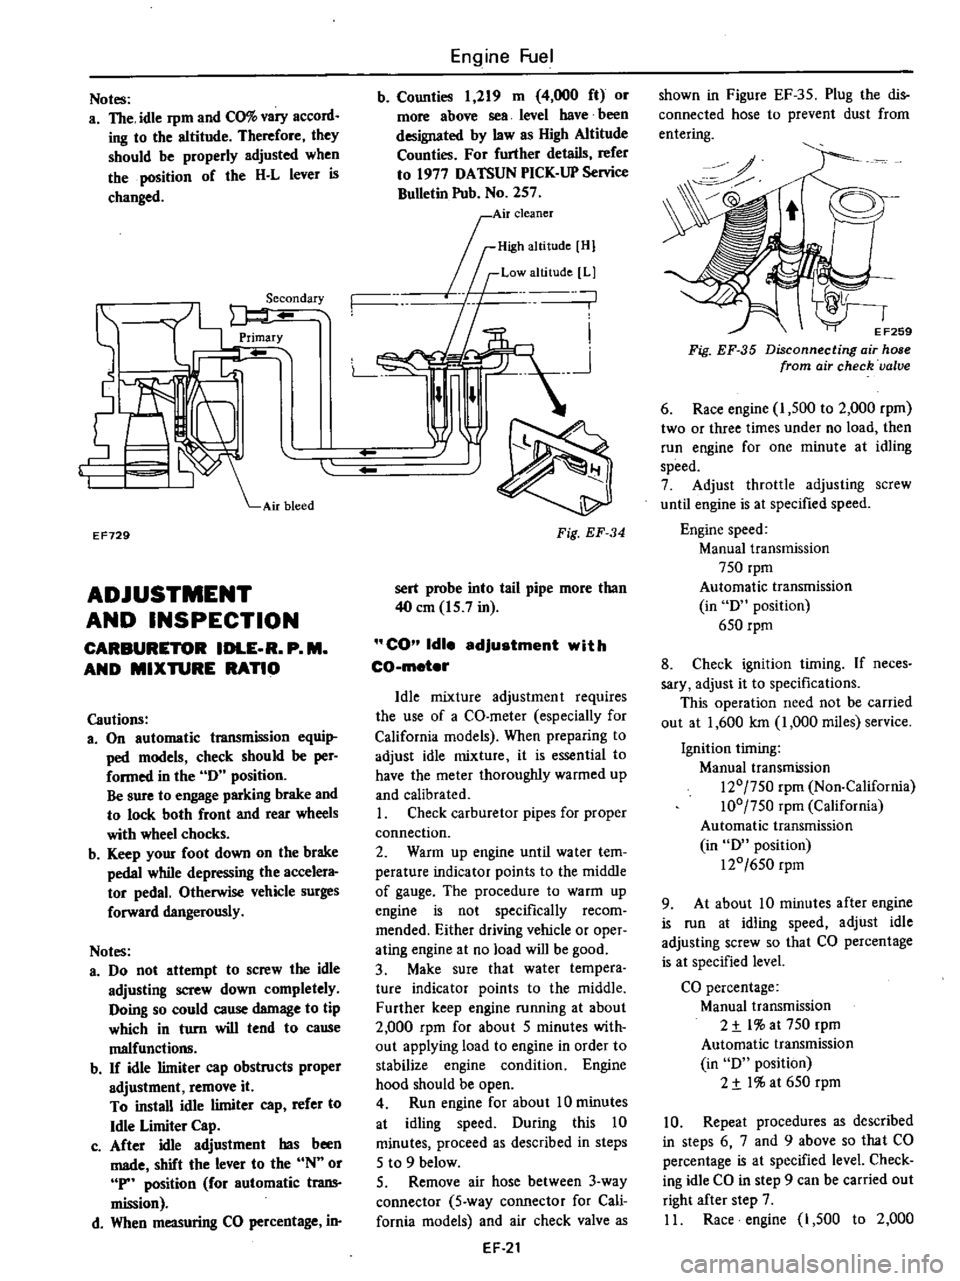
5
Remove
air
hose
between
3
way
connector
5
way
connector
for
Cali
fornia
models
and
air
check
valve
as
EF
21
shown
in
Figure
EF
35
Plug
the
dis
connected
hose
to
prevent
dust
from
entering
0
o
EF259
Fig
EF
35
Disconnecting
air
hose
from
air
check
valve
6
Race
engine
I
500
to
2
000
rpm
two
or
three
times
under
no
load
then
run
engine
for
one
minute
at
idling
speed
7
Adjust
throttle
adjusting
screw
until
engine
is
at
specified
speed
Engine
speed
Manual
transmission
750
rpm
Automatic
transmission
in
0
position
650
rpm
8
Check
ignition
timing
If
neces
sary
adjust
it
to
specifications
This
operation
need
not
be
carried
out
at
1
600
Ian
1
000
miles
service
Ignition
timing
Manual
transmission
120
750
rpm
Non
California
100
750
rpm
California
Automatic
transmission
in
0
position
120
650
rpm
9
At
about
10
minutes
after
engine
is
run
at
idling
speed
adjust
idle
adjusting
screw
so
that
CO
percentage
is
at
specified
level
CO
percentage
Manual
transmission
2
t
l
at
750
rpm
Automatic
transmission
in
0
position
2
t
I
at
650
rpm
10
Repeat
procedures
as
described
in
steps
6
7
and
9
above
so
that
CO
percentage
is
at
specified
level
Check
ing
idle
CO
in
step
9
can
be
carried
out
right
after
step
7
II
Race
engine
1
500
to
2
000
Page 200 of 537
Engine
Electrical
System
SERVICE
DATA
AND
SPECIFICATIONS
D4A4
06
D4A4
07
Type
D4A6
07
D4A6
08
Firing
order
1
3
4
2
13
4
2
Rotating
direction
Counterclockwise
Counterclockwise
Owen
angle
degree
490
to
550
490
to
550
Point
gap
mm
in
0
45
to
0
55
0
45
to
0
55
0
018
to
0
022
0
018
to
0
022
Point
pressure
kg
lb
0
40
to
0
55
0
40
to
0
55
0
88
to
1
21
0
88
to
1
21
Condenser
capacity
JlF
0
20
to
0
24
0
20
to
0
24
Condenser
isolate
resistance
Mrl
5
5
Cap
isolate
resistance
Mrl
50
50
Rotor
head
isolate
resistance
Mrl
50
50
Cap
carbon
point
length
mm
in
10
0
39
10
0
39
For
Canada
DISTRIBUTOR
California
models
CONSTRUCTION
CHECKING
AND
ADJUSTMENT
CAP
AND
ROTOR
HEAD
AIR
GAP
CONSTRUCTION
In
the
conventional
distributor
the
ignition
liming
is
detected
by
the
cam
and
breaker
arm
while
in
this
transis
tor
ignition
unit
it
is
detected
by
the
reluctor
on
the
shaft
and
the
pick
up
coil
provided
in
place
of
the
breaker
The
pick
up
coil
consists
of
a
magnet
coil
etc
The
amount
of
magnetic
flux
passing
through
the
pole
piece
in
the
coil
is
changed
at
the
moment
the
pole
CONTENTS
EE
33
EE
33
EE
33
EE
33
ADVANCE
MECHANISMS
DISASSEMBLY
ASSEMBLY
SERVICE
DATA
AND
SPECIFICATIONS
EE
33
EE
35
EE
35
EE
36
piece
faces
the
protrusion
of
the
re
luctor
and
then
the
electrical
signal
is
genera
ted
in
the
pick
up
coil
This
electric
signal
is
conducted
into
the
transistor
ignition
unit
which
in
turn
breaks
tI
e
primary
coil
current
running
through
the
ignition
coil
and
generates
high
voltage
in
the
secondary
winding
Also
this
transistor
ignition
EE
33
unit
utilizes
this
electric
signal
to
restore
the
primary
coil
to
the
original
state
after
cutting
off
the
primary
current
for
a
fIXed
time
The
centrifugal
and
vacuum
ad
vance
mechanisms
employ
the
con
ventional
mechanical
type
The
con
tactor
is
used
to
eliminate
vacuum
and
centrifugal
advance
hysteresis
I
Page 229 of 537
Inspection
Note
To
clean
or
wash
all
parts
of
master
cylinder
operating
cylinder
and
piping
clean
brake
fluid
must
be
used
Never
use
minera10ils
llUch
as
gasoline
and
kerosene
It
will
ruin
the
rubber
parts
of
the
hydrau
lic
system
I
Check
cylinder
and
piston
for
uneven
wear
or
damage
and
if
neces
sary
replace
2
If
the
clearance
between
cylinder
and
piston
is
more
than
0
15
mm
0
0059
in
replace
cylinder
3
Renew
piston
cup
when
dis
assembled
It
must
also
be
replaced
when
wear
or
deformation
due
to
fatigue
or
damage
is
found
4
Damaged
dust
cover
oil
reservoir
or
cap
should
be
replaced
Return
spring
and
valve
spring
must
also
be
replaced
when
they
are
broken
or
weak
5
Replace
clutch
hose
and
tube
if
any
abnormal
sign
of
damage
or
de
fro
ti
n
is
found
OPERATING
CYLINDER
Removal
and
installation
Removal
1
Detach
clutch
hose
from
operat
ing
cylinder
2
Remove
two
bolts
securing
op
erating
cylinder
to
clutch
housing
Installation
Install
in
the
reverse
order
of
re
moval
Observe
the
following
instructions
Bleed
air
thoroughly
from
clutch
hydraulic
system
2
Do
not
install
return
spring
or
clutch
will
not
be
disengaged
properly
Tightening
torque
Operating
cylinder
securing
bolt
2
5
to
3
5
kg
m
18
to
25
ft
lb
Bleeder
screw
0
7
to
0
9
kg
m
5
1
to
6
5
ft
Ib
Clutch
hose
connector
1
7
to
2
0
kg
m
12
to
14
ft
b
CLUTCH
Disassembly
and
assembly
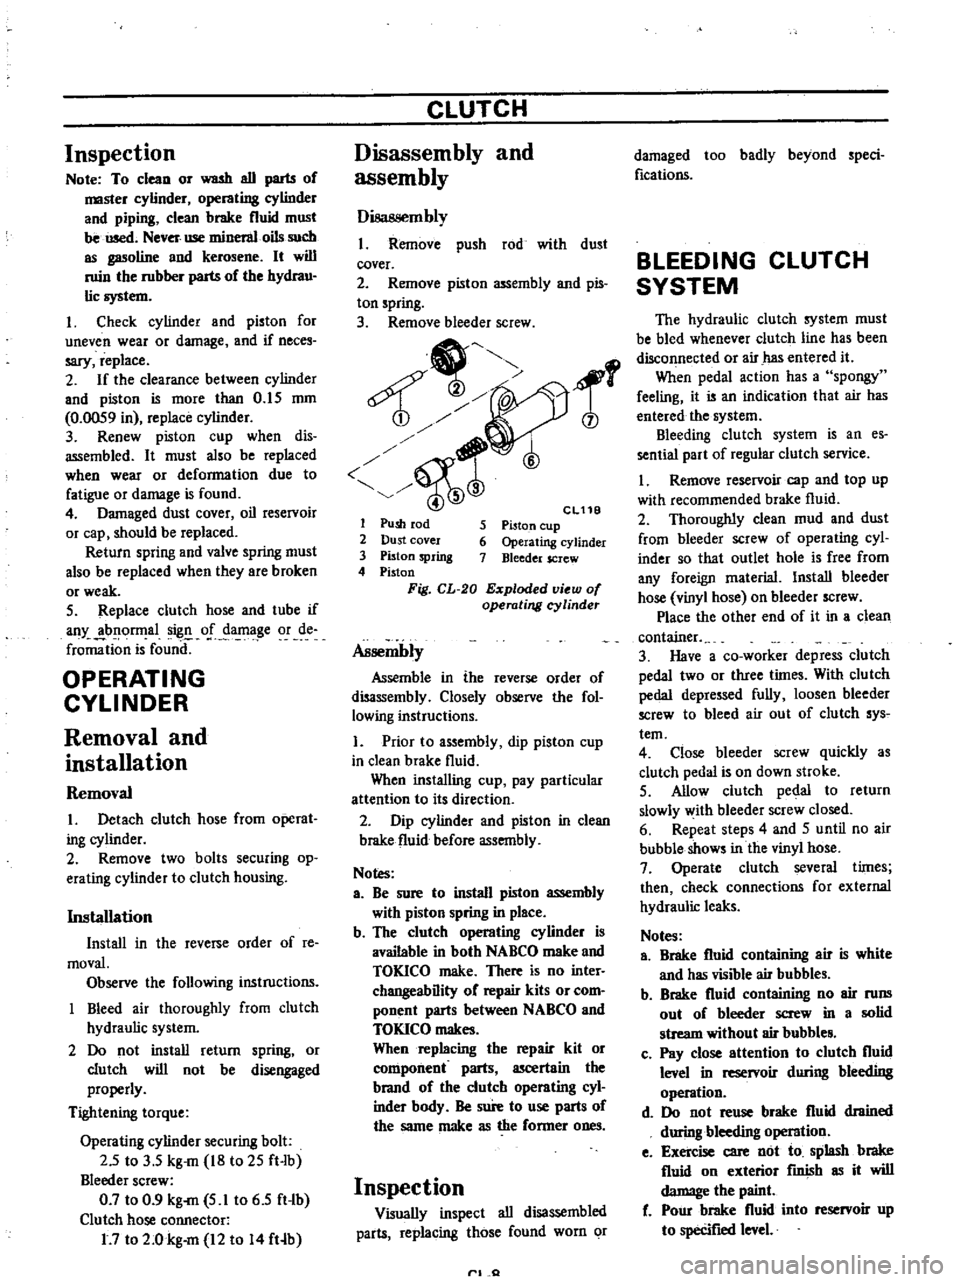
Disassembly
1
Remove
push
rod
with
dust
cover
2
Remove
piston
assembly
and
pis
ton
spring
3
Remove
bleeder
screw
1
6
Cl11B
5
Piston
cup
6
Operating
cylinder
7
Bleeder
screw
1
Push
rod
2
Dust
cover
3
Piston
spring
4
Piston
Fig
CL
20
Exploded
view
of
operating
cyUnder
Assembly
Assemble
in
the
reverse
order
of
disassembly
Closely
observe
the
fol
lowing
instructions
1
Prior
to
assembly
dip
piston
cup
in
clean
brake
fluid
When
installing
cup
pay
particular
attention
to
its
direction
2
Dip
cylinder
and
piston
in
clean
brake
fluid
before
assembly
Notes
a
Be
sure
to
install
piston
assembly
with
piston
spring
in
place
b
The
clutch
operating
cylinder
is
available
in
both
NABCO
make
and
TOKICO
make
There
is
no
inter
changeability
of
repair
kits
or
com
ponent
parts
between
NABCO
and
TOKICO
makes
When
replacing
the
repair
kit
or
component
parts
ascertain
the
brand
of
the
clutch
operating
cyl
inder
bndy
Be
sure
to
use
parts
of
the
same
make
as
the
former
ones
Inspection
Visually
inspect
all
disassembled
parts
replacing
those
found
worn
or
rl
Q
damaged
too
badly
beyond
speci
fications
BLEEDING
CLUTCH
SYSTEM
The
hydraulic
clutch
system
must
be
bled
whenever
clutch
line
has
been
disconnected
or
air
has
entered
it
When
pedal
action
has
a
spongy
feeling
it
is
an
indication
that
air
has
entered
the
system
Bleeding
clutch
system
is
an
es
sential
part
of
regular
clutch
service
I
Remove
reservoir
cap
and
top
up
with
recommended
brake
fluid
2
Thoroughly
clean
mud
and
dust
from
bleeder
screw
of
operating
cyl
inder
so
that
outlet
hole
is
free
from
any
foreign
rnaterial
Install
bleeder
hose
vinyl
hose
on
bleeder
screw
Place
the
other
end
of
it
in
a
clean
container
3
Have
a
co
worker
depress
clutch
pedal
two
or
three
times
With
clu
tch
pedal
depressed
fully
loosen
bleeder
screw
to
bleed
air
out
of
clutch
sys
tern
4
Close
bleeder
screw
quickly
as
clutch
pedal
is
on
down
stroke
5
Allow
clutch
pedal
to
return
slowly
with
bleeder
screw
closed
6
Repeat
steps
4
and
5
until
no
air
bubble
shows
in
the
vinyl
hose
7
Operate
clutch
several
times
then
check
connections
for
external
hydraulic
leaks
Notes
a
Brake
fluid
containing
air
is
white
and
has
visible
air
bubbles
b
Brake
fluid
containing
no
air
runs
out
of
bleeder
screw
in
a
solid
stream
without
air
bubble
c
Pay
close
attention
to
clutch
fluid
level
in
reservoir
during
bleeding
operation
d
Do
not
reuse
brake
fluid
drained
during
bleeding
operation
e
Exercise
care
not
to
splash
brake
fluid
on
exterior
fInish
as
it
will
damage
the
paint
f
Pour
brake
fluid
into
reservoir
up
to
specifIed
level
Page 231 of 537
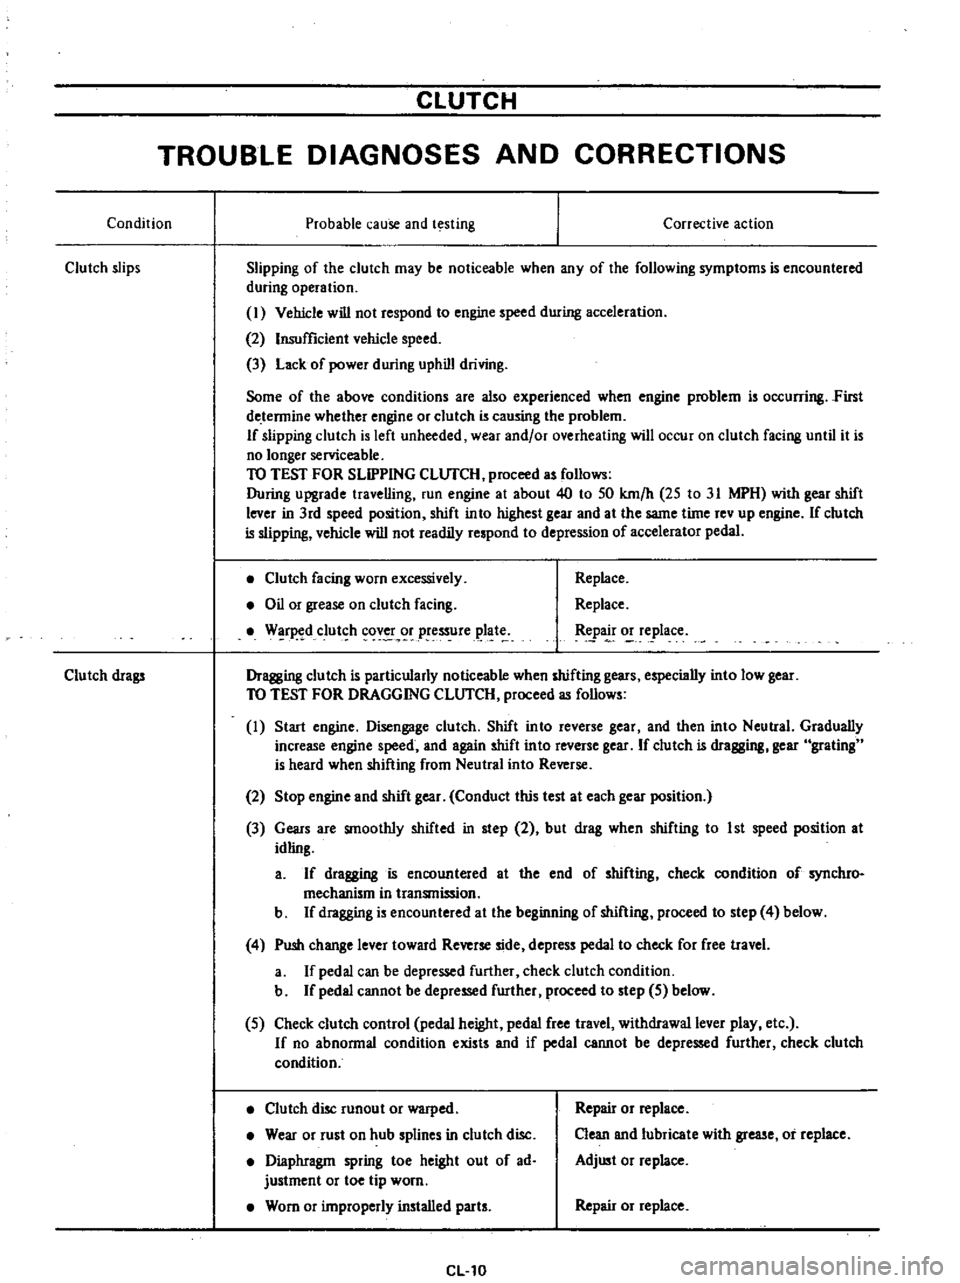
CLUTCH
TROUBLE
DIAGNOSES
AND
CORRECTIONS
Condition
Probable
cause
and
testing
Clutch
slips
Corrective
action
Slipping
of
the
clutch
may
be
noticeable
when
any
of
the
following
symptoms
is
encountered
during
operation
I
Vehicle
will
not
respond
to
engine
speed
during
acceleration
2
Insufficient
vehicle
speed
3
Lack
of
power
during
uphill
driving
Some
of
the
above
conditions
are
also
experienced
when
engine
problem
is
oc
urring
First
de
tennine
whether
engine
or
clutch
is
causing
the
problem
If
slipping
clutch
is
left
unheeded
wear
and
or
overheating
will
occur
on
clutch
facing
until
it
is
no
longer
serviceable
TO
TEST
FOR
SLIPPING
CLlJfCH
proceed
as
follows
During
upgrade
travelling
run
engine
at
about
40
to
50
km
h
25
to
31
MPH
with
gear
shift
lever
in
3rd
speed
position
shift
into
highest
gear
and
at
the
same
time
rev
up
engine
If
clutch
is
slipping
vehicle
will
not
readily
respond
to
depression
of
accelerator
pedal
Clutch
facing
worn
excessively
Oil
or
grease
on
clutch
facing
W
r
d
clut
h
cov
r
pressure
plat
Replace
Replace
tpa
o
e
lace
Dragging
clutch
is
particularly
noticeable
when
shifting
gears
especially
into
low
gear
TO
TEST
FOR
DRAGGING
CLlJfCH
proceed
as
follows
I
Start
engine
Disengage
clutch
Shift
into
reverse
gear
and
then
into
Neutral
Gradually
increase
engine
speed
and
again
shift
into
reverse
gear
If
clutch
is
dragging
gear
grating
is
heard
when
shifting
from
Neutral
into
Reverse
Clutch
drags
2
Stop
engine
and
shift
gear
Conduct
this
test
at
each
gear
position
3
Gears
are
smoothly
shifted
in
step
2
but
drag
when
shifting
to
1st
speed
position
at
idling
a
If
dragging
is
encountered
at
the
end
of
shifting
check
condition
of
synchro
mechanism
in
transmission
b
If
dragging
is
encountered
at
the
beginning
of
shifting
proceed
to
step
4
below
4
Push
change
lever
toward
Reverse
side
depress
pedal
to
check
for
free
travel
a
If
pedal
can
be
depressed
further
check
clutch
condition
b
If
pedal
cannot
be
depressed
further
proceed
to
step
5
below
5
Check
clutch
control
pedal
height
pedal
free
travel
withdrawal
lever
play
etc
If
no
abnonnal
condition
exists
and
if
pedal
cannot
be
depressed
further
check
clutch
condition
Clutch
disc
runout
or
warped
Wear
or
rust
on
hub
splines
in
clutch
disc
Diaphragm
spring
toe
height
out
of
ad
justment
or
toe
tip
worn
Worn
or
improperly
installed
parts
CL10
Repair
or
replace
Clean
and
lubricate
with
grease
or
replace
Adjust
or
replace
Repair
or
replace
Page 284 of 537
D
RANGE
LOW
GEAR
Automatic
Transmission
The
low
gear
in
D
range
is
somewhat
different
from
that
in
I
range
The
rear
c1utdl
is
applied
as
III
I
range
but
the
one
way
clutch
holds
the
connecting
drum
The
power
now
is
the
same
as
in
1
J
range
That
is
the
power
now
takes
place
through
Ihe
input
shaft
and
into
the
rear
clutch
The
input
shaft
is
splined
to
the
rear
clutch
drum
and
drives
it
Rotation
of
Ihe
rear
clutch
drives
the
rear
clutch
hub
and
front
internal
gear
The
front
internal
gear
rotales
the
front
planetary
gears
clockwise
to
cause
the
sun
gear
to
rotate
counter
clockwise
Counterclockwise
rotation
of
the
sun
gear
turns
the
rear
planetary
gears
clockwise
With
the
rear
plane
tary
carrier
held
stationary
by
the
one
way
clutch
the
clockwise
rotation
of
the
rear
planetary
gears
rotates
the
rear
internal
gear
and
drives
the
flange
clockwise
The
internal
drive
flange
is
splined
to
the
outpul
shaft
and
rotates
the
output
shaft
clockwise
When
the
manual
valve
is
posi
tioned
at
D
the
line
pressure
7
introduced
into
the
manual
valve
is
led
to
the
line
pressure
circuits
l
2
and
3
The
pressure
in
the
circuit
I
acluates
the
rear
clutch
and
the
gover
nor
and
al
the
same
time
operates
the
1st
2nd
shift
valve
CID
to
change
the
speed
The
circuit
2
leads
to
the
second
lock
valve
@
The
circuit
3
actuates
the
2nd
3rd
shift
valve
@
for
the
2nd
3rd
speed
change
and
at
the
same
lime
locks
the
second
lock
valve
@
The
throttle
pressure
16
which
changes
with
the
degree
of
accelerator
pedal
depression
presses
Ihe
pressure
regulator
valve
CD
and
increases
the
line
pressure
7
When
Ihe
speed
of
the
vehicle
has
increased
the
governor
pressure
15
introduced
from
the
line
pressure
circuit
I
actuates
the
I
SI
2nd
shift
valve
CID
2nd
3rd
shift
valve
@
and
pressure
modifier
valve
ID
When
the
governor
pressure
is
high
the
pressure
modifier
valve
ID
acls
in
such
a
direction
as
to
compress
the
spring
and
the
throttle
pressure
is
led
to
the
throttle
pressure
18
This
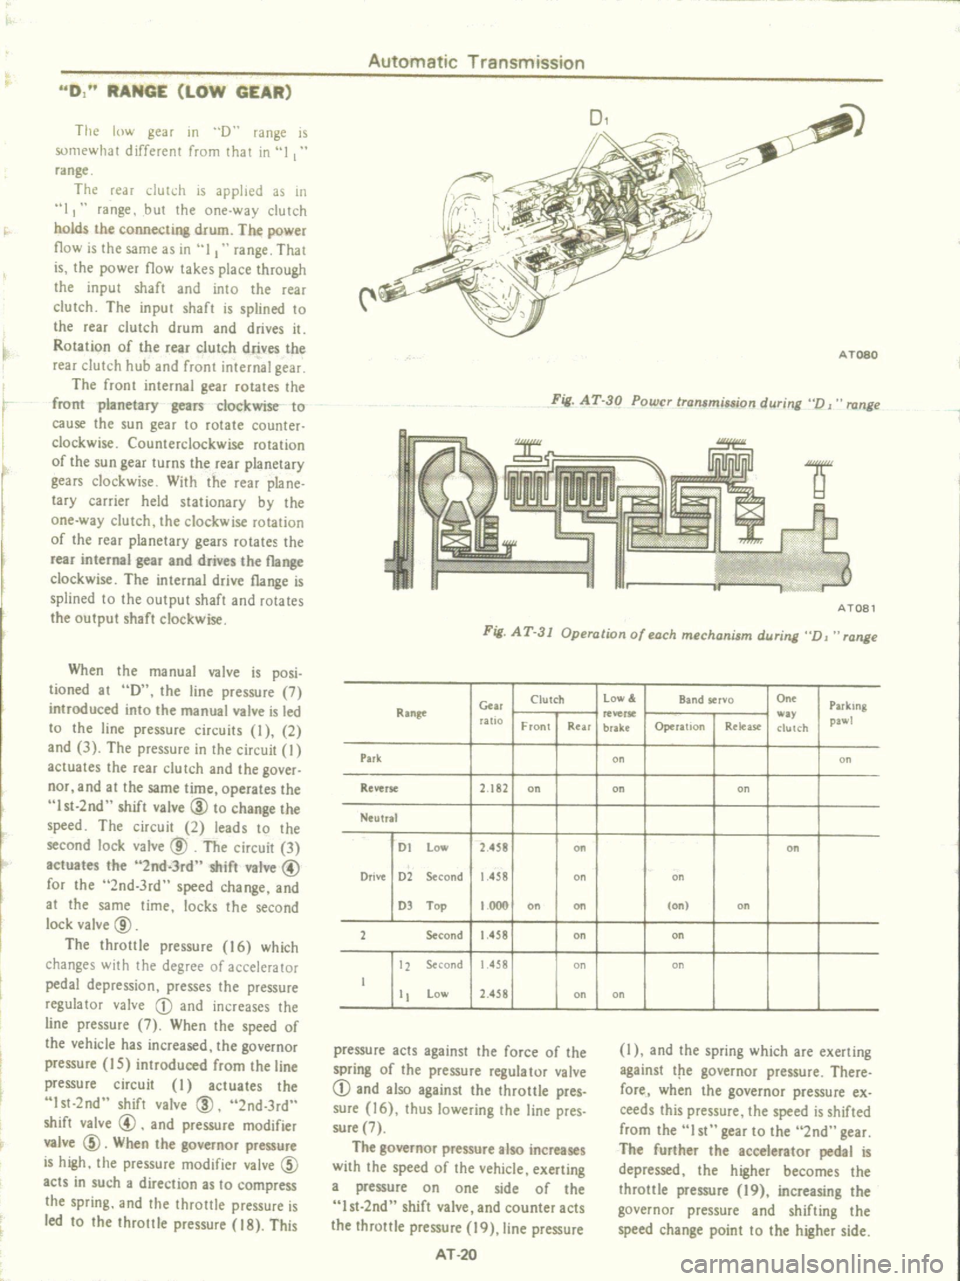
ATOSO
Fig
AT
30
Power
transmission
during
D
J
range
liIIl
I
IW
L
AT08l
Fig
AT
31
Operation
of
each
mechanism
during
VJ
range
Clutch
low
Band
servo
On
Parking
Cur
Ran
Rllelle
way
pawl
ratio
Front
Rur
brake
Operation
Rekase
ch
lch
Park
on
on
RellerK
2
t82
on
on
on
Neutral
01
low
2
S8
on
on
Orivt
02
Second
1
458
on
on
OJ
Top
1000
on
on
on
on
2
Second
1
458
on
00
t2
Second
1
458
on
on
t
tt
low
2
458
on
on
pressure
acts
against
the
force
of
the
spring
of
the
pressure
regulator
valve
CD
and
also
against
the
throttle
pres
sure
16
thus
lowering
the
line
pres
sure
7
The
governor
pressure
also
increases
with
the
speed
of
Ihe
vehicle
exerting
a
pressure
on
one
side
of
the
lst
2nd
shift
valve
and
counter
acts
the
Ihrottle
pressure
19
line
pressure
AT
20
l
and
the
spring
which
are
exerting
against
t
1e
governor
pressure
There
fore
when
the
governor
pressure
ex
ceeds
Ihis
pressure
the
speed
is
shifted
from
the
I
st
gear
to
the
2nd
gear
The
further
the
accelerator
pedal
is
depressed
the
higher
becomes
the
throttle
pressure
19
increasing
the
governor
pressure
and
shifting
the
speed
change
point
to
the
higher
side
Page 498 of 537
Water
in
the
system
will
ice
the
orifice
when
the
high
pressure
re
frigerant
is
changed
to
low
pressure
refrigerant
by
expansion
valve
etc
and
will
obstruct
the
refrigerant
flow
The
following
items
are
general
instructions
to
be
closely
observed
in
servicing
the
system
I
When
a
system
line
is
discon
nected
plug
the
opening
immediately
This
is
especially
necessary
to
prevent
moisture
condensation
from
forming
in
the
line
and
to
keep
out
dirt
and
dust
It
is
also
necessary
to
keep
the
line
at
and
above
surrounding
air
temperatures
at
all
times
When
con
necting
system
lines
do
not
attempt
to
remove
the
plug
from
the
opening
until
ready
for
immediate
use
2
Always
keep
the
working
place
clean
and
dry
and
free
from
dirt
and
dust
Wipe
water
off
with
a
clean
cloth
3
Have
all
necessary
tools
in
pre
paration
beforehand
and
have
tools
clean
and
dry
4
The
compressor
oil
will
easily
absorb
moisture
when
exposed
to
air
Immediateiy
close
the
opening
of
the
container
after
use
It
is
also
necessary
to
observe
the
following
notes
Notes
a
The
oil
should
not
be
transfused
from
a
container
into
another
as
the
failure
will
possibly
cause
mois
ture
to
mix
with
the
oil
b
The
used
oil
should
not
be
returned
into
a
container
c
The
oil
should
not
be
used
if
its
state
of
preservation
is
not
clear
enough
5
When
connecting
or
disconnect
ing
pipes
from
the
refrigeration
sys
tem
use
two
wrenches
One
wrench
is
used
for
holding
the
fixing
nut
in
place
while
the
other
for
turning
the
mating
flare
nut
Failure
to
do
so
may
result
in
a
twisted
tube
or
may
damage
connection
6
Also
use
care
not
to
give
scratches
to
the
seating
surface
at
connections
A
small
scratch
on
the
seating
surface
Air
Conditioning
may
be
the
cause
of
gas
leakage
Before
connecting
pipes
be
sure
to
give
coating
of
compressor
oil
to
the
sea
ting
surfaces
SAFETY
PRECAUTIONS
I
Since
direct
contact
of
the
liquid
refrigerant
with
your
skin
will
cause
frostbite
always
be
careful
when
handling
the
refrigerant
Wear
gloves
or
wrap
a
piece
of
cloth
around
service
valve
to
protect
your
fingers
against
frostbite
by
refrigerant
If
any
of
the
refrigerant
should
get
into
your
eyes
when
charging
the
refrigerant
splash
your
eyes
with
cool
water
to
raise
the
temperature
gradually
Apply
a
protec
tive
film
to
the
eye
to
avoid
infection
Do
not
rub
your
eyes
Consult
an
eye
specialist
Always
wear
goggles
or
glasses
to
protect
your
eyes
when
working
around
the
system
Should
refrigerant
strikes
your
body
splash
on
cool
water
and
apply
a
protective
film
2
The
refrigerant
service
container
has
a
safe
strength
However
if
han
dled
incorrectiy
it
wili
explode
Therefore
always
follow
the
instruc
tions
on
the
label
In
particular
never
stpre
it
in
a
hot
location
above
S20C
l250F
or
drop
it
from
a
high
height
3
The
refrigerant
gas
is
odorless
and
colorless
and
breathing
may
become
difficult
due
to
the
lack
of
oxygen
Since
the
refrigerant
gas
is
heavier
than
air
and
will
lay
close
to
the
floor
be
especially
careful
when
handling
it
in
small
confined
spaces
4
The
refrigerant
itself
is
nonflam
mable
However
a
toxic
gas
phosgene
gas
is
produced
when
it
contacts
fire
and
special
care
is
therefore
required
when
checking
for
leaks
in
the
system
with
a
halide
torch
5
Do
not
steam
clean
on
the
sys
tern
especially
condenser
since
exces
sively
high
pressure
will
build
up
in
the
system
resulting
in
explosion
of
the
system
The
above
precautions
are
essential
in
handling
of
Refrigerant
l
2
and
their
strict
observation
requires
suffi
AC
9
dent
training
Therefore
it
is
of
first
importance
that
any
other
personnel
than
a
well
trained
serviceman
should
not
be
allowed
to
handle
the
refrig
erant
EVACUATING
AND
CHARGING
SYSTEM
During
servicing
use
caution
to
keep
air
from
getting
into
refrigerant
When
air
enters
the
system
all
refriger
ant
must
be
evacuated
from
system
prior
to
charging
new
refrigerant
Air
in
refrigerant
has
the
following
delete
rious
effects
I
Since
the
condensation
tempera
ture
of
the
air
is
extremely
low
the
air
will
not
be
condensed
when
refrigerant
gas
is
condensed
in
the
condenser
and
the
air
will
thus
remain
in
gaseous
form
Consequently
the
effective
thermal
transmission
area
of
condenser
for
refrigerant
gas
will
be
red
uced
and
refrigerant
gas
to
be
condensed
will
be
red
ueed
The
pressure
rise
will
become
proportional
to
the
volume
of
the
air
in
system
2
When
air
and
refrigerant
are
mixed
in
system
a
chemical
reaction
will
be
produced
and
hydrochloric
acid
which
will
adversely
affect
the
aluminum
copper
iron
and
other
materials
in
system
may
be
generated
HANDLING
MANIFOLD
GAUGE
The
pressure
at
the
high
and
low
sides
of
system
should
be
measured
when
evacuating
and
charging
refrig
erant
and
when
diagnosing
trouble
in
the
system
The
manifold
gauge
is
used
for
these
purposes
A
manifold
gauge
has
two
pressure
gauges
a
low
pressure
gauge
and
a
high
pressure
gauge
These
gauges
are
connected
to
the
high
and
low
side
service
valves
of
system
through
flexible
charging
hoses
The
construction
of
manifold
gauge
is
shown
in
Figure
AC
13
When
valve
stem
is
fully
screwed
the
valve
is
front
seated
and
valve
path
and
the
center
path
are
blocked
When
valve
stem
is
backed
off
the
paths
are
opened