oil viscosity DATSUN PICK-UP 1977 Service Manual
[x] Cancel search | Manufacturer: DATSUN, Model Year: 1977, Model line: PICK-UP, Model: DATSUN PICK-UP 1977Pages: 537, PDF Size: 35.48 MB
Page 11 of 537

General
Information
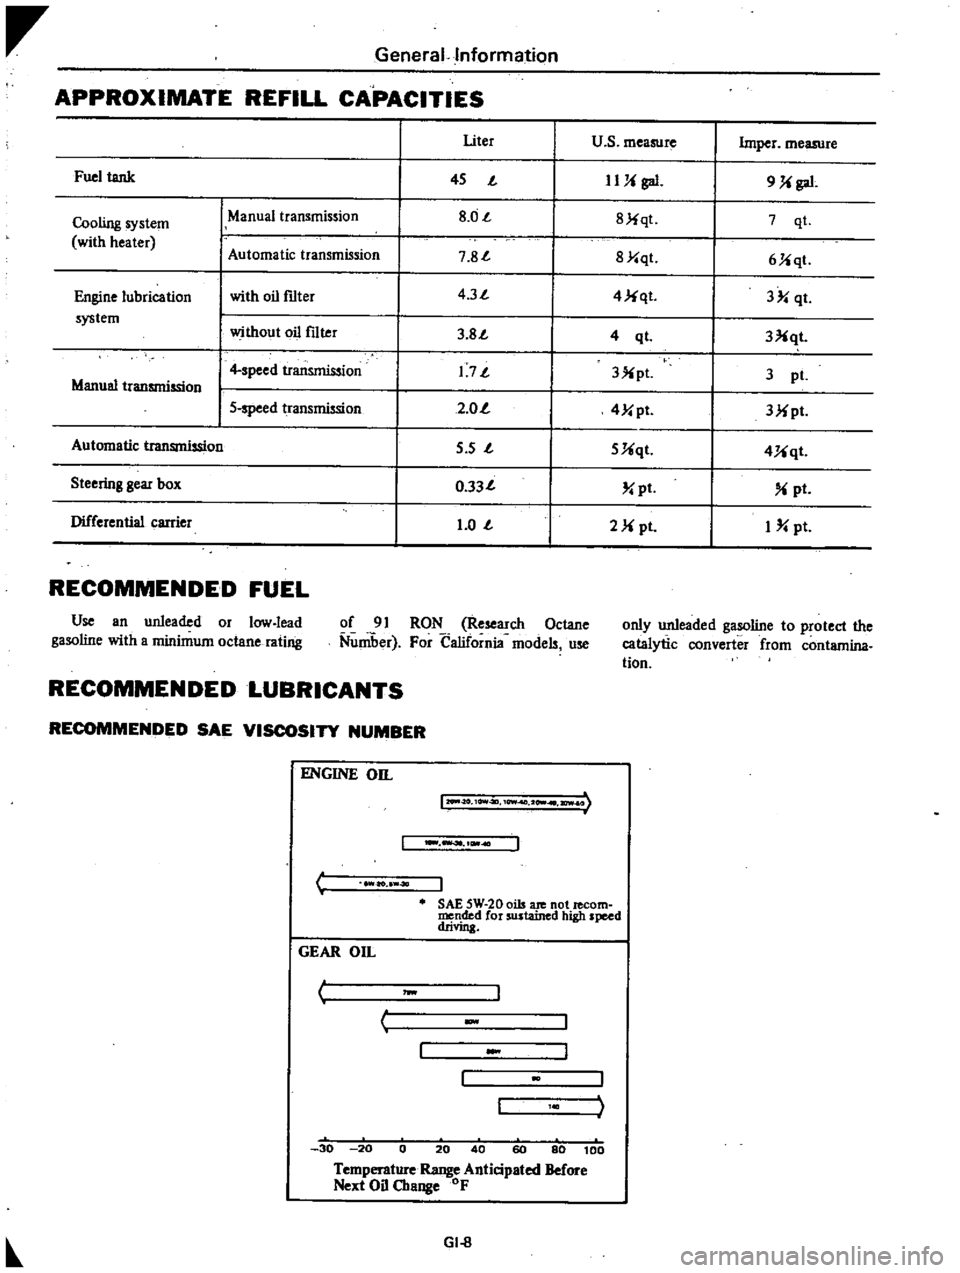
APPROXIMATE
REFILL
CAPACITIES
I
Uter
u
s
measure
Imper
measure
Fuel
tank
I
45
J
IUi
gal
9
Ji
gal
Cooling
system
ManUal
transmission
I
8
0J
I
8Jiqt
7
qt
with
heater
Automatic
tr
smission
I
7
8J
I
8Y
qt
6Jiqt
Engine
lubrication
with
oil
f1lter
I
4
3J
I
4
Ji
qt
3
qt
system
without
oil
f1lter
I
3
8J
I
3Xqt
4
ql
I
4
speed
transmission
I
1
7J
I
3X
pl
3
pI
Manual
transmission
I
5
speed
transmission
I
2
0
I
4Y
pt
3Mpt
Automatic
transmission
I
5
s
J
I
5Uqt
4Uqt
Steering
gear
box
I
0
33J
I
pt
pt
Differential
carrier
I
1
0
J
I
2M
pI
I
pt
RECOMMENDED
FUEL
Use
an
unleaded
or
low
lead
gasoline
with
a
minimum
octane
rating
of
91
RON
Research
Octane
Nuniber
For
California
models
use
only
unleaded
gasoline
to
protect
the
catalytic
converter
from
contamina
tion
RECOMMENDED
LUBRICANTS
RECOMMENDED
SAE
VISCOSITY
NUMBER
C
ENGINE
on
12O
II
O
10Vt4ll
10Wf
2
I
ICWI
I
ao
40
J
SAE
5W
20
oils
ate
not
lecom
mended
for
sustained
high
speed
drivin
GEAR
On
I
J
w
c
30
20
0
20
40
60
80
100
Temperature
Range
Anticipated
Before
Next
Oil
Change
OF
GI
8
Page 12 of 537

General
Information
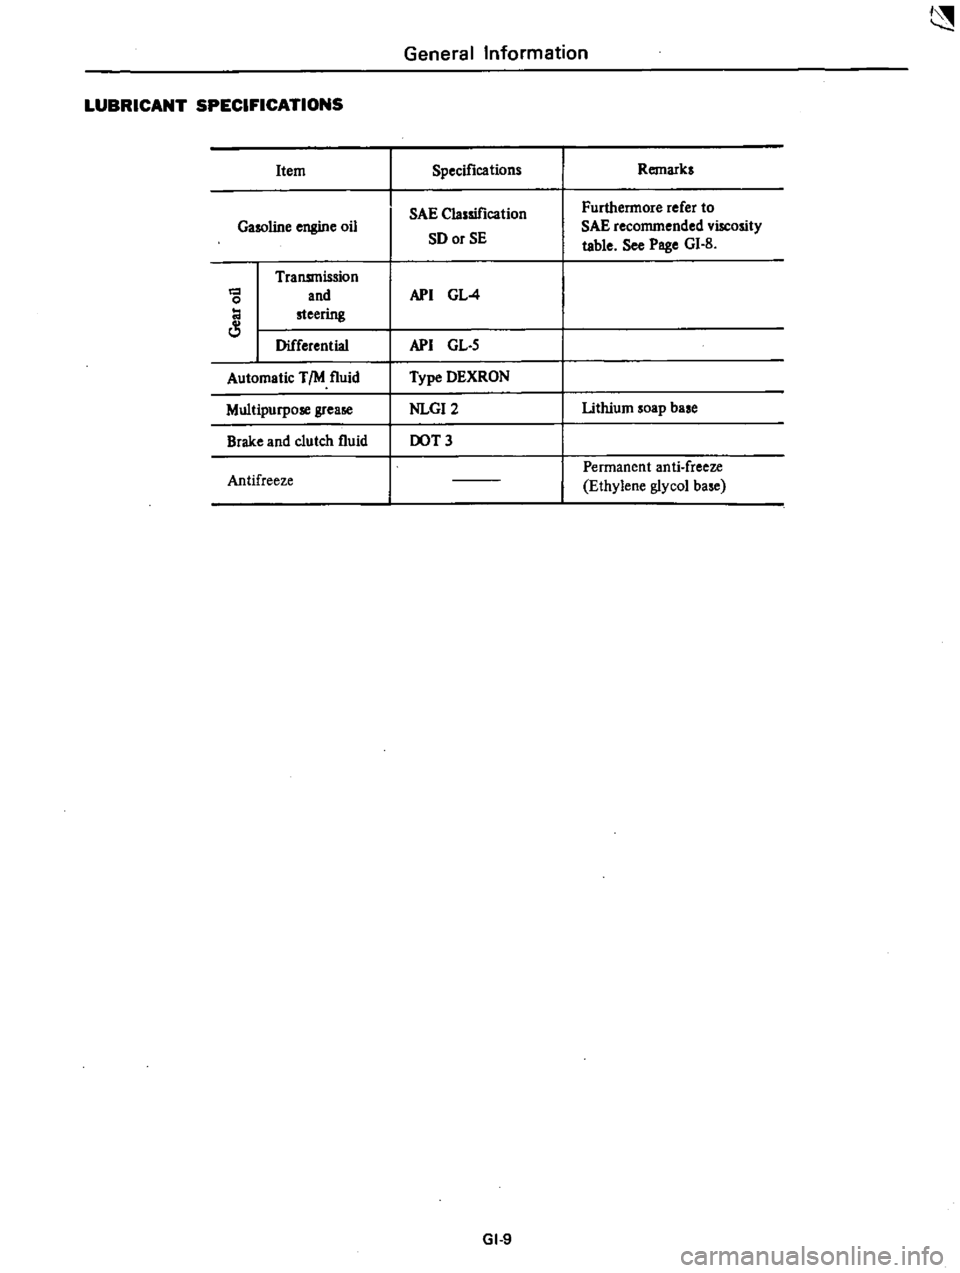
LUBRICANT
SPECIFICATIONS
Item
Specifications
Remarks
SAE
Classification
Furthermore
refer
to
Gasoline
engine
oil
SD
or
SE
SAE
recommended
viscosity
table
See
Poge
GI
B
Transmission
and
API
GL
4
0
steering
Differential
API
GL
S
Automatic
TIM
fluid
Type
DEXRON
Multipurpose
grea
NLGI2
lithium
soap
base
Brake
and
clutch
fluid
DOT
3
Permanent
anti
freeze
Antifreeze
Ethylene
glycol
ba
e
GI
9
Page 20 of 537

r
ManifolJ
nuts
I
2
to
1
6
kg
m
8
7
to
I
6
ft
lb
Carburelor
nuls
0
5
to
1
0
kg
m
3
6
to
7
2
fl
tb
Fig
ET
7
Tightening
s
quence
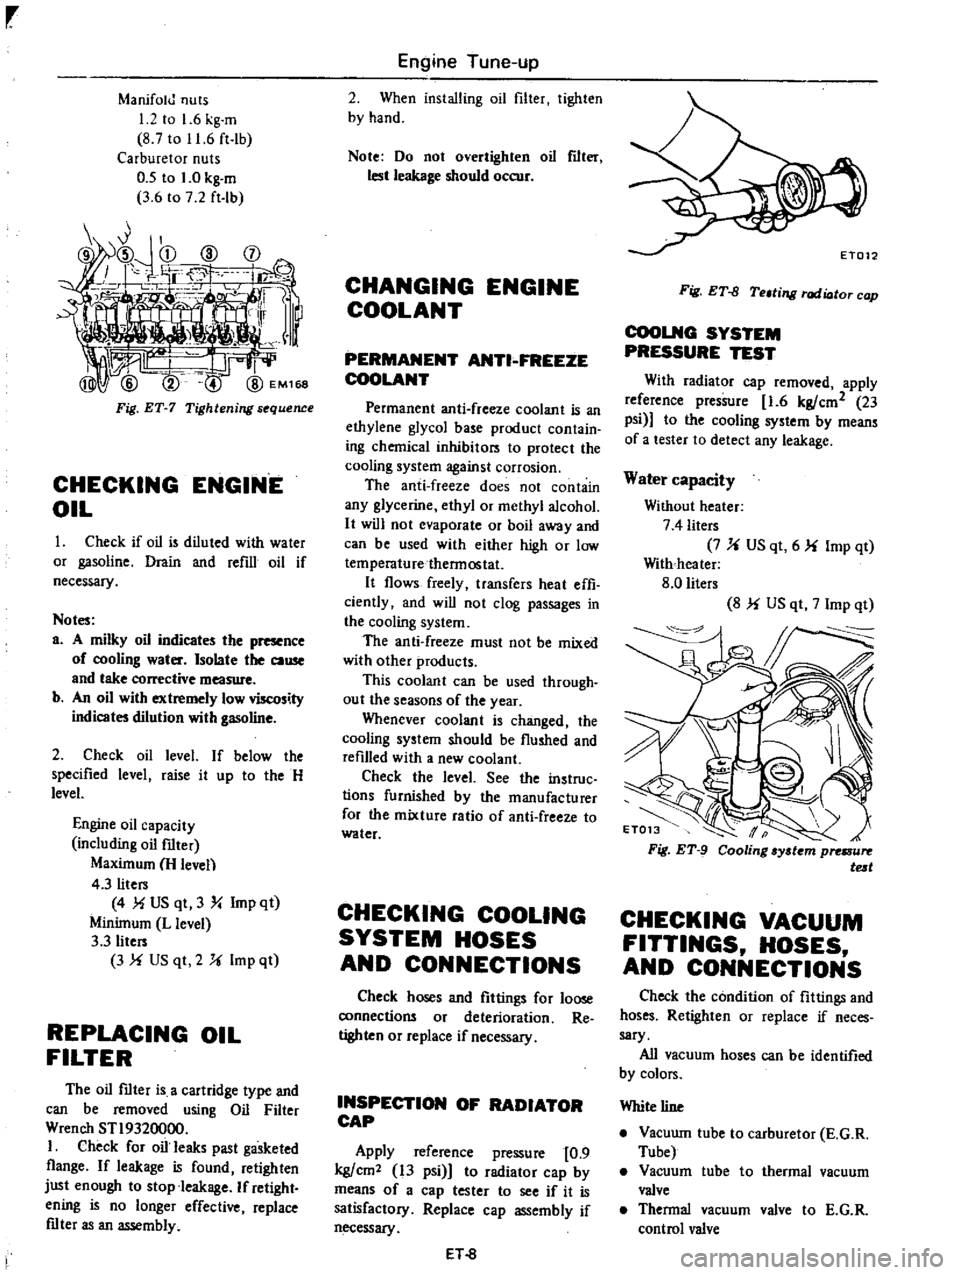
CHECKING
ENGINE
OIL
Check
if
oil
is
diluled
with
water
or
gasoline
Drain
and
refill
oil
if
necessary
Notes
a
A
milky
oil
indicates
the
presence
of
cooling
water
Isolate
the
cause
and
take
corrective
measure
b
An
oil
with
extremely
low
viscosity
indicates
dilution
with
gasoline
2
Check
oil
level
If
below
the
specified
level
raise
it
up
10
the
H
level
Engine
oil
capacity
including
oil
filter
Maximum
H
leven
4
3
liters
4
MUS
qt
3
Y
Imp
qt
Minimum
L
level
3
3
liters
3
f
US
qt
2
U
Imp
ql
REPLACING
OIL
FILTER
The
oil
mter
is
a
cartridge
type
and
can
be
removed
using
Oil
Filter
Wrench
STI9320000
I
Check
for
oil
leaks
past
gasketed
flange
If
leakage
is
found
retighten
just
enough
to
stop
leakage
If
retight
ening
is
no
longer
effective
replace
mter
as
an
assembly
Engine
Tune
up
2
When
installing
oil
filter
tighlen
by
hand
Note
Do
not
overtighten
oil
flIt
lest
leakage
should
occur
CHANGING
ENGINE
COOLANT
PERMANENT
ANTI
FREEZE
COOLANT
Permanent
anti
freeze
coolant
is
an
ethylene
glycol
base
producl
conlain
ing
chemical
inhibilors
10
protect
the
cooling
system
against
corrosion
The
anti
freeze
does
not
contain
any
glycerine
ethyl
or
methyl
alcohol
It
will
not
evaporate
or
boil
away
and
can
be
used
with
either
high
or
low
temperaturethennoslat
It
flows
freely
transfers
heat
effi
ciently
and
will
not
clog
passages
in
the
cooling
system
The
anti
freeze
must
not
be
mixed
with
other
products
This
coolant
can
be
used
through
out
the
seasons
of
the
year
Whenever
coolant
is
changed
the
cooling
syslem
should
be
flushed
and
refilled
with
a
new
coolant
Check
the
level
See
the
instruc
lions
furnished
by
the
manufacturer
for
the
mixture
ratio
of
anti
freeze
10
water
CHECKING
COOLING
SYSTEM
HOSES
AND
CONNECTIONS
Check
hoses
and
fittings
for
loose
connections
or
deterioration
Re
tighten
or
replace
if
necessary
INSPECTION
OF
RADIATOR
CAP
Apply
reference
pressure
0
9
kg
cm2
13
psi
1
to
radiator
cap
by
means
of
a
cap
tester
to
see
if
it
is
satisfactory
Replace
cap
assembly
if
necessary
ET
8
Fig
ET
fJ
Teltill
l
rod
ioto
cop
COOLNG
SYSTEM
PRESSURE
TEST
With
radiator
cap
removed
apply
reference
pressure
1
6
kg
cm2
23
psi
to
the
cooling
system
by
means
of
a
lesler
to
detect
any
leakage
Water
capacity
Without
heater
7
4
liters
7
U
US
qt
6
f
Imp
qt
With
heater
8
0
liters
8
f
US
qt
7
Imp
qt
CHECKING
VACUUM
FITTINGS
HOSES
AND
CONNECTIONS
Check
the
condition
of
filtings
and
hoses
Retighten
or
replace
if
neces
sary
All
vacuum
hoses
can
be
identified
by
colors
White
line
Vacuwn
tube
to
carburetor
E
G
R
Tube
Vacuum
tube
to
thermal
vacuum
valve
Thennal
vacuum
valve
to
E
G
R
control
valve
Page 40 of 537

Engine
Tune
up
Condition
Probable
cause
Low
or
no
current
Ign
tion
system
out
of
order
Burned
distributor
point
Improper
point
gap
Faulty
condenser
Leak
at
rotor
cap
and
rotor
Faulty
spark
plug
Improper
ignition
timing
Faulty
ignition
coil
Disconnection
of
high
tension
cable
Loose
connection
or
disconnection
in
primary
circuit
Fuel
system
out
of
order
Lack
offuel
Dirty
fuel
strainer
Dirty
or
clogged
fuel
pipe
Fuel
pump
will
not
work
properly
Carburetor
choke
will
not
work
properly
Improper
adjustment
of
float
level
Improper
idling
Dirty
or
clogged
carburetor
Clogged
breather
pip
of
fuel
tank
Malfunctioning
an
ti
dieseling
solenoid
valve
Incorrect
sparle
plug
tightening
or
faulty
gasket
Improper
grade
engine
oil
or
low
viscosity
Incorrect
valve
clearance
Compression
leak
from
valve
seat
Sticky
valve
stem
Weak
or
damaged
valve
springs
Compression
leak
at
cylinder
head
gasket
Sticking
or
damaged
piston
ring
Worn
piston
ring
or
cylinder
Trouble
ooting
procedure
Pour
the
engine
oil
from
plug
hole
and
then
measure
cylinder
compression
Compression
increases
Compression
does
not
change
Low
comp
ion
ET
28
Corrective
action
Check
for
loose
terminal
or
disconnection
in
primary
circuit
Check
for
burned
points
Repair
or
replace
Adjust
Replace
Clean
or
replace
aean
adjust
plug
gap
or
replace
Adjust
Replace
Replace
Repair
or
replace
Supply
Replace
Clean
Repair
or
replace
Check
and
adjust
Correct
Adjust
Disassemble
and
clean
Repair
and
clean
Check
for
loose
terminal
or
wire
harness
Tighten
to
normal
torque
or
replace
gasket
Replace
with
proper
grade
oil
Adjust
Remove
cyljnder
head
and
lap
valves
Correct
or
replace
valve
and
valve
guide
Replace
valve
springs
Replace
gasket
Replace
piston
rings
Overhaul
engine
Malfunctiong
cylinder
or
piston
ring
Compression
leaks
from
valve
cylinder
head
or
head
gasket
Except
transistor
ignition
system
Page 497 of 537

REFRIGERAi
H
R
12
COMPRESSOR
OIL
MAINTENANCE
PERIODIC
MAINTENANCE
AND
SEASON
IN
INSPECTION
GENERAL
SERVICE
INSTRUCTION
SAFETY
PRECAUTIONS
EV
ACUA
TlNG
AND
CHARGING
SYSTEM
HANDLING
MANIFOLD
GAUGE
HANDLING
SERVICE
VALVE
HANDLING
CAN
TAP
DISCHARGING
SYSTEM
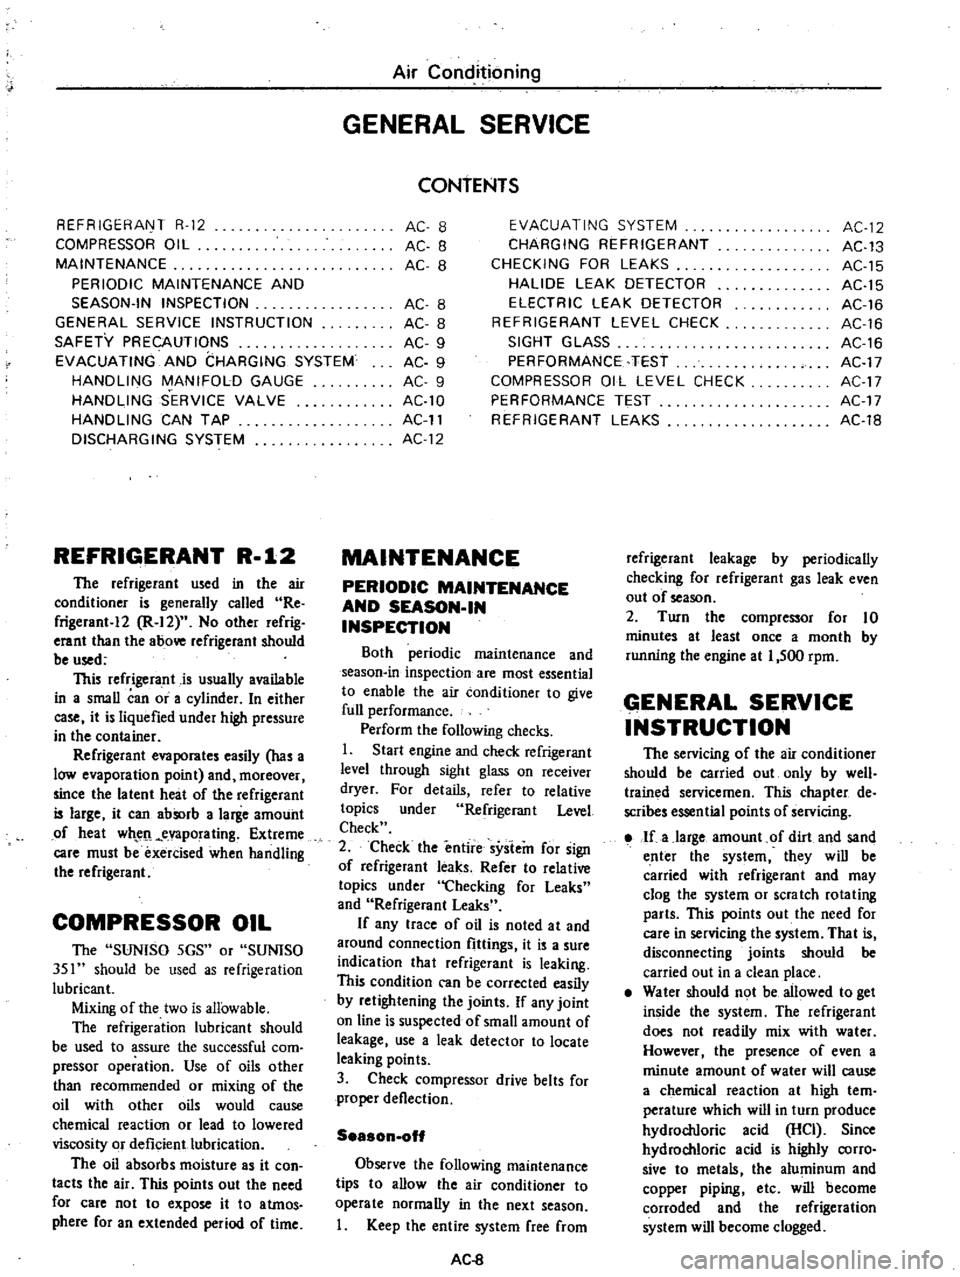
REFRIGERANT
R
12
The
refrigerant
used
in
the
air
conditioner
is
generally
called
Re
frigerant
12
R
12
No
other
refrig
erant
than
the
above
refrigerant
should
be
used
This
refrigerant
is
usually
available
in
a
small
can
or
a
cylinder
In
either
case
it
is
liquefied
under
high
pressure
in
the
container
Refrigerant
evaporates
easily
has
a
low
evaporation
point
and
moreover
since
the
latent
heat
of
the
refrigerant
is
large
it
can
abSorb
a
large
amount
of
heat
wh
err
e
vaporating
Extreme
care
must
be
exercised
when
handling
the
refrigerant
COMPRESSOR
OIL
The
SUNISO
5GS
or
SUNISO
351
should
be
used
as
refrigeration
lubricant
Mixing
of
the
two
is
allowable
The
refrigeration
lubricant
should
be
used
to
assure
the
successful
com
pressor
operation
Use
of
oils
other
than
recommended
or
mixing
of
the
oil
with
other
oils
would
cause
chemical
reaction
or
lead
to
lowered
viscosity
or
deficient
lubrication
The
oil
absorbs
moisture
as
it
con
tacts
the
air
This
points
out
the
need
for
care
not
to
expose
it
to
atmos
phere
for
an
extended
period
of
time
Air
Conditioning
GENERAL
SERVICE
CONTENTS
EVACUATING
SYSTEM
CHARGING
REFRIGERANT
CHECKING
FOR
LEAKS
HALIDE
LEAK
DETECTOR
ELECTRIC
LEAK
DETECTOR
REFRIGERANT
LEVEL
CHECK
SIGHT
GLASS
PERFORMANCE
TEST
COMPRESSOR
OIL
LEVEL
CHECK
PERFORMANCE
TEST
REFRIGERANT
LEAKS
AC
8
AC
8
AC
8
AC
8
AC
8
AC
9
AC
9
AC
9
AC10
AC
11
AC
12
MAINTENANCE
PERIODIC
MAINTENANCE
AND
SEASON
IN
INSPECTION
Both
periodic
maintenance
and
season
in
inspection
are
most
essential
to
enable
the
air
conditioner
to
give
full
performance
Perform
the
following
checks
Start
engine
and
check
refrigerant
level
through
sight
glass
on
receiver
dryer
For
details
refer
to
relative
topics
under
Refrigerant
Level
Check
2
Check
the
entire
sysiein
for
sign
of
refrigerant
leaks
Refer
to
relative
topics
under
Checking
for
Leaks
and
Refrigerant
Leaks
If
any
trace
of
oil
is
noted
at
and
around
connection
fittings
it
is
a
sure
indication
that
refrigerant
is
leaking
This
condition
can
be
corrected
easily
by
retightening
the
joints
If
any
joint
on
line
is
suspected
of
small
amount
of
leakage
use
a
leak
detector
to
locate
leaking
points
3
Check
compressor
drive
belts
for
proper
deflection
Season
off
Observe
the
following
maintenance
tips
to
allow
the
air
conditioner
to
operate
normally
in
the
next
season
I
Keep
the
entire
system
free
from
AC
8
AC12
AC
13
AC15
AC15
AC16
AC
16
AC16
AC
17
AC17
AC
17
AC18
refrigerant
leakage
by
periodically
checking
for
refrigerant
gas
leak
even
out
of
season
2
Turn
the
compressor
for
10
minutes
at
least
once
a
month
by
running
the
engine
at
1
500
rpm
c
ENERAL
SERVICE
INSTRUCTION
The
servicing
of
the
air
conditioner
should
be
carried
out
only
by
well
trained
servicemen
This
chapter
de
scribes
essential
points
of
servicing
Jf
a
Jarge
amount
of
dirt
and
sand
enter
the
system
they
will
be
carried
with
refrigerant
and
may
clog
the
system
or
scratch
rotating
parts
This
points
out
the
need
for
care
in
servicing
the
system
That
is
disconnecting
joints
should
be
carried
out
in
a
dean
place
Water
should
not
be
allowed
to
get
inside
the
system
The
refrigerant
does
not
readily
mix
with
water
However
the
presence
of
even
a
minute
amount
of
water
will
cause
a
chemical
reaction
at
high
tem
perature
which
will
in
turn
produce
hydrochloric
acid
HCl
Since
hydrochloric
acid
is
highly
corro
sive
to
metals
the
aluminum
and
copper
piping
etc
will
become
corroded
and
the
refrigeration
system
will
become
clogged