wiper fluid DATSUN PICK-UP 1977 Service Manual
[x] Cancel search | Manufacturer: DATSUN, Model Year: 1977, Model line: PICK-UP, Model: DATSUN PICK-UP 1977Pages: 537, PDF Size: 35.48 MB
Page 468 of 537

Body
Electrical
System
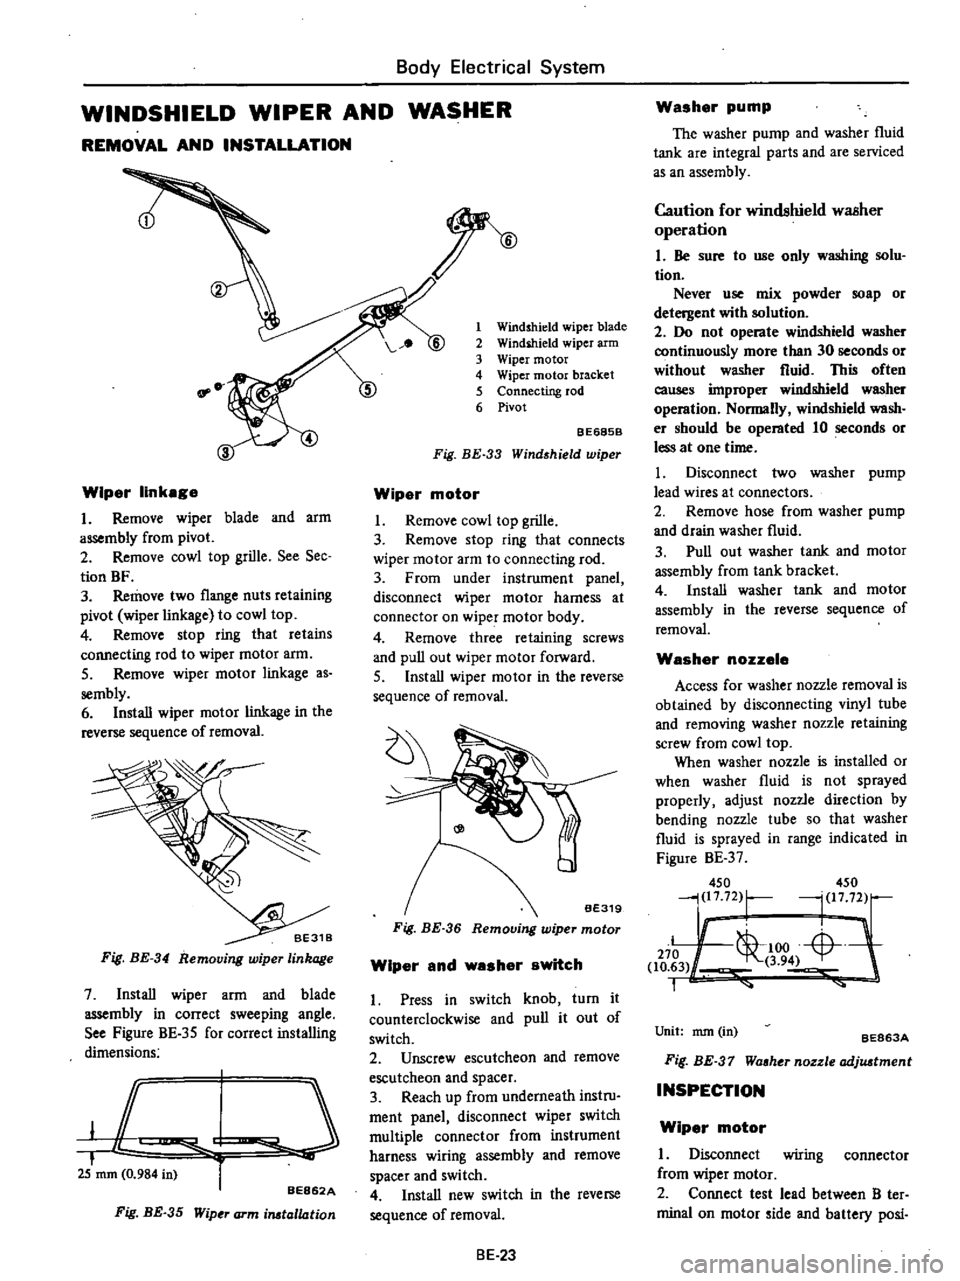
WINDSHIELD
WIPER
AND
WASHER
REMOVAL
AND
INSTALLATION
Wiper
linkage
I
Remove
wiper
blade
and
arm
assembly
from
pivot
2
Remove
cowl
top
grille
See
Sec
tion
BF
3
Remove
two
flange
nuts
retaining
pivot
wiper
linka
e
to
cowl
top
4
Remove
stop
ring
that
retains
connecting
rod
to
wiper
motor
arm
5
Remove
wiper
motor
linkage
as
sembly
6
Install
wiper
motor
linkage
in
the
reverse
sequence
of
removal
Fig
BE
34
Removing
wiper
linkage
7
Install
wiper
arm
and
blade
assembly
in
correct
sweeping
angle
See
Figure
BE
35
for
correct
installing
dimensions
JC
I
i
25
mm
0
984
in
r
BE862A
Fig
BE
35
Wip
J
arm
irutallation
1
Windshield
wiper
blade
2
Windihield
wiper
arm
3
Wiper
motor
4
Wiper
motor
bracket
5
Connecting
rod
6
Pivot
BE685B
Fig
BE
33
Wind
hield
wiper
Wiper
motor
I
Remove
cowl
top
grille
3
Remove
stop
ring
that
connects
wiper
motor
arm
to
connecting
rod
3
From
under
instrument
panel
disconnect
wiper
motor
harness
at
connector
on
wiper
motor
body
4
Remove
three
retaining
screws
and
pull
out
wiper
motor
forward
5
Install
wiper
motor
in
the
reverse
sequence
of
removal
Fig
BE
36
Wiper
and
washer
switch
1
Press
in
switch
knob
turn
it
counterclockwise
and
pull
it
out
of
switch
2
Unscrew
escutcheon
and
remove
escutcheon
and
spacer
3
Reach
up
from
underneath
instru
ment
panel
disconnect
wiper
switch
multiple
connector
from
instrument
harness
wiring
assembly
and
remove
spacer
and
switch
4
Install
new
switch
in
the
reverse
sequence
of
removal
BE
23
Washer
pump
The
washer
pump
and
washer
fluid
tank
are
integral
parts
and
are
serviced
as
an
assembly
Caution
for
windshield
waBher
operation
I
Be
sure
to
use
only
washing
solu
tion
Never
use
mix
powder
soap
or
detergent
with
solution
2
Do
not
operate
windshield
washer
continuously
more
than
30
seconds
or
without
washer
fluid
This
often
causes
improper
windshield
washer
operation
Normally
windshield
wash
er
should
be
operated
10
seconds
or
less
at
one
time
I
Disconnect
two
washer
pump
lead
wires
at
connectors
2
Remove
hose
from
washer
pump
and
drain
washer
fluid
3
Pull
out
washer
tank
and
motor
assembly
from
tank
bracket
4
Install
washer
tank
and
motor
assembly
in
the
reverse
sequence
of
removal
Washer
nozzele
Access
for
washer
nozzle
removal
is
obtained
by
disconnecting
vinyl
tube
and
removing
washer
nozzle
retaining
screw
from
cowl
top
When
washer
nozzle
is
installed
or
when
washer
fluid
is
not
sprayed
properly
adjust
nozzle
direction
by
bending
nozzle
tube
so
that
washer
fluid
is
sprayed
in
range
indicated
in
Figure
BE
37
450
450
j217
72
r
l
1772
Ii
L
1
00
Li
L
J
270
1
to
63
3
94
1
Unit
nun
in
BE863A
Fif
BE
37
Waaher
nozzle
adjuatment
INSPECTION
Wiper
motor
I
Disconnect
wiring
connector
from
wiper
motor
2
Connect
test
lead
between
B
ter
minal
on
motor
ide
and
battery
posi