air condition DODGE CALIBER 2010 1.G User Guide
[x] Cancel search | Manufacturer: DODGE, Model Year: 2010, Model line: CALIBER, Model: DODGE CALIBER 2010 1.GPages: 76, PDF Size: 12.18 MB
Page 24 of 76
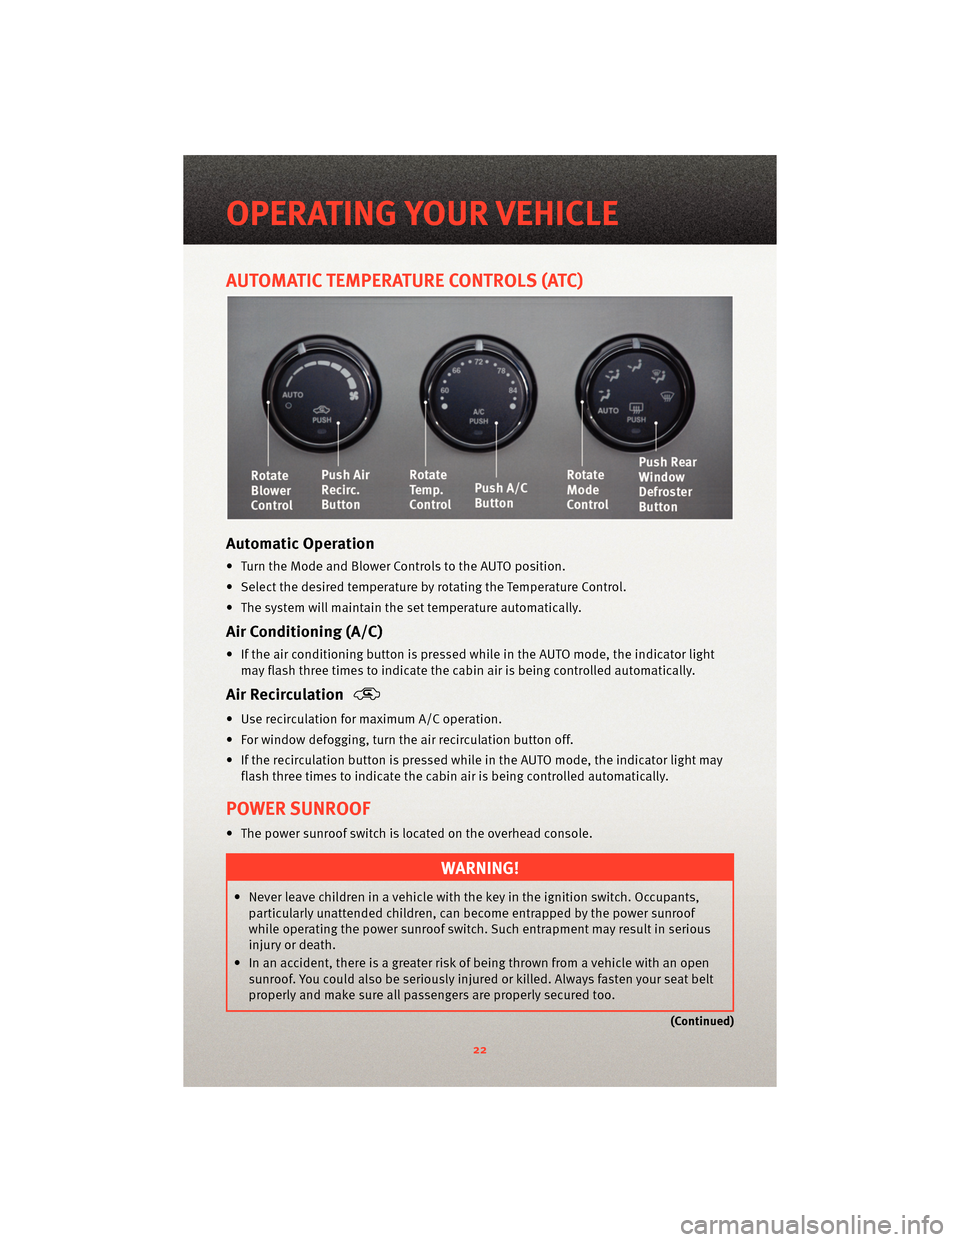
AUTOMATIC TEMPERATURE CONTROLS (ATC)
Automatic Operation
• Turn the Mode and Blower Controls to the AUTO position.
• Select the desired temperature by rotating the Temperature Control.
• The system will maintain the set temperature automatically.
Air Conditioning (A/C)
• If the air conditioning button is pressed while in the AUTO mode, the indicator lightmay flash three times to indicate the cabin air is being controlled automatically.
Air Recirculation
• Use recirculation for maximum A/C operation.
• For window defogging, turn the air recirculation button off.
• If the recirculation button is pressed while in the AUTO mode, the indicator light may flash three times to indicate the cabin air is being controlled automatically.
POWER SUNROOF
• The power sunroof switch is located on the overhead console.
WARNING!
• Never leave children in a vehicle with the key in the ignition switch. Occupants,particularly unattended children, can become entrapped by the power sunroof
while operating the power sunroof switch. Such entrapment may result in serious
injury or death.
• In an accident, there is a greater risk of being thrown from a vehicle with an open sunroof. You could also be seriously injured or killed. Always fasten your seat belt
properly and make sure all passengers are properly secured too.
(Continued)
OPERATING YOUR VEHICLE
22
Page 37 of 76
WARNING!
To avoid serious injury or death: Do not use athree-prong adaptor. Do not insert any
objects into the receptacles. Do not touch with wet hands. Close the lid when not in
use. If this outlet is mishandled, it ma y cause an electric shock and failure.
POWER OUTLET
• The power outlet is located on the ins trument panel below the climate control and is
powered when the ignition switch is in the ON/RUN position.
• The outlet can operate a conventional cigar lighter unit or power accessories designed for use with a standard power outlet adapter.
NOTE: Do not exceed the maximum power of 160 Watts (13 Amps) at 12 Volts. If the 160
Watt (13 Amp) power rating is exceeded the fuse protecting the system will need to be
replaced.
Uconnect™ Phone
• The Uconnect™ Phone is a voice-activated, hands-free, in-vehicle communications system.
• The Uconnect™ Phone allows you to dial a phone number with your cellular phone using simple voice commands.
• For vehicles equipped with Video Entertainment System (VES)™, refer to the Uconnect™ Phone section of the Uconnect™ User's Manual on the DVD for further
details.
• For vehicles not equipped with VES™, refer to your vehicle Owner's Manual on the DVD for further details.
WARNING!
• Any voice commanded system should be used only in safe driving conditionsfollowing local laws and phone use. All attention should be kept on the roadway
ahead. Failure to do so may result in an accident causing serious injury or death.
• Your phone must be turned on and paired to the Uconnect™ Phone to allow use of this vehicle feature in emergency situations, when the cellular phone has network
coverage and stays paired to the Uconnect™ Phone.
NOTE: The Uconnect™ Phone requires a cellular phone equipped with the Bluetooth
®
Hands-Free Profile, Version 0.96 or higher. For Uconnect™ customer support, call
1–877–855–8400.
35
ELECTRONICS
Page 46 of 76
Fuel Cap/Loose Gas Cap Message
• If a “gas cap” message (shown as gASCAP) appears, tighten the gas cap until a“clicking” sound is heard.
• Press the odometer reset button, located belo w the tachometer, to turn the message
off.
• If the message continues to appear for mor e than three days after tightening the gas
cap, see your authorized dealer.
Oil Change Indicator
Message
• If an “oil change” message (shown as CHAngE OIL) appears and a single chime
sounds, it is time for your next required oil change.
Resetting The Light After Servicing
• Turn the ignition switch to the ON/RUN position (do not start engine).
• Fully depress the accelerator pedal three times within 10 seconds.
• Turn the ignition switch to the OFF/LOCK position.
IF YOUR ENGINE OVERHEATS
• In any of the following situations, you c an reduce the potential for overheating by
taking the appropriate action.
• On the highways — slow down.
• In city traffic — while stopped, shift tran smission intoNEUTRAL, but do not increase
engine idle speed.
NOTE: There are steps that you can take to slow down an impending overheat
condition:
• If your air conditioner (A/C) is on, turn it off. The A/C system adds heat to the engine cooling system and turning the A/C off can help remove this heat.
• You can also turn the Temperature Control to maximum heat, the Mode Control to floor and the Fan Control to high. This allows the heater core to act as a supplement to the
radiator and aids in removing heat from the engine cooling system.
• If the temperature reading does not re turn to normal, turn the engine off immediately.
• We recommend that you do not operate the vehicle or engine damage will occur. Have the vehicle serviced immediately.
WHAT TO DO IN EMERGENCIES
44
Page 47 of 76
CAUTION!
Driving with a hot cooling system could damage your vehicle. If the temperature gauge
reads HOT (H), pull over and stop the vehicle. Idle the vehicle with the air conditioner
turned off until the pointer drops back into the normal range. If the pointer remains on
HOT (H), and you hear continuous chimes, t urn the engine off immediately and call for
service.
WARNING!
You or others can be badly burned by hot engine coolant (antifreeze) or steam from
your radiator. If you see or hear steam coming from under the hood, do not open the
hood until the radiator has had time to co ol. Never try to open a cooling system
pressure cap when the radiator or coolant bottle is hot.
AUTOMATIC TRANSAXLE OVERHEATING
• During sustained high speed driving or trailer towing up long grades on hot days, the automatic transaxle oil may become too hot.
• When the transaxle overheat warning light
turns on, you will experience reduced
performance until the automatic transaxle cools down. Once the transaxle has cooled
down and the light turns off, you may continue to drive normally. If the high speed is
maintained, the overheating will continue to occur.
• If the overheating continues, it may become necessary to stop the vehicle and run the engine at idle with the transaxle in NEUTRAL until the light turns off.
45
WHAT TO DO IN EMERGENCIES
Page 62 of 76
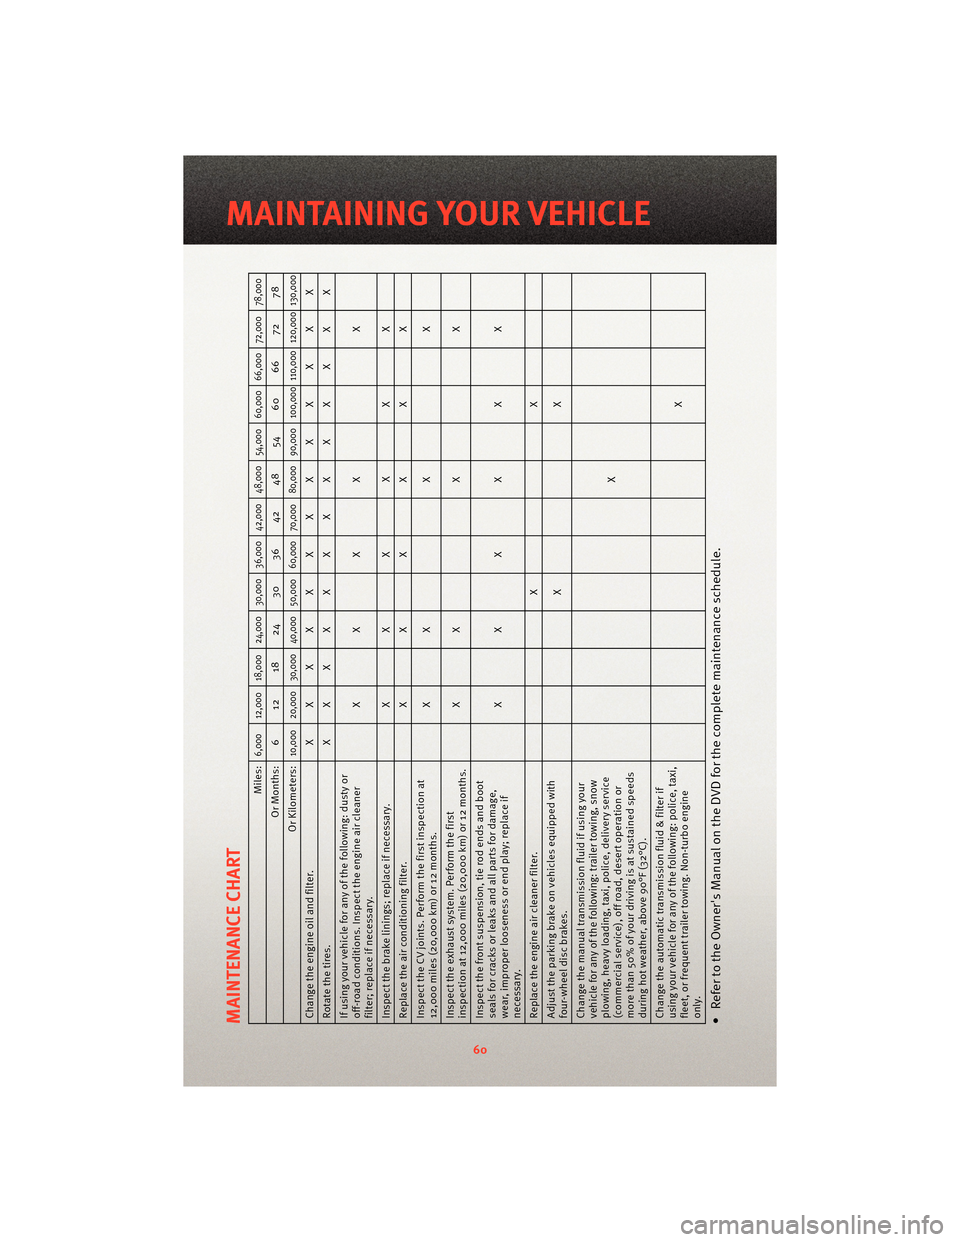
MAINTENANCE CHART
Miles:
6,000 12,000 18,000 24,000 30,000 36,000 42,000 48,000 54,000 60,000 66,000 72,000 78,000
Or Months: 6 12 18 24 30 36 42 48 54 60 66 72 78
Or Kilometers:
10,000 20,000 30,000 40,000 50,000 60,000 70,000 80,000 90,000 100,000 110,000 120,000 130,000
Change the engine oil and filter. XXXXXXXXXXXXX
Rotatethetires. XXXXXXXXXXXXX
If using your vehicle for any of the following: dusty or
off-road conditions. Inspect the engine air cleaner
filter; replace if necessary. XXXX
X
Inspect the brake linings; replace if necessary. XXXXXX
Replace the air conditioning filter. XXXXXX
Inspect the CV joints. Perform the first inspection at
12,000 miles (20,000 km) or 12 months. X
XXX
Inspect the exhaust system. Perform the first
inspection at 12,000 miles (20,000 km) or 12 months. X
XXX
Inspect the front suspe nsion, tie rod ends and boot
seals for cracks or leaks and all parts for damage,
wear, improper looseness or end play; replace if
necessary. XXXXXX
Replace the engine air cleaner filter. XX
Adjust the parking brake on vehicles equipped with
four-wheel disc brakes. XX
Change the manual transmission fluid if using your
vehicle for any of the following: trailer towing, snow
plowing, heavy loading, taxi, police, delivery service
(commercial service), off road, desert operation or
more than 50% of your driving is at sustained speeds
during hot weather, above 90°F (32°C). X
Change the autom atic transmissionfluid & filter if
using your vehicle for any of the following: police, taxi,
fleet, or frequent trailer towing. Non-turbo engine
only. X• Refer to the Owner's Manual on the DVD for the complete maintenance schedule.
60
MAINTAINING YOUR VEHICLE
Page 70 of 76
Using Lift Kits
• Use of lift kits with some vehicle/tirecombinations can cause instability or
loss of control. When changing tire
sizes, always consult an installer for
optimum rim width and carefully
check vehicle/tire clearances.
Check Your Tires For Damage
• Frequent (at least monthly) inspectionof your tires for signs of damage,
uneven tread wear and their general
condition is important for safety.
Impacts, penetrations, cracks, knots,
bulges or air loss always require tire
removal and expert inspection.
Tire Service Life
• The service life of a tire is dependentupon varying factors including, but
not limited to, your driving style, tire
pressure and distance driven.
WARNING!
Tires and the spare tire should be
replaced after six ye ars, regardless of
the remaining tread. Failure to follow
this warning can result in sudden tire
failure. You could lose control and
have an accident resulting in serious
injury or death.
• Keep dismounted tires in a cool, dry place with as little exposure to the
light as possible.
• Protect tires from contact with oil, grease, and gasoline.
NOTE: All tire warranties are made by
the tire manufacturer. Tires are not
covered under your Chrysler New Vehicle
Limited Warranty.
CONSUMER ASSISTANCE
68