warning lights DODGE CHALLENGER 2015 3.G Owners Manual
[x] Cancel search | Manufacturer: DODGE, Model Year: 2015, Model line: CHALLENGER, Model: DODGE CHALLENGER 2015 3.GPages: 603, PDF Size: 14.97 MB
Page 29 of 603
•RKE PANIC button not pushed
•System not disabled from previous remote start event
•Vehicle security alarm not active
•Ignition in Off position (Keyless Enter-N-Go™)
WARNING!
•Do not start or run an engine in a closed garage or
confined area. Exhaust gas contains Carbon Mon-
oxide (CO) which is odorless and colorless. Carbon
Monoxide is poisonous and can cause serious in-
jury or death when inhaled.
•Keep Remote Keyless Entry (RKE) transmitters
away from children. Operation of the Remote Start
System, windows, door locks or other controls
could cause serious injury or death.
To Enter Remote Start Mode
Push and release the REMOTE START button
on the RKE transmitter twice within five sec-
onds. The vehicle doors will lock, the parking
lights will flash and horn will chirp twice (if
programmed). Then, the engine will start and the vehicle
will remain in the Remote Start mode for a 15-minute
cycle.
NOTE:
•If an engine fault is present the vehicle will start and
then shut down 10 seconds later.
•The park lamps will turn on and remain on during
Remote Start mode.
•For security, power window and power sunroof op-
eration (if equipped) are disabled when the vehicle is
in the Remote Start mode.
2
THINGS TO KNOW BEFORE STARTING YOUR VEHICLE 27
Page 31 of 603
Cancel Remote Start
Remote Starting will also cancel if any of the following
occur:
•The engine stalls or engine speed exceeds 2500 rpm
•Any engine warning lights come on
•Low Fuel Light turns on
•The hood is opened
•The hazard switch is pushed
•The shift lever is moved out of PARK
•The brake pedal is pushed
DOOR LOCKS
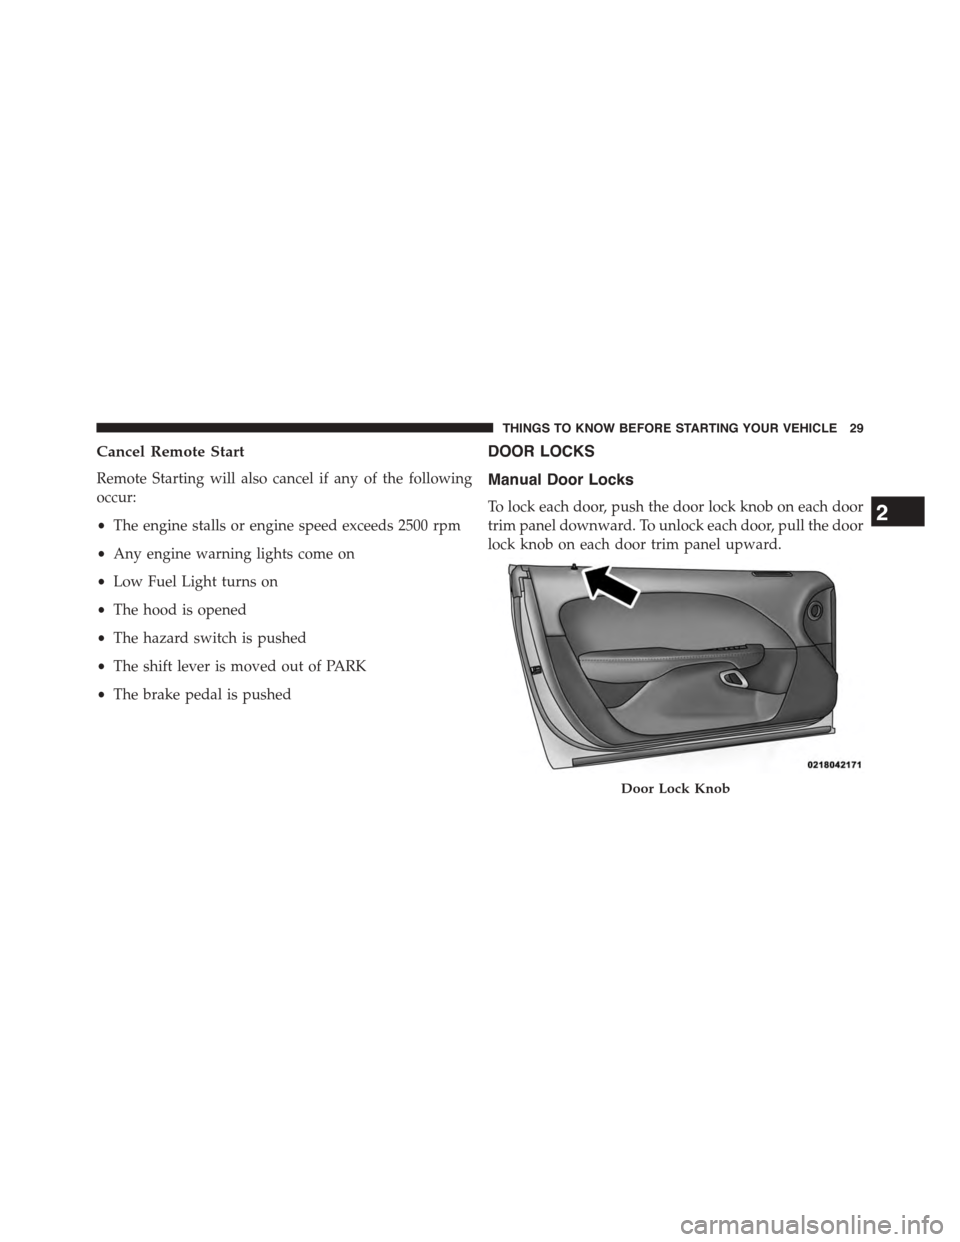
Manual Door Locks
To lock each door, push the door lock knob on each door
trim panel downward. To unlock each door, pull the door
lock knob on each door trim panel upward.
Door Lock Knob
2
THINGS TO KNOW BEFORE STARTING YOUR VEHICLE 29
Page 59 of 603
On the other hand, depending on the type and location of
impact, Advanced Front Air Bags may deploy in crashes
with little vehicle front-end damage but that produce a
severe initial deceleration.
Because air bag sensors measure vehicle deceleration
over time, vehicle speed and damage by themselves are
not good indicators of whether or not an air bag should
have deployed.
Seat belts are necessary for your protection in all colli-
sions, and also are needed to help keep you in position,
away from an inflating air bag.
When the ORC detects a collision requiring the Ad-
vanced Front Air Bags, it signals the inflator units. A large
quantity of non-toxic gas is generated to inflate the
Advanced Front Air Bags.
The steering wheel hub trim cover and the upper right
side of the instrument panel separate and fold out of the
way as the air bags inflate to their full size. The Advanced
Front Air Bags fully inflate in less time than it takes to
blink your eyes. The air bags then quickly deflate while
helping to restrain the driver and front passenger.
Knee Impact Bolsters
The Knee Impact Bolsters help protect the knees of the
driver and front passenger, and position the front occu-
pants for improved interaction with the Advanced Front
Air Bags.
WARNING!
•Do not drill, cut, or tamper with the knee impact
bolsters in any way.
•Do not mount any accessories to the knee impact
bolsters such as alarm lights, stereos, citizen band
radios, etc.
2
THINGS TO KNOW BEFORE STARTING YOUR VEHICLE 57
Page 66 of 603
Do not drive your vehicle after the air bags have de-
ployed. If you are involved in another collision, the air
bags will not be in place to protect you.
WARNING!
Deployed air bags and seat belt pretensioners cannot
protect you in another collision. Have the air bags,
seat belt pretensioners, and the seat belt retractor
assemblies replaced by an authorized dealer imme-
diately. Also, have the Occupant Restraint Controller
System serviced as well.
NOTE:
•Air bag covers may not be obvious in the interior trim,
but they will open during air bag deployment.
•After any collision, the vehicle should be taken to an
authorized dealer immediately.
Enhanced Accident Response System
In the event of an impact, if the communication network
remains intact, and the power remains intact, depending
on the nature of the event, the ORC will determine
whether to have the Enhanced Accident Response Sys-
tem perform the following functions:
•Cut off fuel to the engine.
•Flash hazard lights as long as the battery has power or
until the ignition switch is turned to the “OFF” posi-
tion.
•Turn on the interior lights, which remain on as long as
the battery has power or until the ignition switch is
turned to the “OFF” position.
•Unlock the doors automatically.
64 THINGS TO KNOW BEFORE STARTING YOUR VEHICLE
Page 140 of 603
CAUTION!(Continued)
secure both latches. Never drive your vehicle unless
the hood is fully closed, with both latches engaged.
WARNING!
Be sure the hood is fully latched before driving your
vehicle. If the hood is not fully latched, it could open
when the vehicle is in motion and block your vision.
Failure to follow this warning could result in serious
injury or death.
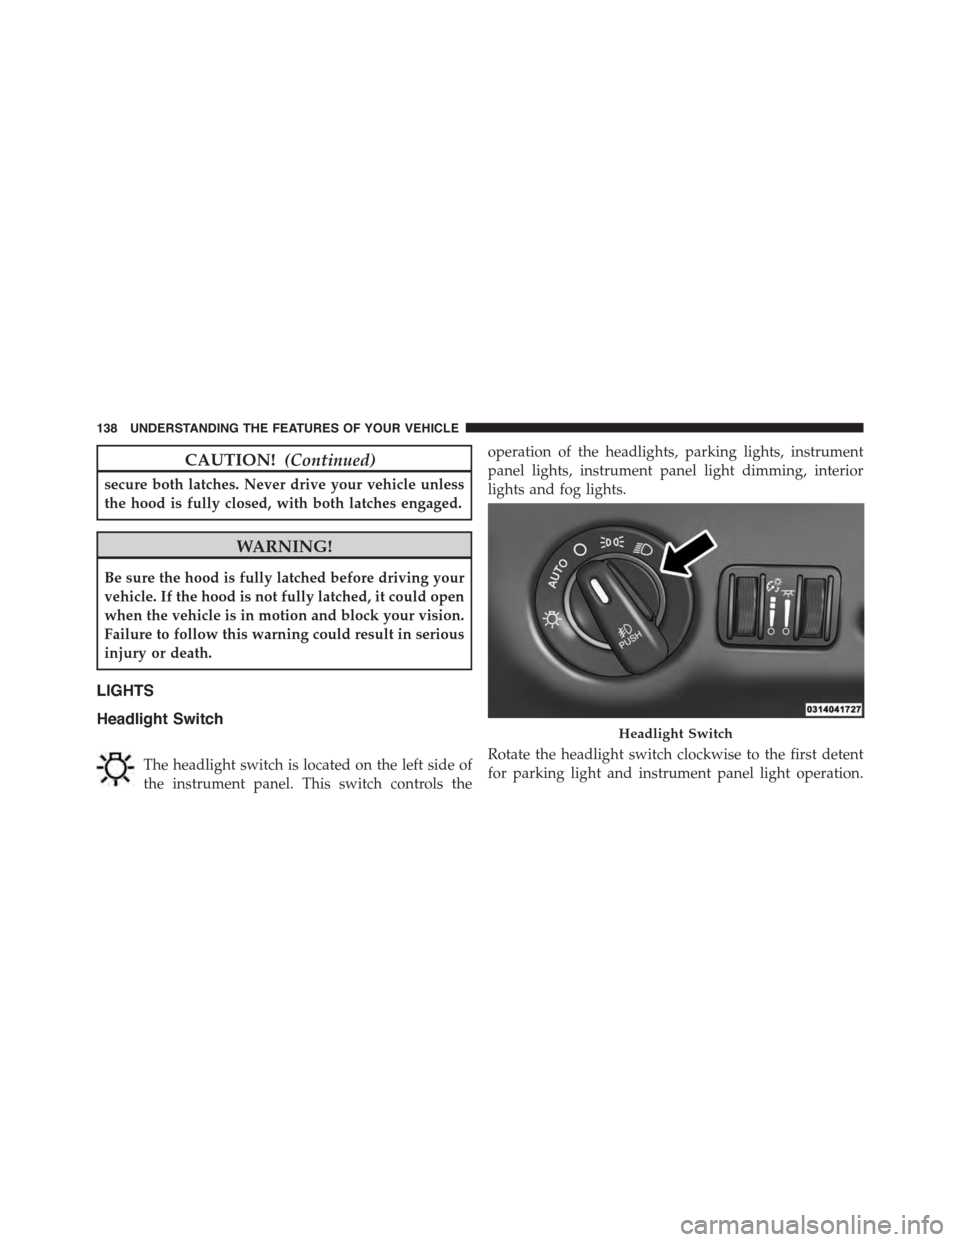
LIGHTS
Headlight Switch
The headlight switch is located on the left side of
the instrument panel. This switch controls the
operation of the headlights, parking lights, instrument
panel lights, instrument panel light dimming, interior
lights and fog lights.
Rotate the headlight switch clockwise to the first detent
for parking light and instrument panel light operation.
Headlight Switch
138 UNDERSTANDING THE FEATURES OF YOUR VEHICLE
Page 151 of 603
several wipe cycles after releasing the multifunction lever
and then resume the intermittent interval previously
selected.
If you activate the washer while the windshield wiper is
turned off, the wipers will operate for several wipe cycles
and then turn off.
WARNING!
Sudden loss of visibility through the windshield
could lead to a collision. You might not see other
vehicles or other obstacles. To avoid sudden icing of
the windshield during freezing weather, warm the
windshield with the defroster before and during
windshield washer use.
Headlights On With Wipers (Available With
Automatic Headlights Only)
When this feature is active, the headlights will turn on
approximately 10 seconds after the wipers are turned on
if the headlight switch is placed in the A (AUTO)
position. In addition, the headlights will turn off when
the wipers are turned off if they were turned on by this
feature.
NOTE:For vehicle equipped with rain sensor (auto
wipes), please note that in addition to the 10 seconds, the
headlights can also turn on if the Rain Sensing feature is
ON, and the front wipers complete a minimum of 5 wipe
cycles within 60 seconds.
In this case (auto wipes) the headlights will turn off if no
wipes occurs in 240 Seconds.
3
UNDERSTANDING THE FEATURES OF YOUR VEHICLE 149
Page 172 of 603
To decrease the distance setting, press the Distance
Setting — Decrease button and release. Each time the
button is pressed, the distance setting decreases by one
bar (shorter).
If there is no vehicle ahead, the vehicle will maintain the
set speed. If a slower moving vehicle is detected in the
same lane, the DID displays the “Sensed Vehicle Indica-
tor” icon, and the system adjusts vehicle speed automati-
cally to maintain the distance setting, regardless of the set
speed.
The vehicle will then maintain the set distance until:
•The vehicle ahead accelerates to a speed above the set
speed.
•The vehicle ahead moves out of your lane or view of
the sensor.
•The distance setting is changed.
•The system disengages. (Refer to the information on
ACC Activation).
The maximum braking applied by ACC is limited; how-
ever, the driver can always apply the brakes manually, if
necessary.
NOTE:The brake lights will illuminate whenever the
ACC system applies the brakes.
A Proximity Warning will alert the driver if ACC predicts
that its maximum braking level is not sufficient to
maintain the set distance. If this occurs, a visual alert
“BRAKE” will flash in the DID and a chime will sound
while ACC continues to apply its maximum braking
capacity.
170 UNDERSTANDING THE FEATURES OF YOUR VEHICLE
Page 216 of 603
WARNING!
To avoid serious injury or death:
•Only devices designed for use in this type of outlet
should be inserted into any 12 Volt outlet.
•Do not touch with wet hands.
•Close the lid when not in use and while driving the
vehicle.
•If this outlet is mishandled, it may cause an electric
shock and failure.
CAUTION!
•Many accessories that can be plugged in draw
power from the vehicle’s battery, even when not in
use (i.e., cellular phones, etc.). Eventually, if
plugged in long enough, the vehicle’s battery will
discharge sufficiently to degrade battery life and/or
prevent the engine from starting.
•Accessories that draw higher power (i.e., coolers,
vacuum cleaners, lights, etc.), will degrade the
battery even more quickly. Only use these intermit-
tently and with greater caution.
•After the use of high power draw accessories, or
long periods of the vehicle not being started (with
accessories still plugged in), the vehicle must be
driven a sufficient length of time to allow the
alternator to recharge the vehicle’s battery.
(Continued)
214 UNDERSTANDING THE FEATURES OF YOUR VEHICLE
Page 231 of 603
10. Air Bag Warning Light
This light will turn on for four to eight seconds
as a bulb check when the ignition switch is first
turned to the ON/RUN position. If the light is
either not on during starting, stays on, or turns
on while driving, have the system inspected at an autho-
rized dealer as soon as possible. Refer to “Occupant
Restraints” in “Things To Know Before Starting Your
Vehicle” for further information.
11. Speedometer
Indicates vehicle speed.
12. Front Fog Light Indicator — If Equipped
This indicator will illuminate when the front fog
lights are on.
13. High Beam Indicator
This indicator will turn on when the high beam
headlights are on. Push the multifunction lever
away from the steering wheel to switch the headlights to
high beam.
14. Park/Headlight ON Indicator
This indicator will illuminate when the park
lights or headlights are turned on.
15. Fuel Gauge
The pointer shows the level of fuel in the fuel tank when
the ignition switch is placed in the ON/RUN position.
16. Temperature Gauge
The temperature gauge shows engine coolant tempera-
ture. Any reading within the normal range for a fully
warm vehicle should be 200 F - 230 F which indicates that
the engine cooling system is operating satisfactorily.
4
UNDERSTANDING YOUR INSTRUMENT PANEL 229
Page 529 of 603
can act as an abrasive and damage the leather upholstery
and should be removed promptly with a damp cloth.
Stubborn soils can be removed easily with a soft cloth
and MOPAR® Total Clean. Care should be taken to avoid
soaking your leather upholstery with any liquid. Please
do not use polishes, oils, cleaning fluids, solvents, deter-
gents, or ammonia-based cleaners to clean your leather
upholstery. Application of a leather conditioner is not
required to maintain the original condition.
WARNING!
Do not use volatile solvents for cleaning purposes.
Many are potentially flammable, and if used in
closed areas they may cause respiratory harm.
CAUTION!
Do not use Alcohol and Alcohol-based and/or Keton
based cleaning products to clean leather seats, as
damage to the seat may result.
Cleaning Headlights
Your vehicle is equipped with plastic headlights and fog
lights that are lighter and less susceptible to stone break-
age than glass headlights.
Plastic is not as scratch resistant as glass and therefore
different lens cleaning procedures must be followed.
To minimize the possibility of scratching the lenses and
reducing light output, avoid wiping with a dry cloth. To
remove road dirt, wash with a mild soap solution fol-
lowed by rinsing.
Do not use abrasive cleaning components, solvents, steel
wool or other aggressive material to clean the lenses.
7
MAINTAINING YOUR VEHICLE 527