tow DODGE CHALLENGER 2015 3.G Owner's Manual
[x] Cancel search | Manufacturer: DODGE, Model Year: 2015, Model line: CHALLENGER, Model: DODGE CHALLENGER 2015 3.GPages: 220, PDF Size: 30.96 MB
Page 150 of 220
We recommend you do not continue driving if the charging system light is on. Have the
vehicle serviced immediately.
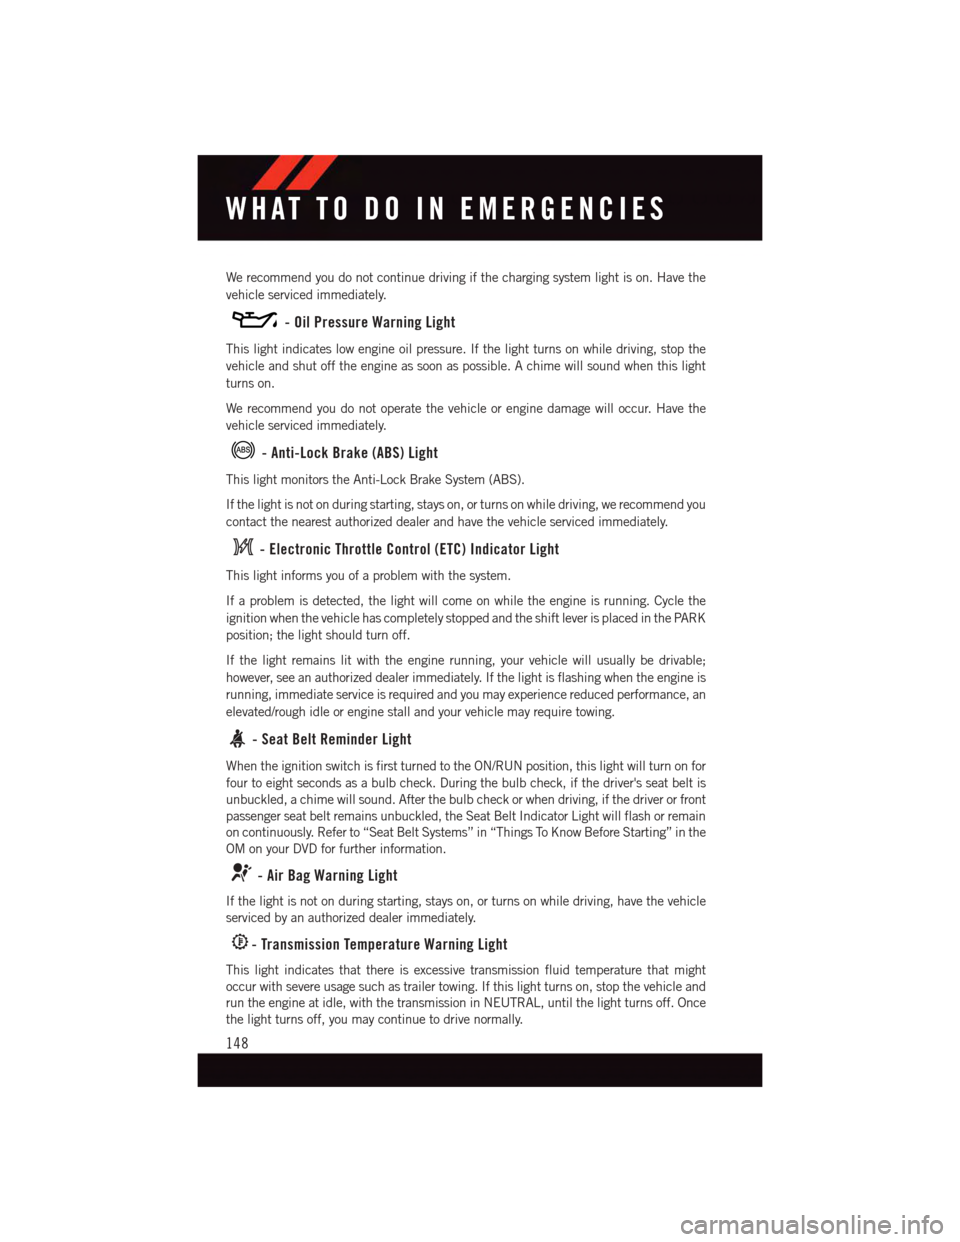
-OilPressureWarningLight
This light indicates low engine oil pressure. If the light turns on while driving, stop the
vehicle and shut off the engine as soon as possible. A chime will sound when this light
turns on.
We recommend you do not operate the vehicle or engine damage will occur. Have the
vehicle serviced immediately.
-Anti-LockBrake(ABS)Light
This light monitors the Anti-Lock Brake System (ABS).
If the light is not on during starting, stays on, or turns on while driving, we recommend you
contact the nearest authorized dealer and have the vehicle serviced immediately.
-ElectronicThrottleControl(ETC)IndicatorLight
This light informs you of a problem with the system.
If a problem is detected, the light will come on while the engine is running. Cycle the
ignition when the vehicle has completely stopped and the shift lever is placed in the PARK
position; the light should turn off.
If the light remains lit with the engine running, your vehicle will usually be drivable;
however, see an authorized dealer immediately. If the light is flashing when the engine is
running, immediate service is required and you may experience reduced performance, an
elevated/rough idle or engine stall and your vehicle may require towing.
-SeatBeltReminderLight
When the ignition switch is first turned to the ON/RUN position, this light will turn on for
four to eight seconds as a bulb check. During the bulb check, if the driver's seat belt is
unbuckled, a chime will sound. After the bulb check or when driving, if the driver or front
passenger seat belt remains unbuckled, the Seat Belt Indicator Light will flash or remain
on continuously. Refer to “Seat Belt Systems” in “Things To Know Before Starting” in the
OM on your DVD for further information.
-AirBagWarningLight
If the light is not on during starting, stays on, or turns on while driving, have the vehicle
serviced by an authorized dealer immediately.
-TransmissionTemperatureWarningLight
This light indicates that there is excessive transmission fluid temperature that might
occur with severe usage such as trailer towing. If this light turns on, stop the vehicle and
run the engine at idle, with the transmission in NEUTRAL, until the light turns off. Once
the light turns off, you may continue to drive normally.
WHAT TO DO IN EMERGENCIES
148
Page 154 of 220
WARNING!
Yo u o r o t h e r s c a n b e b a d l y b u r n e d b y h o t e n g i n e c o o l a n t ( a n t i f r e e z e ) o r s t e a m f r o m y o u r
radiator. If you see or hear steam coming from under the hood, do not open the hood
until the radiator has had time to cool. Never try to open a cooling system pressure cap
when the radiator or coolant bottle is hot.
JACKING AND TIRE CHANGING
Jack Location/Spare Tire Stowage
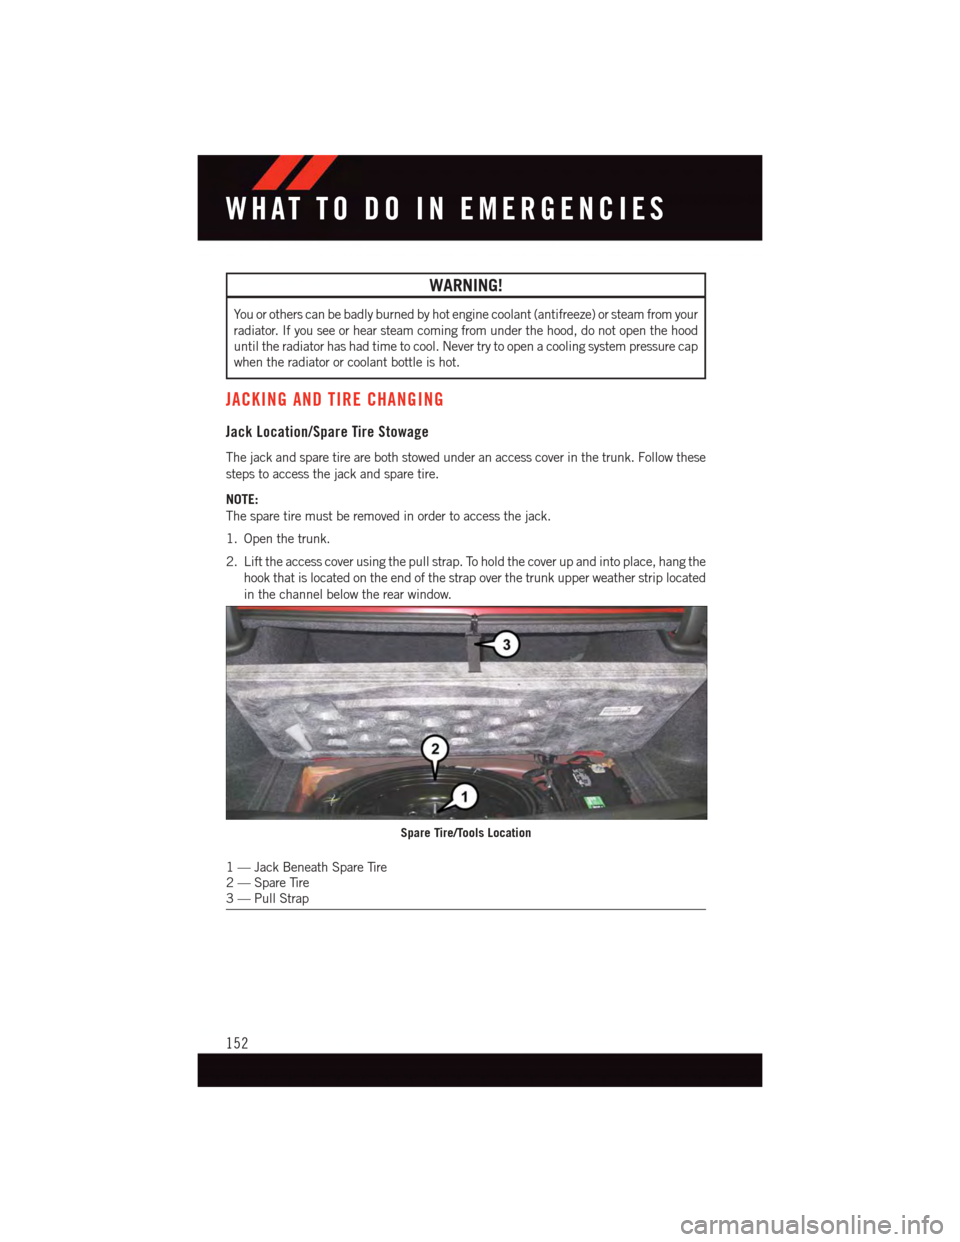
The jack and spare tire are both stowed under an access cover in the trunk. Follow these
steps to access the jack and spare tire.
NOTE:
The spare tire must be removed in order to access the jack.
1. Open the trunk.
2. Lift the access cover using the pull strap. To hold the cover up and into place, hang the
hook that is located on the end of the strap over the trunk upper weather strip located
in the channel below the rear window.
1—JackBeneathSpareTire2—SpareTire3—PullStrap
Spare Tire/Tools Location
WHAT TO DO IN EMERGENCIES
152
Page 158 of 220
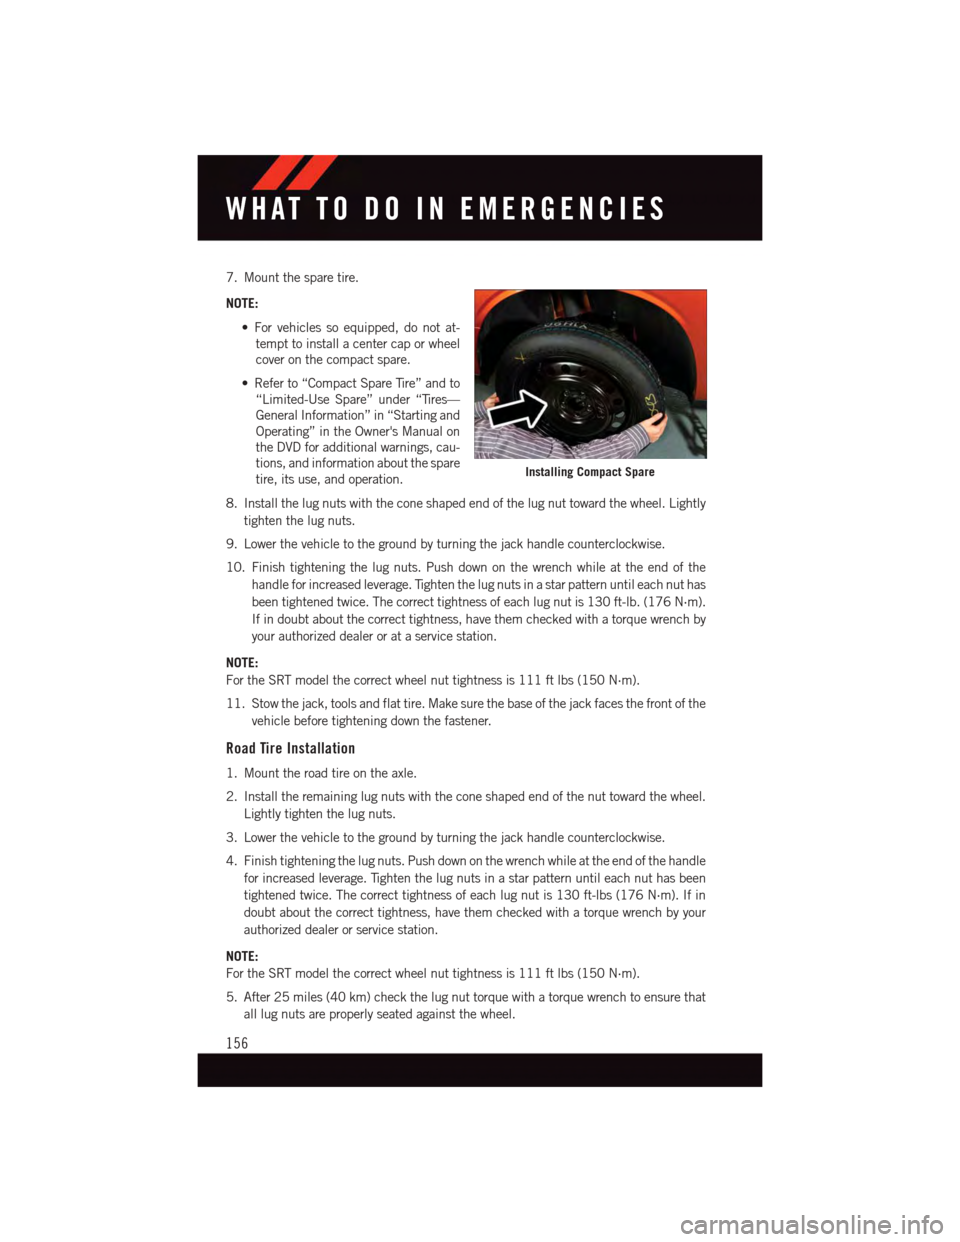
7. Mount the spare tire.
NOTE:
•Forvehiclessoequipped,donotat-
tempt to install a center cap or wheel
cover on the compact spare.
•Referto“CompactSpareTire”andto
“Limited-Use Spare” under “Tires—
General Information” in “Starting and
Operating” in the Owner's Manual on
the DVD for additional warnings, cau-
tions, and information about the spare
tire, its use, and operation.
8. Install the lug nuts with the cone shaped end of the lug nut toward the wheel. Lightly
tighten the lug nuts.
9. Lower the vehicle to the ground by turning the jack handle counterclockwise.
10. Finish tightening the lug nuts. Push down on the wrench while at the end of the
handle for increased leverage. Tighten the lug nuts in a star pattern until each nut has
been tightened twice. The correct tightness of each lug nut is 130 ft-lb. (176 N·m).
If in doubt about the correct tightness, have them checked with a torque wrench by
your authorized dealer or at a service station.
NOTE:
For the SRT model the correct wheel nut tightness is 111 ft lbs (150 N·m).
11. Stow the jack, tools and flat tire. Make sure the base of the jack faces the front of the
vehicle before tightening down the fastener.
Road Tire Installation
1. Mount the road tire on the axle.
2. Install the remaining lug nuts with the cone shaped end of the nut toward the wheel.
Lightly tighten the lug nuts.
3. Lower the vehicle to the ground by turning the jack handle counterclockwise.
4. Finish tightening the lug nuts. Push down on the wrench while at the end of the handle
for increased leverage. Tighten the lug nuts in a star pattern until each nut has been
tightened twice. The correct tightness of each lug nut is 130 ft-lbs (176 N·m). If in
doubt about the correct tightness, have them checked with a torque wrench by your
authorized dealer or service station.
NOTE:
For the SRT model the correct wheel nut tightness is 111 ft lbs (150 N·m).
5. After 25 miles (40 km) check the lug nut torque with a torque wrench to ensure that
all lug nuts are properly seated against the wheel.
Installing Compact Spare
WHAT TO DO IN EMERGENCIES
156
Page 159 of 220
CAUTION!
Do not attempt to raise the vehicle by jacking on locations other than those indicated
in the Jacking Instructions for this vehicle.
WARNING!
•Donotattempttochangeatireonthesideofthevehicleclosetomovingtraffic.
Pull far enough off the road to avoid the danger of being hit when operating the jack
or changing the wheel.
•Beingunderajacked-upvehicleisdangerous.Thevehiclecouldslipoffthejack
and fall on you. You could be crushed. Never put any part of your body under a
vehicle that is on a jack.
•Neverstartorruntheenginewhilethevehicleisonajack.Ifyouneedtogetunder
araisedvehicle,takeittoaservicecenterwhereitcanberaisedonalift.
•Thejackisdesignedtobeusedasatoolforchangingtiresonly.Thejackshouldnot
be used to lift the vehicle for service purposes. The vehicle should be jacked on a
firm level surface only. Avoid ice or slippery areas.
•Aloosetireorjackthrownforwardinacollisionorhardstopcouldendangertheoccupants
of the vehicle. Always stow the jack parts and the spare tire in the places provided.
•Carefullyfollowthesetirechangingwarningstohelppreventpersonalinjuryor
damage to your vehicle:
•Alwaysparkonafirm,levelsurfaceasfarfromtheedgeoftheroadwayaspossible
before raising the vehicle.
•TurnontheHazardWarningflasher.
•Blockthewheeldiagonallyoppositethewheeltoberaised.
•SettheparkingbrakefirmlyandsetanautomatictransmissioninPARK;amanual
transmission in REVERSE.
•Donotletanyonesitinthevehiclewhenitisonajack.
•Donotgetunderthevehiclewhenitisonajack.
•Only use the jack in the positions indicated and for lifting this vehicle during a tire change.
•Ifworkingonorneararoadway,beextremelycarefulofmotortraffic.
•Raising the vehicle higher than necessary can make the vehicle less stable. It could slip
off the jack and hurt someone near it. Raise the vehicle only enough to remove the tire.
•Toavoidtheriskofforcingthevehicleoffthejack,donotfullytightenthewheel
nuts until the vehicle has been lowered. Failure to follow this warning may result in
personal injury.
•Aloosetireorjackthrownforwardinacollisionorhardstopcouldendangertheoccupants
of the vehicle. Always stow the jack parts and the spare tire in the places provided.
•Thelimited-usesparetiresareforemergencyuseonly.Installationofthislimited-use spare tire affects vehicle handling. With this tire, do not drive more than60 mph (100 km/h). Keep inflated to the cold tire inflation pressure listed on eitheryour tire placard or limited-use spare tire and wheel assembly. Replace (or repair)the original tire at the first opportunity and reinstall it on your vehicle. Failure to doso could result in loss of vehicle control.
WHAT TO DO IN EMERGENCIES
157
Page 165 of 220
WARNING!
•Donotattempttosealatireonthesideofthevehicleclosesttotraffic.Pullfar
enough off the road to avoid the danger of being hit when using the Tire Service Kit.•DonotusetheTireServiceKitordrivethevehicleunderthefollowingcircum-
stances:
•Ifthepunctureinthetiretreadisapproximately1/4”.(6mm)orlarger.
•Ifthetirehasanysidewalldamage.
•Ifthetirehasanydamagefromdrivingwithextremelylowtirepressure.
•Ifthetirehasanydamagefromdrivingonaflattire.
•Ifthewheelhasanydamage.
•Ifyouareunsureoftheconditionofthetireorthewheel.
•KeeptheTireServiceKitawayfromopenflamesorheatsource.
•AlooseTireServiceKitthrownforwardinacollisionorhardstopcouldendangerthe
occupants of the vehicle. Always stow the Tire Service Kit in the place provided.
Failure to follow these warnings can result in injuries that are serious or fatal to you,
your passengers, and others around you.
•TakecarenottoallowthecontentsoftheTireServiceKittocomeincontactwith
hair, eyes, or clothing. The Tire Service Kit is harmful if inhaled, swallowed, or
absorbed through the skin. It causes skin, eye, and respiratory irritation. Flush
immediately with plenty of water if there is any contact with eyes or skin. Change
clothing as soon as possible, if there is any contact with clothing.
•TheTireServiceKitSealantsolutioncontainslatex.Incaseofanallergicreaction
or rash, consult a physician immediately. Keep the Tire Service Kit out of reach of
children. If swallowed, rinse mouth immediately with plenty of water and drink
plenty of water. Do not induce vomiting! Consult a physician immediately.
•TheTireServiceKitisnotapermanentflattirerepair.Havethetireinspectedand
repaired or replaced after using the Tire Service Kit. Do not exceed 55 mph
(88 km/h) until the tire is repaired or replaced. Failure to follow this warning can
result in injuries that are serious or fatal to you, your passengers, and others around
you.
WHAT TO DO IN EMERGENCIES
163
Page 170 of 220
MANUAL PARK RELEASE — 8 SPEED TRANSMISSION
WARNING!
Always secure your vehicle by fully applying the parking brake, before activating the
Manual Park Release. Activating the Manual Park Release will allow your vehicle to roll
away if it is not secured by the parking brake or by proper connection to a tow vehicle.
Activating the Manual Park Release on an unsecured vehicle could lead to serious
injury or death for those in or around the vehicle.
In order to push or tow the vehicle in cases where the transmission will not shift out of
PA R K ( s u c h a s a d e a d b a t t e r y ) , a M a n u a l P a r k R e l e a s e i s a v a i l a b l e .
Follow these steps to use the Manual Park Release:
1. Firmly apply the parking brake.
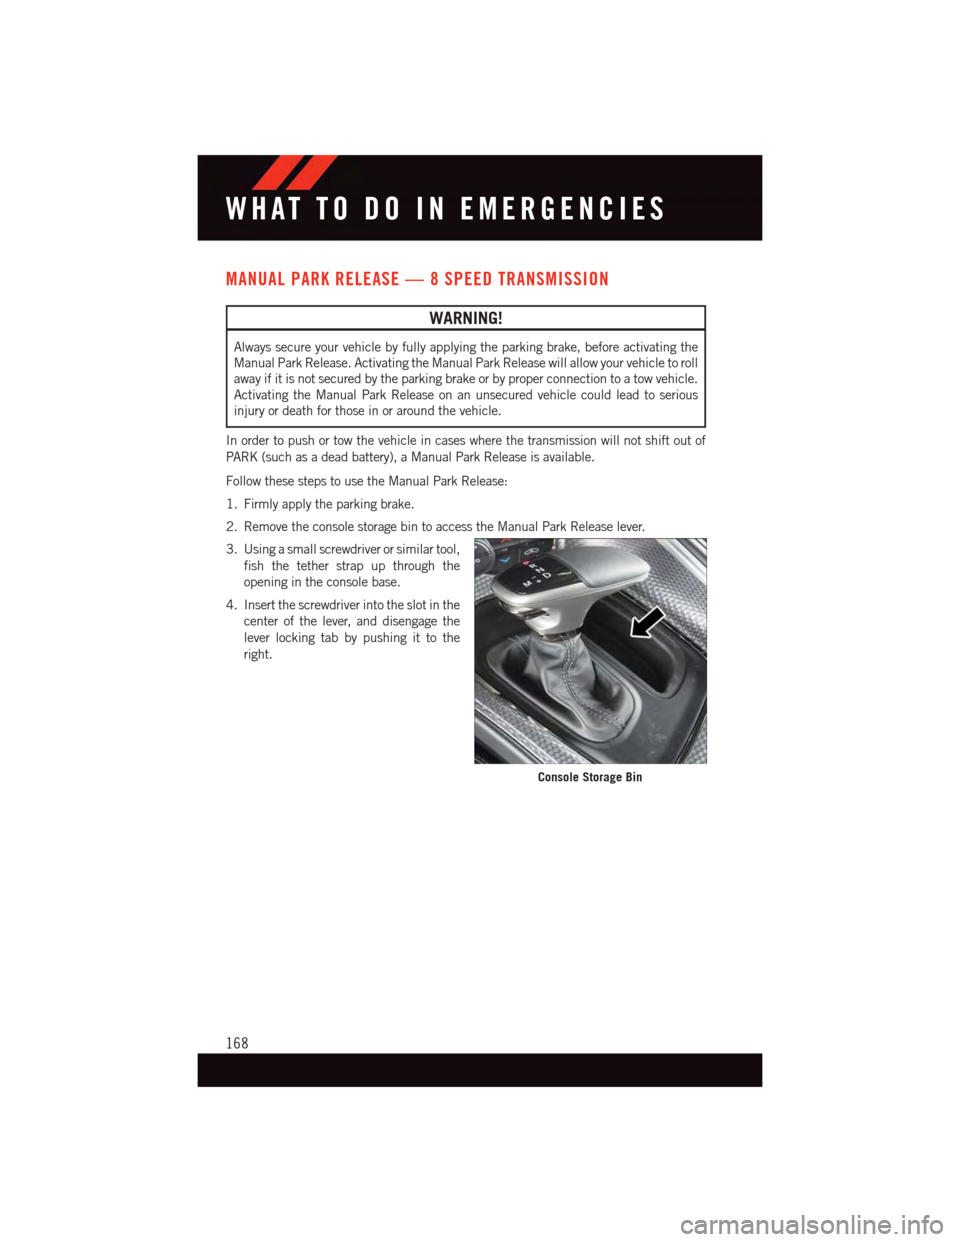
2. Remove the console storage bin to access the Manual Park Release lever.
3. Using a small screwdriver or similar tool,
fish the tether strap up through the
opening in the console base.
4. Insert the screwdriver into the slot in the
center of the lever, and disengage the
lever locking tab by pushing it to the
right.
Console Storage Bin
WHAT TO DO IN EMERGENCIES
168
Page 171 of 220
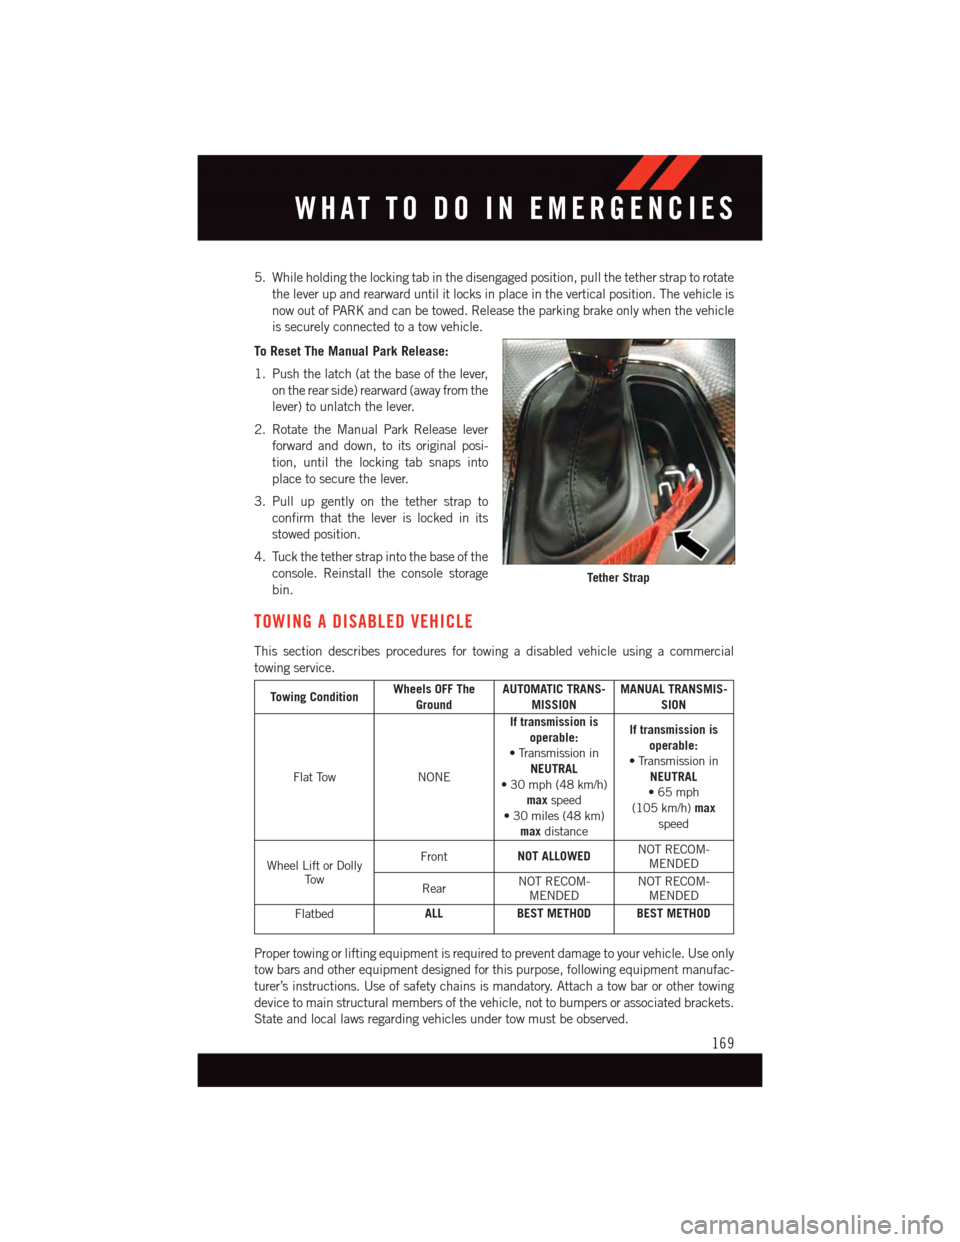
5. While holding the locking tab in the disengaged position, pull the tether strap to rotate
the lever up and rearward until it locks in place in the vertical position. The vehicle is
now out of PARK and can be towed. Release the parking brake only when the vehicle
is securely connected to a tow vehicle.
To Reset The Manual Park Release:
1. Push the latch (at the base of the lever,
on the rear side) rearward (away from the
lever) to unlatch the lever.
2. Rotate the Manual Park Release lever
forward and down, to its original posi-
tion, until the locking tab snaps into
place to secure the lever.
3. Pull up gently on the tether strap to
confirm that the lever is locked in its
stowed position.
4. Tuck the tether strap into the base of the
console. Reinstall the console storage
bin.
TOWING A DISABLED VEHICLE
This section describes procedures for towing a disabled vehicle using a commercial
towing service.
Towing ConditionWheels OFF TheGroundAUTOMATIC TRANS-MISSIONMANUAL TRANSMIS-SION
Flat TowNONE
If transmission isoperable:•TransmissioninNEUTRAL•30mph(48km/h)maxspeed•30miles(48km)maxdistance
If transmission isoperable:•TransmissioninNEUTRAL•65mph(105 km/h)maxspeed
Wheel Lift or DollyTo w
FrontNOT ALLOWEDNOT RECOM-MENDED
RearNOT RECOM-MENDEDNOT RECOM-MENDED
FlatbedALLBEST METHOD BEST METHOD
Proper towing or lifting equipment is required to prevent damage to your vehicle. Use only
tow bars and other equipment designed for this purpose, following equipment manufac-
turer’s instructions. Use of safety chains is mandatory. Attach a tow bar or other towing
device to main structural members of the vehicle, not to bumpers or associated brackets.
State and local laws regarding vehicles under tow must be observed.
Tether Strap
WHAT TO DO IN EMERGENCIES
169
Page 172 of 220
If you must use the accessories (wipers, defrosters, etc.) while being towed, the ignition
must be in the ON/RUN position, not the ACC position.
CAUTION!
•Donotuseslingtypeequipmentwhentowing.Vehicledamagemayoccur.
•Whensecuringthevehicletoaflatbedtruck,donotattachtofrontorrear
suspension components. Damage to your vehicle may occur from improper towing.
•Themanufacturerdoesnotrecommendtowingthisvehicleusingatowdolly.
Vehicle damage may occur.
Automatic Transmission
The manufacturer recommends towing your vehicle with all four wheels OFF the ground
using a flatbed.
If flatbed equipment is not available, and the transmission is operable, the vehicle may be
flat towed (with all four wheels on the ground) under the following conditions:
•ThetransmissionmustbeinNEUTRAL.
•Thetowingdistancemustnotexceed30miles(48km).
•Thetowingspeedmustnotexceed30mph(48km/h).
If the transmission is not operable, or the vehicle must be towed faster than 30 mph (48
km/h) or farther than 30 miles (48 km), then the only acceptable method of towing is with
a flatbed truck.
CAUTION!
To w i n g t h i s v e h i c l e i n v i o l a t i o n o f t h e a b o v e r e q u i r e m e n t s c a n c a u s e s e v e r e t r a n s m i s -
sion damage. Damage from improper towing is not covered under the New Vehicle
Limited Warranty.
If the key fob is unavailable, or the vehicle's battery is discharged, refer to “Manual Park
Release” in this section for instructions on shifting the automatic transmission out of
PA R K f o r t o w i n g .
Manual Transmission
The manufacturer recommends towing your vehicle with all four wheels OFF the ground
using a flatbed.
If flatbed equipment is not available, and the transmission is operable, the vehicle may be
flat towed (with all four wheels on the ground) under the following conditions:
•ThetransmissionmustbeinNEUTRAL.
•Thetowingspeedmustnotexceed65mph(105km/h).
•Thereisnolimitationontowingdistance.
WHAT TO DO IN EMERGENCIES
170
Page 173 of 220
If the transmission is not operable, then the only acceptable method of towing is with a
flatbed truck.
CAUTION!
To w i n g t h i s v e h i c l e i n v i o l a t i o n o f t h e a b o v e r e q u i r e m e n t s c a n c a u s e s e v e r e e n g i n e
and/or transmission damage. Damage from improper towing is not covered under the
New Vehicle Limited Warranty.
EVENT DATA RECORDER (EDR)
This vehicle is equipped with an Event Data Recorder (EDR). The main purpose of an EDR
is to record, in certain crash or near crash-like situations, such as an air bag deployment
or hitting a road obstacle, data that will assist in understanding how a vehicle’s systems
performed. The EDR is designed to record data related to vehicle dynamics and safety
systems for a short period of time, typically 30 seconds or less. The EDR in this vehicle is
designed to record such data as:
•Howvarioussystemsinyourvehiclewereoperating.
•Whetherornotthedriverandpassengersafetybeltswerebuckled/fastened.
•Howfar(ifatall)thedriverwasdepressingtheacceleratorand/orbrakepedal.
•Howfastthevehiclewastraveling.
These data can help provide a better understanding of the circumstances in which crashes
and injuries occur.
NOTE:
EDR data is recorded by your vehicle only if a non-trivial crash situation occurs; no data is
recorded by the EDR under normal driving conditions and no personal data (e.g. name,
gender, age, and crash location) is recorded. However, other parties, such as law
enforcement, could combine the EDR data with the type of personally identifying data
routinely acquired during a crash investigation.
To r e a d d a t a r e c o r d e d b y a n E D R , s p e c i a l e q u i p m e n t i s r e q u i r e d , a n d a c c e s s t o t h e v e h i c l e
or the EDR is needed. In addition to the vehicle manufacturer, other parties such as law
enforcement, that have the special equipment, can read the information if they have
access to the vehicle or the EDR.
WHAT TO DO IN EMERGENCIES
171
Page 188 of 220
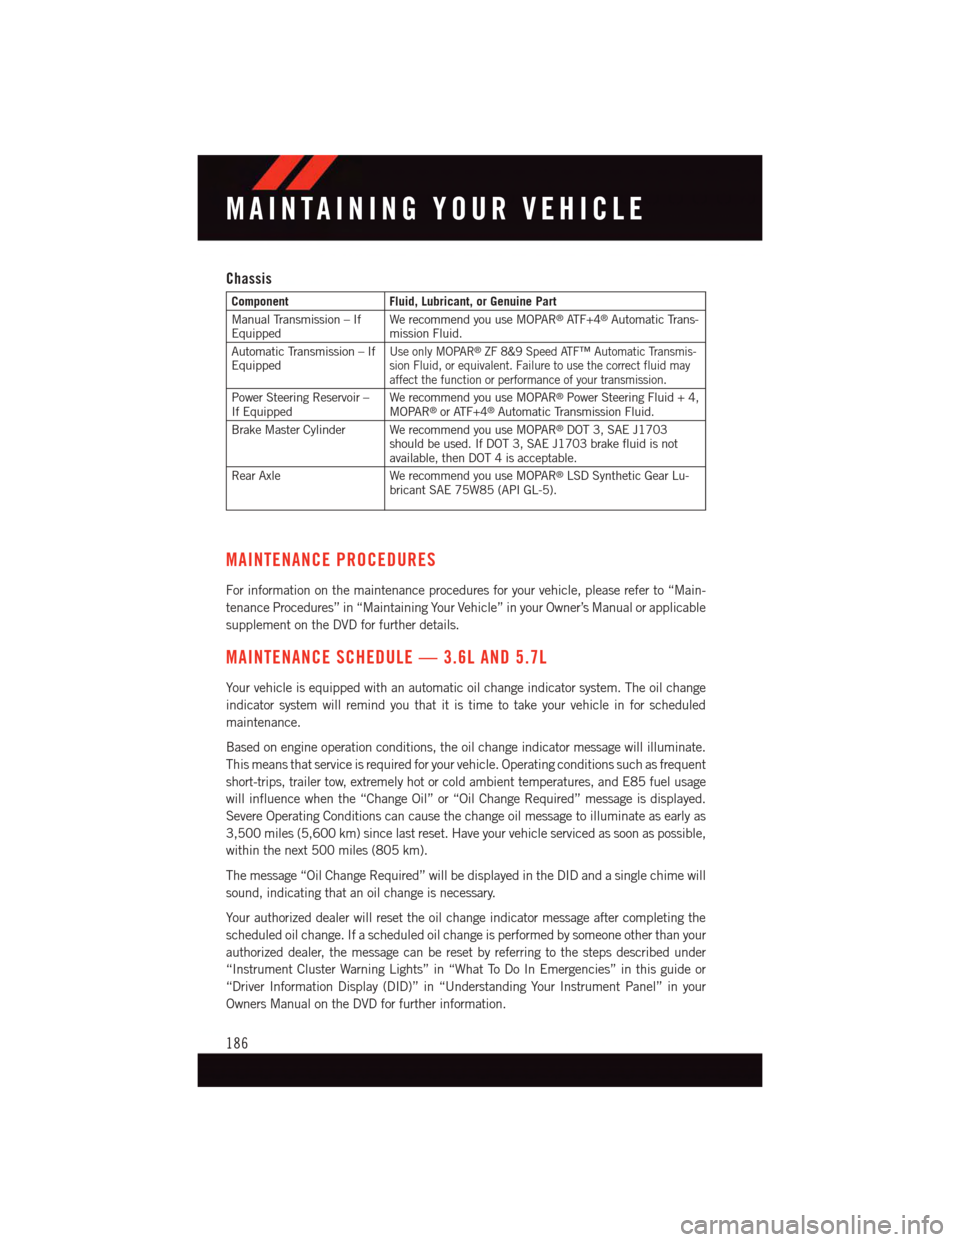
Chassis
ComponentFluid, Lubricant, or Genuine Part
Manual Transmission – IfEquippedWe recommend you use MOPAR®AT F + 4®Automatic Trans-mission Fluid.
Automatic Transmission – IfEquippedUse only MOPAR®ZF 8&9 Speed ATF™ Automatic Transmis-sion Fluid, or equivalent. Failure to use the correct fluid mayaffect the function or performance of your transmission.
Power Steering Reservoir –If EquippedWe recommend you use MOPAR®Power Steering Fluid + 4,MOPAR®or ATF+4®Automatic Transmission Fluid.
Brake Master Cylinder We recommend you use MOPAR®DOT 3, SAE J1703should be used. If DOT 3, SAE J1703 brake fluid is notavailable, then DOT 4 is acceptable.
Rear Axle We recommend you use MOPAR®LSD Synthetic Gear Lu-bricant SAE 75W85 (API GL-5).
MAINTENANCE PROCEDURES
For information on the maintenance procedures for your vehicle, please refer to “Main-
tenance Procedures” in “Maintaining Your Vehicle” in your Owner’s Manual or applicable
supplement on the DVD for further details.
MAINTENANCE SCHEDULE — 3.6L AND 5.7L
Yo u r v e h i c l e i s e q u i p p e d w i t h a n a u t o m a t i c o i l c h a n g e i n d i c a t o r s y s t e m . T h e o i l c h a n g e
indicator system will remind you that it is time to take your vehicle in for scheduled
maintenance.
Based on engine operation conditions, the oil change indicator message will illuminate.
This means that service is required for your vehicle. Operating conditions such as frequent
short-trips, trailer tow, extremely hot or cold ambient temperatures, and E85 fuel usage
will influence when the “Change Oil” or “Oil Change Required” message is displayed.
Severe Operating Conditions can cause the change oil message to illuminate as early as
3,500 miles (5,600 km) since last reset. Have your vehicle serviced as soon as possible,
within the next 500 miles (805 km).
The message “Oil Change Required” will be displayed in the DID and a single chime will
sound, indicating that an oil change is necessary.
Yo u r a u t h o r i z e d d e a l e r w i l l r e s e t t h e o i l c h a n g e i n d i c a t o r m e s s a g e a f t e r c o m p l e t i n g t h e
scheduled oil change. If a scheduled oil change is performed by someone other than your
authorized dealer, the message can be reset by referring to the steps described under
“Instrument Cluster Warning Lights” in “What To Do In Emergencies” in this guide or
“Driver Information Display (DID)” in “Understanding Your Instrument Panel” in your
Owners Manual on the DVD for further information.
MAINTAINING YOUR VEHICLE
186