manual DODGE CHARGER 2014 7.G Owner's Guide
[x] Cancel search | Manufacturer: DODGE, Model Year: 2014, Model line: CHARGER, Model: DODGE CHARGER 2014 7.GPages: 148, PDF Size: 3.77 MB
Page 99 of 148
(C) Injecting TIREFIT Sealant Into The Deflated Tire:
Always start the engine before turning ON the TIREFIT kit.
NOTE:
Manual transmission vehicles must have the parking brake engaged and the shift lever in
NEUTRAL.
After pressing the Power Button (4), the sealant (white fluid) will flow from the Sealant
Bottle (1) through the Sealant Hose (6) and into the tire.
NOTE:
Sealant may leak out through the puncture in the tire.
If the sealant (white fluid) does not flow within0–10seconds through the Sealant
Hose (6):
1. Press the Power Button (4) to turn Off the TIREFIT kit. Disconnect the Sealant Hose (6) from the valve stem. Make sure the valve stem is free of debris. Reconnect the Sealant
Hose (6) to the valve stem. Check that the Mode Select Knob (5) is in the Sealant Mode
position and not Air Mode. Press the Power Button (4) to turn On the TIREFIT kit.
2. Connect the Power Plug (8) to a different 12 Volt power outlet in your vehicle or another vehicle, if available. Make sure the engine is running before turning ON the TIREFIT kit.
3. The Sealant Bottle (1) may be empty due to previous use. Call for assistance.
NOTE:
If the Mode Select Knob (5) is on Air Mode and the pump is operating, air will dispense from
the Air Pump Hose (7) only, not the Sealant Hose (6).
If the sealant (white fluid) does flow through the Sealant Hose (6):
1. Continue to operate the pump until sealant is no longer flowing through the hose (typically takes 30 - 70 seconds). As the sealant flows through the Sealant Hose (6), the
Pressure Gauge (3) can read as high as 70 psi (4.8 Bar). The Pressure Gauge (3) will
decrease quickly from approximately 70 psi (4.8 Bar) to the actual tire pressure when the
Sealant Bottle (1) is empty.
2. The pump will start to inject air into the tire immediately after the Sealant Bottle (1) is empty. Continue to operate the pump and inflate the tire to the pressure indicated on the
tire pressure label on the driver-side latch pillar (recommended pressure). Check the tire
pressure by looking at the Pressure Gauge (3).
If the tire does not inflate to at least 26 psi (1.8 Bar) pressure within 15 minutes:
The tire is too badly damaged. Do not attempt to drive the vehicle further. Call for assis-
tance.
NOTE:
If the tire becomes over-inflated, press the Deflation Button to reduce the tire pressure to
the recommended inflation pressure before continuing.
WHAT TO DO IN EMERGENCIES
97
Page 106 of 148
MANUAL PARK RELEASE — 8 SPEED TRANSMISSION
WARNING!
Always secure your vehicle by fully applying the parking brake, before activating the
Manual Park Release. Activating the Manual Park Release will allow your vehicle to roll
away if it is not secured by the parking brake or by proper connection to a tow vehicle.
Activating the Manual Park Release on an unsecured vehicle could lead to serious injury
or death for those in or around the vehicle.
• In order to push or tow the vehicle in cases where the transmission will not shift out of PARK (such as a dead battery), a Manual Park Release is available. Follow these steps to
use the Manual Park Release:
1. Firmly apply the parking brake.
2. Remove the console storage bin to access the Manual Park Release lever.
3. Using a small screwdriver or similar tool, fish the tether strap up through the opening in the console base.
WHAT TO DO IN EMERGENCIES
104
Page 107 of 148
4. Insert the screwdriver into the slot in the center of the lever, and disengage the leverlocking tab by pushing it to the right.
5. While holding the locking tab in the disengaged position, pull the tether
strap to rotate the lever up and rear-
ward, until it locks in place in the ver-
tical position. The vehicle is now out
of PARK and can be towed. Release
the parking brake only when the ve-
hicle is securely connected to a tow
vehicle.
To Reset The Manual Park Release:
1. Push the latch (at the base of the lever, on the rear side) rearward (away from the lever) to unlatch the lever.
2. Rotate the Manual Park Release lever forward and down, to its original position, until the locking tab snaps into place to secure the lever.
3. Pull up gently on the tether strap to confirm that the lever is locked in its stowed position.
4. Tuck the tether strap into the base of the console. Reinstall the console storage bin.
WHAT TO DO IN EMERGENCIES
105
Page 108 of 148
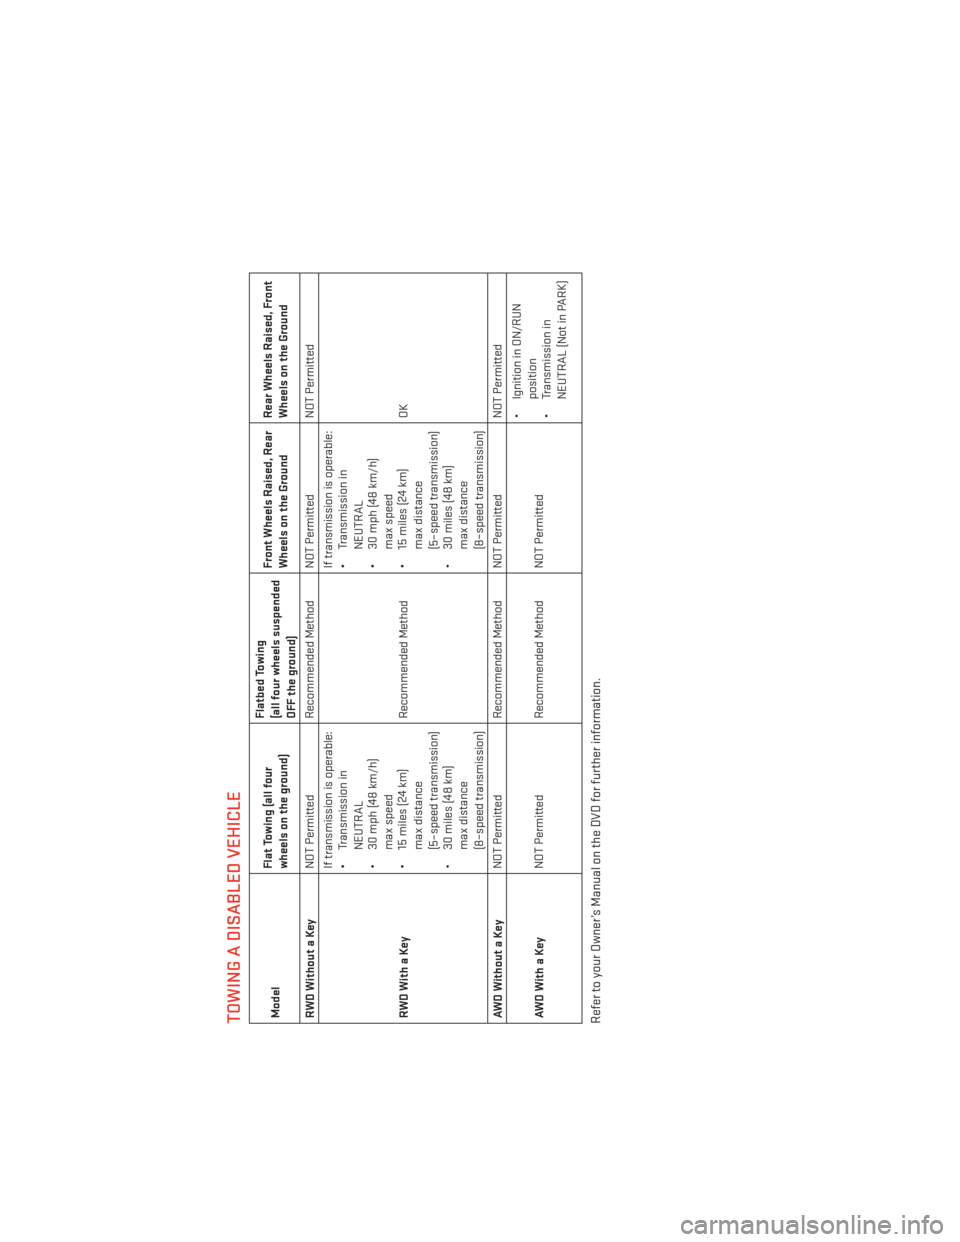
TOWING A DISABLED VEHICLEModelFlat Towing (all four
wheels on the ground) Flatbed Towing
(all four wheels suspended
OFF the ground)Front Wheels Raised, Rear
Wheels on the Ground
Rear Wheels Raised, Front
Wheels on the Ground
RWDWithoutaKey NOT Permitted Recommended Method NOT Permitted NOT Permitted
RWDWithaKey If transmission is operable:
• Transmission in
NEUTRAL
• 30 mph (48 km/h)
max speed
• 15 miles (24 km)
max distance
(5–speed transmission)
• 30 miles (48 km)
max distance
(8–speed transmission) Recommended Method If transmission is operable:
• Transmission in
NEUTRAL
• 30 mph (48 km/h)
max speed
• 15 miles (24 km)
max distance
(5–speed transmission)
• 30 miles (48 km)
max distance
(8–speed transmission) OK
AWDWithoutaKey NOT Permitted
Recommended Method NOT Permitted NOT Permitted
AWDWithaKey NOT Permitted
Recommended Method NOT Permitted • Ignition in ON/RUN
position
• Transmission in
NEUTRAL (Not in PARK)Refer to your Owner’s Manual on the DVD for further information.
WHAT TO DO IN EMERGENCIES
106
Page 112 of 148

Fuel Door Emergency Release
• To manually open the fuel door, removethe cover and pull the release cable lo-
cated in the trunk.
Emergency Refueling
A funnel is provided (located in the trunk in the spare tire area) to open the flapper door to
allow for emergency refueling with a gas can.
CAUTION!
To avoid fuel spillage and overfilling, do not “top off” the fuel tank after filling.
WARNING!
• Never have any smoking materials lit in or near the vehicle when the fuel door is open
or the tank is being filled.
• Never add fuel when the engine is running. This is in violation of most state and
federal fire regulations and/or local bylaws, and will cause the MIL to turn on.
• A fire may result if gasoline is pumped into a portable container that is inside of a
vehicle. You could be burned. Always place gas containers on the ground while filling.
MAINTAINING YOUR VEHICLE
110
Page 118 of 148
CAUTION!
• Mixing of engine coolant (antifreeze) other than specified Organic Additive Technol-ogy (OAT) engine coolant (antifreeze), may result in engine damage and may de-
crease corrosion protection. Organic Additive Technology (OAT) engine coolant is
different and should not be mixed with Hybrid Organic Additive Technology (HOAT)
engine coolant (antifreeze) or any “globally compatible” coolant (antifreeze). If a
non-OAT engine coolant (antifreeze) is introduced into the cooling system in an
emergency, the cooling system will need to be drained, flushed, and refilled with
fresh OAT coolant (conforming to MS-12106), by an authorized dealer as soon as
possible.
• Do not use water alone or alcohol-based engine coolant (antifreeze) products. Do not
use additional rust inhibitors or antirust products, as they may not be compatible
with the radiator engine coolant and may plug the radiator.
• This vehicle has not been designed for use with propylene glycol-based engine
coolant (antifreeze). Use of propylene glycol-based engine coolant (antifreeze) is not
recommended.
E-85 FLEXIBLE FUEL — (3.6L ENGINE ONLY)
Refer to your Owner's Manual on the DVD for further details.
CAUTION!
Only vehicles with the E-85 fuel filler door label or a yellow gas cap can operate on E-85.
MAINTENANCE SCHEDULE
Your vehicle is equipped with an automatic oil change indicator system. The oil change
indicator system will remind you that it is time to take your vehicle in for scheduled
maintenance.
Based on engine operation conditions, the oil change indicator message will illuminate.
This means that service is required for your vehicle. Operating conditions such as frequent
short-trips, trailer tow, extremely hot or cold ambient temperatures, and E85 fuel usage will
influence when the “Change Oil” or “Oil Change Required” message is displayed. Severe
Operating Conditions can cause the change oil message to illuminate as early as
3,500 miles (5,600 km) since last reset. Have your vehicle serviced as soon as possible,
within the next 500 miles (805 km).
On Electronic Vehicle Information Center (EVIC) equipped vehicles, “Oil Change Required”
will be displayed in the EVIC and a single chime will sound, indicating that an oil change is
necessary.
On Non-EVIC equipped vehicles, “Change Oil” will flash in the instrument cluster odometer
and a single chime will sound, indicating that an oil change is necessary.
MAINTAINING YOUR VEHICLE
116
Page 119 of 148
Your authorized dealer will reset the oil change indicator message after completing the
scheduled oil change. If a scheduled oil change is performed by someone other than your
authorized dealer, the message can be reset by referring to the steps described under
“Instrument Cluster Warning Lights” in “What To Do In Emergencies” in this guide or
“Electronic Vehicle Information Center (EVIC)” in “Understanding Your Instrument Panel” in
your Owners Manual on the DVD for further information.
NOTE:
Under no circumstances should oil change intervals exceed 10,000 miles (16,000 km) or
twelve months, whichever comes first.
Severe Duty All Models
Change Engine Oil at 4000 miles (6,500 km) if the vehicle is operated in a dusty and off road
environment. This type of vehicle use is considered Severe Duty
Once A Month Or Before A Long Trip:
• Check engine oil level
• Check windshield washer fluid level
• Check tire pressure and look for unusual wear or damage. Rotate tires at the first sign ofirregular wear, even if it occurs before your next scheduled service.
• Check the fluid levels of the coolant reservoir, brake master cylinder, and power steering and fill as needed.
• Check function of all interior and exterior lights
Required Maintenance Intervals.
Refer to the maintenance schedules on the following page for the required maintenance
intervals.
At Every Oil Change Interval As Indicated By Oil Change Indicator System:
• Change oil and filter
• Rotate the tires. Rotate at the first sign of irregular wear, even if it occurs before your
next scheduled service
• Inspect battery and clean and tighten terminals as required
• Inspect brake pads, shoes, rotors, drums, hoses and park brake
• Inspect engine cooling system protection and hoses
• Inspect exhaust system
• Inspect engine air cleaner if using in dusty or off-road conditions
MAINTAINING YOUR VEHICLE
117
Page 123 of 148
SRT MAINTENANCE SCHEDULE
The Scheduled Maintenance services listed in this manual must be done at the times or
mileages specified to protect your vehicle warranty and ensure the best vehicle perfor-
mance and reliability. More frequent maintenance may be needed for vehicles in severe
operating conditions, such as dusty areas and very short trip driving. Inspection and service
should also be done anytime a malfunction is suspected.
The oil change indicator system will remind you that it is time to take your vehicle in for
scheduled maintenance.
On Electronic Vehicle Information Center (EVIC) equipped vehicles, “Oil Change Required”
will be displayed in the EVIC and a single chime will sound, indicating that an oil change is
necessary.
Based on engine operation conditions, the oil change indicator message will illuminate.
This means that service is required for your vehicle. Have your vehicle serviced as soon as
possible, within the next 500 miles (805 km).
NOTE:
• The oil change indicator message will not monitor the time since the last oil change.Change your vehicle's oil if it has been six months since your last oil change, even if the
oil change indicator message is NOT illuminated.
• Change your engine oil more often if you drive your vehicle off-road for an extended period of time.
• Under no circumstances should oil change intervals exceed 6,000 miles (10,000 km) or six months, whichever comes first.
Your authorized dealer will reset the oil change indicator message after completing the
scheduled oil change. If a scheduled oil change is performed by someone other than your
authorized dealer, the message can be reset by referring to the steps described under
“Instrument Cluster Warning Lights” in “What To Do In Emergencies” in this guide or
“Electronic Vehicle Information Center (EVIC)” in “Understanding Your Instrument Panel” in
your Owners Manual on the DVD for further information.
At Each Stop For Fuel
• Check the engine oil level. Refer to “Maintenance Procedures/Engine Oil” in “Maintaining Your Vehicle” for further information.
• Check the windshield washer solvent and add if required.
MAINTAINING YOUR VEHICLE
121
Page 125 of 148
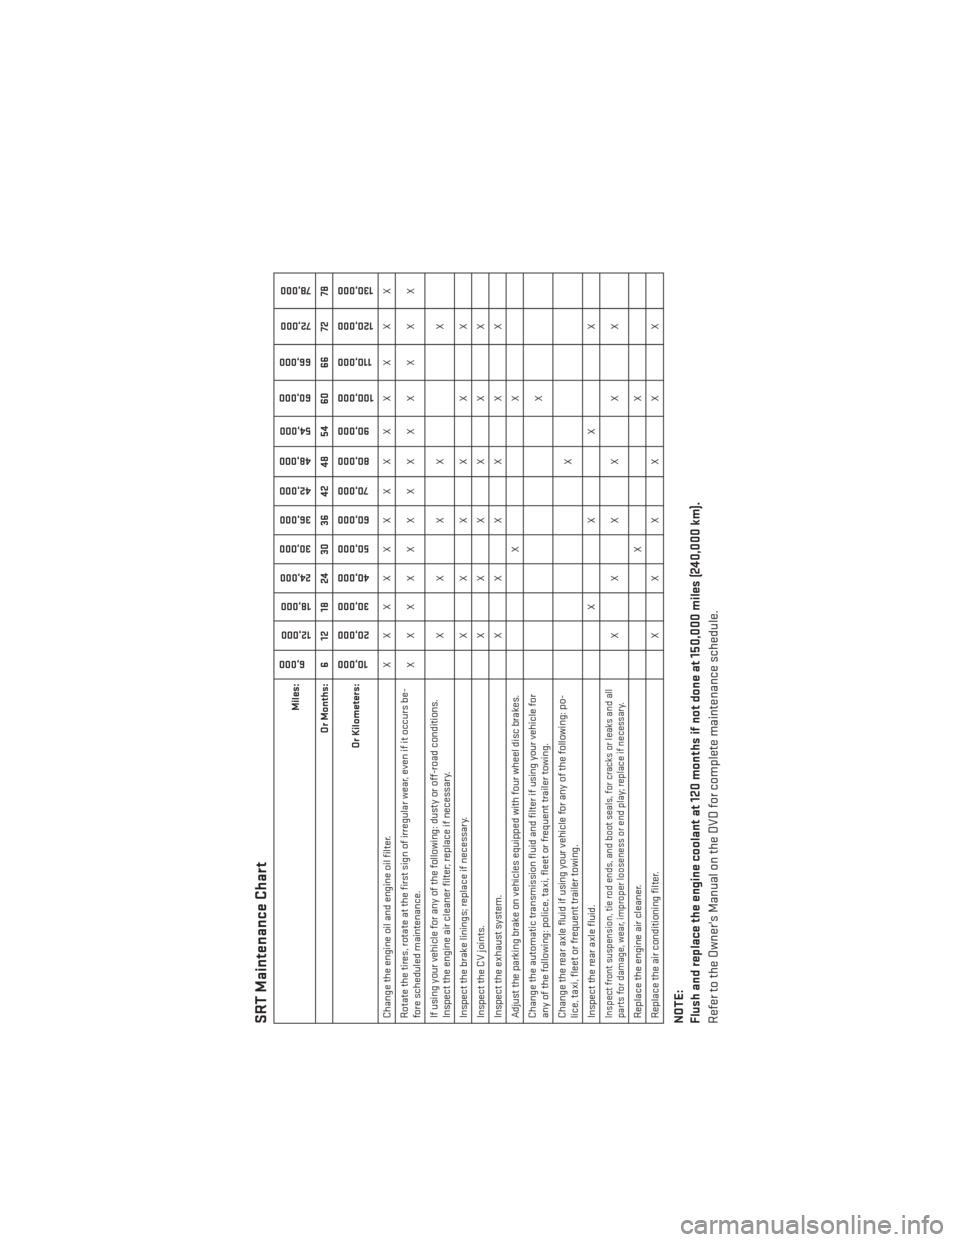
SRT Maintenance Chart
Miles:
6,000
12,000
18,000
24,000
30,000
36,000
42,000
48,000
54,000
60,000
66,000
72,000
78,000
Or Months: 6 12 18 24 30 36 42 48 54 60 66 72 78
Or Kilometers:
10,000
20,000 30,000
40,000
50,000
60,000 70,000
80,000
90,000
100,000
110,000
120,000 130,000
Change the engine oil and engine oil filter. X X XXXXX X X X X X X
Rotate the tires, rotate at the first sign of irregular wear, even if it occurs be-
fore scheduled maintenance. XXXXXXX X X X X X X
If using your vehicle for any of the following: dusty or off-road conditions.
Inspect the engine air cleaner filter; replace if necessary. XX X X
X
Inspect the brake linings; replace if necessary. X X X XXX
Inspect the CV joints. X X X XXX
Inspect the exhaust system. X X X XXX
Adjust the parking brake on vehicles equipped with four wheel disc brakes. XX
Change the automatic transmission fluid and filter if using your vehicle for
any of the following: police, taxi, fleet or frequent trailer towing. X
Change the rear axle fluid if using your vehicle for any of the following: po-
lice, taxi, fleet or frequent trailer towing. X
Inspect the rear axle fluid. XX X XInspect front suspension, tie rod ends, and boot seals, for cracks or leaks and all
parts for damage, wear, improper looseness or end play; replace if necessary.
XX X X X X
Replace the engine air cleaner. X X
Replace the air conditioning filter. X X X X X X
NOTE:
Flush and replace the engine coolant at 120 months if not done at 150,000 miles (240,000 km).
Refer to the Owner's Manual on the DVD for complete maintenance schedule.
MAINTAINING YOUR VEHICLE
123
Page 132 of 148

TIRE PRESSURES
Check the inflation pressure of each tire, including the spare tire, at least monthly and
inflate to the recommended pressure for your vehicle.
The tire pressures recommended for your vehicle are found on the “Tire and Loading
Information” label located on the driver’s side door opening.
NOTE:
Refer to the Owner's Manual on the DVD for
more information regarding tire warnings
and instructions.
WARNING!
• Overloading of your tires is dangerous. Overloading can cause tire failure, affectvehicle handling, and increase your stopping distance. Use tires of the recom-
mended load capacity for your vehicle. Never overload them.
• Improperly inflated tires are dangerous and can cause collisions. Under-inflation is
the leading cause of tire failure and may result in severe cracking, component
separation, or “blow out”. Over-inflation reduces a tire’s ability to cushion shock.
Objects on the road and chuck holes can cause damage that results in tire failure.
Unequal tire pressures can cause steering problems. You could lose control of your
vehicle. Over-inflated or under-inflated tires can affect vehicle handling and can fail
suddenly, resulting in loss of vehicle control.
Tire And Loading Information Location (Example)
MAINTAINING YOUR VEHICLE
130