DODGE CHARGER 2015 7.G Service Manual
Manufacturer: DODGE, Model Year: 2015, Model line: CHARGER, Model: DODGE CHARGER 2015 7.GPages: 236, PDF Size: 35.67 MB
Page 41 of 236
•Drivewiththeenginespeedlessthan3,500RPM.
•Maintainvehiclespeedbelow55mph(88km/h)andobservelocalspeedlimits.
100 to 300 miles (161 to 483 km):
•Depresstheacceleratorpedalslowlyandnotmorethanhalfwaytoavoidrapid
acceleration in lower gears (1st to 3rd gears).
•Avoidaggressivebraking.
•Drivewiththeenginespeedlessthan5,000RPM.
•Maintainvehiclespeedbelow70mph(112km/h)andobservelocalspeedlimits.
300 to 500 miles (483 to 805 km):
•Exercisethefullenginerpmrange,shiftingmanually(paddlesorgearshift)athigher
rpms when possible.
•Donotperformsustainedoperationwiththeacceleratorpedalatwideopenthrottle.
•Maintainvehiclespeedbelow85mph(136km/h)andobservelocalspeedlimits.
For the first 1500 mi (2414 km):
•Donotparticipateintrackevents,sportdrivingschools,orsimilaractivitiesduringthe
first 1500 mi (2414 km).
NOTE:
Check engine oil with every refueling and add if necessary. Oil and fuel consumption may
be higher through the first oil change interval.
SRT Engine Break-In
SRT Engine Break-In Recommendations: The following tips will be helpful in obtaining
optimum performance and maximum durability for your new SRT Vehicle.
Despite modern technology and World Class manufacturing methods, the moving parts of
the vehicle must still wear in with each other. This wearing in occurs mainly during the first
500 miles (805 km) and continues through the first oil change interval.
It is recommended for the operator to observe the following driving behaviors during the
new vehicle break-in period:
0to100miles(0to161km):
•Donotallowtheenginetooperateatidleforanextendedperiodoftime.
•Depresstheacceleratorpedalslowlyandnotmorethanhalfwaytoavoidrapid
acceleration.
•Avoidaggressivebraking.
•Drivewiththeenginespeedlessthan3,500RPM.
•Maintainvehiclespeedbelow55mph(88km/h)andobservelocalspeedlimits.
OPERATING YOUR VEHICLE
39
Page 42 of 236
100 to 300 miles (161 to 483 km):
•Depresstheacceleratorpedalslowlyandnotmorethanhalfwaytoavoidrapid
acceleration in lower gears (1st to 3rd gears).
•Avoidaggressivebraking.
•Drivewiththeenginespeedlessthan5,000RPM.
•Maintainvehiclespeedbelow70mph(112km/h)andobservelocalspeedlimits.
300 to 500 miles (483 to 805 km):
•Exercisethefullenginerpmrange,shiftingmanually(paddlesorgearshift)athigher
rpms when possible.
•Donotperformsustainedoperationwiththeacceleratorpedalatwideopenthrottle.
•Maintainvehiclespeedbelow85mph(136km/h)andobservelocalspeedlimits.
For the first 1500 mi (2414 km):
•Donotparticipateintrackevents,sportdrivingschools,orsimilaractivitiesduringthe
first 1500 mi (2414 km).
NOTE:
Check engine oil with every refueling and add if necessary. Oil and fuel consumption may
be higher through the first oil change interval.
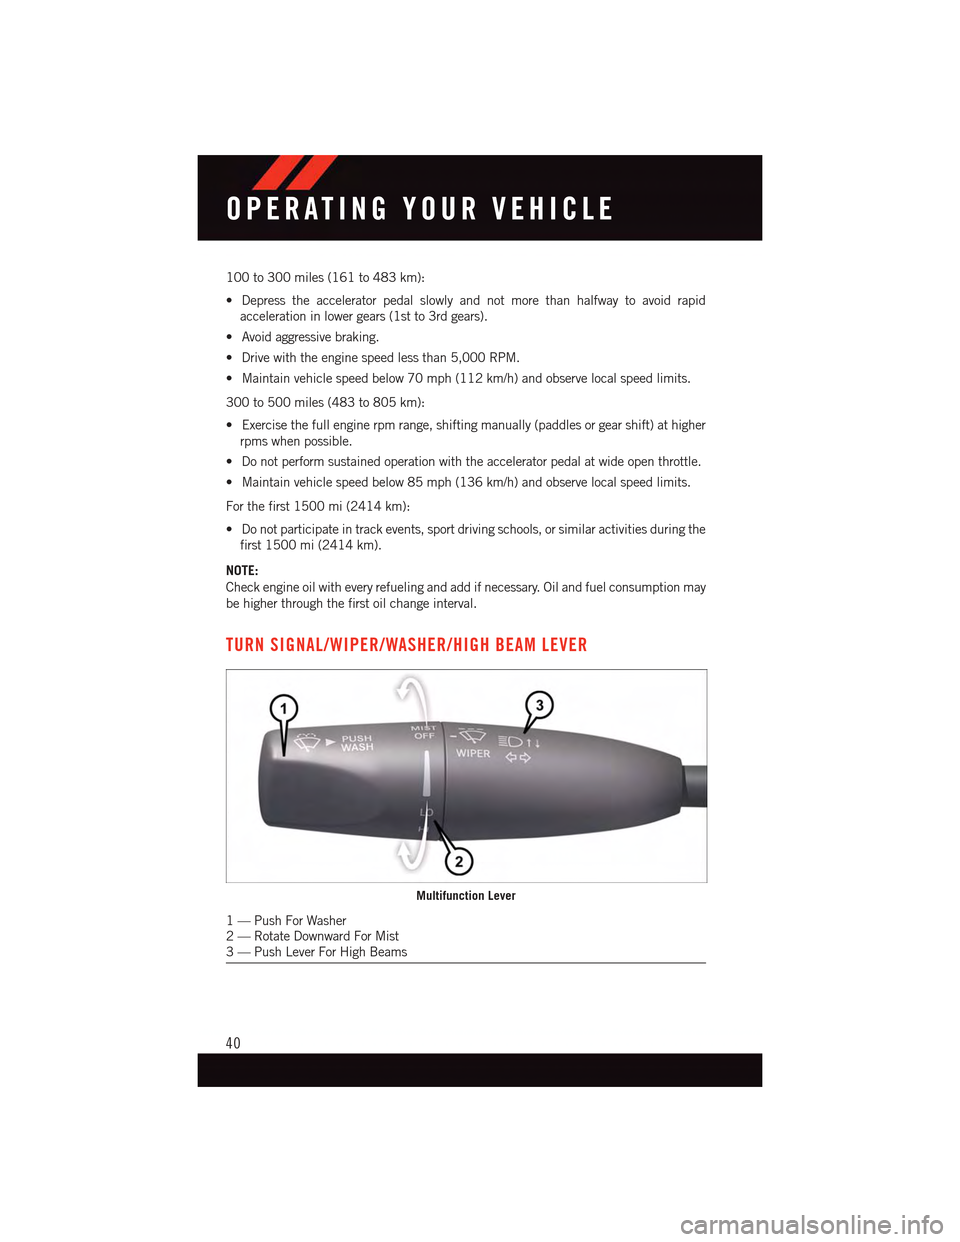
TURN SIGNAL/WIPER/WASHER/HIGH BEAM LEVER
Multifunction Lever
1—PushForWasher2—RotateDownwardForMist3—PushLeverForHighBeams
OPERATING YOUR VEHICLE
40
Page 43 of 236
Turn Signal/Lane Change Assist
Ta p t h e l e v e r u p o r d o w n o n c e a n d t h e t u r n s i g n a l ( r i g h t o r l e f t ) w i l l f l a s h t h r e e t i m e s a n d
automatically turn off.
Front Wipers
Intermittent, Low And High Operation
Rotate the end of the lever to the first detent position for one of four intermittent settings,
the second detent for low wiper operation and the third detent for high wiper operation.
Mist
Rotate the end of the lever rearward when a single wipe is desired.
NOTE:
The mist feature does not activate the washer pump; therefore, no washer fluid will be
sprayed on the windshield. The wash function must be activated in order to spray the
windshield with washer fluid.
Washer Operation
Push the end of the lever inward and hold for as long as spray is desired.
Rain Sensing Wipers
This feature senses moisture on the vehicle's windshield and automatically activates the
wipers for the driver when the switch is in the intermittent position. Rotate the end of the
lever to one of four settings to activate this feature and adjust sensitivity.
Rain Sensing can be turned on and off using the Uconnect®System, refer to the Owner's
Manual on the DVD for further details.
High Beam Operation
Push the lever forward to activate the high beams. Pull the lever toward you for flash to
pass.
NOTE:
For safe driving, turn off the high beams when oncoming traffic is present to prevent
headlight glare and as a courtesy to other motorists.
OPERATING YOUR VEHICLE
41
Page 44 of 236
HEADLIGHT SWITCH
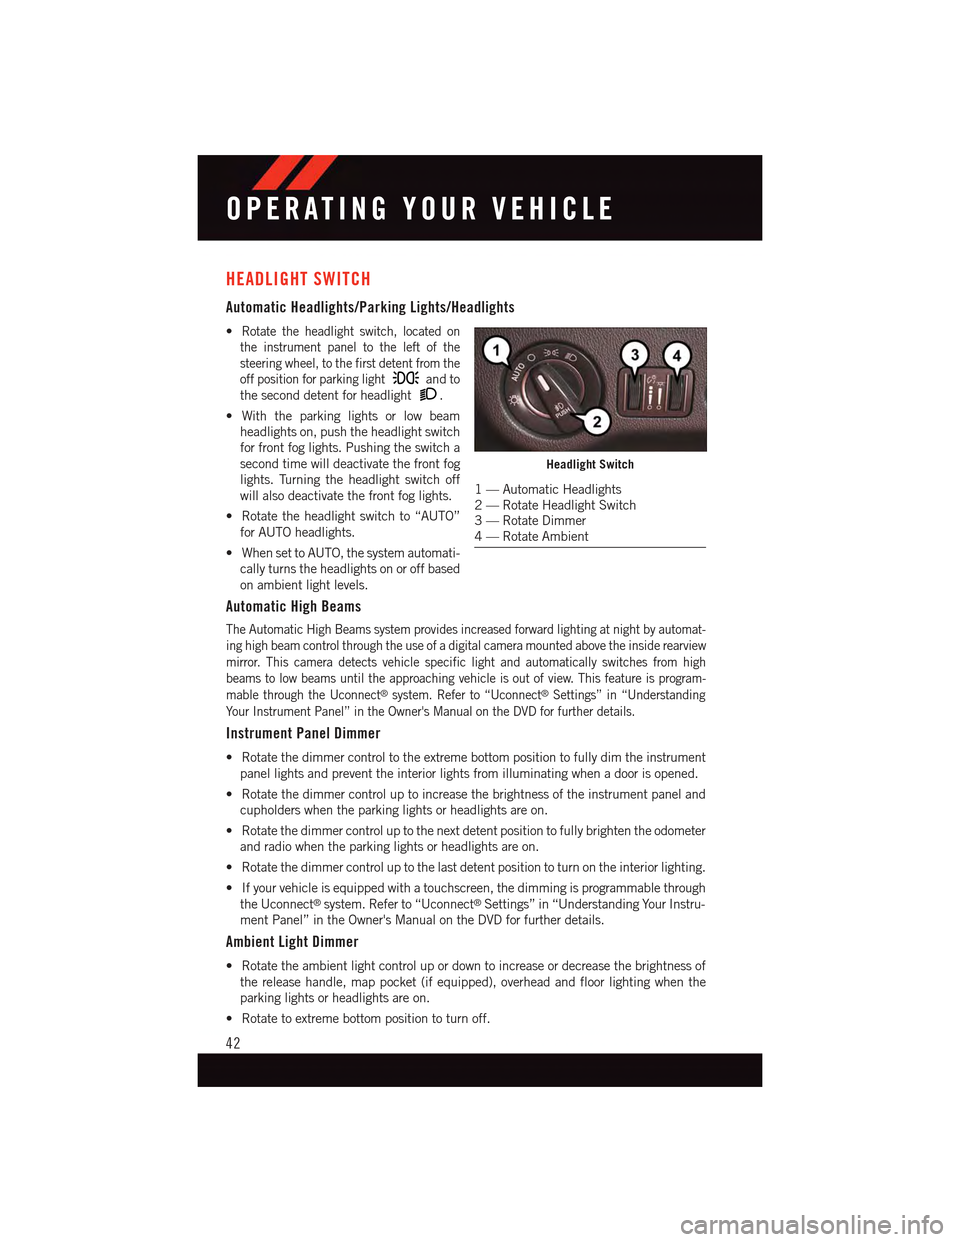
Automatic Headlights/Parking Lights/Headlights
•Rotate the headlight switch, located on
the instrument panel to the left of the
steering wheel, to the first detent from the
off position for parking lightand to
the second detent for headlight.
•Withtheparkinglightsorlowbeam
headlights on, push the headlight switch
for front fog lights. Pushing the switch a
second time will deactivate the front fog
lights. Turning the headlight switch off
will also deactivate the front fog lights.
•Rotatetheheadlightswitchto“AUTO”
for AUTO headlights.
•WhensettoAUTO,thesystemautomati-
cally turns the headlights on or off based
on ambient light levels.
Automatic High Beams
The Automatic High Beams system provides increased forward lighting at night by automat-
ing high beam control through the use of a digital camera mounted above the inside rearview
mirror. This camera detects vehicle specific light and automatically switches from high
beams to low beams until the approaching vehicle is out of view. This feature is program-
mable through the Uconnect®system. Refer to “Uconnect®Settings” in “Understanding
Yo u r I n s t r u m e n t P a n e l ” i n t h e O w n e r ' s M a n u a l o n t h e D V D f o r f u r t h e r d e t a i l s .
Instrument Panel Dimmer
•Rotatethedimmercontroltotheextremebottompositiontofullydimtheinstrument
panel lights and prevent the interior lights from illuminating when a door is opened.
•Rotatethedimmercontroluptoincreasethebrightnessoftheinstrumentpaneland
cupholders when the parking lights or headlights are on.
•Rotatethedimmercontroluptothenextdetentpositiontofullybrightentheodometer
and radio when the parking lights or headlights are on.
•Rotatethedimmercontroluptothelastdetentpositiontoturnontheinteriorlighting.
•Ifyourvehicleisequippedwithatouchscreen,thedimmingisprogrammablethrough
the Uconnect®system. Refer to “Uconnect®Settings” in “Understanding Your Instru-
ment Panel” in the Owner's Manual on the DVD for further details.
Ambient Light Dimmer
•Rotatetheambientlightcontrolupordowntoincreaseordecreasethebrightnessof
the release handle, map pocket (if equipped), overhead and floor lighting when the
parking lights or headlights are on.
•Rotatetoextremebottompositiontoturnoff.
Headlight Switch
1—AutomaticHeadlights2—RotateHeadlightSwitch3—RotateDimmer4—RotateAmbient
OPERATING YOUR VEHICLE
42
Page 45 of 236
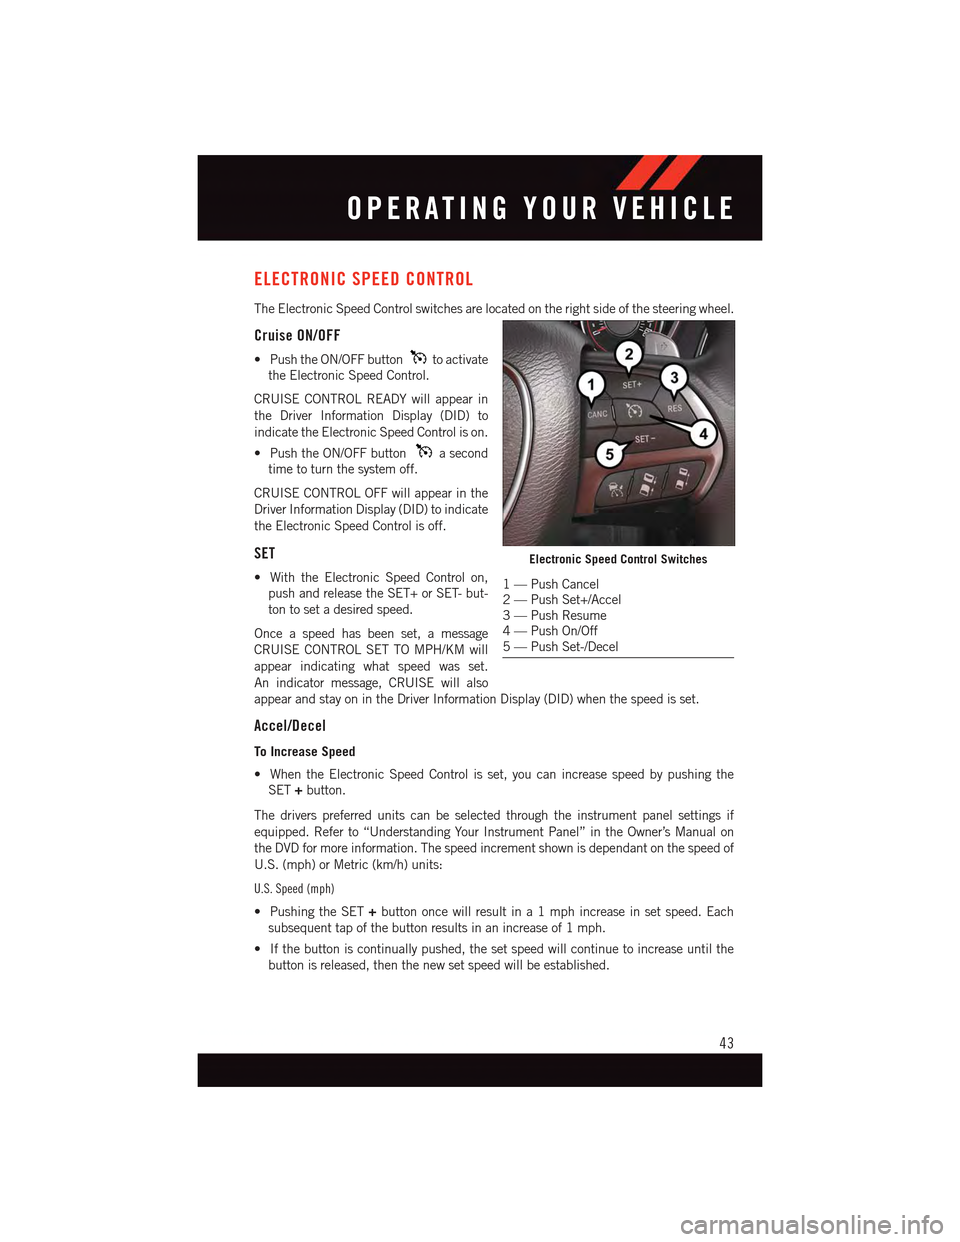
ELECTRONIC SPEED CONTROL
The Electronic Speed Control switches are located on the right side of the steering wheel.
Cruise ON/OFF
•PushtheON/OFFbuttonto activate
the Electronic Speed Control.
CRUISE CONTROL READY will appear in
the Driver Information Display (DID) to
indicate the Electronic Speed Control is on.
•PushtheON/OFFbuttonasecond
time to turn the system off.
CRUISE CONTROL OFF will appear in the
Driver Information Display (DID) to indicate
the Electronic Speed Control is off.
SET
•WiththeElectronicSpeedControlon,
push and release the SET+ or SET- but-
ton to set a desired speed.
Once a speed has been set, a message
CRUISE CONTROL SET TO MPH/KM will
appear indicating what speed was set.
An indicator message, CRUISE will also
appear and stay on in the Driver Information Display (DID) when the speed is set.
Accel/Decel
To Increase Speed
•WhentheElectronicSpeedControlisset,youcanincreasespeedbypushingthe
SET+button.
The drivers preferred units can be selected through the instrument panel settings if
equipped. Refer to “Understanding Your Instrument Panel” in the Owner’s Manual on
the DVD for more information. The speed increment shown is dependant on the speed of
U.S. (mph) or Metric (km/h) units:
U.S. Speed (mph)
•PushingtheSET+button once will result in a 1 mph increase in set speed. Each
subsequent tap of the button results in an increase of 1 mph.
•Ifthebuttoniscontinuallypushed,thesetspeedwillcontinuetoincreaseuntilthe
button is released, then the new set speed will be established.
Electronic Speed Control Switches
1—PushCancel2—PushSet+/Accel3—PushResume4—PushOn/Off5—PushSet-/Decel
OPERATING YOUR VEHICLE
43
Page 46 of 236

Metric Speed (km/h)
•PushingtheSET+button once will result in a 1 km/h increase in set speed. Each
subsequent tap of the button results in an increase of 1 km/h.
•Ifthebuttoniscontinuallypushed,thesetspeedwillcontinuetoincreaseuntilthe
button is released, then the new set speed will be established.
To Decrease Speed
•WhentheElectronicSpeedControlisset,youcandecreasespeedbypushingthe
SET-button.
The drivers preferred units can be selected through the instrument panel settings if
equipped. Refer to “Understanding Your Instrument Panel” in the Owner’s Manual on
the DVD for more information. The speed decrement shown is dependant on the speed of
U.S. (mph) or Metric (km/h) units:
U.S. Speed (mph)
•PushingtheSET-button once will result in a 1 mph decrease in set speed. Each
subsequent tap of the button results in a decrease of 1 mph.
•Ifthebuttoniscontinuallypushed,thesetspeedwillcontinuetodecreaseuntilthe
button is released, then the new set speed will be established.
Metric Speed (km/h)
•PushingtheSET-button once will result in a 1 km/h decrease in set speed. Each
subsequent tap of the button results in a decrease of 1 km/h.
•Ifthebuttoniscontinuallypushed,thesetspeedwillcontinuetodecreaseuntilthe
button is released, then the new set speed will be established.
Resume
•To r e s u m e a p r e v i o u s l y s e l e c t e d s e t s p e e d i n m e m o r y, p u s h t h e R E S b u t t o n a n d r e l e a s e .
Cancel
•PushtheCANCELbutton,orapplythebrakestocancelthesetspeedandmaintainthe
set speed memory.
•PushtheON/OFFbuttontoturnthesystemoffanderasethesetspeedmemory.
WARNING!
Leaving the Electronic Speed Control system on when not in use is dangerous. You
could accidentally set the system or cause it to go faster than you want. You could lose
control and have an accident. Always leave the system OFF when you are not using it.
OPERATING YOUR VEHICLE
44
Page 47 of 236
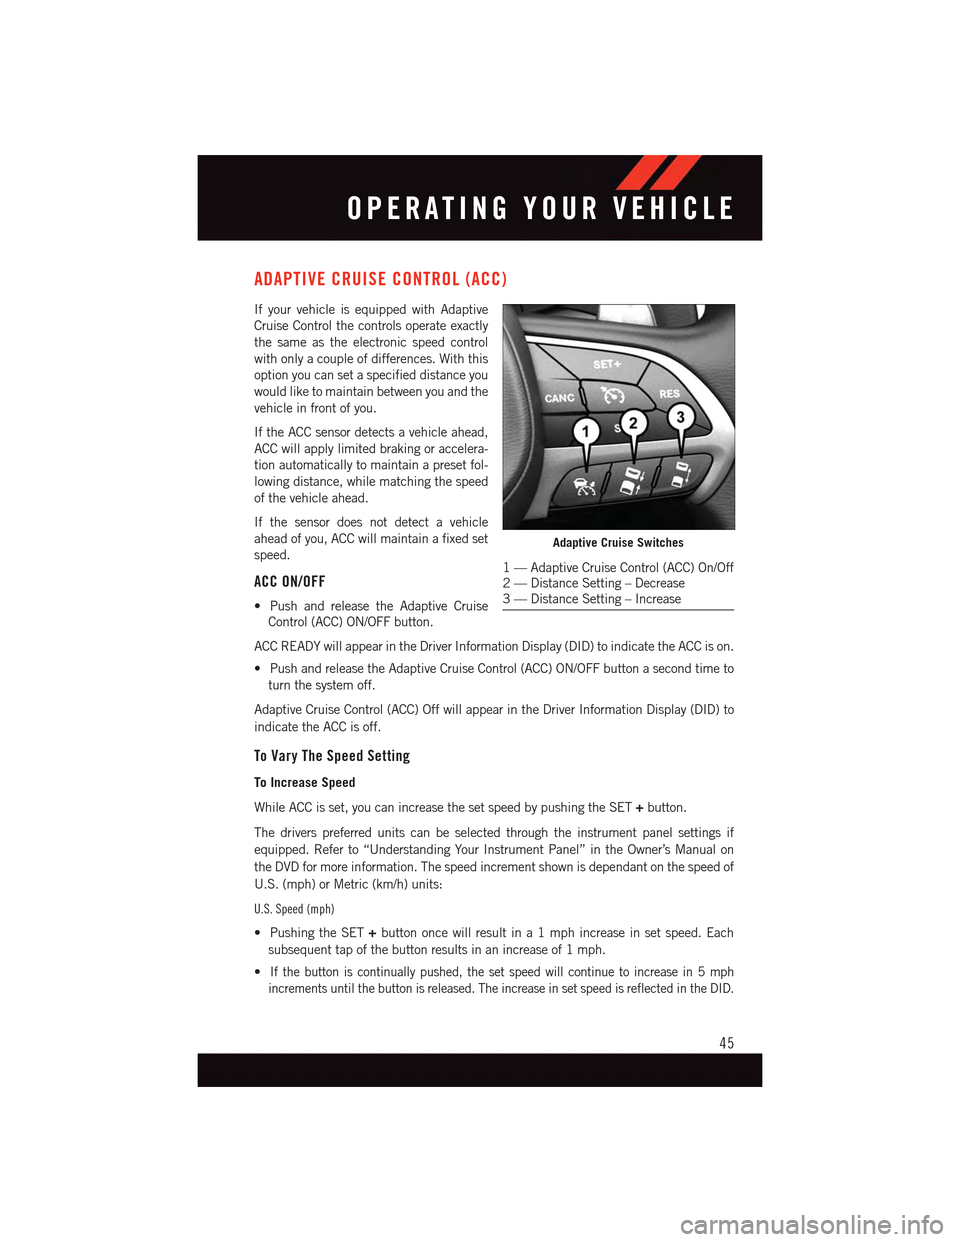
ADAPTIVE CRUISE CONTROL (ACC)
If your vehicle is equipped with Adaptive
Cruise Control the controls operate exactly
the same as the electronic speed control
with only a couple of differences. With this
option you can set a specified distance you
would like to maintain between you and the
vehicle in front of you.
If the ACC sensor detects a vehicle ahead,
ACC will apply limited braking or accelera-
tion automatically to maintain a preset fol-
lowing distance, while matching the speed
of the vehicle ahead.
If the sensor does not detect a vehicle
ahead of you, ACC will maintain a fixed set
speed.
ACC ON/OFF
•PushandreleasetheAdaptiveCruise
Control (ACC) ON/OFF button.
ACC READY will appear in the Driver Information Display (DID) to indicate the ACC is on.
•PushandreleasetheAdaptiveCruiseControl(ACC)ON/OFFbuttonasecondtimeto
turn the system off.
Adaptive Cruise Control (ACC) Off will appear in the Driver Information Display (DID) to
indicate the ACC is off.
To Vary The Speed Setting
To Increase Speed
While ACC is set, you can increase the set speed by pushing the SET+button.
The drivers preferred units can be selected through the instrument panel settings if
equipped. Refer to “Understanding Your Instrument Panel” in the Owner’s Manual on
the DVD for more information. The speed increment shown is dependant on the speed of
U.S. (mph) or Metric (km/h) units:
U.S. Speed (mph)
•PushingtheSET+button once will result in a 1 mph increase in set speed. Each
subsequent tap of the button results in an increase of 1 mph.
•If the button is continually pushed, the set speed will continue to increase in 5 mph
increments until the button is released. The increase in set speed is reflected in the DID.
Adaptive Cruise Switches
1—AdaptiveCruiseControl(ACC)On/Off2—DistanceSetting–Decrease3—DistanceSetting–Increase
OPERATING YOUR VEHICLE
45
Page 48 of 236
Metric Speed (km/h)
•PushingtheSET+button once will result in a 1 km/h increase in set speed. Each
subsequent tap of the button results in an increase of 1 km/h.
•If the button is continually pushed, the set speed will continue to increase in 10 km/h
increments until the button is released. The increase in set speed is reflected in the DID.
To Decrease Speed
While ACC is set, the set speed can be decreased by pushing the SET-button.
The drivers preferred units can be selected through the instrument panel settings if
equipped. Refer to “Understanding Your Instrument Panel” in the Owner’s Manual on
the DVD for more information. The speed increment shown is dependant on the speed of
U.S. (mph) or Metric (km/h) units:
U.S. Speed (mph)
•PushingtheSET-button once will result in a 1 mph decrease in set speed. Each
subsequent tap of the button results in a decrease of 1 mph.
•If the button is continually pushed, the set speed will continue to decrease in 5 mph
decrements until the button is released. The decrease in set speed is reflected in the DID.
Metric Speed (km/h)
•PushingtheSET-button once will result in a 1 km/h decrease in set speed. Each
subsequent tap of the button results in a decrease of 1 km/h.
•If the button is continually pushed, the set speed will continue to decrease in 10 km/h
decrements until the button is released. The decrease in set speed is reflected in the DID.
NOTE:
•WhenyouoverrideandpushtheSET+button or SET-buttons, the new Set Speed will
be the current speed of the vehicle.
•WhenyouusetheSET-button to decelerate, if the engine’s braking power does not
slow the vehicle sufficiently to reach the set speed, the brake system will automatically
slow the vehicle.
•TheACCsystemappliesthebrakedowntoafullstopwhenfollowingatargetvehicle.
If an ACC host vehicle follows a target vehicle to a standstill, the host vehicle will release
the vehicle brakes two seconds after coming to a full stop.
•TheACCsystemmaintainssetspeedwhendrivinguphillanddownhill.However,a
slight speed change on moderate hills is normal. In addition, downshifting may occur
while climbing uphill or descending downhill. This is normal operation and necessary
to maintain set speed. When driving up hill and down hill, the ACC system will cancel
if the braking temperature exceeds normal range (overheated).
OPERATING YOUR VEHICLE
46
Page 49 of 236
Distance Setting (ACC Only)
The specified following distance for ACC can be set by varying the distance setting
between four bars (longest), three bars (long), two bars (medium) and one bar (short).
Using this distance setting and the vehicle speed, ACC calculates and sets the distance
to the vehicle ahead. This distance setting displays in the DID.
•Toincreasethedistancesetting,pushtheDistanceSetting—Increasebuttonand
release. Each time the button is pushed, the distance setting increases by one bar
(longer).
•Todecreasethedistancesetting,pushtheDistanceSetting—Decreasebuttonand
release. Each time the button is pushed, the distance setting decreases by one bar
(shorter).
Changing Modes (ACC Only)
If desired, the Adaptive Cruise Control mode can be turned off and the system can be
operated as a normal (Fixed Speed) Speed Control mode. When in the normal (Fixed
Speed) Speed Control mode the distance setting feature will be disabled and the system
will maintain the speed you set.
•Tochangebetweenthedifferentcruisecontrolmodes,pushtheADAPTIVECRUISE
CONTROL (ACC) ON/OFF button which turns the ACC and the normal (Fixed Speed)
Speed Control OFF.
•Pushingthenormal(FixedSpeed)SPEEDCONTROLON/OFFbuttonwillresultin
turning ON (changing to) the normal (Fixed Speed) Speed Control mode.
Refer to your Owner's Manual on the DVD for further information.
OPERATING YOUR VEHICLE
47
Page 50 of 236
WARNING!
Adaptive Cruise Control (ACC) is a convenience system. It is not a substitute for active
driving involvement. It is always the driver’s responsibility to be attentive of road,
traffic, and weather conditions, vehicle speed, distance to the vehicle ahead; and, most
importantly, brake operation to ensure safe operation of the vehicle under all road
conditions. Your complete attention is always required while driving to maintain safe
control of your vehicle. Failure to follow these warnings can result in a collision and
death or serious personal injury.
The ACC system:
•Doesnotreacttopedestrians,oncomingvehicles,andstationaryobjects(e.g.,
astoppedvehicleinatrafficjamoradisabledvehicle).
•Cannottakestreet,traffic,andweatherconditionsintoaccount,andmaybelimited
upon adverse sight distance conditions.
•Doesnotalwaysfullyrecognizecomplexdrivingconditions,whichcanresultin
wrong or missing distance warnings.
•Willbringthevehicletoacompletestopwhilefollowingatargetvehicleandhold
the vehicle for 2 seconds in the stop position. If the target vehicle does not start
moving within two seconds the ACC system will display a message that the system
will release the brakes and that the brakes must be applied manually. An audible
chime will sound when the brakes are released.
Yo u s h o u l d s w i t c h o f f t h e A C C s y s t e m :
•Whendrivinginfog,heavyrain,heavysnow,sleet,heavytraffic,andcomplex
driving situations (i.e., in highway construction zones).
•Whenenteringaturnlaneorhighwayofframp;whendrivingonroadsthatare
winding, icy, snow-covered, slippery, or have steep uphill or downhill slopes.
•Whentowingatrailerupordownsteepslopes.
•Whencircumstancesdonotallowsafedrivingataconstantspeed.
The Cruise Control system has two control modes:
•AdaptiveCruiseControlmodeformaintaininganappropriatedistancebetween
vehicles.
•Normal(fixedspeed)electronicspeedcontrolmodeforcruisingataconstant
preset speed. For additional information, refer to “Normal (Fixed Speed) Cruise
Control Mode” in this section.
Normal (fixed speed) electronic speed control will not react to preceding vehicles.
Always be aware of the mode selected.
Yo u c a n c h a n g e t h e m o d e b y u s i n g t h e C r u i s e C o n t r o l b u t t o n s . T h e t w o c o n t r o l m o d e s
function differently. Always confirm which mode is selected.
OPERATING YOUR VEHICLE
48