spare tire DODGE CHARGER 2021 User Guide
[x] Cancel search | Manufacturer: DODGE, Model Year: 2021, Model line: CHARGER, Model: DODGE CHARGER 2021Pages: 320, PDF Size: 20.61 MB
Page 231 of 320
IN CASE OF EMERGENCY229
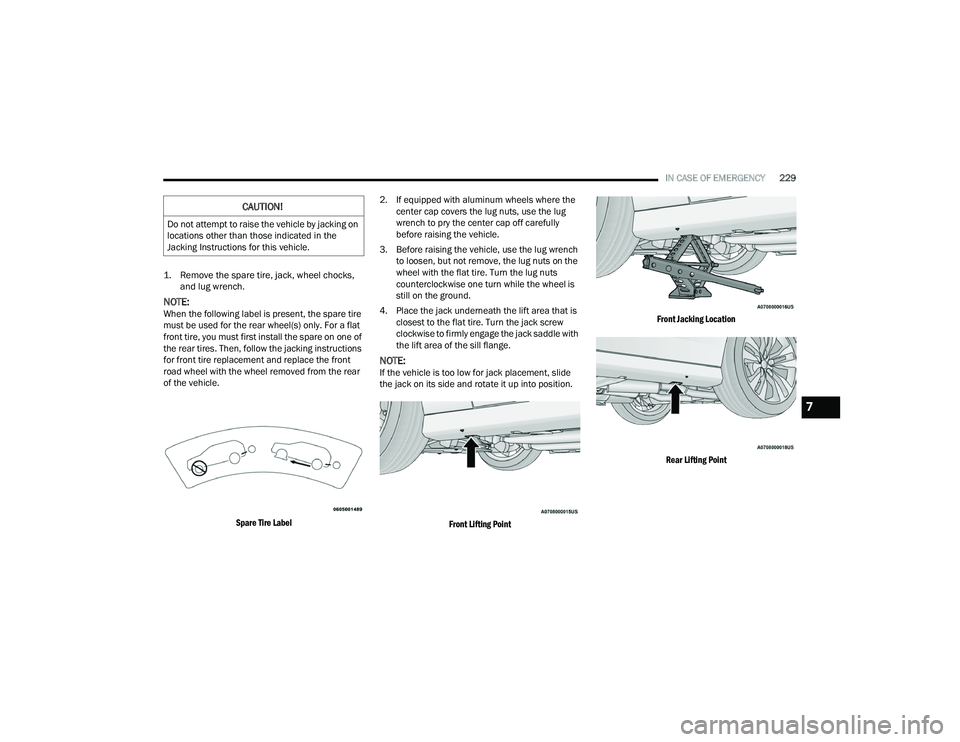
1. Remove the spare tire, jack, wheel chocks, and lug wrench.
NOTE:When the following label is present, the spare tire
must be used for the rear wheel(s) only. For a flat
front tire, you must first install the spare on one of
the rear tires. Then, follow the jacking instructions
for front tire replacement and replace the front
road wheel with the wheel removed from the rear
of the vehicle.
Spare Tire Label
2. If equipped with aluminum wheels where the
center cap covers the lug nuts, use the lug
wrench to pry the center cap off carefully
before raising the vehicle.
3. Before raising the vehicle, use the lug wrench to loosen, but not remove, the lug nuts on the
wheel with the flat tire. Turn the lug nuts
counterclockwise one turn while the wheel is
still on the ground.
4. Place the jack underneath the lift area that is closest to the flat tire. Turn the jack screw
clockwise to firmly engage the jack saddle with
the lift area of the sill flange.
NOTE:If the vehicle is too low for jack placement, slide
the jack on its side and rotate it up into position.
Front Lifting Point Front Jacking Location
Rear Lifting Point
CAUTION!
Do not attempt to raise the vehicle by jacking on
locations other than those indicated in the
Jacking Instructions for this vehicle.
7
21_LD_OM_EN_USC_t.book Page 229
Page 232 of 320
230IN CASE OF EMERGENCY
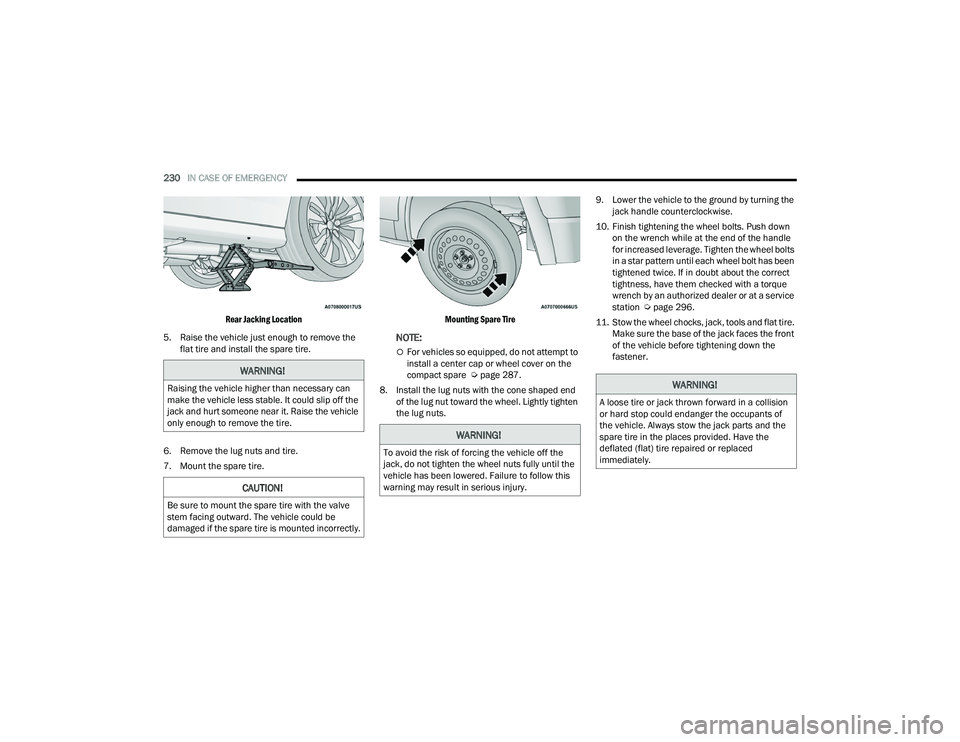
Rear Jacking Location
5. Raise the vehicle just enough to remove the flat tire and install the spare tire.
6. Remove the lug nuts and tire.
7. Mount the spare tire.
Mounting Spare Tire
NOTE:
For vehicles so equipped, do not attempt to
install a center cap or wheel cover on the
compact spare Ú
page 287.
8. Install the lug nuts with the cone shaped end of the lug nut toward the wheel. Lightly tighten
the lug nuts. 9. Lower the vehicle to the ground by turning the
jack handle counterclockwise.
10. Finish tightening the wheel bolts. Push down on the wrench while at the end of the handle
for increased leverage. Tighten the wheel bolts
in a star pattern until each wheel bolt has been
tightened twice. If in doubt about the correct
tightness, have them checked with a torque
wrench by an authorized dealer or at a service
station Ú page 296.
11. Stow the wheel chocks, jack, tools and flat tire. Make sure the base of the jack faces the front
of the vehicle before tightening down the
fastener.
WARNING!
Raising the vehicle higher than necessary can
make the vehicle less stable. It could slip off the
jack and hurt someone near it. Raise the vehicle
only enough to remove the tire.
CAUTION!
Be sure to mount the spare tire with the valve
stem facing outward. The vehicle could be
damaged if the spare tire is mounted incorrectly.
WARNING!
To avoid the risk of forcing the vehicle off the
jack, do not tighten the wheel nuts fully until the
vehicle has been lowered. Failure to follow this
warning may result in serious injury.
WARNING!
A loose tire or jack thrown forward in a collision
or hard stop could endanger the occupants of
the vehicle. Always stow the jack parts and the
spare tire in the places provided. Have the
deflated (flat) tire repaired or replaced
immediately.
21_LD_OM_EN_USC_t.book Page 230
Page 241 of 320
IN CASE OF EMERGENCY239
Emergency Gas Can Refueling
Most gas cans will not open the flapper doors.
A funnel is provided to allow emergency refueling
with a gas can.
See below steps for refueling:
1. Retrieve funnel from the spare tire storage area.
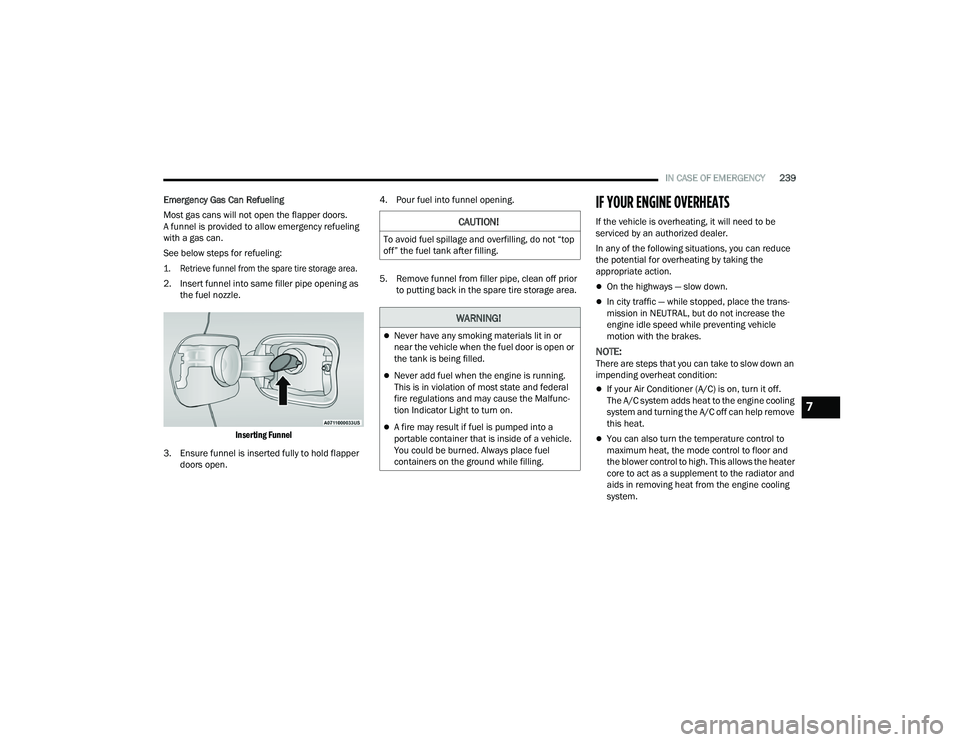
2. Insert funnel into same filler pipe opening as the fuel nozzle.
Inserting Funnel
3. Ensure funnel is inserted fully to hold flapper doors open. 4. Pour fuel into funnel opening.
5. Remove funnel from filler pipe, clean off prior
to putting back in the spare tire storage area.
IF YOUR ENGINE OVERHEATS
If the vehicle is overheating, it will need to be
serviced by an authorized dealer.
In any of the following situations, you can reduce
the potential for overheating by taking the
appropriate action.
On the highways — slow down.
In city traffic — while stopped, place the trans -
mission in NEUTRAL, but do not increase the
engine idle speed while preventing vehicle
motion with the brakes.
NOTE:There are steps that you can take to slow down an
impending overheat condition:
If your Air Conditioner (A/C) is on, turn it off.
The A/C system adds heat to the engine cooling
system and turning the A/C off can help remove
this heat.
You can also turn the temperature control to
maximum heat, the mode control to floor and
the blower control to high. This allows the heater
core to act as a supplement to the radiator and
aids in removing heat from the engine cooling
system.
CAUTION!
To avoid fuel spillage and overfilling, do not “top
off” the fuel tank after filling.
WARNING!
Never have any smoking materials lit in or
near the vehicle when the fuel door is open or
the tank is being filled.
Never add fuel when the engine is running.
This is in violation of most state and federal
fire regulations and may cause the Malfunc -
tion Indicator Light to turn on.
A fire may result if fuel is pumped into a
portable container that is inside of a vehicle.
You could be burned. Always place fuel
containers on the ground while filling.
7
21_LD_OM_EN_USC_t.book Page 239
Page 269 of 320
SERVICING AND MAINTENANCE267
REAR INTERIOR FUSES
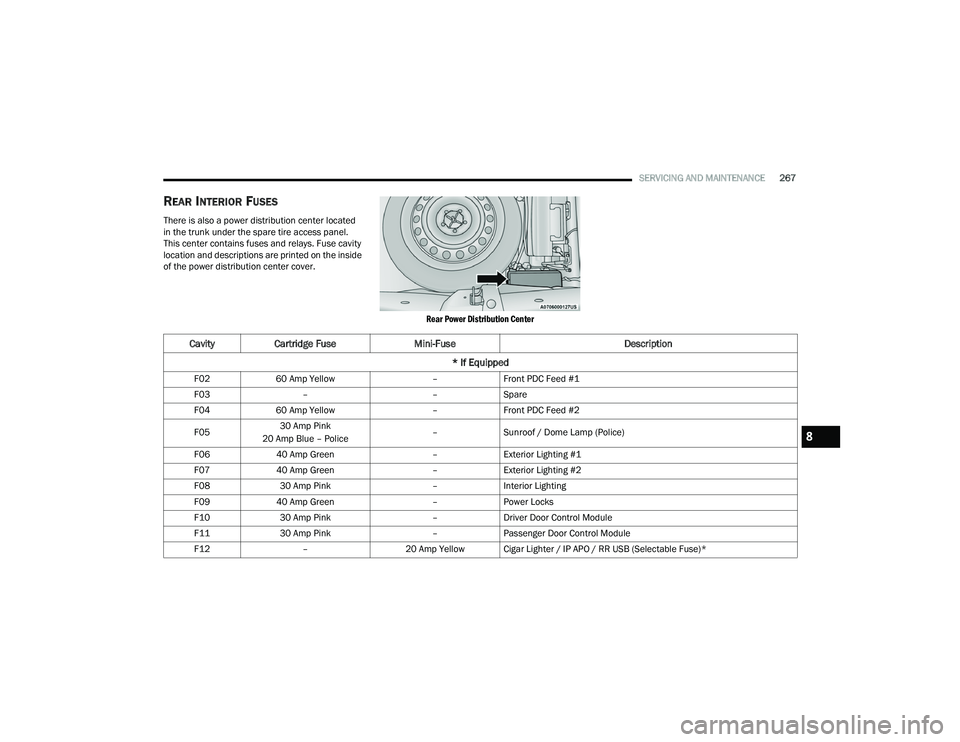
There is also a power distribution center located
in the trunk under the spare tire access panel.
This center contains fuses and relays. Fuse cavity
location and descriptions are printed on the inside
of the power distribution center cover.
Rear Power Distribution Center
CavityCartridge Fuse Mini-Fuse Description
* If Equipped
F02 60 Amp Yellow –Front PDC Feed #1
F03 – –Spare
F04 60 Amp Yellow –Front PDC Feed #2
F05 30 Amp Pink
20 Amp Blue – Police –
Sunroof / Dome Lamp (Police)
F06 40 Amp Green –Exterior Lighting #1
F07 40 Amp Green –Exterior Lighting #2
F08 30 Amp Pink –Interior Lighting
F09 40 Amp Green –Power Locks
F10 30 Amp Pink –Driver Door Control Module
F11 30 Amp Pink –Passenger Door Control Module
F12 –20 Amp Yellow Cigar Lighter / IP APO / RR USB (Selectable Fuse)*
8
21_LD_OM_EN_USC_t.book Page 267
Page 270 of 320
268SERVICING AND MAINTENANCE
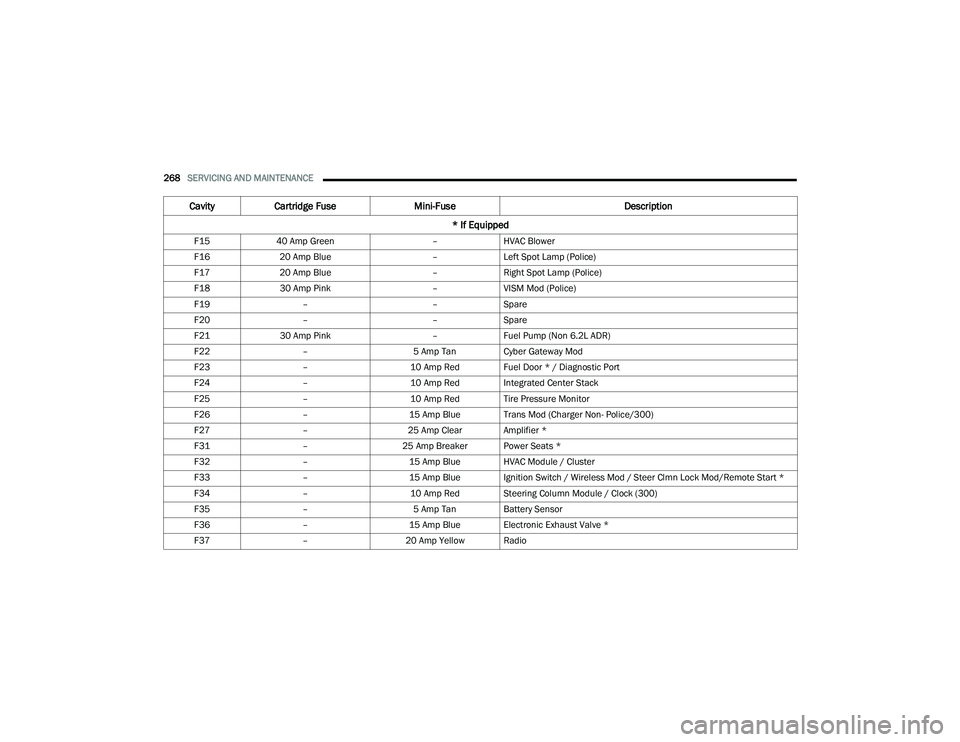
F15 40 Amp Green –HVAC Blower
F16 20 Amp Blue –Left Spot Lamp (Police)
F17 20 Amp Blue –Right Spot Lamp (Police)
F18 30 Amp Pink –VISM Mod (Police)
F19 – –Spare
F20 – –Spare
F21 30 Amp Pink –Fuel Pump (Non 6.2L ADR)
F22 – 5 Amp Tan Cyber Gateway Mod
F23 –10 Amp Red Fuel Door * / Diagnostic Port
F24 –10 Amp Red Integrated Center Stack
F25 –10 Amp Red Tire Pressure Monitor
F26 –15 Amp Blue Trans Mod (Charger Non- Police/300)
F27 –25 Amp Clear Amplifier *
F31 –25 Amp Breaker Power Seats *
F32 –15 Amp Blue HVAC Module / Cluster
F33 –15 Amp Blue Ignition Switch / Wireless Mod / Steer Clmn Lock Mod/Remote Start *
F34 –10 Amp Red Steering Column Module / Clock (300)
F35 – 5 Amp Tan Battery Sensor
F36 –15 Amp Blue Electronic Exhaust Valve *
F37 –20 Amp Yellow Radio
CavityCartridge Fuse Mini-Fuse Description
* If Equipped
21_LD_OM_EN_USC_t.book Page 268
Page 277 of 320
SERVICING AND MAINTENANCE275
TIRES
TIRE SAFETY INFORMATION
Tire safety information will cover aspects of
the following information: Tire Markings, Tire
Identification Numbers, Tire Terminology and
Definitions, Tire Pressures, and Tire Loading.
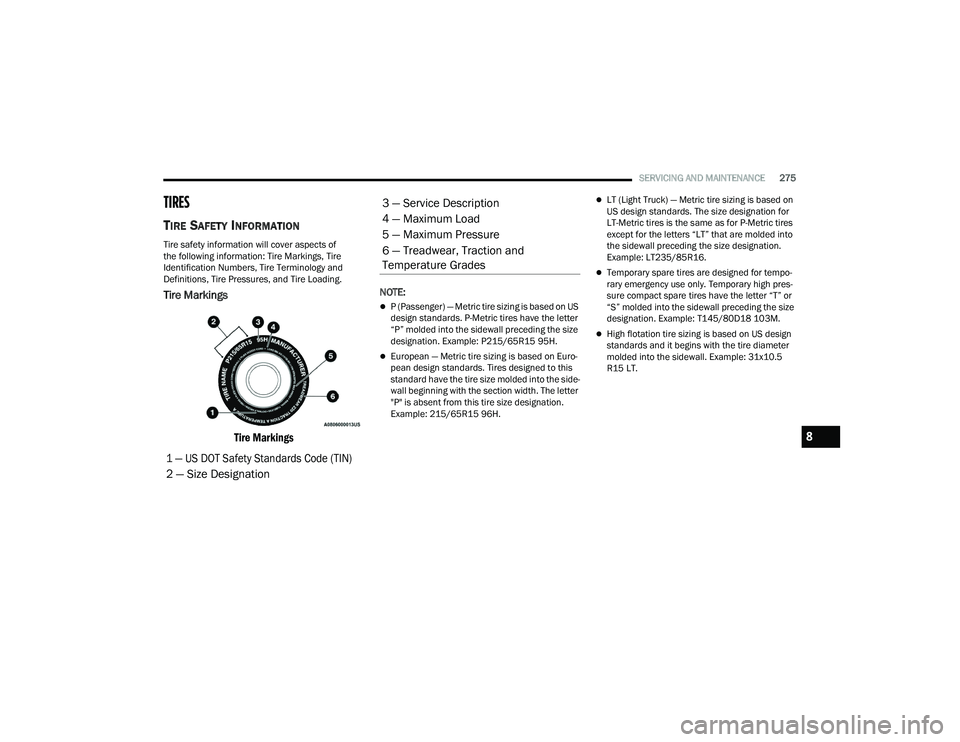
Tire Markings
Tire Markings
NOTE:
P (Passenger) — Metric tire sizing is based on US
design standards. P-Metric tires have the letter
“P” molded into the sidewall preceding the size
designation. Example: P215/65R15 95H.
European — Metric tire sizing is based on Euro -
pean design standards. Tires designed to this
standard have the tire size molded into the side -
wall beginning with the section width. The letter
"P" is absent from this tire size designation.
Example: 215/65R15 96H.
LT (Light Truck) — Metric tire sizing is based on
US design standards. The size designation for
LT-Metric tires is the same as for P-Metric tires
except for the letters “LT” that are molded into
the sidewall preceding the size designation.
Example: LT235/85R16.
Temporary spare tires are designed for tempo -
rary emergency use only. Temporary high pres -
sure compact spare tires have the letter “T” or
“S” molded into the sidewall preceding the size
designation. Example: T145/80D18 103M.
High flotation tire sizing is based on US design
standards and it begins with the tire diameter
molded into the sidewall. Example: 31x10.5
R15 LT.
1 — US DOT Safety Standards Code (TIN)
2 — Size Designation
3 — Service Description
4 — Maximum Load
5 — Maximum Pressure
6 — Treadwear, Traction and
Temperature Grades
8
21_LD_OM_EN_USC_t.book Page 275
Page 278 of 320
276SERVICING AND MAINTENANCE
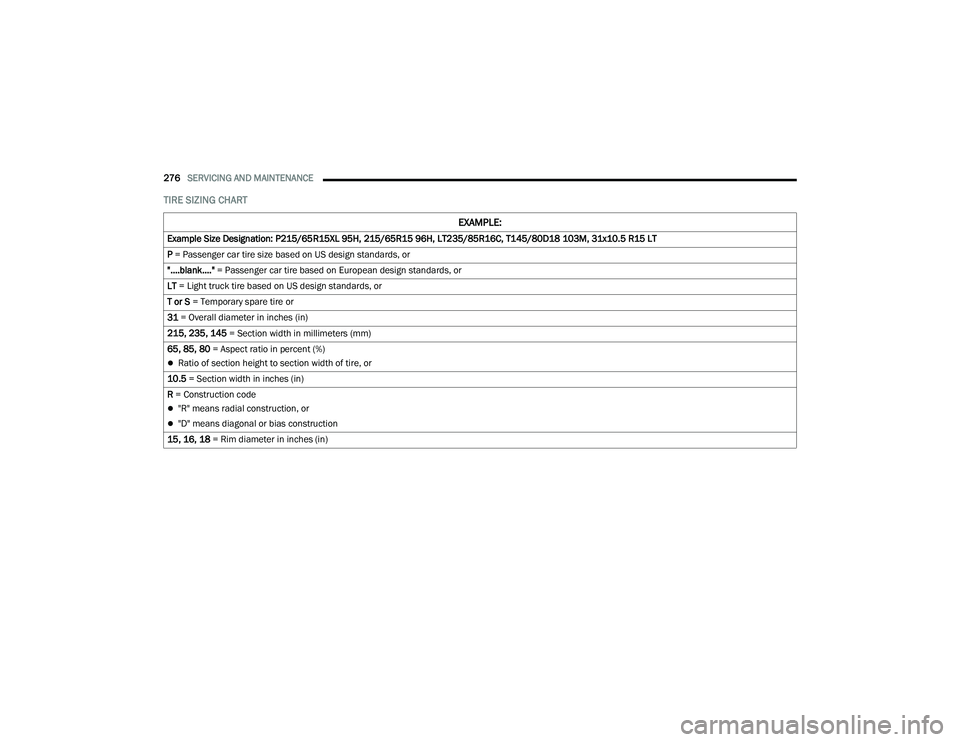
TIRE SIZING CHART
EXAMPLE:
Example Size Designation: P215/65R15XL 95H, 215/65R15 96H, LT235/85R16C, T145/80D18 103M, 31x10.5 R15 LT
P = Passenger car tire size based on US design standards, or
"....blank...." = Passenger car tire based on European design standards, or
LT = Light truck tire based on US design standards, or
T or S = Temporary spare tire or
31 = Overall diameter in inches (in)
215, 235, 145 = Section width in millimeters (mm)
65, 85, 80 = Aspect ratio in percent (%)
Ratio of section height to section width of tire, or
10.5 = Section width in inches (in)
R = Construction code
"R" means radial construction, or
"D" means diagonal or bias construction
15, 16, 18 = Rim diameter in inches (in)
21_LD_OM_EN_USC_t.book Page 276
Page 282 of 320
280SERVICING AND MAINTENANCE
Tire Loading And Tire Pressure
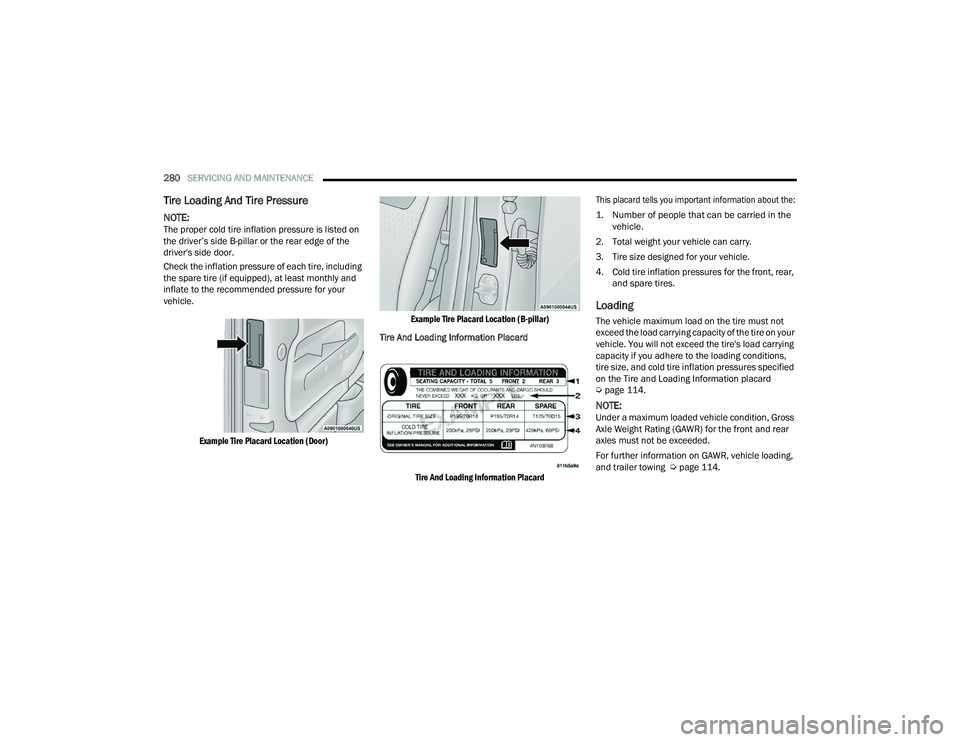
NOTE:The proper cold tire inflation pressure is listed on
the driver’s side B-pillar or the rear edge of the
driver's side door.
Check the inflation pressure of each tire, including
the spare tire (if equipped), at least monthly and
inflate to the recommended pressure for your
vehicle.
Example Tire Placard Location (Door) Example Tire Placard Location (B-pillar)
Tire And Loading Information Placard
Tire And Loading Information Placard
This placard tells you important information about the:
1. Number of people that can be carried in the
vehicle.
2. Total weight your vehicle can carry.
3. Tire size designed for your vehicle.
4. Cold tire inflation pressures for the front, rear, and spare tires.
Loading
The vehicle maximum load on the tire must not
exceed the load carrying capacity of the tire on your
vehicle. You will not exceed the tire's load carrying
capacity if you adhere to the loading conditions,
tire size, and cold tire inflation pressures specified
on the Tire and Loading Information placard
Úpage 114.
NOTE:Under a maximum loaded vehicle condition, Gross
Axle Weight Rating (GAWR) for the front and rear
axles must not be exceeded.
For further information on GAWR, vehicle loading,
and trailer towing Ú page 114.
21_LD_OM_EN_USC_t.book Page 280
Page 287 of 320
SERVICING AND MAINTENANCE285
condition, please replace the TPMS sensor as it is
not designed to be reused when driven under Run
Flat mode 14 psi (96 kPa) condition.
NOTE:TPMS sensor must be replaced after driving the
vehicle on a flat tire condition.
It is not recommended driving a vehicle loaded at
full capacity or to tow a trailer while a tire is in the
Run Flat mode.
See the Tire Pressure Monitoring System section
for more information.
Tire Spinning
When stuck in mud, sand, snow, or ice conditions,
do not spin your vehicle's wheels above 30 mph
(48 km/h) or for longer than 30 seconds
continuously without stopping.
For further information Ú page 242.
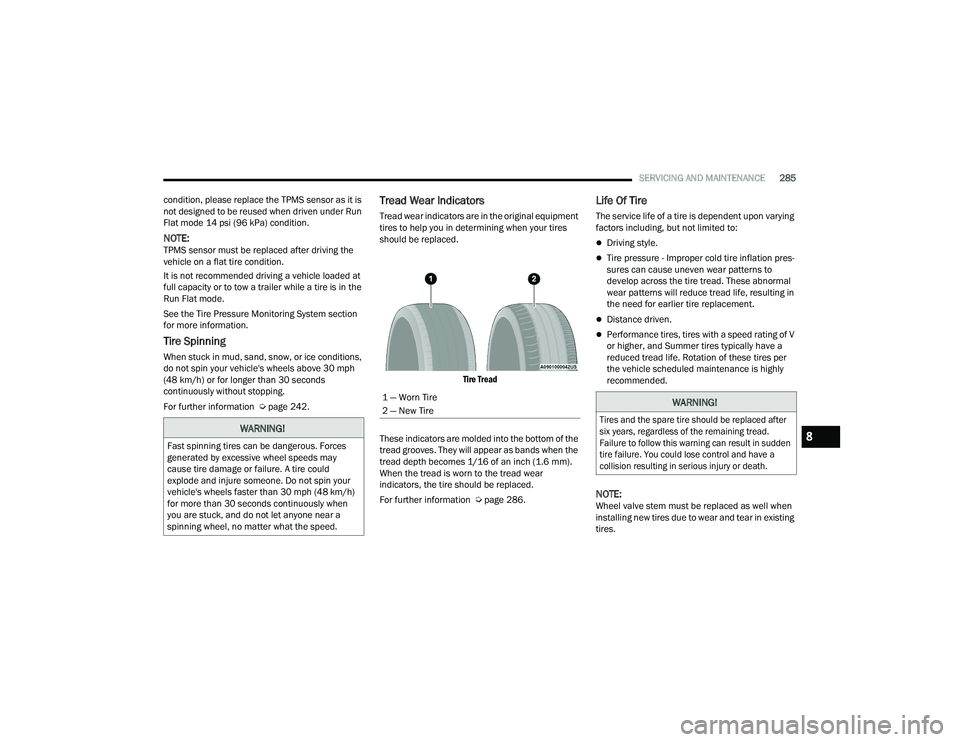
Tread Wear Indicators
Tread wear indicators are in the original equipment
tires to help you in determining when your tires
should be replaced.
Tire Tread
These indicators are molded into the bottom of the
tread grooves. They will appear as bands when the
tread depth becomes 1/16 of an inch (1.6 mm).
When the tread is worn to the tread wear
indicators, the tire should be replaced.
For further information Ú page 286.
Life Of Tire
The service life of a tire is dependent upon varying
factors including, but not limited to:
Driving style.
Tire pressure - Improper cold tire inflation pres -
sures can cause uneven wear patterns to
develop across the tire tread. These abnormal
wear patterns will reduce tread life, resulting in
the need for earlier tire replacement.
Distance driven.
Performance tires, tires with a speed rating of V
or higher, and Summer tires typically have a
reduced tread life. Rotation of these tires per
the vehicle scheduled maintenance is highly
recommended.
NOTE:Wheel valve stem must be replaced as well when
installing new tires due to wear and tear in existing
tires.
WARNING!
Fast spinning tires can be dangerous. Forces
generated by excessive wheel speeds may
cause tire damage or failure. A tire could
explode and injure someone. Do not spin your
vehicle's wheels faster than 30 mph (48 km/h)
for more than 30 seconds continuously when
you are stuck, and do not let anyone near a
spinning wheel, no matter what the speed.
1 — Worn Tire
2 — New TireWARNING!
Tires and the spare tire should be replaced after
six years, regardless of the remaining tread.
Failure to follow this warning can result in sudden
tire failure. You could lose control and have a
collision resulting in serious injury or death.
8
21_LD_OM_EN_USC_t.book Page 285
Page 289 of 320
SERVICING AND MAINTENANCE287
Summer tires do not contain the all season
designation or mountain/snowflake symbol on the
tire sidewall. Use Summer tires only in sets of four;
failure to do so may adversely affect the safety and
handling of your vehicle.
Snow Tires
Some areas of the country require the use of snow tires
during the Winter. Snow tires can be identified by a
“mountain/snowflake” symbol on the tire sidewall.
If you need snow tires, select tires
equivalent in size and type to the original
equipment tires. Use snow tires only in
sets of four; failure to do so may adversely
affect the safety and handling of your vehicle.
Snow tires generally have lower speed ratings than
what was originally equipped with your vehicle and
should not be operated at sustained speeds over
75 mph (120 km/h). For speeds above 75 mph
(120 km/h) refer to original equipment or an
authorized tire dealer for recommended safe
operating speeds, loading and cold tire inflation
pressures.
While studded tires improve performance on ice,
skid and traction capability on wet or dry surfaces
may be poorer than that of non-studded tires. Some
states prohibit studded tires; therefore, local laws
should be checked before using these tire types.
SPARE TIRES — IF EQUIPPED
NOTE:For vehicles equipped with Tire Service Kit instead
of a spare tire Ú
page 231.
For restrictions when towing with a spare tire
designated for temporary emergency use
Ú
page 119.
Spare Tire Matching Original Equipped Tire
And Wheel — If Equipped
Your vehicle may be equipped with a spare tire and
wheel equivalent in look and function to the original
equipment tire and wheel found on the front or rear
axle of your vehicle. This spare tire may be used in
the tire rotation for your vehicle. If your vehicle has
this option, refer to an authorized tire dealer for the
recommended tire rotation pattern.
Compact Spare Tire — If Equipped
The compact spare is for temporary emergency
use only. You can identify if your vehicle is equipped
with a compact spare by looking at the spare tire
description on the Tire and Loading Information
Placard located on the driver’s side door opening
or on the sidewall of the tire. Compact spare tire
descriptions begin with the letter “T” or “S”
preceding the size designation. Example: T145/
80D18 103M.
T, S = Temporary Spare Tire
Since this tire has limited tread life, the original
equipment tire should be repaired (or replaced)
and reinstalled on your vehicle at the first
opportunity.
Do not install a wheel cover or attempt to mount a
conventional tire on the compact spare wheel, since
the wheel is designed specifically for the compact
spare tire. Do not install more than one compact spare
tire and wheel on the vehicle at any given time.
WARNING!
Do not use Summer tires in snow/ice conditions.
You could lose vehicle control, resulting in severe
injury or death. Driving too fast for conditions also
creates the possibility of loss of vehicle control.
CAUTION!
Because of the reduced ground clearance, do not
take your vehicle through an automatic car wash
with a compact or limited use temporary spare
installed. Damage to the vehicle may result.
8
21_LD_OM_EN_USC_t.book Page 287