Uconnect system DODGE CHARGER 2023 Owner's Manual
[x] Cancel search | Manufacturer: DODGE, Model Year: 2023, Model line: CHARGER, Model: DODGE CHARGER 2023Pages: 292, PDF Size: 13.05 MB
Page 56 of 292
54GETTING TO KNOW YOUR VEHICLE
USB/AUX CONTROL
This feature allows an external USB device to be plugged
into the USB port.
Plugging in a smartphone device to a USB port may
activate Android Auto™ or Apple CarPlay® features, if
equipped. For further information, refer to “Android
Auto™” or “Apple CarPlay®” in the Uconnect Radio
Instruction Manual.
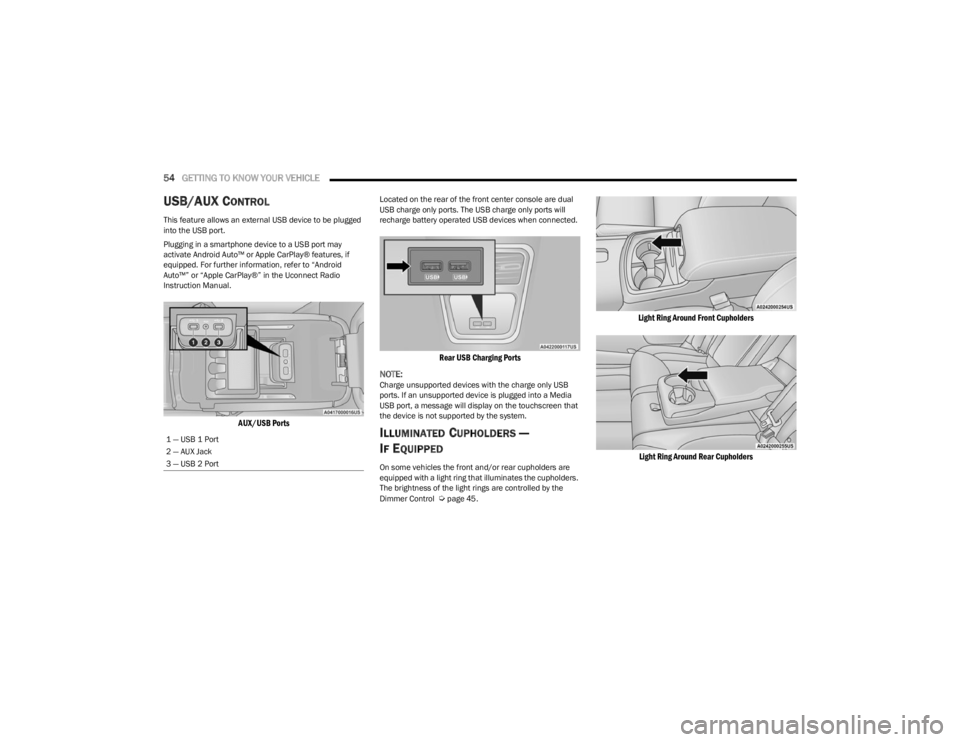
AUX/USB Ports
Located on the rear of the front center console are dual
USB charge only ports. The USB charge only ports will
recharge battery operated USB devices when connected.
Rear USB Charging Ports
NOTE:
Charge unsupported devices with the charge only USB
ports. If an unsupported device is plugged into a Media
USB port, a message will display on the touchscreen that
the device is not supported by the system.
ILLUMINATED CUPHOLDERS —
I
F EQUIPPED
On some vehicles the front and/or rear cupholders are
equipped with a light ring that illuminates the cupholders.
The brightness of the light rings are controlled by the
Dimmer Control
Úpage 45.
Light Ring Around Front Cupholders
Light Ring Around Rear Cupholders
1 — USB 1 Port
2 — AUX Jack
3 — USB 2 Port
23_LD_OM_EN_USC_t.book Page 54
Page 60 of 292

58GETTING TO KNOW YOUR VEHICLE
OPENING AND CLOSING THE SUNROOF
Express Open/Close
Push the switch rearward and release it within one second
and the sunroof will open automatically from any position.
The sunroof will open fully and stop automatically. Push the switch forward and release it within one second
and the sunroof will close automatically from any position.
The sunroof will close fully and stop automatically.
During Express Open or Express Close operation, any
other movement of the sunroof switch will stop the
sunroof.
Manual Open/Close
To open the sunroof, push and hold the switch rearward to
full open.
To close the sunroof, push and hold the switch in the
forward position.
Any release of the switch during open or close operation
will stop the sunroof movement. The sunroof will remain in
a partially opened position until the switch is operated and
held again.
Venting The Sunroof
Push and release the Vent switch within one second, and
the sunroof will express open to the vent position. Push
and hold the Vent switch for more than one second for
manual opening of the sunroof vent.
PINCH PROTECT FEATURE
This feature will detect an obstruction in the closing of the
sunroof during the Express Close operation. If an
obstruction in the path of the sunroof is detected, the
sunroof will automatically retract. Remove the obstruction
if this occurs.
NOTE:If three consecutive sunroof close attempts result in Pinch
Protect reversals, Pinch Protect will disable and the
sunroof must be closed in Manual mode.
SUNSHADE OPERATION
The sunshade can be opened manually. However, the
sunshade will open automatically as the sunroof opens.
NOTE:The sunshade cannot be closed if the sunroof is open.
SUNROOF MAINTENANCE
Use only a non-abrasive cleaner and a soft cloth to clean
the glass panel. Periodically check for and clear out any
debris that may have collected in the tracks.
IGNITION OFF OPERATION
The power sunroof switch can remain active in Accessory
Delay for up to approximately 10 minutes after the
vehicle’s ignition is placed to the OFF position. Opening
either front door will cancel this feature.
This feature is programmable using the Uconnect system
Úpage 112.
WARNING!
Never leave children unattended in a vehicle, or with
access to an unlocked vehicle. Never leave the key
fob in or near the vehicle, or in a location accessible
to children. Do not leave the Keyless Enter ‘n Go™
Ignition in the ACC or ON/RUN position. Occupants,
particularly unattended children, can become
entrapped by the power sunroof while operating the
power sunroof switch. Such entrapment may result
in serious injury or death.
In a collision, there is a greater risk of being thrown
from a vehicle with an open sunroof. You could also
be seriously injured or killed. Always fasten your seat
belt properly and make sure all passengers are also
properly secured.
Do not allow small children to operate the sunroof.
Never allow your fingers, other body parts, or any
object, to project through the sunroof opening. Injury
may result.
23_LD_OM_EN_USC_t.book Page 58
Page 87 of 292
STARTING AND OPERATING85
ELECTRIC POWER STEERING
The Electric Power Steering system provides increased
vehicle response and ease of maneuverability. The system
adapts to different driving conditions. If the electric
steering system experiences a fault that prevents it from
providing assist, you will still have the ability to steer the
vehicle manually.
Alternate electric power steering efforts can be selected
through the Uconnect System
Úpage 112.
If the Electric Power Steering Fault Warning Light is
displayed and the “SERVICE POWER STEERING” or the
“POWER STEERING ASSIST OFF – SERVICE SYSTEM”
message is displayed within the instrument cluster
display, this indicates the vehicle needs to be taken to the
dealer for service
Úpage 68.
NOTE:
Even if the power steering assistance is no longer oper -
ational, it is still possible to steer the vehicle. Under
these conditions there will be a substantial increase in
steering effort, especially at low speeds and during
parking maneuvers.
If the condition persists, see an authorized dealer for
service. If the Electric Power Steering Fault Warning Light is
displayed and the “POWER STEERING SYSTEM OVER
TEMP” message is displayed on the instrument cluster
screen, they indicate that extreme steering maneuvers
may have occurred which caused an over temperature
condition in the power steering system. Once driving
conditions are safe, pull over and let the vehicle idle for a
few moments until the Electric Power Steering Fault
Warning Light and message turn off.
CRUISE CONTROL SYSTEMS — IF EQUIPPED
Your vehicle may be equipped with the Cruise Control
system, or the Adaptive Cruise Control (ACC) system:
Cruise Control will keep your vehicle at a constant
preset speed.
Adaptive Cruise Control (ACC) will adjust the vehicle
speed up to the preset speed to maintain a distance
with the vehicle ahead.
NOTE:
In vehicles equipped with ACC, if ACC is not enabled,
Fixed Speed Cruise Control will not detect vehicles
directly ahead of you. Always be aware of the feature
selected.
Only one Cruise Control feature can operate at a time.
For example, if Fixed Speed Cruise Control is enabled,
Adaptive Cruise Control will be unavailable, and vice
versa.
CRUISE CONTROL
When engaged, the Cruise Control takes over accelerator
operations at speeds greater than 20 mph (32 km/h),
depending on engine size and axle ratio.
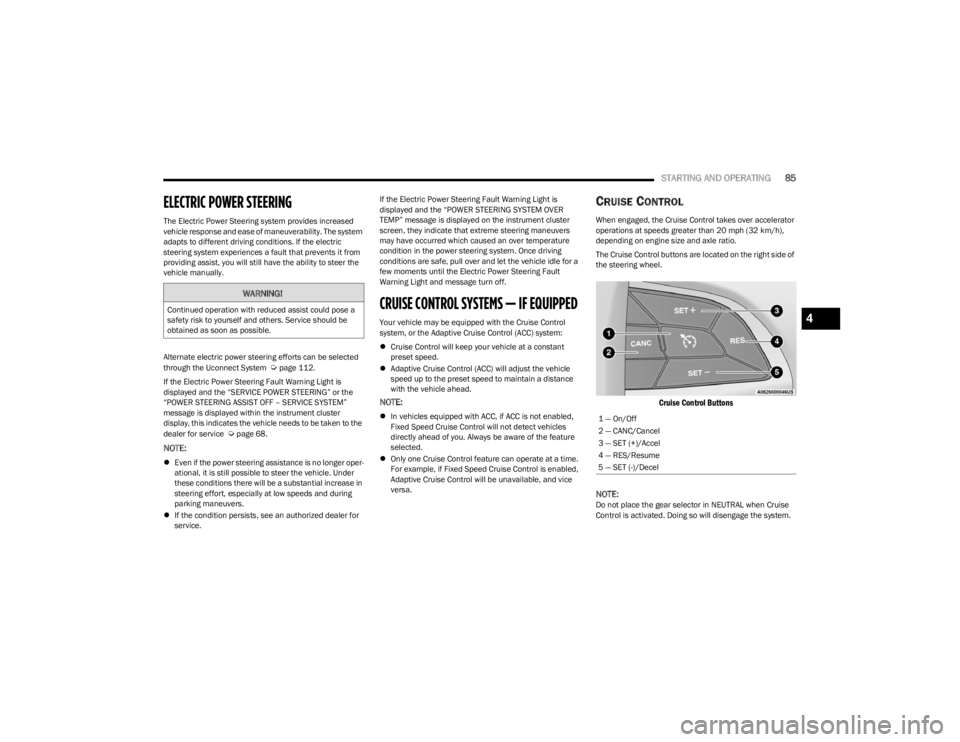
The Cruise Control buttons are located on the right side of
the steering wheel.
Cruise Control Buttons
NOTE:
Do not place the gear selector in NEUTRAL when Cruise
Control is activated. Doing so will disengage the system.
WARNING!
Continued operation with reduced assist could pose a
safety risk to yourself and others. Service should be
obtained as soon as possible.
1 — On/Off
2 — CANC/Cancel
3 — SET (+)/Accel
4 — RES/Resume
5 — SET (-)/Decel
4
23_LD_OM_EN_USC_t.book Page 85
Page 98 of 292
96STARTING AND OPERATING
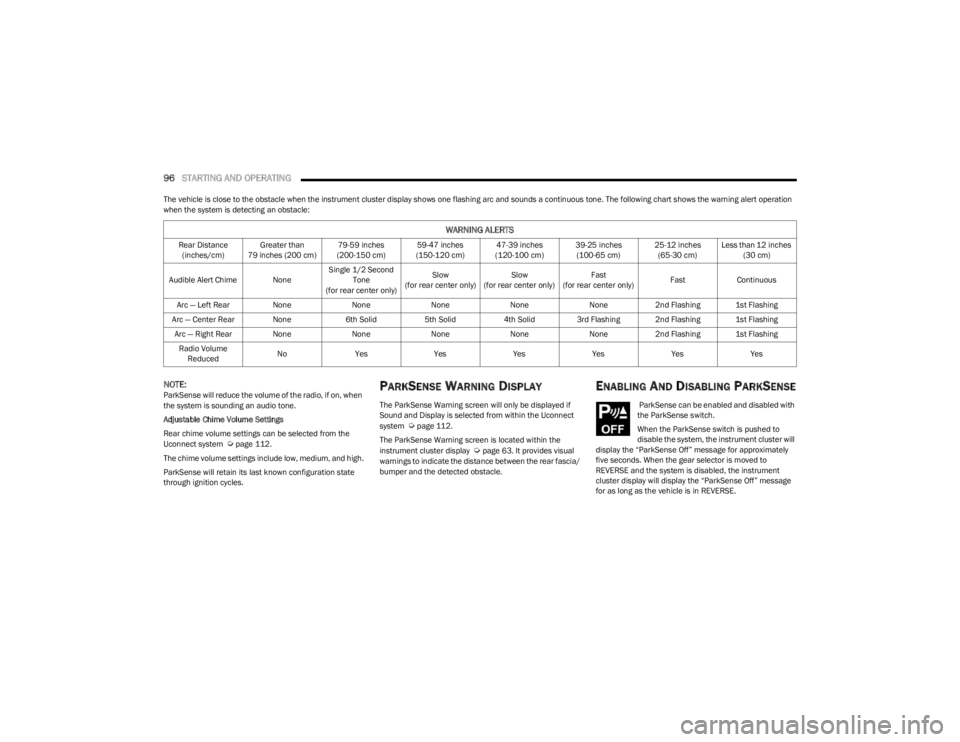
The vehicle is close to the obstacle when the instrument cluster display shows one flashing arc and sounds a continuous tone. The following chart shows the warning alert operation
when the system is detecting an obstacle:
NOTE:ParkSense will reduce the volume of the radio, if on, when
the system is sounding an audio tone.
Adjustable Chime Volume Settings
Rear chime volume settings can be selected from the
Uconnect system
Úpage 112.
The chime volume settings include low, medium, and high.
ParkSense will retain its last known configuration state
through ignition cycles.
PARKSENSE WARNING DISPLAY
The ParkSense Warning screen will only be displayed if
Sound and Display is selected from within the Uconnect
system
Úpage 112.
The ParkSense Warning screen is located within the
instrument cluster display
Úpage 63. It provides visual
warnings to indicate the distance between the rear fascia/
bumper and the detected obstacle.
ENABLING AND DISABLING PARKSENSE
ParkSense can be enabled and disabled with
the ParkSense switch.
When the ParkSense switch is pushed to
disable the system, the instrument cluster will
display the “ParkSense Off” message for approximately
five seconds. When the gear selector is moved to
REVERSE and the system is disabled, the instrument
cluster display will display the “ParkSense Off” message
for as long as the vehicle is in REVERSE.
WARNING ALERTS
Rear Distance (inches/cm) Greater than
79 inches (200 cm) 79-59 inches
(200-150 cm) 59-47 inches
(150-120 cm) 47-39 inches
(120-100 cm) 39-25 inches
(100-65 cm) 25-12 inches
(65-30 cm) Less than 12 inches
(30 cm)
Audible Alert Chime None Single 1/2 Second
Tone
(for rear center only) Slow
(for rear center only) Slow
(for rear center only) Fast
(for rear center only) Fast
Continuous
Arc — Left Rear NoneNoneNoneNoneNone2nd Flashing 1st Flashing
Arc — Center Rear None 6th Solid5th Solid4th Solid3rd Flashing 2nd Flashing 1st Flashing
Arc — Right Rear None NoneNoneNoneNone2nd Flashing 1st Flashing
Radio Volume Reduced No
Yes YesYesYesYesYes
23_LD_OM_EN_USC_t.book Page 96
Page 100 of 292
98STARTING AND OPERATING
LANESENSE — IF EQUIPPED
LANESENSE OPERATION
The LaneSense system is operational at speeds above
37 mph (60 km/h) and below 112 mph (180 km/h). The
LaneSense system uses a forward looking camera to
detect lane markings and measure vehicle position within
the lane boundaries.
When both lane markings are detected and the driver
unintentionally drifts out of the lane (no turn signal
applied), the LaneSense system provides a haptic warning
in the form of torque applied to the steering wheel to
prompt the driver to remain within the lane boundaries. If
the driver unintentionally drifts out of the lane, the
LaneSense system provides a visual warning through the
instrument cluster display to prompt the driver to remain
within the lane boundaries. The driver may manually override the haptic warning by
applying torque to the steering wheel at any time.
When only a single lane marking is detected and the driver
drifts across the lane marking (no turn signal applied), the
LaneSense system provides visual warnings through the
instrument cluster display to prompt the driver to remain
within the lane. When only a single lane marking is
detected, a haptic or a torque warning will not be provided.
NOTE:When operating conditions have been met, the Lane
-
Sense system will monitor if the driver’s hands are on the
steering wheel and provide an audible warning to the
driver if removed. The system will cancel if the driver does
not return their hands to the wheel.
TURNING LANESENSE ON OR OFF
The LaneSense button is located on the
center stack below the Uconnect display.
To turn the LaneSense system on, push the
LaneSense button (LED turns off). A
“LaneSense On” message is shown in the instrument
cluster display.
To turn the LaneSense system off, push the LaneSense
button once (LED turns on).
NOTE:The LaneSense system will retain the last system state, on
or off, from the last ignition cycle when the ignition is
placed in the ON/RUN position.
LANESENSE WARNING MESSAGE
The LaneSense system will indicate the current lane drift
condition through the instrument cluster display.
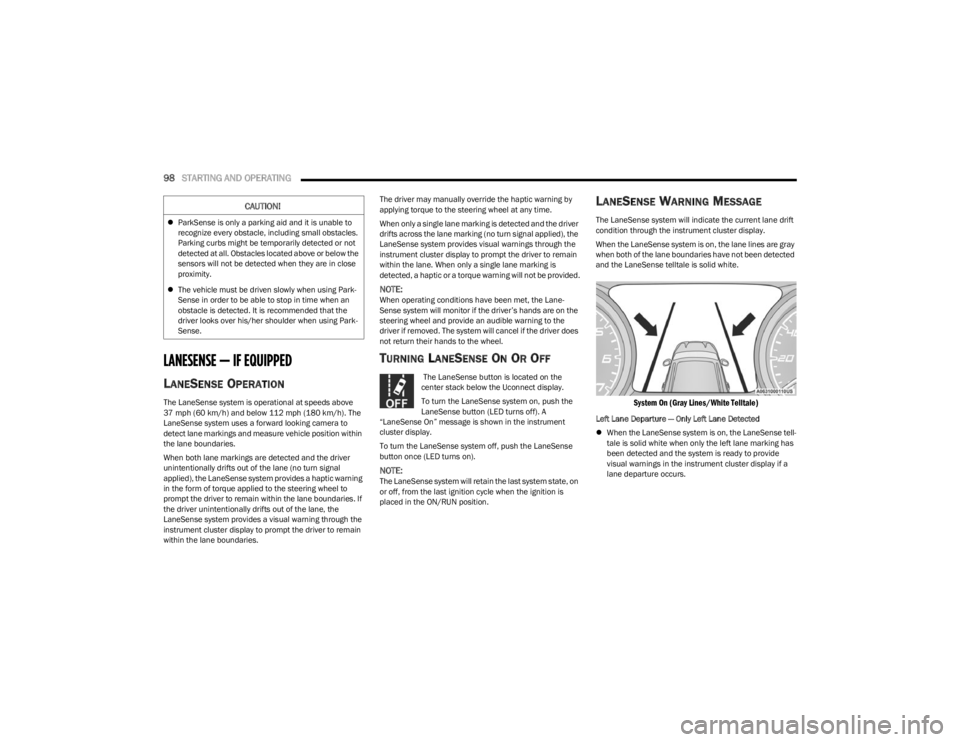
When the LaneSense system is on, the lane lines are gray
when both of the lane boundaries have not been detected
and the LaneSense telltale is solid white.
System On (Gray Lines/White Telltale)
Left Lane Departure — Only Left Lane Detected
When the LaneSense system is on, the LaneSense tell -
tale is solid white when only the left lane marking has
been detected and the system is ready to provide
visual warnings in the instrument cluster display if a
lane departure occurs.
CAUTION!
ParkSense is only a parking aid and it is unable to
recognize every obstacle, including small obstacles.
Parking curbs might be temporarily detected or not
detected at all. Obstacles located above or below the
sensors will not be detected when they are in close
proximity.
The vehicle must be driven slowly when using Park -
Sense in order to be able to stop in time when an
obstacle is detected. It is recommended that the
driver looks over his/her shoulder when using Park -
Sense.
23_LD_OM_EN_USC_t.book Page 98
Page 102 of 292
100STARTING AND OPERATING
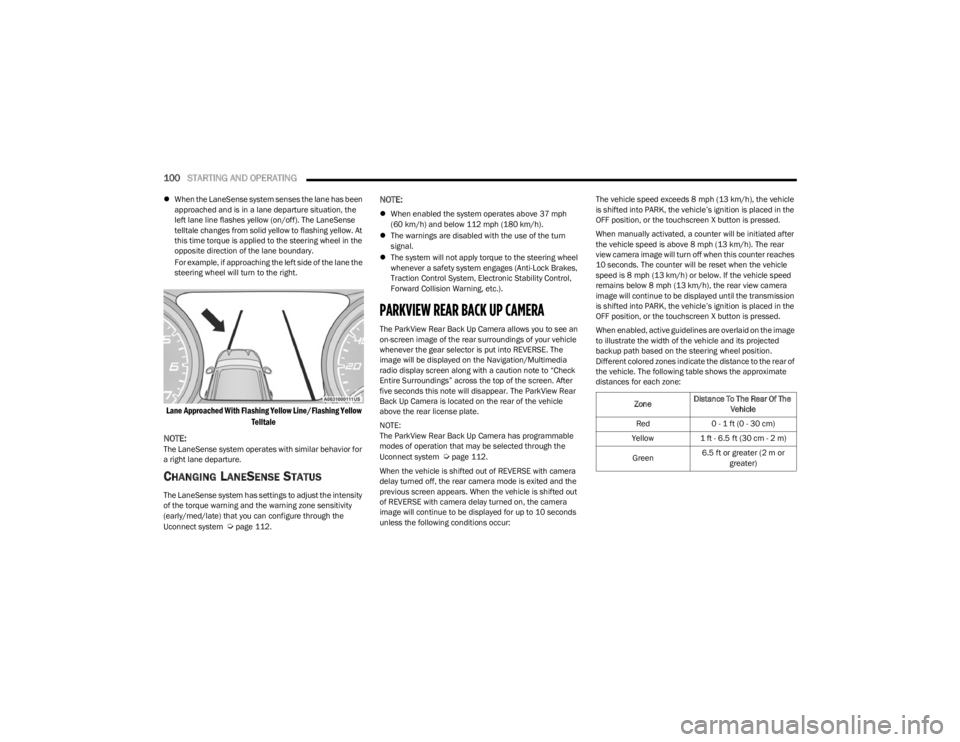
When the LaneSense system senses the lane has been
approached and is in a lane departure situation, the
left lane line flashes yellow (on/off). The LaneSense
telltale changes from solid yellow to flashing yellow. At
this time torque is applied to the steering wheel in the
opposite direction of the lane boundary.
For example, if approaching the left side of the lane the
steering wheel will turn to the right.
Lane Approached With Flashing Yellow Line/Flashing Yellow
Telltale
NOTE:
The LaneSense system operates with similar behavior for
a right lane departure.
CHANGING LANESENSE STATUS
The LaneSense system has settings to adjust the intensity
of the torque warning and the warning zone sensitivity
(early/med/late) that you can configure through the
Uconnect system
Úpage 112.
NOTE:
When enabled the system operates above 37 mph
(60 km/h) and below 112 mph (180 km/h).
The warnings are disabled with the use of the turn
signal.
The system will not apply torque to the steering wheel
whenever a safety system engages (Anti-Lock Brakes,
Traction Control System, Electronic Stability Control,
Forward Collision Warning, etc.).
PARKVIEW REAR BACK UP CAMERA
The ParkView Rear Back Up Camera allows you to see an
on-screen image of the rear surroundings of your vehicle
whenever the gear selector is put into REVERSE. The
image will be displayed on the Navigation/Multimedia
radio display screen along with a caution note to “Check
Entire Surroundings” across the top of the screen. After
five seconds this note will disappear. The ParkView Rear
Back Up Camera is located on the rear of the vehicle
above the rear license plate.
NOTE:
The ParkView Rear Back Up Camera has programmable
modes of operation that may be selected through the
Uconnect system
Úpage 112.
When the vehicle is shifted out of REVERSE with camera
delay turned off, the rear camera mode is exited and the
previous screen appears. When the vehicle is shifted out
of REVERSE with camera delay turned on, the camera
image will continue to be displayed for up to 10 seconds
unless the following conditions occur: The vehicle speed exceeds 8 mph (13 km/h), the vehicle
is shifted into PARK, the vehicle’s ignition is placed in the
OFF position, or the touchscreen X button is pressed.
When manually activated, a counter will be initiated after
the vehicle speed is above 8 mph (13 km/h). The rear
view camera image will turn off when this counter reaches
10 seconds. The counter will be reset when the vehicle
speed is 8 mph (13 km/h) or below. If the vehicle speed
remains below 8 mph (13 km/h), the rear view camera
image will continue to be displayed until the transmission
is shifted into PARK, the vehicle’s ignition is placed in the
OFF position, or the touchscreen X button is pressed.
When enabled, active guidelines are overlaid on the image
to illustrate the width of the vehicle and its projected
backup path based on the steering wheel position.
Different colored zones indicate the distance to the rear of
the vehicle. The following table shows the approximate
distances for each zone:
Zone
Distance To The Rear Of The
Vehicle
Red 0 - 1 ft (0 - 30 cm)
Yellow 1 ft - 6.5 ft (30 cm - 2 m)
Green 6.5 ft or greater (2 m or
greater)
23_LD_OM_EN_USC_t.book Page 100
Page 113 of 292
111
MULTIMEDIA
UCONNECT SYSTEMS
For detailed information about your Uconnect 4C/4C NAV
With 8.4-inch Display system, refer to your Radio
Instruction Manual.
NOTE:Uconnect screen images are for illustration purposes only
and may not reflect exact software for your vehicle.
CYBERSECURITY
Depending on applicability, your vehicle may be able to
send or receive information from a wired or wireless
network. This information allows systems and features in
your vehicle to function properly.Your vehicle may be equipped with certain security
features to reduce the risk of unauthorized and unlawful
access to vehicle systems and wireless communications.
Vehicle software technology continues to evolve over time
and FCA US LLC, working with its suppliers, evaluates and
takes appropriate steps as needed. As always, if you
experience unusual behavior, contact an authorized
dealer immediately,
Úpage 273, or refer to your Radio
Instruction Manual for additional contact information.
The risk of unauthorized and unlawful access to your
vehicle systems may still exist, even if the most recent
version of vehicle software (such as Uconnect software) is
installed.
NOTE:To help further improve user experience, features,
stability, etc., and minimize the potential risk of a security
breach, vehicle owners should routinely check
www.driveuconnect.com (US Residents) or www.driveuco -
nnect.ca (Canadian Residents) to learn about available
Uconnect software updates.
WARNING!
ONLY insert trusted media devices/components into
your vehicle. Media of unknown origin could possibly
contain malicious software, and if installed in your
vehicle, it may increase the possibility for vehicle
systems to be breached.
As always, if you experience unusual vehicle
behavior, contact an authorized dealer immediately.
5
23_LD_OM_EN_USC_t.book Page 111
Page 114 of 292
112MULTIMEDIA
UCONNECT SETTINGS
The Uconnect system uses a combination of buttons on
the touchscreen and buttons on the faceplate located on
the center of the instrument panel. These buttons allow
you to access and change the Customer Programmable
Features. Many features can vary by vehicle.
Buttons on the faceplate are located below and/or beside
the Uconnect system in the center of the instrument
panel. In addition, there is a SCROLL/ENTER control knob
located on the right side. Turn the control knob to scroll
through menus and change settings. Push the center of
the control knob one or more times to select or change a
setting.
Your Uconnect system may also have SCREEN OFF and
MUTE buttons on the faceplate.
Push the SCREEN OFF button on the faceplate to turn off
the Uconnect screen. Push the button again or tap the
screen to turn the screen on.
Press the Back Arrow button to exit out of a Menu or
certain option on the Uconnect system.
CUSTOMER PROGRAMMABLE FEATURES
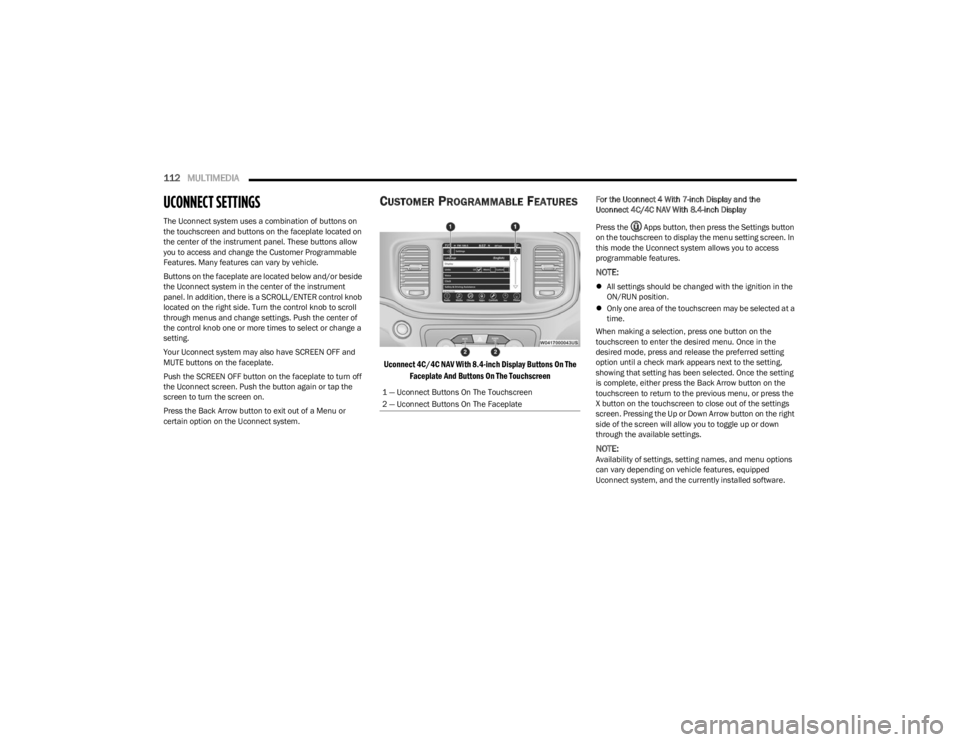
Uconnect 4C/4C NAV With 8.4-inch Display Buttons On The
Faceplate And Buttons On The Touchscreen
For the Uconnect 4 With 7-inch Display and the
Uconnect 4C/4C NAV With 8.4-inch Display
Press the Apps button, then press the Settings button
on the touchscreen to display the menu setting screen. In
this mode the Uconnect system allows you to access
programmable features.
NOTE:
All settings should be changed with the ignition in the
ON/RUN position.
Only one area of the touchscreen may be selected at a
time.
When making a selection, press one button on the
touchscreen to enter the desired menu. Once in the
desired mode, press and release the preferred setting
option until a check mark appears next to the setting,
showing that setting has been selected. Once the setting
is complete, either press the Back Arrow button on the
touchscreen to return to the previous menu, or press the
X button on the touchscreen to close out of the settings
screen. Pressing the Up or Down Arrow button on the right
side of the screen will allow you to toggle up or down
through the available settings.
NOTE:Availability of settings, setting names, and menu options
can vary depending on vehicle features, equipped
Uconnect system, and the currently installed software.
1 — Uconnect Buttons On The Touchscreen
2 — Uconnect Buttons On The Faceplate
23_LD_OM_EN_USC_t.book Page 112
Page 115 of 292
MULTIMEDIA113
Language
Display
When the Language button is pressed on the touchscreen, the system displays the different language options. Once an option is selected, the system will display in the chosen
language.
NOTE:Depending on the vehicle’s options, feature settings may vary.
Setting Name Description
LanguageThis setting will change the language of the Uconnect system and Instrument Cluster
Display. The available languages are English, Français, and Español.
When the Display button is pressed on the touchscreen, the system will display the options related to the theme (if equipped), brightness, and color of the touchscreen. The available
settings are:
NOTE:Depending on the vehicle’s options, feature settings may vary.
Setting Name Description
Display ModeThis setting will allow you to set the brightness manually or have the system
set it automatically. The “Auto” setting has the system automatically adjust the
display brightness. The “Manual” setting will allow the user to adjust the brightness of the display.
Display Brightness With Headlights ON This setting will allow you to set the brightness when the headlights are on. To access this
setting, Display Mode must be set to “Manual”. The “+” setting will increase the brightness; the “-” will decrease the brightness.
Display Brightness With Headlights OFF This setting will allow you to set the brightness when the headlights are off. To access this
setting, Display Mode must be set to “Manual”. The “+” setting will increase the brightness; the “-” will decrease the brightness.
5
23_LD_OM_EN_USC_t.book Page 113
Page 127 of 292
MULTIMEDIA125
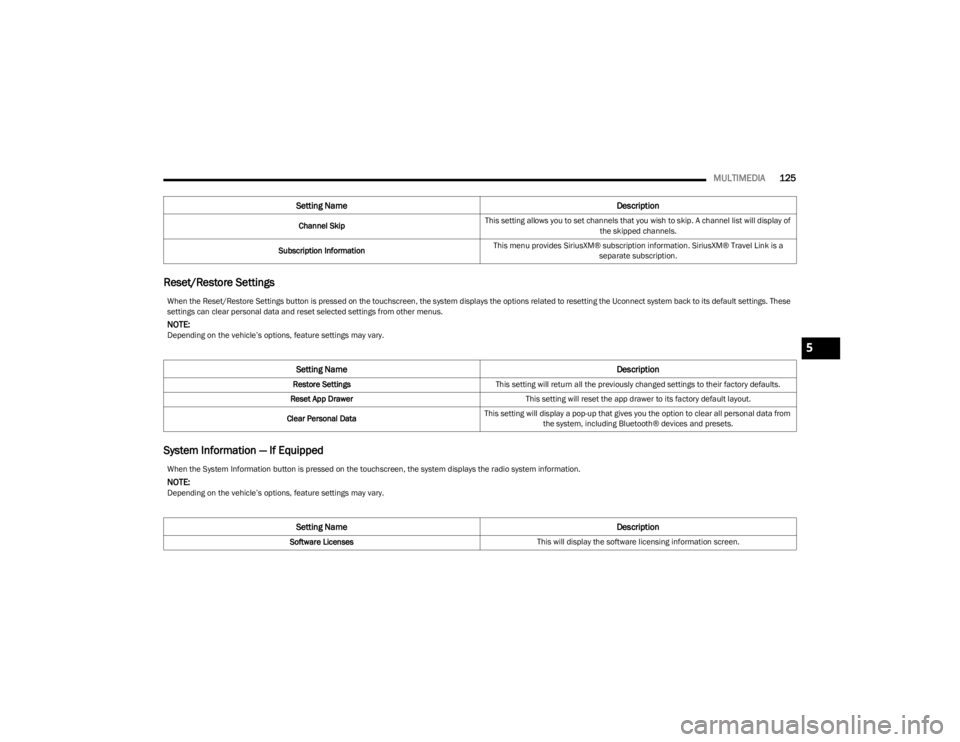
Reset/Restore Settings
System Information — If Equipped
Channel Skip This setting allows you to set channels that you wish to skip. A channel list will display of
the skipped channels.
Subscription Information This menu provides SiriusXM® subscription information. SiriusXM® Travel Link is a
separate subscription.
Setting Name Description
When the Reset/Restore Settings button is pressed on the touchscreen, the system displays the options related to resetting the Uconnect system back to its default settings. These
settings can clear personal data and reset selected settings from other menus.
NOTE:Depending on the vehicle’s options, feature settings may vary.
Setting NameDescription
Restore SettingsThis setting will return all the previously changed settings to their factory defaults.
Reset App Drawer This setting will reset the app drawer to its factory default layout.
Clear Personal Data This setting will display a pop-up that gives you the option to clear all personal data from
the system, including Bluetooth® devices and presets.
When the System Information button is pressed on the touchscreen, the system displays the radio system information.
NOTE:Depending on the vehicle’s options, feature settings may vary.
Setting Name Description
Software LicensesThis will display the software licensing information screen.
5
23_LD_OM_EN_USC_t.book Page 125