DODGE DAKOTA 2004 3.G Owners Manual
Manufacturer: DODGE, Model Year: 2004, Model line: DAKOTA, Model: DODGE DAKOTA 2004 3.GPages: 300, PDF Size: 5.23 MB
Page 101 of 300

12. Seat Belt Reminder Light
This light comes on for several seconds after the
ignition is turned ON as a reminder to ªbuckle
up.º This light will remain on as long as the seat
belt remains unbuckled. If this light flashes, it indi-
cates a fault in the airbag system. Have the system
checked by an authorized dealer.
13. Low Washer Fluid Indicator
This light comes on when the washer fluid level falls
below approximately 1/4 full. The light will remain on
until fluid is added and ignition switch is cycled.
14. Brake System Warning Light
This light will light when the ignition key is turned to the
ON position and will remain on for a few seconds. If the
light stays on, it may be an indication that the parking
brake has not been released, or there is a low brake fluid
level. If the light remains on when the parking brake has
been disengaged, and the fluid level is at the full mark on
the master cylinder reservoir, it indicates a possible brake
hydraulic system malfunction. In this case, the light will
remain on until the cause is corrected. If the parking
brake is applied, the light will flash when the gearposition is out of park for automatic transmissions, or the
engine RPM is greater than 0 for manual transmissions.
If brake failure is indicated, immediate repair is neces-
sary.Operating the vehicle in this condition is danger-
ous!
15. SERVICE 4WD Indicator
This light monitors the electric shift 4WD
system. This light will come on when the
ignition key is turned to the ON position and
will stay on for 2 seconds. If the light stays
on or comes on during driving, it means that the 4WD
system is not functioning properly and that service is
required.
16. Check Gages
This light illuminates when the Voltmeter, En-
gine Oil Pressure or Engine Coolant Tempera-
ture gages indicate a reading either too high or too
low. Examine the gages carefully, and follow the
instructions above for each indicated problem.
NOTE:
When the ignition switch is turned to OFF, the
Fuel Gage, Voltmeter, Oil Pressure and Engine Coolant
INSTRUMENT PANEL AND CONTROLS 101
4
Page 102 of 300

Temperature gages may not show accurate readings.
When the engine is not running, turn the ignition switch
to ON to obtain accurate readings.
17. Airbag Indicator
The indicator lights and remains lit for 6 to 8
seconds when the ignition is first turned ON. If
the light does not come on when the ignition is first
turned on, or the light stays on or comes on while
driving, have the airbag system checked by an autho-
rized dealer.
18. Low Fuel Warning Light
This indicator lights when the fuel gauge reads
1/8 of a tank or less.
19. ABS Warning Light
This light monitors the Anti-Lock Brake Sys-
tem which is described elsewhere in this
manual. This light will come on when the
ignition key is turned to the ON position and
may stay on for 5 seconds. If this light remains on or
comes on during driving, it indicates that the anti-lockportion of the brake system is not functioning and that
service is required. See your authorized dealer imme-
diately.
20. Transmission Oil Temperature Warning Light
This light indicates that there is excessive
transmission fluid temperature that might
occur with severe usage such as trailer tow-
ing. If this light comes on, stop the vehicle
and run the engine at idle or faster, with the transmis-
sion in NEUTRAL until the light goes off.
21. Security
The light will flash rapidly for approximately 15 seconds
when the vehicle theft alarm is arming. The light will
flash at a slower rate after the alarm is set. The security
light will also come on for about three seconds when the
ignition is first turned ON.
22. Cargo Lamp
The Cargo Lamp light will illuminate when the Cargo
Lamp is activated from the Head Lamp switch.
102 INSTRUMENT PANEL AND CONTROLS
Page 103 of 300

23. Malfunction Indicator Light
This light is part of an onboard diagnostic
system which monitors the emissions and en-
gine control system. If the vehicle is ready for
emissions testing the light will come on when the
ignition is first turned on and remain on, as a bulb
check, until the engine is started. If the vehicle is not
ready for emissions testing the light will come on
when the ignition is first turned on and remain on for
15 seconds, then blink for 5 seconds, and remain on
until the vehicle is started. If the bulb does not come
on during starting, have the condition investigated
promptly.
If this light comes on and remains on while driving, it
suggests a potential engine control problem and the need
for system service.
Although your vehicle will usually be drivable and not
need towing, see your dealer for service as soon as
possible.
CAUTION!
Prolonged driving with the MIL on could cause
damage to the engine control system. It also could
affect fuel economy and driveability.
If the MIL is flashing, severe catalytic converter
damage and power loss will soon occur. Immediate
service is required.
24. Door Ajar
The Door Ajar light will illuminate when the
ignition is ON and either one of the passen-
ger doors is opened.
25. Odometer/Trip Odometer Button
Press this button to toggle between the odometer and the
trip odometer display. Holding the button in resets the
trip odometer reading.
26. Odometer/Trip Odometer
The odometer shows the total distance the vehicle has
been driven.
INSTRUMENT PANEL AND CONTROLS 103
4
Page 104 of 300

U.S. federal regulations require that upon transfer of
vehicle ownership, the seller certify to the purchaser the
correct mileage that the vehicle has been driven. There-
fore, if the odometer reading is changed during repair or
replacement, be sure to keep a record of the reading
before and after the service so that the correct mileage can
be determined.
The trip odometer shows individual trip mileage. To
toggle between the odometer and the trip odometer,
press the Odometer/Trip Odometer Button.
27. Cruise Light
This indicator lights when the electronic speed control
system is turned on.
28. Coolant Temperature Light (Clusters Without A
Gauge)
This light warns of an overheated engine con-
dition. For a bulb check, this light will come on
momentarily when the ignition is turned On. If
the light turns on while driving, stop the vehicle and
shut off the engine as soon as possible.
CAUTION!
Driving with a hot engine cooling system could
damage your vehicle. If the temperature light is on,
pull over and stop the vehicle. Idle the vehicle with
the air conditioner turned off until the light turns
off. If the if the light remains on, turn the engine off
immediately, and call for service.
WARNING!
A hot engine cooling system is dangerous. You or
others could be badly burned by steam or boiling
coolant. You may want to call a service center if your
vehicle overheats. If you decide to look under the
hood yourself, see Section 7 of this manual. Follow
the warnings under the Cooling System Pressure
Cap paragraph.
104 INSTRUMENT PANEL AND CONTROLS
Page 105 of 300

29. Engine Oil Pressure Indicator Light (Clusters
Without A Gauge)
This light indicates that the engine oil pressure
has become too low. For a bulb check, this light
will come on momentarily when the ignition is turned
On. If the light turns on while driving, stop the vehicle
and shut off the engine as soon as possible. Immediate
service should be obtained.
30. Voltage Light (Clusters Without A Gauge)
This light monitors the electrical system volt-
age. The light should turn on momentarily as
the engine is started. If the light stays on or turns on
while driving, it indicates a problem with the charging
system. Immediate service should be obtained.ELECTRONIC DIGITAL CLOCK
The clock and radio each use the display panel built into
the radio. A digital readout shows the time in hours and
minutes whenever the ignition switch is in the ªONº or
ªACCº position.
When the ignition switch is in the ªOFFº position, or
when the radio frequency is being displayed, time keep-
ing is accurately maintained.
Clock Setting Procedure
1. Turn the ignition switch to the ªONº or ªACCº
position. Using the point of a ballpoint pen or similar
object, press either the ªHº (Hour) or ªMº (Minute)
buttons on the radio. The display will show the time.
2. Press the ªHº button to set hours or the ªMº button to
set minutes. The time setting will increase each time you
press a button.
INSTRUMENT PANEL AND CONTROLS 105
4
Page 106 of 300

SALES CODE RAZÐAM/ FM STEREO RADIO
WITH CASSETTE TAPE PLAYER, CD PLAYER
AND CD CHANGER CONTROLS Ð IF EQUIPPED
Operating Instructions Ð Radio
NOTE:
Power to operate the radio is controlled by the
ignition switch. It must be in the ON or ACC position to
operate the radio.
Power Switch, Volume Control
Press the ON/VOL control to turn the radio on. Turn the
volume control clockwise to increase the volume. The
volume will be displayed and continuously updated
while the button is pressed.
Seek Button (Radio Mode)
Press and release the Seek button to search for the next
station in either the AM or FM mode. Press the top of the
button to seek up and the bottom to seek down. Holding
the button will by pass stations until you release the
button.
Tuning
Press the TUNE control up or down to increase or
decrease the frequency. If you press and hold the button,
the radio will continue to tune until you release the
button. The frequency will be displayed and continu-
ously updated while the button is pressed.
PTY (Program Type) Button
Pressing this button once will turn on the PTY mode for
5 seconds. If no action is taken during the 5 second time
out the PTY icon will turn off. Pressing the PTY button
within 5 seconds will allow the program format type to
be selected. Many radio stations do not currently broad-
cast PTY information.
106 INSTRUMENT PANEL AND CONTROLS
Page 107 of 300

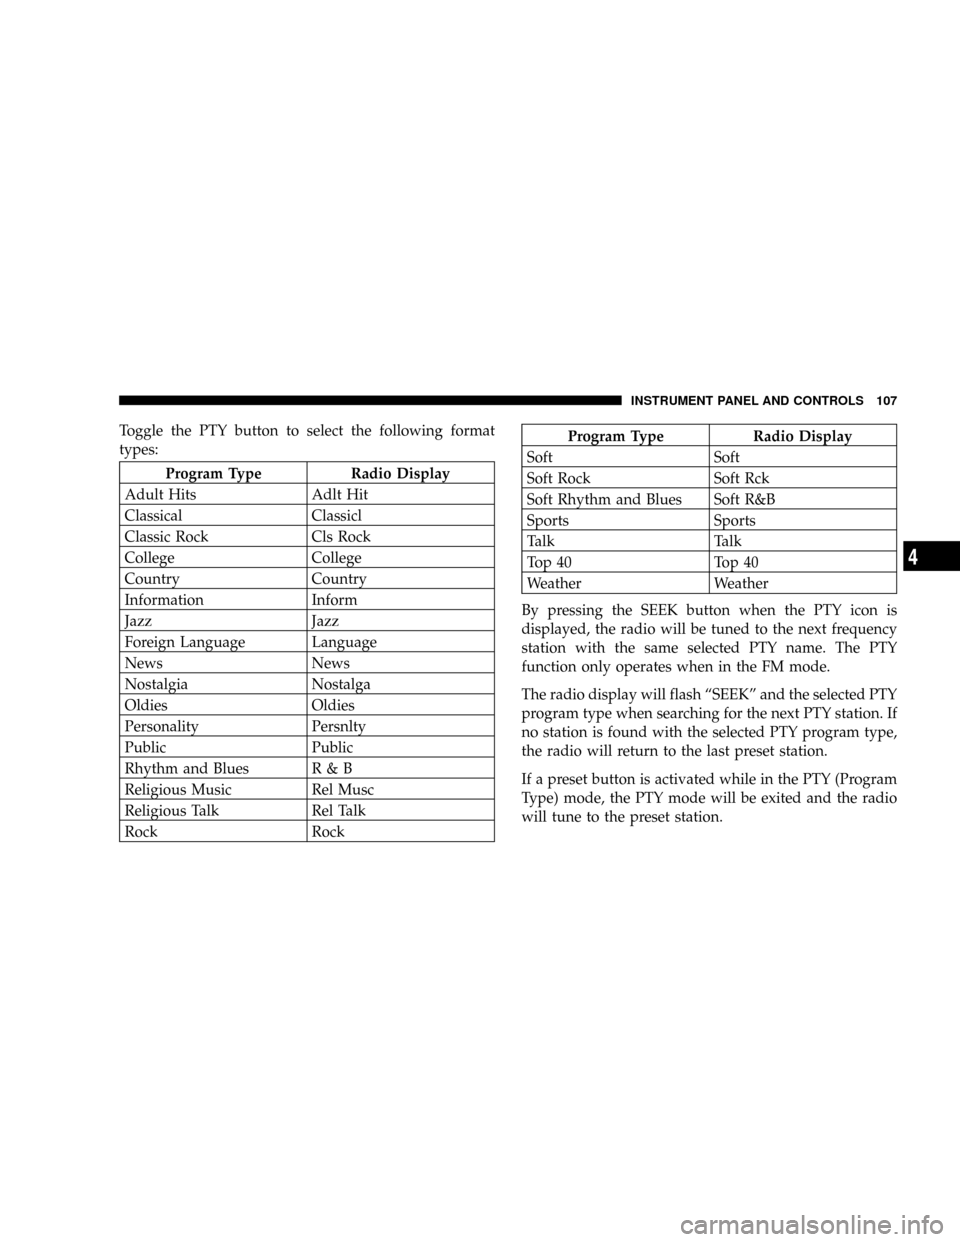
Toggle the PTY button to select the following format
types:
Program Type Radio Display
Adult Hits Adlt Hit
Classical Classicl
Classic Rock Cls Rock
College College
Country Country
Information Inform
Jazz Jazz
Foreign Language Language
News News
Nostalgia Nostalga
Oldies Oldies
Personality Persnlty
Public Public
Rhythm and Blues R & B
Religious Music Rel Musc
Religious Talk Rel Talk
Rock Rock
Program Type Radio Display
Soft Soft
Soft Rock Soft Rck
Soft Rhythm and Blues Soft R&B
Sports Sports
Talk Talk
Top 40 Top 40
Weather Weather
By pressing the SEEK button when the PTY icon is
displayed, the radio will be tuned to the next frequency
station with the same selected PTY name. The PTY
function only operates when in the FM mode.
The radio display will flash ªSEEKº and the selected PTY
program type when searching for the next PTY station. If
no station is found with the selected PTY program type,
the radio will return to the last preset station.
If a preset button is activated while in the PTY (Program
Type) mode, the PTY mode will be exited and the radio
will tune to the preset station.
INSTRUMENT PANEL AND CONTROLS 107
4
Page 108 of 300

Pressing PTY, then SCAN will scan the FM Band and stop
at all RDS stations. Each RDS station will be played for a
5 second scan once around the FM Band and stop at the
last station. The PTY icon will then turn off.
Balance
The Balance control adjusts the left-to-right speaker bal-
ance. Push in the button and it will pop out. Adjust the
balance and push the button back in. The balance will be
displayed and continuously updated while the button is
turned.
Fade
The Fade control provides for balance between the front
and rear speakers. Push in the button and it will pop out.
Adjust the balance and push the button back in. The fade
will be displayed and continuously updated while the
button is turned.
Tone Control
Slide the Bass and/or Treble controls up or down to
adjust the sound for the desired tone. The treble, and bass
will be displayed and continuously updated while the
slide is moved.
AM/FM Selection
Press the AM/FM button to change from AM to FM. The
operating mode will be displayed next to the station
frequency. The display will show ST when a stereo
station is received.
Scan Button
Pressing the SCAN button causes the tuner to search for
the next station, in either AM or FM, pausing for 5
seconds at each listenable station before continuing to the
next.
Pressing the AM/FM button continues the search in the
alternate frequency band.
To stop the search, press SCAN a second time.
To Set The Radio Push-button Memory
When you are receiving a station that you wish to
commit to push-button memory, press the SET button.
SET 1 will show in the display window. Select the
push-button you wish to lock onto this station and press
and release that button. If a station is not selected within
108 INSTRUMENT PANEL AND CONTROLS
Page 109 of 300

5 seconds after pressing the SET button, the station will
continue to play but will not be locked into push-button
memory.
You may add a second station to each push-button by
repeating the above procedure with this exception: Press
the SET button twice and SET 2 will show in the display
window. Each button can be set for SET 1 and SET 2 in
both AM and FM. This allows a total of 10 AM and 10 FM
stations to be locked into memory. You can recall the
stations stored in SET 2 memory by pressing the push-
button twice.
To Change From Clock To Radio Mode
Press the Time button to change the display between
radio frequency and time.
Operating Instructions Ð Tape Player
Insert the cassette with the exposed tape side toward the
right and the mechanical action of the player will gently
pull the cassette into the play position.
NOTE:When subjected to extremely cold temperatures,
the tape mechanism may require a few minutes to warm
up for proper operation. Sometimes poor playback maybe experienced due to a defective cassette tape. Clean and
demagnetize the tape heads at least twice a year.
Seek Button
Press the SEEK button up for the next selection on the
tape and down to return to the beginning of the current
selection.
Press the SEEK button up or down to move the track
number to skip forward or backward 1 to 6 selections.
Press the SEEK button once to move 1 selection, twice to
move 2 selections, etc.
Fast Forward (FF)
Press the FF button up momentarily to advance the tape
in the direction that it is playing. The tape will advance
until the button is pressed again or the end of the tape is
reached. At the end of the tape, the tape will play in the
opposite direction.
Rewind (RW)
Press the RW button momentarily to reverse the tape
direction. The tape will reverse until the button is pressed
again or until the end of the tape is reached. At the end of
the tape, the tape will play in the opposite direction.
INSTRUMENT PANEL AND CONTROLS 109
4
Page 110 of 300

Tape Eject
Press the EJT Tape button and the cassette will disengage
and eject from the radio.
Scan Button
Press this button to play 10 seconds of each selection.
Press the scan button a second time to cancel the feature.
Changing Tape Direction
If you wish to change the direction of tape travel (side
being played), press the PTY button. The lighted arrow in
the display window will show the new direction.
Metal Tape Selection
If a standard metal tape is inserted into the player, the
player will automatically select the correct equalization
and the 70 symbol will appear in the display window.
Pinch Roller Release
If ignition power or the radio ON/OFF switch are turned
off, the pinch roller will automatically retract to protect
the tape from any damage. When power is restored to the
tape player, the pinch roller will automatically reengage
and the tape will resume play.
Noise Reduction
The Dolby Noise Reduction System* is on whenever the
tape player is on, but may be switched off.
To turn off the Dolby Noise reduction System: Press the
Dolby button (button 2) after you insert the tape. The NR
light in the display will go off when the Dolby System is
off. The Dolby System is automatically reactivated each
time a tape is inserted.
* ºDolbyº noise reduction manufactured under license
from Dolby Laboratories Licensing Corporation. Dolby
and the double-D symbol are trademarks of Dolby Labo-
ratories Licensing Corporation.
Operating Instructions Ð CD Player
NOTE:
The ignition switch must be in the ON or ACC
position and the volume control ON before the CD player
will operate.
110 INSTRUMENT PANEL AND CONTROLS