DODGE DAKOTA 2009 3.G Owners Manual
DAKOTA 2009 3.G
DODGE
DODGE
https://www.carmanualsonline.info/img/12/5591/w960_5591-0.png
DODGE DAKOTA 2009 3.G Owners Manual
Trending: TPMS, manual radio set, brake fluid, radio, 4WD, radiator, radio controls
Page 161 of 449
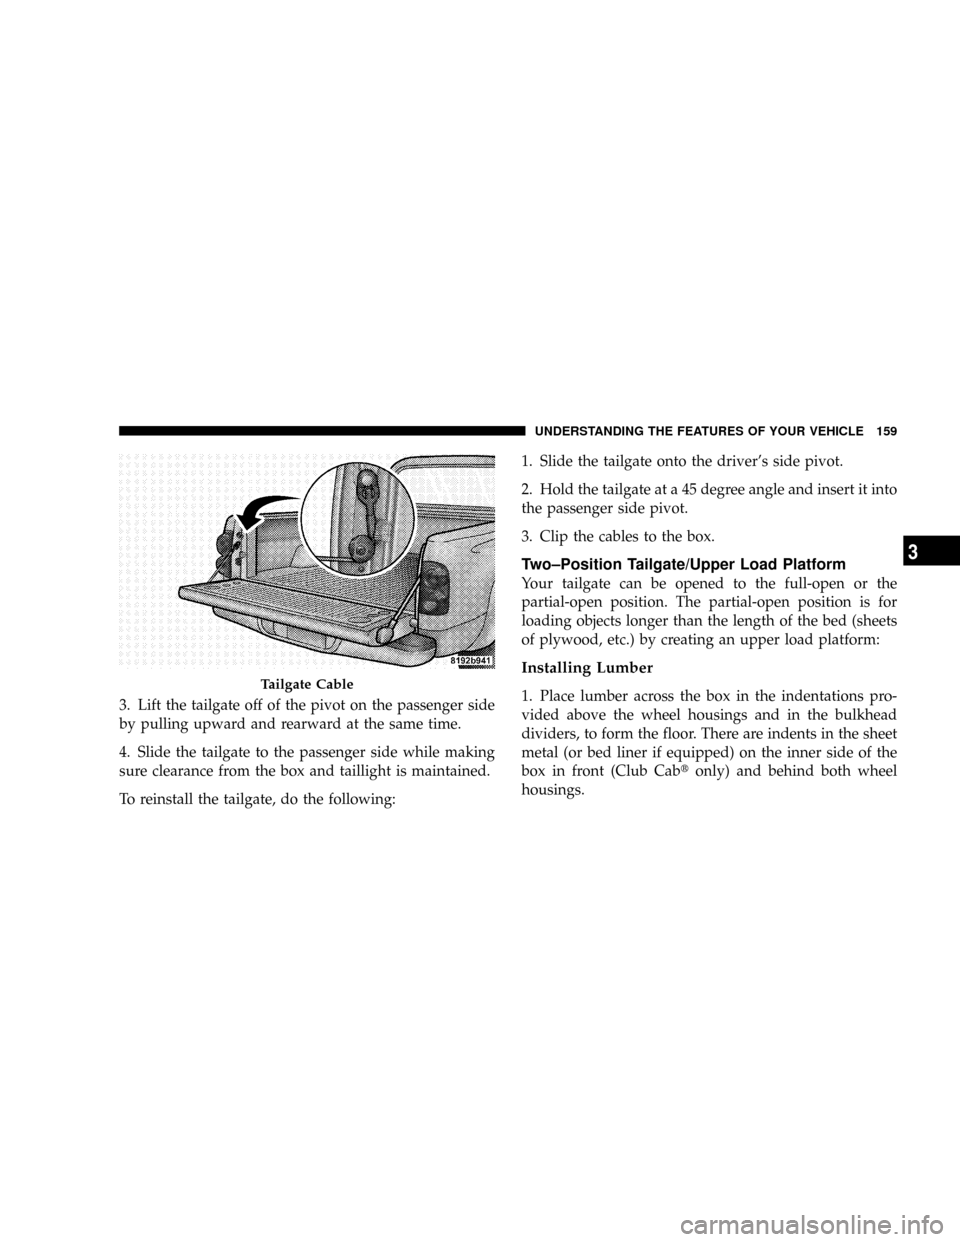
3. Lift the tailgate off of the pivot on the passenger side
by pulling upward and rearward at the same time.
4. Slide the tailgate to the passenger side while making
sure clearance from the box and taillight is maintained.
To reinstall the tailgate, do the following:1. Slide the tailgate onto the driver's side pivot.
2. Hold the tailgate at a 45 degree angle and insert it into
the passenger side pivot.
3. Clip the cables to the box.
Two±Position Tailgate/Upper Load Platform
Your tailgate can be opened to the full-open or the
partial-open position. The partial-open position is for
loading objects longer than the length of the bed (sheets
of plywood, etc.) by creating an upper load platform:
Installing Lumber
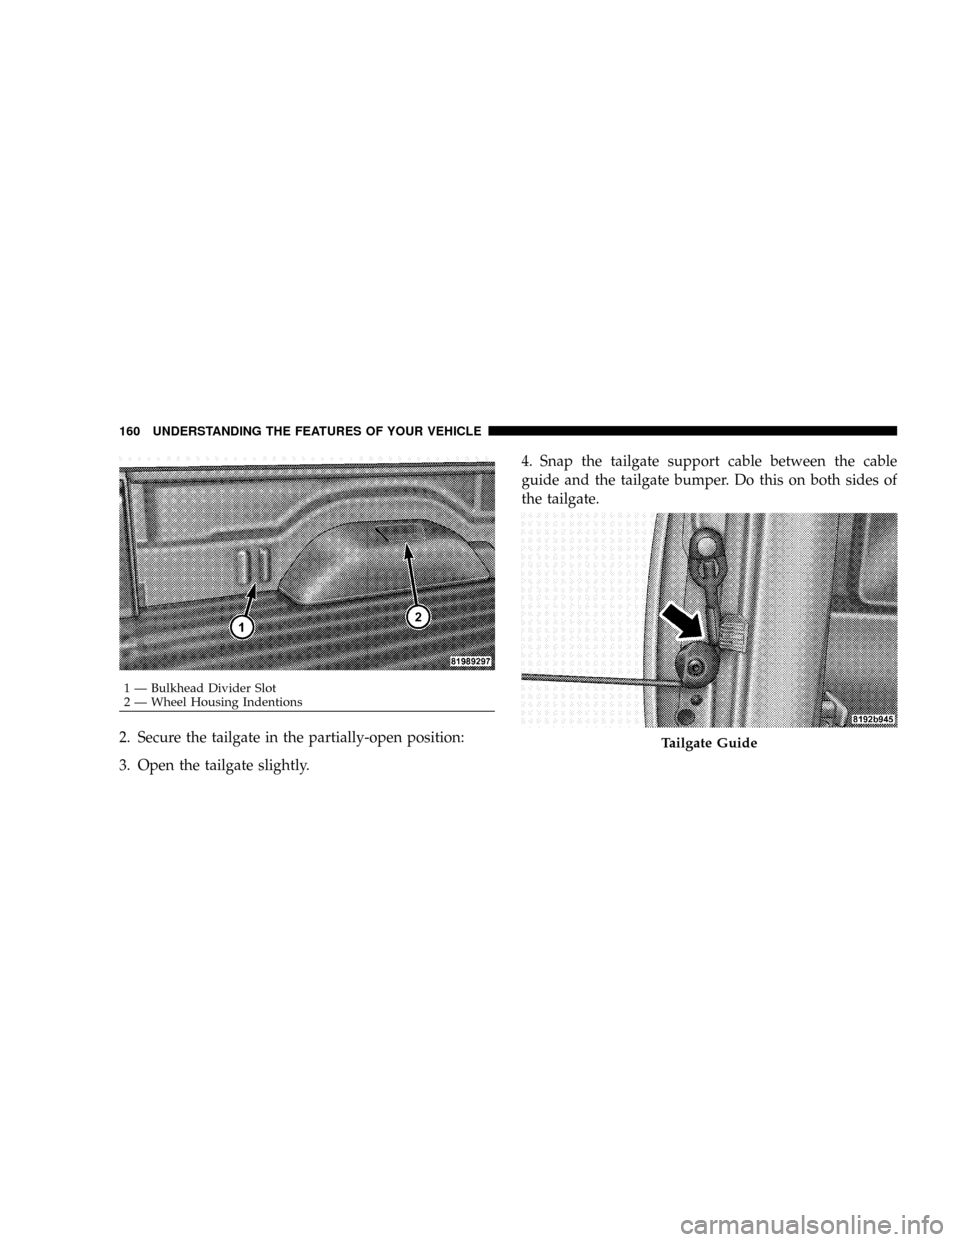
1. Place lumber across the box in the indentations pro-
vided above the wheel housings and in the bulkhead
dividers, to form the floor. There are indents in the sheet
metal (or bed liner if equipped) on the inner side of the
box in front (Club Cabtonly) and behind both wheel
housings.Tailgate Cable
UNDERSTANDING THE FEATURES OF YOUR VEHICLE 159
3
Page 162 of 449
2. Secure the tailgate in the partially-open position:
3. Open the tailgate slightly.4. Snap the tailgate support cable between the cable
guide and the tailgate bumper. Do this on both sides of
the tailgate.
1 Ð Bulkhead Divider Slot
2 Ð Wheel Housing Indentions
Tailgate Guide
160 UNDERSTANDING THE FEATURES OF YOUR VEHICLE
Page 163 of 449
To return the tailgate to the full-open position:
1. Lift up on the tailgate.
2. Remove both cables from between the cable guides
and the tailgate bumpers, and lower the tailgate.
CAUTION!
²Care should always be exercised when operating a
vehicle with cargo. Vehicle speeds may need to be
reduced. Severe turns or rough roads may cause
shifting or bouncing of the cargo that may result in
vehicle damage.
²Ensure the load is securely tied down and is
properly identified according to local laws if it
extends beyond the tail lights.
(Continued)
CAUTION! (Continued)
²Loading should not exceed 400 lbs (181 kg) of
material suspended above the wheelhouse and
partially open tailgate or vehicle damage may
result.
UNDERSTANDING THE FEATURES OF YOUR VEHICLE 161
3
Page 164 of 449
Page 165 of 449
UNDERSTANDING YOUR INSTRUMENT PANEL
CONTENTS
mInstruments And Controls................ 166
mInstrument Cluster..................... 167
mInstrument Cluster Description............ 168
mElectronic Digital Clock................. 179
NClock Setting Procedure................ 179
mSales Code REQ Ð AM/FM Stereo Radio And
6±Disc CD/DVD Changer (MP3/WMA AUX
Jack)................................ 180
NOperating Instructions - Radio Mode....... 180NOperation Instructions - (Disc Mode For CD
And MP3/WMA Audio Play, DVD-Video) . . . 189
NNotes On Playing MP3/WMA Files........ 191
NList Button (Disc Mode For MP3/WMA
Play)............................. 193
NInfo Button (Disc Mode For MP3/WMA
Play)............................. 193
mAM/FM/CD/DVD Multimedia System Radio
(RER/REN) ± If Equipped................ 196
NOperating Instructions Ð Voice Recognition
System (VR) Ð If Equipped............. 1964
Page 166 of 449
NOperating Instructions Ð Hands-Free
Communication (UConnectt)Ð
If Equipped......................... 196
NClock Setting Procedure................ 196
mSales Code RES Ð AM/FM Stereo Radio With
CD Player (MP3 AUX Jack)................ 198
NOperating Instructions Ð Radio Mode...... 199
NOperation Instructions Ð CD Mode For CD
And MP3 Audio Play.................. 202
NNotes On Playing MP3 Files............. 204
NOperation Instructions - Auxiliary Mode.... 207
mSales Code RES/RSC Ð AM/FM Stereo Radio
With CD Player (MP3 AUX Jack) And Sirius
Radio............................... 207
NOperating Instructions Ð Radio Mode...... 208NOperation Instructions Ð CD Mode For CD
And MP3 Audio Play.................. 214
NNotes On Playing MP3 Files............. 216
NList Button (CD Mode For MP3 Play)...... 218
NInfo Button (CD Mode For MP3 Play)...... 219
mSound Box Operation................... 220
mSatellite Radio Ð If Equipped
(REN/REQ/RER/RES/REU Radios Only)..... 221
NSystem Activation.................... 221
NElectronic Serial Number/Sirius
Identification Number (ESN/SID)......... 221
NSelecting Satellite Mode................ 222
NSatellite Antenna..................... 222
NReception Quality.................... 223
164 UNDERSTANDING YOUR INSTRUMENT PANEL
Page 167 of 449
NOperating Instructions Ð Satellite Mode.... 223
NOperating Instructions Ð Hands-Free Phone
(If Equipped)........................ 226
NOperating Instructions Ð Video
Entertainment System (VES)Ÿ
(If Equipped)........................ 226
mRemote Sound System Controls Ð
If Equipped........................... 226
NRadio Operation..................... 227NCD Player.......................... 227
mCD/DVD Maintenance.................. 227
mRadio Operation And Cellular Phones....... 228
mClimate Controls...................... 228
NAir Conditioning And Heater............ 229
NOperating Tips...................... 232
NOperation Tips Chart.................. 234
UNDERSTANDING YOUR INSTRUMENT PANEL 165
4
Page 168 of 449
INSTRUMENTS AND CONTROLS
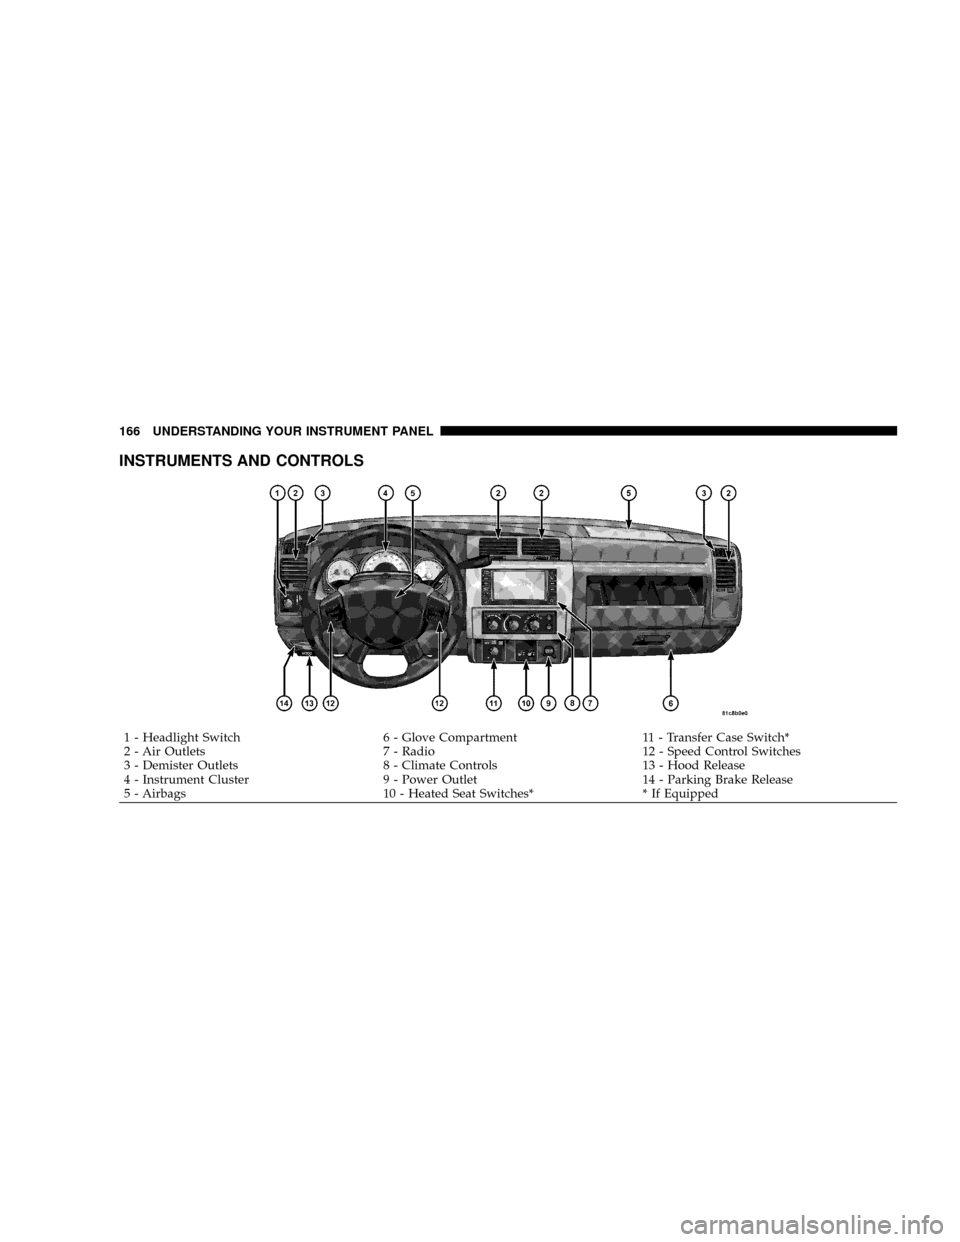
1 - Headlight Switch 6 - Glove Compartment 11 - Transfer Case Switch*
2 - Air Outlets 7 - Radio 12 - Speed Control Switches
3 - Demister Outlets 8 - Climate Controls 13 - Hood Release
4 - Instrument Cluster 9 - Power Outlet 14 - Parking Brake Release
5 - Airbags 10 - Heated Seat Switches* * If Equipped 166 UNDERSTANDING YOUR INSTRUMENT PANEL
Page 169 of 449
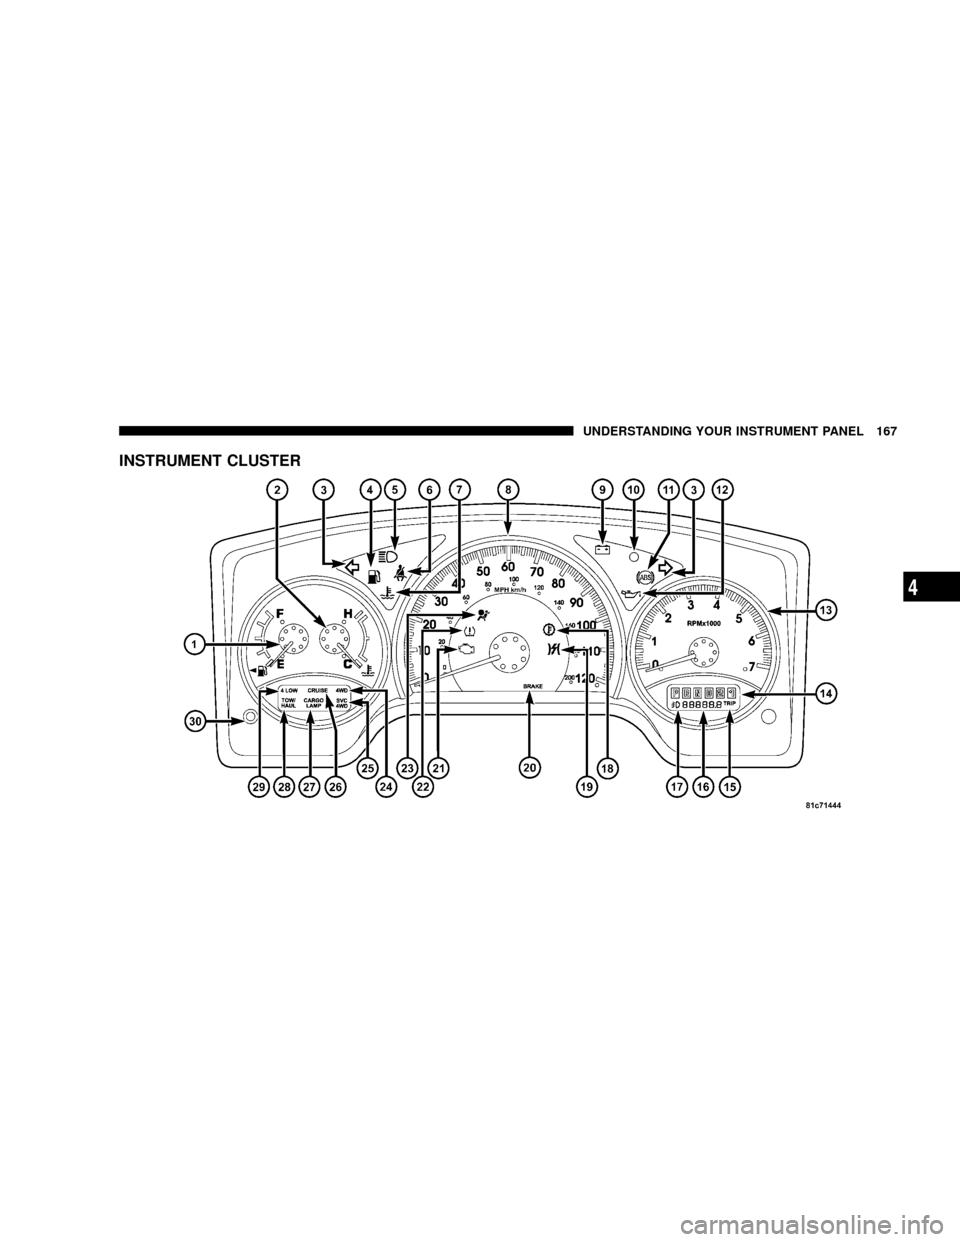
INSTRUMENT CLUSTER
UNDERSTANDING YOUR INSTRUMENT PANEL 167
4
Page 170 of 449
INSTRUMENT CLUSTER DESCRIPTION
1. Fuel Gauge
The fuel gauge shows the level of fuel in the fuel tank
when ignition switch is in the ON position.
2. Temperature Gauge
The temperature gauge shows engine coolant tempera-
ture. Any reading within the normal range indicates that
the engine cooling system is operating satisfactorily. The
gauge pointer will likely indicate a higher temperature
when driving in hot weather, up mountain grades, or
when towing a trailer. It should not be allowed to exceed
the upper limits of the normal operating range.
CAUTION!
Do not leave your vehicle unattended with the en-
gine running as you would not be able to react to the
temperature gauge if the engine overheats.3. Turn Signal Indicators
When a turn signal is activated, a right-pointing or
left-pointing arrow lights up and flashes to indicate the
direction of the turn. These indicators also indicate
proper operation of the front and rear turn signal lights.
If either indicator flashes at a faster rate than normal,
check for a defective bulb. If either indicator fails to light
up when the lever is moved, check for a defective fuse or
turn signal LED. A single chime is activated when the
left/right turn signal is left on, with the vehicle speed
greater than 15 mph (24 km/h) for more than one mile.
4. Low Fuel Warning Light
The low fuel warning light will illuminate when the
fuel gauge reads 1/8 of a tank or less. There is a
pointer on the side of this symbol that indicates the
side that your fuel filler door is located.
168 UNDERSTANDING YOUR INSTRUMENT PANEL
Trending: center console, radio, lumbar support, four wheel drive, CD changer, tire type, towing

