DODGE DAKOTA 2010 3.G Owner's Manual
Manufacturer: DODGE, Model Year: 2010, Model line: DAKOTA, Model: DODGE DAKOTA 2010 3.GPages: 76, PDF Size: 10.76 MB
Page 21 of 76
SPEED CONTROL
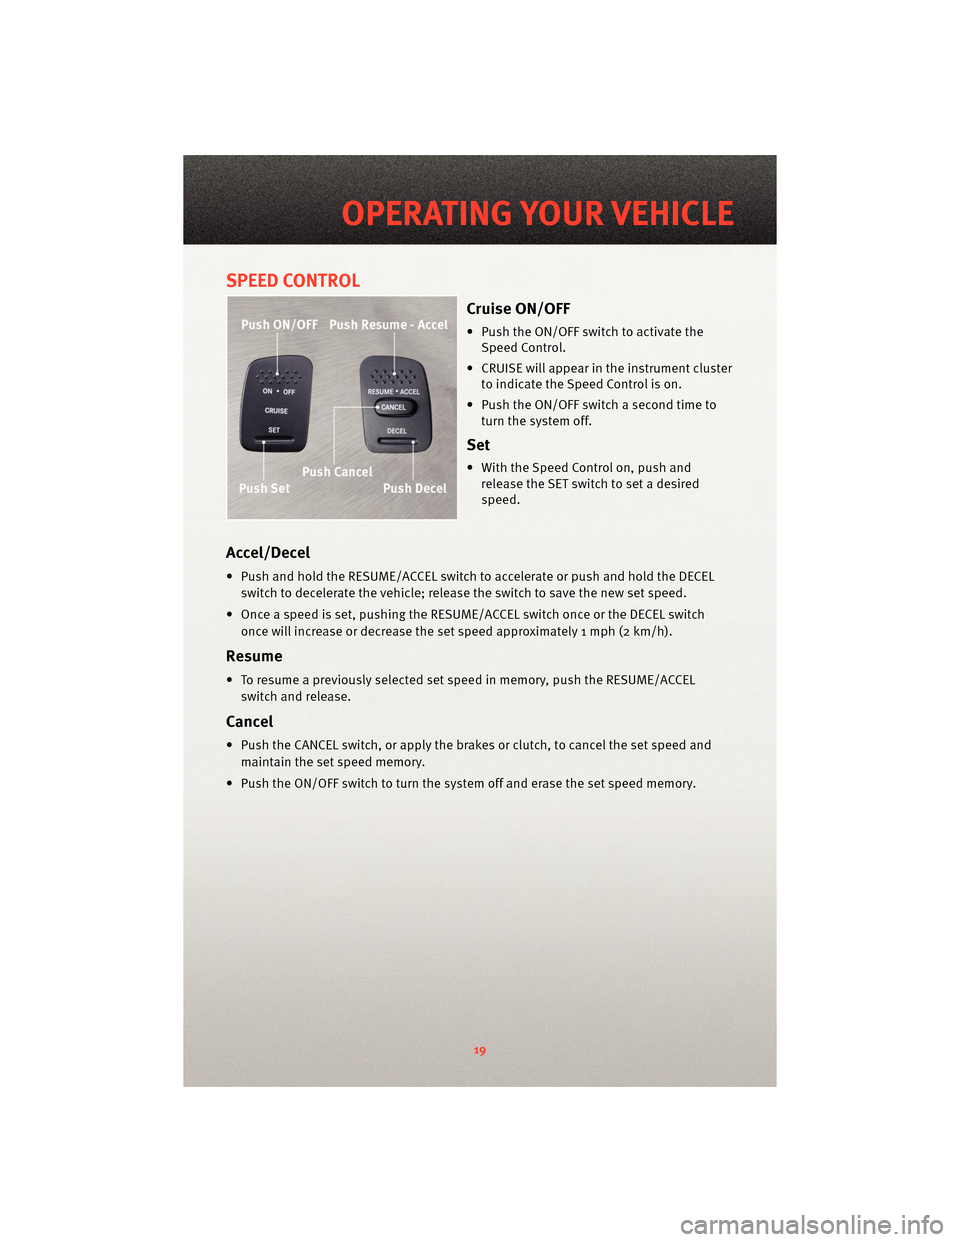
Cruise ON/OFF
• Push the ON/OFF switch to activate theSpeed Control.
• CRUISE will appear in the instrument cluster to indicate the Speed Control is on.
• Push the ON/OFF switch a second time to turn the system off.
Set
• With the Speed Control on, push andrelease the SET switch to set a desired
speed.
Accel/Decel
• Push and hold the RESUME/ACCEL switch to accelerate or push and hold the DECEL
switch to decelerate the vehicle; release the switch to save the new set speed.
• Once a speed is set, pushing the RESUME/ACCEL switch once or the DECEL switch once will increase or decrease the set speed approximately 1 mph (2 km/h).
Resume
• To resume a previously selected set speed in memory, push the RESUME/ACCEL
switch and release.
Cancel
• Push the CANCEL switch, or apply the brakes or clutch, to cancel the set speed andmaintain the set speed memory.
• Push the ON/OFF switch to turn the system off and erase the set speed memory.
19
OPERATING YOUR VEHICLE
Page 22 of 76
CLIMATE CONTROLS
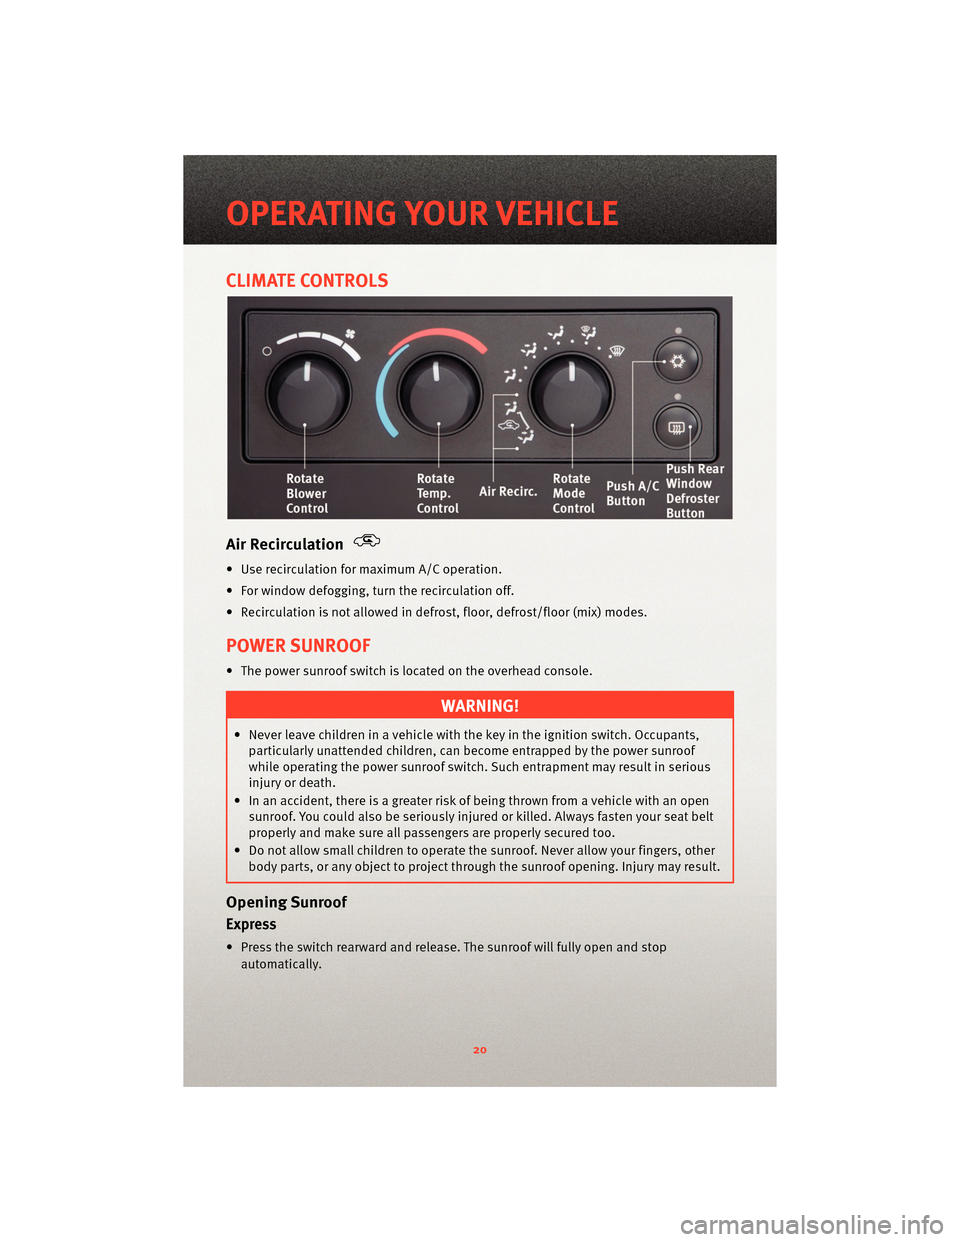
Air Recirculation
• Use recirculation for maximum A/C operation.
• For window defogging, turn the recirculation off.
• Recirculation is not allowed in defrost, floor, defrost/floor (mix) modes.
POWER SUNROOF
• The power sunroof switch is located on the overhead console.
WARNING!
• Never leave children in a vehicle with the key in the ignition switch. Occupants,particularly unattended children, can become entrapped by the power sunroof
while operating the power sunroof switch. Such entrapment may result in serious
injury or death.
• In an accident, there is a greater risk of being thrown from a vehicle with an open sunroof. You could also be seriously injured or killed. Always fasten your seat belt
properly and make sure all passengers are properly secured too.
• Do not allow small children to operate the sunroof. Never allow your fingers, other
body parts, or any object to project through the sunroof opening. Injury may result.
Opening Sunroof
Express
• Press the switch rearward and release. The sunroof will fully open and stop
automatically.
OPERATING YOUR VEHICLE
20
Page 23 of 76
Closing Sunroof
Express
• Press the switch forward and release. The sunroof will close automatically from anyposition.
Manual Open/Close
• Press and hold the switch rearward to open or forward to close the sunroof. Anyrelease of the switch will stop the movement, and the sunroof will remain in a partially
open or closed position until the switch is pressed again.
Venting Sunroof
• Press and release the "V" button, and the sunroof will open to the vent position. This
is called “Express Vent” and will occur regardless of sunroof position. During Express
Vent operation, any movement of the switch will stop the sunroof.
Pinch Protection Feature
• This feature will detect an obstruction in the opening of the sunroof during Express Close operation. If an obstruction in the path of the sunroof is detected, the sunroof
will automatically return to the open position.
NOTE: Pinch protection is disabled while the switch is pressed and held during manual
opening and closing of the sunroof.
WIND BUFFETING
• Wind buffeting can be described as a helicopter-type percussion sound. If buffeting occurs with the rear windows open, adjust the front and rear windows together.
• If buffeting occurs with the sunroof open, adjust the sunroof opening, or adjust any window. This will minimize buffeting.
21
OPERATING YOUR VEHICLE
Page 24 of 76
NON-TOUCH-SCREEN RADIOS
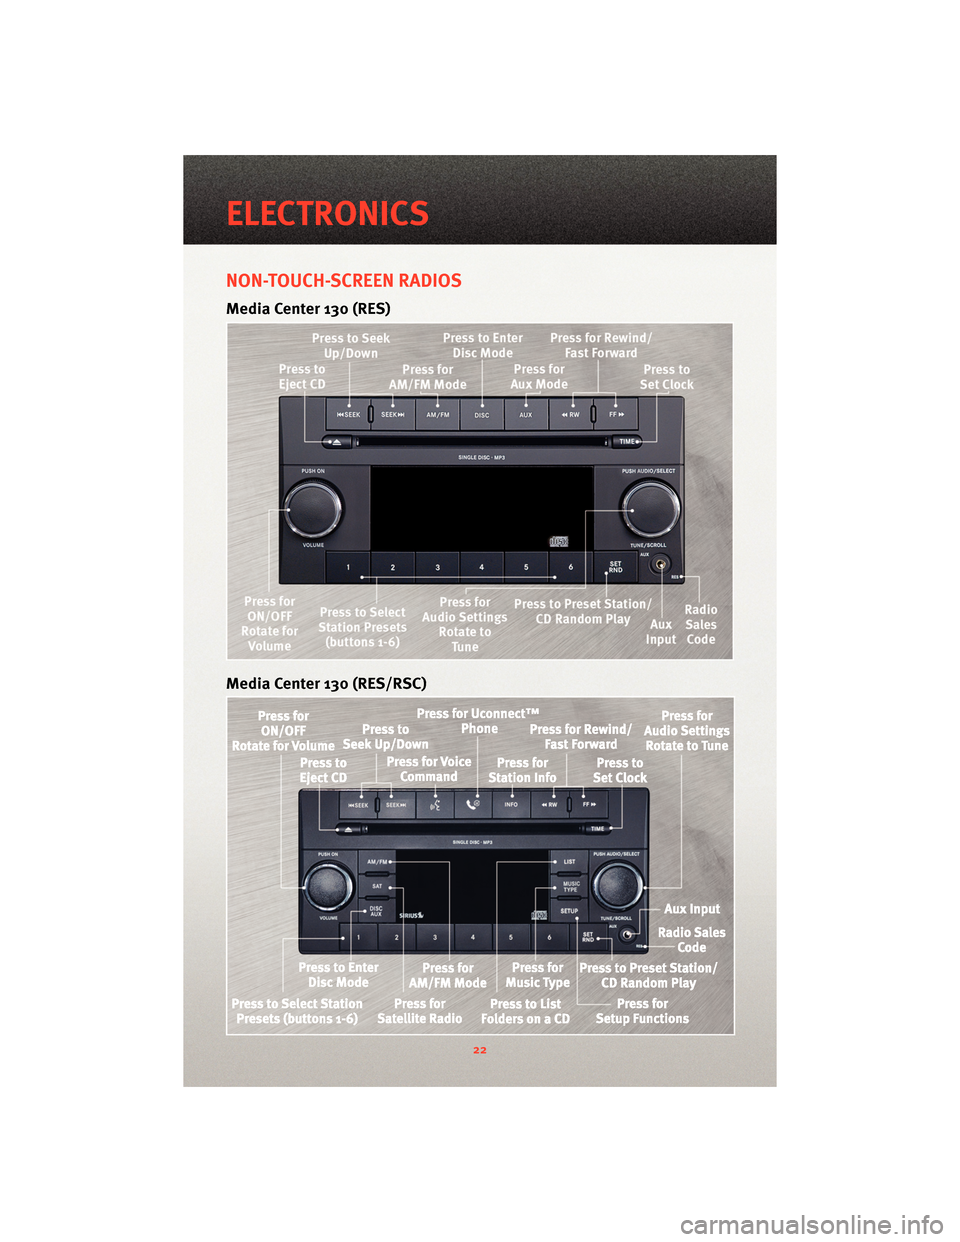
Media Center 130 (RES)
Media Center 130 (RES/RSC)
ELECTRONICS
22
Page 25 of 76
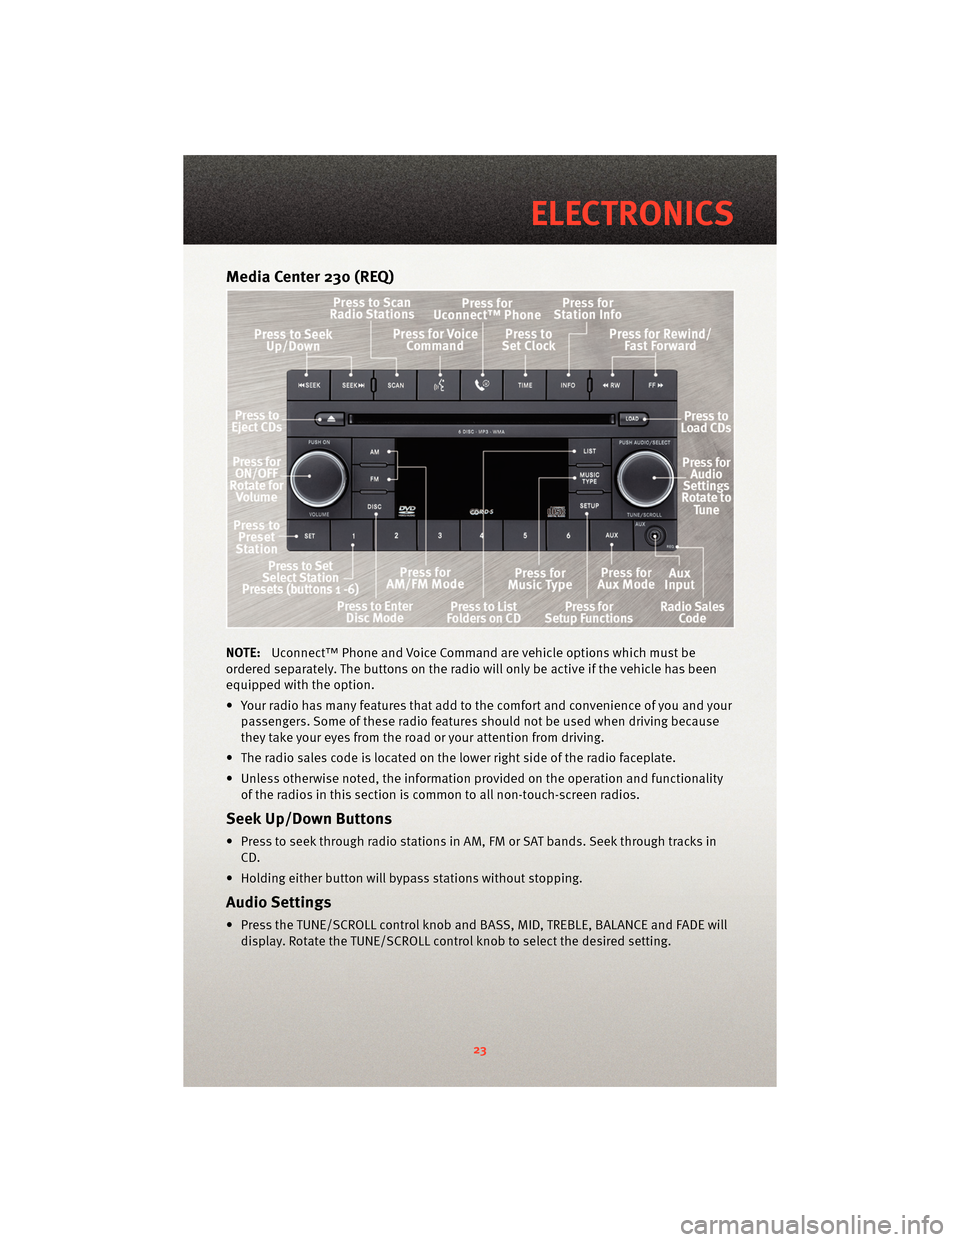
Media Center 230 (REQ)
NOTE:Uconnect™ Phone and Voice Command are vehicle options which must be
ordered separately. The butt ons on the radio will only be active if the vehicle has been
equipped with the option.
• Your radio has many features that add to the comfort and convenience of you and your passengers. Some of these radio featu res should not be used when driving because
they take your eyes from the road or your attention from driving.
• The radio sales code is located on the lower right side of the radio faceplate.
• Unless otherwise noted, the information provided on the operation and functionality of the radios in this section is common to all non-touch-screen radios.
Seek Up/Down Buttons
• Press to seek through radio stations in AM, FM or SAT bands. Seek through tracks inCD.
• Holding either button will bypass stations without stopping.
Audio Settings
• Press the TUNE/SCROLL control knob and BASS, MID, TREBLE, BALANCE and FADE will display. Rotate the TUNE/SCROLL control knob to select the desired setting.
23
ELECTRONICS
Page 26 of 76
Auxiliary Mode
• The auxiliary (AUX) jack allows a portable device, such as an MP3 player or a cassetteplayer, to be plugged into the radio and uti lize the vehicle’s audio system to amplify
the source and play through the vehicle speakers.
• Pressing the AUX button will change the mode to auxiliary device if the AUX jack is connected.
• The control of the external device cannot be provided by the radio; use the device controls instead.
Clock Setting
• Press and hold the TIME button until the hours blink; turn the TUNE/SCROLL controlknob to set the hours.
• Press the TUNE/SCROLL control knob until the minutes begin to blink; turn the TUNE/SCROLL control knob to set the minutes.
• Press the TUNE/SCROLL control knob to save the time change.
• To exit, press any button/knob or wait five seconds.
Station Presets
• Press the SET/RND button once and SET 1 will show in the display. Then select the button (1–6).
• A second station may be added to each push button. Press the SET/RND button twice and SET 2 will show in the display, then select button (1–6).
How To Load Multiple CDs/DVDs
REQ Radio Only
• Press the LOAD button and then press the button with the corresponding number
(1–6) where the CD is being loaded. The radio will display PLEASE WAIT and prompt
when to INSERT DISC.
• After the radio displays INSERT DISC, insert the CD into the player. The radio display will show LOADING DISC when the disc is loading and “READING DISC” when the radio
is reading the disc.
• Press the eject button and then the cor responding number (1–6) to eject the desired
disc.
ELECTRONICS
24
Page 27 of 76
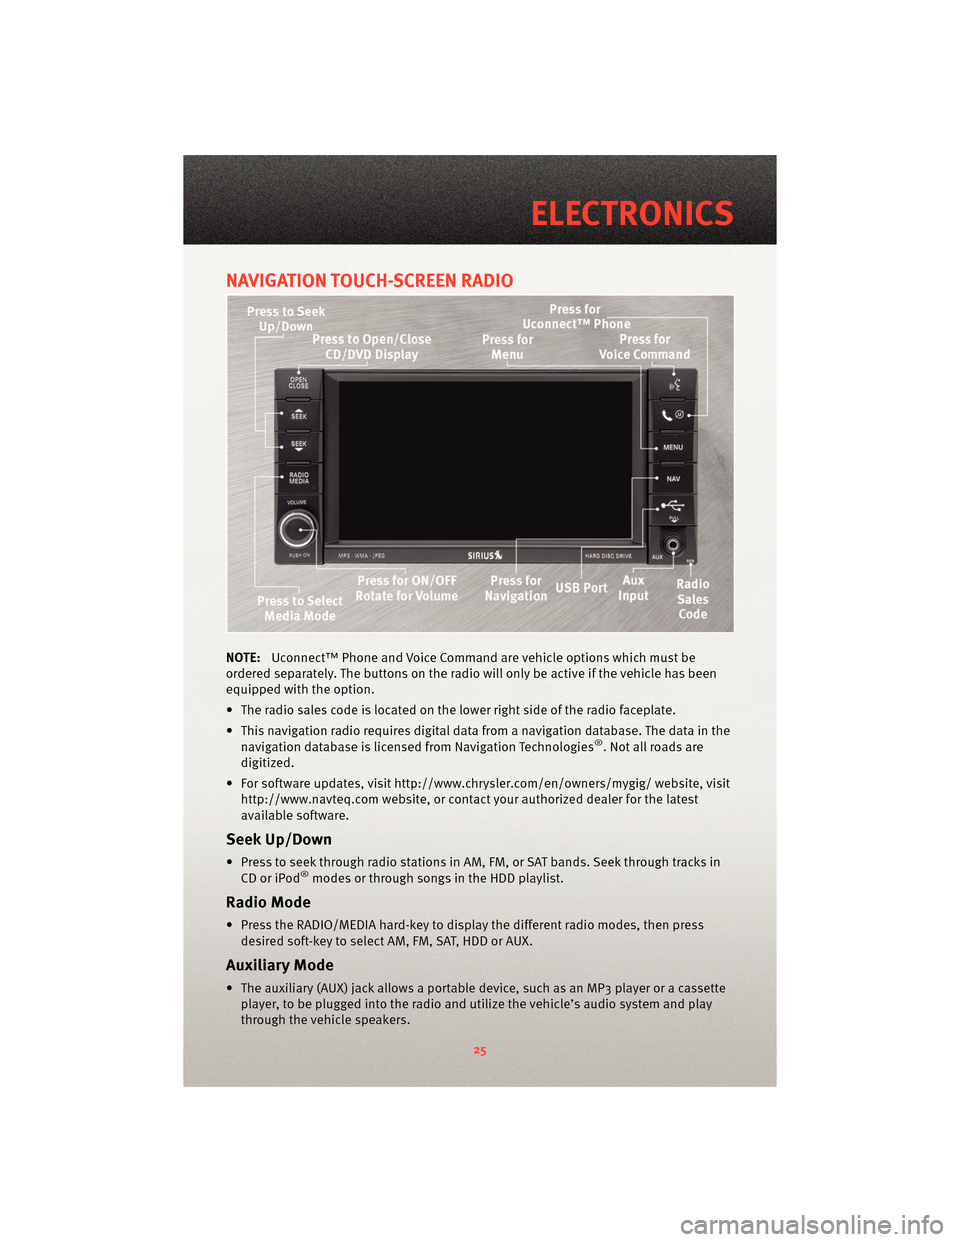
NAVIGATION TOUCH-SCREEN RADIO
NOTE:Uconnect™ Phone and Voice Command are vehicle options which must be
ordered separately. The butt ons on the radio will only be active if the vehicle has been
equipped with the option.
• The radio sales code is located on the lower right side of the radio faceplate.
• This navigation radio requires digital data from a navigation database. The data in the navigation database is licensed from Navigation Technologies
®. Not all roads are
digitized.
• For software updates, visithttp://www.chrysler.com/en/owner s/mygig/ website, visit
http://www.navteq.com website, or contact your authorized dealer for the latest
available software.
Seek Up/Down
• Press to seek through radio stations in AM, FM, or SAT bands. Seek through tracks in CD or iPod®modes or through songs in the HDD playlist.
Radio Mode
• Press the RADIO/MEDIA hard-key to display the different radio modes, then pressdesired soft-key to select AM, FM, SAT, HDD or AUX.
Auxiliary Mode
• The auxiliary (AUX) jack allows a portable device, such as an MP3 player or a cassetteplayer, to be plugged into the radio and utilize the vehicle’s audio system and play
through the vehicle speakers.
25
ELECTRONICS
Page 28 of 76
Clock Setting
Manually Adjust Time
• Turn the radio on, then touch the screen where the time is displayed.
• Touch the USER CLOCK soft-key.
• To adjust the hours, touch either the HOUR FORWARD or HOUR BACKWARD soft-key.
• To adjust the minutes, touch either the MINUTE FORWARD or MINUTE BACKWARDsoft-key.
• To save the new time setting, touch the scr een where the word “Save” is displayed.
Store Radio Presets
• Press the RADIO/MEDIA hard-key repeatedly until AM FM SAT is displayed in the upper
left corner of the screen.
• Select the radio band by touching either the AM, FM, or SAT soft-key.
• Find the station to store by either pressing the SEEK UP/DOWN hard-key, or touch the SCAN soft-key, DIRECT TUNE soft-key or the left and right arrows.
• Once the station is found, touch and hold one of the PRESET soft-keys in the list to the right until you hear a confirmation beep.
Hard Disc Drive Operation
Copy Complete Audio Disc To Hard-Drive
• Press the OPEN/CLOSE hard-key and insert a disc, then press the MENU hard-key.
• Touch the MY FILES soft-key then select MY MUSIC.
• Touch the IMPORT MUSIC FILES soft-key then touch the FROM DISC soft-key.
Copying From USB
• Insert a USB device then select MY MUSIC.
• Touch the IMPORT MUSIC FILES soft-key, then touch the FROM USB soft-key in the nextscreen.
• Select the folders or titles you would like to copy, then touch the DONE soft-key to start the copy process.
Copy Pictures To The Hard-Drive
• Insert either a CD or a USB device containing your pictures.
• Touch the MY PICTURES soft-key to get an overview of the currently stored images.
• Press one of the ADD PICTURES soft-keys, then select the type of media inserted.
• Use the PAGE soft-keys to page through a list of pictures and press the picture youwould like to import.
• Confirm your selection by touching the YES soft-key. The imported picture is now available in the MANAGE MY PICTURES screen.
• In order to display the imported picture in the radio screen, touch the desired picture soft-key.
ELECTRONICS
26
Page 29 of 76
• Select this picture by pressing the PICTURE VIEW soft-key. A check mark indicates thecurrently used picture.
Cleaning Your Touch-Screen Radio
• Do not spray any liquid or caustic chemicals directly on the screen. Use a clean anddry micro fiber lens cleaning cloth in order to clean the touch-screen.
• If necessary, use a lint-free cloth dampened with a cleaning solution such as isopropyl
alcohol or an isopropyl alcohol and water s olution ratio of 50:50. Be sure to follow the
solvent manufacturer's precautions and directions.
Navigation
NOTE:Many features of this radio are speed dependent. For your own safety, it is not
possible to use the touch-screen keyboard to enter a name (e.g., street name) while the
vehicle is in motion. Pull over at a safe location to complete your task.
• The Navigation system receives GPS signals from satellites to display the position of your vehicle.
New Destination
• Press the NAV hard-key to access the Navigation Main Menu.
• Touch the NEW DESTINATION soft-key to program a destination, then select thedestination soft-key of your choice.
Program/Storing Home Address
• Press the NAV hard-key to access the Navigation Main Menu.
• Touch the GUIDE ME HOME soft-key, then touch the STREET ADDRESS soft-key.
• Touch the STATE soft-key, then enter your st ate name into the speller; select your state
from the list and press the CHANGE soft-key.
• Touch the INPUT STREET NAME soft-key and enter your street name into the speller.
• Touch the CONTINUE soft-key and enter your address into the speller; touch the CONTINUE soft-key again.
• Touch the city name and touch the SAVE soft-key to complete programming.
Change Stored Home Address
• Press the MENU hard-key, then touch the MY FILES soft-key.
• Touch the MY ADDRESS BOOK soft-key, then touch the HOME soft-key.
• In the Home Address Information screen touch the EDIT CONTACT soft-key, then touch the CHANGE ADDRESS soft-key in the next screen.
• Touch the INPUT STREET NAME soft-key and enter your street name into the speller.
• Touch the CONTINUE soft-key and enter your address into the speller; touch the CONTINUE soft-key again.
• Touch the city name and touch the SAVE soft-key to complete programming.
27
ELECTRONICS
Page 30 of 76
Guide Me Home
• Press the NAV hard-key to access the Navigation Main Menu.
• Touch the GUIDE ME HOME soft-key to route you back to your home destination fromyour current location. Touch the GO soft-key to start your trip.
Map
• Press the NAV hard-key to access the Navigation Main Menu.
• Touch the MAP soft-key to display a map of your current position.
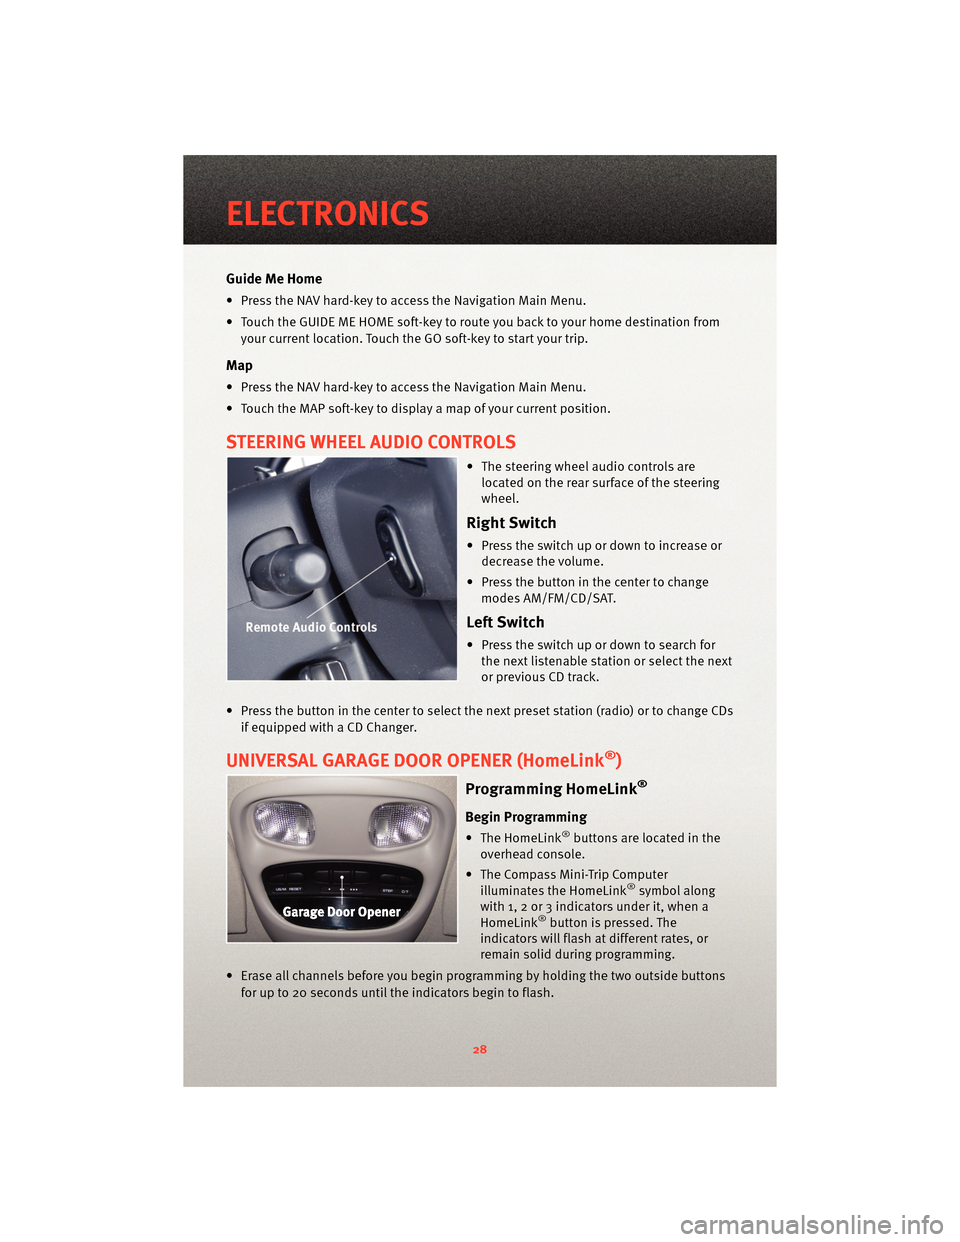
STEERING WHEEL AUDIO CONTROLS
• The steering wheel audio controls arelocated on the rear surface of the steering
wheel.
Right Switch
• Press the switch up or down to increase ordecrease the volume.
• Press the button in the center to change modes AM/FM/CD/SAT.
Left Switch
• Press the switch up or down to search forthe next listenable station or select the next
or previous CD track.
• Press the button in the center to select the next preset station (radio) or to change CDs if equipped with a CD Changer.
UNIVERSAL GARAGE DOOR OPENER (HomeLink®)
Programming HomeLink®
Begin Programming
• The HomeLink®buttons are located in the
overhead console.
• The Compass Mini-Trip Computer illuminates the HomeLink
®symbol along
with 1, 2 or 3 indicators under it, when a
HomeLink
®button is pressed. The
indicators will flash at different rates, or
remain solid during programming.
• Erase all channels before you begin progr amming by holding the two outside buttons
for up to 20 seconds until the indicators begin to flash.
ELECTRONICS
28