battery DODGE DART 2015 PF / 1.G User Guide
[x] Cancel search | Manufacturer: DODGE, Model Year: 2015, Model line: DART, Model: DODGE DART 2015 PF / 1.GPages: 664, PDF Size: 16.96 MB
Page 150 of 664
Call Continuation
Call continuation is the progression of a phone call on the
Uconnect® Phone after the vehicle ignition key has been
switched to OFF. Call continuation functionality avail-
able on the vehicle can be any one of three types:
•After the ignition key is switched to OFF, a call can
continue on the Uconnect® Phone either until the call
ends, or until the vehicle battery condition dictates
cancellation of the call on the Uconnect® Phone and
transfer of the call to the mobile phone.
•After the ignition key is switched to OFF, a call can
continue on the Uconnect® Phone for a certain dura-
tion, after which the call is automatically transferred
from the Uconnect® Phone to the mobile phone.
Uconnect® Phone Features
Language Selection
To change the language that the Uconnect® Phone is
using:
1. Push the Phonebutton to begin.
2. After the “Ready” prompt and the following beep, say
the name of the language you wish to switch to
English, Espanol, or Francais.
3. Continue to follow the system prompts to complete
the language selection.
After selecting one of the languages, all prompts and
voice commands will be in that language.
NOTE:After every Uconnect® Phone language change
operation, only the language-specific 32-name phone-
book is usable. The paired phone name is not language-
specific and is usable across all languages.
148 UNDERSTANDING THE FEATURES OF YOUR VEHICLE
Page 154 of 664
Uconnect® Phone will then send the corresponding
phone number associated with the phonebook entry,
as tones over the phone.
NOTE:
•You may not hear all of the tones due to mobile phone
network configurations. This is normal.
•Some paging and voice mail systems have system time
out settings that are too short and may not allow the
use of this feature.
Barge In — Overriding Prompts
The “Voice Command” button can be used when you
wish to skip part of a prompt and issue your voice
command immediately. For example, if a prompt is
asking “Would you like to pair a phone, clear a...,” you
could push the Voice Commandbutton and say,
“Pair a Phone” to select that option without having to
listen to the rest of the voice prompt.
Turning Confirmation Prompts ON/OFF
Turning confirmation prompts off will stop the system
from confirming your choices (e.g., the Uconnect® Phone
will not repeat a phone number before you dial it).
1. Push the Phonebutton to begin.
2. After the “Ready” prompt and the following beep, say
one of the following:
•“Setup Confirmation Prompts On”
•“Setup Confirmation Prompts Off”
Phone And Network Status Indicators
If available on the radio and/or on a premium display
such as the instrument panel cluster, and supported by
your mobile phone, the Uconnect® Phone will provide
notification to inform you of your phone and network
status when you are attempting to make a phone call
using Uconnect® Phone. The status is given for network
signal strength, phone battery strength, etc.
152 UNDERSTANDING THE FEATURES OF YOUR VEHICLE
Page 192 of 664
Barge In — Overriding Prompts
The Voice Commandbutton can be used when
you wish to skip part of a prompt and issue your voice
command immediately. For example, if a prompt is
asking “There are two numbers with the name John.
Say the full name” you could push the Voice Com-
mandbutton and say, “John Smith” to select that
option without having to listen to the rest of the voice
prompt.
Voice Response Length
It is possible for you to choose between Brief and
Detailed Voice Response Length.
1. Press the “More” button on the touchscreen (where
available), then press the “Settings” button on the
touchscreen.
2. Press the “Display” button on the touchscreen, then
scroll down to Voice Response Length.
3. Select either “Brief” or “Detailed” by pressing the box
next to the selection. A check-mark will appear to
indicate your selection.
Phone And Network Status Indicators
Uconnect® Phone will provide notification to inform you
of your phone and network status when you are attempt-
ing to make a phone call using Uconnect® Phone. The
status is given for network signal strength and phone
battery strength.
190 UNDERSTANDING THE FEATURES OF YOUR VEHICLE
Page 246 of 664
The lights also turn on when a door is opened. The lights
will also turn on when the UNLOCK button on the RKE
is pressed.
Interior Lights
The interior lights come on when a door is opened.
To protect the battery, the interior lights will turn off
automatically 10 minutes after the ignition is moved to
the LOCK position. This will occur if the interior lights
were switched on manually or are on because a door is
open. This includes the glove box light, but not the trunk
light. To restore interior light operation, either place the
ignition in the ON/RUN position or cycle the light
switch.
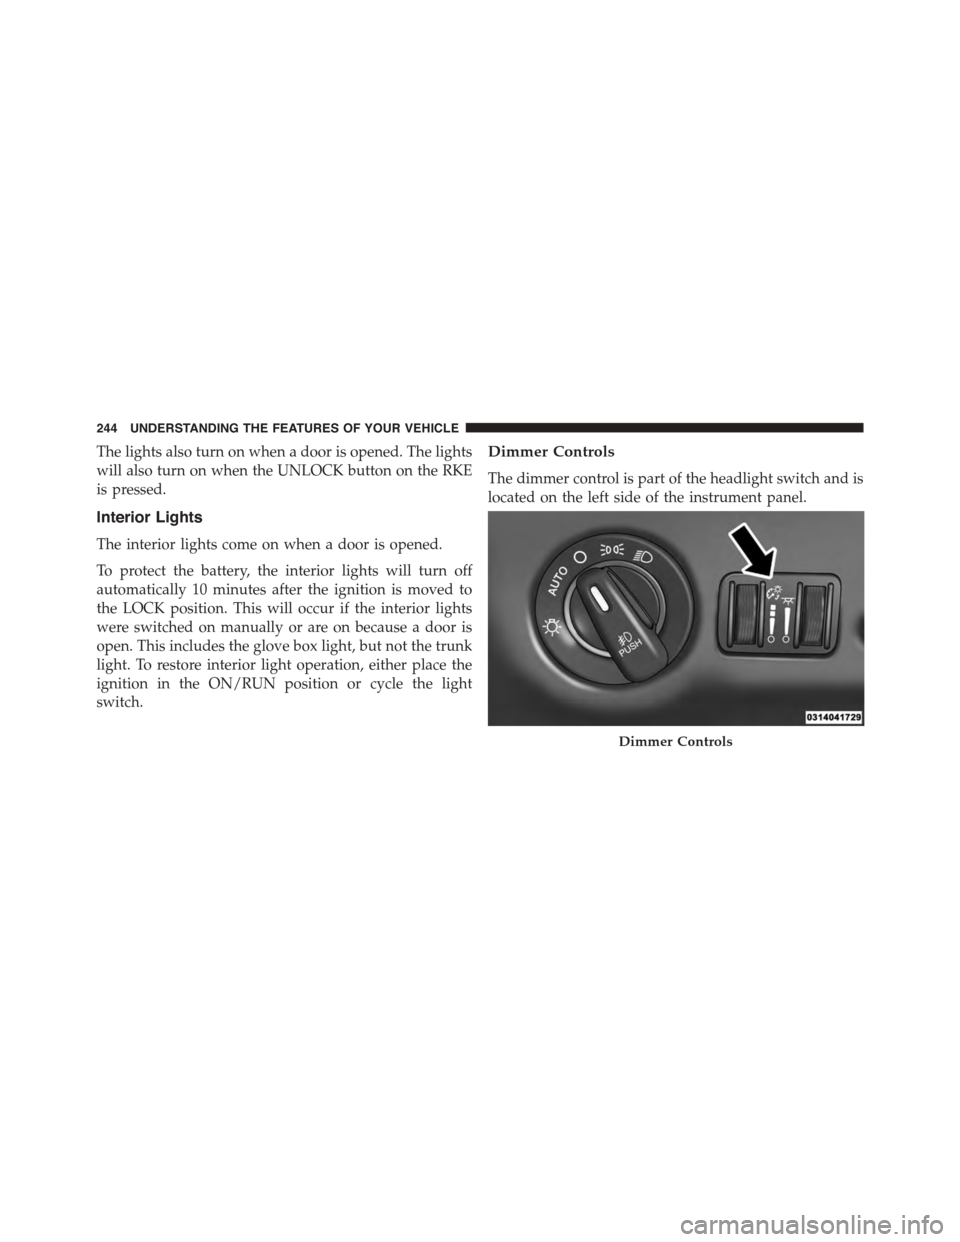
Dimmer Controls
The dimmer control is part of the headlight switch and is
located on the left side of the instrument panel.
Dimmer Controls
244 UNDERSTANDING THE FEATURES OF YOUR VEHICLE
Page 277 of 664
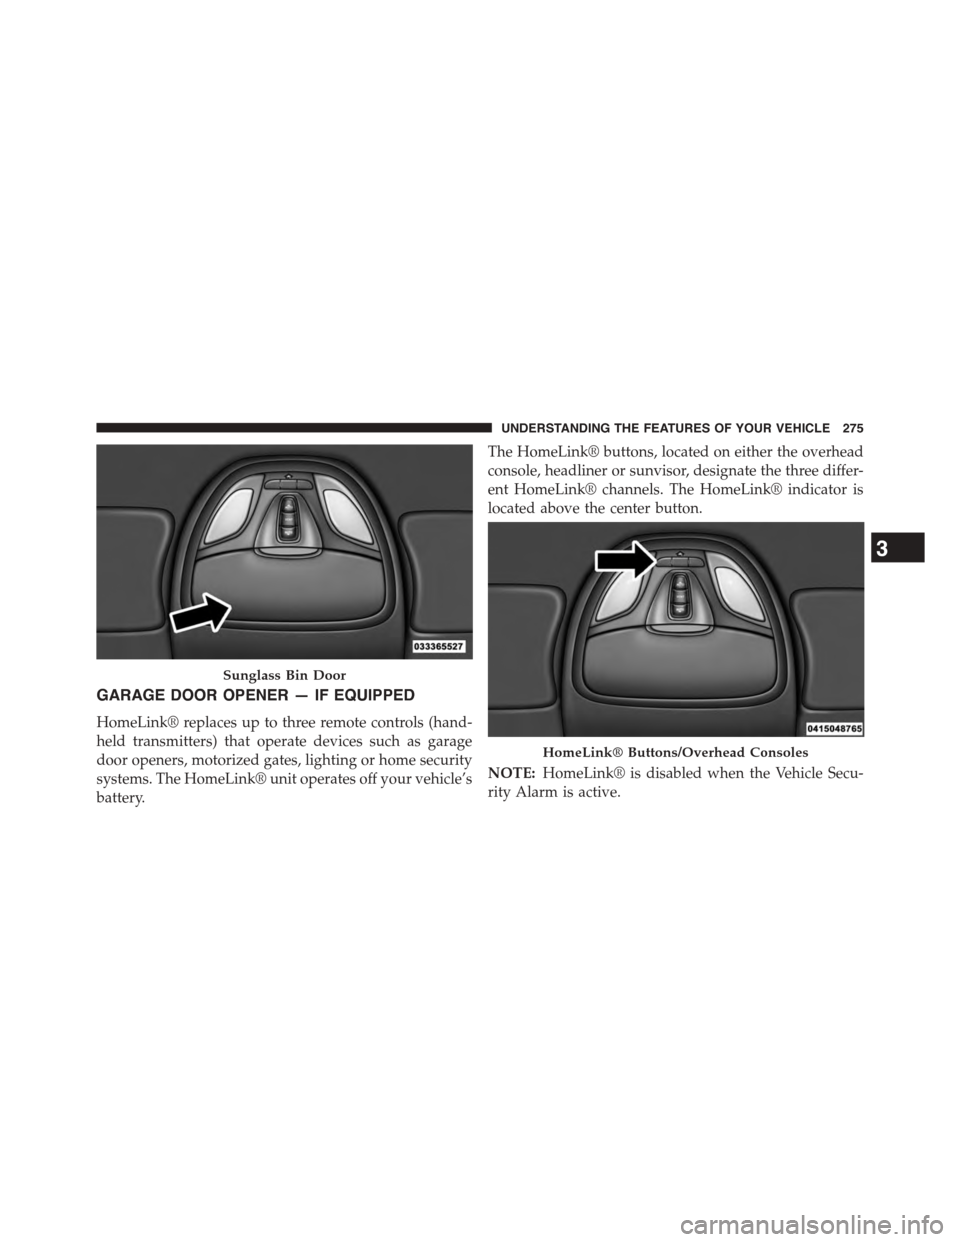
GARAGE DOOR OPENER — IF EQUIPPED
HomeLink® replaces up to three remote controls (hand-
held transmitters) that operate devices such as garage
door openers, motorized gates, lighting or home security
systems. The HomeLink® unit operates off your vehicle’s
battery.
The HomeLink® buttons, located on either the overhead
console, headliner or sunvisor, designate the three differ-
ent HomeLink® channels. The HomeLink® indicator is
located above the center button.
NOTE:HomeLink® is disabled when the Vehicle Secu-
rity Alarm is active.
Sunglass Bin Door
HomeLink® Buttons/Overhead Consoles
3
UNDERSTANDING THE FEATURES OF YOUR VEHICLE 275
Page 278 of 664
Before You Begin Programming HomeLink®
Be sure that your vehicle is parked outside of the garage
before you begin programming.
For more efficient programming and accurate transmis-
sion of the radio-frequency signal it is recommended that
a new battery be placed in the hand-held transmitter of
the device that is being programmed to the HomeLink®
system.
To erase the channels place the ignition in the ON/RUN
position and push and hold the two outside HomeLink®
buttons (I and III) for up 20 seconds or until the red
indicator flashes.
NOTE:
•Erasing all channels should only be performed when
programming HomeLink® for the first time. Do not
erase channels when programming additional buttons.
•If you have any problems, or require assistance, please
call toll-free 1-800-355-3515 or, on the Internet at
HomeLink.com for information or assistance.
Programming A Rolling Code
For programming garage door openers that were manu-
factured after 1995. These garage door openers can be
identified by the “LEARN” or “TRAIN” button located
where the hanging antenna is attached to the garage door
opener. It is NOT the button that is normally used to
open and close the door. The name and color of the
button may vary by manufacturer.
276 UNDERSTANDING THE FEATURES OF YOUR VEHICLE
Page 284 of 664
To do this, push and hold the two outside buttons for 20
seconds until the red indicator flashes. Note that all
channels will be erased. Individual channels cannot be
erased.
The HomeLink® Universal Transceiver is disabled when
the Vehicle Security Alarm is active.
Troubleshooting Tips
If you are having trouble programming HomeLink®,
here are some of the most common solutions:
•Replace the battery in the original hand-held transmit-
ter.
•Push the LEARN button on the Garage Door Opener
to complete the training for a Rolling Code.
•Did you unplug the device for programming and
remember to plug it back in?
If you have any problems, or require assistance, please
call toll-free 1-800-355-3515 or, on the Internet at
HomeLink.com for information or assistance.
WARNING!
Vehicle exhaust contains carbon monoxide, a danger-
ous gas. Do not run your vehicle in the garage while
programming the transceiver. Exhaust gas can cause
serious injury or death.
WARNING!
Your motorized door or gate will open and close
while you are programming the universal trans-
ceiver. Do not program the transceiver if people, pets
or other objects are in the path of the door or gate.
Only use this transceiver with a garage door opener
(Continued)
282 UNDERSTANDING THE FEATURES OF YOUR VEHICLE
Page 292 of 664
CAUTION!
•Many accessories that can be plugged in draw
power from the vehicle’s battery, even when not in
use (i.e., cellular phones, etc.). Eventually, if
plugged in long enough, the vehicle’s battery will
discharge sufficiently to degrade battery life and/or
prevent the engine from starting.
•Accessories that draw higher power (i.e., coolers,
vacuum cleaners, lights, etc.), will degrade the
battery even more quickly. Only use these intermit-
tently and with greater caution.
•After the use of high power draw accessories, or
long periods of the vehicle not being started (with
accessories still plugged in), the vehicle must be
driven a sufficient length of time to allow the
alternator to recharge the vehicle’s battery.
(Continued)
CAUTION!(Continued)
•Power outlets are designed for accessory plugs
only. Do not hang any type of accessory or acces-
sory bracket from the plug. Improper use of the
power outlet can cause damage.
290 UNDERSTANDING THE FEATURES OF YOUR VEHICLE
Page 326 of 664
•UP Arrow Button
Push and release the UP arrow button to scroll
upward through the main menus (Odometer,
Digital Vehicle Speed, Trip Info, Range To
Empty, Average Fuel Economy, Current Fuel
Economy, Stored Messages, Settings).
•RIGHT Arrow Button
Push and release the RIGHT arrow button to
access the sub-menu screens of a main menu
item. Push and hold the RIGHT arrow button
for two seconds to reset displayed/selected
features that can be reset.
Electronic Vehicle Information Center (EVIC)
Messages
•Key Fob Battery Low
•Wrong Key Fob
•Key Fob Damaged
•Key In Ignition
•Left Turn Signal Out
•Right Turn Signal Out
•Turn Signal On
•Lights On
•Low Beam Headlight Out
•High Beam Headlight Out
•License Plate Light Out
•Backup Light Out
•Brake Light Out
•Parking Light Out
•Service Air Bag System
324 UNDERSTANDING YOUR INSTRUMENT PANEL
Page 327 of 664
•Service Air Bag Warning Light
•Washer Fluid Low
•Parking Brake Engaged
•Brake Fluid Low
•Service Electronic Braking System
•Engine Temperature Hot
•Battery Voltage Low
•Oil Pressure Low
•Fuel Low
•Service Antilock Brake System
•Service Electronic Throttle Control
•Transmission Too Hot
•Service Power Steering
•Oil Temperature Hot
•Check Fuel Cap
•Oil Change Due
•Service Tire Pressure System
•Inflate Tire to XX
•Coolant Low
•Rain Sensor Fail
•Traction Control Off
•Engine Warming Wait To Start
•Too Cold Plug In Heater
•Cruise Off
•Cruise Ready
•Cruise Set To XXX MPH
4
UNDERSTANDING YOUR INSTRUMENT PANEL 325