battery DODGE DART 2015 PF / 1.G Owner's Manual
[x] Cancel search | Manufacturer: DODGE, Model Year: 2015, Model line: DART, Model: DODGE DART 2015 PF / 1.GPages: 664, PDF Size: 16.96 MB
Page 384 of 664
NOTE:The center console will have a position where the
iPod® or consumer electronic audio device cable can be
routed through without damaging the cable when clos-
ing the lid. A factory cut out space for the cable to be
routed may be located in the base of the center console on
either the front or side. This allows routing of the cable
without damaging it while closing the lid. If a cut out is
not available in the center console base, route the cable
away from the lid latch and in a place that will allow the
lid to close without damaging the cable.
Once the audio device is connected and synchronized to
the vehicle’s iPod®/USB/MP3 control system (iPod® or
external USB device may take a few minutes to connect),
the audio device starts charging and is ready for use by
pressing radio switches, as described below.
NOTE:If the audio device battery is completely dis-
charged, it may not communicate with the iPod®/USB/
MP3 control system until a minimum charge is attained.
Leaving the audio device connected to the iPod®/USB/
MP3 control system may charge it to the required level.
Using This Feature
By using an iPod® cable, or an external USB device to
connect to the USB port:
•The audio device can be played on the vehicle’s sound
system, providing metadata (artist, track title, album,
etc.) information on the radio display.
•The audio device can be controlled using the radio
buttons to Play, Browse, and List the iPod® contents.
•The audio device battery charges when plugged into
the USB/AUX connector (if supported by the specific
audio device).
382 UNDERSTANDING YOUR INSTRUMENT PANEL
Page 396 of 664
6. Electronic Rear Window Defrost
Press this button to turn on the rear window defroster
and the heated outside mirrors (if equipped). An indica-
tor in the button will illuminate when the rear window
defroster is on. The rear window defroster automatically
turns off after approximately 15 minutes. For an addi-
tional 15 minutes of operation, press the button a second
time.
NOTE:
•You can turn off the heated mirror feature at anytime
by pressing the rear window defroster switch a
second time.
•To prevent excessive battery drain, use the rear
window defroster only when the engine is operating.
CAUTION!
Failure to follow these cautions can cause damage to
the heating elements:
•Use care when washing the inside of the rear
window. Do not use abrasive window cleaners on
the interior surface of the window. Use a soft cloth
and a mild washing solution, wiping parallel to the
heating elements. Labels can be peeled off after
soaking with warm water.
•Do not use scrapers, sharp instruments, or abrasive
window cleaners on the interior surface of the
window.
•Keep all objects a safe distance from the window.
394 UNDERSTANDING YOUR INSTRUMENT PANEL
Page 416 of 664
ENGINE START/STOP Button Functions — With
Driver ’s Foot OFF The Brake Pedal (In PARK Or
NEUTRAL Position)
The ENGINE START/STOP button operates similar to an
ignition switch. It has four positions, OFF, ACC, RUN
and START. To change the ignition positions without
starting the vehicle and use the accessories follow these
steps:
•Starting with the ignition in the OFF position,
•Press the ENGINE START/STOP button once to place
the ignition to the ACC position (EVIC/DID will
display “ACC”),
•Press the ENGINE START/STOP button a second time
to place the ignition to the RUN position (EVIC/DID
will display “ON/RUN”),
•Press the ENGINE START/STOP button a third time to
return the ignition to the OFF position (EVIC/DID will
display “OFF”).
Extreme Cold Weather (Below –20°F or−29°C)
To ensure reliable starting under extreme cold conditions
an externally powered electric block heater (available
from your authorized dealer) is required for the 1.4L
Turbo engine below -20°F (-29°C) and for the 2.4L engine
below -29°F (-34°C) and is recommended for the 2.0L
engine and 2.4L engine below -20°F (-29°C).
Extended Park Starting
NOTE:Extended Park condition occurs when the vehicle
has not been started or driven for at least 35 days.
1. Install a battery charger or jumper cables to the battery
to ensure a full battery charge during the crank cycle.
414 STARTING AND OPERATING
Page 504 of 664
CAUTION!(Continued)
emissions to exceed the applicable standard, and/or
cause the “Malfunction Indicator Light” to illumi-
nate. Pump labels should clearly communicate if a
fuel contains greater than 10% Ethanol.
Problems that result from using gasoline containing
Methanol or gasoline containing more than 10% Ethanol
are not the responsibility of the manufacturer and may
not be covered under New Vehicle Limited Warranty.
E-85 Usage In Non-Flex Fuel Vehicles
Non-Flex Fuel (FFV) vehicles are compatible with gaso-
line containing 10% ethanol (E10). Gasoline with higher
ethanol content may void the vehicle’s warranty.
If a Non-FFV vehicle is inadvertently fueled with E-85
fuel, the engine will have some or all of these symptoms:
•Operate in a lean mode
•OBD II “Malfunction Indicator Light” on
•Poor engine performance
•Poor cold start and cold driveability
•Increased risk for fuel system component corrosion
To fix a Non-FFV vehicle inadvertently fueled once with
E-85 perform the following:
•Change the engine oil and oil filter
•Disconnect and reconnect the battery
•Drain the fuel tank (see your authorized dealer)
More extensive repairs will be required for prolonged
exposure to E-85 fuel.
502 STARTING AND OPERATING
Page 523 of 664
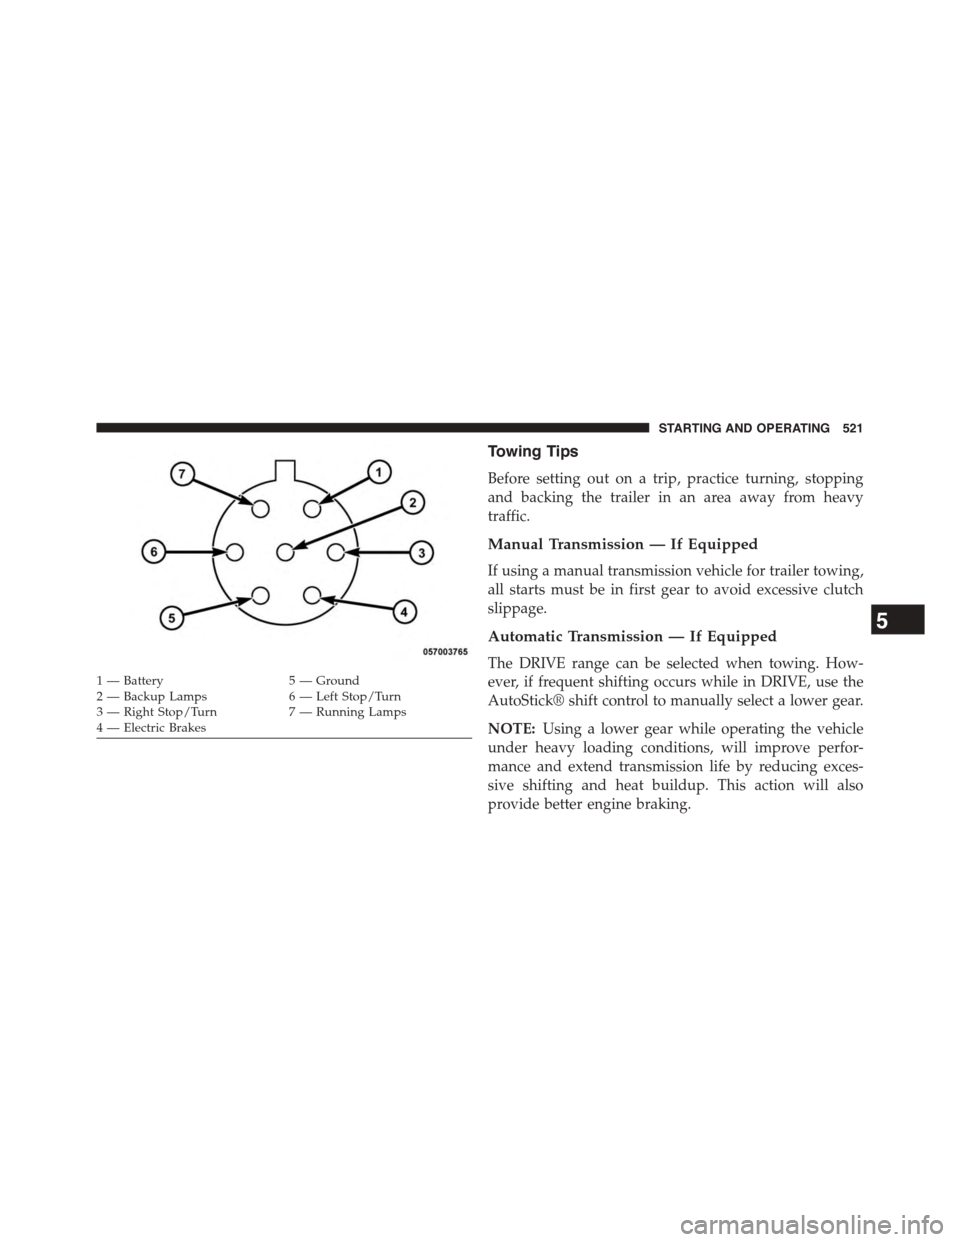
Towing Tips
Before setting out on a trip, practice turning, stopping
and backing the trailer in an area away from heavy
traffic.
Manual Transmission — If Equipped
If using a manual transmission vehicle for trailer towing,
all starts must be in first gear to avoid excessive clutch
slippage.
Automatic Transmission — If Equipped
The DRIVE range can be selected when towing. How-
ever, if frequent shifting occurs while in DRIVE, use the
AutoStick® shift control to manually select a lower gear.
NOTE:Using a lower gear while operating the vehicle
under heavy loading conditions, will improve perfor-
mance and extend transmission life by reducing exces-
sive shifting and heat buildup. This action will also
provide better engine braking.
1—Battery5—Ground2—BackupLamps6—LeftStop/Turn3—RightStop/Turn7—RunningLamps4 — Electric Brakes
5
STARTING AND OPERATING 521
Page 526 of 664
NOTE:Vehicles equipped with a manual transmission
or a DDCT transmission (1.4L turbo engine) may be
recreationally towed (flat towed) at any legal highway
speed, for any distance, if the transmission is inNEU-
TRAL. For vehicles with DDCT transmission (1.4L turbo
automatic), refer to#Shift Lever Override#in#What to Do
in Emergencies#for instructions on shifting the transmis-
sion into NEUTRAL when the ignition is OFF. If the
ignition is left in the ACC position, it may be helpful to
disconnect the negative battery cable (and secure it away
from the battery post), to avoid draining the battery.
CAUTION!
•DO NOT flat tow any 2.0L or 2.4L engine vehicle
equipped with an automatic transmission. Damage
to the drivetrain will result. If these vehicles re-
quire towing, make sure all the wheels are OFF the
ground.
•Do not dolly tow this vehicle. Use of a towing dolly
can cause significant damage to your vehicle. Dam-
age from improper towing is not covered under the
New Vehicle Limited Warranty.
•Towing this vehicle in violation of the above re-
quirements can cause severe transmission damage.
Damage from improper towing is not covered un-
der the New Vehicle Limited Warranty.
524 STARTING AND OPERATING
Page 529 of 664
HAZARD WARNING FLASHERS
The Hazard Warning flasher switch is located in the
center of the instrument panel.
Press the switch to turn on the Hazard Warning
flashers. When the switch is activated, all direc-
tional turn signals will flash on and off to warn oncoming
traffic of an emergency. Press the switch a second time to
turn off the Hazard Warning flashers.
This is an emergency warning system and it should not
be used when the vehicle is in motion. Use it when your
vehicle is disabled and it is creating a safety hazard for
other motorists.
When you must leave the vehicle to seek assistance, the
Hazard Warning flashers will continue to operate even
though the ignition is placed in the OFF position.
NOTE:With extended use the Hazard Warning flashers
may wear down your battery.
IF YOUR ENGINE OVERHEATS
In any of the following situations, you can reduce the
potential for overheating by taking the appropriate action.
•On the highways — slow down.
•In city traffic — while stopped, place the transmission in
NEUTRAL, but do not increase the engine idle speed.
NOTE:There are steps that you can take to slow down
an impending overheat condition:
•If your air conditioner (A/C) is on, turn it off. The A/C
system adds heat to the engine cooling system and
turning the A/C off can help remove this heat.
•You can also turn the temperature control to maximum
heat, the mode control to floor and the blower control
to high. This allows the heater core to act as a
supplement to the radiator and aids in removing heat
from the engine cooling system.
6
WHAT TO DO IN EMERGENCIES 527
Page 553 of 664
5. Lower the jack until it is free. Remove the wheel
blocks. Reassemble the lug wrench to the jack assem-
bly and stow it in the spare tire area. Secure the
assembly using the means provided. Release the park-
ing brake before driving the vehicle.
6. After 25 miles (40 km) check the wheel bolt torque
with a torque wrench to ensure that all wheel bolts are
properly seated against the wheel.
JUMP-STARTING PROCEDURES
If your vehicle has a discharged battery it can be jump-
started using a set of jumper cables and a battery in
another vehicle or by using a portable battery booster
pack. Jump-starting can be dangerous if done improperly
so please follow the procedures in this section carefully.
NOTE:When using a portable battery booster pack
follow the manufacturer ’s operating instructions and
precautions.
CAUTION!
Do not use a portable battery booster pack or any
other booster source with a system voltage greater
than 12 Volts or damage to the battery, starter motor,
alternator or electrical system may occur.
WARNING!
Do not attempt jump-starting if the battery is frozen.
It could rupture or explode and cause personal injury.
Preparations For Jump-Start
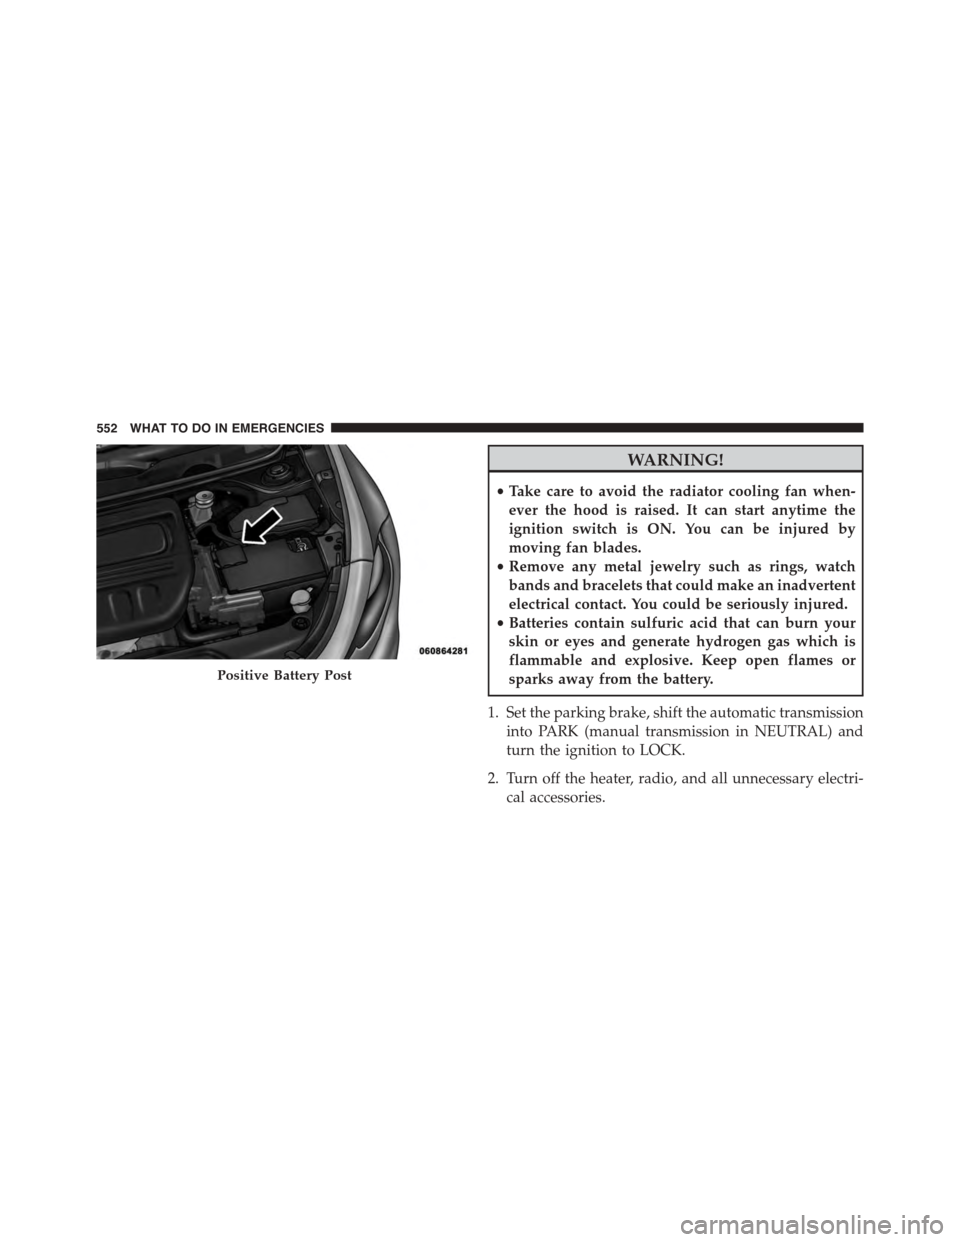
The battery in your vehicle is located in the front of the
engine compartment, behind the left headlight assembly.
NOTE:The positive battery post is covered with a
protective cap. Lift up on the cap to gain access to the
positive battery post.
6
WHAT TO DO IN EMERGENCIES 551
Page 554 of 664
WARNING!
•Take care to avoid the radiator cooling fan when-
ever the hood is raised. It can start anytime the
ignition switch is ON. You can be injured by
moving fan blades.
•Remove any metal jewelry such as rings, watch
bands and bracelets that could make an inadvertent
electrical contact. You could be seriously injured.
•Batteries contain sulfuric acid that can burn your
skin or eyes and generate hydrogen gas which is
flammable and explosive. Keep open flames or
sparks away from the battery.
1. Set the parking brake, shift the automatic transmission
into PARK (manual transmission in NEUTRAL) and
turn the ignition to LOCK.
2. Turn off the heater, radio, and all unnecessary electri-
cal accessories.
Positive Battery Post
552 WHAT TO DO IN EMERGENCIES
Page 555 of 664
3. If using another vehicle to jump-start the battery, park
the vehicle within the jumper cables reach, set the
parking brake and make sure the ignition is OFF.
WARNING!
Do not allow vehicles to touch each other as this
could establish a ground connection and personal
injury could result.
Jump-Starting Procedure
WARNING!
Failure to follow this jump-starting procedure could
result in personal injury or property damage due to
battery explosion.
CAUTION!
Failure to follow these procedures could result in
damage to the charging system of the booster vehicle
or the discharged vehicle.
Connecting The Jumper Cables
1. Connect the positive(+)end of the jumper cable to the
positive(+)post of the discharged vehicle.
2. Connect the opposite end of the positive(+)jumper
cable to the positive(+)post of the booster battery.
3. Connect the negative(-)end of the jumper cable to the
negative(-)post of the booster battery.
4. Connect the opposite end of the negative(-)jumper
cable to a good engine ground (exposed metal part of
the discharged vehicle’s engine) away from the battery
and the fuel injection system.
6
WHAT TO DO IN EMERGENCIES 553