battery DODGE DART 2015 PF / 1.G Service Manual
[x] Cancel search | Manufacturer: DODGE, Model Year: 2015, Model line: DART, Model: DODGE DART 2015 PF / 1.GPages: 664, PDF Size: 16.96 MB
Page 579 of 664
WARNING!(Continued)
•The battery in this vehicle has a vent hose that
should not be disconnected and should only be
replaced with a battery of the same type (vented).
CAUTION!
•It is essential when replacing the cables on the
battery that the positive cable is attached to the
positive post and the negative cable is attached to
the negative post. Battery posts are marked positive
(+) and negative (-) and are identified on the
battery case. Cable clamps should be tight on the
terminal posts and free of corrosion.
•If a “fast charger” is used while the battery is in the
vehicle, disconnect both vehicle battery cables be-
fore connecting the charger to the battery. Do not
use a “fast charger” to provide starting voltage.
Air Conditioner Maintenance
For best possible performance, your air conditioner
should be checked and serviced by an authorized dealer
at the start of each warm season. This service should
include cleaning of the condenser fins and a performance
test. Drive belt tension should also be checked at this
time.
WARNING!
•Use only refrigerants and compressor lubricants
approved by the manufacturer for your air condi-
tioning system. Some unapproved refrigerants are
flammable and can explode, injuring you. Other
unapproved refrigerants or lubricants can cause the
system to fail, requiring costly repairs. Refer to
Warranty Information Book, located on the DVD,
for further warranty information.
7
MAINTAINING YOUR VEHICLE 577
Page 606 of 664
Cavity Cartridge FuseMini FuseDescription
F24–5 Amp Tan Run/Accessory Relay
F25–5 Amp Tan Transmission Control Module #4
F26–5 Amp Tan Stop Lamp Switch
F27–10 Amp Red Pneumatic Lumbar Support
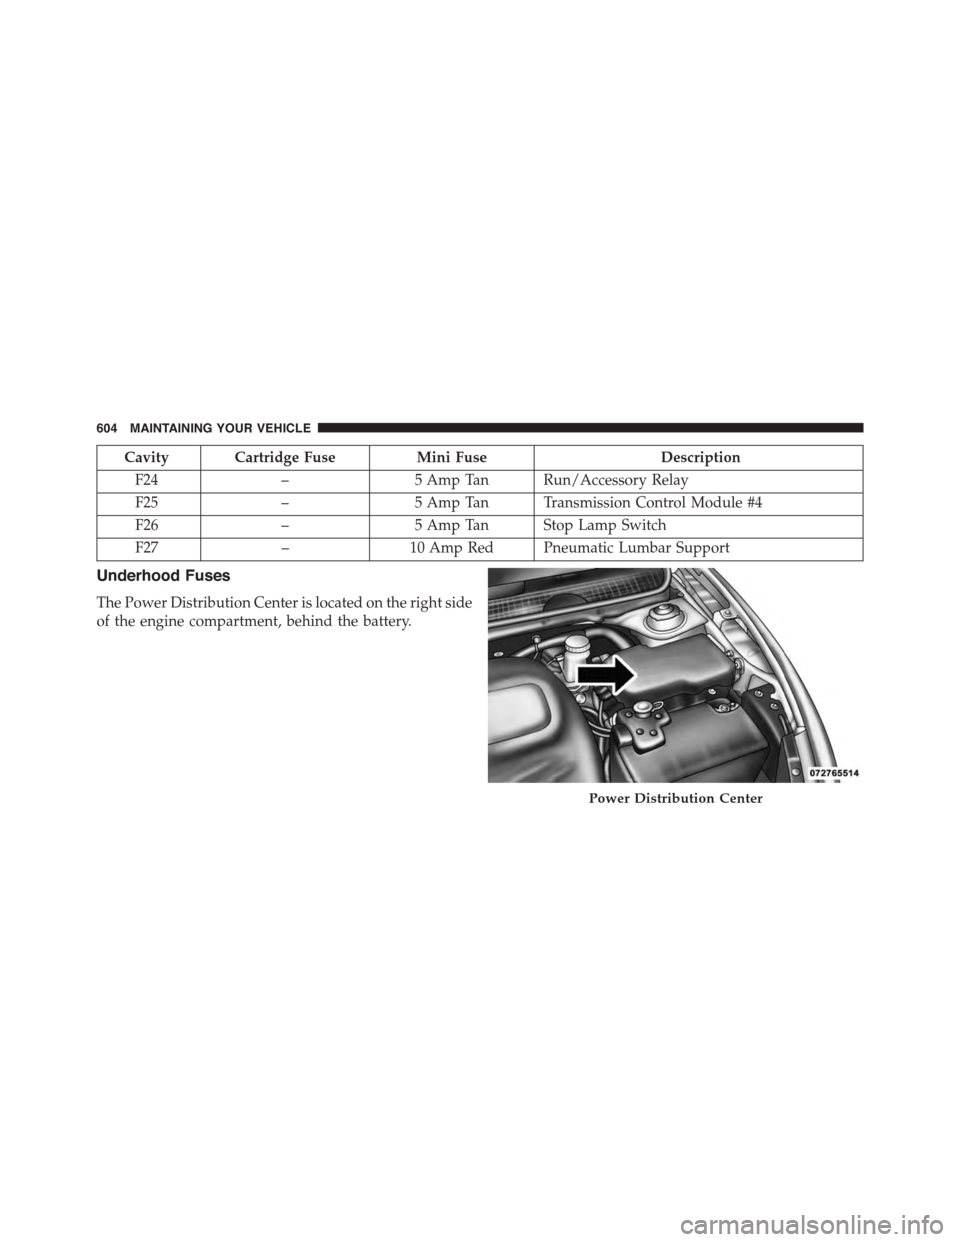
Underhood Fuses
The Power Distribution Center is located on the right side
of the engine compartment, behind the battery.
Power Distribution Center
604 MAINTAINING YOUR VEHICLE
Page 608 of 664
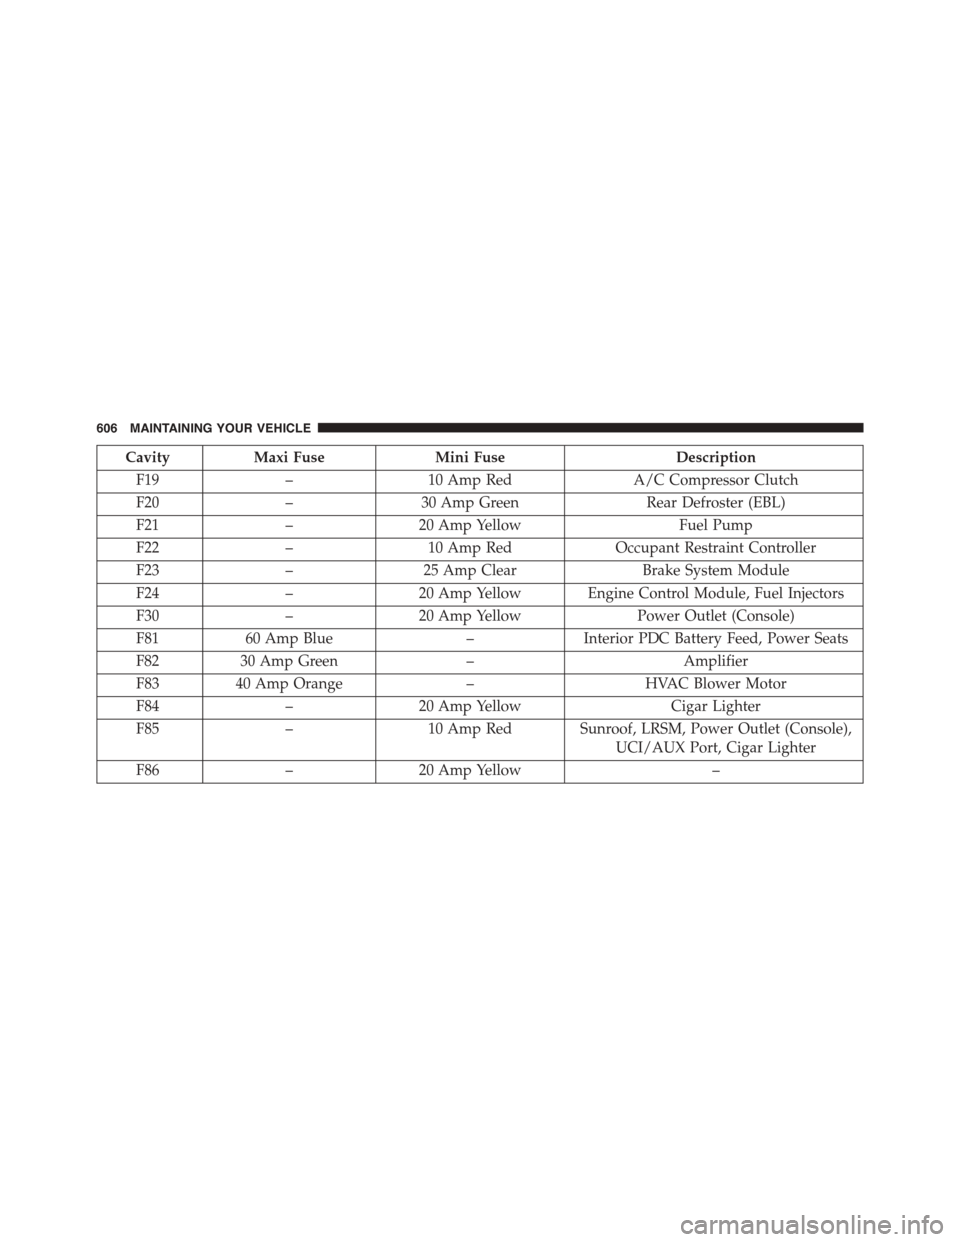
CavityMaxi FuseMini FuseDescription
F19–10 Amp RedA/C Compressor Clutch
F20–30 Amp GreenRear Defroster (EBL)
F21–20 Amp YellowFuel Pump
F22–10 Amp RedOccupant Restraint Controller
F23–25 Amp ClearBrake System Module
F24–20 Amp Yellow Engine Control Module, Fuel Injectors
F30–20 Amp YellowPower Outlet (Console)
F8160 Amp Blue–Interior PDC Battery Feed, Power Seats
F8230 Amp Green–Amplifier
F8340 Amp Orange–HVAC Blower Motor
F84–20 Amp YellowCigar Lighter
F85–10 Amp Red Sunroof, LRSM, Power Outlet (Console),
UCI/AUX Port, Cigar Lighter
F86–20 Amp Yellow–
606 MAINTAINING YOUR VEHICLE
Page 611 of 664
VEHICLE STORAGE
If you will not be using your vehicle for more than 21 days,
you may want to take steps to preserve your battery.
•Disconnect the negative cable from the battery.
•Anytime you store your vehicle, or keep it out of service
(i.e., vacation) for two weeks or more, run the air
conditioning system at idle for about five minutes in the
fresh air and high blower setting. This will ensure
adequate system lubrication to minimize the possibility
of compressor damage when the system is started again.
NOTE:When the vehicle has not been started or driven
for at least 35 days, an Extended Park Start Procedure is
required to start the vehicle. Refer to “Starting Procedures”
in “Starting And Operating” for further information.
REPLACEMENT BULBS
Interior Bulbs
Bulb Number
Dome LampW5W
Overhead Console LampW5W
7
MAINTAINING YOUR VEHICLE 609
Page 625 of 664
Check the tire inflation pressures and look for unusual
wear or damage.
Check the fluid levels of the coolant reservoir, and brake
master cylinder as needed.
Check function of all interior and exterior lights.
Required Maintenance
Refer to the Maintenance Schedules on the following
pages for required maintenance.
At Every Oil Change Interval As Indicated By Oil
Change Indicator System:
•Change engine oil and filter.
•Rotate the tires.Rotate at the first sign of irregu-
lar wear, even if it occurs before the oil indicator
system turns on.
At Every Oil Change Interval As Indicated By Oil
Change Indicator System:
•Inspect battery and clean and tighten terminals as
required.
•Inspect brake pads, shoes, rotors, drums, hoses
and park brake.
•Inspect engine cooling system protection and
hoses.
•Inspect exhaust system.
•Inspect engine air cleaner if using in dusty or
off-road conditions.
8
MAINTENANCE
SCHEDULES
MAINTENANCE SCHEDULES 623
Page 643 of 664
Tamper Alert...........................22
Vehicle Security Alarm....................20
Alarm Light.............................315
Alarm, Panic.............................22
Alarm (Security Alarm)......................20
Alarm System (Security Alarm)................20
Alterations/Modifications, Vehicle...............7
Antifreeze (Engine Coolant)..................586
Capacities............................615
Disposal..............................589
Anti-Lock Brake System (ABS)................453
Anti-Lock Warning Light....................318
Appearance Care.........................595
Assistance Towing.........................150
Assist, Hill Start..........................458
Auto Down Power Windows..................44
Automatic Dimming Mirror..................122
Automatic Door Locks......................36
Automatic Headlights......................237
Automatic High Beams.....................239
Automatic Temperature Control (ATC)..........402
Automatic Transmission....................421
Adding Fluid..........................594
Fluid and Filter Changes..................595
Fluid Level Check.......................594
Fluid Type............................593
Gear Ranges...........................426
Special Additives.......................594
Autostick...............................443
Auto Unlock, Doors........................36
Auto Up Power Windows....................44
Battery.................................576
Keyless Transmitter Replacement (RKE)........27
Belts, Seat...............................112
Bluetooth®
Connecting To A Particular Mobile Phone Or
Audio Device After Pairing................17610
INDEX 641
Page 653 of 664
Passing..............................243
Reading..............................243
Seat Belt Reminder......................312
Security Alarm.........................315
Service...............................611
Service Engine Soon (Malfunction Indicator) . . . .318
Tire Pressure Monitoring (TPMS)............308
Traction Control........................464
Turn Signal............................114
Vanity Mirror..........................125
Voltage..............................317
Warning (Instrument Cluster Description)......308
Loading Vehicle..........................508
Capacities............................509
Ti re s . . . . . . . . . . . . . . . . . . . . . . . . . . . . . . ..471
Locks..................................34
Automatic Door.........................36
Auto Unlock...........................36
Child Protection.........................37
Door.................................34
Power Door............................35
Lubrication, Body.........................580
Lug Nuts...............................528
Maintenance Free Battery....................576
Maintenance Procedures....................571
Maintenance Schedule......................622
Malfunction Indicator Light (Check Engine).......318
Manual, Service..........................636
Manual Transmission......................417
Fluid Level Check.......................595
Frequency of Fluid Change................595
Lubricant Selection......................595
Shift Speeds...........................418
Master Cylinder (Brakes)....................591
Methanol...............................501
Mini-Trip Computer.......................326
Mirrors................................12110
INDEX 651
Page 661 of 664
Transmission
Automatic............................421
Filter................................595
Fluid................................619
Maintenance...........................593
Manual..............................417
Transmitter Battery Service (Remote Keyless Entry) . .27
Transmitter, Garage Door Opener (HomeLink®). . . .275
Transmitter Programming (Remote Keyless Entry) . . .27
Transmitter, Remote Keyless Entry (RKE).........23
Transporting Pets.........................109
Tread Wear Indicators......................485
Trip Odometer...........................316
Trunk Lid (Deck Lid).......................47
Trunk Release, Emergency....................48
Trunk Release Remote Control.................47
Turn Signals.............................242
UCI Connector...........................380
Uconnect®
Advanced Phone Connectivity..............153
Operation.............................170
Phone Call Features.....................182
Phone Features.........................148
Things You Should Know About Your
Uconnect® Phone.......................192
Uconnect® Settings.......................25
Uconnect® Settings......................351
Uconnect® 130 With Satellite Radio
Playing MP3 Files.......................374
Uconnect® (Hands-Free Phone)...............135
Uconnect® Phone.........................167
Uconnect® Settings.........................25
Uconnect® Voice Command..................211
Uniform Tire Quality Grades.................637
Universal Consumer Interface (UCI) Connector . . . .380
Universal Transmitter......................275
Unleaded Gasoline........................50010
INDEX 659
Page 663 of 664

INSTALLATION OF RADIO TRANSMITTING
EQUIPMENT
Special design considerations are incorporated into this
vehicle’s electronic system to provide immunity to radio
frequency signals. Mobile two-way radios and telephone
equipment must be installed properly by trained person-
nel. The following must be observed during installation.
The positive power connection should be made directly
to the battery and fused as close to the battery as possible.
The negative power connection should be made to body
sheet metal adjacent to the negative battery connection.
This connection should not be fused.
Antennas for two-way radios should be mounted on the
roof or the rear area of the vehicle. Care should be used
in mounting antennas with magnet bases. Magnets may
affect the accuracy or operation of the compass on
vehicles so equipped.
The antenna cable should be as short as practical and
routed away from the vehicle wiring when possible. Use
only fully shielded coaxial cable.
Carefully match the antenna and cable to the radio to
ensure a low Standing Wave Ratio (SWR).
Mobile radio equipment with output power greater than
normal may require special precautions.
All installations should be checked for possible interfer-
ence between the communications equipment and the
vehicle’s electronic systems.