instrument cluster DODGE DART 2015 PF / 1.G Owner's Manual
[x] Cancel search | Manufacturer: DODGE, Model Year: 2015, Model line: DART, Model: DODGE DART 2015 PF / 1.GPages: 664, PDF Size: 16.96 MB
Page 337 of 664
•LEFT Arrow Button
Push the LEFT arrow button to return to the
main menu from an info screen or sub-menu
item.
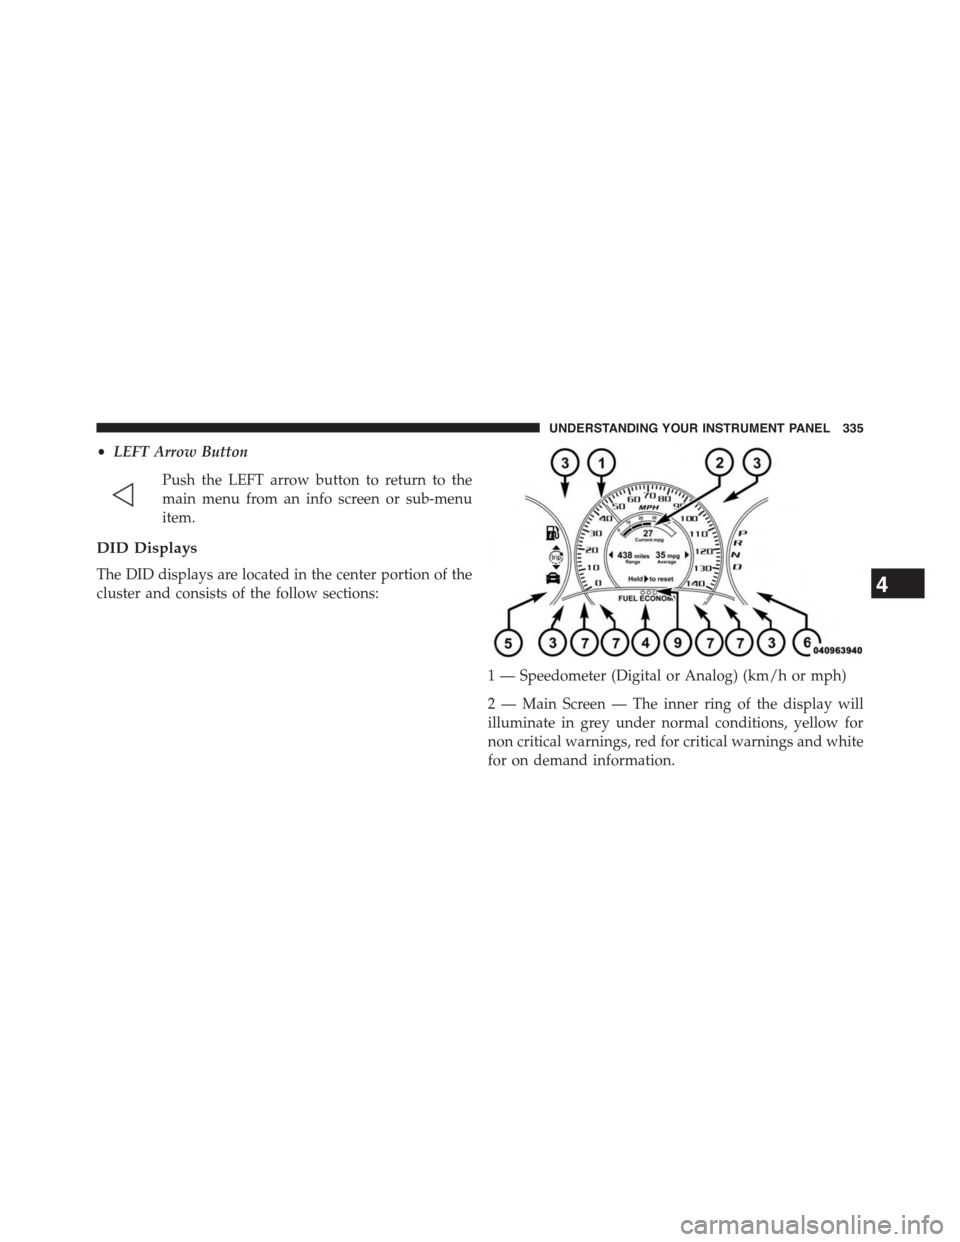
DID Displays
The DID displays are located in the center portion of the
cluster and consists of the follow sections:
1 — Speedometer (Digital or Analog) (km/h or mph)
2 — Main Screen — The inner ring of the display will
illuminate in grey under normal conditions, yellow for
non critical warnings, red for critical warnings and white
for on demand information.
4
UNDERSTANDING YOUR INSTRUMENT PANEL 335
Page 349 of 664
Stored Messages
Push and release the UP or DOWN arrow
button until the Messages display icon is high-
lighted in the DID. This feature shows the
number of stored warning messages. Pushing
the RIGHT arrow button will allow you to see what the
stored messages are. Push the LEFT arrow button to
return to the Main Menu.
Screen Setup
Push and release the UP or DOWN arrow
button until the Screen Setup display icon is
highlighted in the DID. Push and release the
RIGHT arrow button to enter the Screen Setup
submenu. The Screen Setup feature allows you to change
what information is displayed in the instrument cluster
as well as the location that information is displayed.
Push and release the UP or DOWN arrow button until
the Screen Setup display icon is highlighted in the DID.
Push and release the RIGHT arrow button to enter the
Screen Setup submenu. The Screen Setup feature allows
you to change the location that information is displayed
within the instrument cluster. Use the UP and DOWN
buttons to highlight a screen setup location (i.e., Upper
Left, Upper Right, etc.) then push the RIGHT arrow
button to select the location and make changes. Push the
UP and DOWN buttons to select the information you
would like to display in that location (i.e., Date, Time,
Outside Temp, etc.) and push the RIGHT arrow button to
save the display setting. You can push the LEFT arrow
button at any time to back out of a sub-menu selection.
4
UNDERSTANDING YOUR INSTRUMENT PANEL 347
Page 356 of 664
has been selected. Press the back arrow button on the
touchscreen to return to the previous menu.
•Units
When in this display, you may select to have the EVIC,
odometer, and navigation system (if equipped) changed
between US and Metric units of measure. Press US or
Metric until a check-mark appears next to the setting,
showing that setting has been selected. Press the back
arrow button on the touchscreen to return to the previous
menu.
•Voice Response Length
When in this display, you may change the Voice Re-
sponse Length settings. To change the Voice Response
Length, press the Brief or Detailed button on the touch-
screen until a check-mark appears next to the setting,
showing that setting has been selected. Press the back
arrow button on the touchscreen to return to the previous
menu.
•Touchscreen Beep
When in this display, you may turn on or shut off the
sound heard when a press screen button (button on the
touchscreen) is pressed. Press the Touchscreen Beep
button on the touchscreen until a check-mark appears
next to the setting, showing that setting has been se-
lected. Press the back arrow button on the touchscreen to
return to the previous menu.
•Navigation Turn-By-Turn In Cluster — If Equipped
When this feature is selected, the turn-by-turn directions
will appear in the display as the vehicle approaches a
designated turn within a programmed route. To make
your selection, press the Navigation Turn-By-Turn In
Cluster button on the touchscreen, until a check-mark
appears next to the setting, showing that setting has been
selected. Press the back arrow button on the touchscreen
to return to the previous menu.
354 UNDERSTANDING YOUR INSTRUMENT PANEL
Page 426 of 664
Brake/Transmission Shift Interlock System
This vehicle is equipped with a Brake Transmission Shift
Interlock System (BTSI) that holds the shift lever in PARK
unless the brakes are applied. To shift the transmission
out of PARK, the ignition switch must be turned to the
ON/RUN position (engine running or not) and the brake
pedal must be pressed.
Six-Speed Automatic Transmission (1.4L Turbo
Engine Only — DDCT)
The transmission gear position display (located in the
instrument panel cluster) indicates the transmission gear
range. You must press the brake pedal and the lock
button on the shift lever to move the shift lever out of
PARK (refer to “Brake/Transmission Shift Interlock Sys-
tem” in this section). To drive, press the lock button on
the front of the shift lever and move the shift lever from
PARK or NEUTRAL to the DRIVE position.
The electronically-controlled transmission provides a
precise shift schedule. The transmission electronics are
self-calibrating; therefore, the first few shifts on a new
vehicle may be somewhat abrupt. This is a normal
condition, and precision shifts will develop within a few
hundred miles (kilometers).
Only shift from DRIVE to PARK or REVERSE when the
accelerator pedal is released and the vehicle is stopped.
Be sure to keep your foot on the brake pedal when
shifting between these gears.
This transmission is programmed to prevent shifting
from REVERSE to DRIVE or DRIVE to REVERSE, if
vehicle speed is above 6 mph (10 km/h). This safety
feature helps protect your transmission from damage.
The transmission shift lever has PARK, REVERSE, NEU-
TRAL, DRIVE, and AutoStick® (+/-) shift positions.
Manual shifts can be made using the AutoStick® shift
control (refer to “AutoStick®” in this section for further
424 STARTING AND OPERATING
Page 427 of 664
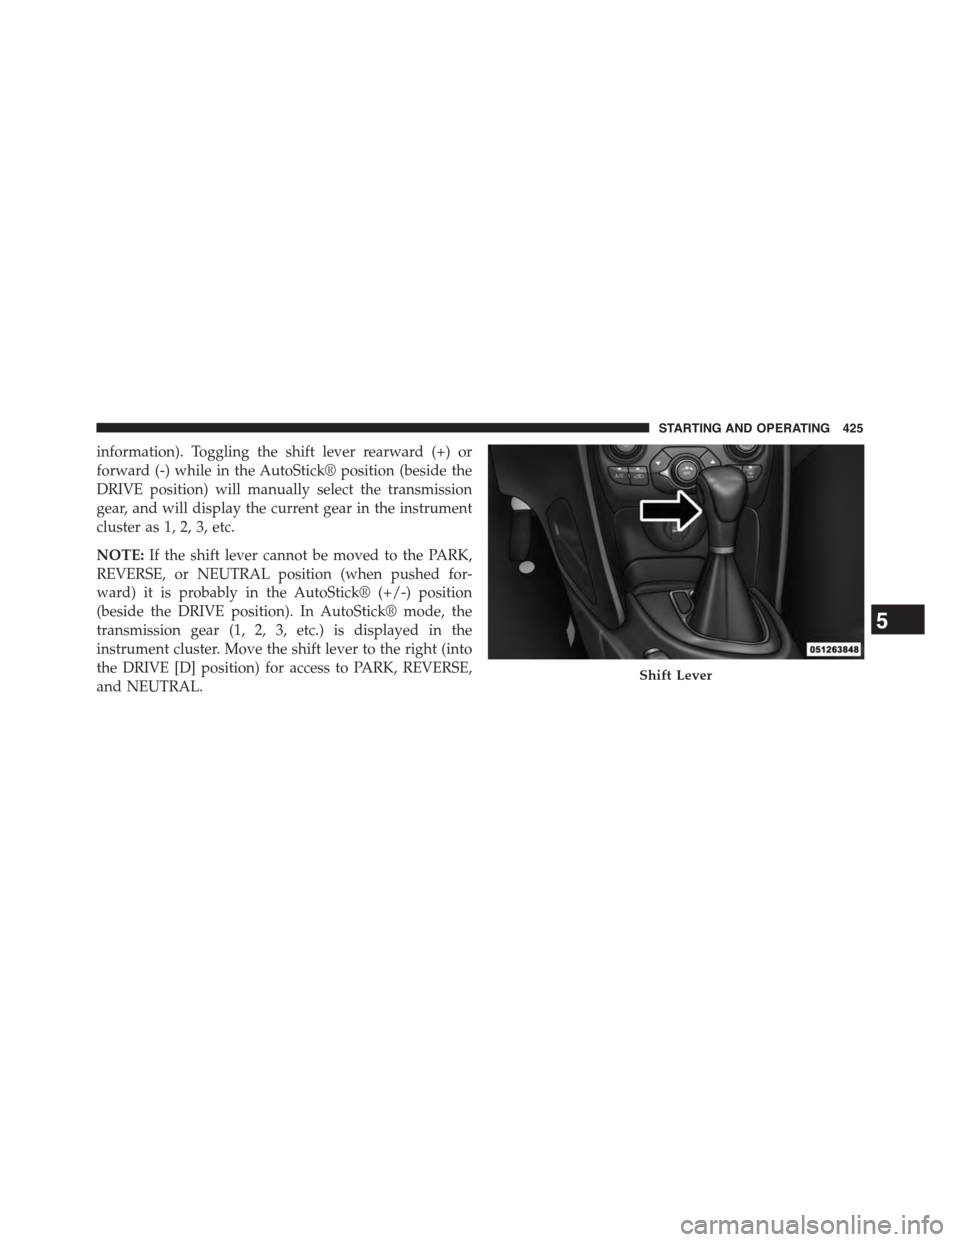
information). Toggling the shift lever rearward (+) or
forward (-) while in the AutoStick® position (beside the
DRIVE position) will manually select the transmission
gear, and will display the current gear in the instrument
cluster as 1, 2, 3, etc.
NOTE:If the shift lever cannot be moved to the PARK,
REVERSE, or NEUTRAL position (when pushed for-
ward) it is probably in the AutoStick® (+/-) position
(beside the DRIVE position). In AutoStick® mode, the
transmission gear (1, 2, 3, etc.) is displayed in the
instrument cluster. Move the shift lever to the right (into
the DRIVE [D] position) for access to PARK, REVERSE,
and NEUTRAL.Shift Lever
5
STARTING AND OPERATING 425
Page 434 of 664
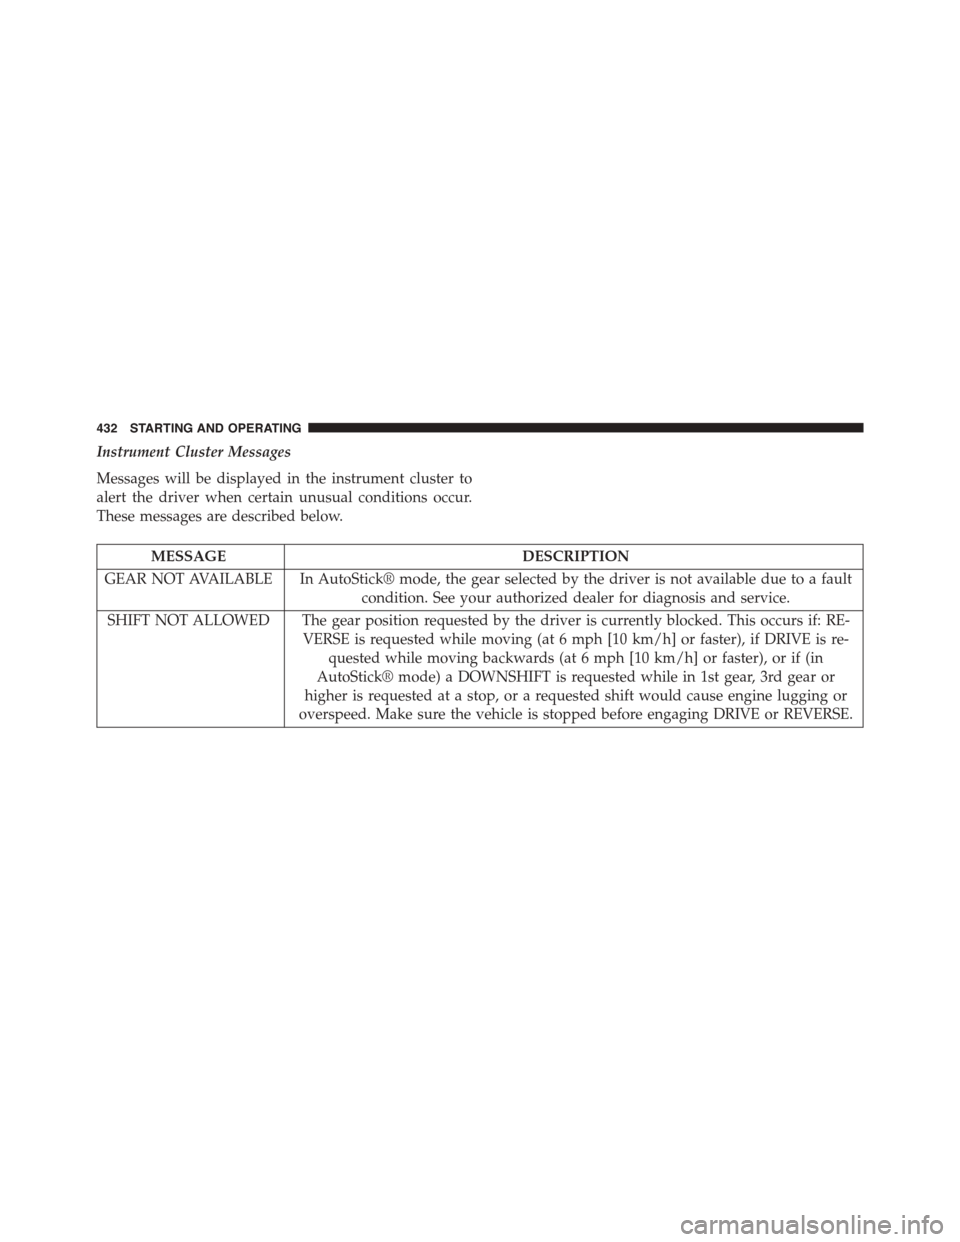
Instrument Cluster Messages
Messages will be displayed in the instrument cluster to
alert the driver when certain unusual conditions occur.
These messages are described below.
MESSAGEDESCRIPTION
GEAR NOT AVAILABLE In AutoStick® mode, the gear selected by the driver is not available due to a fault
condition. See your authorized dealer for diagnosis and service.
SHIFT NOT ALLOWED The gear position requested by the driver is currently blocked. This occurs if: RE-
VERSE is requested while moving (at 6 mph [10 km/h] or faster), if DRIVE is re-
quested while moving backwards (at 6 mph [10 km/h] or faster), or if (in
AutoStick® mode) a DOWNSHIFT is requested while in 1st gear, 3rd gear or
higher is requested at a stop, or a requested shift would cause engine lugging or
overspeed. Make sure the vehicle is stopped before engaging DRIVE or REVERSE.
432 STARTING AND OPERATING
Page 437 of 664
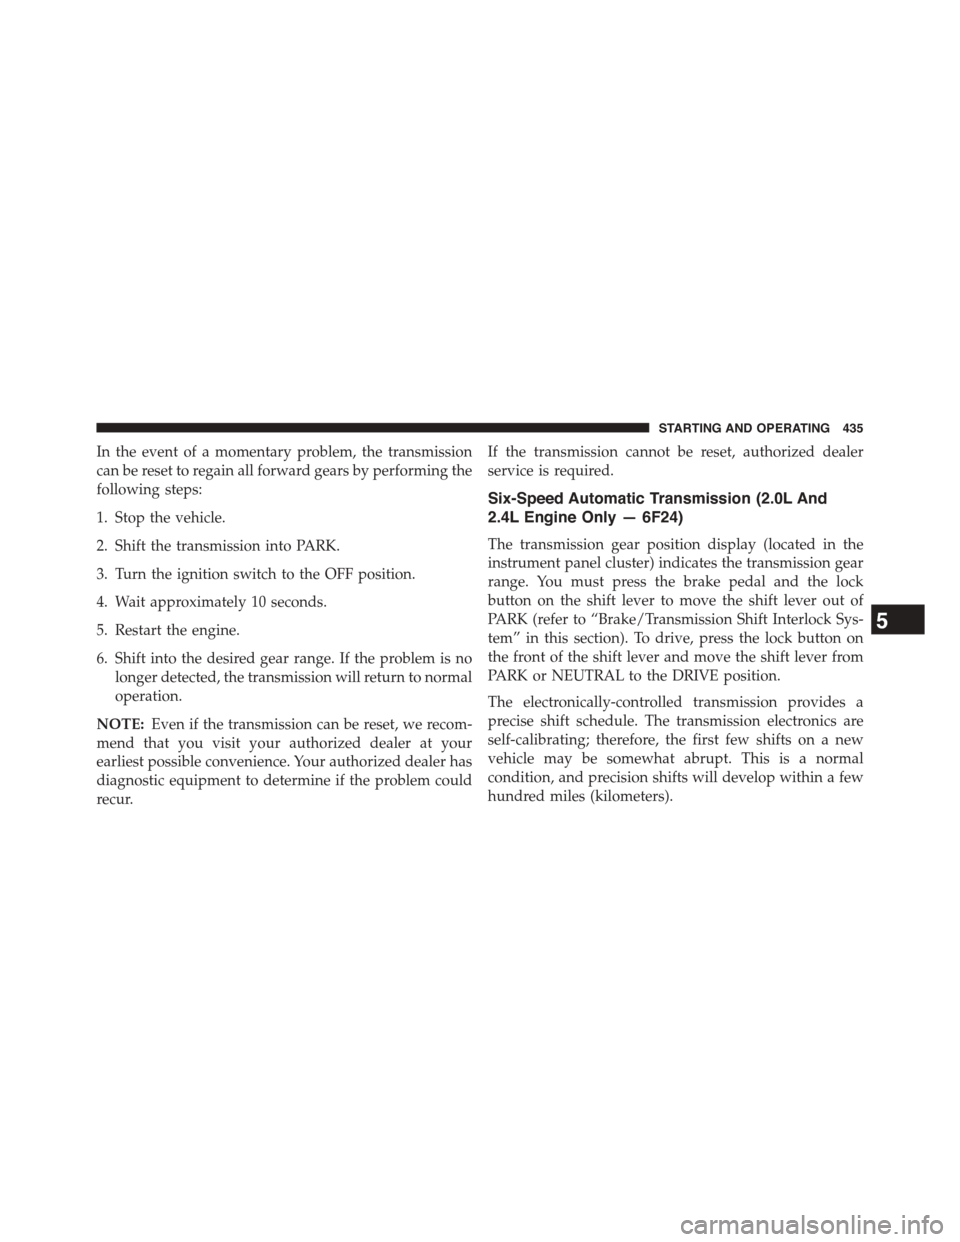
In the event of a momentary problem, the transmission
can be reset to regain all forward gears by performing the
following steps:
1. Stop the vehicle.
2. Shift the transmission into PARK.
3. Turn the ignition switch to the OFF position.
4. Wait approximately 10 seconds.
5. Restart the engine.
6. Shift into the desired gear range. If the problem is no
longer detected, the transmission will return to normal
operation.
NOTE:Even if the transmission can be reset, we recom-
mend that you visit your authorized dealer at your
earliest possible convenience. Your authorized dealer has
diagnostic equipment to determine if the problem could
recur.
If the transmission cannot be reset, authorized dealer
service is required.
Six-Speed Automatic Transmission (2.0L And
2.4L Engine Only — 6F24)
The transmission gear position display (located in the
instrument panel cluster) indicates the transmission gear
range. You must press the brake pedal and the lock
button on the shift lever to move the shift lever out of
PARK (refer to “Brake/Transmission Shift Interlock Sys-
tem” in this section). To drive, press the lock button on
the front of the shift lever and move the shift lever from
PARK or NEUTRAL to the DRIVE position.
The electronically-controlled transmission provides a
precise shift schedule. The transmission electronics are
self-calibrating; therefore, the first few shifts on a new
vehicle may be somewhat abrupt. This is a normal
condition, and precision shifts will develop within a few
hundred miles (kilometers).
5
STARTING AND OPERATING 435
Page 438 of 664
Only shift from DRIVE to PARK or REVERSE when the
accelerator pedal is released and the vehicle is stopped.
Be sure to keep your foot on the brake pedal when
shifting between these gears.
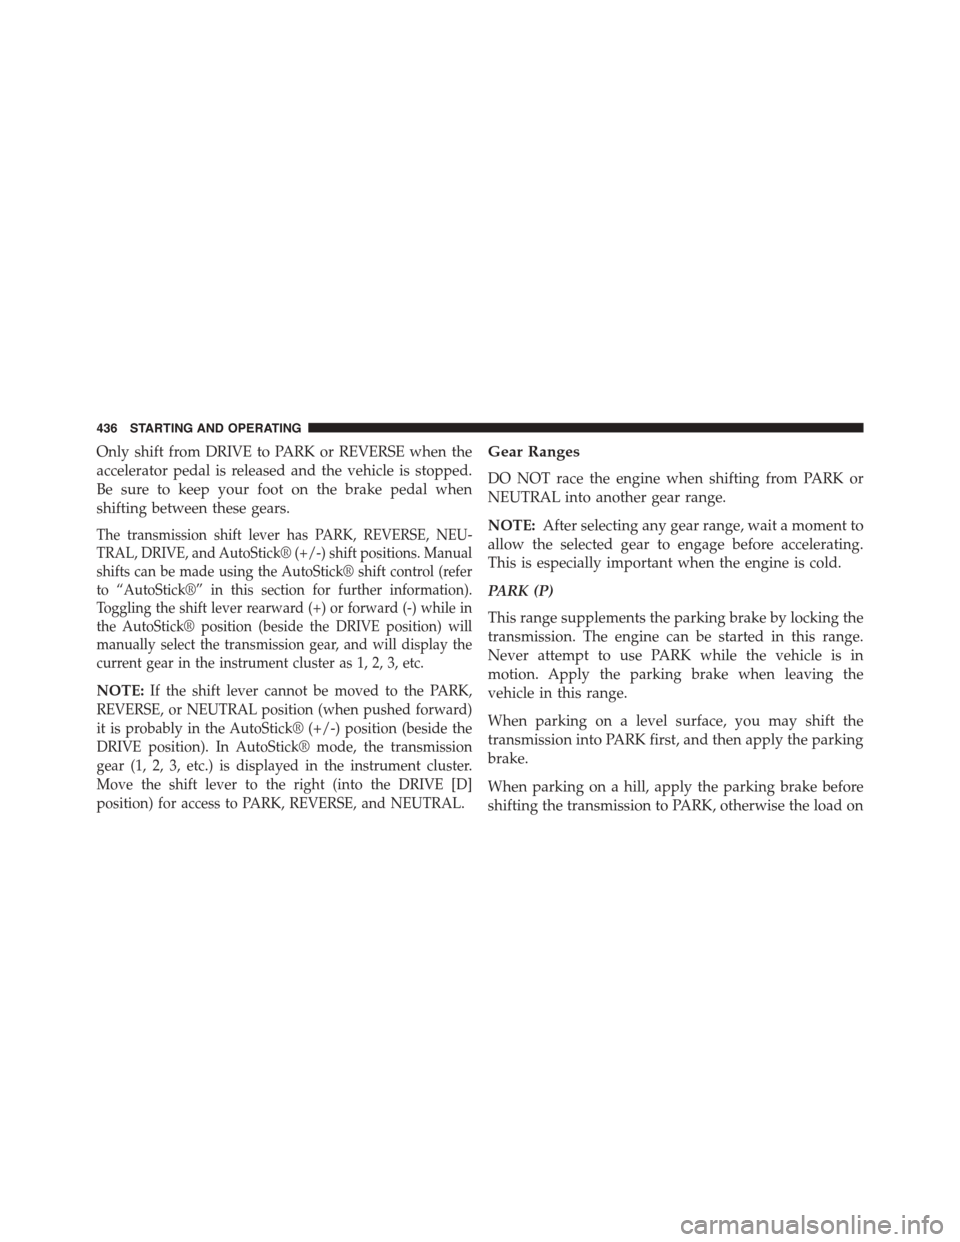
The transmission shift lever has PARK, REVERSE, NEU-
TRAL, DRIVE, and AutoStick® (+/-) shift positions. Manual
shifts can be made using the AutoStick® shift control (refer
to “AutoStick®” in this section for further information).
Toggling the shift lever rearward (+) or forward (-) while in
the AutoStick® position (beside the DRIVE position) will
manually select the transmission gear, and will display the
current gear in the instrument cluster as 1, 2, 3, etc.
NOTE:If the shift lever cannot be moved to the PARK,
REVERSE, or NEUTRAL position (when pushed forward)
it is probably in the AutoStick® (+/-) position (beside the
DRIVE position). In AutoStick® mode, the transmission
gear (1, 2, 3, etc.) is displayed in the instrument cluster.
Move the shift lever to the right (into the DRIVE [D]
position) for access to PARK, REVERSE, and NEUTRAL.
Gear Ranges
DO NOT race the engine when shifting from PARK or
NEUTRAL into another gear range.
NOTE:After selecting any gear range, wait a moment to
allow the selected gear to engage before accelerating.
This is especially important when the engine is cold.
PARK (P)
This range supplements the parking brake by locking the
transmission. The engine can be started in this range.
Never attempt to use PARK while the vehicle is in
motion. Apply the parking brake when leaving the
vehicle in this range.
When parking on a level surface, you may shift the
transmission into PARK first, and then apply the parking
brake.
When parking on a hill, apply the parking brake before
shifting the transmission to PARK, otherwise the load on
436 STARTING AND OPERATING
Page 445 of 664
NOTE:Engagement of the torque converter clutch is
inhibited at very cold temperatures. Because the engine
speed is higher when the torque converter clutch is not
engaged, it may seem as if the transmission is not shifting
into Overdrive when cold. This is normal. The torque
converter clutch will function normally once the trans-
mission is sufficiently warm.
AUTOSTICK®
AutoStick® is a driver-interactive transmission feature
providing manual shift control, giving you more control
of the vehicle. AutoStick® allows you to maximize en-
gine braking, eliminate undesirable upshifts and down-
shifts, and improve overall vehicle performance. This
system can also provide you with more control during
passing, city driving, cold slippery conditions, mountain
driving, and many other situations.
Operation
When the shift lever is in the AutoStick® position (beside
the DRIVE position), it can be moved forward and
rearward. This allows the driver to manually select the
transmission gear being used. Moving the shift lever
forward (-) triggers a downshift and rearward (+) an
upshift. The current gear is displayed in the instrument
cluster. In AutoStick® mode, the transmission will only
shift up or down when the driver moves the shift lever
rearward (+) or forward (-), unless an engine lugging or
overspeed condition would result. It will remain in the
selected gear until another upshift or downshift is cho-
sen, except as described below.
•For all models except GT, the transmission will auto-
matically upshift when necessary to prevent engine
over-speed.
5
STARTING AND OPERATING 443
Page 450 of 664
PARKING BRAKE
Before leaving the vehicle, make sure that the parking
brake is fully applied. Also, be certain to leave an
automatic transmission in PARK, or manual transmission
in REVERSE or first gear.
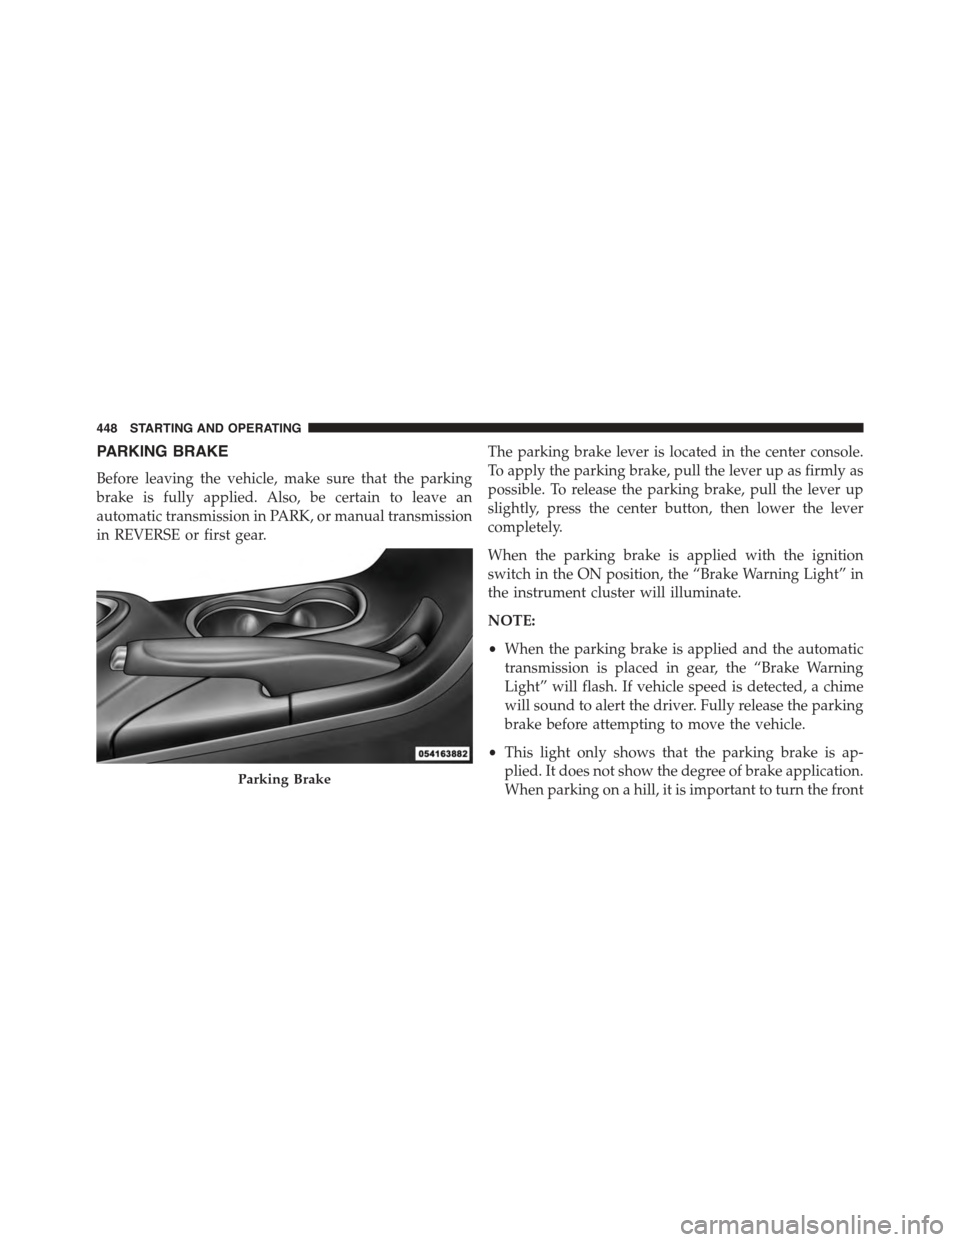
The parking brake lever is located in the center console.
To apply the parking brake, pull the lever up as firmly as
possible. To release the parking brake, pull the lever up
slightly, press the center button, then lower the lever
completely.
When the parking brake is applied with the ignition
switch in the ON position, the “Brake Warning Light” in
the instrument cluster will illuminate.
NOTE:
•When the parking brake is applied and the automatic
transmission is placed in gear, the “Brake Warning
Light” will flash. If vehicle speed is detected, a chime
will sound to alert the driver. Fully release the parking
brake before attempting to move the vehicle.
•This light only shows that the parking brake is ap-
plied. It does not show the degree of brake application.
When parking on a hill, it is important to turn the frontParking Brake
448 STARTING AND OPERATING