turn signal DODGE DART 2015 PF / 1.G Owners Manual
[x] Cancel search | Manufacturer: DODGE, Model Year: 2015, Model line: DART, Model: DODGE DART 2015 PF / 1.GPages: 664, PDF Size: 16.96 MB
Page 22 of 664
VEHICLE SECURITY ALARM — IF EQUIPPED
The Vehicle Security Alarm monitors the vehicle doors
for unauthorized entry and the ignition switch for unau-
thorized operation. This system may also incorporate a
ultrasonic intrusion sensor that monitors for motion in
the vehicle. If something triggers the alarm, the Vehicle
Security Alarm will provide the following audible and
visible signals: the horn will pulse, the headlights, park
lamps and/or turn signals will flash, and the Vehicle
Security Light in the instrument cluster will flash.
Rearming Of The System
If something triggers the alarm, and no action is taken to
disarm it, the Vehicle Security Alarm will turn the horn
off after three minutes, turn all of the visual signals off
after 15 minutes, and then the Vehicle Security Alarm will
rearm itself.
To Arm The System
Follow these steps to arm the Vehicle Security Alarm:
1. Make sure the vehicles ignition is cycled to the “OFF”
position (refer to#Starting Procedures#in#Starting
And Operating#for further information).
•For vehicles equipped with Keyless Enter-N-Go™,
make sure the vehicle ignition system is OFF.
•For vehicles not equipped with Keyless Enter-N-
Go™, make sure the vehicle ignition system is OFF
and the key is physically removed from the ignition.
2. Perform one of the following methods to lock the
vehicle:
•Push LOCK on the interior power door lock switch
with the driver and/or passenger door open.
•Push the LOCK button on the exterior Passive Entry
Door Handle with a valid Key Fob available in the
20 THINGS TO KNOW BEFORE STARTING YOUR VEHICLE
Page 24 of 664
system will give you a false alarm. If one of the previ-
ously described arming sequences has occurred, the
Vehicle Security Alarm will arm regardless of whether
you are in the vehicle or not. If you remain in the vehicle
and open a door, the alarm will sound. If this occurs,
disarm the Vehicle Security Alarm.
If the Vehicle Security Alarm is armed and the battery
becomes disconnected, the Vehicle Security Alarm will
remain armed when the battery is reconnected; the
exterior lights will flash, the horn will sound. If this
occurs, disarm the Vehicle Security Alarm.
Tamper Alert
If something has triggered the Vehicle Security Alarm in
your absence, the horn will sound three times and the
exterior lights blink three times when you unlock the
doors. Check the vehicle for tampering.
To Use The Panic Alarm
To turn the Panic Alarm feature on or off, push and hold
the PANIC button on the Key Fob/Remote for at least
one second and release. When the Panic Alarm is on, the
headlights will turn on, the park lights and turn signals
will flash, the horn will pulse on and off, and the interior
lights will turn on.
The Panic Alarm will stay on for three minutes unless
you turn it off by either pushing the PANIC button a
second time or drive the vehicle at a speed of 15 mph
(24 km/h) or greater.
NOTE:
•The interior lights will turn off if you cycle the ignition
switch to the ACC or ON/RUN position while the
Panic Alarm is activated. However, the exterior lights
and horn will remain on.
22 THINGS TO KNOW BEFORE STARTING YOUR VEHICLE
Page 27 of 664
To Unlock The Doors
Push and release the UNLOCK button on the RKE
transmitter once to unlock the driver’s door or twice
within five seconds to unlock all doors. The turn signal
lights will flash to acknowledge the unlock signal. The
illuminated entry system will also turn on.
If the vehicle is equipped with Passive Entry, refer to
“Keyless Enter-N-Go™” under “Things To Know Before
Starting Your Vehicle” for further information.
1st Push Of Key Fob Unlocks
This feature lets you program the system to unlock either
the driver’s door or all doors on the first push of the
UNLOCK button on the RKE transmitter. To change the
current setting, refer to “Uconnect® Settings” in “Under-
standing Your Instrument Panel” for further information.
Flash Lights With Lock
This feature will cause the turn signal lights to flash when
the doors are locked with the RKE transmitter. This
feature can be turned on or turned off. To change the
current setting, refer to “Uconnect® Settings” in “Under-
standing Your Instrument Panel” for further information.
Headlight Illumination On Approach
This feature activates the headlights for up to 90 seconds
when the doors are unlocked with the RKE transmitter.
The time for this feature is programmable on vehicles
equipped through Uconnect®. To change the current
setting, refer to “Uconnect® Settings” in “Understanding
Your Instrument Panel” for further information.
To Lock The Doors
Push and release the LOCK button on the RKE transmit-
ter to lock all doors. The turn signal lights will flash and
the horn will chirp to acknowledge the signal.
2
THINGS TO KNOW BEFORE STARTING YOUR VEHICLE 25
Page 28 of 664
If the vehicle is equipped with Passive Entry, refer to
“Keyless Enter-N-Go™” under “Things To Know Before
Starting Your Vehicle” for further information.
Sound Horn With Lock
This feature will cause the horn to chirp when the doors
are locked with the RKE transmitter. This feature can be
turned on or turned off. To change the current setting,
refer to “Uconnect® Settings” in “Understanding Your
Instrument Panel” for further information.
To Unlatch The Trunk
Push the TRUNK button on the RKE transmitter two
times within five seconds to unlatch the trunk.
If the vehicle is equipped with Passive Entry, refer to
“Keyless Enter-N-Go™” under “Things To Know Before
Starting Your Vehicle” for further information.
Using The Panic Alarm
To turn the Panic Alarm feature on or off, push and hold
the PANIC button on the RKE transmitter for at least one
second and release. When the Panic Alarm is activated,
the turn signals will flash, the horn will pulse on and off,
and the interior lights will turn on.
The Panic Alarm will stay on for three minutes unless
you turn it off by either pushing the PANIC button a
second time or drive the vehicle at a speed of 15 MPH
(24 km/h) or greater.
NOTE:
•The interior lights will turn off if you cycle the ignition
switch to the ACC or ON/RUN position while the
Panic Alarm is activated. However, the exterior lights
and horn will remain on.
26 THINGS TO KNOW BEFORE STARTING YOUR VEHICLE
Page 77 of 664
WARNING!
•If an occupant in the front passenger seat is seated
improperly, the occupant may provide an output
signal to the OCS that is different from the occu-
pant’s properly seated weight input. This may
result in serious injury or death in a collision.
•Always wear your seat belt and sit properly, with
the seatback in an upright position, your back
against the seatback, sitting upright, facing for-
ward, in the center of the seat, with your feet
comfortably on or near the floor.
•Do not carry or hold any objects (e.g., backpacks,
boxes, etc.) while seated in the front passenger seat.
Holding an object may provide an output signal to
the OCS that is different than the occupant’s prop-
erly seated weight input, which may result in
serious injury or death in a collision.
(Continued)
WARNING!(Continued)
•Placing an object on the floor under the front
passenger seat may prevent the OCS from working
properly, which may result in serious injury or
death in a collision. Do not place any objects on the
floor under the front passenger seat.
The Air Bag Warning Lightin the instrument panel
will turn on whenever the OCS is unable to classify the
front passenger seat status. A malfunction in the OCS
may affect the operation of the air bag system.
If the Air Bag Warning Lightdoes not come on, or
stays on after you start the vehicle, or it comes on as
you drive, take the vehicle to an authorized dealer for
service immediately.
The passenger seat assembly contains critical OCS com-
ponents that may affect the Passenger Advanced Front
Air Bag inflation. In order for the OCS to properly
2
THINGS TO KNOW BEFORE STARTING YOUR VEHICLE 75
Page 116 of 664
WARNING!(Continued)
•Always make sure that objects cannot fall into the
driver footwell while the vehicle is moving. Ob-
jects can become trapped under the brake pedal
and accelerator pedal causing a loss of vehicle
control.
•If required, mounting posts must be properly in-
stalled, if not equipped from the factory.
Failure to properly follow floor mat installation or
mounting can cause interference with the brake
pedal and accelerator pedal operation causing loss of
control of the vehicle.
Periodic Safety Checks You Should Make Outside
The Vehicle
Tires
Examine tires for excessive tread wear and uneven wear
patterns. Check for stones, nails, glass, or other objects
lodged in the tread or sidewall. Inspect the tread for cuts
and cracks. Inspect sidewalls for cuts, cracks and bulges.
Check the wheel nuts for tightness. Check the tires
(including spare) for proper cold inflation pressure.
Lights
Have someone observe the operation of brake lights and
exterior lights while you work the controls. Check turn
signal and high beam indicator lights on the instrument
panel.
Door Latches
Check for positive closing, latching, and locking.
Fluid Leaks
Check area under vehicle after overnight parking for fuel,
engine coolant, oil, or other fluid leaks. Also, if gasoline
fumes are detected or if fuel, power steering fluid (if
equipped), or brake fluid leaks are suspected, the cause
should be located and corrected immediately.
11 4 T H I N G S TO K N O W B E F O R E S TA R T I N G Y O U R V E H I C L E
Page 117 of 664
UNDERSTANDING THE FEATURES OF YOUR VEHICLE
CONTENTS
!MIRRORS............................121
▫Inside Day/Night Mirror — If Equipped . . . .121
▫Automatic Dimming Mirror — If Equipped . . .122
▫Outside Mirrors......................122
▫Outside Mirrors Folding Feature —
If Equipped.........................123
▫Outside Mirrors With Turn Signal And Approach
Lighting — If Equipped.................123
▫Power Mirrors.......................124
▫Heated Mirrors — If Equipped...........124
▫Illuminated Vanity Mirrors — If Equipped . . .125
!BLIND SPOT MONITORING (BSM) — IF
EQUIPPED...........................125
▫Rear Cross Path.......................132
▫Modes Of Operation...................133
▫General Information....................135
!Uconnect® PHONE (Uconnect® 200).........135
▫Operation...........................137
▫Phone Call Features....................145
▫Uconnect® Phone Features..............148
3
Page 119 of 664
▫Head Restraints......................230
▫Folding Rear Seat.....................232
!TO OPEN AND CLOSE THE HOOD.........234
!LIGHTS.............................236
▫Headlight Switch.....................236
▫Automatic Headlights — If Equipped.......237
▫Headlights On With Wipers (Available With
Automatic Headlights Only).............238
▫Headlight Time Delay..................238
▫Automatic High Beam Headlamp Control —
If Equipped.........................239
▫Daytime Running Lights (DRL)...........240
▫Lights-On Reminder...................240
▫Fog Lights — If Equipped...............241
▫Multifunction Lever...................242
▫Turn Signals.........................242
▫Lane Change Assist...................243
▫High/Low Beam Switch................243
▫Flash-To-Pass........................243
▫Front Map/Reading Lights..............243
▫Interior Lights.......................244
!WINDSHIELD WIPERS AND WASHERS......246
▫Intermittent Wiper System...............247
▫Wiper Operation......................247
▫Mist Feature.........................248
▫Windshield Washers...................248
3
UNDERSTANDING THE FEATURES OF YOUR VEHICLE 117
Page 125 of 664
WARNING!
Vehicles and other objects seen in the passenger side
convex mirror will look smaller and farther away
than they really are. Relying too much on your
passenger side convex mirror could cause you to
collide with another vehicle or other object. Use your
inside mirror when judging the size or distance of a
vehicle seen in the passenger side convex mirror.
Outside Mirrors Folding Feature — If Equipped
Some models have outside mirrors that are hinged. The
hinge allows the mirror to pivot forward and rearward to
resist damage. The hinge has three detent positions: full
forward, full rearward and normal.
Outside Mirrors With Turn Signal And Approach
Lighting — If Equipped
Driver and passenger outside mirrors with turn signal
and puddle lamp contain three LEDs.
Two of the LED’s are used as turn signal indicators,
which flash with the corresponding turn signal lights in
the front and rear of the vehicle. Turning on the Hazard
Warning flashers will also activate these LEDs.
The third LED supplies illuminated entry lighting, which
turns on in both mirrors when you use the Remote
Keyless Entry (RKE) transmitter or open any door. This
LED shines downward to illuminate the ground adjacent
to the Front and Rear Doors.
The Illuminated Entry lighting fades to off after about 30
seconds or it will fade to off immediately once the
ignition is placed into the RUN position.
3
UNDERSTANDING THE FEATURES OF YOUR VEHICLE 123
Page 134 of 664
WARNING!(Continued)
system is not designed to detect pedestrians, bicy-
clists, or animals. Even if your vehicle is equipped
with the BSM system, always check your vehicle’s
mirrors, glance over your shoulder, and use your turn
signal before changing lanes. Failure to do so can
result in serious injury or death.
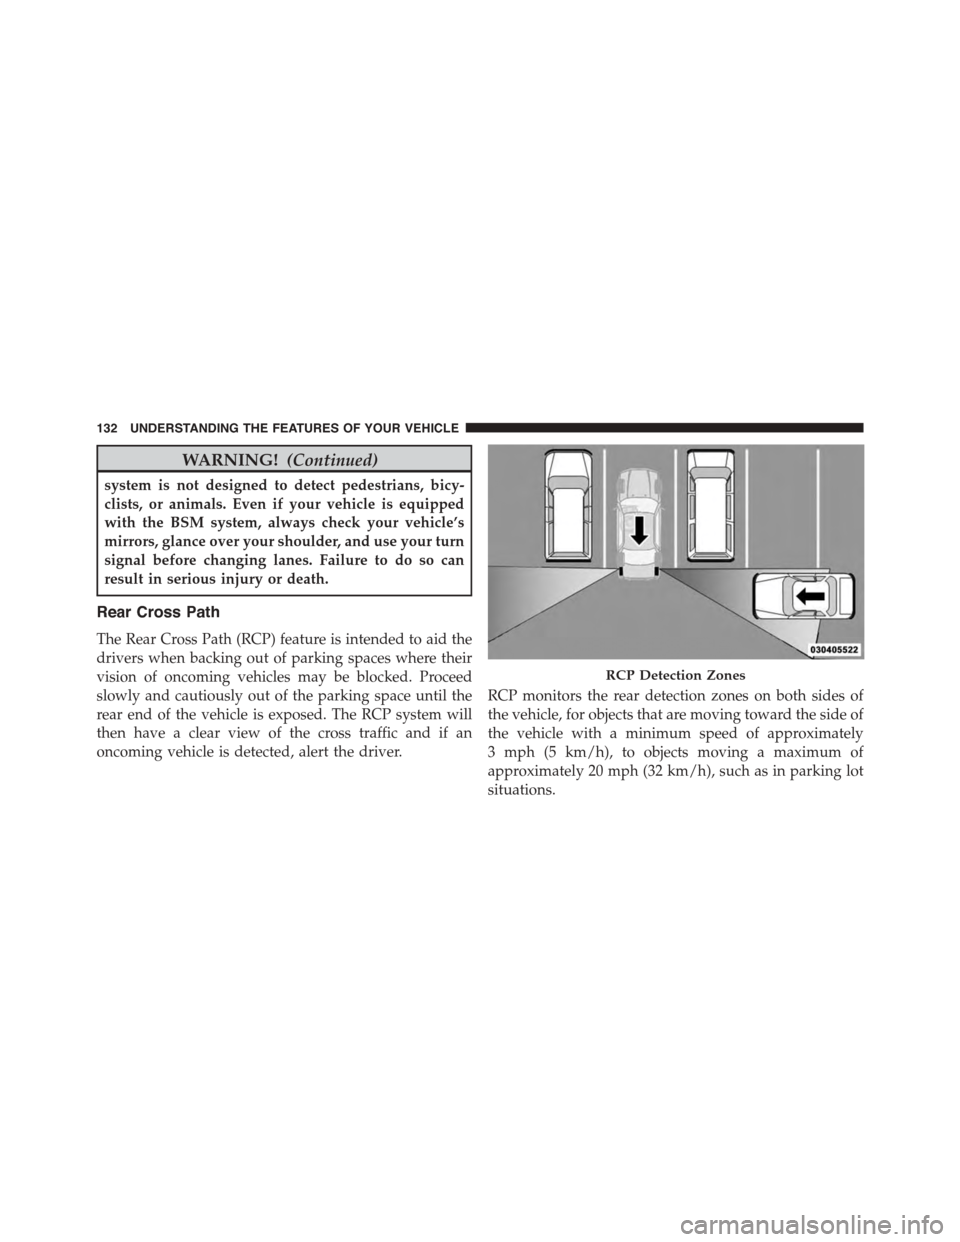
Rear Cross Path
The Rear Cross Path (RCP) feature is intended to aid the
drivers when backing out of parking spaces where their
vision of oncoming vehicles may be blocked. Proceed
slowly and cautiously out of the parking space until the
rear end of the vehicle is exposed. The RCP system will
then have a clear view of the cross traffic and if an
oncoming vehicle is detected, alert the driver.
RCP monitors the rear detection zones on both sides of
the vehicle, for objects that are moving toward the side of
the vehicle with a minimum speed of approximately
3 mph (5 km/h), to objects moving a maximum of
approximately 20 mph (32 km/h), such as in parking lot
situations.
RCP Detection Zones
132 UNDERSTANDING THE FEATURES OF YOUR VEHICLE