display DODGE DART 2015 PF / 1.G Owner's Manual
[x] Cancel search | Manufacturer: DODGE, Model Year: 2015, Model line: DART, Model: DODGE DART 2015 PF / 1.GPages: 164, PDF Size: 25.19 MB
Page 56 of 164
Store Radio Presets
When you are receiving a station that you wish to commit to pushbutton memory, push and
hold the button (1–5) you wish to lock onto this station for three seconds.
Yo u m a y a d d a s e c o n d o r t h i r d s t a t i o n t o e a c h p u s h b u t t o n b y r e p e a t i n g t h e a b o v e
procedure with this exception: Push the “A–B–C” button to select the A, B or C mode.
Each button can be set for up to three stations in both AM and FM. This allows a total of
15 AM, 15 FM and 15 SXM stations to be stored into push-button memory.
INFO Button
Push the INFO button for an RDS station (one with call letters displayed). The radio will
return a Radio Text message broadcast from an FM station (FM mode only).
Player Button
Pushing the “Player” button will allow you to switch from AM/FM/SXM modes to Player
mode (AUX/CD/Bluetooth®Steaming (BT)/USB).
MENU Button
Pushing the MENU button allows you to scroll between the setting sub-menus. Once the
desired sub-menu setting is highlighted push the TUNE/SCROLL knob to select the
setting. The following items are selectable:
Radio Mode
•Audio—SelectingtheAudiosub-menuwillallowyoutoadjusttheBass,MidRange,
Tr e b l e , B a l a n c e o r F a d e , j u s t l i k e p u s h i n g t h e A U D I O h a r d c o n t r o l . I f t h e B A C K b u t t o n
is pushed the radio will return to the Main Menu.
•Clock—SelectingClockwillallowyoutosettheclock.Adjustthehoursbyturningthe
TUNE/SCROLL control knob. After adjusting the hours, push the ENTER/BROWSE
button to set the minutes. The minutes will highlight. Adjust the minutes using the
right side TUNE/SCROLL control knob. Press the ENTER/BROWSE button to save time
change.
Player Mode
•Player Browse—SelectingPlayerBrowsewillgototheappropriatebrowsemenu
depending on the device currently playing (will function the same as pushing the
browse button while in that mode). This will only appear in the menu if the device
currently playing can support these features.
•Shuffle (SHFL)—Thisfunctionshuffles(randomizestheorderofthefiles).Thiswill
only appear in the menu if the device currently playing can support these features.
•Repeat (RPT)—WhenRepeatisactivated,thecurrentlyplayingsongwillbeginagain
when it ends. It will continue to cycle through the same song until repeat is turned Off.
Repeat will be turned off once one for the following conditions are met: 1) The source
is ejected 2) A different track list within that source is initiated 3) The REPEAT button
is toggled OFF. This will only appear in the menu if the device currently playing can
support these features.
ELECTRONICS
54
Page 57 of 164
•Audio—SelectingtheAudiosub-menuwillallowyoutoadjusttheBass,MidRange,
Tr e b l e , B a l a n c e o r F a d e , j u s t l i k e p u s h i n g t h e A U D I O h a r d c o n t r o l . I f t h e B A C K b u t t o n
is pushed the radio will return to the Main Menu.
•Clock—SelectingClockwillallowyoutosettheclock.Adjustthehoursbyturningthe
right-side TUNE/SCROLL control knob. After adjusting the hours, push the ENTER/
BROWSE button to set the minutes. The minutes will highlight. Adjust the minutes
using the right side TUNE/SCROLL control knob. Push the ENTER/BROWSE button to
save time change.
System Info
Selecting System Info will display the software version, serial number and SIRIUS ID.
SiriusXM Satellite Radio
SiriusXM Satellite Radio gives you over 130 channels, including 100% commercial-free
music from nearly every genre, plus all your favorite sports, news, talk and entertainment
channels–all with crystal clear, coast-to-coast coverage, all in one place and all at your
fingertips.
To a c c e s s S i r i u s X M S a t e l l i t e R a d i o , p u s h t h e R A D I O b u t t o n .
•If you decide to continue your service at the end of your trial subscription, the plan you
choose will automatically renew and bill at then-current rates until you call SiriusXM
at 1-866-635-2349 to cancel. Canadian residents call 1-888-539-7474.See
SiriusXM Customer Agreement for complete terms at www.siriusxm.com. For Canadian
residents www.siriusxm.ca. All fees and programming subject to change. Our satellite
service is available only to those at least 18 and older in the 48 contiguous USA and
D.C. Our Sirius satellite service is also available in PR (with coverage limitations). Our
Internet radio service is available throughout our satellite service area and in AK and HI.
©2014SiriusXMRadioInc.Sirius,XMandallrelatedmarksandlogosaretrademarks
of Sirius XM Radio Inc.
CD/DISC Operation — If Equipped
This radio is capable of playing compact discs (CD), recordable compact discs (CD-R),
rewritable compact discs (CD-RW), compact discs with MP3 tracks and multisession
compact discs with CD, MP3 and WMA tracks.
Seek Up/Down Buttons
•PushtoseekthroughCDtracks.
•Holdeitherbuttontobypasstrackswithoutstopping.
ELECTRONICS
55
Page 58 of 164
Audio Jack Operation
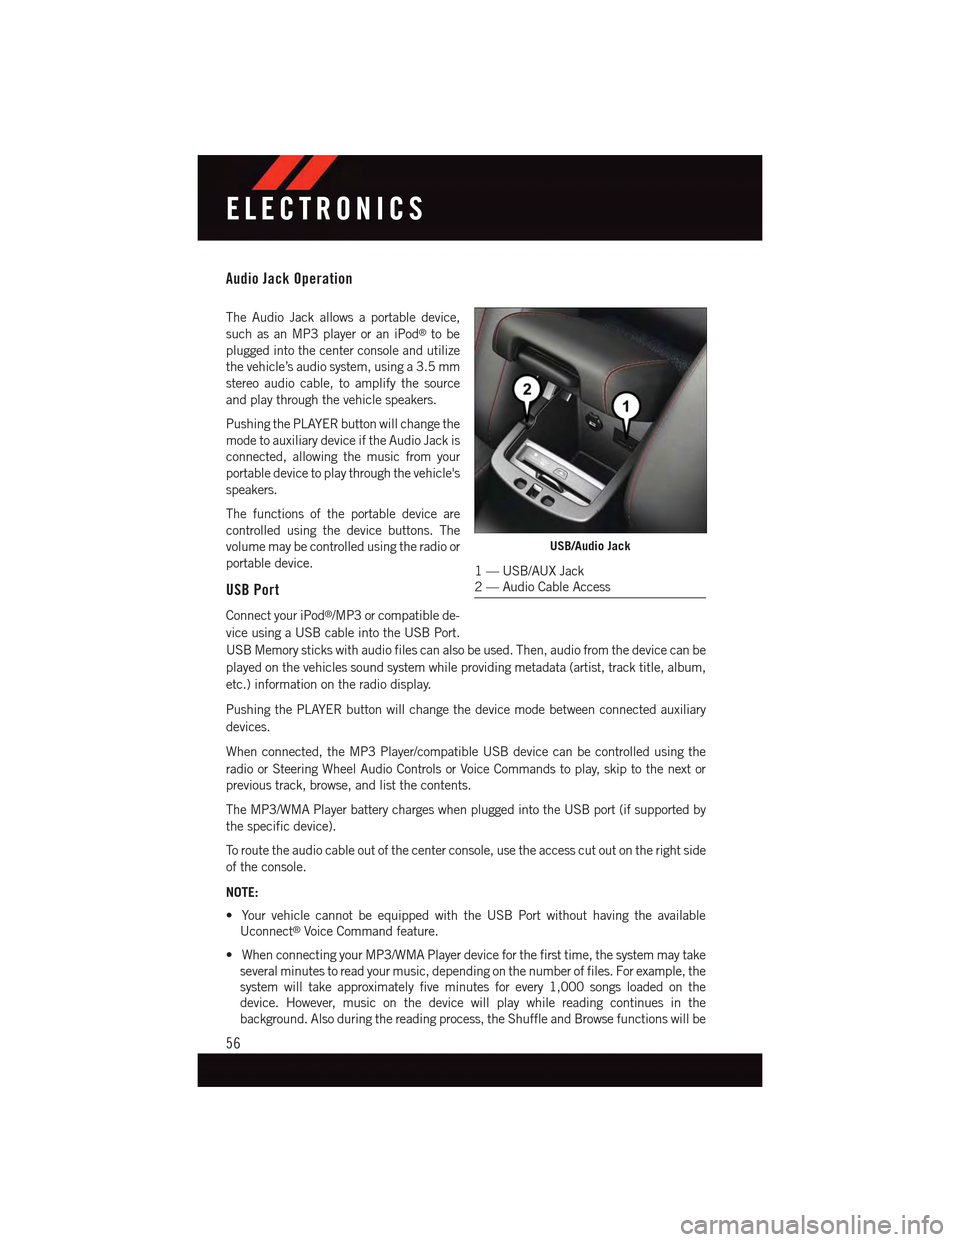
The Audio Jack allows a portable device,
such as an MP3 player or an iPod®to be
plugged into the center console and utilize
the vehicle’s audio system, using a 3.5 mm
stereo audio cable, to amplify the source
and play through the vehicle speakers.
Pushing the PLAYER button will change the
mode to auxiliary device if the Audio Jack is
connected, allowing the music from your
portable device to play through the vehicle's
speakers.
The functions of the portable device are
controlled using the device buttons. The
volume may be controlled using the radio or
portable device.
USB Port
Connect your iPod®/MP3 or compatible de-
vice using a USB cable into the USB Port.
USB Memory sticks with audio files can also be used. Then, audio from the device can be
played on the vehicles sound system while providing metadata (artist, track title, album,
etc.) information on the radio display.
Pushing the PLAYER button will change the device mode between connected auxiliary
devices.
When connected, the MP3 Player/compatible USB device can be controlled using the
radio or Steering Wheel Audio Controls or Voice Commands to play, skip to the next or
previous track, browse, and list the contents.
The MP3/WMA Player battery charges when plugged into the USB port (if supported by
the specific device).
To r o u t e t h e a u d i o c a b l e o u t o f t h e c e n t e r c o n s o l e , u s e t h e a c c e s s c u t o u t o n t h e r i g h t s i d e
of the console.
NOTE:
•YourvehiclecannotbeequippedwiththeUSBPortwithouthavingtheavailable
Uconnect®Voice Command feature.
•WhenconnectingyourMP3/WMAPlayerdeviceforthefirsttime,thesystemmaytake
several minutes to read your music, depending on the number of files. For example, the
system will take approximately five minutes for every 1,000 songs loaded on the
device. However, music on the device will play while reading continues in the
background. Also during the reading process, the Shuffle and Browse functions will be
USB/Audio Jack
1—USB/AUXJack2—AudioCableAccess
ELECTRONICS
56
Page 60 of 164
NOTE:
For assistance in pairing your phone, contact Uconnect®customer support at
1-877-855-8400 or visit UconnectPhone.com for phone compatibility, pairing instruc-
tions and details. Canadian Residents: call 1-800-465-2001 (English) or
1-800-387-9983 (French) or visit UconnectPhone.com.
When your phone finds the system, select “Uconnect” as the paired device.
Complete The Pairing Procedure
When prompted on the phone, enter the 4-digit PIN number shown on the radio display.
If your phone asks you to accept a connection request from Uconnect®,select“Yes”.If
available, check the box telling it not to ask again – that way your phone will automatically
connect each time you start the vehicle.
Phonebook Download — Automatic Phonebook Transfer From Mobile Phone
If equipped and specifically supported by your phone, Uconnect®Phone automatically
downloads names (text names) and number entries from your mobile phone’s phonebook.
Specific Bluetooth®Phones with Phone Book Access Profile may support this feature.
See UconnectPhone.com for supported phones.
Automatic download and update, if supported, begins as soon as the Bluetooth®wireless
phone connection is made to the Uconnect®Phone, for example, after you start the
vehicle.
NOTE:
Yo u m a y b e a s k e d f o r p e r m i s s i o n t o i n i t i a t e t h e p h o n e b o o k d o w n l o a d .
•Amaximumof1,000entriesperphonewillbedownloadedandupdatedeverytimea
phone is connected to the Uconnect®Phone.
•Dependingonthemaximumnumberofentriesdownloaded,theremaybeashortdelay
before the latest downloaded names can be used. Until then, if available, the previously
downloaded phonebook is available for use.
•Onlythephonebookofthecurrentlyconnectedmobilephoneisaccessible.
•Onlythemobilephone’sphonebookisdownloaded.SIMcardphonebookisnotpartof
the Mobile phonebook.
•ThisdownloadedphonebookcannotbeeditedordeletedontheUconnect®Phone.
These can only be edited on the mobile phone. The changes are transferred and
updated to Uconnect®Phone on the next phone connection.
Making A Phone Call
•Pushthe“Phone”button.
•AftertheBEEP,say“dial”(or“call”aname).
ELECTRONICS
58
Page 65 of 164
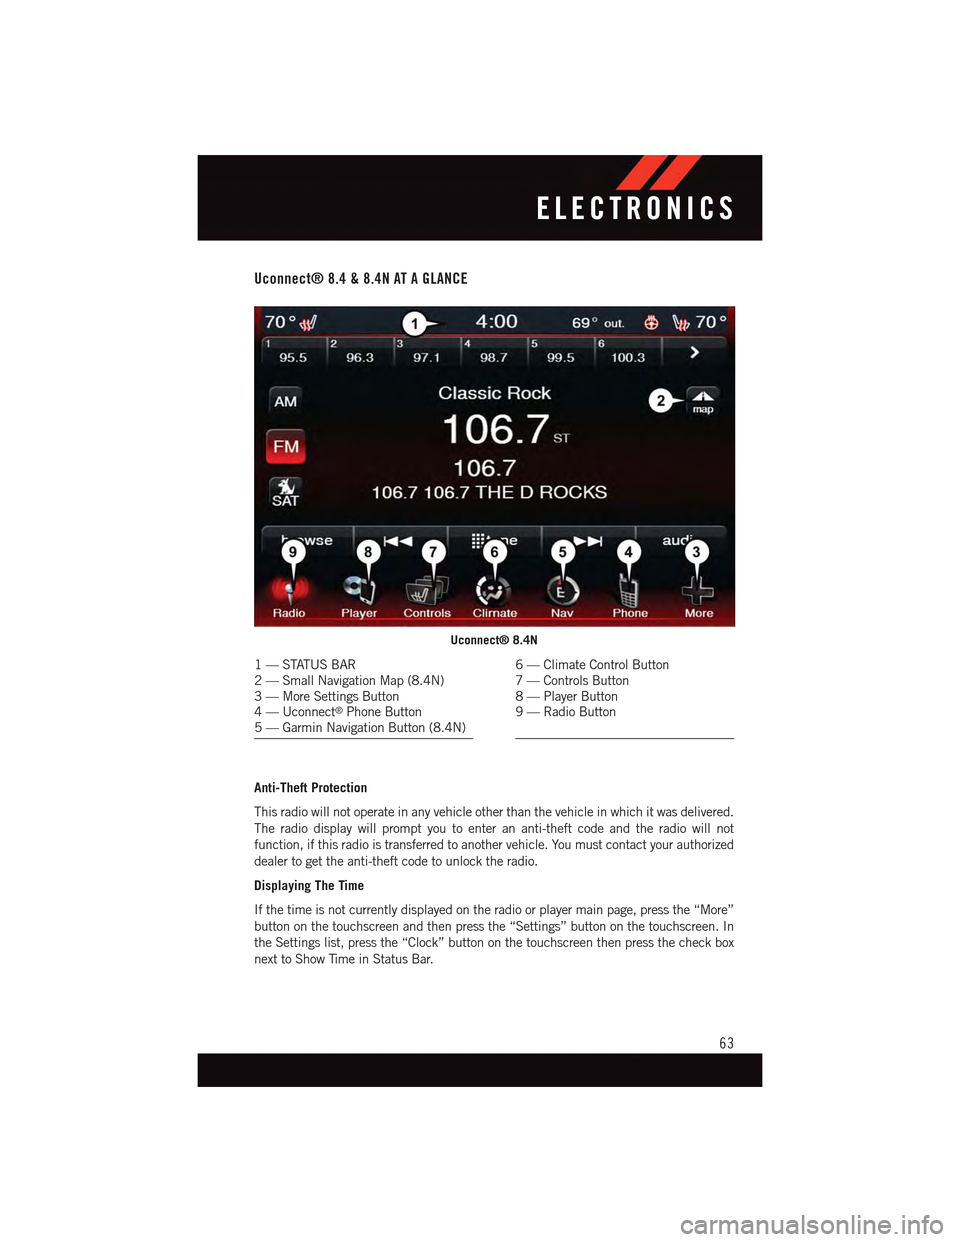
Uconnect® 8.4 & 8.4N AT A GLANCE
Anti-Theft Protection
This radio will not operate in any vehicle other than the vehicle in which it was delivered.
The radio display will prompt you to enter an anti-theft code and the radio will not
function, if this radio is transferred to another vehicle. You must contact your authorized
dealer to get the anti-theft code to unlock the radio.
Displaying The Time
If the time is not currently displayed on the radio or player main page, press the “More”
button on the touchscreen and then press the “Settings” button on the touchscreen. In
the Settings list, press the “Clock” button on the touchscreen then press the check box
next to Show Time in Status Bar.
Uconnect® 8.4N
1—STATUSBAR2—SmallNavigationMap(8.4N)3—MoreSettingsButton4—Uconnect®Phone Button5—GarminNavigationButton(8.4N)
6—ClimateControlButton7—ControlsButton8—PlayerButton9—RadioButton
ELECTRONICS
63
Page 66 of 164
Setting The Time
Model 8.4N synchronizes time automatically via GPS, so should not require any time
adjustment. If you do need to set the time manually, follow the instructions below for
Model 8.4.
For Model 8.4, turn the unit on, then press the “Time Display” at the top of the screen.
Press “Yes.”
If the time is not displayed at the top of the screen, press the “More” button on the
touchscreen and then the “Settings” button on the touchscreen. In the Settings screen,
press the “Clock” button on the touchscreen, then check or uncheck this option.
Press “+” or “–” next to Set Time Hours and Set Time Minutes to adjust the time.
If these features are not available, uncheck the Sync with GPS box.
Press “X” to save your settings and exit out of the Clock Setting screen.
Audio Settings
Press the “Audio” button on the touchscreen to activate the Audio settings screen to
adjust Balance\Fade, Equalizer and Speed Adjusted Volume.
Yo u c a n r e t u r n t o t h e R a d i o s c r e e n b y t o u c h i n g t h e “ X ” l o c a t e d a t t h e t o p r i g h t .
Balance/Fade
Press the “Balance/Fade” button on the touchscreen to Balance audio between the front
speakers or fade the audio between the rear and front speakers.
To u c h i n g t h e “ F r o n t , ” “ R e a r, ” “ L e f t ” o r “ R i g h t ” b u t t o n s o n t h e t o u c h s c r e e n o r p r e s s a n d
drag the red Speaker Icon to adjust the Balance/Fade.
Equalizer
Press the “Equalizer” button on the touchscreen to activate the Equalizer screen.
Press the “+” or “–” buttons on the touchscreen, or by touching and dragging over the
level bar for each of the equalizer bands. The level value, which spans between ±9, is
displayed at the bottom of each of the Bands.
Speed Adjusted Volume
Press the “Speed Adjusted Volume” button on the touchscreen to activate the Speed
Adjusted Volume screen. The Speed Adjusted Volume is adjusted by touching the “+” and
“–” buttons or by touching and dragging over the level bar. This alters the automatic
adjustment of the audio volume with variation to vehicle speed.
ELECTRONICS
64
Page 71 of 164
Replay Option Option Description
Play/Pause Touch to Pause content playback. Touch Pause/Play again to resumeplayback.
Rewind/RW Rewinds the channel content in steps of five seconds. Touch and hold torewind continuously, then release to begin playing content at that point.
FastForward/FWForwards the content, and works similarly to Rewind/RW. However, FastForward/FW can only be used when content has been previously rewound.
Replay Time Displays the amount of time in the upper center of the screen by whichyour content lags the Live channel.
Live Resumes playback of Live content at any time while replaying rewoundcontent.
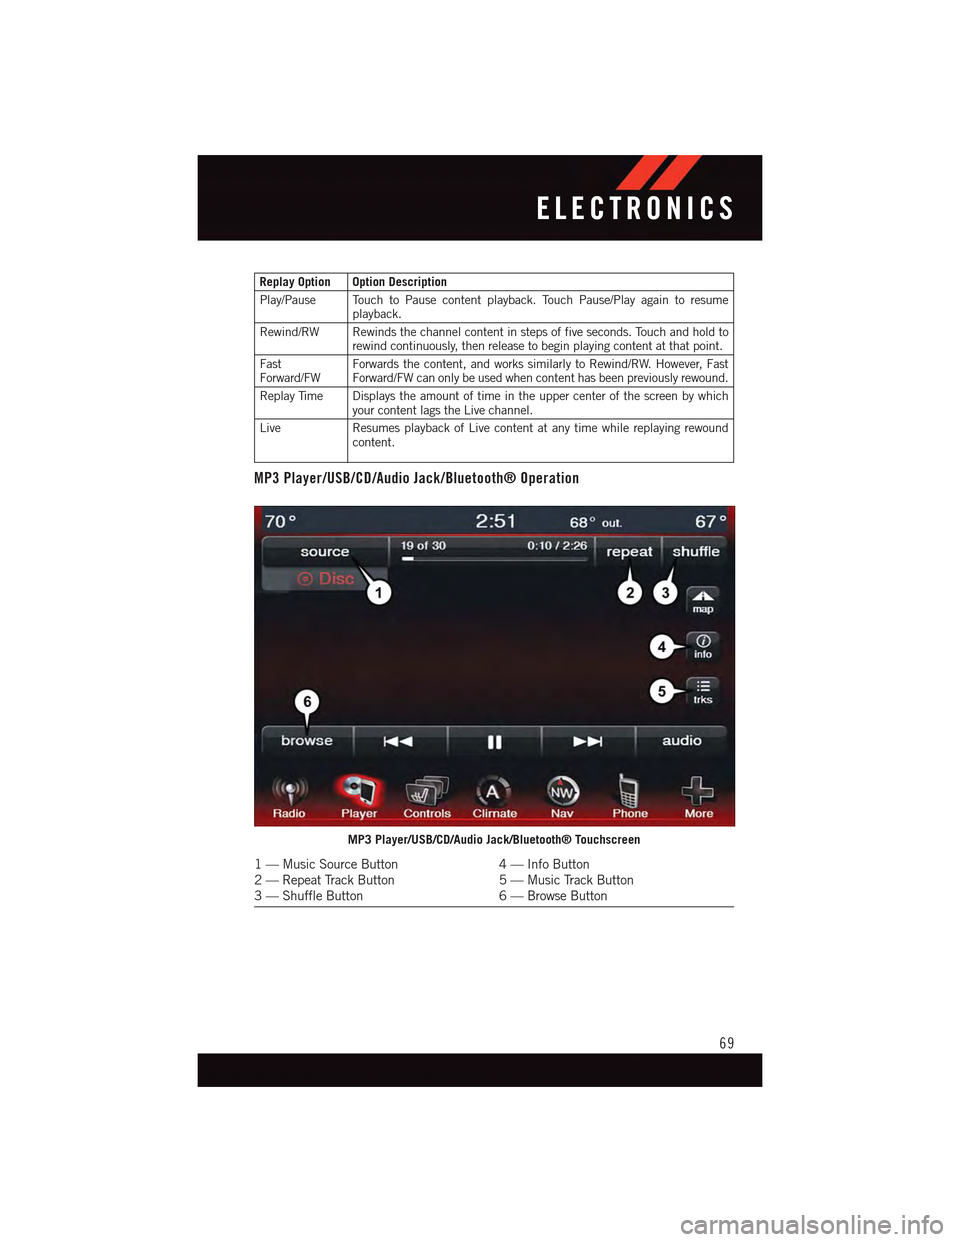
MP3 Player/USB/CD/Audio Jack/Bluetooth® Operation
MP3 Player/USB/CD/Audio Jack/Bluetooth® Touchscreen
1—MusicSourceButton4—InfoButton2—RepeatTrackButton5—MusicTrackButton3—ShuffleButton6—BrowseButton
ELECTRONICS
69
Page 72 of 164
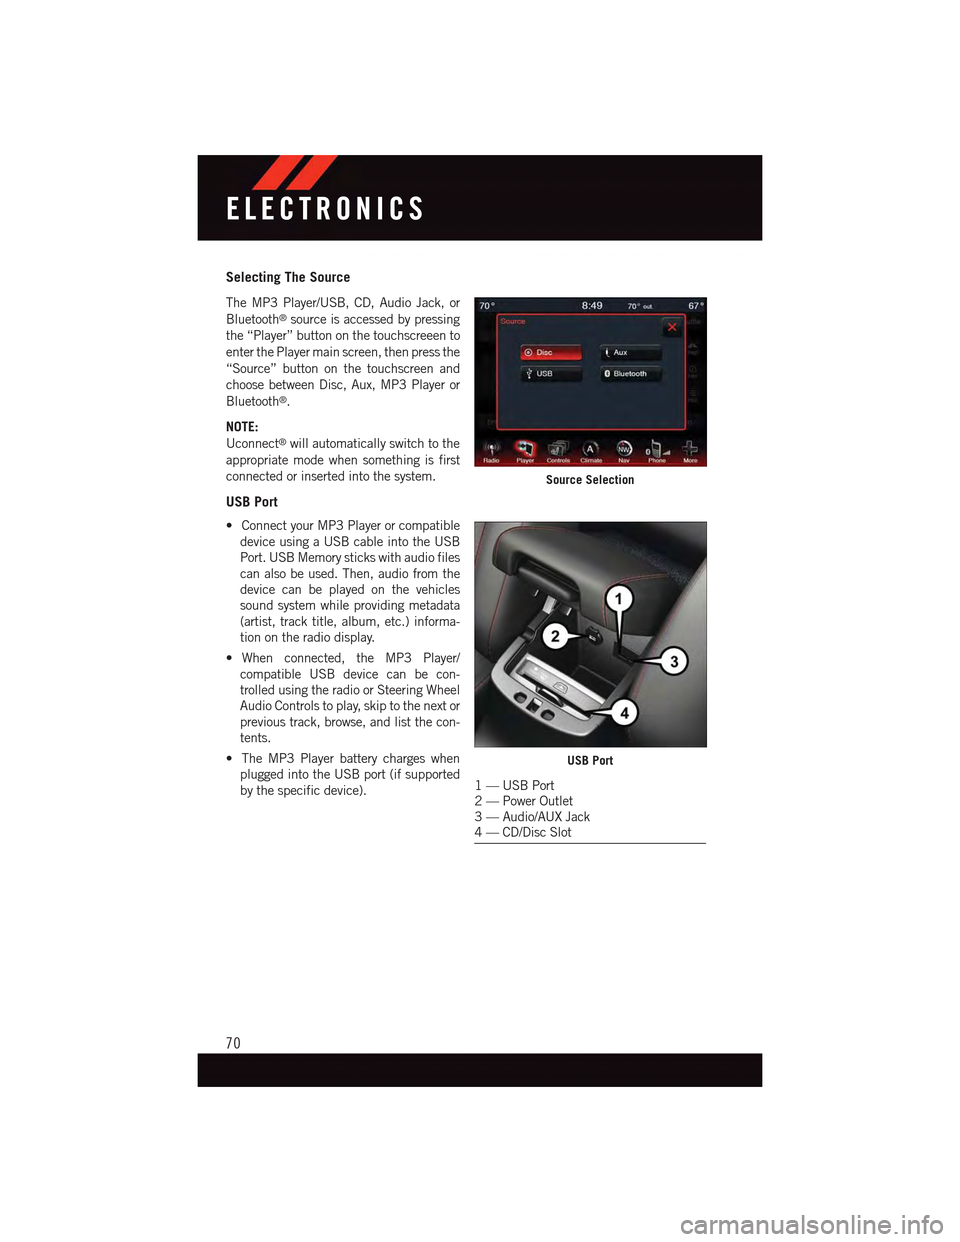
Selecting The Source
The MP3 Player/USB, CD, Audio Jack, or
Bluetooth®source is accessed by pressing
the “Player” button on the touchscreeen to
enter the Player main screen, then press the
“Source” button on the touchscreen and
choose between Disc, Aux, MP3 Player or
Bluetooth®.
NOTE:
Uconnect®will automatically switch to the
appropriate mode when something is first
connected or inserted into the system.
USB Port
•ConnectyourMP3Playerorcompatible
device using a USB cable into the USB
Port. USB Memory sticks with audio files
can also be used. Then, audio from the
device can be played on the vehicles
sound system while providing metadata
(artist, track title, album, etc.) informa-
tion on the radio display.
•When connected, the MP3 Player/
compatible USB device can be con-
trolled using the radio or Steering Wheel
Audio Controls to play, skip to the next or
previous track, browse, and list the con-
tents.
•TheMP3Playerbatterychargeswhen
plugged into the USB port (if supported
by the specific device).
Source Selection
USB Port
1—USBPort2—PowerOutlet3—Audio/AUXJack4—CD/DiscSlot
ELECTRONICS
70
Page 74 of 164
Remote CD/Disc Player — If Equipped
The CD/Disc Player is located inside the center console.
With the printed side facing the rear of the car, lift up the protective door and insert the
disc into the disc slot. The radio pulls the disc in automatically. The radio selects the
appropriate mode after the disc is recognized, and starts playing the first track.
The CD/Disc can also be selected by pressing the “Player” button on the touchscreen,
then press the “Source” button on the touchscreen and then press the “Disc” button on
the touchscreen.
NOTE:
•DependingontheCD/Discbeingused,youwillonlybeabletobrowsebyfolder.
•ThereareVoiceCommandsavailablewhileinthismode.RefertotheUconnect®Voice
Command section in this guide.
Bluetooth® Streaming Audio
•IfequippedwithUconnect®Voice Command, your Bluetooth-equipped MP3 Player
devices, cell phones or other media players, may also be able to stream music to your
vehicle's sound system. Your connected device must be Bluetooth-compatible, and
paired with your Uconnect®system (see Uconnect®Phone section or
www.UconnectPhone.com for pairing instructions). You can access the music from
your connected Bluetooth®device by touching the Source soft-key while in Player
mode.
Garmin® Navigation (8.4N Only)
Uconnect®8.4N integrates Garmin’s consumer-friendly navigation into your vehicle.
Garmin Navigation includes Lane Assist and Junction View, Speed Limit information, and
adatabasewithoversixmillionpointsofinterest.
Press the “Nav” button on the touchscreen in the menu bar to access the Navigation
system.
Changing The Navigation Voice Prompt Volume
1. Program a destination.
2. While traveling on your route, press the upper left area of the map screen where your
next turn is displayed.
3. The Navigation system will then repeat the distance to your next turn.
4. While the Navigation system is speaking, use the ON/OFF VOLUME rotary knob to
adjust the volume to a comfortable level. Please note the volume setting for Navigation
Voice Prompt is different than the audio system.
ELECTRONICS
72
Page 77 of 164
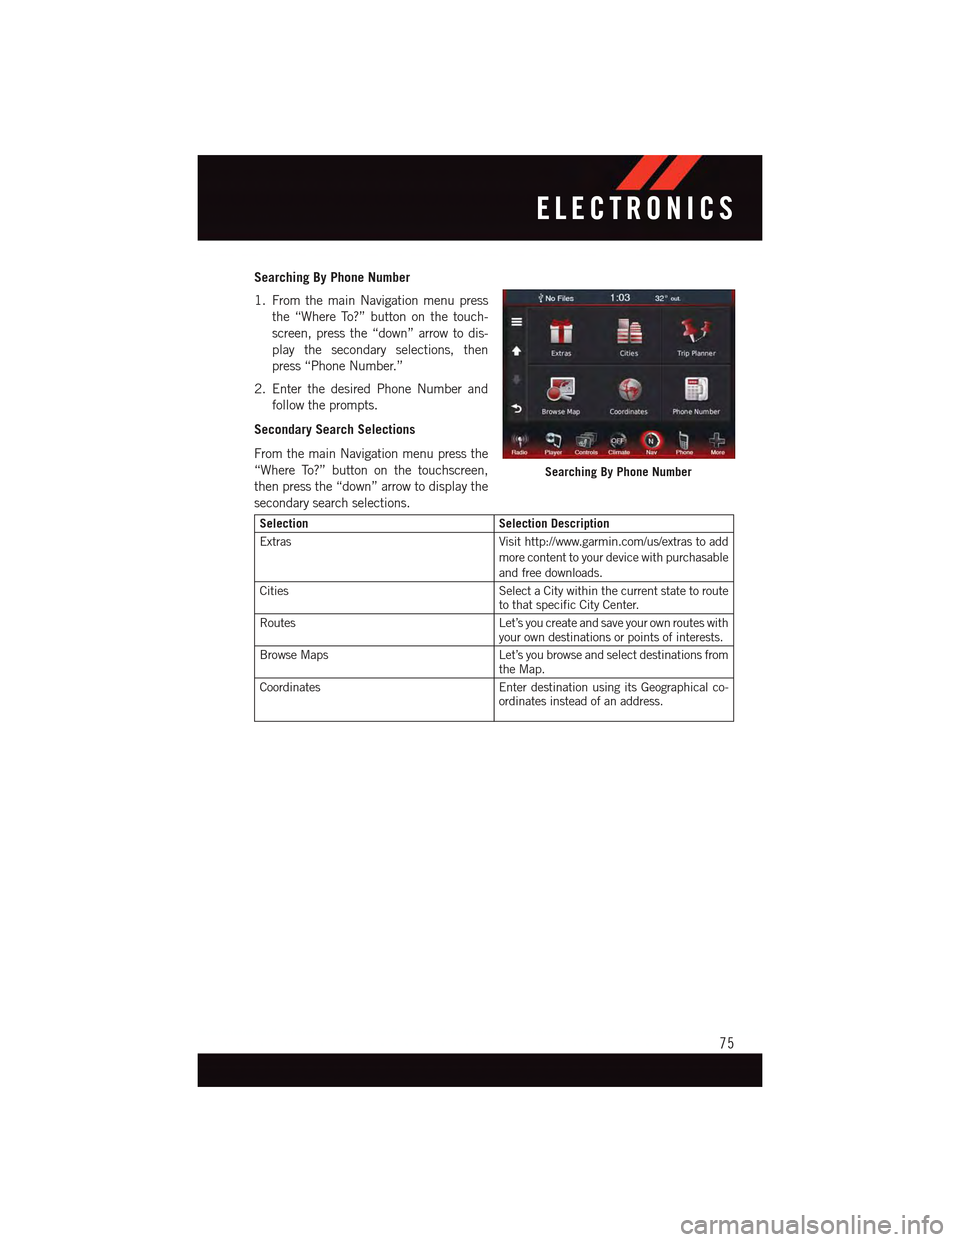
Searching By Phone Number
1. From the main Navigation menu press
the “Where To?” button on the touch-
screen, press the “down” arrow to dis-
play the secondary selections, then
press “Phone Number.”
2. Enter the desired Phone Number and
follow the prompts.
Secondary Search Selections
From the main Navigation menu press the
“Where To?” button on the touchscreen,
then press the “down” arrow to display the
secondary search selections.
SelectionSelection Description
ExtrasVisit http://www.garmin.com/us/extras to addmore content to your device with purchasableand free downloads.
CitiesSelect a City within the current state to routeto that specific City Center.
RoutesLet’s you create and save your own routes withyour own destinations or points of interests.
Browse MapsLet’s you browse and select destinations fromthe Map.
CoordinatesEnter destination using its Geographical co-ordinates instead of an address.
Searching By Phone Number
ELECTRONICS
75