DODGE DART 2016 PF / 1.G Owners Manual
Manufacturer: DODGE, Model Year: 2016, Model line: DART, Model: DODGE DART 2016 PF / 1.GPages: 671, PDF Size: 4.75 MB
Page 611 of 671
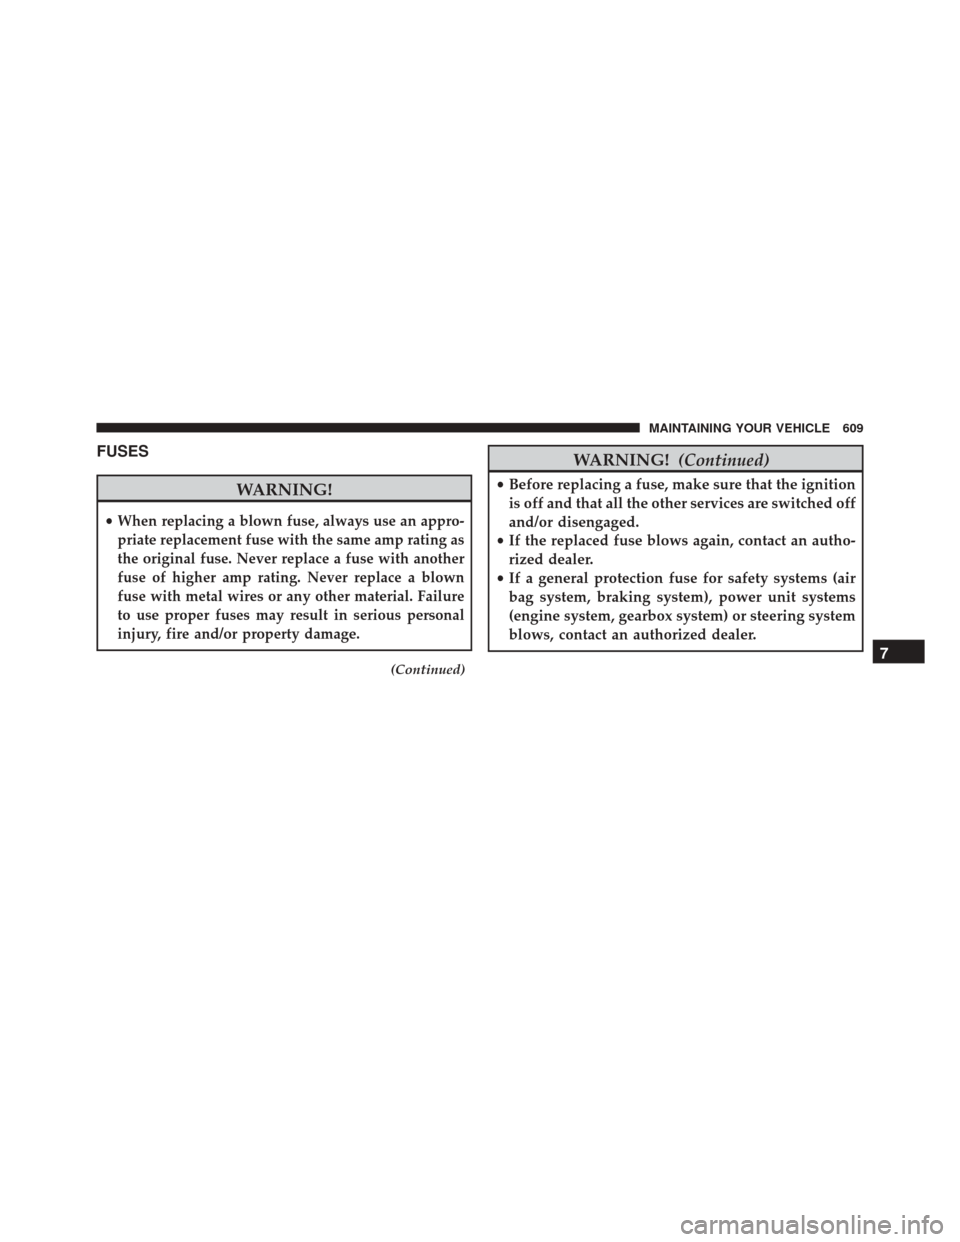
FUSES
WARNING!
•When replacing a blown fuse, always use an appro-
priate replacement fuse with the same amp rating as
the original fuse. Never replace a fuse with another
fuse of higher amp rating. Never replace a blown
fuse with metal wires or any other material. Failure
to use proper fuses may result in serious personal
injury, fire and/or property damage.
(Continued)
WARNING! (Continued)
•Before replacing a fuse, make sure that the ignition
is off and that all the other services are switched off
and/or disengaged.
• If the replaced fuse blows again, contact an autho-
rized dealer.
• If a general protection fuse for safety systems (air
bag system, braking system), power unit systems
(engine system, gearbox system) or steering system
blows, contact an authorized dealer.
7
MAINTAINING YOUR VEHICLE 609
Page 612 of 671
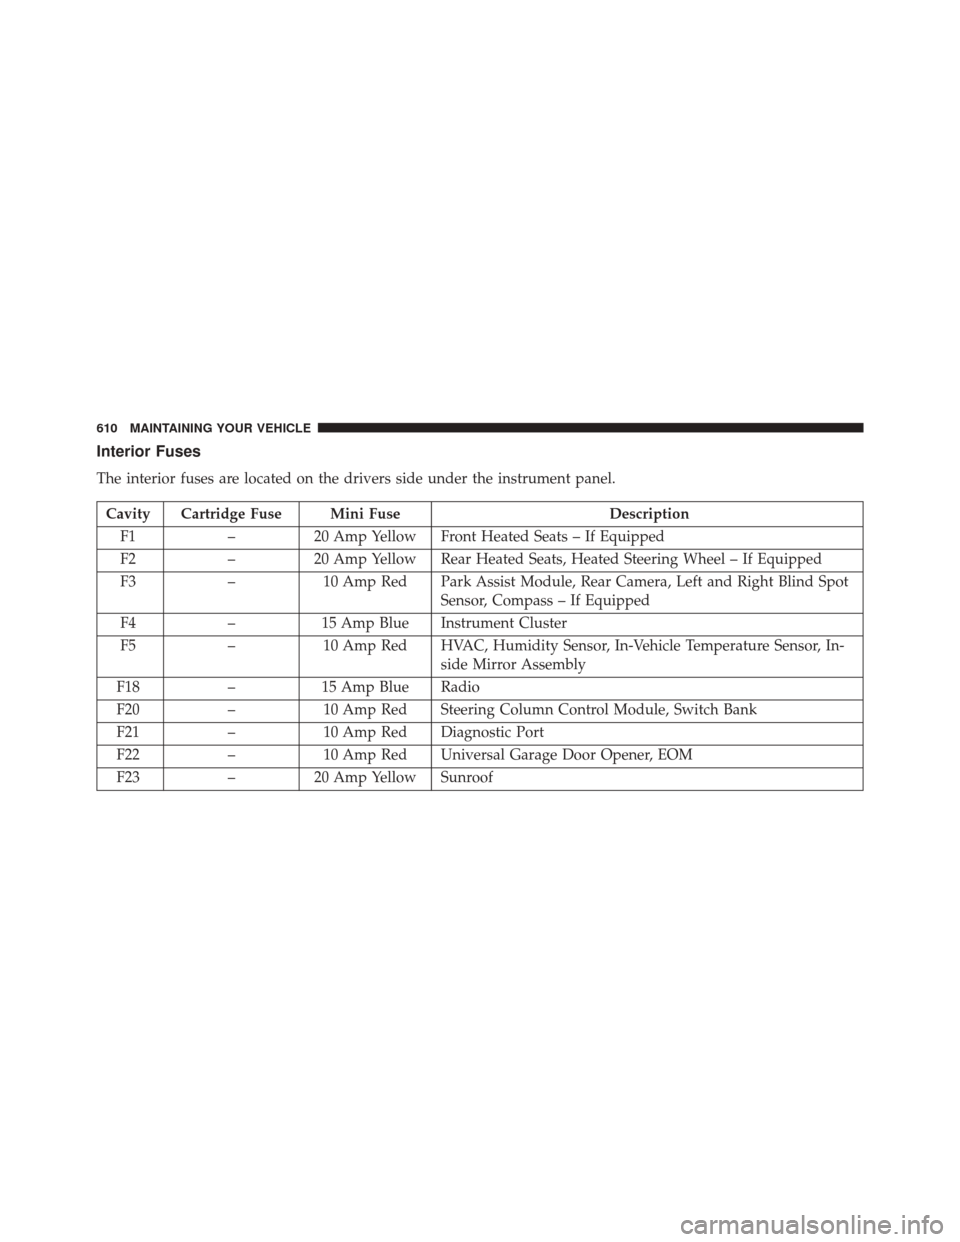
Interior Fuses
The interior fuses are located on the drivers side under the instrument panel.
Cavity Cartridge Fuse Mini FuseDescription
F1 –20 Amp Yellow Front Heated Seats – If Equipped
F2 –20 Amp Yellow Rear Heated Seats, Heated Steering Wheel – If Equipped
F3 –10 Amp Red Park Assist Module, Rear Camera, Left and Right Blind Spot
Sensor, Compass – If Equipped
F4 –15 Amp Blue Instrument Cluster
F5 –10 Amp Red HVAC, Humidity Sensor, In-Vehicle Temperature Sensor, In-
side Mirror Assembly
F18 –15 Amp Blue Radio
F20 –10 Amp Red Steering Column Control Module, Switch Bank
F21 –10 Amp Red Diagnostic Port
F22 –10 Amp Red Universal Garage Door Opener, EOM
F23 –20 Amp Yellow Sunroof
610 MAINTAINING YOUR VEHICLE
Page 613 of 671
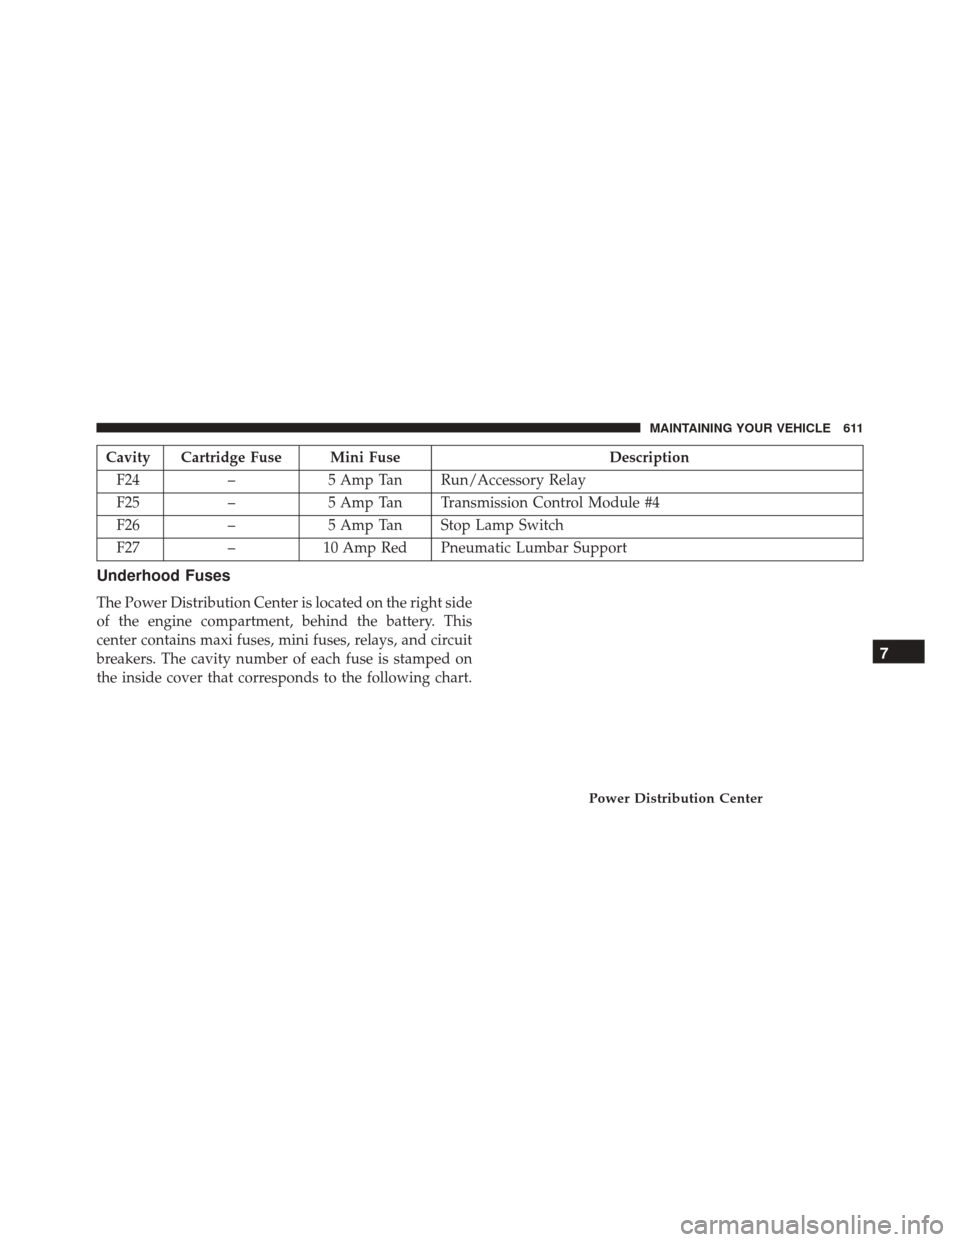
Cavity Cartridge Fuse Mini FuseDescription
F24 –5 Amp Tan Run/Accessory Relay
F25 –5 Amp Tan Transmission Control Module #4
F26 –5 Amp Tan Stop Lamp Switch
F27 –10 Amp Red Pneumatic Lumbar Support
Underhood Fuses
The Power Distribution Center is located on the right side
of the engine compartment, behind the battery. This
center contains maxi fuses, mini fuses, relays, and circuit
breakers. The cavity number of each fuse is stamped on
the inside cover that corresponds to the following chart.
Power Distribution Center
7
MAINTAINING YOUR VEHICLE 611
Page 614 of 671
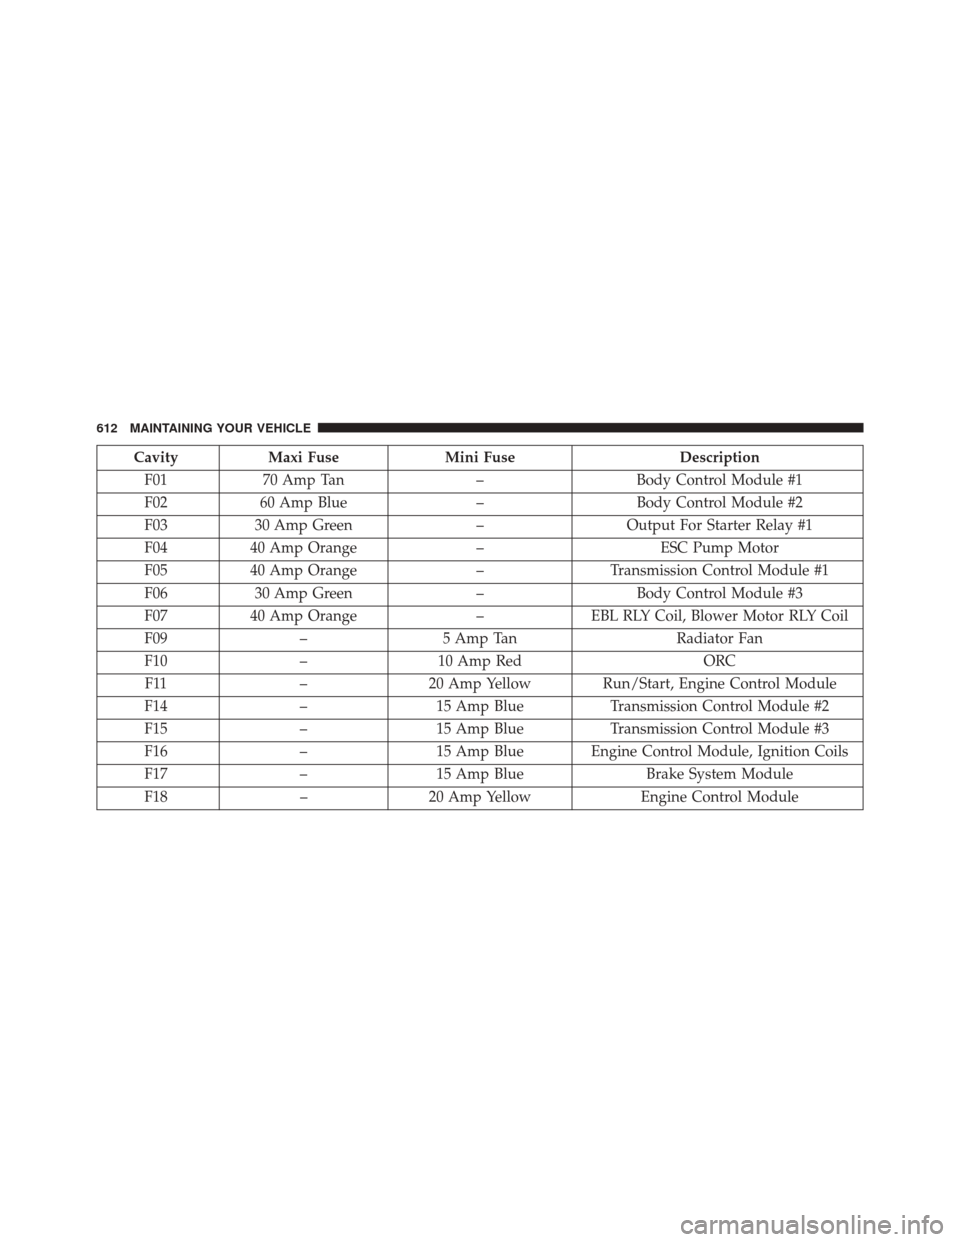
CavityMaxi Fuse Mini Fuse Description
F01 70 Amp Tan –Body Control Module #1
F02 60 Amp Blue –Body Control Module #2
F03 30 Amp Green –Output For Starter Relay #1
F04 40 Amp Orange –ESC Pump Motor
F05 40 Amp Orange –Transmission Control Module #1
F06 30 Amp Green –Body Control Module #3
F07 40 Amp Orange –EBL RLY Coil, Blower Motor RLY Coil
F09 –5 Amp Tan Radiator Fan
F10 –10 Amp Red ORC
F11 –20 Amp Yellow Run/Start, Engine Control Module
F14 –15 Amp Blue Transmission Control Module #2
F15 –15 Amp Blue Transmission Control Module #3
F16 –15 Amp Blue Engine Control Module, Ignition Coils
F17 –15 Amp Blue Brake System Module
F18 –20 Amp Yellow Engine Control Module
612 MAINTAINING YOUR VEHICLE
Page 615 of 671
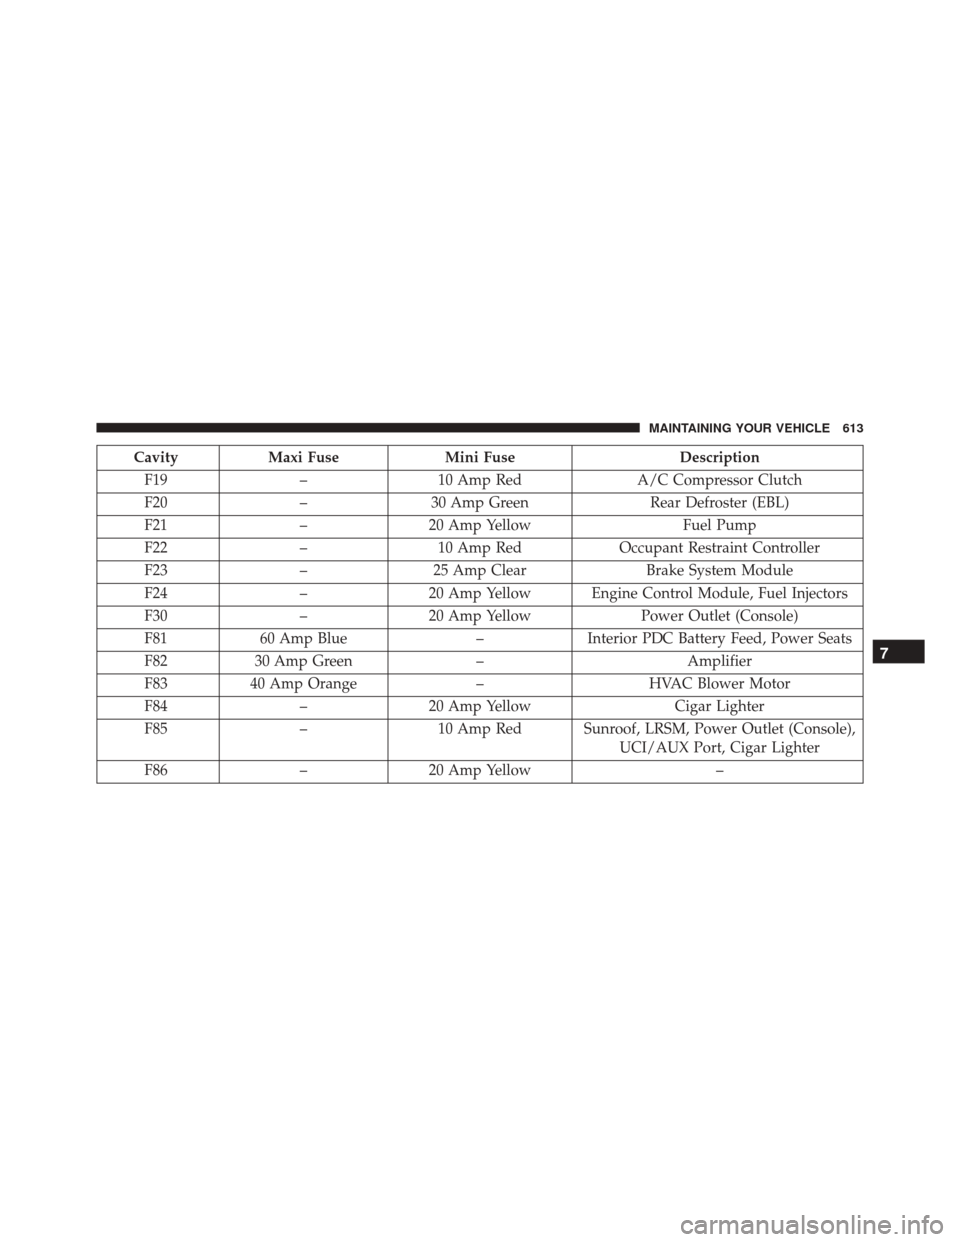
CavityMaxi Fuse Mini Fuse Description
F19 –10 Amp Red A/C Compressor Clutch
F20 –30 Amp Green Rear Defroster (EBL)
F21 –20 Amp Yellow Fuel Pump
F22 –10 Amp Red Occupant Restraint Controller
F23 –25 Amp Clear Brake System Module
F24 –20 Amp Yellow Engine Control Module, Fuel Injectors
F30 –20 Amp Yellow Power Outlet (Console)
F81 60 Amp Blue –Interior PDC Battery Feed, Power Seats
F82 30 Amp Green –Amplifier
F83 40 Amp Orange –HVAC Blower Motor
F84 –20 Amp Yellow Cigar Lighter
F85 –10 Amp Red Sunroof, LRSM, Power Outlet (Console),
UCI/AUX Port, Cigar Lighter
F86 –20 Amp Yellow –
7
MAINTAINING YOUR VEHICLE 613
Page 616 of 671
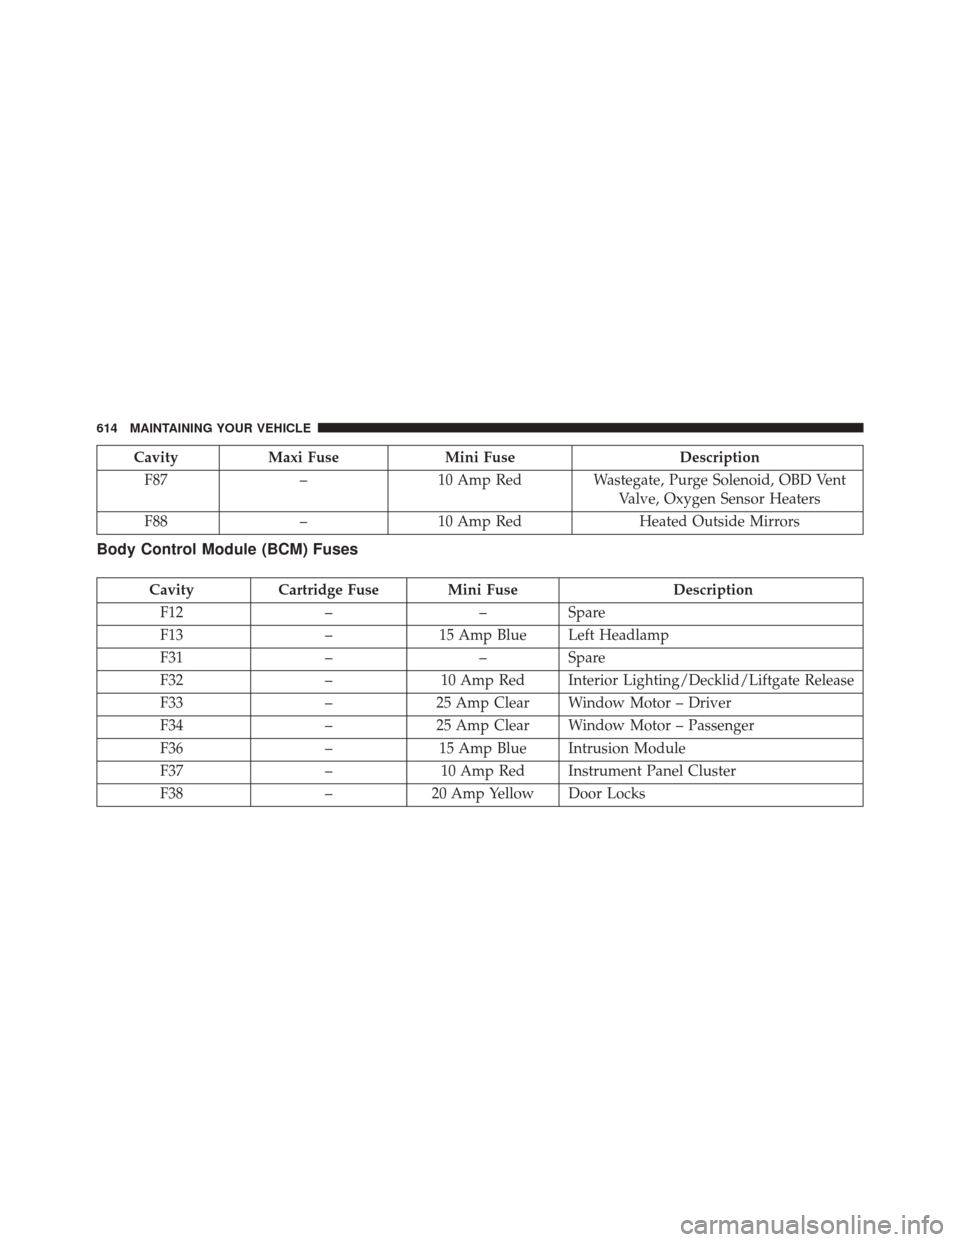
CavityMaxi Fuse Mini Fuse Description
F87 –10 Amp Red Wastegate, Purge Solenoid, OBD Vent
Valve, Oxygen Sensor Heaters
F88 –10 Amp Red Heated Outside Mirrors
Body Control Module (BCM) Fuses
CavityCartridge Fuse Mini Fuse Description
F12 ––Spare
F13 –15 Amp Blue Left Headlamp
F31 ––Spare
F32 –10 Amp Red Interior Lighting/Decklid/Liftgate Release
F33 –25 Amp Clear Window Motor – Driver
F34 –25 Amp Clear Window Motor – Passenger
F36 –15 Amp Blue Intrusion Module
F37 –10 Amp Red Instrument Panel Cluster
F38 –20 Amp Yellow Door Locks
614 MAINTAINING YOUR VEHICLE
Page 617 of 671
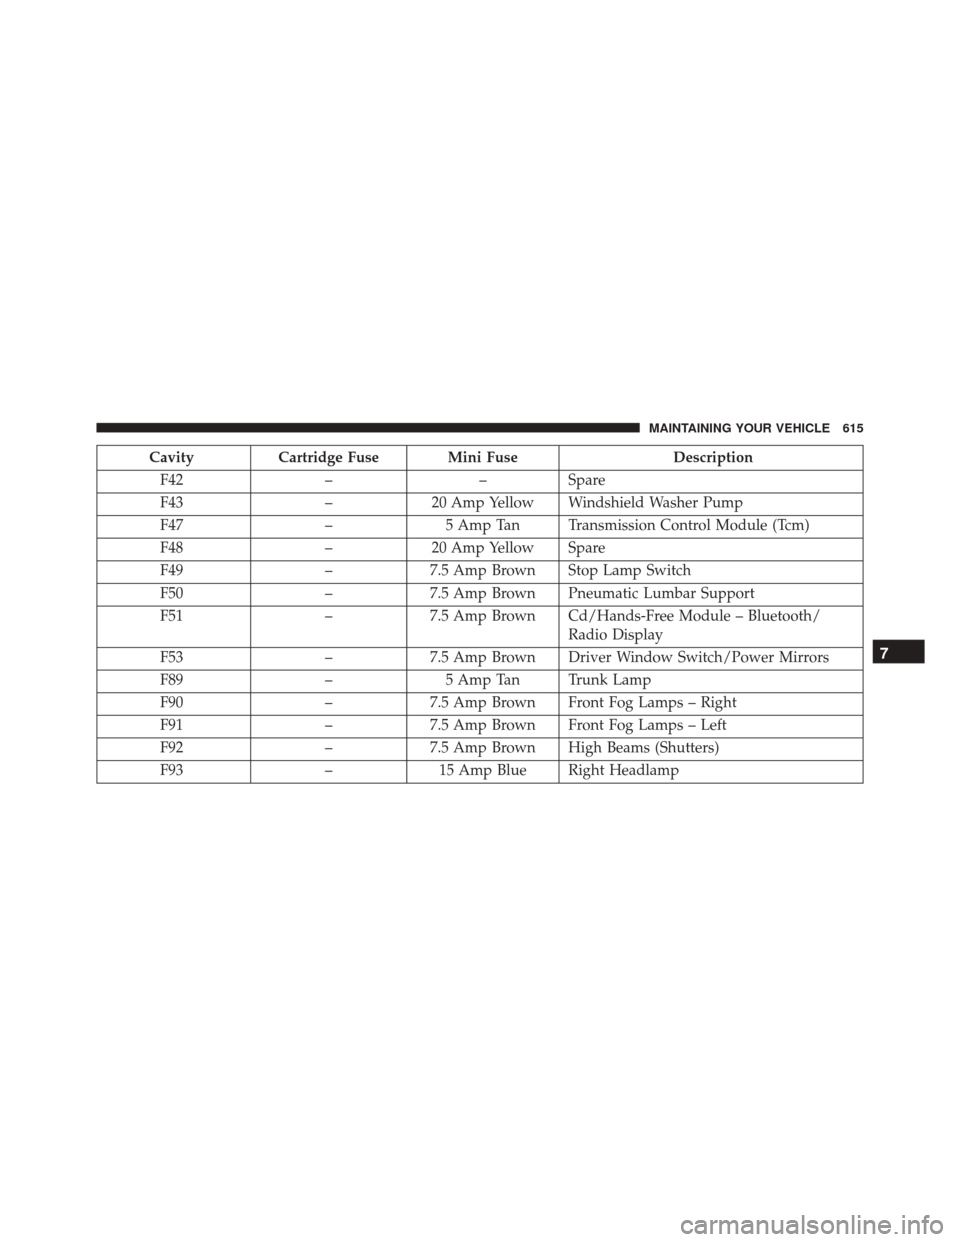
CavityCartridge Fuse Mini Fuse Description
F42 ––Spare
F43 –20 Amp Yellow Windshield Washer Pump
F47 –5 Amp Tan Transmission Control Module (Tcm)
F48 –20 Amp Yellow Spare
F49 –7.5 Amp Brown Stop Lamp Switch
F50 –7.5 Amp Brown Pneumatic Lumbar Support
F51 –7.5 Amp Brown Cd/Hands-Free Module – Bluetooth/
Radio Display
F53 –7.5 Amp Brown Driver Window Switch/Power Mirrors
F89 –5 Amp Tan Trunk Lamp
F90 –7.5 Amp Brown Front Fog Lamps – Right
F91 –7.5 Amp Brown Front Fog Lamps – Left
F92 –7.5 Amp Brown High Beams (Shutters)
F93 –15 Amp Blue Right Headlamp
7
MAINTAINING YOUR VEHICLE 615
Page 618 of 671
VEHICLE STORAGE
If you will not be using your vehicle for more than 21
days, you may want to take steps to preserve your
battery.
•Disconnect the negative cable from the battery.
• Anytime you store your vehicle, or keep it out of
service (i.e., vacation) for two weeks or more, run the
air conditioning system at idle for about five minutes in the fresh air and high blower setting. This will
ensure adequate system lubrication to minimize the
possibility of compressor damage when the system is
started again.
NOTE:
When the vehicle has not been started or driven
for at least 35 days, an Extended Park Start Procedure is
required to start the vehicle. Refer to “Starting Procedures”
in “Starting And Operating” for further information.
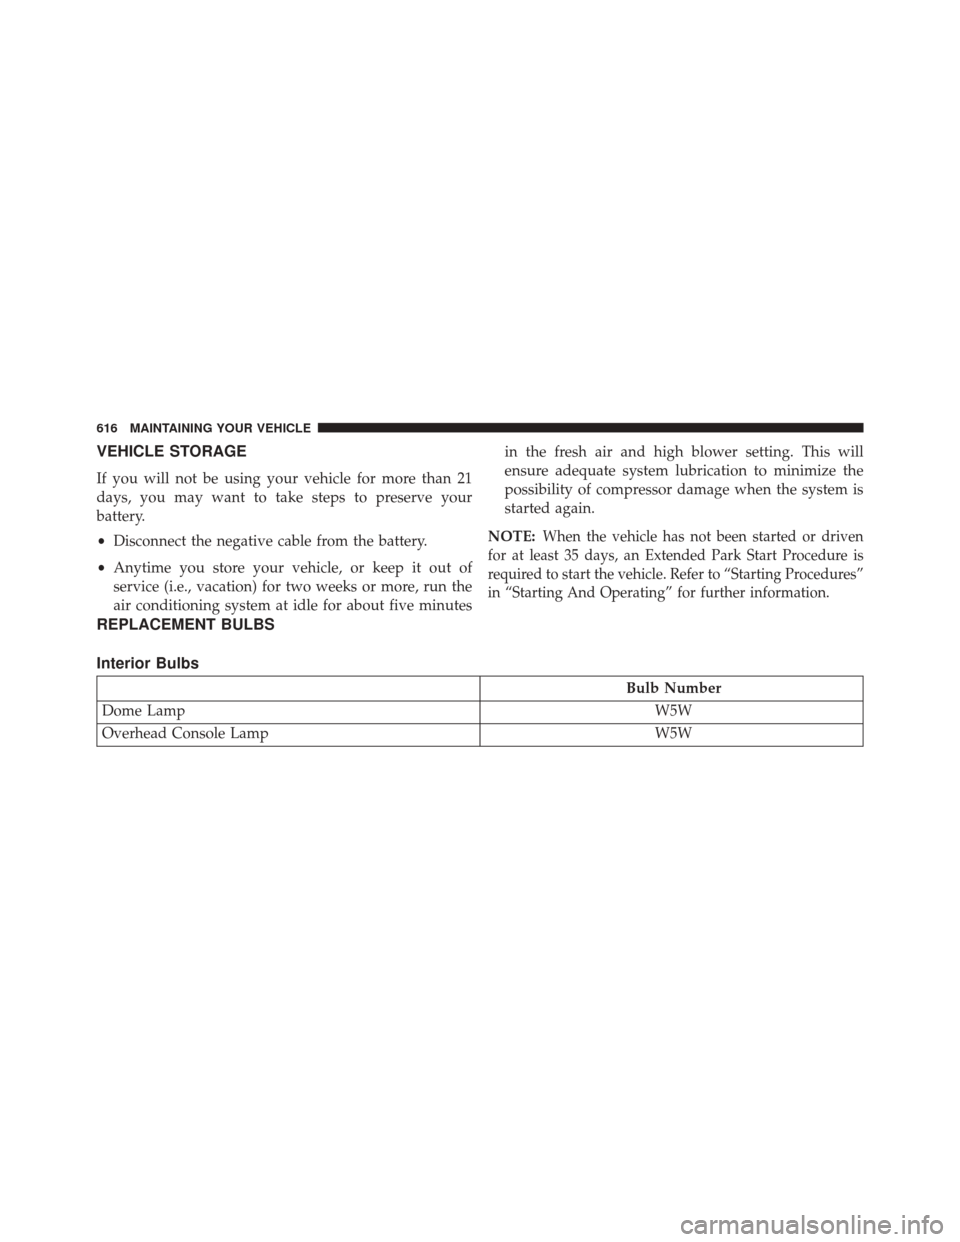
REPLACEMENT BULBS
Interior Bulbs
Bulb Number
Dome Lamp W5W
Overhead Console Lamp W5W
616 MAINTAINING YOUR VEHICLE
Page 619 of 671
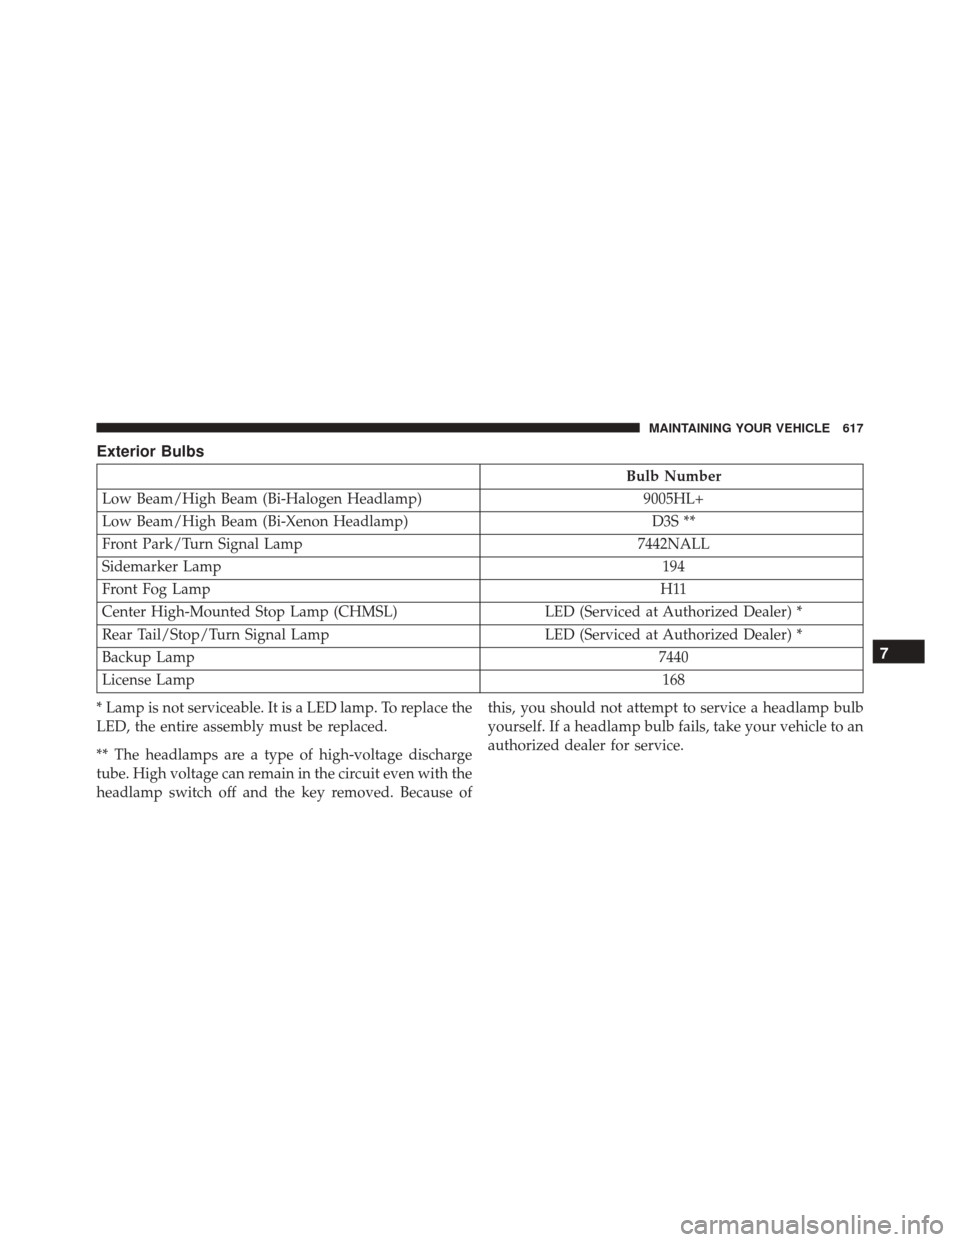
Exterior Bulbs
Bulb Number
Low Beam/High Beam (Bi-Halogen Headlamp) 9005HL+
Low Beam/High Beam (Bi-Xenon Headlamp) D3S **
Front Park/Turn Signal Lamp 7442NALL
Sidemarker Lamp 194
Front Fog Lamp H11
Center High-Mounted Stop Lamp (CHMSL) LED (Serviced at Authorized Dealer) *
Rear Tail/Stop/Turn Signal Lamp LED (Serviced at Authorized Dealer) *
Backup Lamp 7440
License Lamp 168
* Lamp is not serviceable. It is a LED lamp. To replace the
LED, the entire assembly must be replaced.
** The headlamps are a type of high-voltage discharge
tube. High voltage can remain in the circuit even with the
headlamp switch off and the key removed. Because of this, you should not attempt to service a headlamp bulb
yourself. If a headlamp bulb fails, take your vehicle to an
authorized dealer for service.
7
MAINTAINING YOUR VEHICLE 617
Page 620 of 671
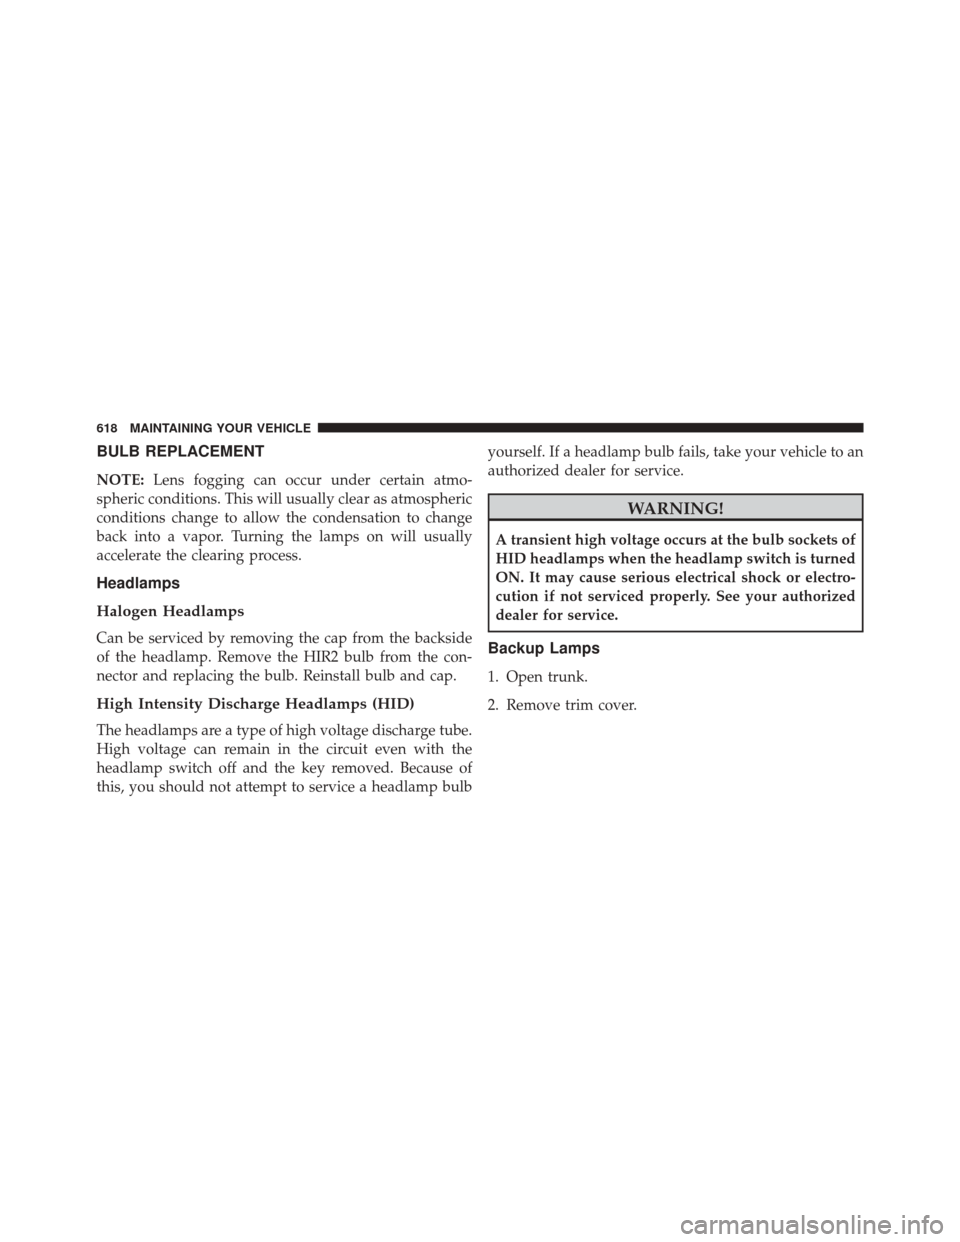
BULB REPLACEMENT
NOTE:Lens fogging can occur under certain atmo-
spheric conditions. This will usually clear as atmospheric
conditions change to allow the condensation to change
back into a vapor. Turning the lamps on will usually
accelerate the clearing process.
Headlamps
Halogen Headlamps
Can be serviced by removing the cap from the backside
of the headlamp. Remove the HIR2 bulb from the con-
nector and replacing the bulb. Reinstall bulb and cap.
High Intensity Discharge Headlamps (HID)
The headlamps are a type of high voltage discharge tube.
High voltage can remain in the circuit even with the
headlamp switch off and the key removed. Because of
this, you should not attempt to service a headlamp bulb yourself. If a headlamp bulb fails, take your vehicle to an
authorized dealer for service.
WARNING!
A transient high voltage occurs at the bulb sockets of
HID headlamps when the headlamp switch is turned
ON. It may cause serious electrical shock or electro-
cution if not serviced properly. See your authorized
dealer for service.
Backup Lamps
1. Open trunk.
2. Remove trim cover.
618 MAINTAINING YOUR VEHICLE