vehicle DODGE DURANGO 1998 1.G Owner's Manual
[x] Cancel search | Manufacturer: DODGE, Model Year: 1998, Model line: DURANGO, Model: DODGE DURANGO 1998 1.GPages: 193, PDF Size: 5.65 MB
Page 56 of 193
Downloaded from www.Manualslib.com manuals search engine INSTALLATION
(1) Thoroughly clean the idler shaft bore.
(2) Position the idler shaft in the bore.
NOTE: The two lubrication holes in the idler shaft
do not require any special alignment.
NOTE: Before using the retaining bolt to install the
idler shaft, coat the threads and the pilot on the
idler shaft with clean engine oil.
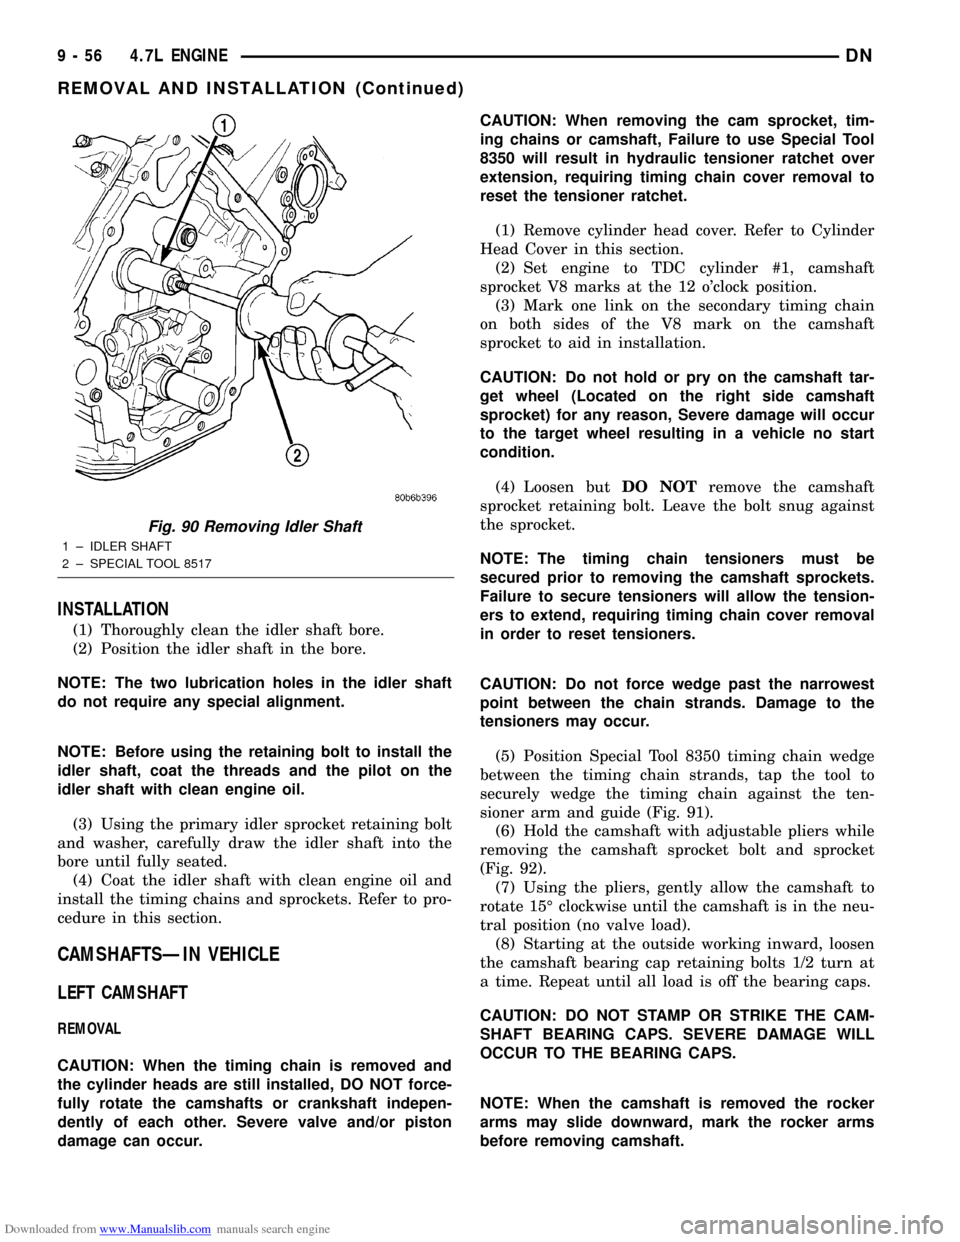
(3) Using the primary idler sprocket retaining bolt
and washer, carefully draw the idler shaft into the
bore until fully seated.
(4) Coat the idler shaft with clean engine oil and
install the timing chains and sprockets. Refer to pro-
cedure in this section.
CAMSHAFTSÐIN VEHICLE
LEFT CAMSHAFT
REMOVAL
CAUTION: When the timing chain is removed and
the cylinder heads are still installed, DO NOT force-
fully rotate the camshafts or crankshaft indepen-
dently of each other. Severe valve and/or piston
damage can occur.CAUTION: When removing the cam sprocket, tim-
ing chains or camshaft, Failure to use Special Tool
8350 will result in hydraulic tensioner ratchet over
extension, requiring timing chain cover removal to
reset the tensioner ratchet.
(1) Remove cylinder head cover. Refer to Cylinder
Head Cover in this section.
(2) Set engine to TDC cylinder #1, camshaft
sprocket V8 marks at the 12 o'clock position.
(3) Mark one link on the secondary timing chain
on both sides of the V8 mark on the camshaft
sprocket to aid in installation.
CAUTION: Do not hold or pry on the camshaft tar-
get wheel (Located on the right side camshaft
sprocket) for any reason, Severe damage will occur
to the target wheel resulting in a vehicle no start
condition.
(4) Loosen butDO NOTremove the camshaft
sprocket retaining bolt. Leave the bolt snug against
the sprocket.
NOTE: The timing chain tensioners must be
secured prior to removing the camshaft sprockets.
Failure to secure tensioners will allow the tension-
ers to extend, requiring timing chain cover removal
in order to reset tensioners.
CAUTION: Do not force wedge past the narrowest
point between the chain strands. Damage to the
tensioners may occur.
(5) Position Special Tool 8350 timing chain wedge
between the timing chain strands, tap the tool to
securely wedge the timing chain against the ten-
sioner arm and guide (Fig. 91).
(6) Hold the camshaft with adjustable pliers while
removing the camshaft sprocket bolt and sprocket
(Fig. 92).
(7) Using the pliers, gently allow the camshaft to
rotate 15É clockwise until the camshaft is in the neu-
tral position (no valve load).
(8) Starting at the outside working inward, loosen
the camshaft bearing cap retaining bolts 1/2 turn at
a time. Repeat until all load is off the bearing caps.
CAUTION: DO NOT STAMP OR STRIKE THE CAM-
SHAFT BEARING CAPS. SEVERE DAMAGE WILL
OCCUR TO THE BEARING CAPS.
NOTE: When the camshaft is removed the rocker
arms may slide downward, mark the rocker arms
before removing camshaft.
Fig. 90 Removing Idler Shaft
1 ± IDLER SHAFT
2 ± SPECIAL TOOL 8517
9 - 56 4.7L ENGINEDN
REMOVAL AND INSTALLATION (Continued)
Page 59 of 193
Downloaded from www.Manualslib.com manuals search engine (2) Set engine to TDC cylinder #1, camshaft
sprocket V8 marks at the 12 o'clock position.
(3) Mark one link on the secondary timing chain
on both sides of the V8 mark on the camshaft
sprocket to aid in installation.
CAUTION: Do not hold or pry on the camshaft tar-
get wheel for any reason, Severe damage will occur
to the target wheel. A damaged target wheel could
cause a vehicle no start condition.
(4) Loosen butDO NOTremove the camshaft
sprocket retaining bolt. Leave bolt snug against
sprocket.
NOTE: The timing chain tensioners must be
secured prior to removing the camshaft sprockets.
Failure to secure tensioners will allow the tension-
ers to extend, requiring timing chain cover removal
in order to reset tensioners.
CAUTION: Do not force wedge past the narrowest
point between the chain strands. Damage to the
tensioners may occur.
(5) Position Special Tool 8350 timing chain wedge
between the timing chain strands. Tap the tool to
securely wedge the timing chain against the ten-
sioner arm and guide (Fig. 97).
(6) Remove the camshaft position sensor (Fig. 98).(7) Hold the camshaft with adjustable pliers while
removing the camshaft sprocket bolt and sprocket
(Fig. 99).
(8) Using the pliers, gently allow the camshaft to
rotate 45É counter-clockwise until the camshaft is in
the neutral position (no valve load).
(9) Starting at the outside working inward, loosen
the camshaft bearing cap retaining bolts 1/2 turn at
a time. Repeat until all load is off the bearing caps.
CAUTION: DO NOT STAMP OR STRIKE THE CAM-
SHAFT BEARING CAPS. SEVERE DAMAGE WILL
OCCUR TO THE BEARING CAPS.
NOTE: When the camshaft is removed the rocker
arms may slide downward, mark the rocker arms
before removing camshaft.
(10) Remove the camshaft bearing caps and the
camshaft.
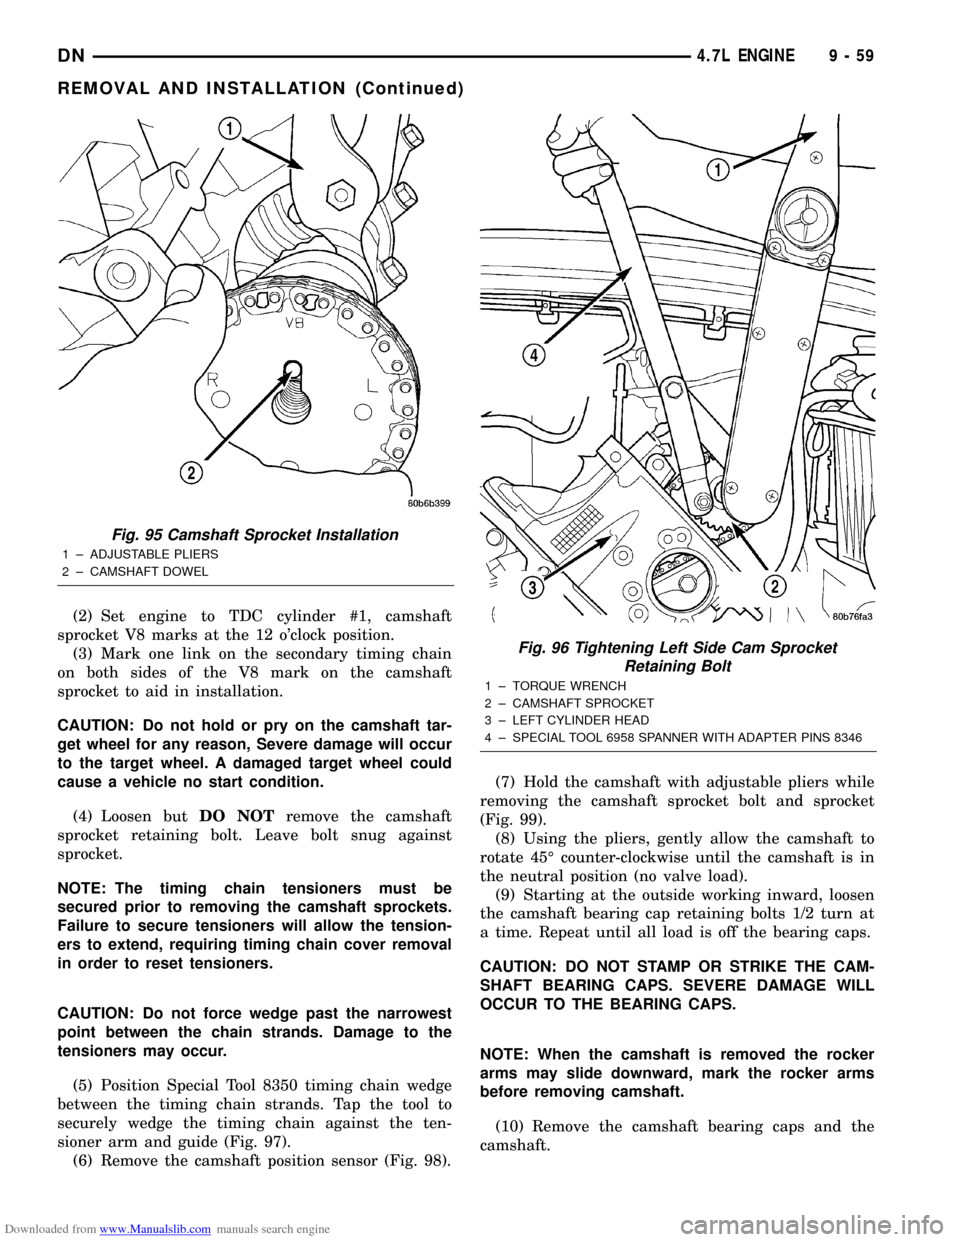
Fig. 95 Camshaft Sprocket Installation
1 ± ADJUSTABLE PLIERS
2 ± CAMSHAFT DOWEL
Fig. 96 Tightening Left Side Cam Sprocket
Retaining Bolt
1 ± TORQUE WRENCH
2 ± CAMSHAFT SPROCKET
3 ± LEFT CYLINDER HEAD
4 ± SPECIAL TOOL 6958 SPANNER WITH ADAPTER PINS 8346
DN4.7L ENGINE 9 - 59
REMOVAL AND INSTALLATION (Continued)
Page 61 of 193
Downloaded from www.Manualslib.com manuals search engine INSTALLATION
(1) Lubricate camshaft journals with clean engine
oil.
NOTE: Position the right side camshaft so that the
camshaft sprocket dowel is near the 10 o'clock
position, This will place the camshaft at the neutral
position easing the installation of the camshaft
bearing caps.
(2) Position the camshaft into the cylinder head.
(3) Install the camshaft bearing caps, hand tighten
the retaining bolts.
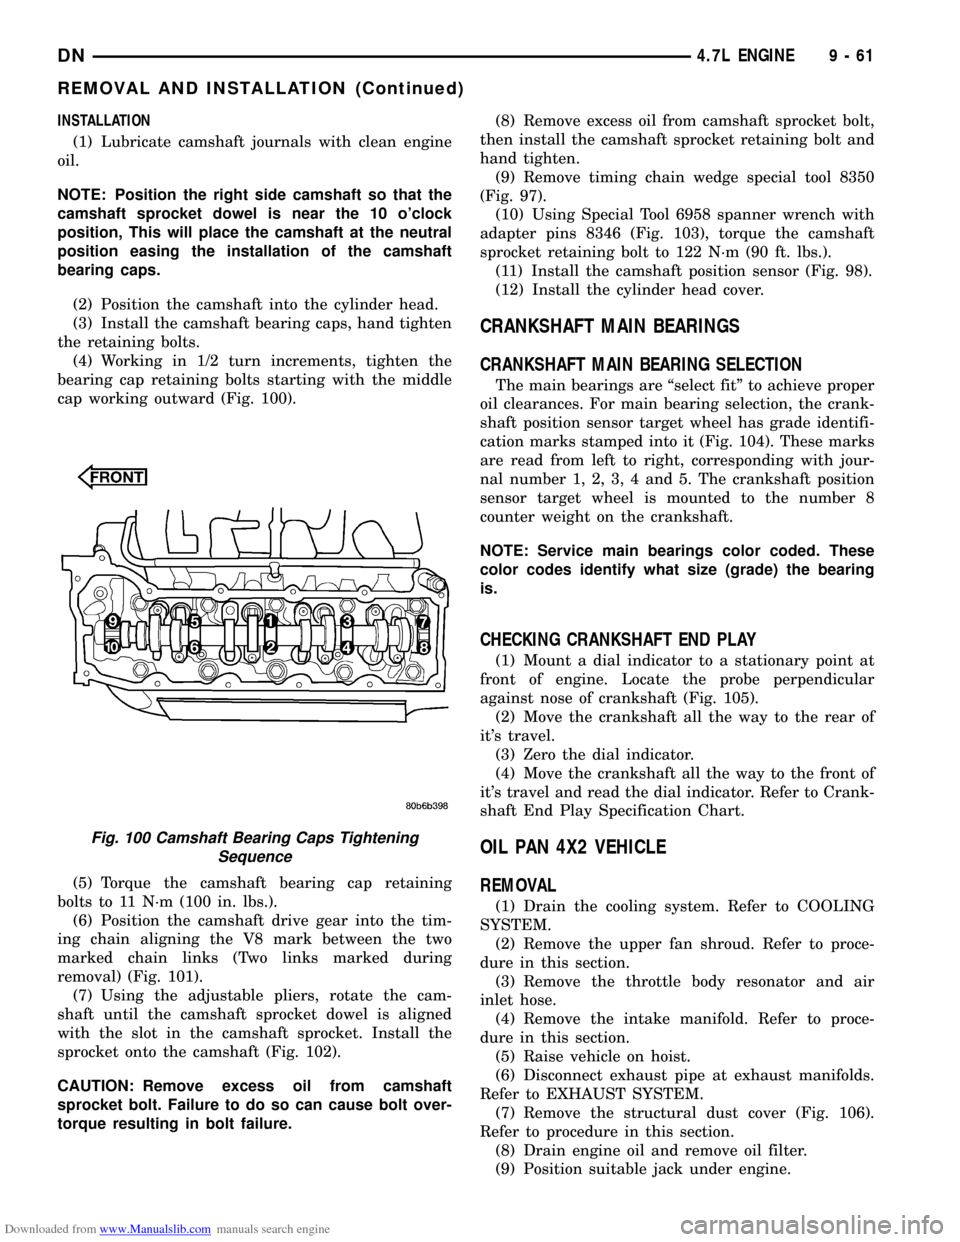
(4) Working in 1/2 turn increments, tighten the
bearing cap retaining bolts starting with the middle
cap working outward (Fig. 100).
(5) Torque the camshaft bearing cap retaining
bolts to 11 N´m (100 in. lbs.).
(6) Position the camshaft drive gear into the tim-
ing chain aligning the V8 mark between the two
marked chain links (Two links marked during
removal) (Fig. 101).
(7) Using the adjustable pliers, rotate the cam-
shaft until the camshaft sprocket dowel is aligned
with the slot in the camshaft sprocket. Install the
sprocket onto the camshaft (Fig. 102).
CAUTION: Remove excess oil from camshaft
sprocket bolt. Failure to do so can cause bolt over-
torque resulting in bolt failure.(8) Remove excess oil from camshaft sprocket bolt,
then install the camshaft sprocket retaining bolt and
hand tighten.
(9) Remove timing chain wedge special tool 8350
(Fig. 97).
(10) Using Special Tool 6958 spanner wrench with
adapter pins 8346 (Fig. 103), torque the camshaft
sprocket retaining bolt to 122 N´m (90 ft. lbs.).
(11) Install the camshaft position sensor (Fig. 98).
(12) Install the cylinder head cover.
CRANKSHAFT MAIN BEARINGS
CRANKSHAFT MAIN BEARING SELECTION
The main bearings are ªselect fitº to achieve proper
oil clearances. For main bearing selection, the crank-
shaft position sensor target wheel has grade identifi-
cation marks stamped into it (Fig. 104). These marks
are read from left to right, corresponding with jour-
nal number 1, 2, 3, 4 and 5. The crankshaft position
sensor target wheel is mounted to the number 8
counter weight on the crankshaft.
NOTE: Service main bearings color coded. These
color codes identify what size (grade) the bearing
is.
CHECKING CRANKSHAFT END PLAY
(1) Mount a dial indicator to a stationary point at
front of engine. Locate the probe perpendicular
against nose of crankshaft (Fig. 105).
(2) Move the crankshaft all the way to the rear of
it's travel.
(3) Zero the dial indicator.
(4) Move the crankshaft all the way to the front of
it's travel and read the dial indicator. Refer to Crank-
shaft End Play Specification Chart.
OIL PAN 4X2 VEHICLE
REMOVAL
(1) Drain the cooling system. Refer to COOLING
SYSTEM.
(2) Remove the upper fan shroud. Refer to proce-
dure in this section.
(3) Remove the throttle body resonator and air
inlet hose.
(4) Remove the intake manifold. Refer to proce-
dure in this section.
(5) Raise vehicle on hoist.
(6) Disconnect exhaust pipe at exhaust manifolds.
Refer to EXHAUST SYSTEM.
(7) Remove the structural dust cover (Fig. 106).
Refer to procedure in this section.
(8) Drain engine oil and remove oil filter.
(9) Position suitable jack under engine.
Fig. 100 Camshaft Bearing Caps Tightening
Sequence
DN4.7L ENGINE 9 - 61
REMOVAL AND INSTALLATION (Continued)
Page 64 of 193
Downloaded from www.Manualslib.com manuals search engine (5) Lower engine and install both the left and
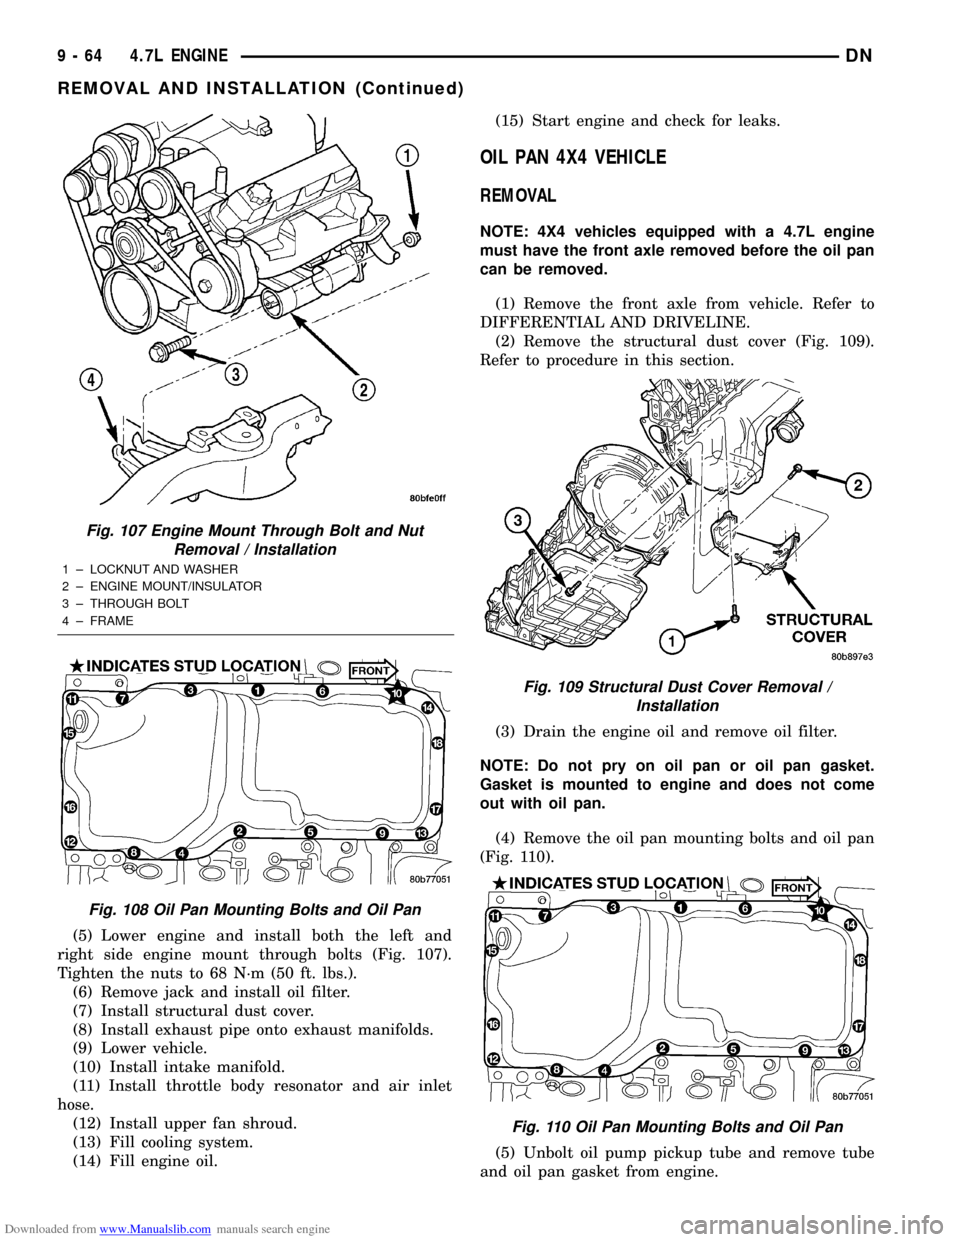
right side engine mount through bolts (Fig. 107).
Tighten the nuts to 68 N´m (50 ft. lbs.).
(6) Remove jack and install oil filter.
(7) Install structural dust cover.
(8) Install exhaust pipe onto exhaust manifolds.
(9) Lower vehicle.
(10) Install intake manifold.
(11) Install throttle body resonator and air inlet
hose.
(12) Install upper fan shroud.
(13) Fill cooling system.
(14) Fill engine oil.(15) Start engine and check for leaks.
OIL PAN 4X4 VEHICLE
REMOVAL
NOTE: 4X4 vehicles equipped with a 4.7L engine
must have the front axle removed before the oil pan
can be removed.
(1) Remove the front axle from vehicle. Refer to
DIFFERENTIAL AND DRIVELINE.
(2) Remove the structural dust cover (Fig. 109).
Refer to procedure in this section.
(3) Drain the engine oil and remove oil filter.
NOTE: Do not pry on oil pan or oil pan gasket.
Gasket is mounted to engine and does not come
out with oil pan.
(4) Remove the oil pan mounting bolts and oil pan
(Fig. 110).
(5) Unbolt oil pump pickup tube and remove tube
and oil pan gasket from engine.
Fig. 107 Engine Mount Through Bolt and Nut
Removal / Installation
1 ± LOCKNUT AND WASHER
2 ± ENGINE MOUNT/INSULATOR
3 ± THROUGH BOLT
4 ± FRAME
Fig. 108 Oil Pan Mounting Bolts and Oil Pan
Fig. 109 Structural Dust Cover Removal /
Installation
Fig. 110 Oil Pan Mounting Bolts and Oil Pan
9 - 64 4.7L ENGINEDN
REMOVAL AND INSTALLATION (Continued)
Page 65 of 193
Downloaded from www.Manualslib.com manuals search engine INSTALLATION
(1) Clean the oil pan gasket mating surface of the
bedplate and oil pan.
(2) Position the oil pan gasket and pickup tube
with new o-ring. Install the mounting bolt and nuts.
Tighten bolt and nuts to 28 N´m (20 ft. lbs.).
(3) Position the oil pan and install the mounting
bolts. Tighten the mounting bolts to 15 N´m (11 ft.
lbs.) in the sequence shown (Fig. 110).
(4) Install structural dust cover.
(5) Install oil filter.
(6) Install front axle. Refer to DIFFERENTIAL
AND DRIVELINE.
(7) Lower vehicle.
(8) Fill engine oil.
(9) Start engine check for leaks.
PISTON AND CONNECTING ROD
REMOVAL
(1) Disconnect negative cable from battery.
(2) Remove the following components: (Refer to
procedures in this section)
²Oil pan and gasket/windage tray.
²Cylinder head covers.
²Timing chain cover.
²Cylinder head(s).
(3) If necessary, remove top ridge of cylinder bores
with a reliable ridge reamer before removing pistons
from cylinder block.Be sure to keep tops of pis-
tons covered during this operation.Pistons and
connecting rods must be removed from top of cylinder
block. When removing piston and connecting rod
assemblies from the engine, rotate crankshaft so the
each connecting rod is centered in cylinder bore.
CAUTION: DO NOT use a number stamp or a punch
to mark connecting rods or caps, as damage to
connecting rods could occur
NOTE: Connecting rods and bearing caps are not
interchangeable and should be marked before
removing to ensure correct reassembly.
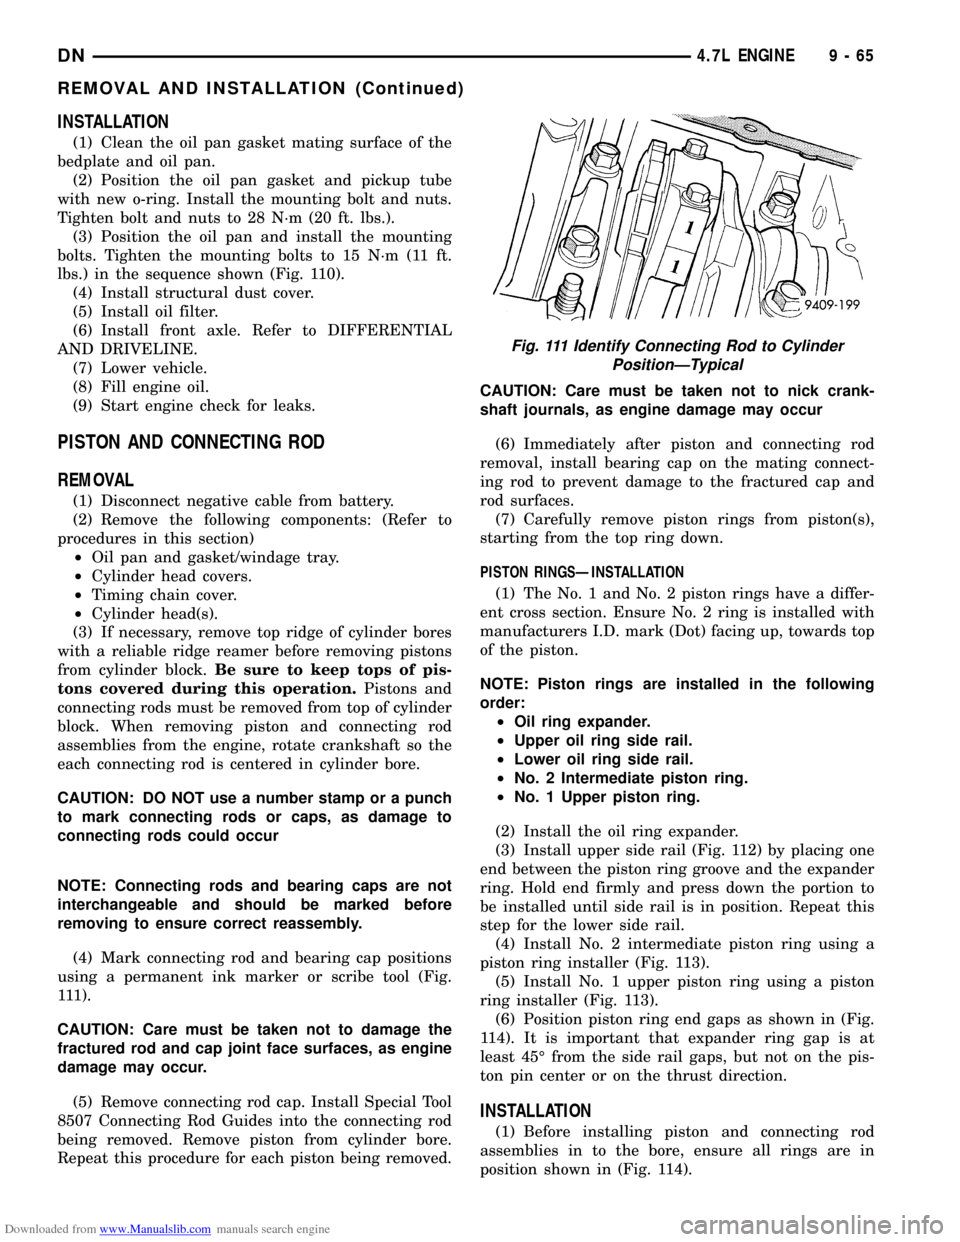
(4) Mark connecting rod and bearing cap positions
using a permanent ink marker or scribe tool (Fig.
111).
CAUTION: Care must be taken not to damage the
fractured rod and cap joint face surfaces, as engine
damage may occur.
(5) Remove connecting rod cap. Install Special Tool
8507 Connecting Rod Guides into the connecting rod
being removed. Remove piston from cylinder bore.
Repeat this procedure for each piston being removed.CAUTION: Care must be taken not to nick crank-
shaft journals, as engine damage may occur
(6) Immediately after piston and connecting rod
removal, install bearing cap on the mating connect-
ing rod to prevent damage to the fractured cap and
rod surfaces.
(7) Carefully remove piston rings from piston(s),
starting from the top ring down.
PISTON RINGSÐINSTALLATION
(1) The No. 1 and No. 2 piston rings have a differ-
ent cross section. Ensure No. 2 ring is installed with
manufacturers I.D. mark (Dot) facing up, towards top
of the piston.
NOTE: Piston rings are installed in the following
order:
²Oil ring expander.
²Upper oil ring side rail.
²Lower oil ring side rail.
²No. 2 Intermediate piston ring.
²No. 1 Upper piston ring.
(2) Install the oil ring expander.
(3) Install upper side rail (Fig. 112) by placing one
end between the piston ring groove and the expander
ring. Hold end firmly and press down the portion to
be installed until side rail is in position. Repeat this
step for the lower side rail.
(4) Install No. 2 intermediate piston ring using a
piston ring installer (Fig. 113).
(5) Install No. 1 upper piston ring using a piston
ring installer (Fig. 113).
(6) Position piston ring end gaps as shown in (Fig.
114). It is important that expander ring gap is at
least 45É from the side rail gaps, but not on the pis-
ton pin center or on the thrust direction.
INSTALLATION
(1) Before installing piston and connecting rod
assemblies in to the bore, ensure all rings are in
position shown in (Fig. 114).
Fig. 111 Identify Connecting Rod to Cylinder
PositionÐTypical
DN4.7L ENGINE 9 - 65
REMOVAL AND INSTALLATION (Continued)
Page 67 of 193
Downloaded from www.Manualslib.com manuals search engine (7) Rotate crankshaft until connecting rod journal
is on the center of cylinder bore. Insert rod and pis-
ton into cylinder bore and carefully position connect-
ing rod guides over crankshaft journal.
(8) Tap piston down in cylinder bore using a ham-
mer handle. While at the same time, guide connect-
ing rod into position on rod journal.
CAUTION: Connecting Rod Bolts are Torque to
Yield Bolts and Must Not Be Reused. Always
replace the Rod Bolts whenever they are loosened
or removed.
(9) Lubricate rod bolts and bearing surfaces with
engine oil. Install connecting rod cap and bearing.
Tighten bolts to 27 N´m (20 ft. lbs.) plus 90É.
(10) Install the following components: (Refer to
procedures in this section)
²Cylinder head(s).
²Timing chain and cover.
²Cylinder head covers.
²Oil pan and gasket/windage tray.
(11) Fill crankcase with proper engine oil to cor-
rect level.
(12) Connect negative cable to battery.
CRANKSHAFT
REMOVAL
NOTE: To remove the crankshaft from the engine,
the engine must be removed from the vehicle.
(1) Remove the engine. Refer to Engine Assembly
in this section for procedure.
(2) Remove the engine oil pump. Refer to Oil
Pump in this section for procedure.
CAUTION: DO NOT pry on the oil pan gasket when
removing the oil pan, The oil pan gasket is mounted
to the cylinder block in three locations and will
remain attached to block when removing oil pan.
Gasket can not be removed with oil pan.
(3) Remove oil pan bolts and oil pan.
(4) Remove the oil pump pickup tube and oil pan
gasket /windage tray.
(5) Remove the bedplate mounting bolts. Note the
location of the three stud bolts for installation.
(6) Remove the connecting rods from the crank-
shaft.
CAUTION: The bedplate to cylinder block mating
surface is a critical sealing surface. Do not pry on
or damage this surface in anyway.
NOTE: The bedplate contains the lower main bear-
ing halves. Use care when handling bedplate as not
to drop or damage bearing halves. Installing main
bearing halves in the wrong position will cause
sever damage to the crankshaft.
NOTE: The bedplate has pry points cast into it. Use
these points only. The pry points are on both the
left and right sides, only the left side is shown.
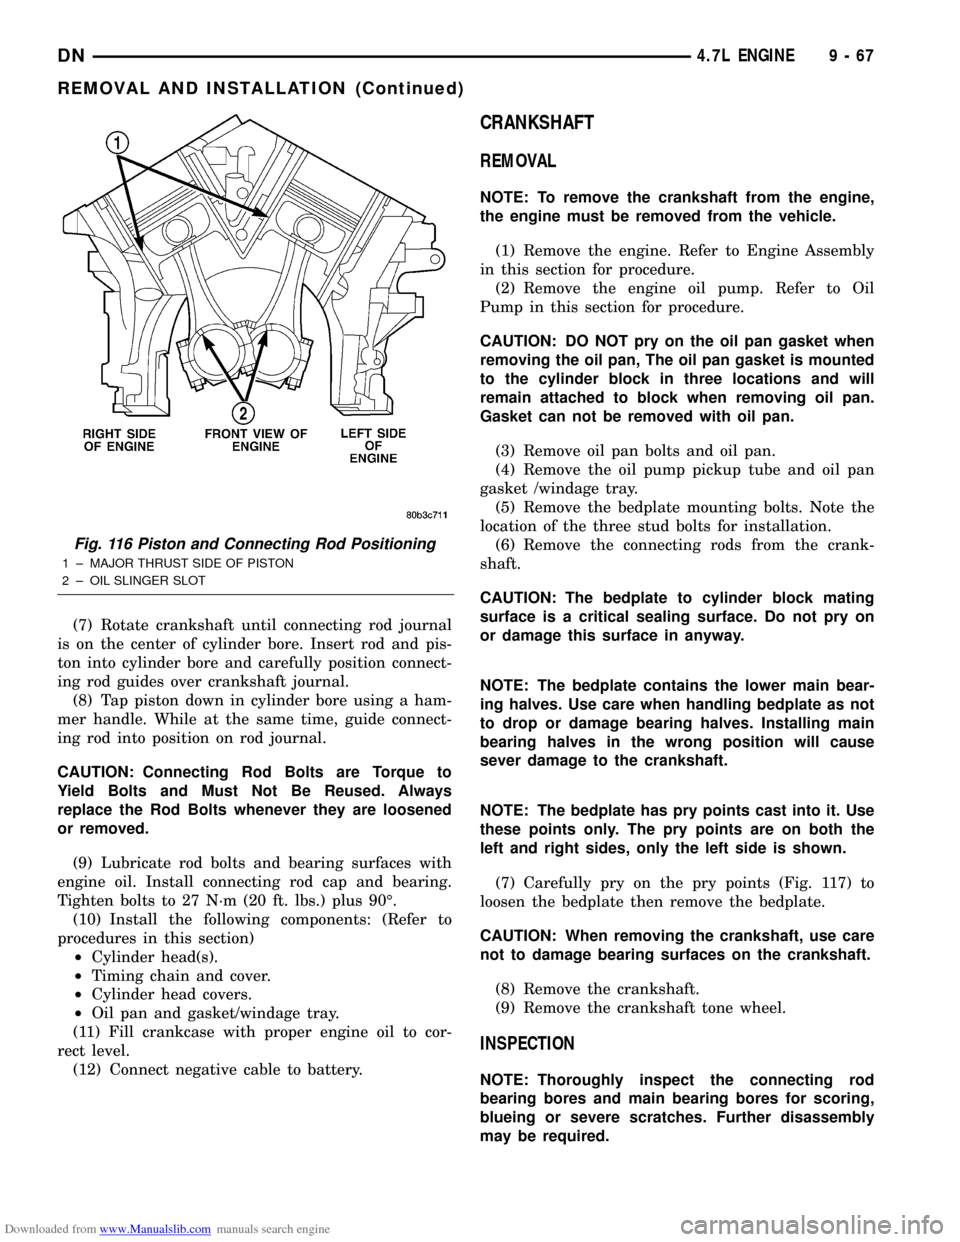
(7) Carefully pry on the pry points (Fig. 117) to
loosen the bedplate then remove the bedplate.
CAUTION: When removing the crankshaft, use care
not to damage bearing surfaces on the crankshaft.
(8) Remove the crankshaft.
(9) Remove the crankshaft tone wheel.
INSPECTION
NOTE: Thoroughly inspect the connecting rod
bearing bores and main bearing bores for scoring,
blueing or severe scratches. Further disassembly
may be required.
Fig. 116 Piston and Connecting Rod Positioning
1 ± MAJOR THRUST SIDE OF PISTON
2 ± OIL SLINGER SLOT
DN4.7L ENGINE 9 - 67
REMOVAL AND INSTALLATION (Continued)
Page 70 of 193
Downloaded from www.Manualslib.com manuals search engine ENGINE OIL PRESSURE SENDING UNIT
REMOVAL
(1) Disconnect the negative cable from the battery.
(2) Raise vehicle on hoist.
(3) Remove front splash shield.
(4) Disconnect oil pressure sender wire (Fig. 125).
(5) Remove the pressure sender (Fig. 125).
INSTALLATION
(1) Install oil pressure sender.
(2) Connect oil pressure sender wire.
(3) Install front splash shield.
(4) Lower vehicle.
(5) Connect the negative battery cable.CRANKSHAFT OIL SEALÐFRONT
REMOVAL
(1) Disconnect negative cable from battery.
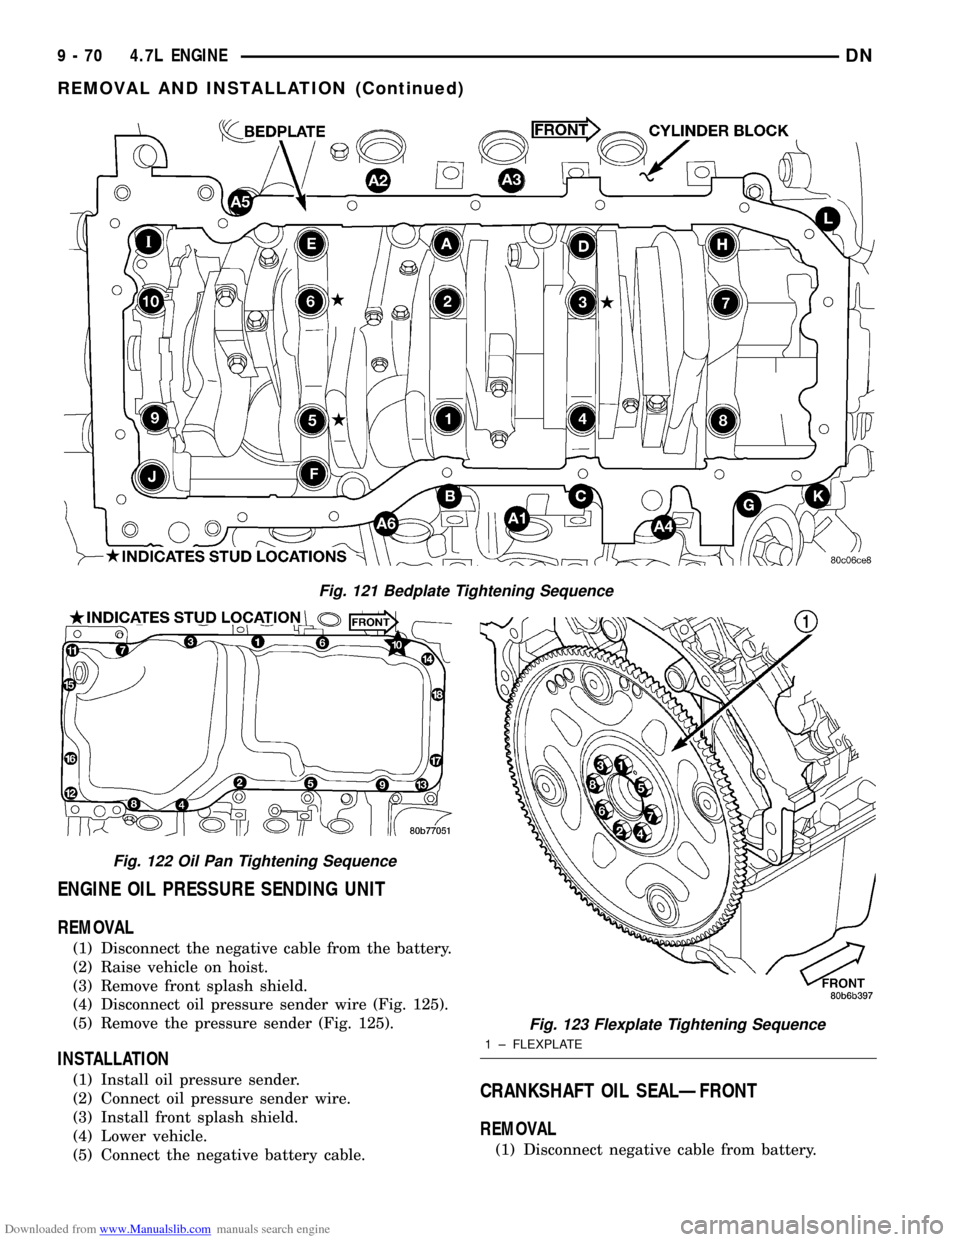
Fig. 121 Bedplate Tightening Sequence
Fig. 122 Oil Pan Tightening Sequence
Fig. 123 Flexplate Tightening Sequence
1 ± FLEXPLATE
9 - 70 4.7L ENGINEDN
REMOVAL AND INSTALLATION (Continued)
Page 73 of 193
Downloaded from www.Manualslib.com manuals search engine CRANKSHAFT OIL SEALÐREAR
REMOVAL
NOTE: This procedure can be preformed in vehicle.(1) If being preformed in vehicle, remove the
transmission. Refer to Group 21, Transmission and
Transfer Case.
(2) Remove the flexplate. Refer to procedure in
this section.
NOTE: The crankshaft oil seal CAN NOT be reused
after removal.
NOTE: The crankshaft rear oil seal remover Special
Tool 8506 must be installed deeply into the seal.
Continue to tighten the removal tool into the seal
until the tool can not be turned farther. Failure to
install tool correctly the first time will cause tool to
pull free of seal without removing seal from engine.
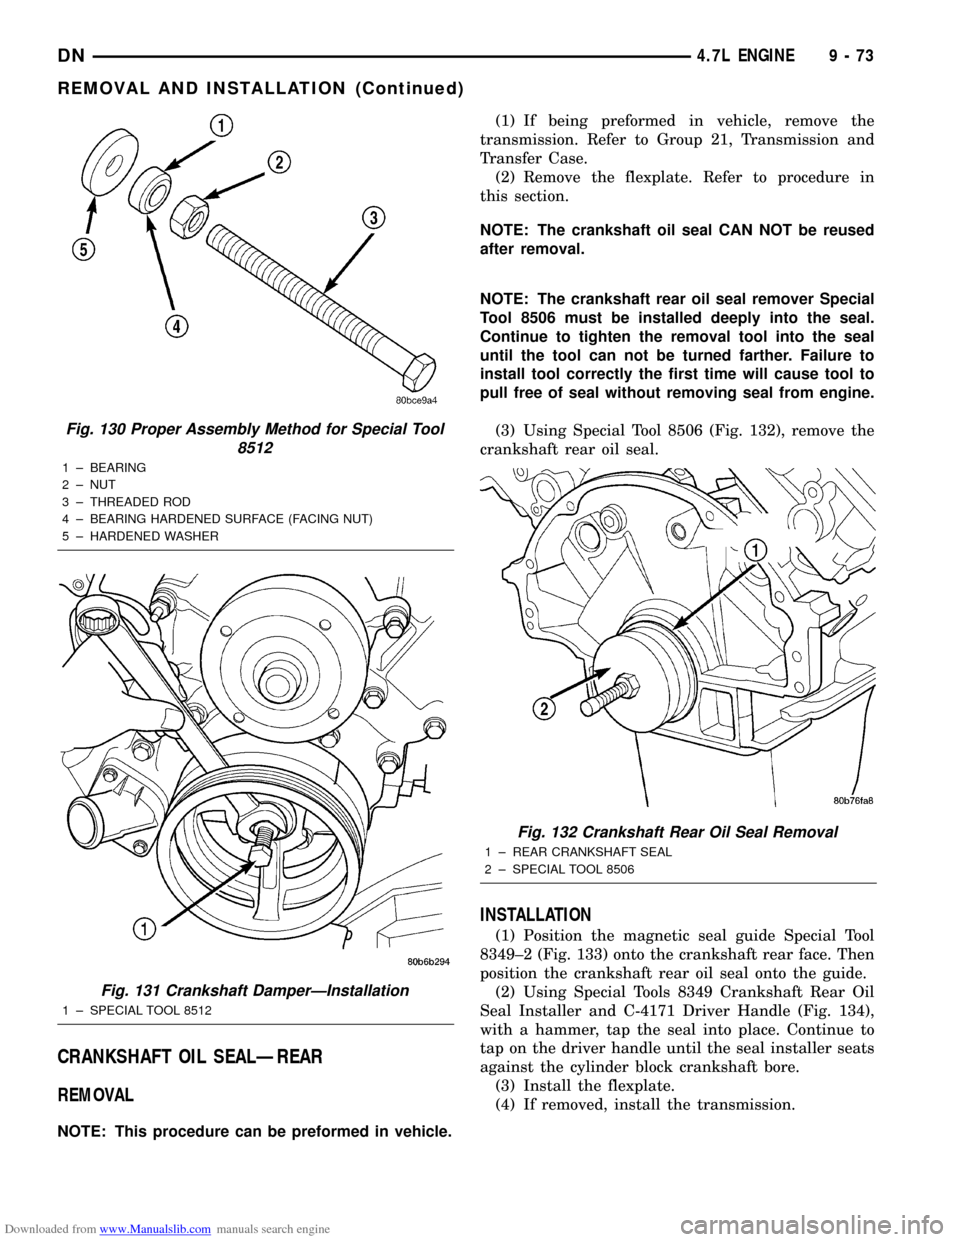
(3) Using Special Tool 8506 (Fig. 132), remove the
crankshaft rear oil seal.
INSTALLATION
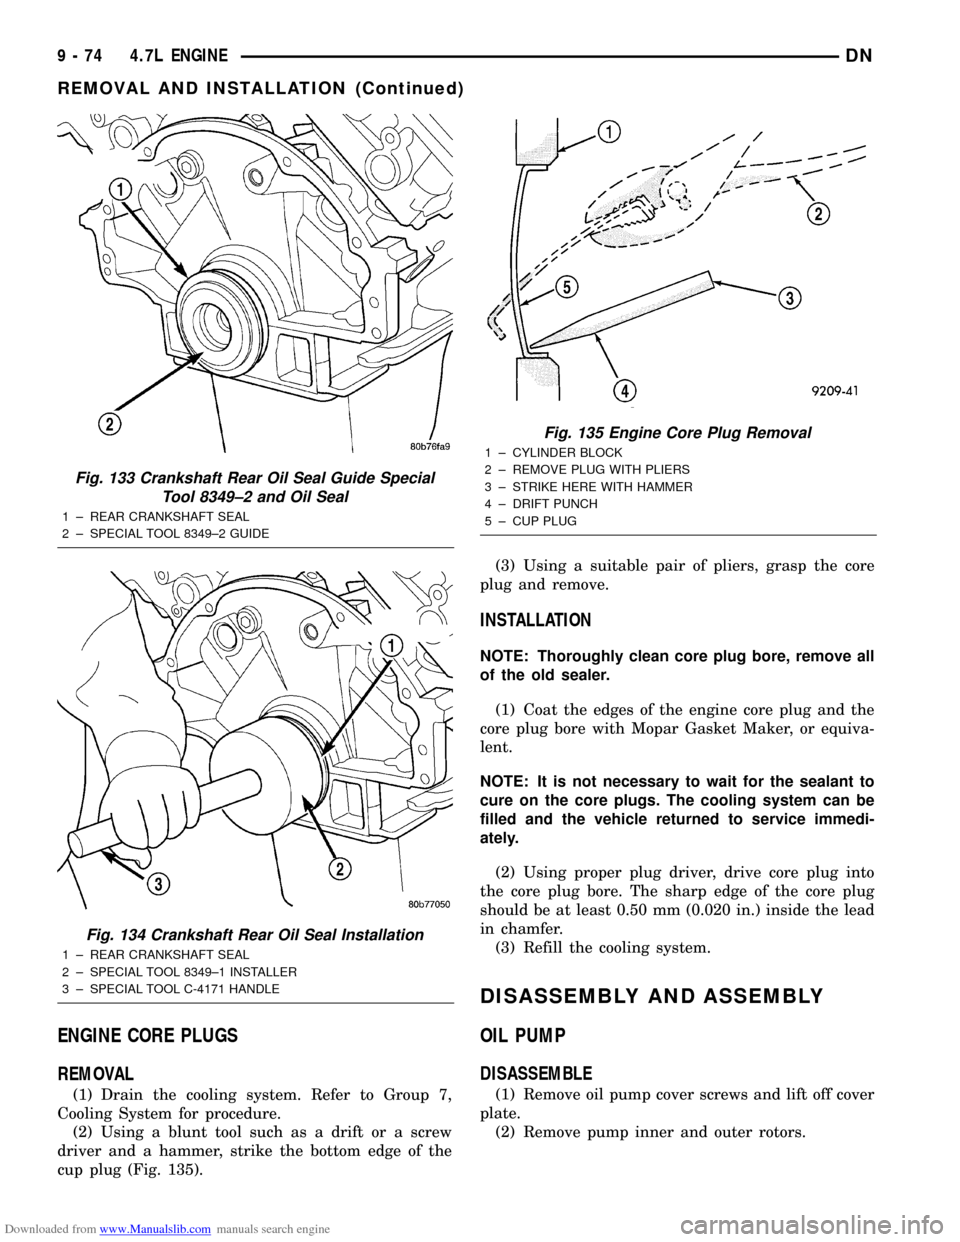
(1) Position the magnetic seal guide Special Tool
8349±2 (Fig. 133) onto the crankshaft rear face. Then
position the crankshaft rear oil seal onto the guide.
(2) Using Special Tools 8349 Crankshaft Rear Oil
Seal Installer and C-4171 Driver Handle (Fig. 134),
with a hammer, tap the seal into place. Continue to
tap on the driver handle until the seal installer seats
against the cylinder block crankshaft bore.
(3) Install the flexplate.
(4) If removed, install the transmission.
Fig. 130 Proper Assembly Method for Special Tool
8512
1 ± BEARING
2 ± NUT
3 ± THREADED ROD
4 ± BEARING HARDENED SURFACE (FACING NUT)
5 ± HARDENED WASHER
Fig. 131 Crankshaft DamperÐInstallation
1 ± SPECIAL TOOL 8512
Fig. 132 Crankshaft Rear Oil Seal Removal
1 ± REAR CRANKSHAFT SEAL
2 ± SPECIAL TOOL 8506
DN4.7L ENGINE 9 - 73
REMOVAL AND INSTALLATION (Continued)
Page 74 of 193
Downloaded from www.Manualslib.com manuals search engine ENGINE CORE PLUGS
REMOVAL
(1) Drain the cooling system. Refer to Group 7,
Cooling System for procedure.
(2) Using a blunt tool such as a drift or a screw
driver and a hammer, strike the bottom edge of the
cup plug (Fig. 135).(3) Using a suitable pair of pliers, grasp the core
plug and remove.
INSTALLATION
NOTE: Thoroughly clean core plug bore, remove all
of the old sealer.
(1) Coat the edges of the engine core plug and the
core plug bore with Mopar Gasket Maker, or equiva-
lent.
NOTE: It is not necessary to wait for the sealant to
cure on the core plugs. The cooling system can be
filled and the vehicle returned to service immedi-
ately.
(2) Using proper plug driver, drive core plug into
the core plug bore. The sharp edge of the core plug
should be at least 0.50 mm (0.020 in.) inside the lead
in chamfer.
(3) Refill the cooling system.
DISASSEMBLY AND ASSEMBLY
OIL PUMP
DISASSEMBLE
(1) Remove oil pump cover screws and lift off cover
plate.
(2) Remove pump inner and outer rotors.
Fig. 133 Crankshaft Rear Oil Seal Guide Special
Tool 8349±2 and Oil Seal
1 ± REAR CRANKSHAFT SEAL
2 ± SPECIAL TOOL 8349±2 GUIDE
Fig. 134 Crankshaft Rear Oil Seal Installation
1 ± REAR CRANKSHAFT SEAL
2 ± SPECIAL TOOL 8349±1 INSTALLER
3 ± SPECIAL TOOL C-4171 HANDLE
Fig. 135 Engine Core Plug Removal
1 ± CYLINDER BLOCK
2 ± REMOVE PLUG WITH PLIERS
3 ± STRIKE HERE WITH HAMMER
4 ± DRIFT PUNCH
5 ± CUP PLUG
9 - 74 4.7L ENGINEDN
REMOVAL AND INSTALLATION (Continued)
Page 86 of 193
Downloaded from www.Manualslib.com manuals search engine 5.2L ENGINE
TABLE OF CONTENTS
page page
DESCRIPTION AND OPERATION
ENGINE................................86
ENGINE LUBRICATION SYSTEM.............87
EXHAUST MANIFOLD.....................89
INTAKE MANIFOLD.......................89
CYLINDER HEAD COVER GASKET...........90
CYLINDER HEAD.........................90
VALVES AND VALVE SPRINGS..............90
ENGINE OIL PAN.........................90
CRANKSHAFT OIL SEALS..................90
PISTON AND CONNECTING ROD............90
CRANKSHAFT MAIN BEARINGS.............91
CRANKSHAFT...........................91
SERVICE PROCEDURES
FORM-IN-PLACE GASKETS.................91
ENGINE PERFORMANCE..................92
ENGINE OIL.............................92
REPAIR DAMAGED OR WORN THREADS......94
CYLINDER BOREÐHONING................94
HYDROSTATIC LOCK.....................95
VALVE TIMING...........................95
VALVE SERVICE.........................95
MEASURING TIMING CHAIN STRETCH........97
PISTONSÐFITTING.......................98
PISTON RINGSÐFITTING..................98
CONNECTING ROD BEARINGSÐFITTING.....100
CRANKSHAFT MAIN BEARINGSÐFITTING....100
REMOVAL AND INSTALLATION
ENGINE MOUNTSÐFRONT................100
ENGINE MOUNTÐREAR..................102
ENGINE ASSEMBLY......................102
INTAKE MANIFOLD......................103
EXHAUST MANIFOLD....................105
CYLINDER HEAD COVER.................106
ROCKER ARMS AND PUSH RODS..........107
VALVE SPRING AND STEM SEAL
REPLACEMENT-IN VEHICLE.............107CYLINDER HEAD........................107
VALVES AND VALVE SPRINGS.............108
HYDRAULIC TAPPETS....................109
VIBRATION DAMPER.....................109
TIMING CHAIN COVER...................110
TIMING CHAIN..........................111
CAMSHAFT............................111
CAMSHAFT BEARINGS...................113
CRANKSHAFT MAIN BEARINGS............113
DISTRIBUTOR DRIVE SHAFT BUSHING......114
OILPAN...............................115
PISTON AND CONNECTING ROD ASSEMBLY . . 116
CRANKSHAFT..........................116
OIL PUMP.............................117
CRANKSHAFT OIL SEALÐFRONT...........117
CRANKSHAFT OIL SEALSÐREAR...........118
ENGINE CORE OIL AND CAMSHAFT PLUGS . . 120
DISASSEMBLY AND ASSEMBLY
VALVE SERVICE........................121
OIL PUMP.............................123
CYLINDER BLOCK.......................124
CLEANING AND INSPECTION
CYLINDER HEAD COVER.................124
CYLINDER HEAD ASSEMBLY..............124
PISTON AND CONNECTING ROD ASSEMBLY . . 124
OILPAN...............................124
OIL PUMP.............................125
CYLINDER BLOCK.......................127
INTAKE MANIFOLD......................127
EXHAUST MANIFOLD....................127
SPECIFICATIONS
5.2L ENGINE SPECIFICATIONS.............128
TORQUE SPECIFICATIONS................132
SPECIAL TOOLS
5.2L ENGINE...........................132
DESCRIPTION AND OPERATION
ENGINE
DESCRIPTION
The 5.2 Liter (318 CID) eight-cylinder engine is a
V-Type lightweight, single cam, overhead valve
engine with hydraulic roller tappets.
The engine lubrication system consists of a rotor
type oil pump and a full flow oil filter.The cylinders are numbered from front to rear; 1,
3, 5, 7 on the left bank and 2, 4, 6, 8 on the right
bank. The firing order is 1-8-4-3-6-5-7-2 (Fig. 1). This
engine is designed for unleaded fuel.
The engine serial number is stamped into a
machined pad located on the left, front corner of the
cylinder block. When component part replacement is
necessary, use the engine type and serial number for
reference (Fig. 2).
9 - 86 5.2L ENGINEDN