engine DODGE DURANGO 2014 3.G Owner's Manual
[x] Cancel search | Manufacturer: DODGE, Model Year: 2014, Model line: DURANGO, Model: DODGE DURANGO 2014 3.GPages: 188, PDF Size: 3.8 MB
Page 56 of 188
Download The Uconnect® Access App
If you own a compatible Apple or Android® powered device, the Uconnect Access App
allows you to remotely lock or unlock your doors, start your engine or activate your horn and
lights from virtually anywhere (Vehicle must be within the United States and have network
coverage). You can download the App from Mopar Owner Connect or from the Apple App or
Google Play store. For Uconnect® phone compatibility - visit UconnectPhone.com or call
1–877–855–8400.
Set Up Your Via Mobile Profile — If Equipped
Setting up your Via Mobile profile means entering your login information for each app so
that they can work in your vehicle. Complete your Via Mobile Profile online during registra-
tion of your Uconnect® Access system. Access this page by logging into your Mopar Owner
Connect account (moparownerconnect.com), going to Edit Profile, then Via Mobile Profile.
If you already have an account with these apps, click “SetUp” to enter your information.
If you do not have an account, you can create a new one.
Aha™ by HARMAN (www.aharadio.com)
• Enter your email address and password for Aha™, or create a new Aha™ account.
• You can link your Facebook, Twitter or Slacker accounts on the Aha™ website.
iHeartRadio (www.iheart.com)
• Click “Sign Up” if you’re new to iHeartRadio, or “Log In” to enter your iHeartRadio accountinformation.
• Select “Activate” to continue,
• Select “Close” to complete activation.
Pandora® (www.pandora.com)
• Enter your Pandora® username/email address and password, then click “Save.”
Slacker Radio (www.slacker.com)
• Enter your Slacker username/email address and password, then click “Save.”
Invite family and friends to use the Via Mobile Apps in your vehicle by setting up their own
Via Mobile profile.
Renewing Subscriptions And Purchasing WiFi Hotspot
(Uconnect® 8.4AN Only, U.S. 48 Contiguous States And Alaska)
Subscriptions, and WiFi Hotspot, can be purchased from the Uconnect® Store within your
vehicle, and online at Mopar Owner Connect. If you need help press the ASSIST button on
the rearview mirror, then select Uconnect® Care (or dial 855-792-4241).
ELECTRONICS
54
Page 61 of 188
4.Yelp® — Customers have the ability to search for nearby destinations or a point of
interest (POI) either by category or custom search by using keywords (for example,
“Italian restaurant”). Searching can be done by voice or using the touchscreen keypad.
Using the touchscreen, launch Yelp® by selecting the “Apps” icon, touch the “All Apps”
tab, and then touch “Yelp.” Using voice recognition press the Voice Command (VR)
button on the steering wheel and say “Launch Yelp®.”
5. Security Alarm Notification — The Security Alarm Notification feature notifies you via
email or text (SMS) message when the vehicle’s factory-installed security alarm system
has been set-off. There are a number of reasons why your alarm may have been
triggered, one of which could be that your vehicle was stolen. If so, please see the details
of the Stolen Vehicle Assistance service below. When you register, Security Alarm
Notification is automatically set to send you an email at the mail address you provide
should the alarm go off. You may also opt to have a text message sent to your mobile
device.
6. Stolen Vehicle Assistance — If your vehicle is stolen, contact local law enforcement
immediately to file a stolen vehicle report. Once this report has been filed, Uconnect®
care can help locate your vehicle. The Uconnect® Care agent will ask for the stolen
vehicle report number issued by local law enforcement. Then, using GPS technology and
the built-in wireless connection within your vehicle, the Uconnect® Care agent will be
able to locate the stolen vehicle and work with law enforcement to help recover it.
(Vehicle must be within the United States, have network coverage and must be regis-
tered with Uconnect® Access with an active subscription that includes the applicable
feature).
7. WiFi Hotspot — WiFi Hotspot is on-demand WiFi 3G connectivity that's built-in and ready
to go whenever you are. Once your vehicle is registered for Uconnect® Access, you can
purchase a Wifi Hotspot subscription at the Uconnect® Store. After you've made your
purchase, turn on your signal and connect your devices. It's never been easier to bring
your home or office with you.
Your vehicle must have a working electrical system for any of the in vehicle Uconnect®
features to operate.
Uconnect® Access Remote Features
If you own a compatible iPhone® or Android® powered device, the Uconnect® Access App
allows you to remotely lock or unlock your doors, start your engine or activate your horn
and lights from virtually anywhere (Vehicle must be within the United States and have
network coverage). You can download the App from Mopar Owner Connect or from the
App Store (iPhone) or Google Play store. Visit UconnectPhone.com to determine if your
device is compatible. For Uconnect® Phone customer support and to determine if your
device is compatible.
U.S. residents - visit UconnectPhone.com or call 1–877–855–8400
ELECTRONICS
59
Page 62 of 188
Remote Start—This feature provides the ability to start the engine on your vehicle, without the
keys and from virtually any distance. You can send a request to your vehicle in one of two ways:
1. Using the Uconnect® Access App from a compatible smartphone.
2. From the Mopar Owner Connect website.
• You can also send a command to turn-off an engine that has been remote started.
• After 15 minutes if you have not entered your vehicle with the key, the engine will shutoff automatically.
•
This remote function requires your vehicle to be equipped with a factory-installed
Remote Start system. To use this feature after the Uconnect® Access App is downloaded,
login with your user name and Uconnect® Security PIN.
•You can set-up notifications for your account to receive an email or text (SMS) message
every time a command is sent. Login to Mopar Owner Connect (moparownerconnect.com)
and click on Edit Profile to manage Uconnect® Notifications.
Remote Door Lock/Unlock — This feature provides the ability to lock or unlock the door on
your vehicle, without the keys and from virtually any distance. You can send a request to
your vehicle in one of three ways:
1. Using the Uconnect® Access App from a compatible smartphone.
2. From the Mopar Owner Connect website.
3. By contacting the Uconnect® Care on the phone.
To use this feature after the Uconnect® Access App is downloaded, login using your user
name and Uconnect® Security PIN. Press the “App” button on your smartphone with the
closed lock icon to lock the door, and press the “open lock” icon to unlock the driver’s door.
You can set-up notifications for your account to receive an email or text (SMS) message
every time a command is sent. Login to Mopar Owner Connect (moparownerconnect.com)
and click on Edit Profile to manage Uconnect® Notifications.
Remote Horn And Lights — It’s easy to locate a vehicle in a dark, crowded or noisy parking
area by activating the horn and lights. It may also help if you need to draw attention to your
vehicle for any reason. You can send a request to your vehicle in one of three ways:
1. Using the Uconnect® Access App from a compatible smartphone.
2. From the Mopar Owner Connect website.
3. By contacting the Uconnect® Care on the phone.
To use this feature after the Uconnect® Access App is downloaded, login using your user name
and Uconnect® Security PIN. You can set-up notifications for your account to receive an
email or text (SMS) message every time a command is sent. Login to Mopar Owner Connect
(moparownerconnect.com) and click on Edit Profile to manage Uconnect® Notifications.
ELECTRONICS
60
Page 118 of 188
Compass Calibration
This compass is self-calibrating, which eliminates the need to set the compass manually.
When the vehicle is new, the compass may appear erratic and the EVIC will display “CAL”
until the compass is calibrated.
You may also calibrate the compass by completing one or more 360 degree turns (in an area
free from large metal or metallic objects) until the “CAL” message displayed in the EVIC
turns off. The compass will now function normally.
ECO
The ECO message will appear in your EVIC display whenever you are driving in a fuel
efficient manner.
This feature allows you to monitor when you are driving in a fuel efficient manner, and it can
be used to modify driving habits in order to increase fuel economy.
PROGRAMMABLE FEATURES
EVIC Programmable Features
The EVIC can be used to view the following main menu items:
NOTE:
Depending on the vehicles options, feature settings may vary.
• Speedometer• Trip
• MPH to km/h • Audio
• Vehicle Info • Stored Messages
• Driver Assist • Screen Setup
• Fuel Economy • Speed Warning - If Equipped
NOTE:
Refer to your Owner's Manual on the DVD for further information.
Uconnect® Customer Programmable Features
The Uconnect® system allows you to access Customer Programmable feature settings
such as Display, Clock, Safety/Assistance, Lights, Doors & Locks, Auto-On Comfort &
Remote Start, Engine Off Operation, Compass Settings, Audio, Trailer Brake, Phone/
Bluetooth®, Suspension and SiriusXM Setup and System Information through soft-keys.
• Press the SETTINGS button (Uconnect® 5.0), or press the “Apps” button (Uconnect® 8.4)
located near the bottom of the touchscreen, then press the “Settings” button on the
touchscreen to access the Settings screen. When making a selection, scroll up or down
until the preferred setting is highlighted, then press and release the preferred setting
until a check-mark appears next to the setting, showing that setting has been selected.
ELECTRONICS
116
Page 119 of 188
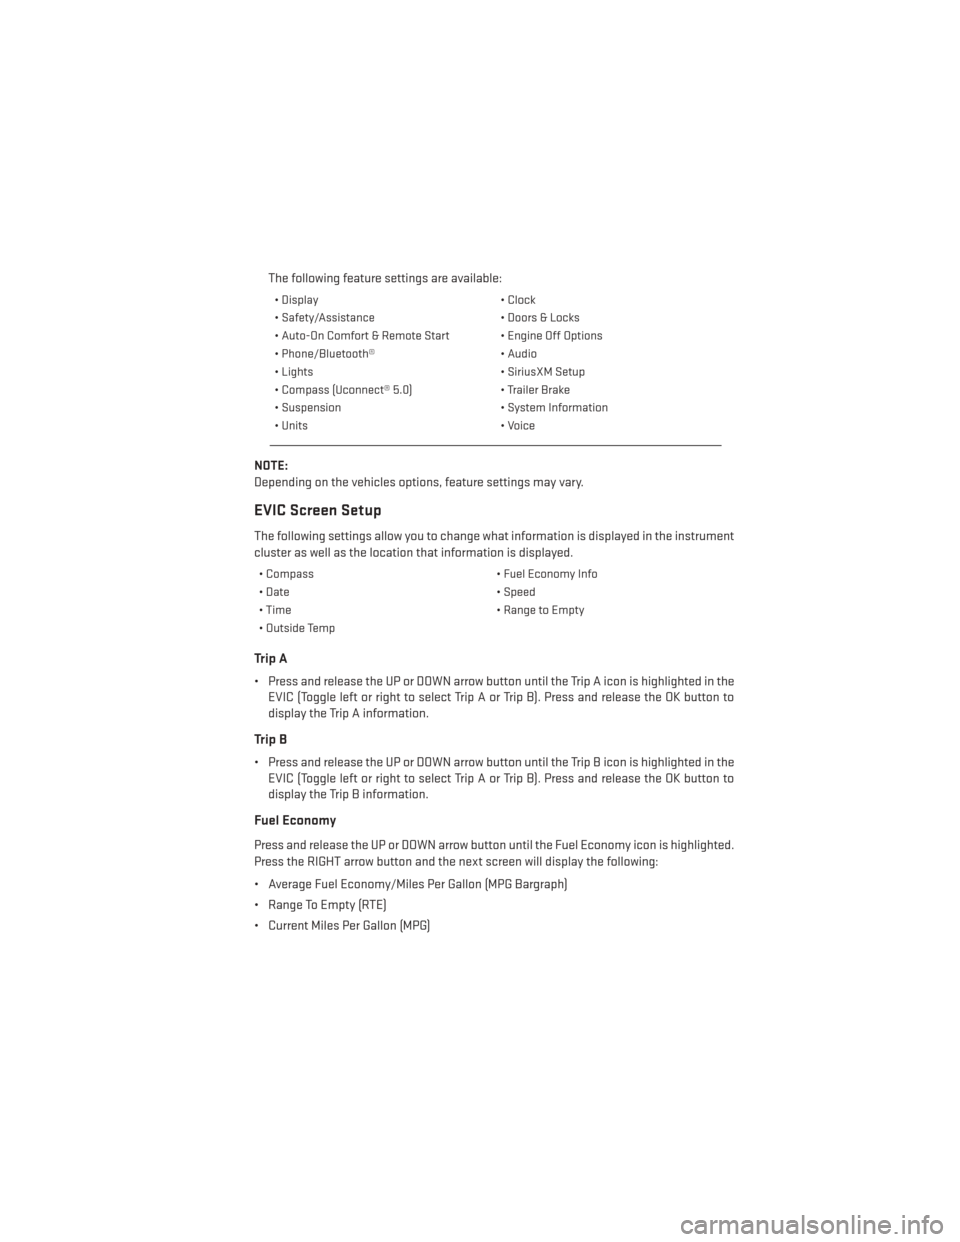
The following feature settings are available:
• Display• Clock
• Safety/Assistance • Doors & Locks
• Auto-On Comfort & Remote Start • Engine Off Options
• Phone/Bluetooth® • Audio
• Lights • SiriusXM Setup
• Compass (Uconnect® 5.0) • Trailer Brake
• Suspension • System Information
• Units • Voice
NOTE:
Depending on the vehicles options, feature settings may vary.
EVIC Screen Setup
The following settings allow you to change what information is displayed in the instrument
cluster as well as the location that information is displayed.
• Compass • Fuel Economy Info
• Date • Speed
• Time • Range to Empty
• Outside Temp
Trip A
• Press and release the UP or DOWN arrow button until the Trip A icon is highlighted in the EVIC (Toggle left or right to select Trip A or Trip B). Press and release the OK button to
display the Trip A information.
Trip B
• Press and release the UP or DOWN arrow button until the Trip B icon is highlighted in theEVIC (Toggle left or right to select Trip A or Trip B). Press and release the OK button to
display the Trip B information.
Fuel Economy
Press and release the UP or DOWN arrow button until the Fuel Economy icon is highlighted.
Press the RIGHT arrow button and the next screen will display the following:
• Average Fuel Economy/Miles Per Gallon (MPG Bargraph)
• Range To Empty (RTE)
• Current Miles Per Gallon (MPG)
ELECTRONICS
117
Page 125 of 188
ALL-WHEEL DRIVE OPERATION
Single-Speed Operating Instructions/Precautions
This system contains a single-speed (HI range only) transfer case, which provides conve-
nient full-time all-wheel drive. No driver interaction is required. The Brake Traction Control
(BTC) System, which combines standard ABS and Traction Control, provides resistance to
any wheel that is slipping to allow additional torque transfer to wheels with traction.
NOTE:
This system is not appropriate for conditions where AWD LOW range is recommended. Refer to
“Off-Road Driving Tips” in “Starting and Operating” on the DVD for further information.
Electronically Shifted Transfer Case (Three-Position Switch)
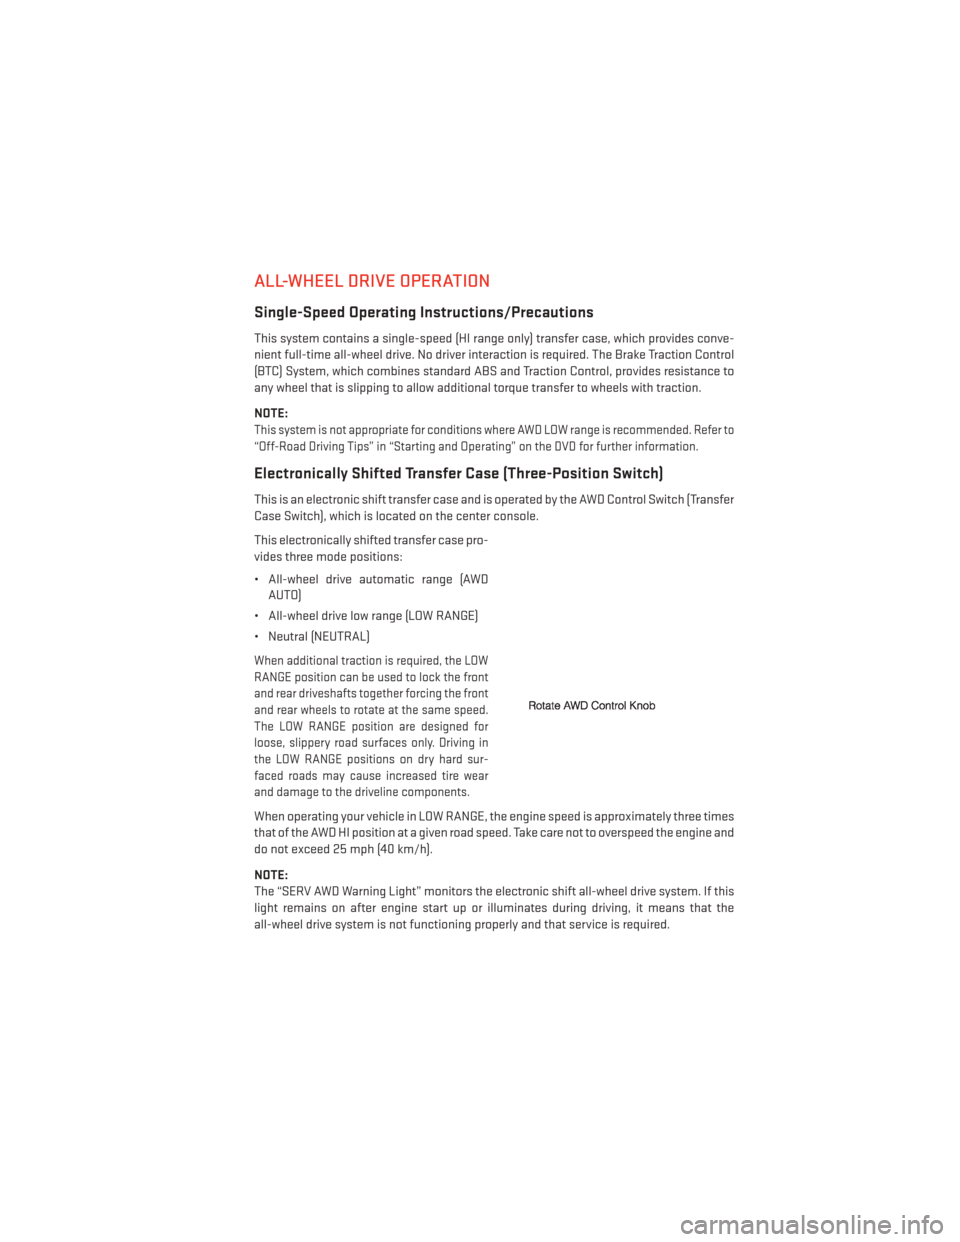
This is an electronic shift transfer case and is operated by the AWD Control Switch (Transfer
Case Switch), which is located on the center console.
This electronically shifted transfer case pro-
vides three mode positions:
• All-wheel drive automatic range (AWDAUTO)
• All-wheel drive low range (LOW RANGE)
• Neutral (NEUTRAL)
When additional traction is required, the LOW
RANGE position can be used to lock the front
and rear driveshafts together forcing the front
and rear wheels to rotate at the same speed.
The LOW RANGE position are designed for
loose, slippery road surfaces only. Driving in
the LOW RANGE positions on dry hard sur-
faced roads may cause increased tire wear
and damage to the driveline components.
When operating your vehicle in LOW RANGE, the engine speed is approximately three times
that of the AWD HI position at a given road speed. Take care not to overspeed the engine and
do not exceed 25 mph (40 km/h).
NOTE:
The “SERV AWD Warning Light” monitors the electronic shift all-wheel drive system. If this
light remains on after engine start up or illuminates during driving, it means that the
all-wheel drive system is not functioning properly and that service is required.
OFF-ROAD CAPABILITIES
123
Page 126 of 188
Shifting Procedures
AWD Auto To Low Range
NOTE:
When shifting into or out of LOW RANGE some gear noise may be heard. This noise is
normal and is not detrimental to the vehicle or occupants.
• Shifting can be performed with the vehicle rolling 2 to 3 mph (3 to 5 km/h) or completelystopped. Use either of the following procedures:
Preferred Procedure
1. With the engine running, slow the vehicle to 2 to 3 mph (3 to 5 km/h).
2. Shift the transmission into NEUTRAL.
3. While still rolling, rotate the transfer case control switch to the desired position.
4. After the desired position indicator light is ON (not flashing), shift the transmission back into gear.
Alternate Procedure
1. Bring the vehicle to complete stop.
2. With the ignition switch in the ON position and the engine either OFF or running, shift the transmission into NEUTRAL.
3. Rotate the transfer case control switch to the desired position.
4. After the desired position indicator light is ON (not flashing), shift the transmission back into gear.
NOTE:
• If Steps 1 or 2 of either the Preferred or Alternate Procedure are not satisfied prior to attempting the shift or if they no longer are being met while the shift attempt is in
process, the desired position indicator light will flash continuously while the original
position indicator light is ON, until all requirements have been met.
• The ignition switch must be in the ON position for a shift to take place and for the position indicator lights to be operable. If the ignition switch is not in the ON position, then the
shift will not take place and no position indicator lights will be on or flashing.
WARNING!
• Always engage the parking brake when powering down the vehicle if the “SERV AWD
Warning Light” is illuminated. Not engaging the parking brake may allow the vehicle
to roll which may cause personal injury.
•
You or others could be injured if you leave the vehicle unattended with the transfer case
in the NEUTRAL position without first fully engaging the parking brake. The transfer case
NEUTRAL position disengages both the front and rear driveshafts from the powertrain
and will allow the vehicle to move regardless of the transmission position. The parking
brake should always be applied when the driver is not in the vehicle.
OFF-ROAD CAPABILITIES
124
Page 127 of 188
ROOF LUGGAGE RACK
The crossbars on your vehicle are delivered stowed within the roof rack side rails. When
installed, the roof rack can hold a maximum of 150 lbs (68 kg) of evenly distributed weight.
Installing The Crossbars
1. To install the crossbars, completely loosen the thumb screws at both ends and slide thecrossbar out from its stowed position.
2. Bend the pivot points at each end of the crossbar and push the thumb screw down.
NOTE:
Position the crossbars across the roof making sure the letters on the crossbar align with the
matching letters on the side rail.
3. Set the crossbars into position, slide them into the groove and tighten the thumb screws.
4. Refer to the Owner's Manual on the DVD for further details.
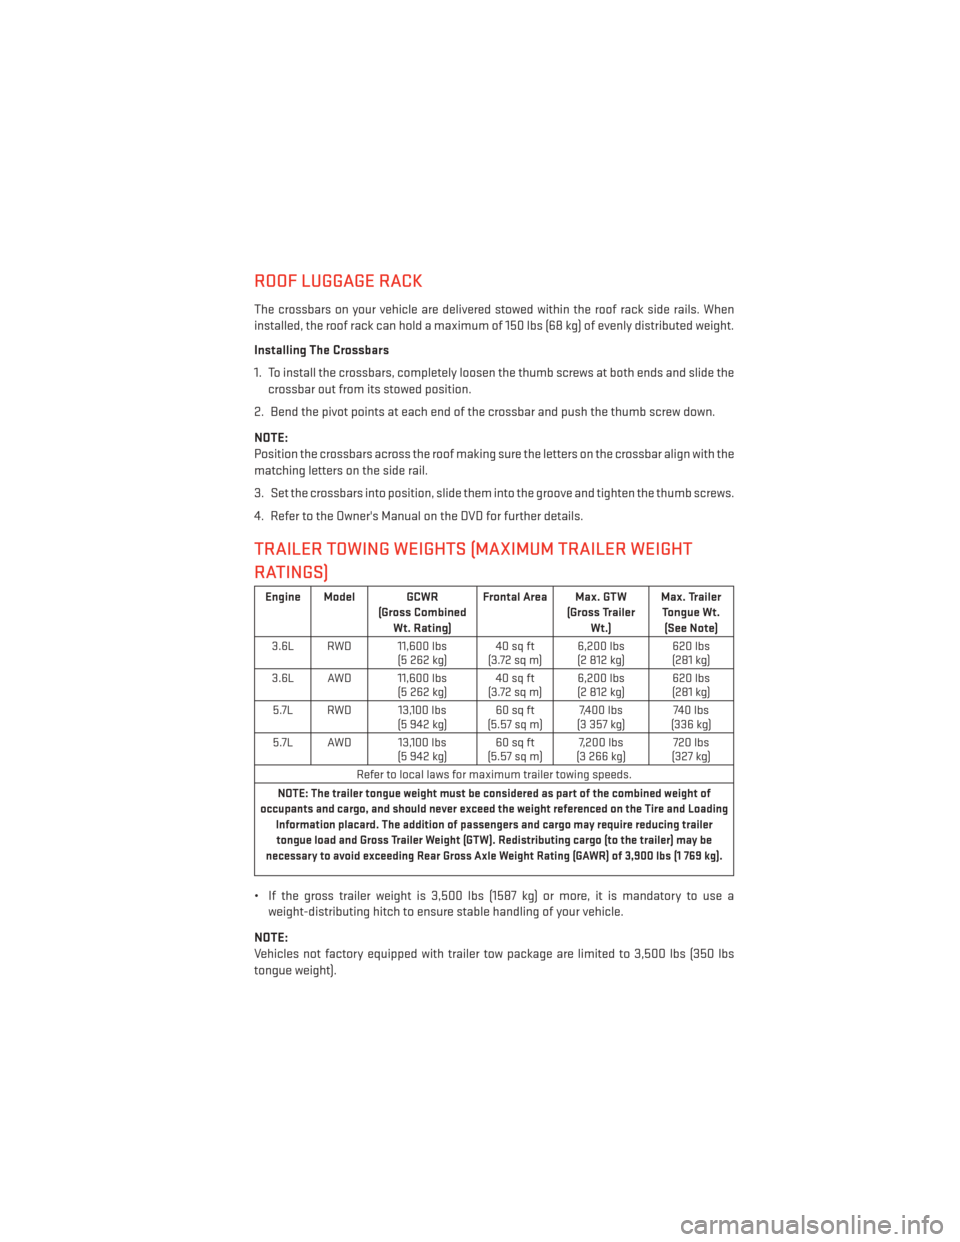
TRAILER TOWING WEIGHTS (MAXIMUM TRAILER WEIGHT
RATINGS)
Engine Model GCWR (Gross CombinedWt. Rating) Frontal Area Max. GTW
(Gross TrailerWt.) Max. Trailer
Tongue Wt. (See Note)
3.6L RWD 11,600 lbs (5 262 kg)40 sq ft
(3.72sqm) 6,200 lbs
(2 812 kg) 620 lbs
(281 kg)
3.6L AWD 11,600 lbs (5 262 kg)40 sq ft
(3.72sqm) 6,200 lbs
(2 812 kg) 620 lbs
(281 kg)
5.7L RWD 13,100 lbs (5 942 kg)60 sq ft
(5.57 sq m) 7,400 lbs
(3 357 kg) 740 lbs
(336 kg)
5.7L AWD 13,100 lbs (5 942 kg)60 sq ft
(5.57 sq m) 7,200 lbs
(3 266 kg) 720 lbs
(327 kg)
Refer to local laws for maximum trailer towing speeds.
NOTE: The trailer tongue weight must be considered as part of the combined weight of
occupants and cargo, and should never exceed the weight referenced on the Tire and Loading Information placard. The addition of passengers and cargo may require reducing trailertongue load and Gross Trailer Weight (GTW). Redistributing cargo (to the trailer) may be
necessary to avoid exceeding Rear Gross Axle Weight Rating (GAWR) of 3,900 lbs (1 769 kg).
• If the gross trailer weight is 3,500 lbs (1587 kg) or more, it is mandatory to use a weight-distributing hitch to ensure stable handling of your vehicle.
NOTE:
Vehicles not factory equipped with trailer tow package are limited to 3,500 lbs (350 lbs
tongue weight).
UTILITY
125
Page 130 of 188
Shifting Into NEUTRAL
Use the following procedure to prepare your vehicle for recreational towing:
1. Bring the vehicle to a complete stop, with the engine running.
2. Press and hold the brake pedal.
3. Shift the transmission into NEUTRAL.
4. Using a ballpoint pen or similar object, press and hold the recessed transfer caseNEUTRAL (N) button (located by the selector switch) for four seconds. The light behind
the N symbol will blink, indicating shift in progress. The light will stop blinking (stay on
solid) when the shift to NEUTRAL (N) is complete. A “FOUR WHEEL DRIVE SYSTEM IN
NEUTRAL” message will display on the EVIC (Electronic Vehicle Information Center).
5. After the shift is completed and the NEUTRAL (N) light stays on, release the NEUTRAL (N) button.
6. Shift the transmission into REVERSE.
7. Release the brake pedal for five seconds and ensure that there is no vehicle movement.
8. Shift the transmission back into NEUTRAL.
9. Firmly apply the parking brake.
10. With the transmission and transfer case in NEUTRAL, press and hold the ENGINE START/STOP button until the engine turns off. Turning the engine off will automatically
place the transmission in PARK.
11.
Press the ENGINE STOP/START button again (without pressing the brake pedal), if needed,
to turn the ignition switch to the OFF position.
CAUTION!
Damage to the transmission may occur if the transmission is shifted into PARK with the
transfer case in NEUTRAL (N) and the engine running. With the transfer case in NEUTRAL
(N) ensure that the engine is OFF before shifting the transmission into PARK.
12. Attach the vehicle to the tow vehicle using a suitable tow bar.
13. Release the parking brake.
UTILITY
128
Page 132 of 188
Shifting Out Of NEUTRAL (N)
Use the following procedure to prepare your vehicle for normal usage:
1. Bring the vehicle to a complete stop, leaving it connected to the tow vehicle.
2. Firmly apply the parking brake.
3. Start the engine.
4. Press and hold the brake pedal.
5. Shift the transmission into NEUTRAL.
6. Using a ballpoint pen or similar object, press and hold the recessed transfer caseNEUTRAL (N) button (located by the selector switch) for one second.
7. When the NEUTRAL (N) indicator light turns off, release the NEUTRAL (N) button.
8. After the NEUTRAL (N) button has been released, the transfer case will shift to the position indicated by the selector switch.
9. Shift the transmission into PARK and turn the engine OFF.
10. Release the brake pedal.
11. Disconnect vehicle from the tow vehicle.
12. Start the engine.
13. Press and hold the brake pedal.
14. Release the parking brake.
15. Shift the transmission into DRIVE, release the brake pedal, and check that the vehicle operates normally.
NOTE:
• Steps 1 through 5 are requirements that must be met before pressing the NEUTRAL (N) button, and must continue to be met until the shift has been completed. If any of these
requirements are not met before pressing the NEUTRAL (N) button or are no longer met
during the shift, the NEUTRAL (N) indicator light will flash continuously until all require-
ments are met or until the NEUTRAL (N) button is released.
• The ignition switch must be in the ON/RUN position for a shift to take place and for the position indicator lights to be operable. If the ignition switch is not in the ON/RUN
position, the shift will not take place and no position indicator lights will be on or flashing.
• A flashing NEUTRAL (N) position indicator light indicates that shift requirements have not been met.
UTILITY
130