DODGE DURANGO 2015 3.G User Guide
Manufacturer: DODGE, Model Year: 2015, Model line: DURANGO, Model: DODGE DURANGO 2015 3.GPages: 236, PDF Size: 35.01 MB
Page 181 of 236
Preparations For Jacking
1. Park the vehicle on a firm level surface, away from traffic for your safety.
2. Turn the engine off, place the transmission in PARK, fully depress the pedal to the floor
to set the parking brake, and activate the Hazard Warning flashers.
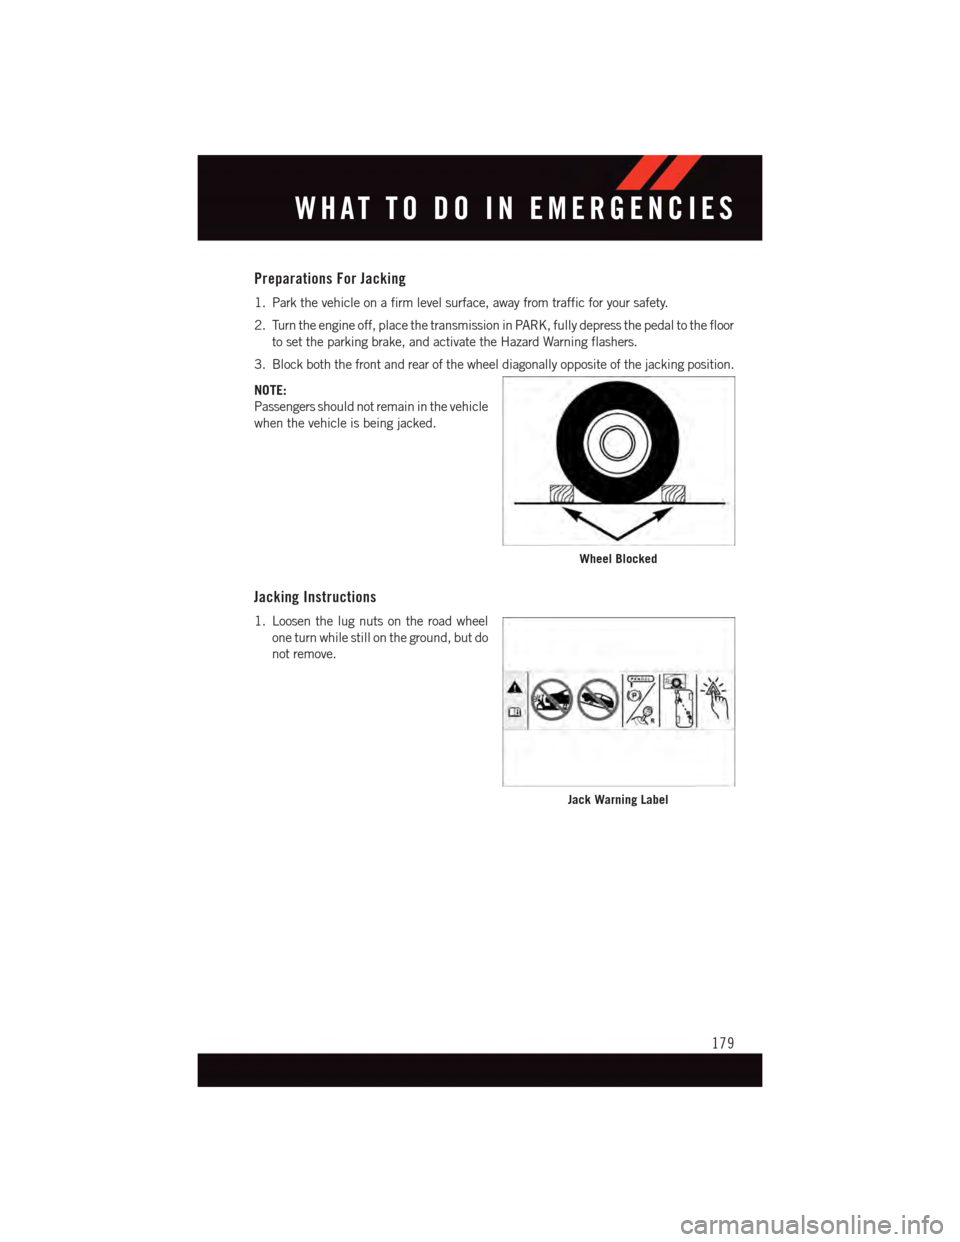
3. Block both the front and rear of the wheel diagonally opposite of the jacking position.
NOTE:
Passengers should not remain in the vehicle
when the vehicle is being jacked.
Jacking Instructions
1. Loosen the lug nuts on the road wheel
one turn while still on the ground, but do
not remove.
Wheel Blocked
Jack Warning Label
WHAT TO DO IN EMERGENCIES
179
Page 182 of 236
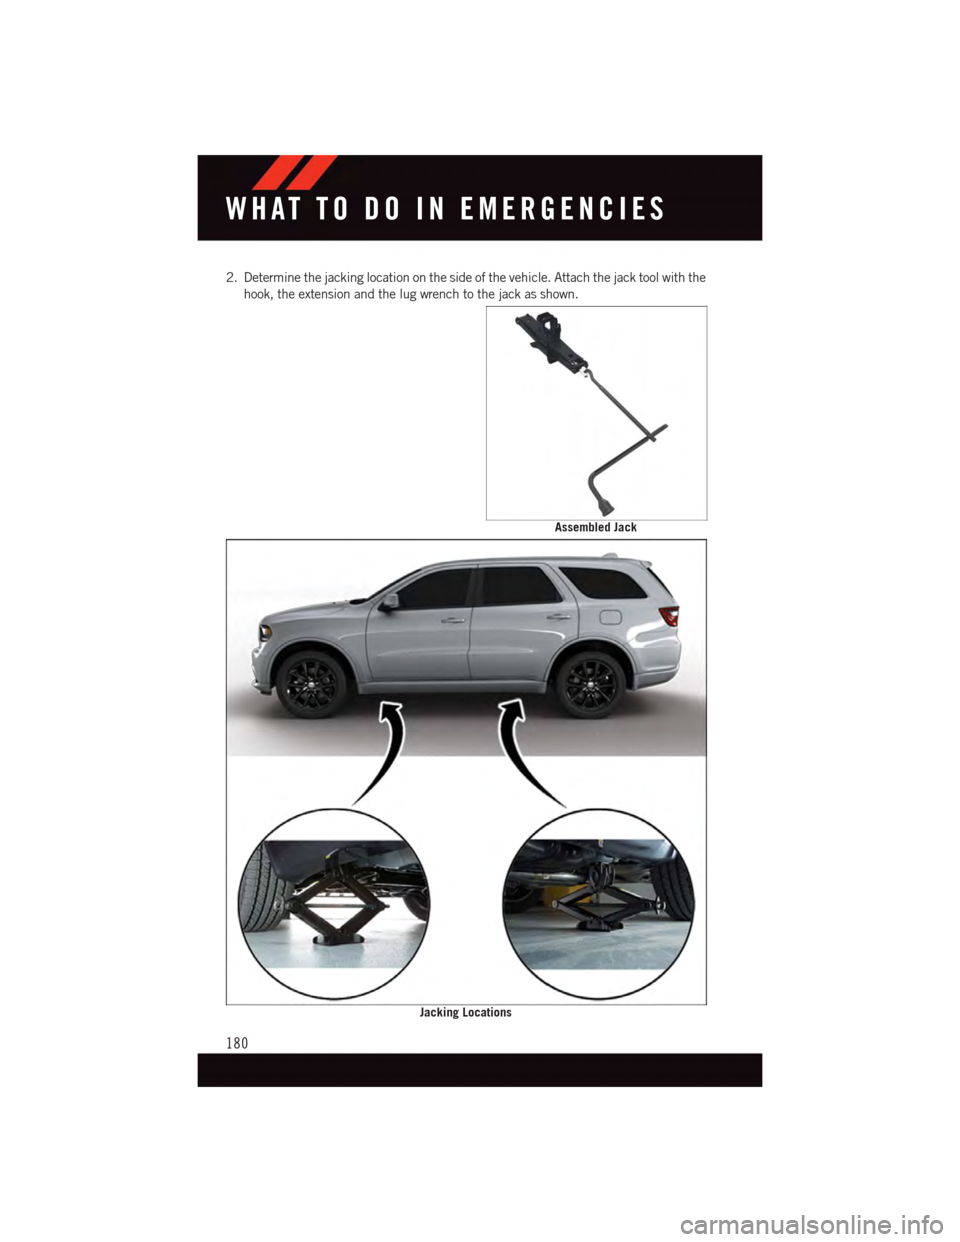
2. Determine the jacking location on the side of the vehicle. Attach the jack tool with the
hook, the extension and the lug wrench to the jack as shown.
Assembled Jack
Jacking Locations
WHAT TO DO IN EMERGENCIES
180
Page 183 of 236
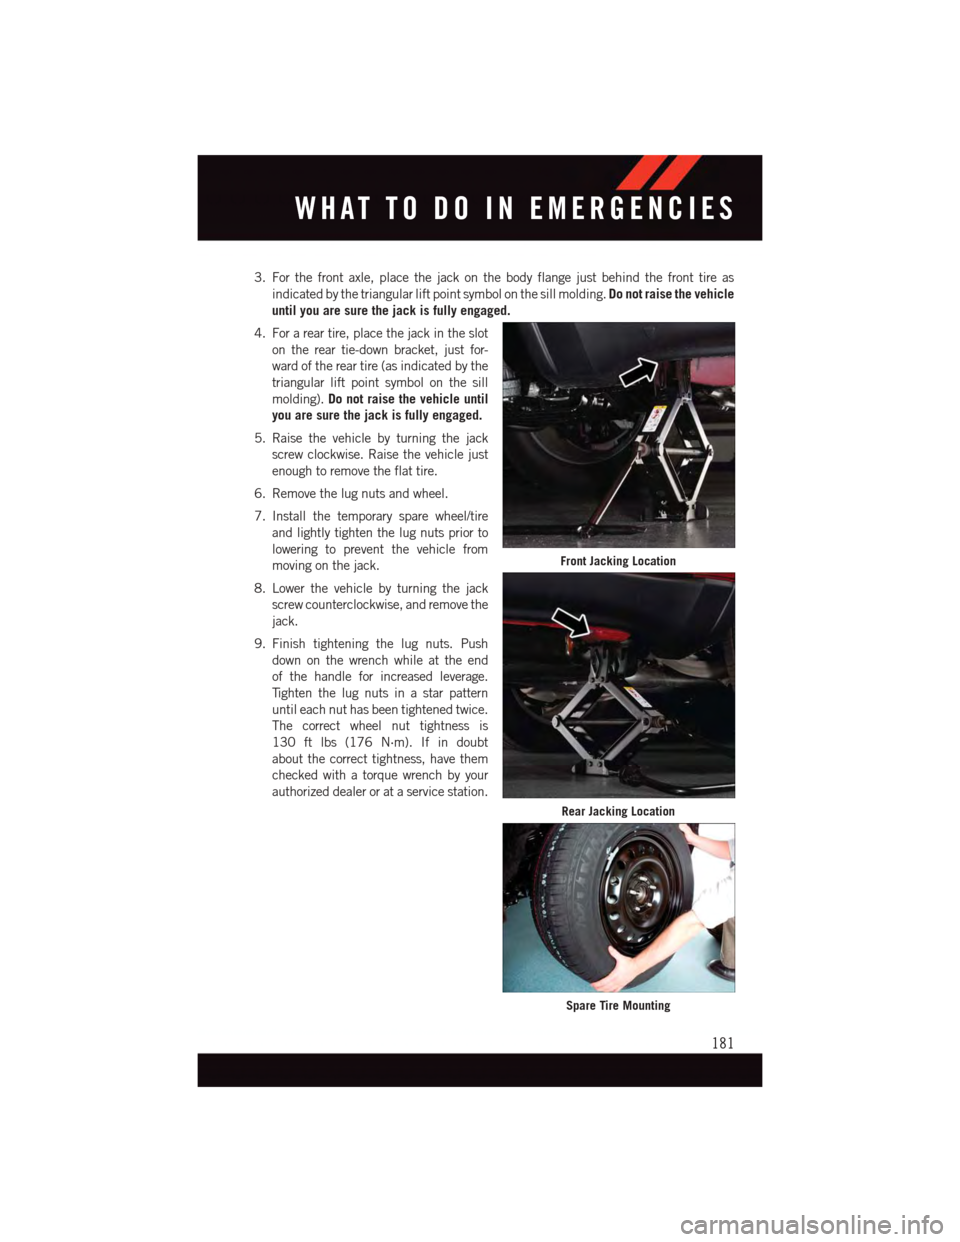
3. For the front axle, place the jack on the body flange just behind the front tire as
indicated by the triangular lift point symbol on the sill molding.Do not raise the vehicle
until you are sure the jack is fully engaged.
4. For a rear tire, place the jack in the slot
on the rear tie-down bracket, just for-
ward of the rear tire (as indicated by the
triangular lift point symbol on the sill
molding).Do not raise the vehicle until
you are sure the jack is fully engaged.
5. Raise the vehicle by turning the jack
screw clockwise. Raise the vehicle just
enough to remove the flat tire.
6. Remove the lug nuts and wheel.
7. Install the temporary spare wheel/tire
and lightly tighten the lug nuts prior to
lowering to prevent the vehicle from
moving on the jack.
8. Lower the vehicle by turning the jack
screw counterclockwise, and remove the
jack.
9. Finish tightening the lug nuts. Push
down on the wrench while at the end
of the handle for increased leverage.
Ti g h t e n t h e l u g n u t s i n a s t a r p a t t e r n
until each nut has been tightened twice.
The correct wheel nut tightness is
130 ft lbs (176 N·m). If in doubt
about the correct tightness, have them
checked with a torque wrench by your
authorized dealer or at a service station.
Front Jacking Location
Rear Jacking Location
Spare Tire Mounting
WHAT TO DO IN EMERGENCIES
181
Page 184 of 236
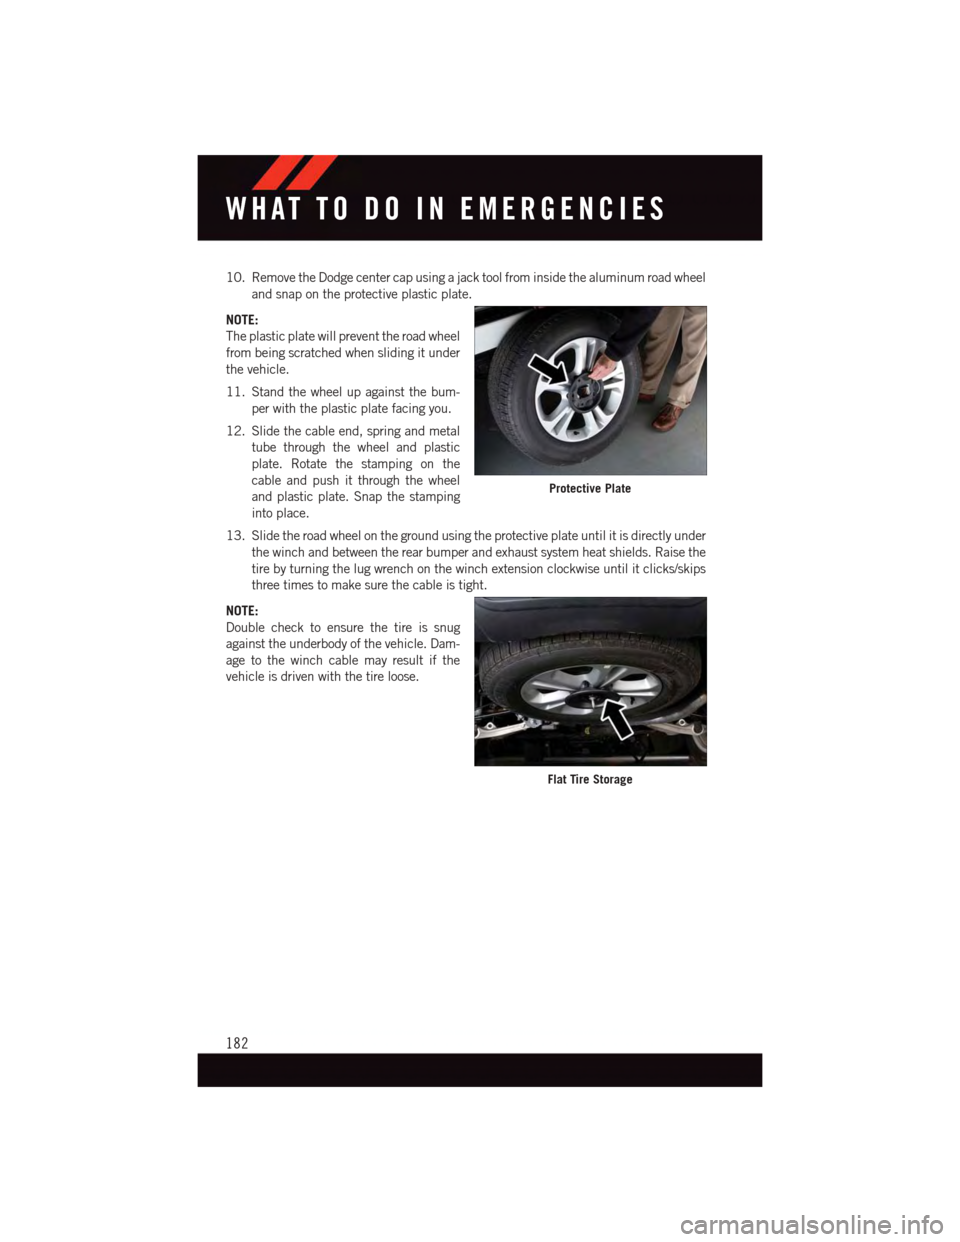
10. Remove the Dodge center cap using a jack tool from inside the aluminum road wheel
and snap on the protective plastic plate.
NOTE:
The plastic plate will prevent the road wheel
from being scratched when sliding it under
the vehicle.
11. Stand the wheel up against the bum-
per with the plastic plate facing you.
12. Slide the cable end, spring and metal
tube through the wheel and plastic
plate. Rotate the stamping on the
cable and push it through the wheel
and plastic plate. Snap the stamping
into place.
13. Slide the road wheel on the ground using the protective plate until it is directly under
the winch and between the rear bumper and exhaust system heat shields. Raise the
tire by turning the lug wrench on the winch extension clockwise until it clicks/skips
three times to make sure the cable is tight.
NOTE:
Double check to ensure the tire is snug
against the underbody of the vehicle. Dam-
age to the winch cable may result if the
vehicle is driven with the tire loose.
Protective Plate
Flat Tire Storage
WHAT TO DO IN EMERGENCIES
182
Page 185 of 236
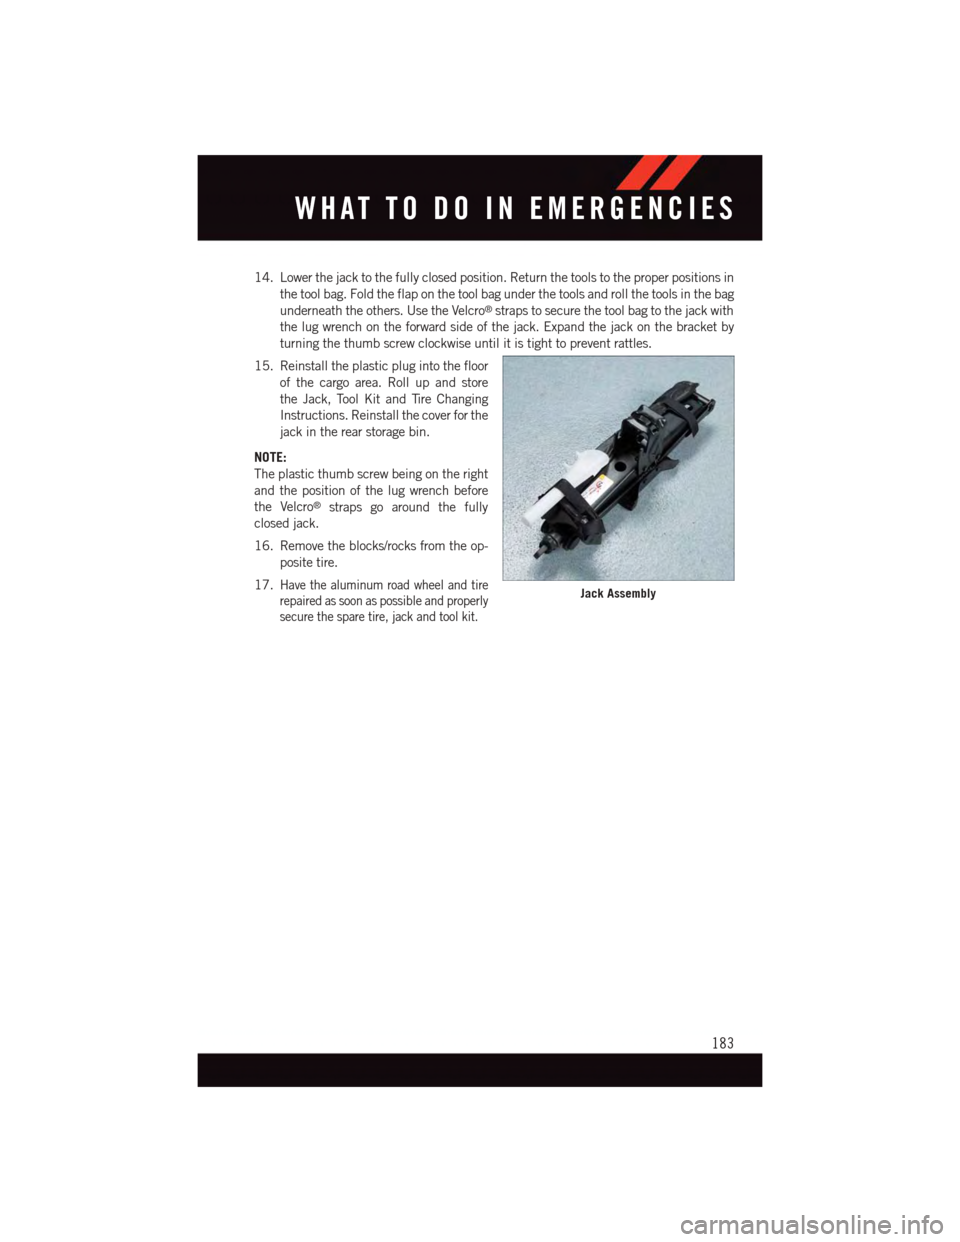
14. Lower the jack to the fully closed position. Return the tools to the proper positions in
the tool bag. Fold the flap on the tool bag under the tools and roll the tools in the bag
underneath the others. Use the Velcro®straps to secure the tool bag to the jack with
the lug wrench on the forward side of the jack. Expand the jack on the bracket by
turning the thumb screw clockwise until it is tight to prevent rattles.
15. Reinstall the plastic plug into the floor
of the cargo area. Roll up and store
the Jack, Tool Kit and Tire Changing
Instructions. Reinstall the cover for the
jack in the rear storage bin.
NOTE:
The plastic thumb screw being on the right
and the position of the lug wrench before
the Velcro®straps go around the fully
closed jack.
16. Remove the blocks/rocks from the op-
posite tire.
17.Have the aluminum road wheel and tire
repaired as soon as possible and properly
secure the spare tire, jack and tool kit.
Jack Assembly
WHAT TO DO IN EMERGENCIES
183
Page 186 of 236
Road Tire Installation
1. Mount the road tire on the axle.
2. Install the remaining lug nuts with the cone shaped end of the nut toward the wheel.
Lightly tighten the lug nuts.
3. Lower the vehicle to the ground by turning the jack handle counterclockwise.
4. Finish tightening the lug nuts. Push down on the wrench while at the end of the handle
for increased leverage. Tighten the lug nuts in a star pattern until each nut has been
tightened twice. The correct tightness of each lug nut is 130 ft/lbs (176 N·m). If in
doubt about the correct tightness, have them checked with a torque wrench by your
authorized dealer or service station.
5. After 25 miles (40 km) check the lug nut torque with a torque wrench to ensure that
all lug nuts are properly seated against the wheel.
CAUTION!
•Donotusepowertoolstowinchthetireupordown.Impacttypetoolscandamage
the winch mechanism.
•Donotattempttoraisethevehiclebyjackingonlocationsotherthanthose
indicated in the Jacking Instructions for this vehicle.
•Besuretomountthesparetirewiththevalvestemfacingoutward.Thevehicle
could be damaged if the spare tire is mounted incorrectly.
WHAT TO DO IN EMERGENCIES
184
Page 187 of 236
WARNING!
•Donotattempttochangeatireonthesideofthevehicleclosetomovingtraffic.
Pull far enough off the road to avoid the danger of being hit when operating the jack
or changing the wheel.
•Beingunderajacked-upvehicleisdangerous.Thevehiclecouldslipoffthejack
and fall on you. You could be crushed. Never put any part of your body under a
vehicle that is on a jack. If you need to get under a raised vehicle, take it to a service
center where it can be raised on a lift.
•Thejackisdesignedtobeusedasatoolforchangingtiresonly.Thejackshouldnot
be used to lift the vehicle for service purposes. The vehicle should be jacked on a
firm level surface only. Avoid ice or slippery areas.
•Alwaysparkonafirm,levelsurfaceasfarfromtheedgeoftheroadwayaspossible
before raising the vehicle.
•TurnontheHazardWarningflasher.
•Blockthewheeldiagonallyoppositethewheeltoberaised.
•SettheparkingbrakefirmlyandsettheautomatictransmissioninPARK.
•Neverstartorruntheenginewiththevehicleonajack.
•Donotletanyonesitinthevehiclewhenitisonajack.
•Donotgetunderthevehiclewhenitisonajack.
•Onlyusethejackinthepositionsindicatedandforliftingthisvehicleduringatire
change.
•Ifworkingonorneararoadway,beextremelycarefulofmotortraffic.
•Toassurethatsparetires,flatorinflated,aresecurelystowed,sparesmustbe
stowed with the valve stem facing the ground. Carefully follow these tire changing
warnings to help prevent personal injury or damage to your vehicle:
•Raisingthevehiclehigherthannecessarycanmakethevehiclelessstable.
It could slip off the jack and hurt someone near it. Raise the vehicle only
enough to remove the tire.
•Toavoidtheriskofforcingthevehicleoffthejack,donotfullytightenthe
wheel nuts until the vehicle has been lowered. Failure to follow this warning
may result in personal injury.
•Donotusepowertoolstowinchthetireupordown.Impact-typetoolsmay
damage the winch mechanism.
•Aloosetireorjack,thrownforwardinacollisionorhardstopcouldendanger
the occupants of the vehicle. Always stow the jack parts and the spare tire in
the places provided.
•Toavoidtheriskofforcingthevehicleoffthejack,donottightenthelug
nuts fully until the vehicle is lowered to the ground.
WHAT TO DO IN EMERGENCIES
185
Page 188 of 236
BATTERY LOCATION
The battery in your vehicle is located under the passenger's front seat. Remote battery
posts are located on the right side of the engine compartment for jump-starting.
JUMP-STARTING
If your vehicle has a discharged battery it can be jump-started using a set of jumper cables
and a battery in another vehicle or by using a portable battery booster pack.
Jump-starting can be dangerous if done improperly so please follow the procedures in this
section carefully.
NOTE:
When using a portable battery booster pack follow the manufacturer’s operating instruc-
tions and precautions.
Preparations For Jump-Start
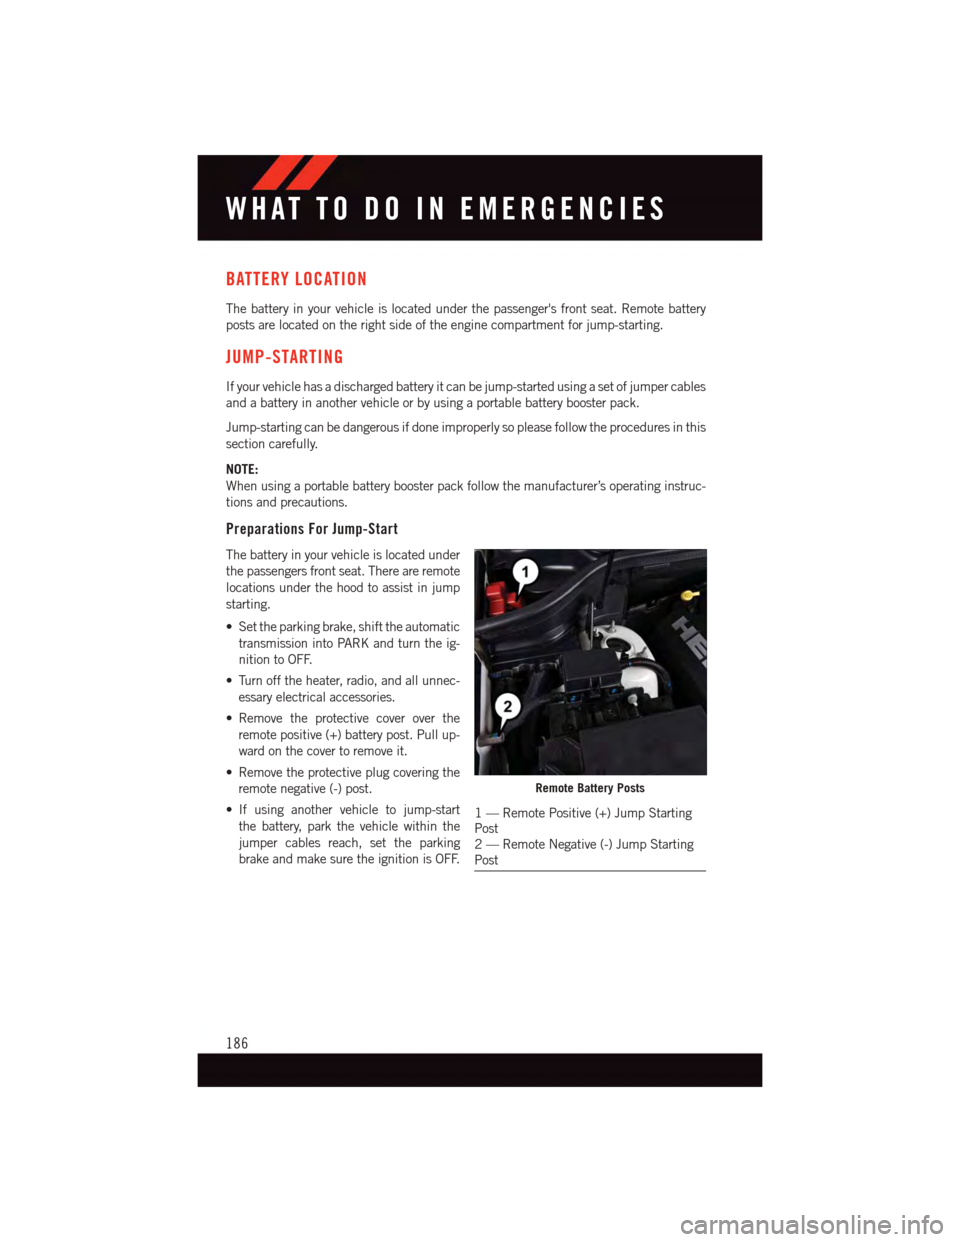
The battery in your vehicle is located under
the passengers front seat. There are remote
locations under the hood to assist in jump
starting.
•Settheparkingbrake,shifttheautomatic
transmission into PARK and turn the ig-
nition to OFF.
•Turnofftheheater,radio,andallunnec-
essary electrical accessories.
•Remove the protective cover over the
remote positive (+) battery post. Pull up-
ward on the cover to remove it.
•Removetheprotectiveplugcoveringthe
remote negative (-) post.
•If using another vehicle to jump-start
the battery, park the vehicle within the
jumper cables reach, set the parking
brake and make sure the ignition is OFF.
Remote Battery Posts
1—RemotePositive(+)JumpStartingPost2—RemoteNegative(-)JumpStartingPost
WHAT TO DO IN EMERGENCIES
186
Page 189 of 236
Jump-Starting Procedure
1. Connect the positive(+)end of the jumper cable to the remote positive(+)post of the
vehicle with discharged battery.
2. Connect the opposite end of the positive(+)jumper cable to the positive(+)post of the
booster battery.
3. Connect the negative(-)end of the jumper cable to the negative(-)post of the booster
battery.
4. Connect the opposite end of the negative(-)jumper cable to the remote negative(-)
post of the vehicle with the discharged battery.
5. Start the engine in the vehicle that has the booster battery, let the engine idle a few
minutes, and then start the engine in the vehicle with the discharged battery.
Once the engine is started, remove the jumper cables in the reverse sequence:
1. Disconnect the negative(-)end of the jumper cable from the remote negative(-)post
of the vehicle with the discharged battery.
2. Disconnect the opposite end of the negative(-)jumper cable from the negative(-)post
of the booster battery.
3. Disconnect the positive(+)end of the jumper cable from the positive(+)post of the
booster battery.
4. Disconnect the opposite end of the positive(+)jumper cable from the remote positive
(+)post of the discharged vehicle.
5. Reinstall the protective cover over the remote positive(+)post of the vehicle with the
discharged battery.
6. Reinstall the protective plug over the remote negative(-)post of the vehicle with the
discharged battery.
NOTE:
If frequent jump-starting is required to start your vehicle you should have the battery and
charging system inspected at your authorized dealer.
CAUTION!
•Donotuseaportablebatteryboosterpackoranyotherboostersourcewithasystem
voltage greater than 12 Volts or damage to the battery, starter motor, alternator or
electrical system may occur.
•Failuretofollowtheseprocedurescouldresultindamagetothechargingsystemof
the booster vehicle or the discharged vehicle.
•Accessoriesthatcanbepluggedintothevehiclepoweroutletsdrawpowerfromthe
vehicle’s battery, even when not in use (e.g., cellular phones, etc.). Eventually, if
plugged in long enough, the vehicle’s battery discharges sufficiently to degrade
battery life and/or prevent the engine from starting.
WHAT TO DO IN EMERGENCIES
187
Page 190 of 236
WARNING!
•Whentemperaturesarebelowthefreezingpoint,electrolyteinadischargedbattery
may freeze. Do not attempt jump-starting because the battery could rupture or
explode and cause personal injury. Battery temperature must be brought above the
freezing point before attempting a jump-start.
•Takecaretoavoidtheradiatorcoolingfanwheneverthehoodisraised.Itcanstart
anytime the ignition switch is on. You can be injured by moving fan blades.
•Removeanymetaljewelry,suchaswatchbandsorbracelets,thatmightmakean
inadvertent electrical contact. You could be severely injured.
•Batteriescontainsulfuricacidthatcanburnyourskinoreyesandgenerate
hydrogen gas which is flammable and explosive. Keep open flames or sparks away
from the battery.
•Donotallowvehiclestotoucheachotherasthiscouldestablishaground
connection and personal injury could result.
•Failuretofollowthisprocedurecouldresultinpersonalinjuryorpropertydamage
due to battery explosion.
•Donotconnectthecabletothenegativepost(-)ofthedischargedbattery.The
resulting electrical spark could cause the battery to explode and could result in
personal injury.
WHAT TO DO IN EMERGENCIES
188