light DODGE DURANGO 2015 3.G Owner's Manual
[x] Cancel search | Manufacturer: DODGE, Model Year: 2015, Model line: DURANGO, Model: DODGE DURANGO 2015 3.GPages: 236, PDF Size: 35.01 MB
Page 43 of 236
Rear Wiper
Rear Wiper Operation
Rotate the center portion of the lever forward to the first detent for intermittent operation
and to the second detent for rear wiper operation.
Rear Washer Operation
Rotate the center portion of the lever past the second detent to activate the rear washer.
High Beam Operation
Push the lever forward to activate the high beams. Pull the lever toward you for flash to
pass.
NOTE:
For safe driving, turn off high beams when oncoming traffic is present to prevent headlight
glare and as a courtesy to other motorists.
HEADLIGHT SWITCH
Automatic Headlights/Parking Lights/Headlights
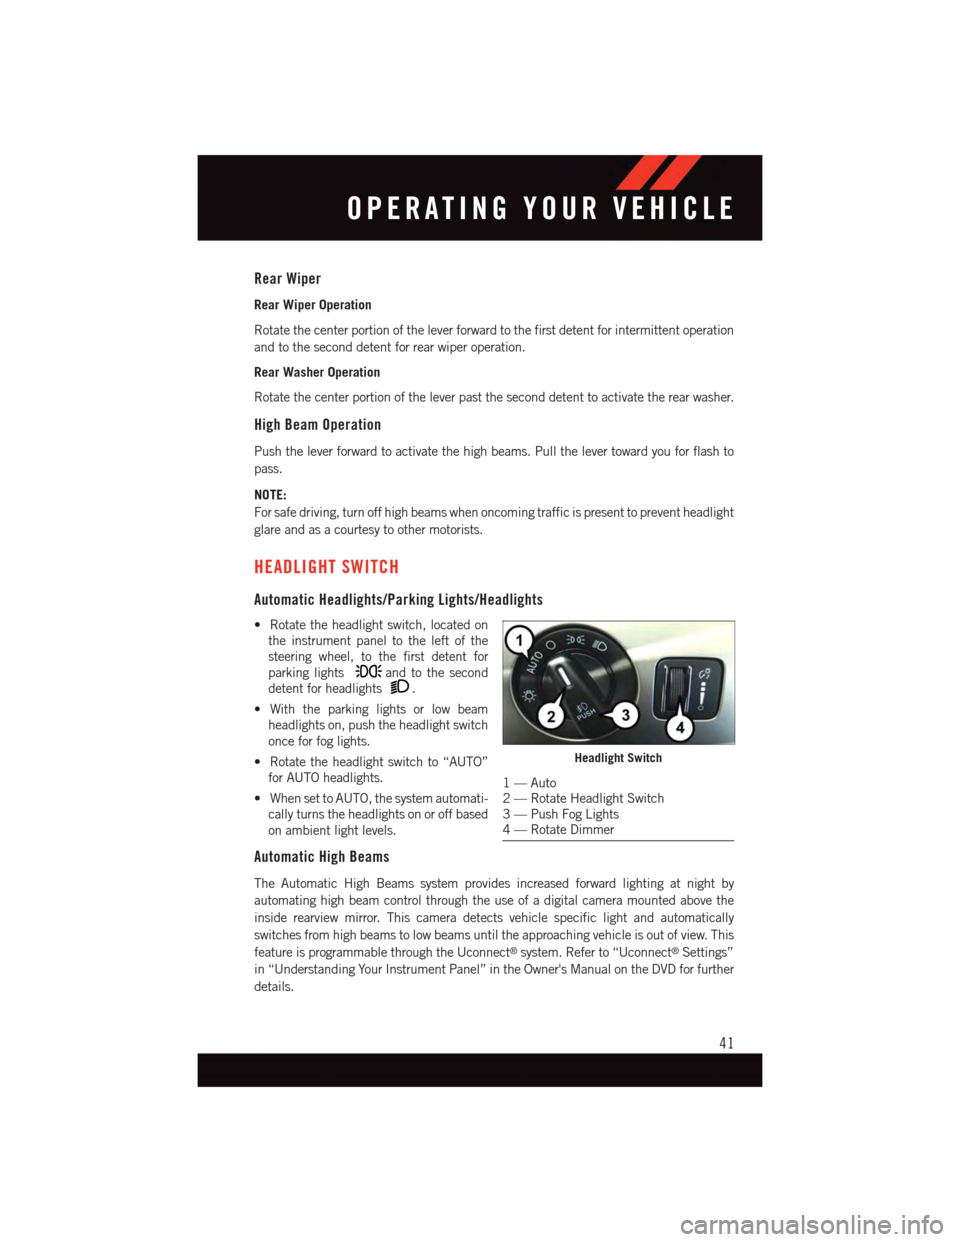
•Rotatetheheadlightswitch,locatedon
the instrument panel to the left of the
steering wheel, to the first detent for
parking lightsand to the second
detent for headlights.
•Withtheparkinglightsorlowbeam
headlights on, push the headlight switch
once for fog lights.
•Rotatetheheadlightswitchto“AUTO”
for AUTO headlights.
•WhensettoAUTO,thesystemautomati-
cally turns the headlights on or off based
on ambient light levels.
Automatic High Beams
The Automatic High Beams system provides increased forward lighting at night by
automating high beam control through the use of a digital camera mounted above the
inside rearview mirror. This camera detects vehicle specific light and automatically
switches from high beams to low beams until the approaching vehicle is out of view. This
feature is programmable through the Uconnect®system. Refer to “Uconnect®Settings”
in “Understanding Your Instrument Panel” in the Owner's Manual on the DVD for further
details.
Headlight Switch
1—Auto2—RotateHeadlightSwitch3—PushFogLights4—RotateDimmer
OPERATING YOUR VEHICLE
41
Page 44 of 236
Instrument Panel Dimmer
•Rotatethedimmercontroltotheextremebottompositiontofullydimtheinstrument
panel lights and prevent the interior lights from illuminating when a door is opened.
•Rotatethedimmercontroluptoincreasethebrightnessoftheinstrumentpanelwhen
the parking lights or headlights are on.
•Rotatethedimmercontroluptothenextdetentpositiontofullybrightentheodometer
and radio when the parking lights or headlights are on.
•Rotatethedimmercontroluptothelastdetentpositiontoturnontheinteriorlighting.
If your vehicle is equipped with a touchscreen, the dimming is programmable through the
Uconnect®system. Refer to “Uconnect®Settings ” in “Understanding Your Instrument
Panel” in the Owner's Manual on the DVD for further details.
ELECTRONIC SPEED CONTROL
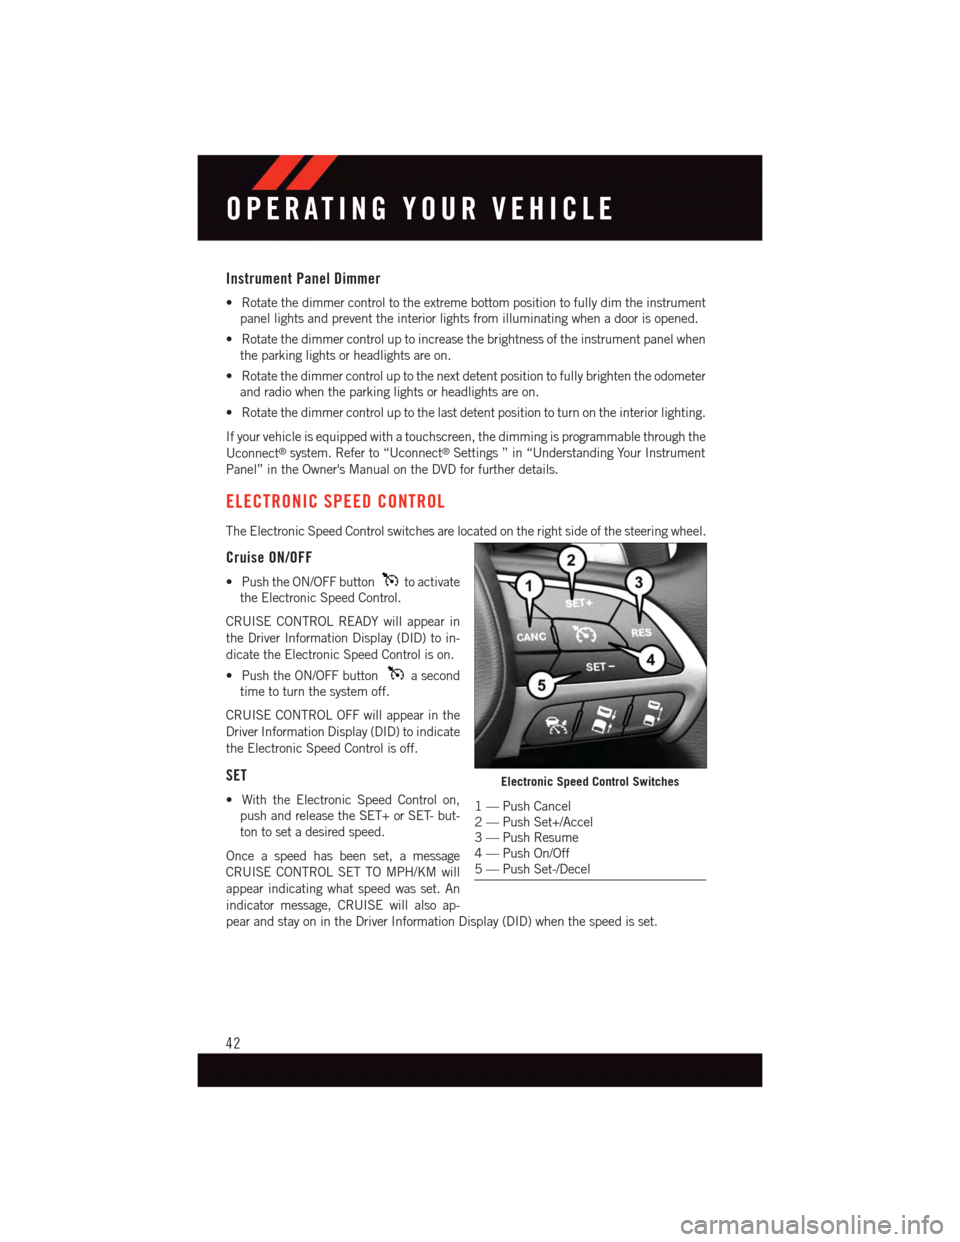
The Electronic Speed Control switches are located on the right side of the steering wheel.
Cruise ON/OFF
•PushtheON/OFFbuttonto activate
the Electronic Speed Control.
CRUISE CONTROL READY will appear in
the Driver Information Display (DID) to in-
dicate the Electronic Speed Control is on.
•PushtheON/OFFbuttonasecond
time to turn the system off.
CRUISE CONTROL OFF will appear in the
Driver Information Display (DID) to indicate
the Electronic Speed Control is off.
SET
•WiththeElectronicSpeedControlon,
push and release the SET+ or SET- but-
ton to set a desired speed.
Once a speed has been set, a message
CRUISE CONTROL SET TO MPH/KM will
appear indicating what speed was set. An
indicator message, CRUISE will also ap-
pear and stay on in the Driver Information Display (DID) when the speed is set.
Electronic Speed Control Switches
1—PushCancel2—PushSet+/Accel3—PushResume4—PushOn/Off5—PushSet-/Decel
OPERATING YOUR VEHICLE
42
Page 48 of 236
NOTE:
•WhenyouoverrideandpushtheSET+button or SET-buttons, the new Set Speed will
be the current speed of the vehicle.
•WhenyouusetheSET-button to decelerate, if the engine’s braking power does not
slow the vehicle sufficiently to reach the set speed, the brake system will automatically
slow the vehicle.
•TheACCsystemappliesthebrakedowntoafullstopwhenfollowingatargetvehicle.
If an ACC host vehicle follows a target vehicle to a standstill, the host vehicle will release
the vehicle brakes two seconds after coming to a full stop.
•TheACCsystemmaintainssetspeedwhendrivinguphillanddownhill.However,a
slight speed change on moderate hills is normal. In addition, downshifting may occur
while climbing uphill or descending downhill. This is normal operation and necessary
to maintain set speed. When driving up hill and down hill, the ACC system will cancel
if the braking temperature exceeds normal range (overheated).
Distance Setting (ACC Only)
The specified following distance for ACC can be set by varying the distance setting
between four bars (longest), three bars (long), two bars (medium) and one bar (short).
Using this distance setting and the vehicle speed, ACC calculates and sets the distance to
the vehicle ahead. This distance setting displays in the DID.
•Toincreasethedistancesetting,pushtheDistanceSetting—Increasebuttonand
release. Each time the button is pushed, the distance setting increases by one bar
(longer).
•Todecreasethedistancesetting,pushtheDistanceSetting—Decreasebuttonand
release. Each time the button is pushed, the distance setting decreases by one bar
(shorter).
ACC Operation At Stop
If the ACC system brings your vehicle to a standstill while following a target vehicle, if the
target vehicle starts moving within two seconds of your vehicle coming to a standstill, your
vehicle will resume motion without the need for any driver action.
If the target vehicle does not start moving within two seconds of your vehicle coming to a
standstill, the driver will either have to push the RES (resume) button, or apply the
accelerator pedal to reengage the ACC to the existing Set Speed.
While the ACC system is holding your vehicle at a standstill, if the driver seatbelt is
unbuckled or the driver door is opened, the parking brake will be activated, and the ACC
system will be cancelled.
OPERATING YOUR VEHICLE
46
Page 53 of 236
AUTOMATIC DIMMING MIRRORS
The rearview and driver side exterior mirror automatically adjusts for headlight glare from
vehicles behind you.
Yo u c a n t u r n t h e f e a t u r e o n o r o f f w h e n t h e A u t o m a t i c D i m m i n g M i r r o r f e a t u r e i s s e l e c t e d
through the programmable features in the Uconnect®system. Refer to “Uconnect®
Settings” in “Understanding Your Instrument Panel” in the Owner's Manual on the DVD
for further details.
ELECTRONIC SHIFTER
Yo u r v e h i c l e i s e q u i p p e d w i t h a f u e l e f f i c i e n t e i g h t - s p e e d t r a n s m i s s i o n . T h e E l e c t r o n i c
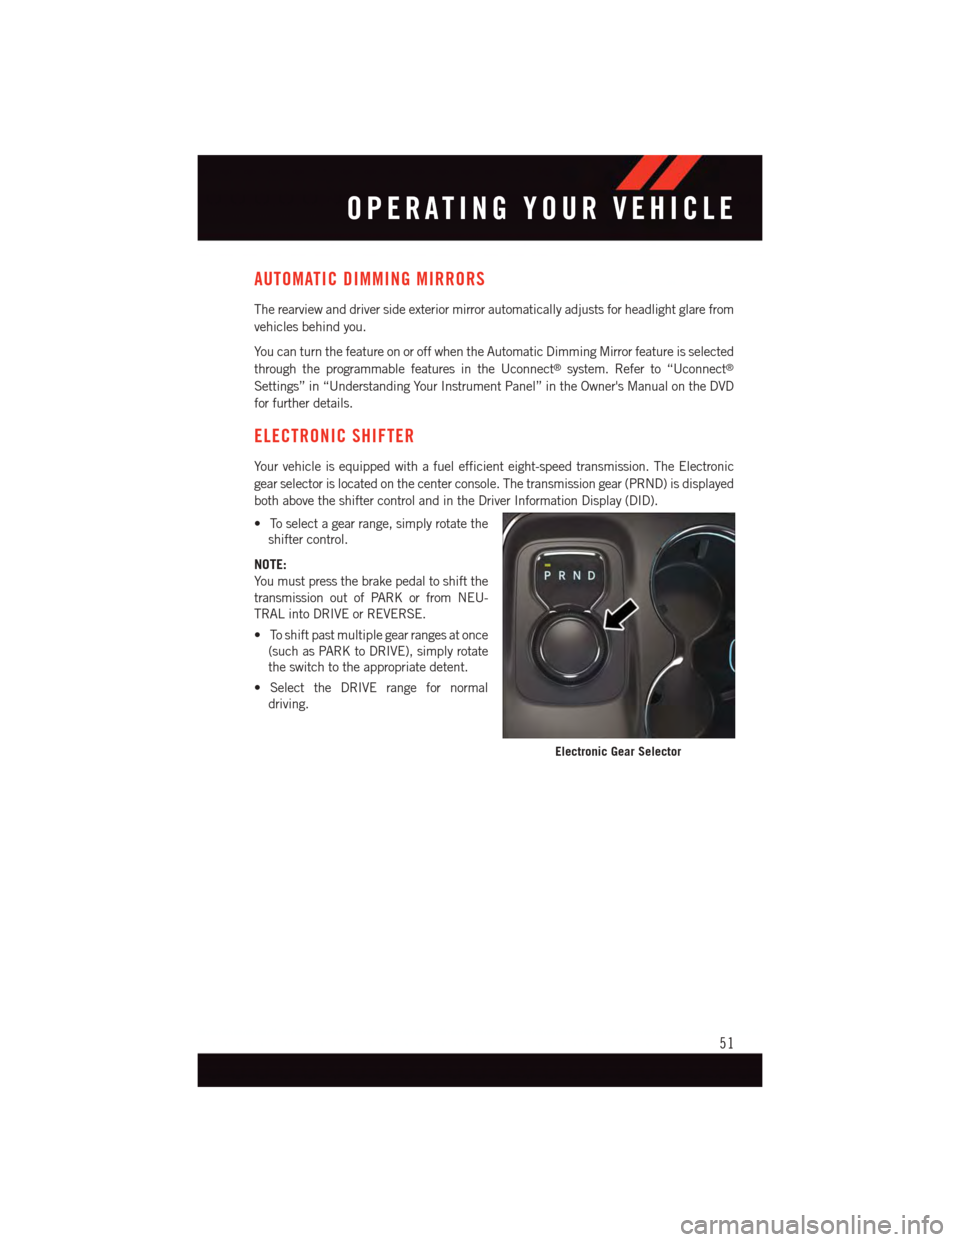
gear selector is located on the center console. The transmission gear (PRND) is displayed
both above the shifter control and in the Driver Information Display (DID).
•Toselectagearrange,simplyrotatethe
shifter control.
NOTE:
Yo u m u s t p r e s s t h e b r a k e p e d a l t o s h i f t t h e
transmission out of PARK or from NEU-
TRAL into DRIVE or REVERSE.
•Toshiftpastmultiplegearrangesatonce
(such as PARK to DRIVE), simply rotate
the switch to the appropriate detent.
•SelecttheDRIVErangefornormal
driving.
Electronic Gear Selector
OPERATING YOUR VEHICLE
51
Page 56 of 236
FUEL ECONOMY (ECO) MODE
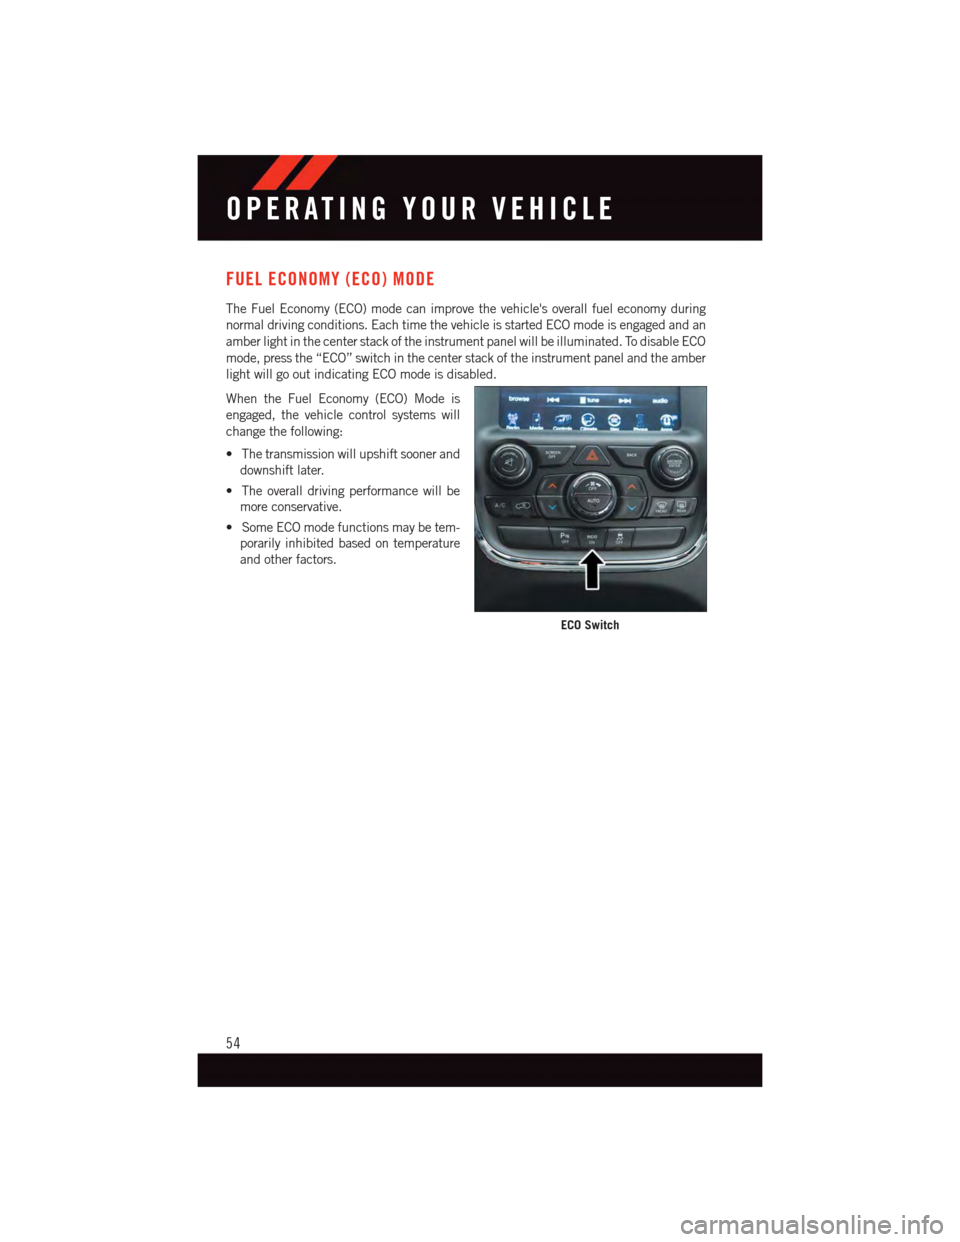
The Fuel Economy (ECO) mode can improve the vehicle's overall fuel economy during
normal driving conditions. Each time the vehicle is started ECO mode is engaged and an
amber light in the center stack of the instrument panel will be illuminated. To disable ECO
mode, press the “ECO” switch in the center stack of the instrument panel and the amber
light will go out indicating ECO mode is disabled.
When the Fuel Economy (ECO) Mode is
engaged, the vehicle control systems will
change the following:
•Thetransmissionwillupshiftsoonerand
downshift later.
•Theoveralldrivingperformancewillbe
more conservative.
•SomeECOmodefunctionsmaybetem-
porarily inhibited based on temperature
and other factors.
ECO Switch
OPERATING YOUR VEHICLE
54
Page 63 of 236
PARKVIEW® REAR BACK-UP CAMERA
Yo u c a n s e e a n o n - s c r e e n i m a g e o f t h e r e a r o f y o u r v e h i c l e w h e n e v e r t h e s h i f t l e v e r / g e a r
selector is put into REVERSE. The ParkView®Rear Back-Up Camera image will be
displayed on the radio display screen, located on the center stack of the instrument panel.
If the radio display screen appears foggy, clean the camera lens located on the liftgate.
WARNING!
Drivers must be careful when backing up; even when using the ParkView®Rear
Back-Up Camera. Always check carefully behind your vehicle, and be sure to check for
pedestrians, animals, other vehicles, obstructions, or blind spots before backing up.
Yo u m u s t c o n t i n u e t o p a y a t t e n t i o n w h i l e b a c k i n g u p . F a i l u r e t o d o s o c a n r e s u l t i n
serious injury or death.
BLIND SPOT MONITORING
The Blind Spot Monitoring (BSM) system uses two radar-based sensors, located inside the
rear bumper fascia, to detect Highway licensable vehicles (automobiles, trucks, motor-
cycles etc.) that enter the blind spot zones from the rear/front/side of the vehicle.
The Blind Spot Monitoring (BSM) system warning light, located in the outside mirrors, will
illuminate if a vehicle moves into a blind spot zone.
The BSM system can also be configured to sound an audible (chime) alert and mute the
radio to notify you of objects that have entered the detection zones.
Refer to “Blind Spot Monitoring” in “Understanding The Features Of Your Vehicle” in your
Owner's Manual on the DVD for further details.
OPERATING YOUR VEHICLE
61
Page 71 of 236
Uconnect® Access Registration (Uconnect® 8.4A/8.4AN, U.S. 48 Contiguous
States, Alaska And Hawaii)
To u n l o c k t h e f u l l p o t e n t i a l o f U c o n n e c t®Access in your vehicle, you first need to register
with Uconnect®Access.
1. From the parked vehicle with the radio touchscreen powered on, select the “Apps”
button located near the bottom right-hand corner of the radio touchscreen.
NOTE:
Should you require assistance anytime during the registration process, simply call
Uconnect®Care at 1-855-792-4241.
2. Press “Start” on the reminder screen or select “Uconnect Registration” under the “All
Apps” or “Favorites Apps” tab on the Apps list.
3. The Uconnect®Access Registration App will open and display step-by-step instruc-
tions to start your registration.
4. Enter your email address into the radio touchscreen.
5. A message will display on the touchscreen indicating your email submission was
accepted. In a few minutes, you will receive an email which will allow you to register
your vehicle for Uconnect®Access. You should open this email and begin your
Uconnect®Access registration within 72 hours.
6. Check for an email from Uconnect®Access that contains your personalized registra-
tion link. If you don't see it, check your spam or junk mail folder. Open the email and
click on the link to continue registering.
NOTE:
For security reasons, this link is valid for 72 hours from the time you’ve submitted your
email address into the radio touchscreen. If the link has expired, simply re-enter your
email address into the Uconnect®Registration App on the radio touchscreen to receive
another link. The secured registration link will take you through the Uconnect®Access
registration process step by step.
7. To unlock the full potential of Uconnect®Access in your vehicle, you will need to create
or validate an existing Mopar Owner Connect account previously (Owner Center).
Uconnect®along with Mopar Owner Connect have joined forces to create one
destination to manage all of your vehicle needs, from managing your Uconnect®
Access account, to tracking service history and finding recommended accessories for
your vehicle. If you already have a Mopar Owner Connect account, log in to the website
with your existing username/email and password. For assistance with this web based
registration process, call Uconnect®Care at 1-855-792-4241.
8. Once you are logged in to your Mopar Owner Connect account, you will create a
personal Uconnect®Security PIN. The Uconnect®Security PIN will be required to
authenticate you when accessing your account via Uconnect®Care or performing any
remote services such as Remote Door Lock/Unlock, Remote Horn & Lights or Starting
and Stopping the engine.
ELECTRONICS
69
Page 72 of 236
9. If your vehicle qualifies for a trial package it will be presented. Simply agree to the
Uconnect®Te r m s o f S e r v i c e ( c h e c k b o x ) a n d t h e n s e l e c t t h e “ S t a r t S e r v i c e ” b u t t o n .
At this point your vehicle is registered with Uconnect®Access. Continue to set up Via
Mobile. Apps will be downloaded the next time you start your vehicle. If the Apps have not
appeared after 24 hours, please contact Uconnect®Care.
Download The Uconnect® Access App
The Uconnect®Access smartphone app allows you to remotely lock or unlock your doors,
start your engine (if equipped) and activate your horn and lights from virtually anywhere.
The smartphone app also features Via Mobile (if equipped) which uses your smartphone’s
data plan to access your personal Pandora®,iHeartRadio,SlackerRadioandAha™by
HARMAN accounts and control them using your vehicle touchscreen.
The Uconnect®Access app is only compatible with select iPhone®and Android smart-
phones. Visit UconnectPhone.com or call 1-877-855-8400 to confirm that your smart-
phone is compatible with Uconnect®.Onceyou’veconfirmedyoursmartphoneis
compatible, Android and iPhone®users should visit their respective app store and search
for “Uconnect Access” to download the app.
Set Up Your Via Mobile Profile — If Equipped
Setting up your Via Mobile profile means entering your login information for each App so
that they can work in your vehicle. Complete your Via Mobile Profile online during
registration of your Uconnect®Access system. Access this page by logging into your
Mopar Owner Connect account (moparownerconnect.com), going to Edit Profile, then Via
Mobile Profile.
If you already have an account with these Apps, scroll down and press the “Link” button
to enter your information. If you do not have an account, you can create a new one.
Aha™ by HARMAN (www.aharadio.com)
•EnteryouremailaddressandpasswordforAha™,orcreateanewAha™account.
•YoucanlinkyourFacebook,TwitterorSlackeraccountsontheAha™website.
iHeartRadio (www.iHeartRadio.com)
•EnteryouremailaddressandpasswordforiHeartRadio,orcreateanewiHeartRadio
account.
•Select“Activate”tocontinue,
•Select“Close”tocompleteactivation.
Pandora® (www.pandora.com)
•EnteryourPandora®username/email address and password, then click “Save.”
•CreateanewPandora®account.
ELECTRONICS
70
Page 76 of 236
Selling Your Vehicle
When you sell your vehicle, we recommend that you remove your Uconnect®Access
Account information from the vehicle. You can do this using the radio touchscreen in the
vehicle or on the Mopar Owner Connect website (moparownerconnect.com). Removing
your account information cancels your subscription and makes your vehicle factory-ready
for a new owner/subscriber.
1. From your vehicle’s radio touchscreen, select “Uconnect®Store” from the Apps Menu.
2. Select “My Apps,” then “Settings.” Press “Remove Uconnect®Account.”
3. Enter your Uconnect®Security PIN, and select “Continue.”
For additional information on Uconnect®:
•U.S.residents-visitDriveUconnect.comorcall1-877-855-8400.
•CanadianResidents-visitDriveUconnect.caorcall,1-800-465-2001(English)or
1-800-387-9983 (French).
Built-In Features (Uconnect® 8.4A/8.4AN)
CAUTION!
•Ignoringtherearviewmirrorlightcouldmeanyoumaynothave9-1-1Callservice
if needed. If the rearview mirror light is illuminated, have an authorized dealer
service the 9-1-1 Call system immediately.
•TheOccupantRestraintController(ORC)turnsontheAirBagWarningLightonthe
instrument panel if a malfunction is detected in any part of the air bag system. If the
Air Bag Warning Light is illuminated, the air bag system may not be working
properly and the 9-1-1 system may not be able to send a signal to a 9-1-1 operator.
If the Air Bag Warning Light is illuminated, have an authorized dealer service your
vehicle immediately.
•Ifanyoneinthevehiclecouldbeindanger(e.g.,fireorsmokeisvisible,dangerous
road conditions or location), do not wait for voice contact from a 9-1-1 operator. All
occupants should exit the vehicle immediately and move to a safe location.
•Donotaddanyaftermarketelectricalequipmenttothevehicle’selectricalsystem.
This may prevent your vehicle from sending a signal to initiate an emergency call.
To a v o i d i n t e r f e r e n c e t h a t c a n c a u s e t h e 9 - 1 - 1 C a l l s y s t e m t o f a i l , n e v e r a d d
aftermarket equipment (e.g., two-way mobile radio, CB radio, data recorder, etc.) to
your vehicle’s electrical system or modify the antennas on your vehicle. IF YOUR
VEHICLE LOSES BATTERY POWER FOR ANY REASON (INCLUDING DURING OR
AFTER AN ACCIDENT), THE UCONNECT®FEATURES, APPS AND SERVICES,
AMONG OTHERS, WILL NOT OPERATE.
ELECTRONICS
74
Page 77 of 236
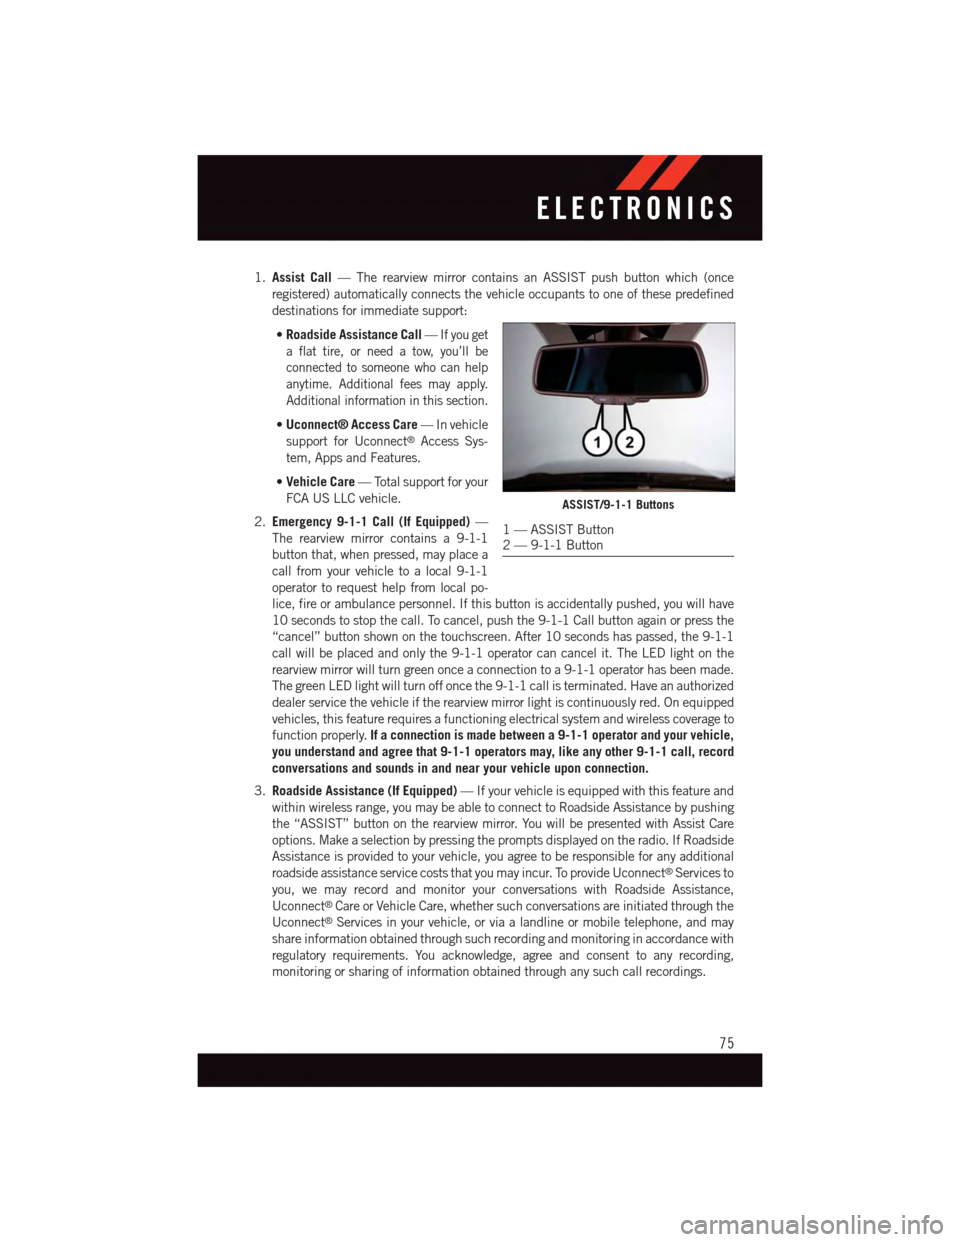
1.Assist Call—TherearviewmirrorcontainsanASSISTpushbuttonwhich(once
registered) automatically connects the vehicle occupants to one of these predefined
destinations for immediate support:
•Roadside Assistance Call—If you get
aflattire,orneedatow,you’llbe
connected to someone who can help
anytime. Additional fees may apply.
Additional information in this section.
•Uconnect® Access Care—Invehicle
support for Uconnect®Access Sys-
tem, Apps and Features.
•Vehicle Care—Totalsupportforyour
FCA US LLC vehicle.
2.Emergency 9-1-1 Call (If Equipped)—
The rearview mirror contains a 9-1-1
button that, when pressed, may place a
call from your vehicle to a local 9-1-1
operator to request help from local po-
lice, fire or ambulance personnel. If this button is accidentally pushed, you will have
10 seconds to stop the call. To cancel, push the 9-1-1 Call button again or press the
“cancel” button shown on the touchscreen. After 10 seconds has passed, the 9-1-1
call will be placed and only the 9-1-1 operator can cancel it. The LED light on the
rearview mirror will turn green once a connection to a 9-1-1 operator has been made.
The green LED light will turn off once the 9-1-1 call is terminated. Have an authorized
dealer service the vehicle if the rearview mirror light is continuously red. On equipped
vehicles, this feature requires a functioning electrical system and wireless coverage to
function properly.If a connection is made between a 9-1-1 operator and your vehicle,
you understand and agree that 9-1-1 operators may, like any other 9-1-1 call, record
conversations and sounds in and near your vehicle upon connection.
3.Roadside Assistance (If Equipped)—Ifyourvehicleisequippedwiththisfeatureand
within wireless range, you may be able to connect to Roadside Assistance by pushing
the “ASSIST” button on the rearview mirror. You will be presented with Assist Care
options. Make a selection by pressing the prompts displayed on the radio. If Roadside
Assistance is provided to your vehicle, you agree to be responsible for any additional
roadside assistance service costs that you may incur. To provide Uconnect®Services to
you, we may record and monitor your conversations with Roadside Assistance,
Uconnect®Care or Vehicle Care, whether such conversations are initiated through the
Uconnect®Services in your vehicle, or via a landline or mobile telephone, and may
share information obtained through such recording and monitoring in accordance with
regulatory requirements. You acknowledge, agree and consent to any recording,
monitoring or sharing of information obtained through any such call recordings.
ASSIST/9-1-1 Buttons
1—ASSISTButton2—9-1-1Button
ELECTRONICS
75