air filter DODGE DURANGO 2020 User Guide
[x] Cancel search | Manufacturer: DODGE, Model Year: 2020, Model line: DURANGO, Model: DODGE DURANGO 2020Pages: 464, PDF Size: 22.14 MB
Page 313 of 464
SERVICING AND MAINTENANCE311
Synthetic Engine Oils
You may use synthetic engine oils provided the
recommended oil quality requirements are met,
and the recommended maintenance intervals
for oil and filter changes are followed.
Synthetic engine oils which do not have both the
engine oil certification mark and the correct SAE
viscosity grade number should not be used.
Materials Added To Engine Oil
The manufacturer strongly recommends
against the addition of any additives (other than
leak detection dyes) to the engine oil. Engine oil
is an engineered product and its performance
may be impaired by supplemental additives.
Disposing Of Used Engine Oil And Oil
Filters
Care should be taken in disposing of used
engine oil and oil filters from your vehicle. Used
oil and oil filters, indiscriminately discarded, can
present a problem to the environment. Contact
an authorized dealer, service station or
governmental agency for advice on how and
where used oil and oil filters can be safely
discarded in your area.
ENGINE OIL FILTER
The engine oil filter should be replaced with a
new filter at every engine oil change.
Engine Oil Filter Selection
This manufacturer's engines have a full-flow
type disposable oil filter. Use a filter of this type
for replacement. The quality of replacement
filters varies considerably. Only high quality
filters should be used to ensure most efficient
service. Mopar engine oil filters are high quality
oil filters and are recommended.
ENGINE AIR CLEANER FILTER
Refer to the “Maintenance Plan” in this section
for the proper maintenance intervals.
NOTE:
Be sure to follow the “Severe Duty Conditions”
maintenance interval if applicable. Engine Air Cleaner Filter Selection
The quality of replacement engine air cleaner
filters varies considerably. Only high quality
filters should be used to ensure most efficient
service. Mopar engine air cleaner filters are a
high quality filter and are recommended.
Engine Air Cleaner Filter Inspection and
Replacement
Inspect engine air cleaner filter for dirt and/or
debris, if you find evidence of either dirt or
debris change the engine air cleaner filter.
WARNING!
The air induction system (air cleaner, hoses,
etc.) can provide a measure of protection in
the case of engine backfire. Do not remove
the air induction system (air cleaner, hoses,
etc.) unless such removal is necessary for
repair or maintenance. Make sure that no
one is near the engine compartment before
starting the vehicle with the air induction
system (air cleaner, hoses, etc.) removed.
Failure to do so can result in serious personal
injury.
7
20_WD_OM_EN_USC_t.book Page 311
Page 314 of 464
312SERVICING AND MAINTENANCE
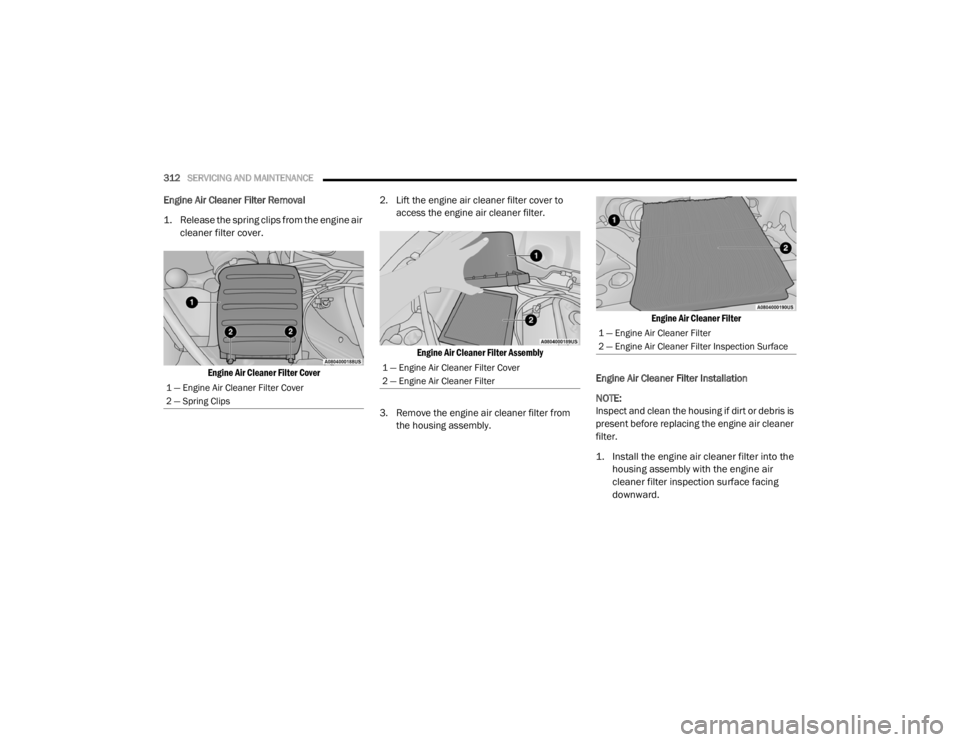
Engine Air Cleaner Filter Removal
1. Release the spring clips from the engine air
cleaner filter cover.
Engine Air Cleaner Filter Cover
2. Lift the engine air cleaner filter cover to
access the engine air cleaner filter.
Engine Air Cleaner Filter Assembly
3. Remove the engine air cleaner filter from the housing assembly.
Engine Air Cleaner Filter
Engine Air Cleaner Filter Installation
NOTE:
Inspect and clean the housing if dirt or debris is
present before replacing the engine air cleaner
filter.
1. Install the engine air cleaner filter into the housing assembly with the engine air
cleaner filter inspection surface facing
downward.
1 — Engine Air Cleaner Filter Cover
2 — Spring Clips
1 — Engine Air Cleaner Filter Cover
2 — Engine Air Cleaner Filter
1 — Engine Air Cleaner Filter
2 — Engine Air Cleaner Filter Inspection Surface
20_WD_OM_EN_USC_t.book Page 312
Page 315 of 464
SERVICING AND MAINTENANCE313
(Continued)
2. Install the engine air cleaner filter cover onto the housing assembly locating tabs.
3. Latch the spring clips and lock the engine air cleaner filter cover to the housing
assembly.
AIR CONDITIONER MAINTENANCE
For best possible performance, your air
conditioner should be checked and serviced by
an authorized dealer at the start of each warm
season. This service should include cleaning of
the condenser fins and a performance test.
Drive belt tension should also be checked at
this time.
Refrigerant Recovery And Recycling
R-134a — If Equipped
R-134a Air Conditioning Refrigerant is a
hydrofluorocarbon (HFC) that is an
ozone-friendly substance. The manufacturer
recommends that air conditioning service be
performed by an authorized dealer or other
service facilities using recovery and recycling
equipment. NOTE:
Use only manufacturer approved A/C system
Polyalkylene Glycol (PAG) compressor oil and
refrigerants.
Refrigerant Recovery And Recycling —
R–1234yf
R–1234yf Air Conditioning Refrigerant is a
hydrofluoroolefin (HFO) that is endorsed by the
Environmental Protection Agency and is an
ozone-friendly substance with a low
global-warming potential. The manufacturer
recommends that air conditioning service be
performed by an authorized dealer using
recovery and recycling equipment.
NOTE:
Use only manufacturer approved A/C system
Polyalkylene Glycol (PAG) compressor oil, and
refrigerants.
WARNING!
Use only refrigerants and compressor lubri
-
cants approved by the manufacturer for
your air conditioning system. Some unap -
proved refrigerants are flammable and can
explode, injuring you. Other unapproved
refrigerants or lubricants can cause the
system to fail, requiring costly repairs.
Refer to Warranty Information Book, for
further warranty information.
The air conditioning system contains refrig -
erant under high pressure. To avoid risk of
personal injury or damage to the system,
adding refrigerant or any repair requiring
lines to be disconnected should be done by
an experienced technician.
CAUTION!
Do not use chemical flushes in your air
conditioning system as the chemicals can
damage your air conditioning components.
Such damage is not covered by the New
Vehicle Limited Warranty.
WARNING! (Continued)
7
20_WD_OM_EN_USC_t.book Page 313
Page 316 of 464
314SERVICING AND MAINTENANCE
Air Conditioning Filter Replacement (A/C
Air Filter)
Refer to “Scheduled Servicing” in this section
for the proper maintenance intervals.
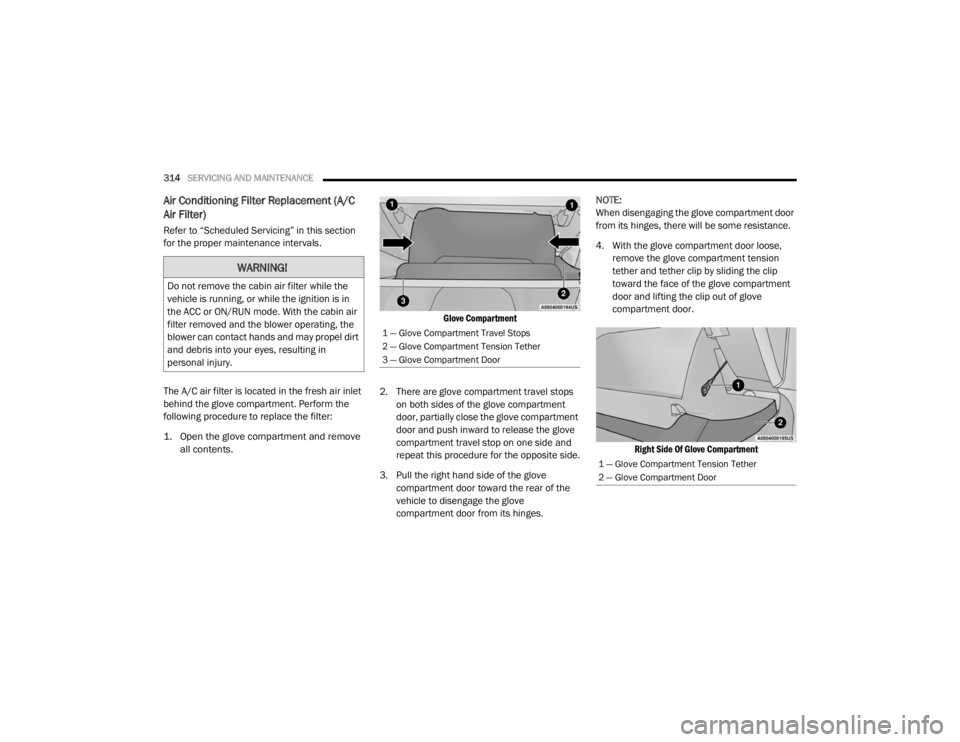
The A/C air filter is located in the fresh air inlet
behind the glove compartment. Perform the
following procedure to replace the filter:
1. Open the glove compartment and remove
all contents.
Glove Compartment
2. There are glove compartment travel stops on both sides of the glove compartment
door, partially close the glove compartment
door and push inward to release the glove
compartment travel stop on one side and
repeat this procedure for the opposite side.
3. Pull the right hand side of the glove compartment door toward the rear of the
vehicle to disengage the glove
compartment door from its hinges. NOTE:
When disengaging the glove compartment door
from its hinges, there will be some resistance.
4. With the glove compartment door loose,
remove the glove compartment tension
tether and tether clip by sliding the clip
toward the face of the glove compartment
door and lifting the clip out of glove
compartment door.
Right Side Of Glove Compartment
WARNING!
Do not remove the cabin air filter while the
vehicle is running, or while the ignition is in
the ACC or ON/RUN mode. With the cabin air
filter removed and the blower operating, the
blower can contact hands and may propel dirt
and debris into your eyes, resulting in
personal injury.
1 — Glove Compartment Travel Stops
2 — Glove Compartment Tension Tether
3 — Glove Compartment Door
1 — Glove Compartment Tension Tether
2 — Glove Compartment Door
20_WD_OM_EN_USC_t.book Page 314
Page 317 of 464
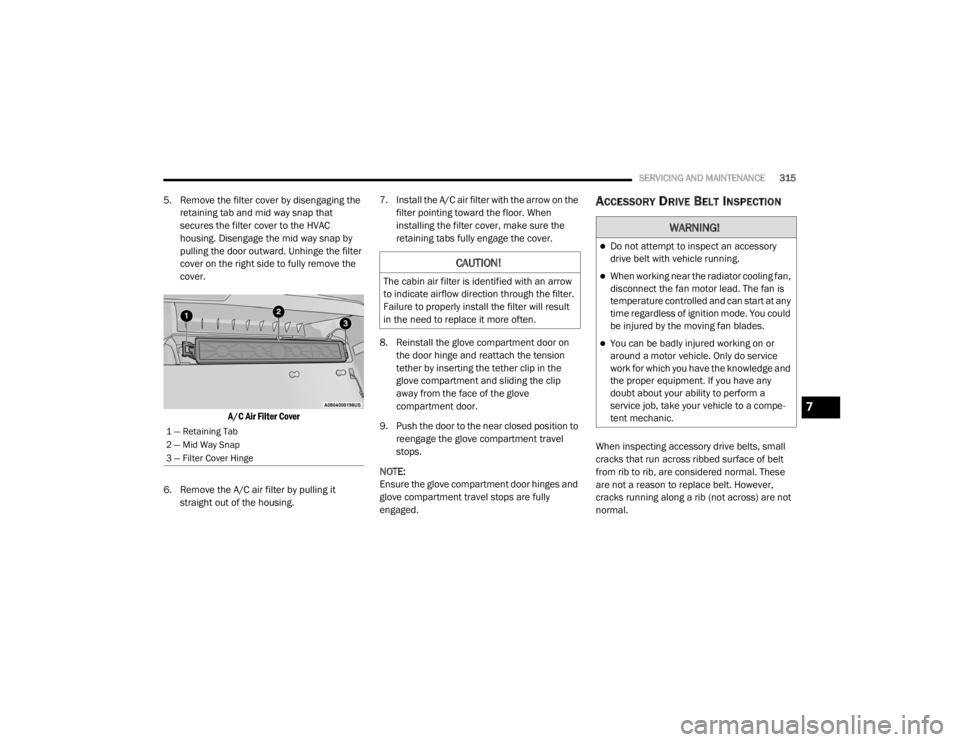
SERVICING AND MAINTENANCE315
5. Remove the filter cover by disengaging the
retaining tab and mid way snap that
secures the filter cover to the HVAC
housing. Disengage the mid way snap by
pulling the door outward. Unhinge the filter
cover on the right side to fully remove the
cover.
A/C Air Filter Cover
6. Remove the A/C air filter by pulling it straight out of the housing. 7. Install the A/C air filter with the arrow on the
filter pointing toward the floor. When
installing the filter cover, make sure the
retaining tabs fully engage the cover.
8. Reinstall the glove compartment door on the door hinge and reattach the tension
tether by inserting the tether clip in the
glove compartment and sliding the clip
away from the face of the glove
compartment door.
9. Push the door to the near closed position to reengage the glove compartment travel
stops.
NOTE:
Ensure the glove compartment door hinges and
glove compartment travel stops are fully
engaged.ACCESSORY DRIVE BELT INSPECTION
When inspecting accessory drive belts, small
cracks that run across ribbed surface of belt
from rib to rib, are considered normal. These
are not a reason to replace belt. However,
cracks running along a rib (not across) are not
normal.
1 — Retaining Tab
2 — Mid Way Snap
3 — Filter Cover Hinge
CAUTION!
The cabin air filter is identified with an arrow
to indicate airflow direction through the filter.
Failure to properly install the filter will result
in the need to replace it more often.
WARNING!
Do not attempt to inspect an accessory
drive belt with vehicle running.
When working near the radiator cooling fan,
disconnect the fan motor lead. The fan is
temperature controlled and can start at any
time regardless of ignition mode. You could
be injured by the moving fan blades.
You can be badly injured working on or
around a motor vehicle. Only do service
work for which you have the knowledge and
the proper equipment. If you have any
doubt about your ability to perform a
service job, take your vehicle to a compe -
tent mechanic.
7
20_WD_OM_EN_USC_t.book Page 315
Page 328 of 464
326SERVICING AND MAINTENANCE
AUTOMATIC TRANSMISSION
Selection Of Lubricant
It is important to use the proper transmission
fluid to ensure optimum transmission
performance and life. Use only the
manufacturer's specified transmission fluid.
Refer to “Fluids And Lubricants” in “Technical
Specifications” for fluid specifications. It is
important to maintain the transmission fluid at
the correct level using the recommended fluid.
NOTE:
No chemical flushes should be used in any
transmission; only the approved lubricant
should be used.
Special Additives
The manufacturer strongly recommends
against using any special additives in the
transmission. Automatic Transmission Fluid
(ATF) is an engineered product and its
performance may be impaired by supplemental
additives. Therefore, do not add any fluid
additives to the transmission. Avoid using
transmission sealers as they may adversely
affect seals.
Fluid Level Check
The fluid level is preset at the factory and does
not require adjustment under normal operating
conditions. Routine fluid level checks are not
required; therefore the transmission has no
dipstick. An authorized dealer can check your
transmission fluid level using special service
tools. If you notice fluid leakage or transmission
malfunction, visit an authorized dealer
immediately to have the transmission fluid level
checked. Operating the vehicle with an
improper fluid level can cause severe
transmission damage.
Fluid And Filter Changes
Under normal operating conditions, the fluid
installed at the factory will provide satisfactory
lubrication for the life of the vehicle.
Routine fluid and filter changes are not
required. However, change the fluid and filter if
the fluid becomes contaminated (with water,
etc.), or if the transmission is disassembled for
any reason.
CAUTION!
Using a transmission fluid other than the
manufacturer’s recommended fluid may
cause deterioration in transmission shift
quality and/or torque converter shudder.
Refer to “Fluids And Lubricants” in “Technical
Specifications” for fluid specifications.
CAUTION!
Do not use chemical flushes in your
transmission as the chemicals can damage
your transmission components. Such damage
is not covered by the New Vehicle Limited
Warranty.
CAUTION!
If a transmission fluid leak occurs, visit an
authorized dealer immediately. Severe
transmission damage may occur. An
authorized dealer has the proper tools to
adjust the fluid level accurately.
20_WD_OM_EN_USC_t.book Page 326
Page 416 of 464
414MULTIMEDIA
Natural Speech
Your Uconnect Phone Voice system uses a
Natural Language Voice Recognition (VR)
engine.
Natural speech allows the user to speak
commands in phrases or complete sentences.
The system filters out certain non-word
utterances and sounds such as “ah” and “eh.”
The system handles fill-in words such as “I
would like to.”
The system handles multiple inputs in the same
phrase or sentence such as “make a phone
call” and “to Kelly Smith”. For multiple inputs in
the same phrase or sentence, the system
identifies the topic or context and provides the
associated follow-up prompt such as “Who do
you want to call?” in the case where a phone
call was requested but the specific name was
not recognized.
The system utilizes continuous dialog; when the
system requires more information from the user
it will ask a question to which the user can
respond without pushing the Voice Command
button on your steering wheel. Help Command
If you need assistance at any prompt, or if you
want to know your options at any prompt, say
“Help” following the beep.
To activate the Uconnect Phone from idle,
simply push the Phone button (if active) on your
steering wheel and say a command or say
“Help.” All Uconnect Phone sessions begin with
a push of the VR button or the Phone button (if
active) on the radio control head.
Cancel Command
At any prompt, after the beep, you can say
“Cancel” and you will be returned to the main
menu.
You can also push the VR button or Phone
button (if active) on your steering wheel when
the system is listening for a command and be
returned to the main or previous menu.
Pair (Link) Uconnect Phone To A Mobile Phone
To begin using your Uconnect Phone, you must
pair your compatible Bluetooth®-enabled
mobile phone. Mobile phone pairing is the
process of establishing a wireless connection
between a cellular phone and the Uconnect
system.To complete the pairing process, you need to
reference your mobile phone Owner's Manual.
Please visit UconnectPhone.com for complete
mobile phone compatibility information.
NOTE:
You must have Bluetooth® enabled on your
phone to complete this procedure.
The vehicle must be in PARK.
1. Place the ignition in the ACC or ON/RUN position.
2. Press the Phone button in the Menu Bar on the touchscreen.
NOTE:
If there are no phones currently connected with
the system, a pop-up will appear asking if you
would like to pair a mobile phone.
3. Select “Yes” to begin the pairing process.
20_WD_OM_EN_USC_t.book Page 414
Page 450 of 464
448
INDEX
A
About Your Brakes......................................... 350Adaptive Cruise Control (ACC)
(Cruise Control).............................................. 208Adding Engine Coolant (Antifreeze)............... 322Adding Fuel.................................................... 238Additives, Fuel............................................... 352Adjust
Down.................................................... 38, 39Forward................................................ 38, 39Rearward.............................................. 38, 39Up......................................................... 38, 39Air BagAir Bag Operation...................................... 156Air Bag Warning Light................................ 153Driver Knee Air Bag................................... 157Enhanced Accident Response......... 161, 293Event Data Recorder (EDR)....................... 293If Deployment Occurs................................ 160Knee Impact Bolsters................................ 156Maintaining Your Air Bag System.............. 161Maintenance............................................. 161Redundant Air Bag Warning Light.............154Side Air Bags............................................. 157Transporting Pets...................................... 180Air Bag Light............................... 110, 153, 181
Air Cleaner, Engine (Engine Air Cleaner
Filter)............................................................ 311Air Conditioner Maintenance........................ 313Air Conditioner Refrigerant........................... 313Air Conditioner System................................. 313Air Conditioning................................................ 68Rear............................................................. 66Air Conditioning Filter.................... 70, 311, 314Air Conditioning System................................... 69Air Conditioning, Operating Tips....................... 69Air Filter........................................................ 311Air PressureTires......................................................... 336AlarmArm The System................................... 23, 24Disarm The System..................................... 24Rearm The System...................................... 24Security Alarm.......................................... 113Alarm SystemSecurity Alarm............................................. 23All Wheel Drive (AWD)................................... 199Alterations/ModificationsVehicle......................................................... 11Android Auto................................................. 442Antifreeze (Engine Coolant)........ 322, 355, 356Disposal................................................... 323
Anti-Lock Brake System (ABS)....................... 122Anti-Lock Warning Light................................ 116Apple CarPlay................................................ 442Arming SystemSecurity Alarm.............................................23Assist, Hill Start............................................. 128Audio Settings............................................... 402Audio Systems (Radio).................................. 361Auto Down Power Windows..............................71Automatic Headlights.......................................52Automatic High Beams.....................................51Automatic Temperature Control (ATC)..............69Automatic Transmission....................... 184, 193Adding Fluid..................................... 326, 360Fluid And Filter Change............................. 326Fluid Change............................................. 326Fluid Level Check...................................... 326Fluid Type............................... 326, 358, 360Special Additives...................................... 326Automatic Transmission Limp Home Mode... 197Aux Mode...................................................... 405Auxiliary Driving Systems.............................. 131Auxiliary Electrical Outlet (Power Outlet)..........87Auxiliary Power Outlet......................................87Axle Fluid....................................................... 358Axle Lubrication............................................ 360
20_WD_OM_EN_USC_t.book Page 448
Page 452 of 464

450
Radiator Cap
............................................. 323Selection Of Coolant (Antifreeze)......322, 355, 356, 357, 359Corrosion Protection...................................... 346Cruise Control (Speed Control)............ 205, 208Cruise Light......................................... 117, 119Cupholders...................................................... 86Customer Assistance..................................... 444Cybersecurity................................................. 361
D
Daytime Running Lights................................... 51Dealer Service............................................... 308Defroster, Windshield.................................... 181Diagnostic System, Onboard......................... 120Disabled Vehicle Towing................................ 290DisposalAntifreeze (Engine Coolant)....................... 323Disturb........................................................... 420Do Not Disturb............................................... 441Door Ajar.............................................. 111, 112Door Ajar Light..................................... 111, 112Door Locks............................................... 24, 29Child-Protection Door Lock — Rear Doors.... 29Door Opener, Garage....................................... 78Doors............................................................... 24Driver’s Seat Back Tilt..................................... 32Driving........................................................... 257DVD Player (Video Entertainment
System)......................................................... 425
E
Economy (Fuel) Mode................................... 192Electric Brake Control System....................... 123Anti-Lock Brake System............................ 122Electronic Roll Mitigation................. 124, 130Electric Remote Mirrors................................... 49Electrical Outlet, Auxiliary (Power Outlet)......... 87Electronic Speed Control (Cruise Control)..... 206Electronic Stability Control (ESC).................. 125Electronic Throttle Control Warning Light...... 111Electronically Shifted Transfer Case............. 199Emergency Gas Can Refueling...................... 286Emergency, In Case OfFreeing Vehicle When Stuck..................... 289Hazard Warning Flasher........................... 261Jacking............................................ 275, 327Jump Starting........................................... 283Emission Control System Maintenance........ 121Engine.................................................. 304, 306Air Cleaner................................................ 311Block Heater............................................. 188Break-In Recommendations............ 188, 189Compartment......................... 304, 305, 306Compartment Identification............. 304, 305Coolant (Antifreeze).................................. 359Cooling..................................................... 321Exhaust Gas Caution....................... 180, 354Fails To Start............................................ 187Flooded, Starting...................................... 187
Fuel Requirements.......................... 351, 355Jump Starting........................................... 283Oil........................ 308, 309, 355, 356, 359Oil Filler Cap........................... 304, 309, 310Oil Filter.................................................... 311Oil Selection.................. 309, 355, 356, 357Oil Synthetic.............................................. 311Overheating.............................................. 287Starting............................................ 184, 185Engine Oil Viscosity.............................. 309, 310Engine Oil Viscosity Chart.............................. 310Enhanced Accident Response Feature161, 293Ethanol.......................................................... 353Exhaust Gas Cautions.......................... 180, 354Exhaust System................................... 180, 320Exterior Lights............................... 50, 183, 266
F
FiltersAir Cleaner
................................................ 311Air Conditioning........................ 70, 311, 314Engine Oil........................................ 311, 359Engine Oil Disposal................................... 311Flashers........................................................ 261Hazard Warning........................................ 261Turn Signals............................ 118, 183, 269Flash-To-Pass...................................................52Flooded Engine Starting................................ 187
20_WD_OM_EN_USC_t.book Page 450