lights DODGE DURANGO 2020 Service Manual
[x] Cancel search | Manufacturer: DODGE, Model Year: 2020, Model line: DURANGO, Model: DODGE DURANGO 2020Pages: 464, PDF Size: 22.14 MB
Page 301 of 464
SERVICING AND MAINTENANCE299
At Each Stop For Fuel
Check the engine oil level. Refer to “Engine
Compartment” in this section for further
information.
Check the windshield washer solvent and
add if required. Once A Month
Check tire pressure and look for unusual
wear or damage.
Inspect the battery, and clean and tighten the
terminals as required.
Check the fluid levels of the coolant reservoir,
engine oil, brake master cylinder, and add as
needed.
Check all lights and other electrical items for
correct operation. At Each Oil Change
Change the engine oil filter.
Inspect the brake hoses and lines.
Inspect the CV/Universal joints.
Rotate the tires. Rotate at the first sign of
irregular wear, even if it occurs before the oil
indicator system turns on.
CAUTION!
Failure to perform the required maintenance
items may result in damage to the vehicle.
7
20_WD_OM_EN_USC_t.book Page 299
Page 348 of 464
346SERVICING AND MAINTENANCE
STORING THE VEHICLE
If you are storing your vehicle for more than
21 days, we recommend that you take the
following steps to minimize the drain on your
vehicle's battery:
Disconnect the negative cable from battery.
Any time you store your vehicle or keep it out
of service (i.e., vacation) for two weeks or
more, run the air conditioning system at idle
for about five minutes in the fresh air and
high blower setting. This will ensure
adequate system lubrication to minimize the
possibility of compressor damage when the
system is started again.
BODYWORK
PROTECTION FROM ATMOSPHERIC
A
GENTS
Vehicle body care requirements vary according
to geographic locations and usage. Chemicals
that make roads passable in snow and ice and
those that are sprayed on trees and road
surfaces during other seasons are highly
corrosive to the metal in your vehicle. Outside parking, which exposes your vehicle to
airborne contaminants, road surfaces on which
the vehicle is operated, extreme hot or cold
weather and other extreme conditions will have
an adverse effect on paint, metal trim, and
underbody protection.
The following maintenance recommendations
will enable you to obtain maximum benefit from
the corrosion resistance built into your vehicle.
What Causes Corrosion?
Corrosion is the result of deterioration or
removal of paint and protective coatings from
your vehicle.
The most common causes are:
Road salt, dirt and moisture accumulation
Stone and gravel impact
Insects, tree sap and tar
Salt in the air near seacoast localities
Atmospheric fallout/industrial pollutants
BODY AND UNDERBODY MAINTENANCE
Cleaning Headlights
Your vehicle is equipped with plastic headlights
and fog lights that are lighter and less
susceptible to stone breakage than glass
headlights.
Plastic is not as scratch resistant as glass and
therefore different lens cleaning procedures
must be followed.
To minimize the possibility of scratching the
lenses and reducing light output, avoid wiping
with a dry cloth. To remove road dirt, wash with
a mild soap solution followed by rinsing.
Do not use abrasive cleaning components,
solvents, steel wool or other aggressive
material to clean the lenses.
20_WD_OM_EN_USC_t.book Page 346
Page 365 of 464
MULTIMEDIA363
CUSTOMER PROGRAMMABLE FEATURES
— U
CONNECT 4 SETTINGS
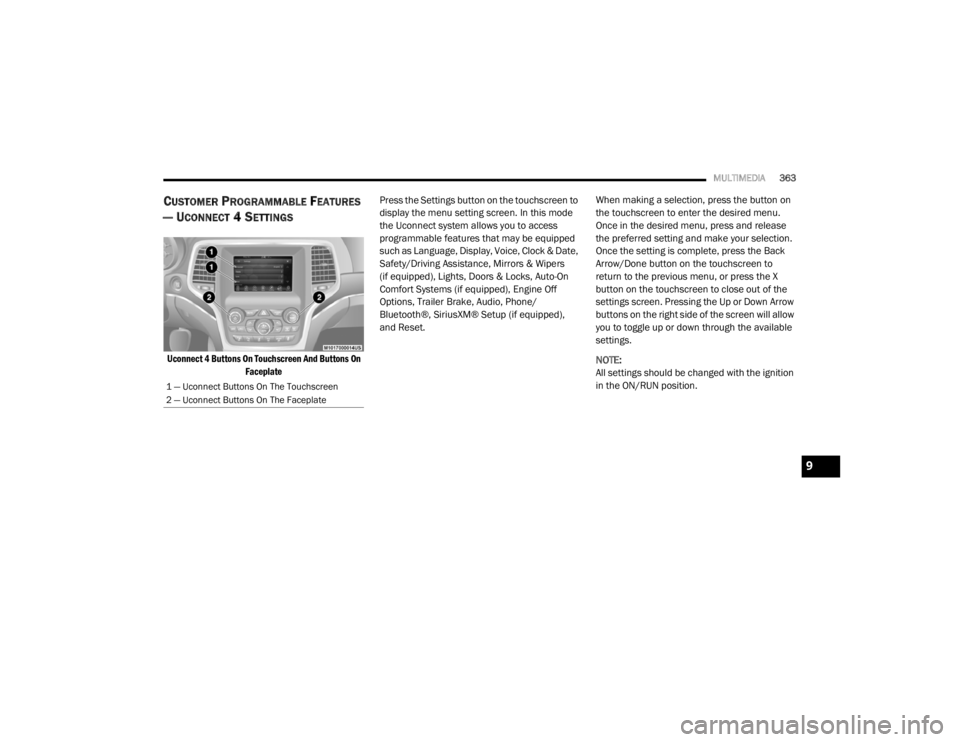
Uconnect 4 Buttons On Touchscreen And Buttons On
Faceplate
Press the Settings button on the touchscreen to
display the menu setting screen. In this mode
the Uconnect system allows you to access
programmable features that may be equipped
such as Language, Display, Voice, Clock & Date,
Safety/Driving Assistance, Mirrors & Wipers
(if equipped), Lights, Doors & Locks, Auto-On
Comfort Systems (if equipped), Engine Off
Options, Trailer Brake, Audio, Phone/
Bluetooth®, SiriusXM® Setup (if equipped),
and Reset.
When making a selection, press the button on
the touchscreen to enter the desired menu.
Once in the desired menu, press and release
the preferred setting and make your selection.
Once the setting is complete, press the Back
Arrow/Done button on the touchscreen to
return to the previous menu, or press the X
button on the touchscreen to close out of the
settings screen. Pressing the Up or Down Arrow
buttons on the right side of the screen will allow
you to toggle up or down through the available
settings.
NOTE:
All settings should be changed with the ignition
in the ON/RUN position.
1 — Uconnect Buttons On The Touchscreen
2 — Uconnect Buttons On The Faceplate
9
20_WD_OM_EN_USC_t.book Page 363
Page 366 of 464
364MULTIMEDIA
Language
After pressing the Language button on the touchscreen, the following setting will be available:
Display
After pressing the Display button on the touchscreen, the following settings will be available:
Setting Name Selectable Options
Set LanguageEnglishFrançais Español
NOTE:
When the “Set Language” feature is selected, you may select one of multiple languages (English / Français / Español) for all display nomenclature,
including the trip functions and the navigation system (if equipped). Press the Set Language button on the touchscreen, and then press the desired
language button on the touchscreen until a check mark appears next to the language, showing that setting has been selected.
Setting Name Selectable Options
Display ModeManual Auto
Display Brightness With Headlights ON +
-
NOTE:
To make changes to the "Display Brightness With Headlights ON" setting, the headlights must be on and the interior dimmer switch must not be in
the "party" or "parade" position.
20_WD_OM_EN_USC_t.book Page 364
Page 367 of 464
MULTIMEDIA365
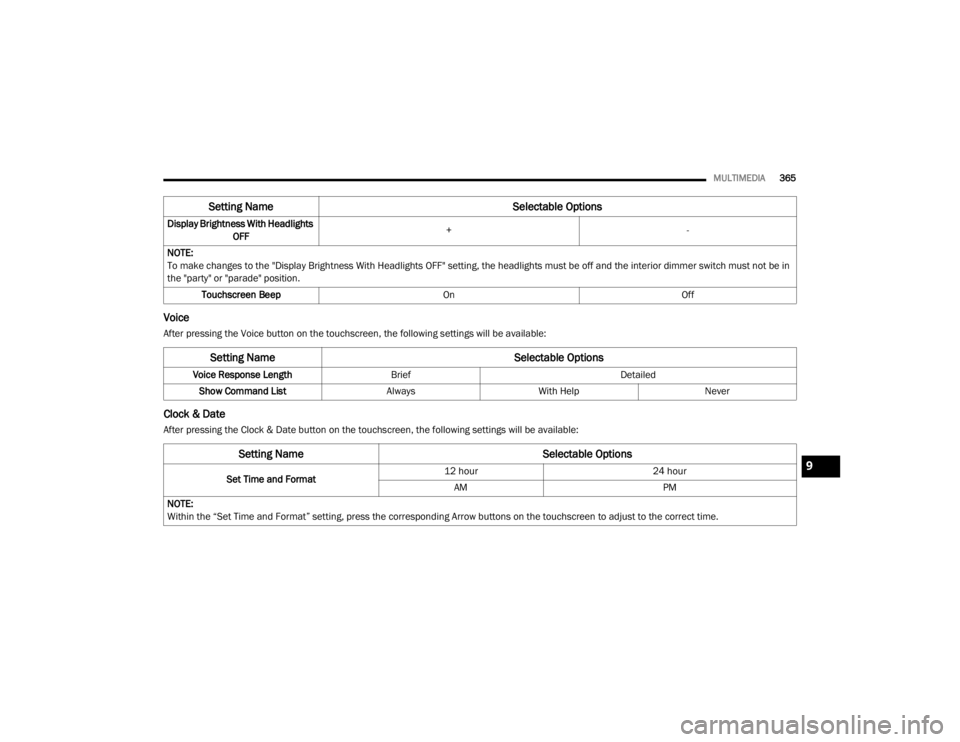
Voice
After pressing the Voice button on the touchscreen, the following settings will be available:
Clock & Date
After pressing the Clock & Date button on the touchscreen, the following settings will be available:Display Brightness With Headlights
OFF +
-
NOTE:
To make changes to the "Display Brightness With Headlights OFF" setting, the headlights must be off and the interior dimmer switch must not be in
the "party" or "parade" position. Touchscreen Beep OnOff
Setting Name Selectable Options
Setting NameSelectable Options
Voice Response LengthBrief Detailed
Show Command List AlwaysWith Help Never
Setting Name Selectable Options
Set Time and Format12 hour
24 hour
AM PM
NOTE:
Within the “Set Time and Format” setting, press the corresponding Arrow buttons on the touchscreen to adjust to the correct time.
9
20_WD_OM_EN_USC_t.book Page 365
Page 370 of 464
368MULTIMEDIA
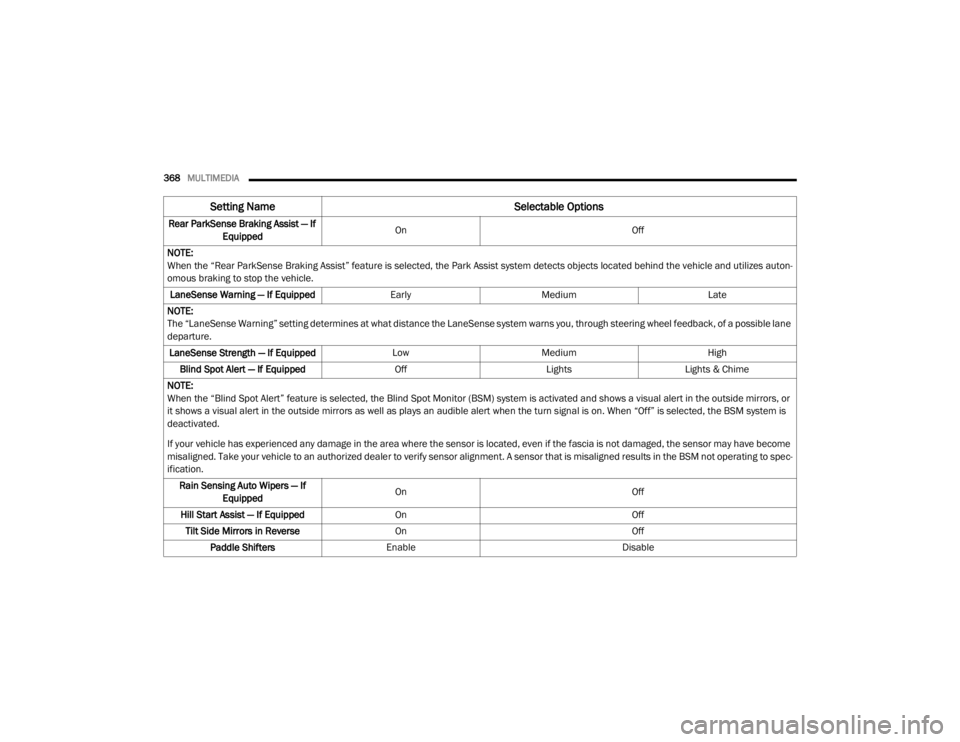
Rear ParkSense Braking Assist — If
Equipped On
Off
NOTE:
When the “Rear ParkSense Braking Assist” feature is selected, the Park Assist system detects objects located behind the vehicle and utilizes auton -
omous braking to stop the vehicle.
LaneSense Warning — If Equipped EarlyMedium Late
NOTE:
The “LaneSense Warning” setting determines at what distance the LaneSense system warns you, through steering wheel feedback, of a possible lane
departure. LaneSense Strength — If Equipped LowMedium High
Blind Spot Alert — If Equipped OffLightsLights & Chime
NOTE:
When the “Blind Spot Alert” feature is selected, the Blind Spot Monitor (BSM) system is activated and shows a visual alert in the outside mirrors, or
it shows a visual alert in the outside mirrors as well as plays an audible alert when the turn signal is on. When “Off” is selected, the BSM system is
deactivated.
If your vehicle has experienced any damage in the area where the sensor is located, even if the fascia is not damaged, the sensor may have become
misaligned. Take your vehicle to an authorized dealer to verify sensor alignment. A sensor that is misaligned results in the BSM not operating to spec -
ification.
Rain Sensing Auto Wipers — If Equipped On
Off
Hill Start Assist — If Equipped On Off
Tilt Side Mirrors in Reverse On Off
Paddle Shifters Enable Disable
Setting Name Selectable Options
20_WD_OM_EN_USC_t.book Page 368
Page 371 of 464
MULTIMEDIA369
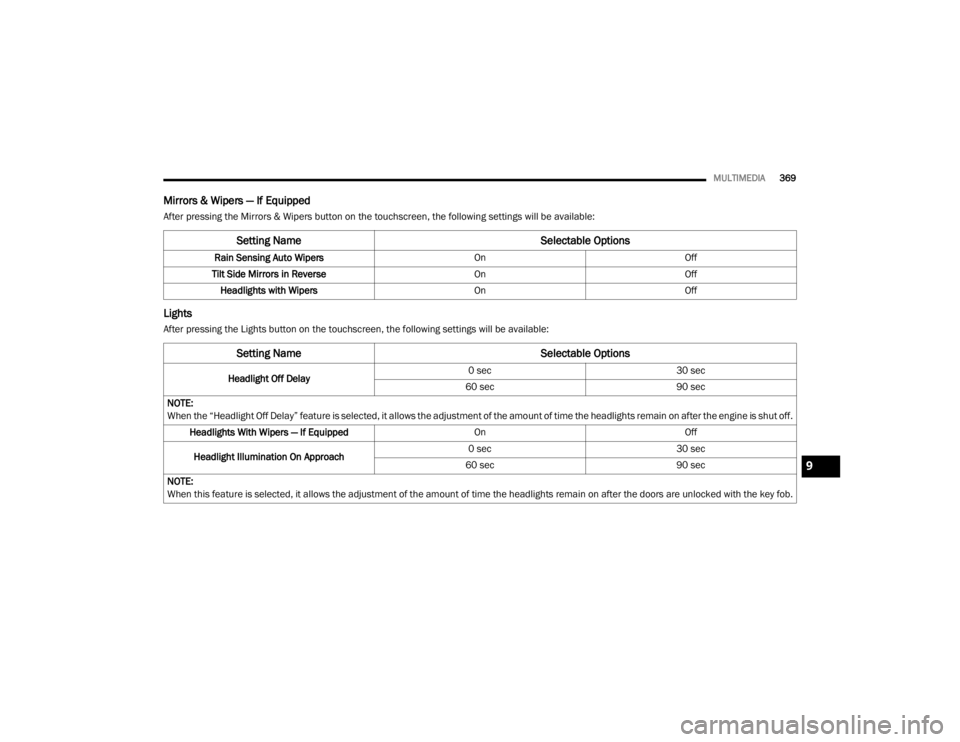
Mirrors & Wipers — If Equipped
After pressing the Mirrors & Wipers button on the touchscreen, the following settings will be available:
Lights
After pressing the Lights button on the touchscreen, the following settings will be available:
Setting Name Selectable Options
Rain Sensing Auto WipersOnOff
Tilt Side Mirrors in Reverse OnOff
Headlights with Wipers OnOff
Setting Name Selectable Options
Headlight Off Delay0 sec
30 sec
60 sec 90 sec
NOTE:
When the “Headlight Off Delay” feature is selected, it allows the adjustment of the amount of time the headlights remain on after the engine is shut off. Headlights With Wipers — If Equipped OnOff
Headlight Illumination On Approach 0 sec
30 sec
60 sec 90 sec
NOTE:
When this feature is selected, it allows the adjustment of the amount of time the headlights remain on after the doors are unlocked with the key fob.
9
20_WD_OM_EN_USC_t.book Page 369
Page 372 of 464
370MULTIMEDIA
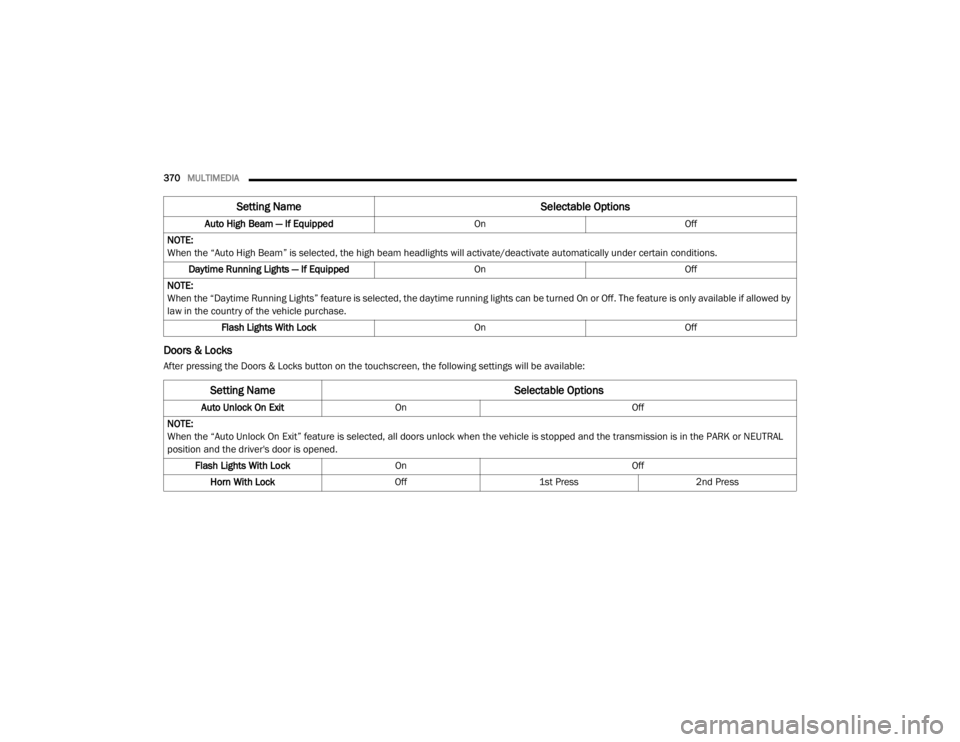
Doors & Locks
After pressing the Doors & Locks button on the touchscreen, the following settings will be available:Auto High Beam — If Equipped
OnOff
NOTE:
When the “Auto High Beam” is selected, the high beam headlights will activate/deactivate automatically under certain conditions. Daytime Running Lights — If Equipped OnOff
NOTE:
When the “Daytime Running Lights” feature is selected, the daytime running lights can be turned On or Off. The feature is only available if allowed by
law in the country of the vehicle purchase. Flash Lights With Lock OnOff
Setting Name Selectable Options
Setting NameSelectable Options
Auto Unlock On ExitOn Off
NOTE:
When the “Auto Unlock On Exit” feature is selected, all doors unlock when the vehicle is stopped and the transmission is in the PARK or NEUTRAL
position and the driver's door is opened. Flash Lights With Lock On Off
Horn With Lock Off1st Press 2nd Press
20_WD_OM_EN_USC_t.book Page 370
Page 374 of 464
372MULTIMEDIA
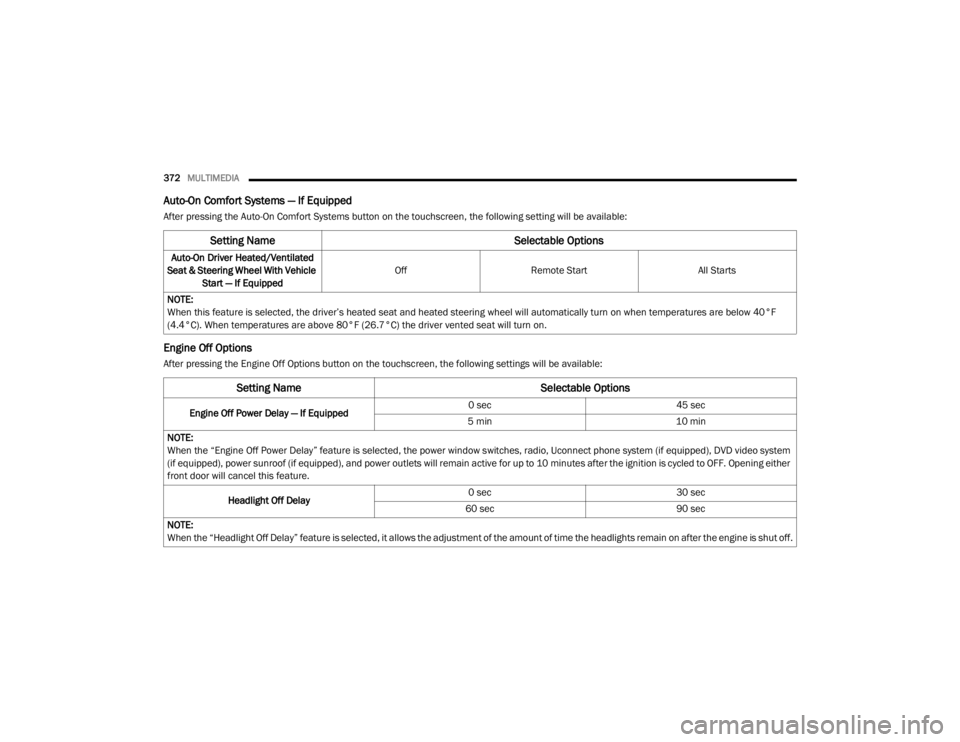
Auto-On Comfort Systems — If Equipped
After pressing the Auto-On Comfort Systems button on the touchscreen, the following setting will be available:
Engine Off Options
After pressing the Engine Off Options button on the touchscreen, the following settings will be available:
Setting Name Selectable Options
Auto-On Driver Heated/Ventilated
Seat & Steering Wheel With Vehicle Start — If Equipped Off
Remote Start All Starts
NOTE:
When this feature is selected, the driver’s heated seat and heated steering wheel will automatically turn on when temperatures are below 40°F
(4.4°C). When temperatures are above 80°F (26.7°C) the driver vented seat will turn on.
Setting Name Selectable Options
Engine Off Power Delay — If Equipped 0 sec
45 sec
5 min 10 min
NOTE:
When the “Engine Off Power Delay” feature is selected, the power window switches, radio, Uconnect phone system (if equipped), DVD video system
(if equipped), power sunroof (if equipped), and power outlets will remain active for up to 10 minutes after the ignition is cycled to OFF. Opening either
front door will cancel this feature.
Headlight Off Delay 0 sec
30 sec
60 sec 90 sec
NOTE:
When the “Headlight Off Delay” feature is selected, it allows the adjustment of the amount of time the headlights remain on after the engine is shut off.
20_WD_OM_EN_USC_t.book Page 372
Page 379 of 464
MULTIMEDIA377
CUSTOMER PROGRAMMABLE FEATURES
— U
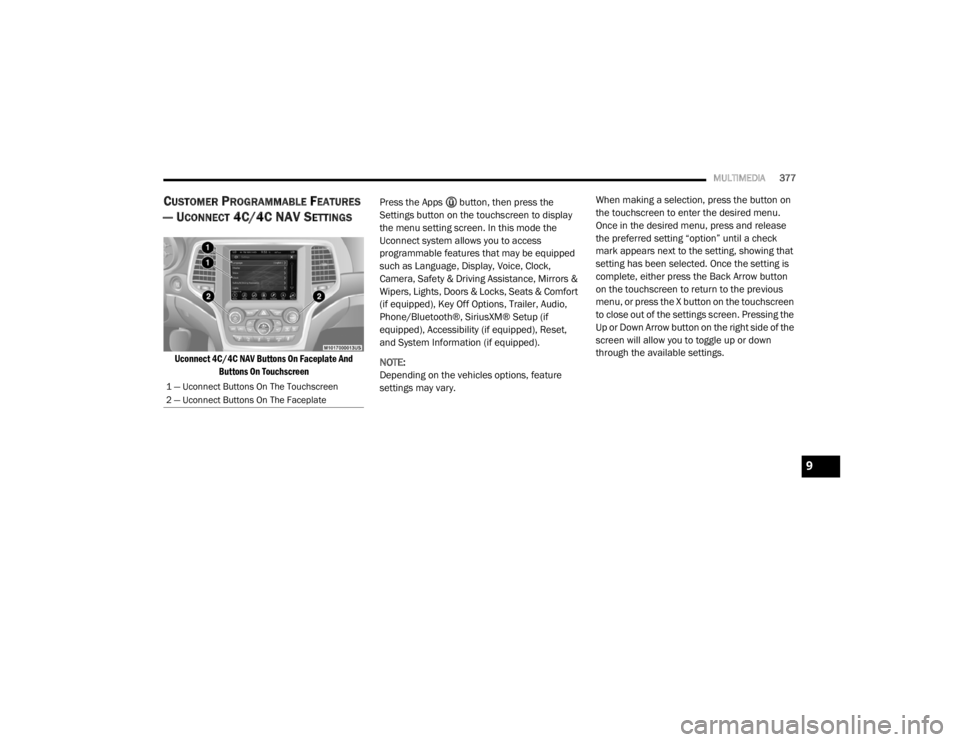
CONNECT 4C/4C NAV SETTINGS
Uconnect 4C/4C NAV Buttons On Faceplate And
Buttons On Touchscreen
Press the Apps button, then press the
Settings button on the touchscreen to display
the menu setting screen. In this mode the
Uconnect system allows you to access
programmable features that may be equipped
such as Language, Display, Voice, Clock,
Camera, Safety & Driving Assistance, Mirrors &
Wipers, Lights, Doors & Locks, Seats & Comfort
(if equipped), Key Off Options, Trailer, Audio,
Phone/Bluetooth®, SiriusXM® Setup (if
equipped), Accessibility (if equipped), Reset,
and System Information (if equipped).
NOTE:
Depending on the vehicles options, feature
settings may vary. When making a selection, press the button on
the touchscreen to enter the desired menu.
Once in the desired menu, press and release
the preferred setting “option” until a check
mark appears next to the setting, showing that
setting has been selected. Once the setting is
complete, either press the Back Arrow button
on the touchscreen to return to the previous
menu, or press the X button on the touchscreen
to close out of the settings screen. Pressing the
Up or Down Arrow button on the right side of the
screen will allow you to toggle up or down
through the available settings.
1 — Uconnect Buttons On The Touchscreen
2 — Uconnect Buttons On The Faceplate
9
20_WD_OM_EN_USC_t.book Page 377