buttons DODGE DURANGO 2021 Owner's Guide
[x] Cancel search | Manufacturer: DODGE, Model Year: 2021, Model line: DURANGO, Model: DODGE DURANGO 2021Pages: 340, PDF Size: 20.38 MB
Page 186 of 340
184MULTIMEDIA
HEADPHONES OPERATION
The headphones receive two separate channels of
audio using an infrared transmitter from the video
screen.
If no audio is heard after increasing the volume
control, verify that the screen is turned on, the
channel is not muted, and the headphone channel
selector switch is on the desired channel. If audio
is still not heard, check that the batteries are
charged.
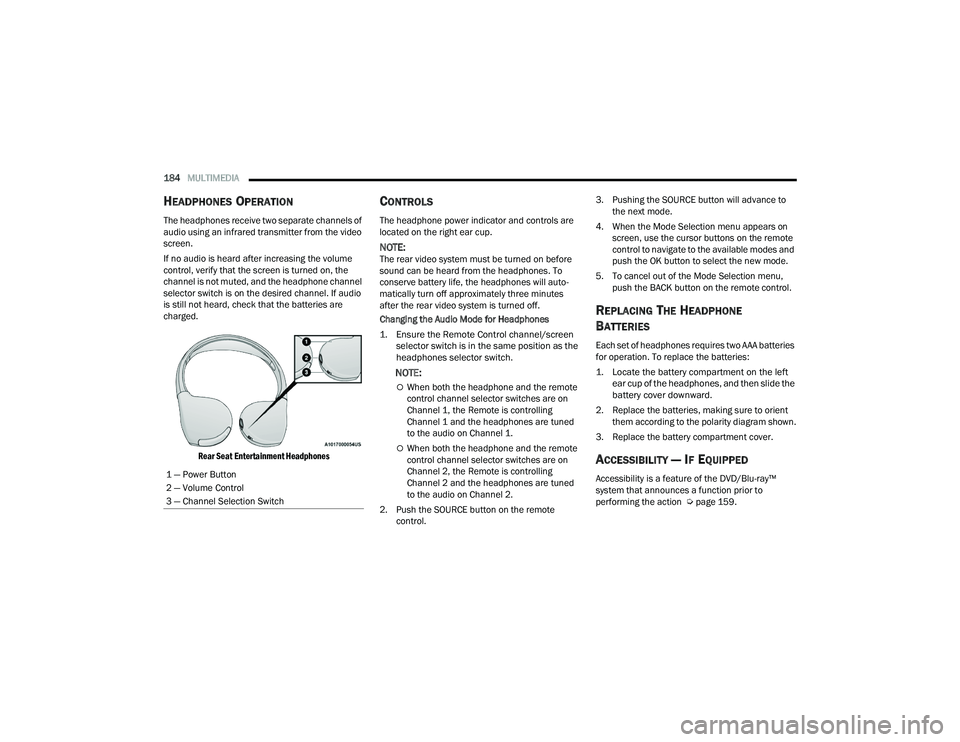
Rear Seat Entertainment Headphones
CONTROLS
The headphone power indicator and controls are
located on the right ear cup.
NOTE:The rear video system must be turned on before
sound can be heard from the headphones. To
conserve battery life, the headphones will auto -
matically turn off approximately three minutes
after the rear video system is turned off.
Changing the Audio Mode for Headphones
1. Ensure the Remote Control channel/screen selector switch is in the same position as the
headphones selector switch.
NOTE:
When both the headphone and the remote
control channel selector switches are on
Channel 1, the Remote is controlling
Channel 1 and the headphones are tuned
to the audio on Channel 1.
When both the headphone and the remote
control channel selector switches are on
Channel 2, the Remote is controlling
Channel 2 and the headphones are tuned
to the audio on Channel 2.
2. Push the SOURCE button on the remote control. 3. Pushing the SOURCE button will advance to
the next mode.
4. When the Mode Selection menu appears on screen, use the cursor buttons on the remote
control to navigate to the available modes and
push the OK button to select the new mode.
5. To cancel out of the Mode Selection menu, push the BACK button on the remote control.
REPLACING THE HEADPHONE
B
ATTERIES
Each set of headphones requires two AAA batteries
for operation. To replace the batteries:
1. Locate the battery compartment on the left
ear cup of the headphones, and then slide the
battery cover downward.
2. Replace the batteries, making sure to orient them according to the polarity diagram shown.
3. Replace the battery compartment cover.
ACCESSIBILITY — IF EQUIPPED
Accessibility is a feature of the DVD/Blu-ray™
system that announces a function prior to
performing the action Ú page 159.
1 — Power Button
2 — Volume Control
3 — Channel Selection Switch
21_WD_OM_EN_USC_t.book Page 184
Page 187 of 340
MULTIMEDIA185
STEREO HEADPHONE LIFETIME LIMITED
W
ARRANTY
Who Does This Warranty Cover? This warranty
covers the initial user or purchaser ("you" or "your")
of this particular Aptiv PLC (“Aptiv”) wireless
headphone ("Product"). The warranty is not
transferable.
How Long Does the Coverage Last? This warranty
lasts as long as you own the Product.
What Does This Warranty Cover? Except as
specified below, this warranty covers any Product
that in normal use is defective in workmanship or
materials.
What Does This Warranty Not Cover? This warranty
does not cover any damage or defect that results
from misuse, abuse, or modification of the Product
other than by Aptiv. Foam earpieces, which will
wear over time through normal use, are specifically
not covered (replacement foam is available for a
nominal charge). APTIV IS NOT LIABLE FOR ANY
INJURIES OR DAMAGES TO PERSONS OR
PROPERTY RESULTING FROM THE USE OF, OR ANY
FAILURE OR DEFECT IN, THE PRODUCT, NOR IS
APTIV LIABLE FOR ANY GENERAL, SPECIAL,
DIRECT, INDIRECT, INCIDENTAL, CONSEQUENTIAL,
EXEMPLARY, PUNITIVE OR OTHER DAMAGES OF
ANY KIND OR NATURE WHATSOEVER. Some states
and jurisdictions may not allow the exclusion or
limitation of incidental or consequential damages, so the above limitation may not apply to you. This
warranty gives you specific legal rights. You may
also have other rights, which vary from jurisdiction
to jurisdiction.
What Will Aptiv Do?
Aptiv, at its option, will repair or
replace any defective Product. Aptiv reserves the
right to replace any discontinued Product with a
comparable model. THIS WARRANTY IS THE SOLE
WARRANTY FOR THIS PRODUCT, SETS FORTH
YOUR EXCLUSIVE REMEDY REGARDING
DEFECTIVE PRODUCTS, AND IS IN LIEU OF ALL
OTHER WARRANTIES (EXPRESS OR IMPLIED),
INCLUDING ANY WARRANTY FOR
MERCHANTABILITY OR FITNESS FOR A
PARTICULAR PURPOSE.
If you have any questions or comments regarding
your Aptiv wireless headphones, please email
[email protected] or phone: 888-293-3332
System Information
Disc Menu
When listening to a CD Audio or CD Data disc,
pushing the remote control’s POPUP/MENU button
displays a list of all commands which control
playback of the disc.
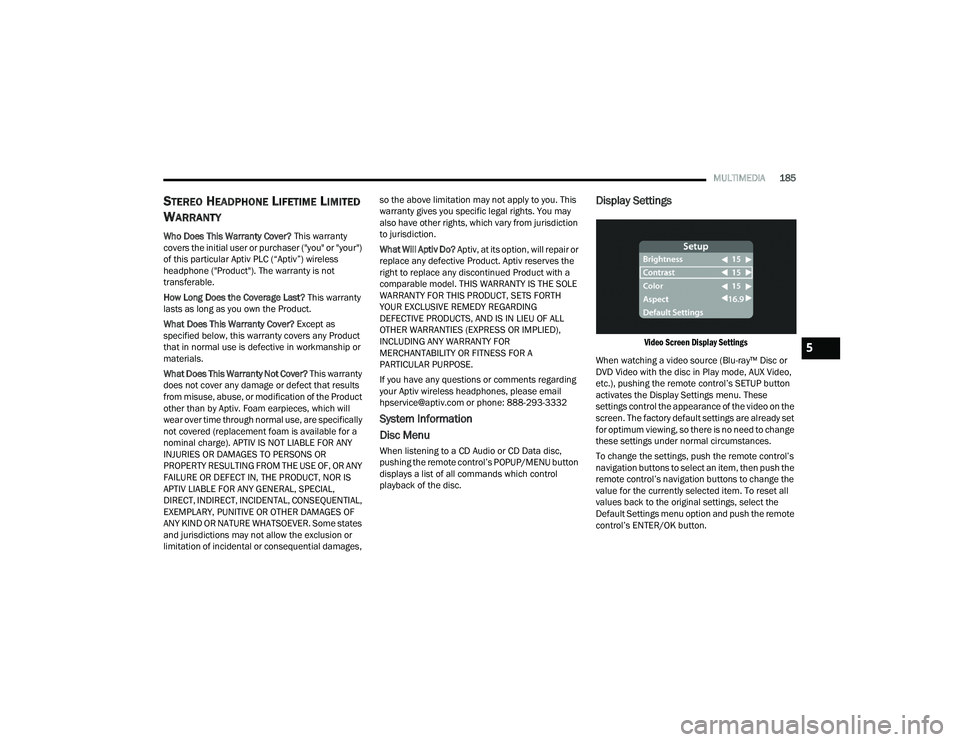
Display Settings
Video Screen Display Settings
When watching a video source (Blu-ray™ Disc or
DVD Video with the disc in Play mode, AUX Video,
etc.), pushing the remote control’s SETUP button
activates the Display Settings menu. These
settings control the appearance of the video on the
screen. The factory default settings are already set
for optimum viewing, so there is no need to change
these settings under normal circumstances.
To change the settings, push the remote control’s
navigation buttons to select an item, then push the
remote control’s navigation buttons to change the
value for the currently selected item. To reset all
values back to the original settings, select the
Default Settings menu option and push the remote
control’s ENTER/OK button.5
21_WD_OM_EN_USC_t.book Page 185
Page 245 of 340
243
IN CASE OF EMERGENCY
HAZARD WARNING FLASHERS
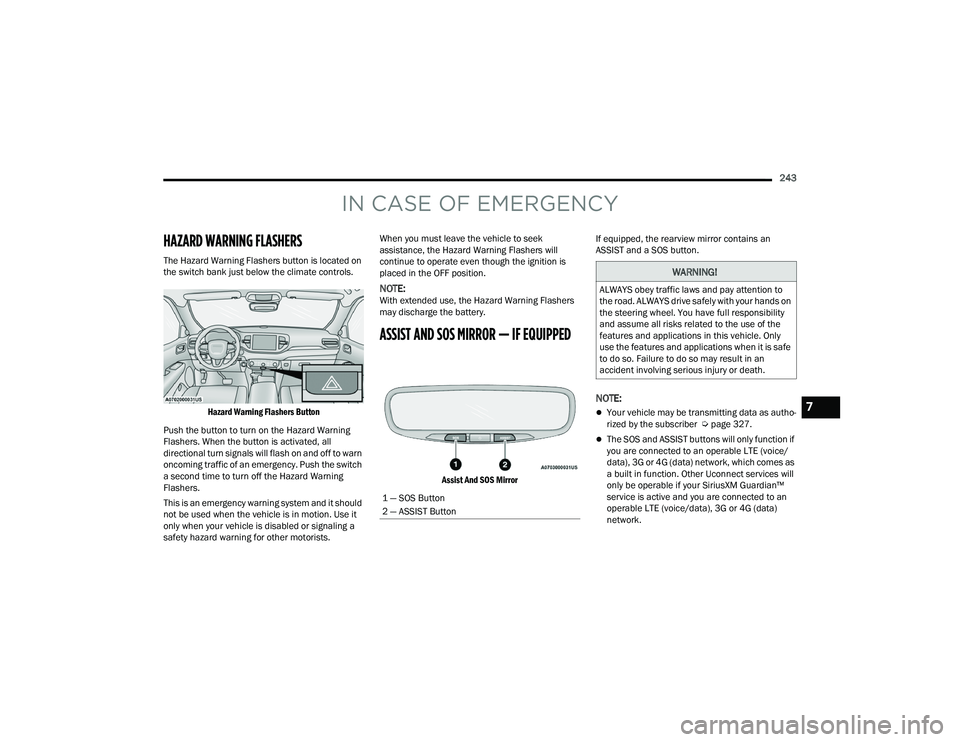
The Hazard Warning Flashers button is located on
the switch bank just below the climate controls.
Hazard Warning Flashers Button
Push the button to turn on the Hazard Warning
Flashers. When the button is activated, all
directional turn signals will flash on and off to warn
oncoming traffic of an emergency. Push the switch
a second time to turn off the Hazard Warning
Flashers.
This is an emergency warning system and it should
not be used when the vehicle is in motion. Use it
only when your vehicle is disabled or signaling a
safety hazard warning for other motorists. When you must leave the vehicle to seek
assistance, the Hazard Warning Flashers will
continue to operate even though the ignition is
placed in the OFF position.
NOTE:With extended use, the Hazard Warning Flashers
may discharge the battery.
ASSIST AND SOS MIRROR — IF EQUIPPED
Assist And SOS Mirror
If equipped, the rearview mirror contains an
ASSIST and a SOS button.
NOTE:
Your vehicle may be transmitting data as autho
-
rized by the subscriber Ú page 327.
The SOS and ASSIST buttons will only function if
you are connected to an operable LTE (voice/
data), 3G or 4G (data) network, which comes as
a built in function. Other Uconnect services will
only be operable if your SiriusXM Guardian™
service is active and you are connected to an
operable LTE (voice/data), 3G or 4G (data)
network.
1 — SOS Button
2 — ASSIST Button
WARNING!
ALWAYS obey traffic laws and pay attention to
the road. ALWAYS drive safely with your hands on
the steering wheel. You have full responsibility
and assume all risks related to the use of the
features and applications in this vehicle. Only
use the features and applications when it is safe
to do so. Failure to do so may result in an
accident involving serious injury or death.
7
21_WD_OM_EN_USC_t.book Page 243
Page 246 of 340
244IN CASE OF EMERGENCY
ASSIST Call
The ASSIST Button is used to automatically
connect you to any one of the following support
centers:
Roadside Assistance – If you get a flat tire, or
need a tow, just push the ASSIST button and you
will be connected to a representative for assis-
tance. Roadside Assistance will know what
vehicle you’re driving and its location. Additional
fees may apply for roadside assistance.
SiriusXM Guardian™ Customer Care – In-vehicle
support for SiriusXM Guardian™.
Vehicle Customer Care – Total support for all
other vehicle issues.
Uconnect Customer Care - Total support for
Radio, Phone and NAV issues.
SOS Call
1. Push the SOS Call button on the Rearview Mirror.
NOTE:In case the SOS Call button is pushed in error,
there will be a 10 second delay before the SOS Call
system initiates a call to a SOS operator. To cancel
the SOS Call connection, push the SOS call button
on the Rearview Mirror or press the cancellation
button on the Device Screen. Termination of the
SOS Call will turn off the green LED light on the
Rearview Mirror. 2. The LED light located between the ASSIST and
SOS buttons on the Rearview Mirror will turn
green once a connection to a SOS operator has
been made.
3. Once a connection between the vehicle and a SOS operator is made, the SOS Call system
may transmit the following important vehicle
information to a SOS operator:
Indication that the occupant placed a
SOS Call
The vehicle brand
The last known GPS coordinates of the
vehicle
4. You should be able to speak with the SOS operator through the vehicle audio system to
determine if additional assistance is needed.
NOTE:
Your vehicle may be transmitting data as
authorized by the subscriber.
Once a connection is made between the
vehicle’s SOS Call system and the SOS oper -
ator, the SOS operator may be able to open
a voice connection with the vehicle to deter -
mine if additional assistance is needed.
Once the SOS operator opens a voice
connection with the vehicle’s SOS Call
system, the operator should be able to
speak with you or other vehicle occupants
and hear sounds occurring in the vehicle.
The vehicle’s SOS Call system will attempt
to remain connected with the SOS operator
until the SOS operator terminates the
connection.
5. The SOS operator may attempt to contact appropriate emergency responders and
provide them with important vehicle
information and GPS coordinates.
WARNING!
ALWAYS obey traffic laws and pay attention to
the road. ALWAYS drive safely with your hands on
the steering wheel. You have full responsibility
and assume all risks related to the use of the
features and applications in this vehicle. Only
use the features and applications when it is safe
to do so. Failure to do so may result in an
accident involving serious injury or death.
21_WD_OM_EN_USC_t.book Page 244
Page 247 of 340
IN CASE OF EMERGENCY245
(Continued) SOS Call System Limitations
Vehicles sold in Mexico DO NOT have SOS Call
system capabilities.
SOS or other emergency line operators in Mexico
may not answer or respond to SOS system calls. If the SOS Call system detects a malfunction, any
of the following may occur at the time the
malfunction is detected, and at the beginning of
each ignition cycle:
The Rearview Mirror light located between the
ASSIST and SOS buttons will continuously illumi
-
nate red.
The Device Screen will display the following
message “Vehicle device requires service.
Please contact an authorized dealer.”
An In-Vehicle Audio message will state “Vehicle
device requires service. Please contact an
authorized dealer.”
WARNING!
If anyone in the vehicle could be in danger
(e.g., fire or smoke is visible, dangerous road
conditions or location), do not wait for voice
contact from an Emergency Services Agent. All
occupants should exit the vehicle immediately
and move to a safe location.
Never place anything on or near the vehicle’s
operable network and GPS antennas. You
could prevent operable network and GPS
signal reception, which can prevent your
vehicle from placing an emergency call. An
operable network and GPS signal reception is
required for the SOS Call system to function
properly.
The SOS Call system is embedded into the
vehicle’s electrical system. Do not add after -
market electrical equipment to the vehicle’s
electrical system. This may prevent your
vehicle from sending a signal to initiate an
emergency call. To avoid interference that can
cause the SOS Call system to fail, never add
aftermarket equipment (e.g., two-way mobile
radio, CB radio, data recorder, etc.) to your
vehicle’s electrical system or modify the
antennas on your vehicle. IF YOUR VEHICLE
LOSES BATTERY POWER FOR ANY REASON
(INCLUDING DURING OR AFTER AN ACCI -
DENT), THE UCONNECT FEATURES, APPS AND
SERVICES, AMONG OTHERS, WILL NOT
OPERATE.
Modifications to any part of the SOS Call
system could cause the air bag system to fail
when you need it. You could be injured if the
air bag system is not there to help protect you.
WARNING!
WARNING!
Ignoring the Rearview Mirror light could mean
you will not have SOS Call services. If the Rear -
view Mirror light is illuminated, have an autho -
rized dealer service the SOS Call system
immediately.
The Occupant Restraint Control module turns
on the air bag Warning Light on the instrument
panel if a malfunction in any part of the
system is detected. If the Air Bag Warning
Light is illuminated, have an authorized dealer
service the Occupant Restraint Control system
immediately.
7
21_WD_OM_EN_USC_t.book Page 245