USB port DODGE DURANGO 2021 Owners Manual
[x] Cancel search | Manufacturer: DODGE, Model Year: 2021, Model line: DURANGO, Model: DODGE DURANGO 2021Pages: 340, PDF Size: 20.38 MB
Page 69 of 340

GETTING TO KNOW YOUR VEHICLE67
Rear Mini Center Console — If Equipped
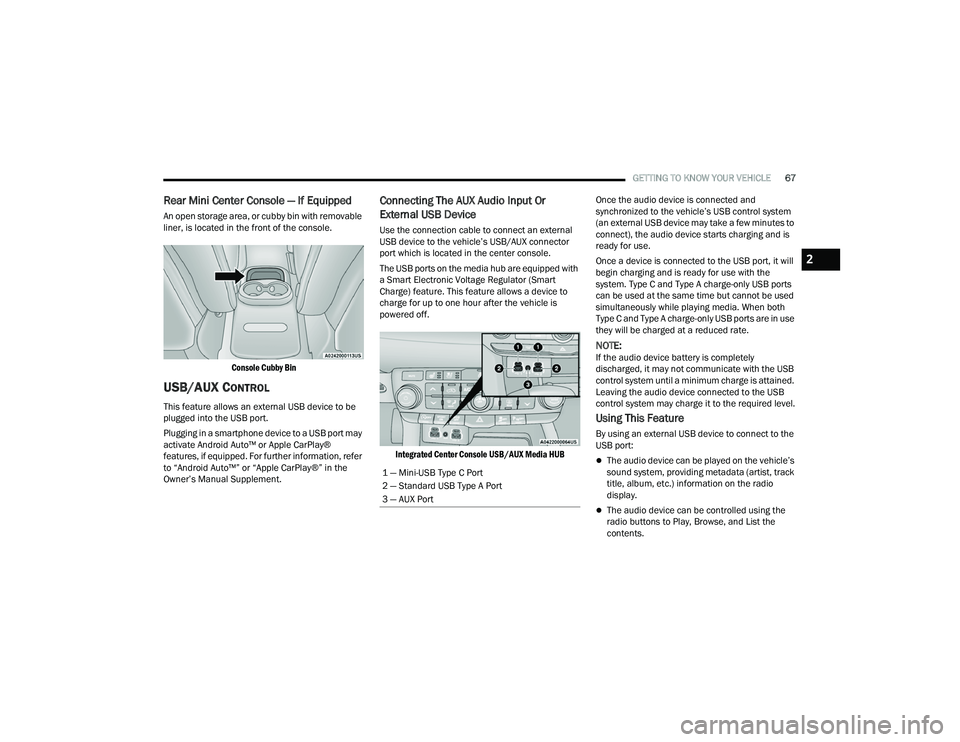
An open storage area, or cubby bin with removable
liner, is located in the front of the console.
Console Cubby Bin
USB/AUX CONTROL
This feature allows an external USB device to be
plugged into the USB port.
Plugging in a smartphone device to a USB port may
activate Android Auto™ or Apple CarPlay®
features, if equipped. For further information, refer
to “Android Auto™” or “Apple CarPlay®” in the
Owner’s Manual Supplement.
Connecting The AUX Audio Input Or
External USB Device
Use the connection cable to connect an external
USB device to the vehicle’s USB/AUX connector
port which is located in the center console.
The USB ports on the media hub are equipped with
a Smart Electronic Voltage Regulator (Smart
Charge) feature. This feature allows a device to
charge for up to one hour after the vehicle is
powered off.
Integrated Center Console USB/AUX Media HUB
Once the audio device is connected and
synchronized to the vehicle’s USB control system
(an external USB device may take a few minutes to
connect), the audio device starts charging and is
ready for use.
Once a device is connected to the USB port, it will
begin charging and is ready for use with the
system. Type C and Type A charge-only USB ports
can be used at the same time but cannot be used
simultaneously while playing media. When both
Type C and Type A charge-only USB ports are in use
they will be charged at a reduced rate.
NOTE:If the audio device battery is completely
discharged, it may not communicate with the USB
control system until a minimum charge is attained.
Leaving the audio device connected to the USB
control system may charge it to the required level.
Using This Feature
By using an external USB device to connect to the
USB port:
The audio device can be played on the vehicle’s
sound system, providing metadata (artist, track
title, album, etc.) information on the radio
display.
The audio device can be controlled using the
radio buttons to Play, Browse, and List the
contents.
1 — Mini-USB Type C Port
2 — Standard USB Type A Port
3 — AUX Port
2
21_WD_OM_EN_USC_t.book Page 67
Page 70 of 340

68GETTING TO KNOW YOUR VEHICLE
The audio device battery charges when plugged
into the USB/AUX connector (if supported by the
specific audio device).
NOTE:For further information, refer to the Uconnect
Owner’s Manual Supplement.
Second Row USB Charging Port
Second Row USB Charging ports can be used for
charging purposes only. Use the connection cable
to connect an external USB device to the vehicle’s
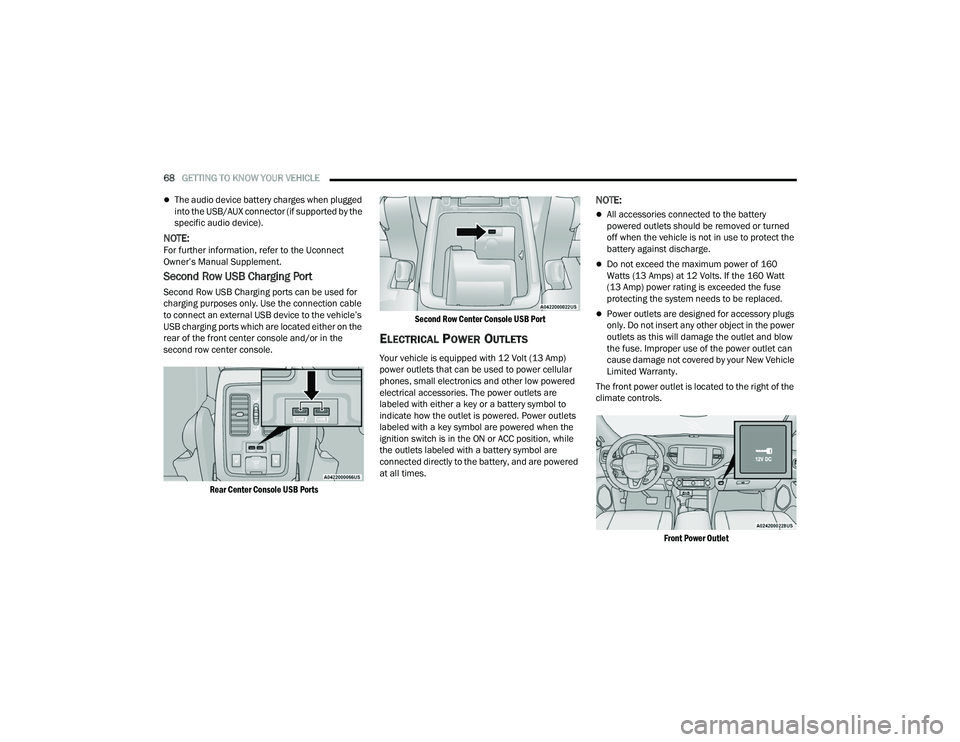
USB charging ports which are located either on the
rear of the front center console and/or in the
second row center console.
Rear Center Console USB Ports Second Row Center Console USB Port
ELECTRICAL POWER OUTLETS
Your vehicle is equipped with 12 Volt (13 Amp)
power outlets that can be used to power cellular
phones, small electronics and other low powered
electrical accessories. The power outlets are
labeled with either a key or a battery symbol to
indicate how the outlet is powered. Power outlets
labeled with a key symbol are powered when the
ignition switch is in the ON or ACC position, while
the outlets labeled with a battery symbol are
connected directly to the battery, and are powered
at all times.
NOTE:
All accessories connected to the battery
powered outlets should be removed or turned
off when the vehicle is not in use to protect the
battery against discharge.
Do not exceed the maximum power of 160
Watts (13 Amps) at 12 Volts. If the 160 Watt
(13 Amp) power rating is exceeded the fuse
protecting the system needs to be replaced.
Power outlets are designed for accessory plugs
only. Do not insert any other object in the power
outlets as this will damage the outlet and blow
the fuse. Improper use of the power outlet can
cause damage not covered by your New Vehicle
Limited Warranty.
The front power outlet is located to the right of the
climate controls.
Front Power Outlet
21_WD_OM_EN_USC_t.book Page 68
Page 92 of 340

90GETTING TO KNOW YOUR INSTRUMENT PANEL
When load reduction is activated, the message
“Battery Saver On” or “Battery Saver Mode” will
appear in the instrument cluster.
These messages indicate the vehicle battery has a
low state of charge and continues to lose electrical
charge at a rate that the charging system cannot
sustain.
NOTE:
The charging system is independent from load
reduction. The charging system performs a diag -
nostic on the charging system continuously.
If the Battery Charge Warning Light is on it may
indicate a problem with the charging system
Ú page 92.
The electrical loads that may be switched off
(if equipped), and vehicle functions which can be
affected by load reduction:
Heated Seat/Vented Seats/Heated Wheel
Rear Defroster And Heated Mirrors
HVAC System
115 Volt AC Power Inverter System
Audio and Telematics System Loss of the battery charge may indicate one or
more of the following conditions:
The charging system cannot deliver enough
electrical power to the vehicle system because
the electrical loads are larger than the capability
of the charging system. The charging system is
still functioning properly.
Turning on all possible vehicle electrical loads
(e.g. HVAC to max settings, exterior and interior
lights, overloaded power outlets +12 Volt,
115 Volt AC, USB ports) during certain driving
conditions (city driving, towing, frequent stop
-
ping, etc.).
Installing options like additional lights, upfitter
electrical accessories, audio systems, alarms
and similar devices.
Unusual driving cycles (short trips separated by
long parking periods).
The vehicle was parked for an extended period
of time (weeks, months).
The battery was recently replaced and was not
charged completely.
The battery was discharged by an electrical load
left on when the vehicle was parked.
The battery was used for an extended period
with the engine not running to supply radio,
lights, chargers, +12 Volt portable appliances
like vacuum cleaners, game consoles and
similar devices. What to do when an electrical load reduction
action message is present (“Battery Saver On” or
“Battery Saver Mode”)
During a trip:
Reduce power to unnecessary loads if possible:
Turn off redundant lights (interior or
exterior)
Check what may be plugged in to power
outlets +12 Volt, 115 Volt AC, USB ports
Check HVAC settings (blower, temperature)
Check the audio settings (volume)
After a trip:
Check if any aftermarket equipment was
installed (additional lights, upfitter electrical
accessories, audio systems, alarms) and review
specifications if any (load and Ignition Off Draw
currents).
Evaluate the latest driving cycles (distance,
driving time and parking time).
The vehicle should have service performed if
the message is still present during consecutive
trips, and if the evaluation and driving pattern of
the vehicle did not help to identify the cause.
21_WD_OM_EN_USC_t.book Page 90
Page 292 of 340

290SERVICING AND MAINTENANCE
F52 ––Spare
F53 –20 Amp Yellow Trailer Tow – Left Turn/Stop Lights*
F54 ––Spare
F55 ––Spare
F56 –15 Amp Blue PCM*
F57 –20 Amp Yellow NOX Sensor*/PM Sensor*/Fuel Htr*
F58 –15 Amp Blue HID Headlamps LH*
F59 –10 Amp Red SCR Pumps Relay*
F60 –15 Amp Blue Transmission Control Module
F61 –10 Amp Red PM Sensor
F62 –10 Amp Red Air Conditioning Clutch
F63 –20 Amp Yellow Ignition Coils / Ignition Coil Capacitors / Short Runner Valve Actuator —
If Equipped (Gas) Urea Heater (Diesel)*
F64 –25 Amp Clear Fuel Injectors/PCM/ECM
F65 ––Spare
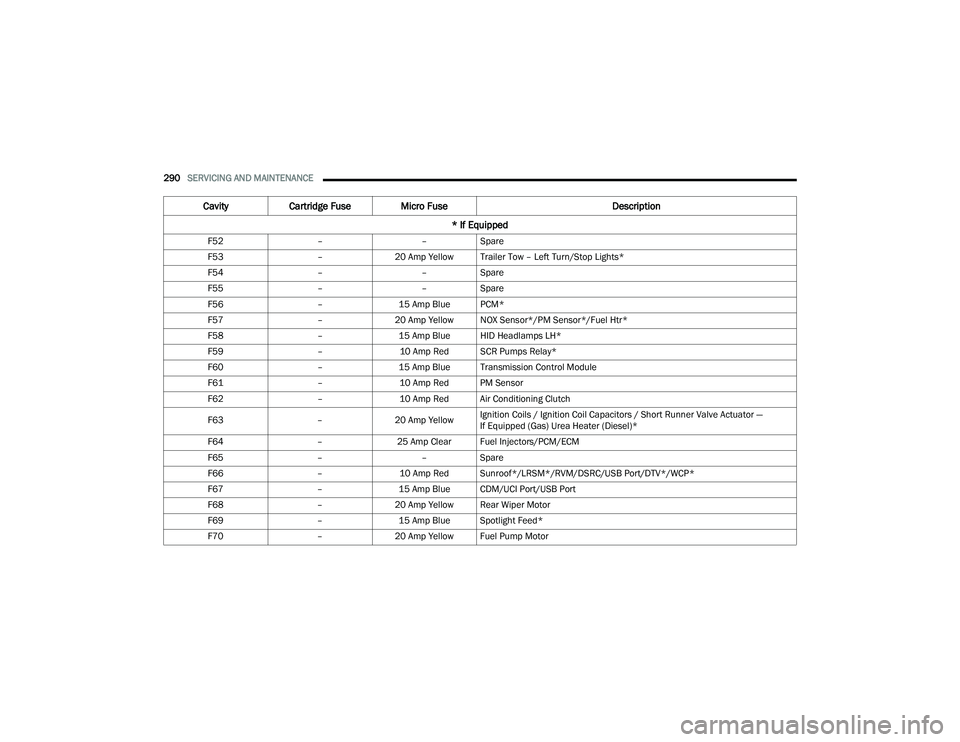
F66 –10 Amp Red Sunroof*/LRSM*/RVM/DSRC/USB Port/DTV*/WCP*
F67 –15 Amp Blue CDM/UCI Port/USB Port
F68 –20 Amp Yellow Rear Wiper Motor
F69 –15 Amp Blue Spotlight Feed*
F70 –20 Amp Yellow Fuel Pump Motor
Cavity Cartridge Fuse Micro Fuse Description
* If Equipped
21_WD_OM_EN_USC_t.book Page 290