spare tire DODGE DURANGO 2021 Owners Manual
[x] Cancel search | Manufacturer: DODGE, Model Year: 2021, Model line: DURANGO, Model: DODGE DURANGO 2021Pages: 340, PDF Size: 20.38 MB
Page 8 of 340
6
IN CASE OF EMERGENCY
HAZARD WARNING FLASHERS ........................ 243
ASSIST AND SOS MIRROR — IF EQUIPPED...... 243
JACKING AND TIRE CHANGING ........................ 247 Preparations For Jacking ............................ 247
Jack Location ................................................. 248
Spare Tire Stowage ....................................... 249
Spare Tire Removal ....................................... 249
Jacking Instructions ..................................... 251
JUMP STARTING .................................................. 255
Preparations For Jump Start......................... 255Jump Starting Procedure .............................. 256
REFUELING IN EMERGENCY –
IF EQUIPPED ........................................................ 257
IF YOUR ENGINE OVERHEATS ............................ 258
MANUAL PARK RELEASE ................................... 258
FREEING A STUCK VEHICLE .............................. 260
TOWING A DISABLED VEHICLE .........................261
Rear Wheel Drive Models ............................. 262
All Wheel Drive Models ................................. 263
ENHANCED ACCIDENT RESPONSE SYSTEM
(EARS) .................................................................. 263
EVENT DATA RECORDER (EDR) ......................... 263
SERVICING AND MAINTENANCE
SCHEDULED SERVICING ................................... 264
Maintenance Plan ......................................... 265
ENGINE COMPARTMENT .................................... 268
3.6L Engine ................................................... 268
5.7L Engine ................................................... 269
Checking Oil Level ......................................... 270
Adding Washer Fluid .................................... 270
Maintenance-Free Battery ........................... 270Pressure Washing ......................................... 271
VEHICLE MAINTENANCE..................................... 271
Engine Oil ...................................................... 271
Engine Oil Filter ............................................ 272
Engine Air Cleaner Filter ............................ 272
Air Conditioner Maintenance ..................... 273
Accessory Drive Belt Inspection ................... 275Body Lubrication .......................................... 276
Windshield Wiper Blades ............................. 276
Exhaust System ............................................ 279
Cooling System .............................................. 280
Brake System ............................................... 283
Automatic Transmission ............................... 284
Front/Rear Axle Fluid ................................... 285Transfer Case ............................................... 285
Fuses.............................................................. 286
Bulb Replacement......................................... 293 TIRES ..................................................................... 295
Tire Safety Information ................................. 295
Tires — General Information ........................ 303Tire Types....................................................... 306Spare Tires — If Equipped ............................ 307
Wheel And Wheel Trim Care ........................ 309Snow Traction Devices ................................. 310
Tire Rotation Recommendations ................ 312
DEPARTMENT OF TRANSPORTATION
UNIFORM TIRE QUALITY GRADES .................... 312
Treadwear...................................................... 312
Traction Grades ............................................. 313Temperature Grades..................................... 313
STORING THE VEHICLE .................................... 313
BODYWORK .......................................................... 313 Protection From Atmospheric Agents .......... 313
Body And Underbody Maintenance ............. 314
Preserving The Bodywork ............................. 314
INTERIORS ........................................................... 315
Seats And Fabric Parts ................................. 315
Plastic And Coated Parts .............................. 315
Leather Surfaces........................................... 316
Glass Surfaces ............................................. 316
21_WD_OM_EN_USC_t.book Page 6
Page 97 of 340
GETTING TO KNOW YOUR INSTRUMENT PANEL95
The ESC OFF Indicator Light and the ESC Indi-
cator Light come on momentarily each time the
ignition is placed in the ON/RUN or ACC/ON/
RUN position.
The ESC system will make buzzing or clicking
sounds when it is active. This is normal; the
sounds will stop when ESC becomes inactive.
This light will come on when the vehicle is in an
ESC event.
Electronic Stability Control (ESC) OFF
Warning Light
This warning light indicates the ESC is off.
Each time the ignition is turned to
ON/RUN or ACC/ON/RUN, the ESC
system will be on, even if it was turned off
previously.
Low Washer Fluid Warning Light —
If Equipped
This warning light will illuminate when the
windshield washer fluid is low
Ú page 270.
Tire Pressure Monitoring System (TPMS)
Warning Light
The warning light switches on and a
message is displayed to indicate that the
tire pressure is lower than the
recommended value and/or that slow
pressure loss is occurring. In these cases, optimal
tire duration and fuel consumption may not be
guaranteed.
Should one or more tires be in the condition
mentioned above, the display will show the
indications corresponding to each tire.
Each tire, including the spare (if provided), should
be checked monthly when cold and inflated to the
inflation pressure recommended by the vehicle
manufacturer on the vehicle placard or tire
inflation pressure label. If your vehicle has tires of
a different size than the size indicated on the vehicle placard or tire inflation pressure label, you
should determine the proper tire inflation pressure
for those tires.
As an added safety feature, your vehicle has been
equipped with a TPMS that illuminates a low tire
pressure telltale when one or more of your tires is
significantly underinflated. Accordingly, when the
low tire pressure telltale illuminates, you should
stop and check your tires as soon as possible, and
inflate them to the proper pressure. Driving on a
significantly underinflated tire causes the tire to
overheat and can lead to tire failure. Underinflation
also reduces fuel efficiency and tire tread life, and
may affect the vehicle’s handling and stopping
ability.
Please note that the TPMS is not a substitute for
proper tire maintenance, and it is the driver’s
responsibility to maintain correct tire pressure,
even if underinflation has not reached the level to
trigger illumination of the TPMS low tire pressure
telltale.
Your vehicle has also been equipped with a TPMS
malfunction indicator to indicate when the system
is not operating properly. The TPMS malfunction
indicator is combined with the low tire pressure
telltale. When the system detects a malfunction,
the telltale will flash for approximately one minute
and then remain continuously illuminated. This
sequence will continue upon subsequent vehicle
start-ups as long as the malfunction exists.
CAUTION!
Do not continue driving with one or more flat
tires as handling may be compromised. Stop the
vehicle, avoiding sharp braking and steering. If a
tire puncture occurs, repair immediately using
the dedicated tire repair kit and contact an
authorized dealer as soon as possible.
3
21_WD_OM_EN_USC_t.book Page 95
Page 150 of 340
148STARTING AND OPERATING
Towing Requirements — Tires
Do not attempt to tow a trailer while using a
compact spare tire.
Do not drive more than 50 mph (80 km/h) when
towing while using a full size spare tire.
Proper tire inflation pressures are essential to
the safe and satisfactory operation of your
vehicle.
Check the trailer tires for proper tire inflation
pressures before trailer usage.
Check for signs of tire wear or visible tire
damage before towing a trailer.
Replacing tires with a higher load carrying
capacity will not increase the vehicle's GVWR
and GAWR limits.
For further information Úpage 295.
Towing Requirements — Trailer Brakes
Do not interconnect the hydraulic brake system
or vacuum system of your vehicle with that of
the trailer. This could cause inadequate braking
and possible personal injury.
An electronically actuated trailer brake
controller is required when towing a trailer with
electronically actuated brakes. When towing a
trailer equipped with a hydraulic surge actuated
brake system, an electronic brake controller is
not required.
Trailer brakes are recommended for trailers
over 1,000 lb (453 kg) and required for trailers
in excess of 2,000 lb (907 kg).
Safety chains must always be used between
your vehicle and trailer. Always connect the
chains to the hook retainers of the vehicle
hitch. Cross the chains under the trailer
tongue and allow enough slack for turning
corners.
Vehicles with trailers should not be parked on
a grade. When parking, apply the parking
brake on the tow vehicle. Put the tow vehicle
transmission in PARK (P). For four-wheel drive
vehicles, make sure the transfer case is not in
NEUTRAL (N). Always, block or "chock" the
trailer wheels.
GCWR must not be exceeded.
Total weight must be distributed between the
tow vehicle and the trailer such that the
following four ratings are not exceeded :
GVWR
GTW
GAWR
Tongue weight rating for the trailer hitch
utilized.
WARNING!
WARNING!
Do not connect trailer brakes to your vehicle's
hydraulic brake lines. It can overload your
brake system and cause it to fail. You might
not have brakes when you need them and
could have an accident.
Towing any trailer will increase your stopping
distance. When towing, you should allow for
additional space between your vehicle and the
vehicle in front of you. Failure to do so could
result in an accident.
CAUTION!
If the trailer weighs more than 1,000 lb (453 kg)
loaded, it should have its own brakes and they
should be of adequate capacity. Failure to do
this could lead to accelerated brake lining wear,
higher brake pedal effort, and longer stopping
distances.
21_WD_OM_EN_USC_t.book Page 148
Page 205 of 340
SAFETY203
vehicle’s recommended cold tire pressure
displayed in the “Inflate to XX” message.
NOTE:When filling warm tires, the tire pressure may need
to be increased up to an additional 4 psi (28 kPa)
above the recommended cold placard pressure in
order to turn the TPMS Warning Light off.
The system will automatically update, the graphic
display of the pressure value(s) will return to its
original color and the TPMS Warning Light will
extinguish once the updated tire pressure(s) have
been received. The vehicle may need to be driven
for up to 20 minutes above 15 mph (24 km/h) to
receive this information.
Service TPMS Warning
The TPMS Warning Light will flash on and off for 75
seconds, and remain on solid when a system fault
is detected. The system fault will also sound a
chime. The instrument cluster display will display a
“SERVICE TPM SYSTEM” message for a minimum
of five seconds. This message is then followed by a
graphic display, with “--“ in place of the pressure
value(s), indicating which Tire Pressure Monitoring
System sensor(s) is not being received.
If the ignition switch is cycled, this sequence will
repeat, providing the system fault still exists. If the
system fault no longer exists, the TPMS Warning
Light will no longer flash, the "SERVICE TPM
SYSTEM" message will not be present, and a pressure value will be displayed instead of dashes.
A system fault can occur by any of the following:
Jamming due to electronic devices or driving
next to facilities emitting the same Radio
Frequencies as the TPMS sensors.
Lots of snow or ice around the wheels or wheel
housings.
Using tire chains on the vehicle.
Using wheels/tires not equipped with TPMS
sensors.
NOTE:
There is no TPMS sensor in the spare tire. The TPMS
will not be able to monitor the tire pressure. If you
install the spare tire in place of a road tire that has a
pressure below the low-pressure warning limit, upon
the next ignition switch cycle, the TPMS Warning
Light will remain on, a chime will sound, and the
instrument cluster display will still display a pressure
value in the different color graphic display and an
“Inflate to XX” message will be displayed. After
driving the vehicle for up to 20 minutes above
15 mph (24 km/h), the TPMS Warning Light will
flash on and off for 75 seconds and then remain on
solid. In addition, the instrument cluster display will
display a “SERVICE TPM SYSTEM" message for five
seconds and then display dashes (--) in place of the
pressure value. For each subsequent ignition switch
cycle, a chime will sound, the TPMS Warning Light
will flash on and off for 75 seconds and then remain on solid, and the instrument cluster display will
display a "SERVICE TPM SYSTEM" message for five
seconds and then display dashes (--) in place of the
pressure value. Once you repair or replace the
original road tire, and reinstall it on the vehicle in
place of the spare tire, the TPMS will update auto
-
matically.
In addition, the TPMS Warning Light will turn off
and the graphic in the instrument cluster display
will display a new pressure value instead of dashes
(--), as long as no tire pressure is below the
low-pressure warning limit in any of the four active
road tires. The vehicle may need to be driven for up
to 20 minutes above 15 mph (24 km/h) in order
for the TPMS to receive this information.
TPMS Deactivation — If Equipped
The TPMS can be deactivated if replacing all four
wheel and tire assemblies (road tires) with wheel
and tire assemblies that do not have TPMS
sensors, such as when installing winter wheel and
tire assemblies on your vehicle.
To deactivate the TPMS, first, replace all four wheel
and tire assemblies (road tires) with tires not
equipped with TPMS sensors. Then, drive the
vehicle for 20 minutes above 15 mph (24 km/h).
The TPMS will chime, the TPMS Warning Light will
flash on and off for 75 seconds and then remain
on. The instrument cluster will display the
“SERVICE TPM SYSTEM” message and then
display dashes (--) in place of the pressure values.
6
21_WD_OM_EN_USC_t.book Page 203
Page 243 of 340
SAFETY241
PERIODIC SAFETY CHECKS YOU SHOULD
M
AKE OUTSIDE THE VEHICLE
Tires
Examine tires for excessive tread wear and uneven
wear patterns. Check for stones, nails, glass, or
other objects lodged in the tread or sidewall.
Inspect the tread for cuts and cracks. Inspect
sidewalls for cuts, cracks, and bulges. Check the
lug nut/bolt torque for tightness. Check the tires
(including spare) for proper cold inflation pressure.
Lights
Have someone observe the operation of brake
lights and exterior lights while you work the
controls. Check turn signal and high beam
indicator lights on the instrument panel.
Door Latches
Check for proper closing, latching, and locking.
Fluid Leaks
Check area under the vehicle after overnight
parking for fuel, coolant, oil, or other fluid leaks.
Also, if gasoline fumes are detected or if fuel or
brake fluid leaks are suspected, the cause should
be located and corrected immediately.
EXHAUST GAS
NEVER place any objects under the floor mat
(e.g., towels, keys, etc.). These objects could
change the position of the floor mat and may
cause interference with the accelerator,
brake, or clutch pedals.
If the vehicle carpet has been removed and
re-installed, always properly attach carpet to
the floor and check the floor mat fasteners are
secure to the vehicle carpet. Fully depress
each pedal to check for interference with the
accelerator, brake, or clutch pedals then
re-install the floor mats.
It is recommended to only use mild soap and
water to clean your floor mats. After cleaning,
always check your floor mat has been properly
installed and is secured to your vehicle using
the floor mat fasteners by lightly pulling mat.
WARNING!
WARNING!
Exhaust gases can injure or kill. They contain
carbon monoxide (CO), which is colorless and
odorless. Breathing it can make you
unconscious and can eventually poison you. To
avoid breathing (CO), follow these safety tips:
Do not run the engine in a closed garage or in
confined areas any longer than needed to
move your vehicle in or out of the area.
If you are required to drive with the trunk/lift -
gate/rear doors open, make sure that all
windows are closed and the climate control
BLOWER switch is set at high speed. DO NOT
use the recirculation mode.
If it is necessary to sit in a parked vehicle with
the engine running, adjust your heating or
cooling controls to force outside air into the
vehicle. Set the blower at high speed.
6
21_WD_OM_EN_USC_t.book Page 241
Page 251 of 340
IN CASE OF EMERGENCY249
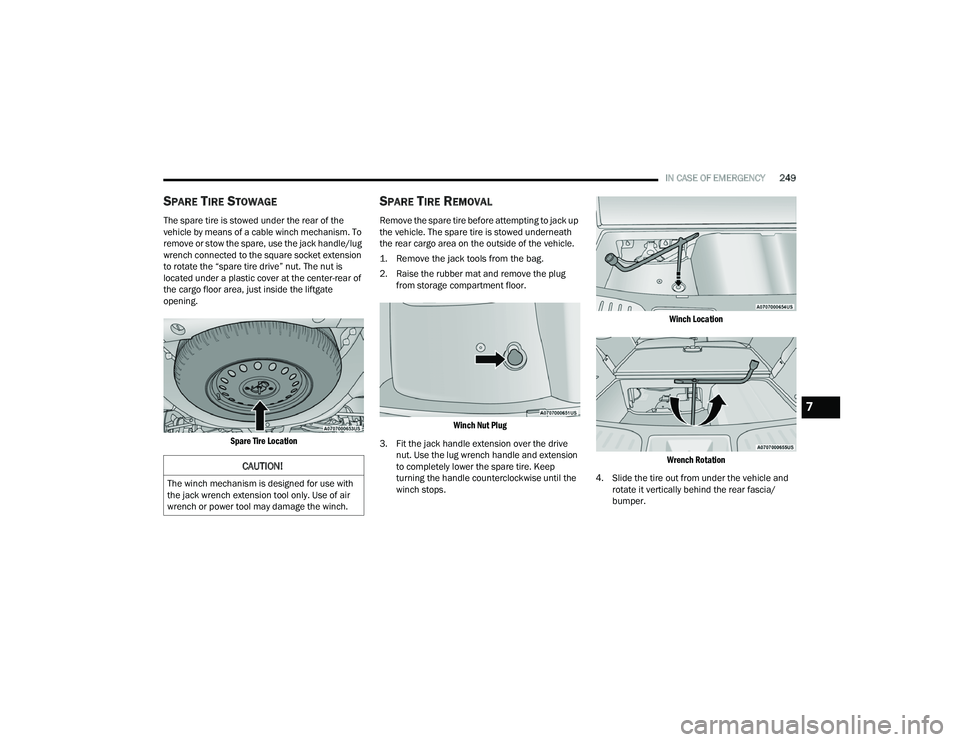
SPARE TIRE STOWAGE
The spare tire is stowed under the rear of the
vehicle by means of a cable winch mechanism. To
remove or stow the spare, use the jack handle/lug
wrench connected to the square socket extension
to rotate the “spare tire drive” nut. The nut is
located under a plastic cover at the center-rear of
the cargo floor area, just inside the liftgate
opening.
Spare Tire Location
SPARE TIRE REMOVAL
Remove the spare tire before attempting to jack up
the vehicle. The spare tire is stowed underneath
the rear cargo area on the outside of the vehicle.
1. Remove the jack tools from the bag.
2. Raise the rubber mat and remove the plug from storage compartment floor.
Winch Nut Plug
3. Fit the jack handle extension over the drive nut. Use the lug wrench handle and extension
to completely lower the spare tire. Keep
turning the handle counterclockwise until the
winch stops.
Winch Location
Wrench Rotation
4. Slide the tire out from under the vehicle and rotate it vertically behind the rear fascia/
bumper.
CAUTION!
The winch mechanism is designed for use with
the jack wrench extension tool only. Use of air
wrench or power tool may damage the winch.
7
21_WD_OM_EN_USC_t.book Page 249
Page 252 of 340
250IN CASE OF EMERGENCY
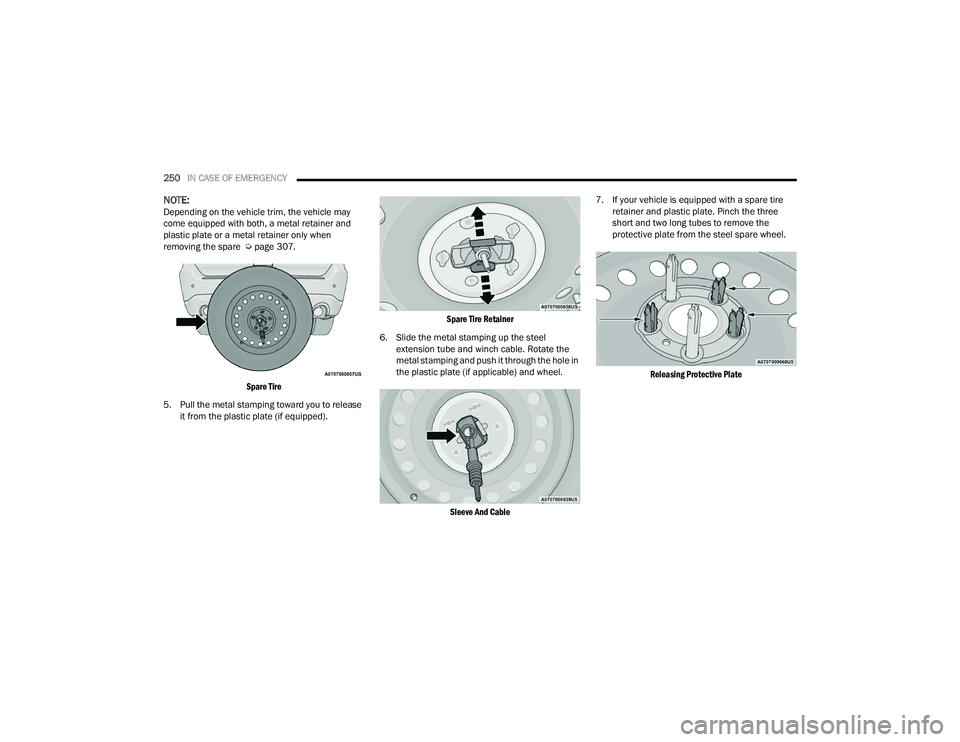
NOTE:Depending on the vehicle trim, the vehicle may
come equipped with both, a metal retainer and
plastic plate or a metal retainer only when
removing the spare Úpage 307.
Spare Tire
5. Pull the metal stamping toward you to release it from the plastic plate (if equipped).
Spare Tire Retainer
6. Slide the metal stamping up the steel extension tube and winch cable. Rotate the
metal stamping and push it through the hole in
the plastic plate (if applicable) and wheel.
Sleeve And Cable
7. If your vehicle is equipped with a spare tire
retainer and plastic plate. Pinch the three
short and two long tubes to remove the
protective plate from the steel spare wheel.
Releasing Protective Plate
21_WD_OM_EN_USC_t.book Page 250
Page 253 of 340
IN CASE OF EMERGENCY251
(Continued)
JACKING INSTRUCTIONS
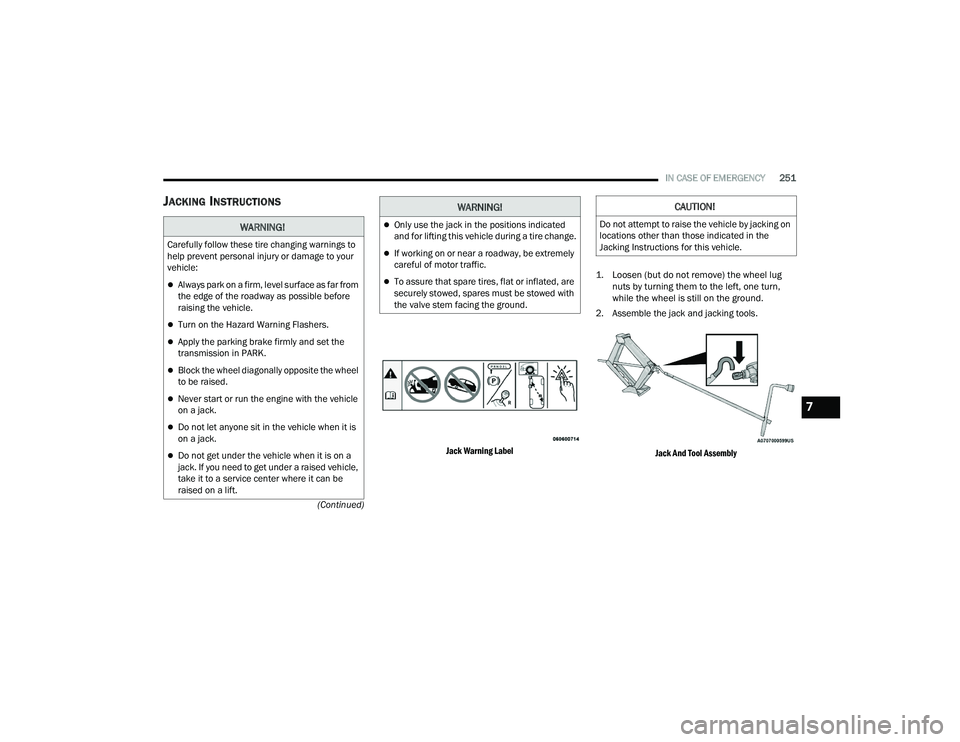
Jack Warning Label
1. Loosen (but do not remove) the wheel lug
nuts by turning them to the left, one turn,
while the wheel is still on the ground.
2. Assemble the jack and jacking tools.
Jack And Tool Assembly
WARNING!
Carefully follow these tire changing warnings to
help prevent personal injury or damage to your
vehicle:
Always park on a firm, level surface as far from
the edge of the roadway as possible before
raising the vehicle.
Turn on the Hazard Warning Flashers.
Apply the parking brake firmly and set the
transmission in PARK.
Block the wheel diagonally opposite the wheel
to be raised.
Never start or run the engine with the vehicle
on a jack.
Do not let anyone sit in the vehicle when it is
on a jack.
Do not get under the vehicle when it is on a
jack. If you need to get under a raised vehicle,
take it to a service center where it can be
raised on a lift.
Only use the jack in the positions indicated
and for lifting this vehicle during a tire change.
If working on or near a roadway, be extremely
careful of motor traffic.
To assure that spare tires, flat or inflated, are
securely stowed, spares must be stowed with
the valve stem facing the ground.
WARNING!CAUTION!
Do not attempt to raise the vehicle by jacking on
locations other than those indicated in the
Jacking Instructions for this vehicle.
7
21_WD_OM_EN_USC_t.book Page 251
Page 255 of 340
IN CASE OF EMERGENCY253
6. Remove the lug nuts and wheel.
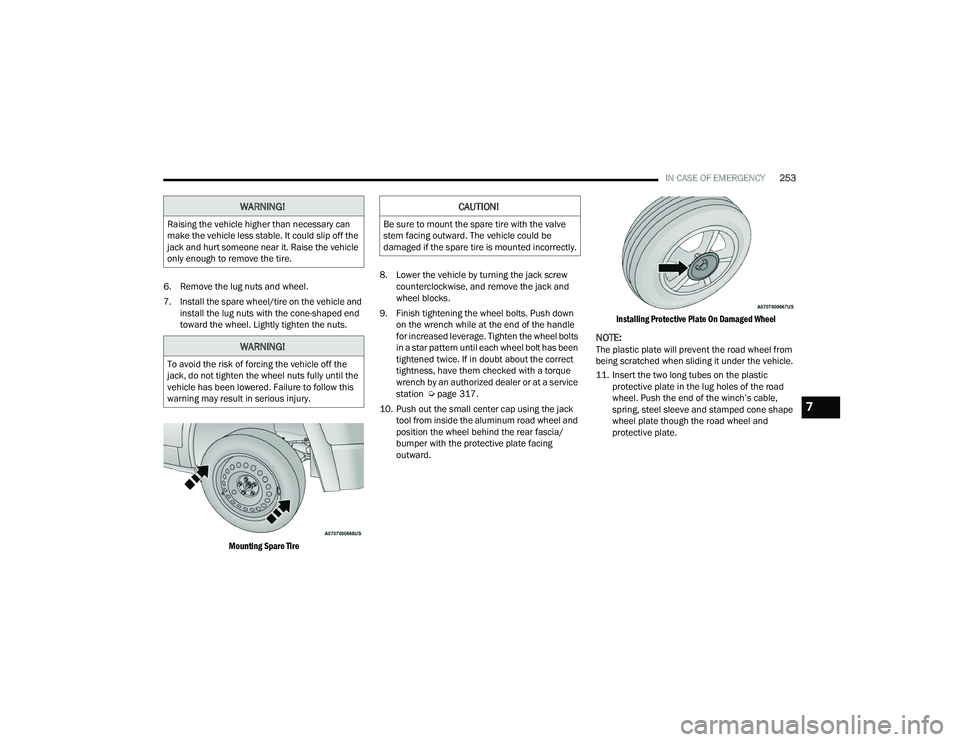
7. Install the spare wheel/tire on the vehicle and install the lug nuts with the cone-shaped end
toward the wheel. Lightly tighten the nuts.
Mounting Spare Tire
8. Lower the vehicle by turning the jack screw
counterclockwise, and remove the jack and
wheel blocks.
9. Finish tightening the wheel bolts. Push down on the wrench while at the end of the handle
for increased leverage. Tighten the wheel bolts
in a star pattern until each wheel bolt has been
tightened twice. If in doubt about the correct
tightness, have them checked with a torque
wrench by an authorized dealer or at a service
station Ú page 317.
10. Push out the small center cap using the jack tool from inside the aluminum road wheel and
position the wheel behind the rear fascia/
bumper with the protective plate facing
outward.
Installing Protective Plate On Damaged Wheel
NOTE:The plastic plate will prevent the road wheel from
being scratched when sliding it under the vehicle.
11. Insert the two long tubes on the plastic
protective plate in the lug holes of the road
wheel. Push the end of the winch’s cable,
spring, steel sleeve and stamped cone shape
wheel plate though the road wheel and
protective plate.
WARNING!
Raising the vehicle higher than necessary can
make the vehicle less stable. It could slip off the
jack and hurt someone near it. Raise the vehicle
only enough to remove the tire.
WARNING!
To avoid the risk of forcing the vehicle off the
jack, do not tighten the wheel nuts fully until the
vehicle has been lowered. Failure to follow this
warning may result in serious injury.
CAUTION!
Be sure to mount the spare tire with the valve
stem facing outward. The vehicle could be
damaged if the spare tire is mounted incorrectly.
7
21_WD_OM_EN_USC_t.book Page 253
Page 256 of 340
254IN CASE OF EMERGENCY
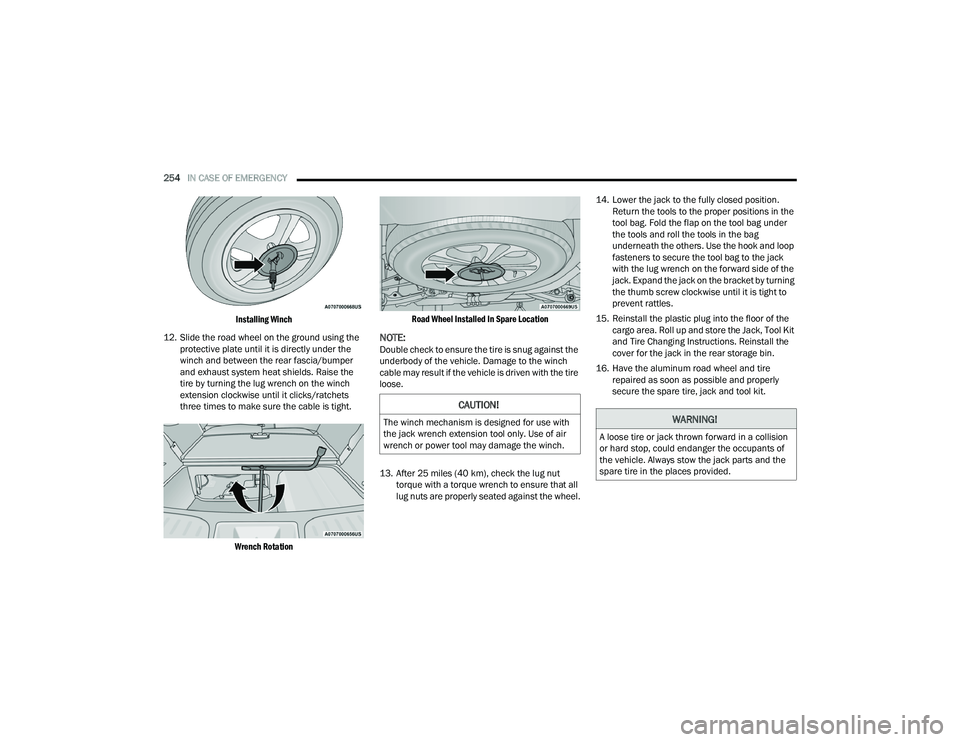
Installing Winch
12. Slide the road wheel on the ground using the protective plate until it is directly under the
winch and between the rear fascia/bumper
and exhaust system heat shields. Raise the
tire by turning the lug wrench on the winch
extension clockwise until it clicks/ratchets
three times to make sure the cable is tight.
Wrench Rotation Road Wheel Installed In Spare Location
NOTE:Double check to ensure the tire is snug against the
underbody of the vehicle. Damage to the winch
cable may result if the vehicle is driven with the tire
loose.
13. After 25 miles (40 km), check the lug nut
torque with a torque wrench to ensure that all
lug nuts are properly seated against the wheel. 14. Lower the jack to the fully closed position.
Return the tools to the proper positions in the
tool bag. Fold the flap on the tool bag under
the tools and roll the tools in the bag
underneath the others. Use the hook and loop
fasteners to secure the tool bag to the jack
with the lug wrench on the forward side of the
jack. Expand the jack on the bracket by turning
the thumb screw clockwise until it is tight to
prevent rattles.
15. Reinstall the plastic plug into the floor of the cargo area. Roll up and store the Jack, Tool Kit
and Tire Changing Instructions. Reinstall the
cover for the jack in the rear storage bin.
16. Have the aluminum road wheel and tire repaired as soon as possible and properly
secure the spare tire, jack and tool kit.
CAUTION!
The winch mechanism is designed for use with
the jack wrench extension tool only. Use of air
wrench or power tool may damage the winch.WARNING!
A loose tire or jack thrown forward in a collision
or hard stop, could endanger the occupants of
the vehicle. Always stow the jack parts and the
spare tire in the places provided.
21_WD_OM_EN_USC_t.book Page 254