DODGE GRAND CARAVAN 2009 5.G Owners Manual
Manufacturer: DODGE, Model Year: 2009, Model line: GRAND CARAVAN, Model: DODGE GRAND CARAVAN 2009 5.GPages: 535, PDF Size: 18.61 MB
Page 421 of 535
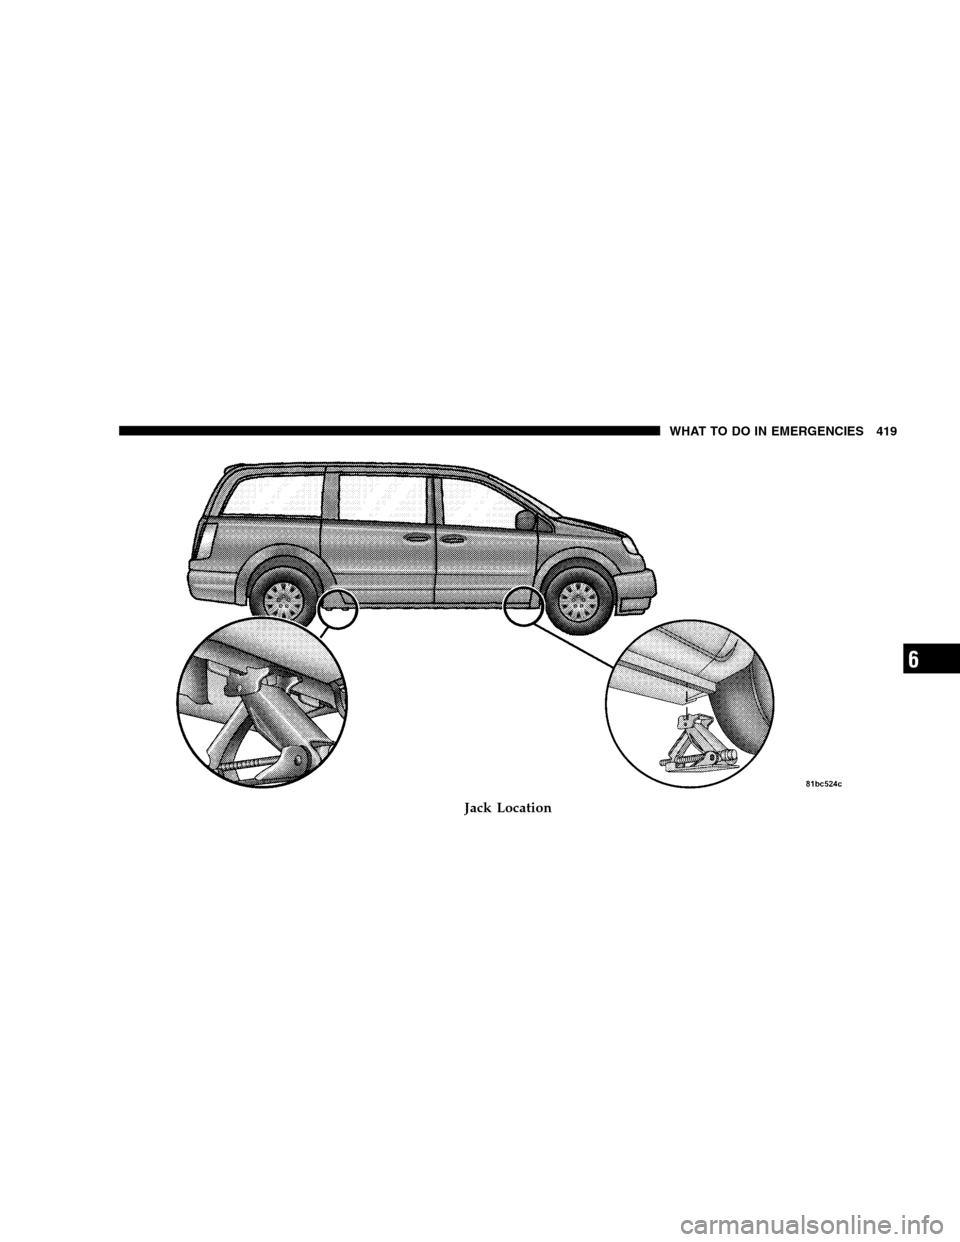
Jack Location
WHAT TO DO IN EMERGENCIES 419 6
Page 422 of 535
CAUTION!Do not attempt to raise the vehicle by jacking on
locations other than those indicated in Step 5.
6. Place the wrench on the jack screw and turn to the
right until the jack head is properly engaged in the
described location. Do not raise the vehicle until you are
sure the jack is securely engaged.
7. Raise the vehicle by turning the jack screw to the right,
using the swivel wrench. Raise the vehicle only until the
tire just clears the surface and enough clearance is
obtained to install the spare tire. Minimum tire lift
provides maximum stability. WARNING!Raising the vehicle higher than necessary can make
the vehicle less stable. It could slip off the jack and
hurt someone near it. Raise the vehicle only enough
to remove the tire.
8. Remove the wheel lug nuts, for vehicles with wheel
covers, remove the cover from the wheel by hand. Do not
pry the wheel cover off. Then pull the wheel off the hub.
9. Install the compact spare tire. Lightly tighten the lug
nuts. To avoid the risk of forcing the vehicle off the jack,
do not tighten the lug nuts fully until the vehicle has been
lowered.
NOTE:
Do not install the wheel cover on the compact spare.
Do not use a hammer or force to install the wheel
covers.
420 WHAT TO DO IN EMERGENCIES
Page 423 of 535
10. Lower the vehicle by turning the jack screw to the
left.
11. Finish tightening the lug nuts. Push down on the
wrench while tightening for increased leverage. Alternate
lug nuts until each nut has been tightened twice. The
correct wheel nut tightness is 95 ft lbs (130 N·m). If in
doubt about the correct tightness, have them checked
with a torque wrench by your authorized dealer or at a
service station.
12. Lower the jack to its fully-closed position.WARNING!
A loose tire or jack thrown forward in a collision or
hard stop could endanger the occupants of the ve-
hicle. Always stow the jack parts and the spare tire in
the places provided. Have the deflated (flat) tire
repaired or replaced immediately.
13. Place the deflated (flat) tire and compact spare tire
cover assembly. in the rear cargo area.
Do not stow the
deflated tire in the spare tire location. Have the full-
sized tire repaired or replaced, as soon as possible.
14. Stow the cable and wheel spacer before driving the
vehicle. Reassemble the winch handle extensions to form
a “T” and fit the winch “T” handle over the drive nut.
Rotate the nut to the right until the winch mechanism
clicks at least three times.
15. Stow the jack, jack handle and winch handle tools.
16. Check the compact spare tire pressure as soon as
possible. Correct the tire pressure, as required.Wheel Nuts
All wheel nuts should be tightened occasionally, to
eliminate the possibility of wheel studs being sheared or
the bolt holes in the wheels becoming elongated. This is
especially important during the first few hundred miles
WHAT TO DO IN EMERGENCIES 421 6
Page 424 of 535
of operation, and after each time a tire is changed, to
allow the wheel nuts to become properly set. All nuts
should first be firmly seated against the wheel. The nuts
should then be tightened to recommended torque.
Tighten the nuts to final torque in increments. Progress
around the bolt circle, tightening the nut opposite to the
nut just previously tightened until final torque is
achieved. Recommended torque is 95 ft lbs (130 N·m).
Secure The Spare Tire As Follows:
1. To stow the compact spare tire/cover assembly on
vehicles equipped with Stow ’n Gotseating, assemble
the winch handle extensions to form a “T” and fit the
winch “T” handle over the drive nut. Rotate the nut to
the left until the winch mechanism stops turning freely.
This will allow enough slack in the cable to allow you to
pull the wheel spacer out from under the vehicle. WARNING!
A loose compact spare tire/cover assembly, thrown
forward in a collision or hard stop could endanger
the occupants of the vehicle. Always stow the com-
pact spare tire with the cover assembly in the place
provided.
CAUTION!
The winch mechanism is designed for use with the
winch “T” handle only. Use of an air wrench or other
power tools is not recommended and can damage the
winch.
422 WHAT TO DO IN EMERGENCIES
Page 425 of 535
2. Assemble the winch handle extensions to form the
spare tire hook, and pull the wheel spacer from under the
vehicle.
3. Turn the compact spare tire so that the valve stem is
down, and place the tire into the spare tire/cover assem-
bly. Slide the wheel spacer through the center of the
wheel and spare tire/cover assembly, so that the two
retainer tabs snap out and engage the spare tire cover on
the opposite side.CAUTION!
The compact spare tire/cover assembly must be used
when the compact spare tire is stored. Failure to use
this cover could drastically reduce the life of the
compact spare tire. WARNING!
Verify that both retainer tabs of the wheel spacer
have been properly extended through the center of
the wheel and spare tire/cover assembly. Failure to
properly engage both retainer tabs could result in
loss of the spare tire and cover assembly, which will
cause vehicle damage and may cause loss of vehicle
control.
4. Using the winch “T” handle, rotate the drive nut to the
right until the compact spare tire/cover assembly is
drawn into place against the underside of the vehicle.
5. Continue to rotate the nut to the right until you hear
the winch mechanism click three times. It cannot be
overtightened. Check under the vehicle to ensure the
compact spare tire/cover assembly is positioned cor-
rectly against the underside of the vehicle.
WHAT TO DO IN EMERGENCIES 423 6
Page 426 of 535
CAUTION!For vehicles equipped with Stow ’n Got
seating, the
winch mechanism is designed specifically to stow a
compact spare tire only. Do not attempt to use the
winch to stow the full size flat tire, or any other
full-size tire. Vehicle damage may result.
JUMP-STARTING PROCEDURE WARNING!
Do not attempt to push or tow the vehicle to get it
started. Vehicles equipped with an automatic
transmission cannot be started this way. Unburned
fuel could enter the catalytic converter and once
the engine has started, ignite and damage the
converter and vehicle.
(Continued) WARNING! (Continued)
If the vehicle has a discharged battery, booster
cables may be used to obtain a start from another
vehicle. This type of start can be dangerous if done
improperly, so follow this procedure carefully.
Battery fluid is a corrosive acid solution; do not
allow battery fluid to contact eyes, skin or cloth-
ing. Do not lean over a battery when attaching
clamps, or allow the clamps to touch each other. If
acid splashes in eyes or on skin, flush the contami-
nated area immediately with large quantities of
water.
A battery generates hydrogen gas, which is flam-
mable and explosive. Keep all flames and sparks
away from the vent holes. Do not use a booster
battery or any other booster source with an output
that exceeds 12-Volts.
(Continued)
424 WHAT TO DO IN EMERGENCIES
Page 427 of 535
WARNING! (Continued)
Take special care to avoid the radiator cooling fan
whenever the hood is raised. The cooling fan is
electrically operated and can start anytime the
ignition switch is ON. You can be hurt by the fan.
During cold weather when temperatures are be-
low the freezing point, electrolyte in a discharged
battery may freeze. Do not attempt jump-starting
because the battery could rupture or explode. The
battery temperature must be brought up above the
freezing point before attempting a jump-start. When jump-starting, proceed as follows:
1. Wear eye protection and remove any metal jewelry,
such as watch bands or bracelets, that might make an
inadvertent electrical contact.
2. When a boost is provided by a battery in another
vehicle, park that vehicle within booster cable reach and
do not let the vehicles touch. Set the parking brake, place
the automatic transmission shift lever into PARK and
turn the ignition switch to the OFF position for both
vehicles.
3. Turn off the heater, radio and all unnecessary electrical
loads.
4. Connect one end of a jumper cable to the positive
terminal of the discharged battery. Connect the other end
of the same cable to the positive terminal of the booster
battery.
WHAT TO DO IN EMERGENCIES 425 6
Page 428 of 535
WARNING!Do not permit vehicles to touch each other, as this
could establish a ground connection and personal
injury could result.
5. Connect the other cable, first to the negative terminal
of the booster battery, and then to the engine of the
vehicle with the discharged battery. Make sure there is a
good contact on the engine. WARNING!
Do not connect the cable to the negative post of the
discharge battery. The resulting electrical spark could
cause the battery to explode.
6. Start the engine in the vehicle that has the booster
battery. Let the engine idle a few minutes, then start the
engine in the vehicle with the discharged battery.
7. When removing the jumper cables, reverse the above
sequence exactly. Be careful of the moving belts and fan. WARNING!
Any procedure other than the jump-starting process
listed could result in:
Personal injury caused by electrolyte squirting out
the battery vent;
Personal injury or property damage due to battery
explosion;
Damage to charging system of booster vehicle or
of immobilized vehicle.
426 WHAT TO DO IN EMERGENCIES
Page 429 of 535
FREEING A STUCK VEHICLEIf your vehicle becomes stuck in mud, sand or snow, it
can often be moved by a rocking motion. Turn your
steering wheel right and left to clear the area around the
front wheels. Then move the shift lever back and forth
between REVERSE and DRIVE. Using minimal accelera-
tor pedal pressure to maintain the rocking motion, with-
out spinning the wheels, is most effective.
WARNING!
Fast spinning tires can be dangerous. Forces gener-
ated by excessive wheel speeds may cause tire dam-
age or failure. A tire could explode and injure some-
one. Do not spin your vehicle’s wheels faster than
35 mph (55 km/h) when you are stuck. Do not let
anyone near a spinning wheel, no matter what the
speed. CAUTION!
Revving the engine or spinning the wheels too fast
may lead to transmission overheating and failure. It
can also damage the tires. Do not spin the wheels
above 35 mph (55 km/h).
TOWING A DISABLED VEHICLE
Towing With The Ignition Key
Your vehicle may be towed under the following condi-
tions:
The shift lever must be in NEUTRAL.
The distance to be traveled must not exceed 100 miles
(160 km).
The towing speed must not exceed 44 mph (72 km/h).
WHAT TO DO IN EMERGENCIES 427
6
Page 430 of 535
CAUTION!Exceeding these towing limits may cause a transmis-
sion gear failure.
If the transmission is inoperative, or if the vehicle is to be
towed more than 100 miles (160 km), the vehicle must be
towed with the front wheels off the ground. CAUTION!
Do not attempt to tow this vehicle from the front
with sling-type towing equipment. Damage to the
front fascia will result.
(Continued) CAUTION! (Continued)
Always use wheel lift equipment when towing
from the front. The only other approved method of
towing is with a flatbed truck.
Do not tow the vehicle from the rear. Damage to
the rear sheet metal, liftgate and fascia will occur.
Do not push or tow this vehicle with another
vehicle as damage to the bumper fascia and trans-
mission may result.
If the vehicle being towed requires steering, the
ignition switch must be in the OFF position, not in
the LOCK or ACC positions.
428 WHAT TO DO IN EMERGENCIES