light DODGE GRAND CARAVAN 2015 5.G Owner's Manual
[x] Cancel search | Manufacturer: DODGE, Model Year: 2015, Model line: GRAND CARAVAN, Model: DODGE GRAND CARAVAN 2015 5.GPages: 164, PDF Size: 22.27 MB
Page 48 of 164
FUEL ECONOMY (ECON) MODE
The Fuel Economy (ECON) mode can improve the vehicle’s overall fuel economy during
normal driving conditions.
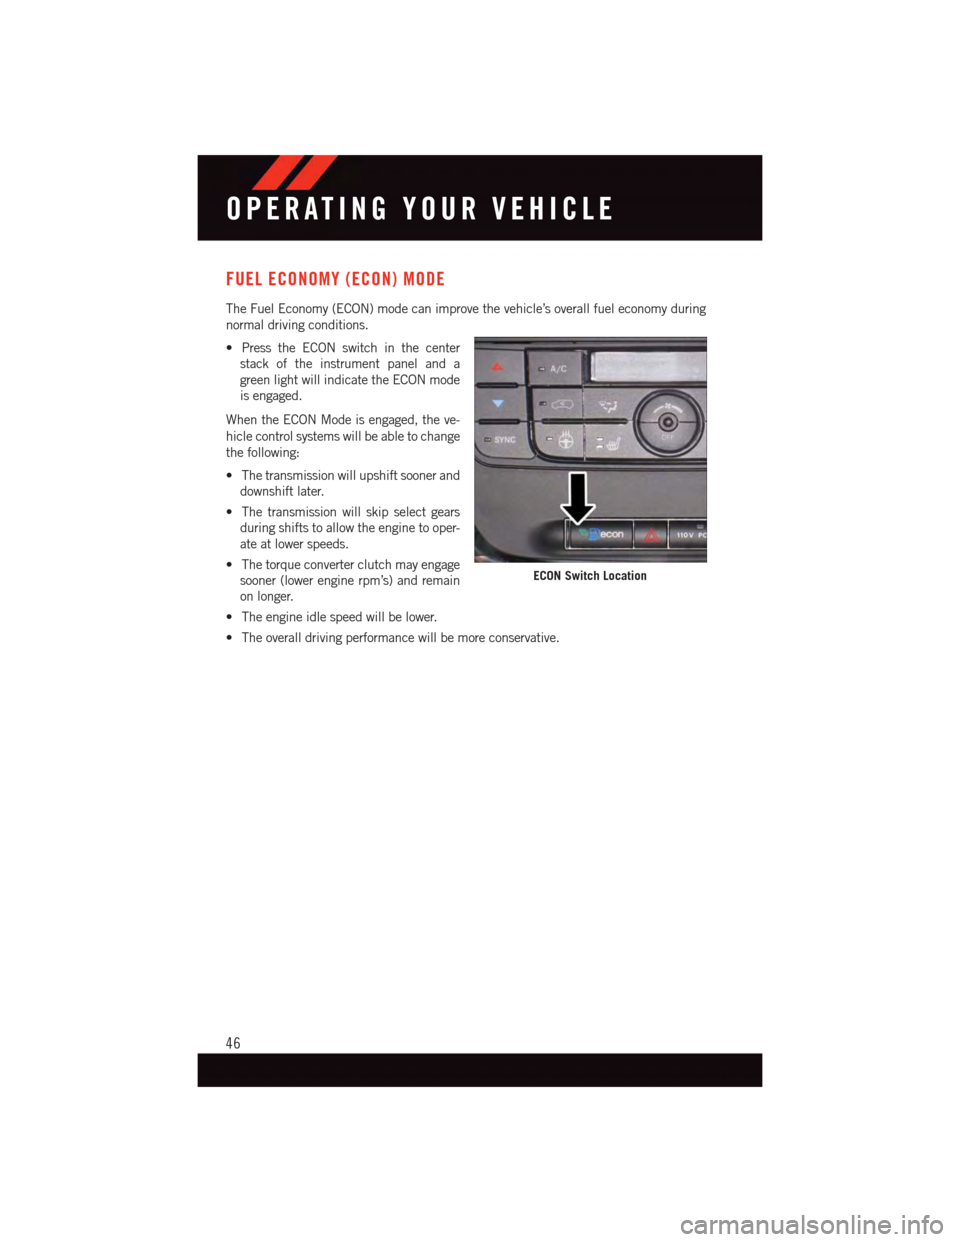
•PresstheECONswitchinthecenter
stack of the instrument panel and a
green light will indicate the ECON mode
is engaged.
When the ECON Mode is engaged, the ve-
hicle control systems will be able to change
the following:
•Thetransmissionwillupshiftsoonerand
downshift later.
•Thetransmissionwillskipselectgears
during shifts to allow the engine to oper-
ate at lower speeds.
•Thetorqueconverterclutchmayengage
sooner (lower engine rpm’s) and remain
on longer.
•Theengineidlespeedwillbelower.
•Theoveralldrivingperformancewillbemoreconservative.
ECON Switch Location
OPERATING YOUR VEHICLE
46
Page 52 of 164
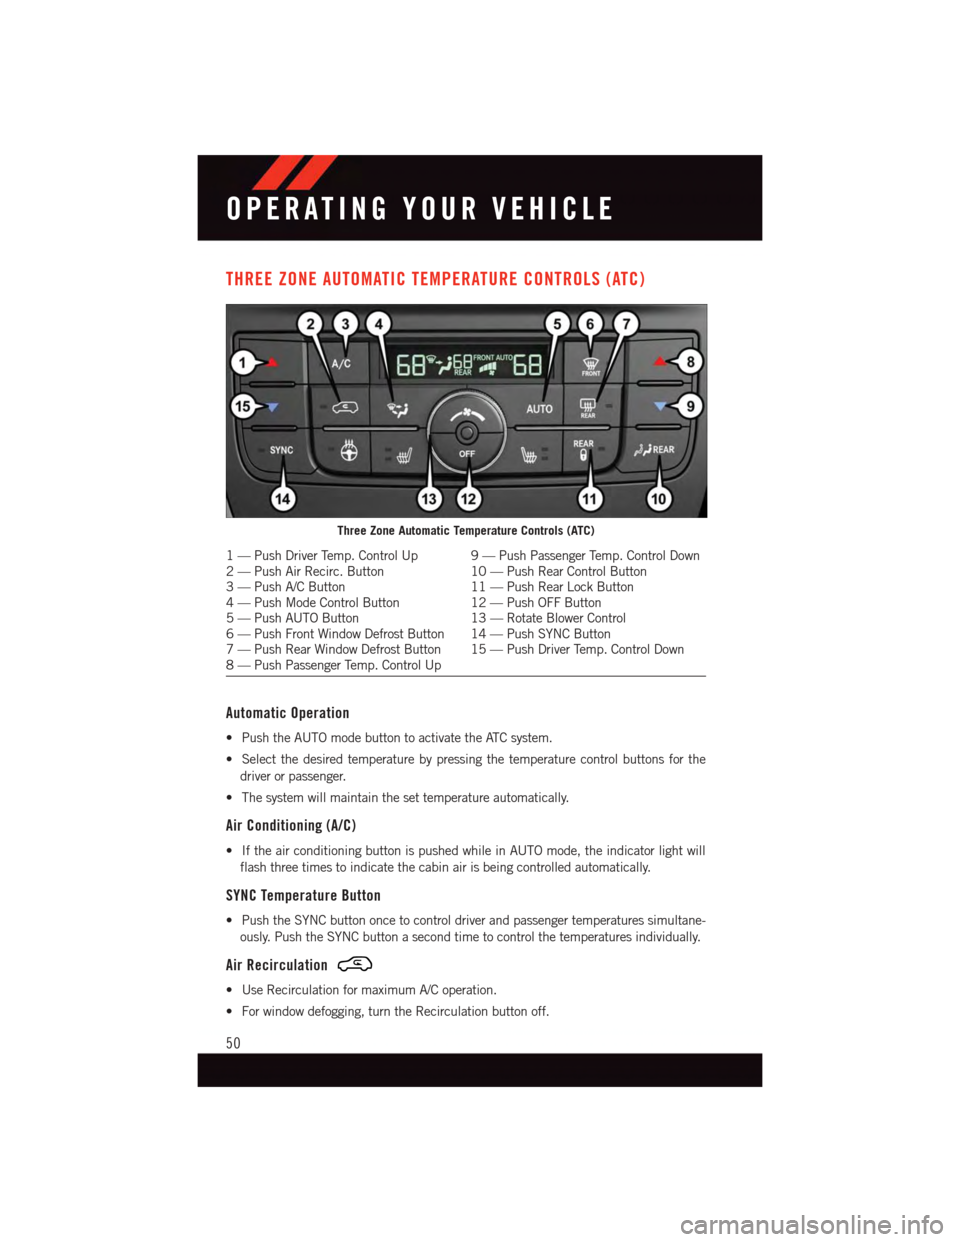
THREE ZONE AUTOMATIC TEMPERATURE CONTROLS (ATC)
Automatic Operation
•PushtheAUTOmodebuttontoactivatetheATCsystem.
•Selectthedesiredtemperaturebypressingthetemperaturecontrolbuttonsforthe
driver or passenger.
•Thesystemwillmaintainthesettemperatureautomatically.
Air Conditioning (A/C)
•IftheairconditioningbuttonispushedwhileinAUTOmode,theindicatorlightwill
flash three times to indicate the cabin air is being controlled automatically.
SYNC Temperature Button
•PushtheSYNCbuttononcetocontroldriverandpassengertemperaturessimultane-
ously. Push the SYNC button a second time to control the temperatures individually.
Air Recirculation
•UseRecirculationformaximumA/Coperation.
•Forwindowdefogging,turntheRecirculationbuttonoff.
Three Zone Automatic Temperature Controls (ATC)
1—PushDriverTemp.ControlUp 9—PushPassengerTemp.ControlDown2—PushAirRecirc.Button 10—PushRearControlButton3—PushA/CButton 11—PushRearLockButton4—PushModeControlButton 12—PushOFFButton5—PushAUTOButton 13—RotateBlowerControl6—PushFrontWindowDefrostButton 14—PushSYNCButton7—PushRearWindowDefrostButton 15—PushDriverTemp.ControlDown8—PushPassengerTemp.ControlUp
OPERATING YOUR VEHICLE
50
Page 54 of 164
PARKSENSE® REAR PARK ASSIST
If an object is detected behind the rear bumper while the vehicle is in REVERSE, a
warning will display in the instrument cluster and a tone will sound, (closer the object the
faster the tone) that changes speed depending on the distance of the object from the
bumper, will sound.
When the Instrument Cluster reads either “Clean Sensor” or “Blinded”, clean off the
bumper sensors to see if the condition is corrected.
PARKVIEW® REAR BACK-UP CAMERA
Yo u c a n s e e a n o n - s c r e e n i m a g e o f t h e r e a r o f y o u r v e h i c l e w h e n e v e r t h e s h i f t l e v e r i s p u t
into REVERSE. The ParkView®Rear Back-Up Camera image will be displayed on the radio
display screen, located on the center stack of the instrument panel.
If the radio display screen appears foggy, clean the camera lens located on the liftgate.
Refer to your Owner's Manual on the DVD for further details.
WARNING!
Drivers must be careful when backing up; even when using the ParkView®Rear
Back-Up Camera. Always check carefully behind your vehicle, and be sure to check for
pedestrians, animals, other vehicles, obstructions, or blind spots before backing up.
Yo u m u s t c o n t i n u e t o p a y a t t e n t i o n w h i l e b a c k i n g u p . F a i l u r e t o d o s o c a n r e s u l t i n
serious injury or death.
BLIND SPOT MONITORING WITH REAR CROSS PATH
The Blind Spot Monitoring (BSM) system uses two radar-based sensors, located inside the
rear bumper fascia, to detect Highway licensable vehicles (automobiles, trucks, motor-
cycles etc.) that enter the blind spot zones from the rear/front/side of the vehicle.
The Blind Spot Monitoring (BSM) system warning light, located in the outside mirrors, will
illuminate if a vehicle moves into a blind spot zone.
The BSM system can also be configured to sound an audible (chime) alert and mute the
radio to notify you of objects that have entered the detection zones.
Refer to your Owner's Manual on the DVD for further details.
OPERATING YOUR VEHICLE
52
Page 90 of 164
Auto Unlock Doors On Exit
To h a v e a l l o f t h e v e h i c l e d o o r s u n l o c k w h e n a n y d o o r i s o p e n e d :
•Enteryourvehicleandcloseallthedoors,andfastenyourseatbelt.
•CycletheignitionswitchbetweentheLOCKandONpositionfourtimes,endinginthe
LOCK position (do not start the engine).
•PushthepowerdoorUNLOCKswitchtounlockthedoors.Asinglechimewillindicate
that programming is complete.
Sound Horn With Lock
To t u r n t h e h o r n c h i r p o n o r o f f w h e n t h e d o o r s a r e l o c k e d :
•PushtheLOCKbuttonandPANICbuttonatthesametimeforatleastfourseconds,
but no longer than 10 seconds.
•Releasebothbuttonsatthesametime.
Flashing Lights With Lock
The turn signal lights flash when the doors are locked, which can be turned on or off. To
turn this feature on or off:
•PushandholdtheUNLOCKbuttonandtheLOCKbuttonatthesametimeforatleast
four seconds, but no longer than 10 seconds.
•Releasebothbuttonsatthesametime.
ELECTRONICS
88
Page 91 of 164
UNIVERSAL GARAGE DOOR OPENER (HomeLink®)
HomeLink®replaces up to three hand-held transmitters that operate devices such as
garage door openers, motorized gates, lighting or home security systems. The HomeLink®
unit is powered by your vehicles 12 Volt battery.
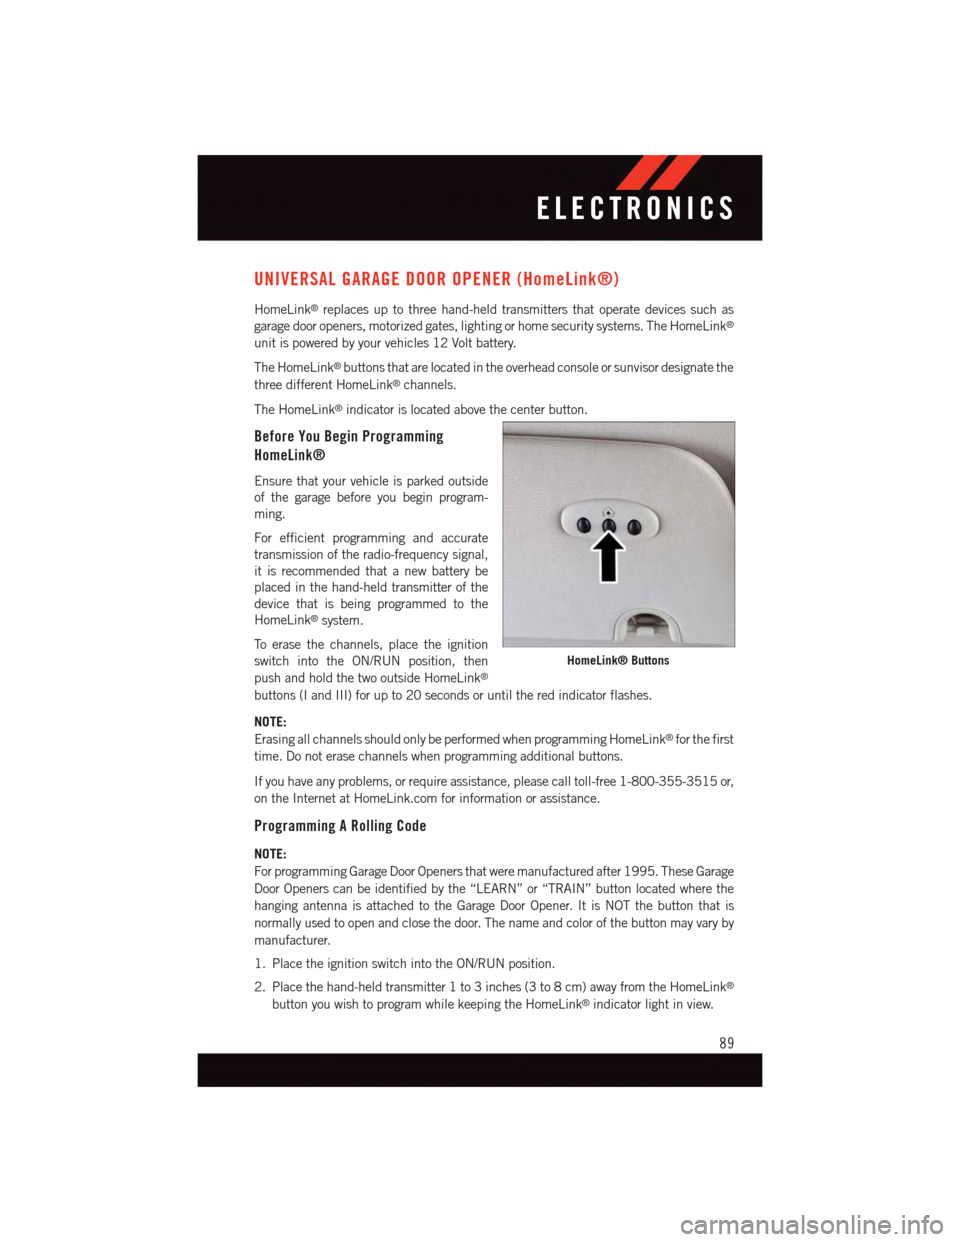
The HomeLink®buttons that are located in the overhead console or sunvisor designate the
three different HomeLink®channels.
The HomeLink®indicator is located above the center button.
Before You Begin Programming
HomeLink®
Ensure that your vehicle is parked outside
of the garage before you begin program-
ming.
For efficient programming and accurate
transmission of the radio-frequency signal,
it is recommended that a new battery be
placed in the hand-held transmitter of the
device that is being programmed to the
HomeLink®system.
To e r a s e t h e c h a n n e l s , p l a c e t h e i g n i t i o n
switch into the ON/RUN position, then
push and hold the two outside HomeLink®
buttons (I and III) for up to 20 seconds or until the red indicator flashes.
NOTE:
Erasing all channels should only be performed when programming HomeLink®for the first
time. Do not erase channels when programming additional buttons.
If you have any problems, or require assistance, please call toll-free 1-800-355-3515 or,
on the Internet at HomeLink.com for information or assistance.
Programming A Rolling Code
NOTE:
For programming Garage Door Openers that were manufactured after 1995. These Garage
Door Openers can be identified by the “LEARN” or “TRAIN” button located where the
hanging antenna is attached to the Garage Door Opener. It is NOT the button that is
normally used to open and close the door. The name and color of the button may vary by
manufacturer.
1. Place the ignition switch into the ON/RUN position.
2. Place the hand-held transmitter 1 to 3 inches (3 to 8 cm) away from the HomeLink®
button you wish to program while keeping the HomeLink®indicator light in view.
HomeLink® Buttons
ELECTRONICS
89
Page 92 of 164
3. Push and hold the HomeLink®button you want to program while you push and hold
the hand-held transmitter button.
4. Continue to hold both buttons and observe the indicator light. The HomeLink®
indicator will flash slowly and then rapidly after HomeLink®has received the fre-
quency signal from the hand-held transmitter. Release both buttons after the indicator
light changes from slow to rapid.
5. At the garage door opener motor (in the garage), locate the “LEARN” or “TRAINING”
button. This can usually be found where the hanging antenna wire is attached to the
garage door opener motor. Firmly push and release the “LEARN” or “TRAINING”
button.
NOTE:
Yo u h a v e 3 0 s e c o n d s i n w h i c h t o i n i t i a t e t h e n e x t s t e p a f t e r t h e L E A R N b u t t o n h a s b e e n
pushed.
6. Return to the vehicle and push the programmed HomeLink®button twice (holding the
button for two seconds each time). If the device is plugged in and activates,
programming is complete.
NOTE:
If the device does not activate, push the button a third time (for two seconds) to complete
the training.
7. To program the remaining two HomeLink®buttons, repeat each step for each
remaining button. DO NOT erase the channels.
Programming A Non-Rolling Code
NOTE:
For programming Garage Door Openers manufactured before 1995.
1. Turn the ignition switch to the ON/RUN position.
2. Place the hand-held transmitter 1 to 3 inches (3 to 8 cm) away from the HomeLink®
button you wish to program while keeping the HomeLink®indicator light in view.
3. Push and hold the HomeLink®button you want to program while you push and hold
the hand-held transmitter button.
4. Continue to hold both buttons and observe the indicator light. The HomeLink®
indicator will flash slowly and then rapidly after HomeLink®has received the fre-
quency signal from the hand-held transmitter. Release both buttons after the indicator
light changes from slow to rapid.
5. Push and hold the programmed HomeLink®button and observe the indicator light. If
the indicator light stays on constantly, programming is complete and the garage door
(or device) should activate when the HomeLink®button is pushed.
6. To program the two remaining HomeLink®buttons, repeat each step for each
remaining button. DO NOT erase the channels.
ELECTRONICS
90
Page 93 of 164
Using HomeLink®
To o p e r a t e , p u s h a n d r e l e a s e t h e p r o g r a m m e d H o m e L i n k®button. Activation will now
occur for the programmed device (e.g., garage door opener, gate operator, security system,
entry door lock, home/office lighting, etc.,). The hand-held transmitter of the device may
also be used at any time.
WARNING!
•Yourmotorizeddoororgatewillopenandclosewhileyouareprogrammingthe
universal transceiver. Do not program the transceiver if people or pets are in the
path of the door or gate.
•Donotrunyourvehicleinaclosedgarageorconfinedareawhileprogrammingthe
transceiver. Exhaust gas from your vehicle contains Carbon Monoxide (CO) which is
odorless and colorless. Carbon Monoxide is poisonous when inhaled and can cause
you and others to be severely injured or killed.
POWER INVERTER
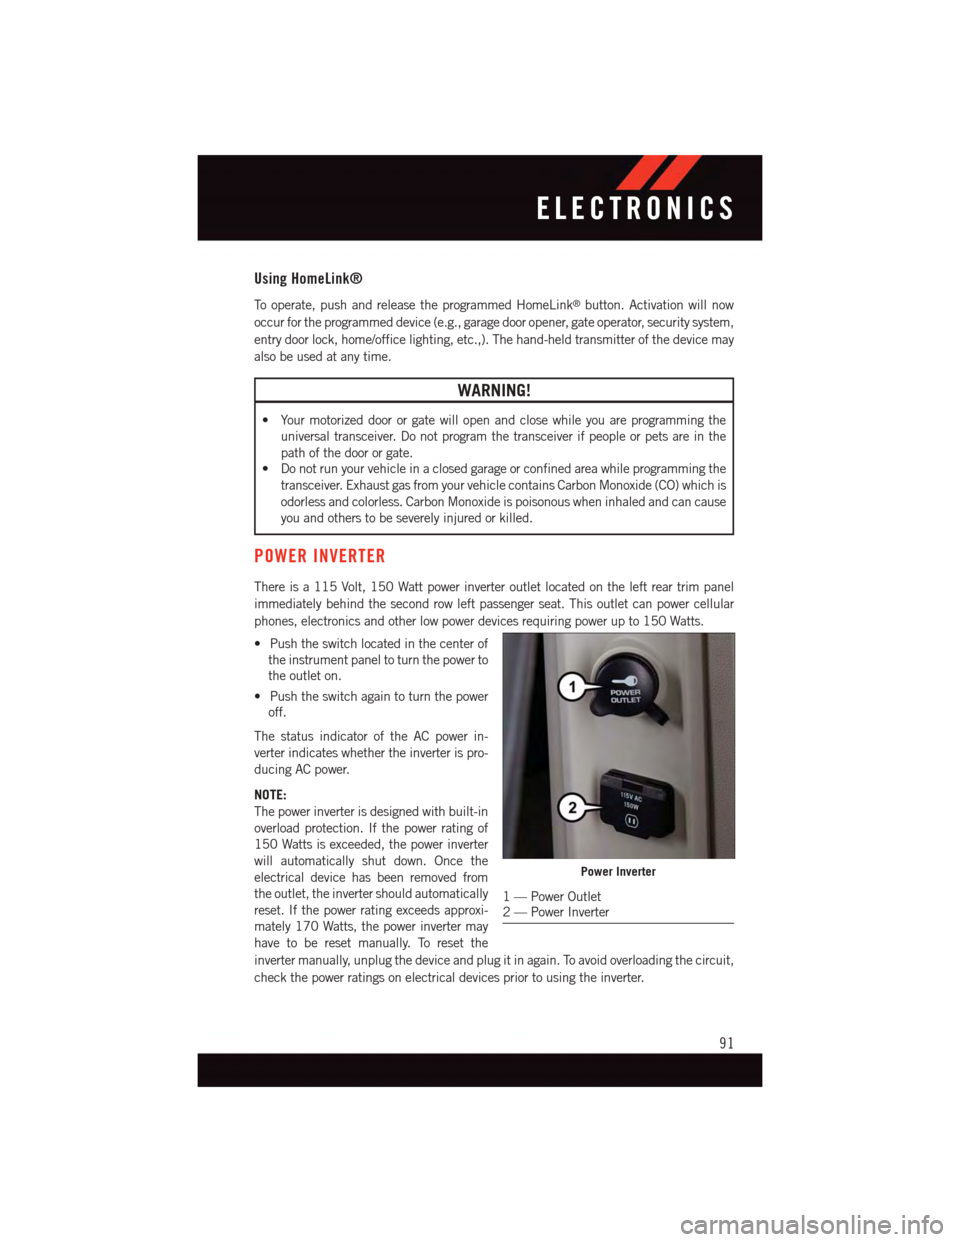
There is a 115 Volt, 150 Watt power inverter outlet located on the left rear trim panel
immediately behind the second row left passenger seat. This outlet can power cellular
phones, electronics and other low power devices requiring power up to 150 Watts.
•Pushtheswitchlocatedinthecenterof
the instrument panel to turn the power to
the outlet on.
•Pushtheswitchagaintoturnthepower
off.
The status indicator of the AC power in-
verter indicates whether the inverter is pro-
ducing AC power.
NOTE:
The power inverter is designed with built-in
overload protection. If the power rating of
150 Watts is exceeded, the power inverter
will automatically shut down. Once the
electrical device has been removed from
the outlet, the inverter should automatically
reset. If the power rating exceeds approxi-
mately 170 Watts, the power inverter may
have to be reset manually. To reset the
inverter manually, unplug the device and plug it in again. To avoid overloading the circuit,
check the power ratings on electrical devices prior to using the inverter.
Power Inverter
1—PowerOutlet2—PowerInverter
ELECTRONICS
91
Page 94 of 164
WARNING!
To A v o i d S e r i o u s I n j u r y o r D e a t h D O N O T:
•useathree-prongadaptor
•insertanyobjectsintothereceptacles
•touchwithwethands
Close the lid when not in use. If this outlet is mishandled, it may cause an electric
shock and failure.
POWER OUTLETS
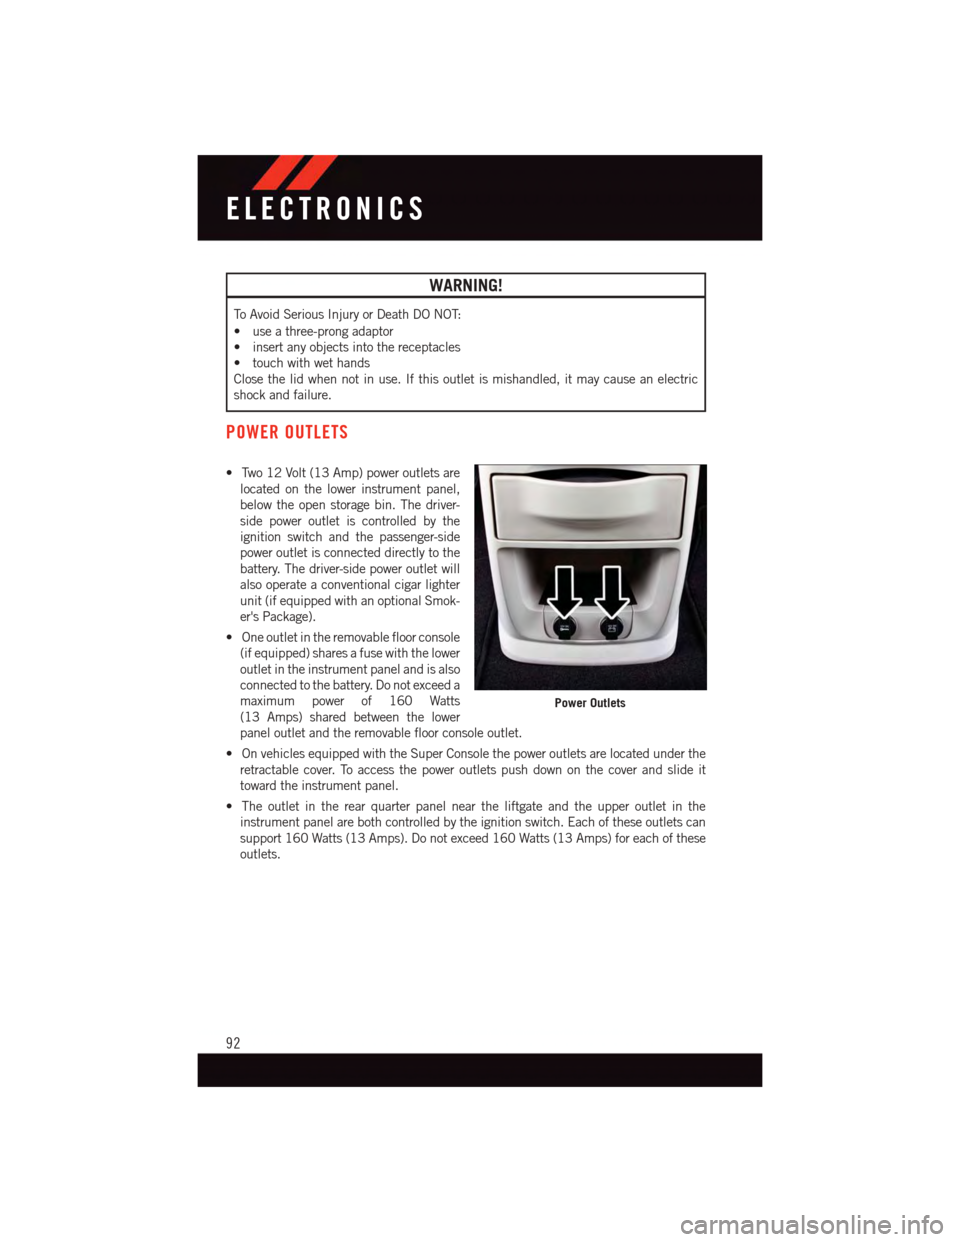
•Two12Volt(13Amp)poweroutletsare
located on the lower instrument panel,
below the open storage bin. The driver-
side power outlet is controlled by the
ignition switch and the passenger-side
power outlet is connected directly to the
battery. The driver-side power outlet will
also operate a conventional cigar lighter
unit (if equipped with an optional Smok-
er's Package).
•Oneoutletintheremovablefloorconsole
(if equipped) shares a fuse with the lower
outlet in the instrument panel and is also
connected to the battery. Do not exceed a
maximum power of 160 Watts
(13 Amps) shared between the lower
panel outlet and the removable floor console outlet.
•OnvehiclesequippedwiththeSuperConsolethepoweroutletsarelocatedunderthe
retractable cover. To access the power outlets push down on the cover and slide it
toward the instrument panel.
•Theoutletintherearquarterpanelneartheliftgateandtheupperoutletinthe
instrument panel are both controlled by the ignition switch. Each of these outlets can
support 160 Watts (13 Amps). Do not exceed 160 Watts (13 Amps) for each of these
outlets.
Power Outlets
ELECTRONICS
92
Page 95 of 164
NOTE:
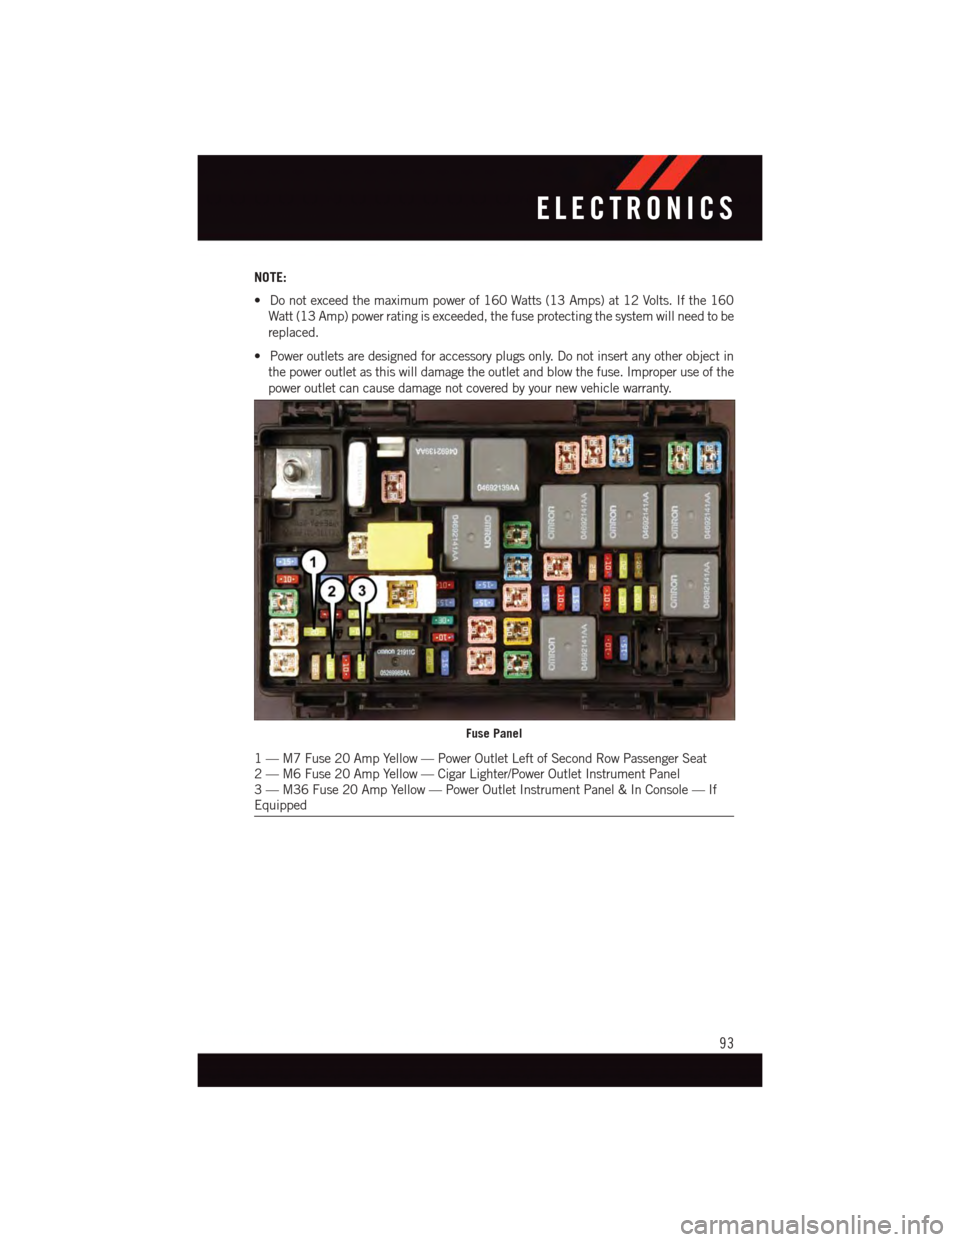
•Donotexceedthemaximumpowerof160Watts(13Amps)at12Volts.Ifthe160
Watt (13 Amp) power rating is exceeded, the fuse protecting the system will need to be
replaced.
•Poweroutletsaredesignedforaccessoryplugsonly.Donotinsertanyotherobjectin
the power outlet as this will damage the outlet and blow the fuse. Improper use of the
power outlet can cause damage not covered by your new vehicle warranty.
Fuse Panel
1—M7Fuse20AmpYellow—PowerOutletLeftofSecondRowPassengerSeat2—M6Fuse20AmpYellow—CigarLighter/PowerOutletInstrumentPanel3—M36Fuse20AmpYellow—PowerOutletInstrumentPanel&InConsole—IfEquipped
ELECTRONICS
93
Page 99 of 164
ROADSIDE ASSISTANCE
Dial toll-free 1-800-521-2779 for U.S. Residents or 1-800-363-4869 for Canadian
Residents.
•Provideyourname,vehicleidentificationnumber,licenseplatenumber,andyour
location, including the telephone number from which you are calling.
•Brieflydescribethenatureoftheproblemandanswerafewsimplequestions.
•Youwillbegiventhenameoftheserviceproviderandanestimatedtimeofarrival.If
you feel you are in an “unsafe situation”, please let us know. With your consent, we will
contact local police or safety authorities.
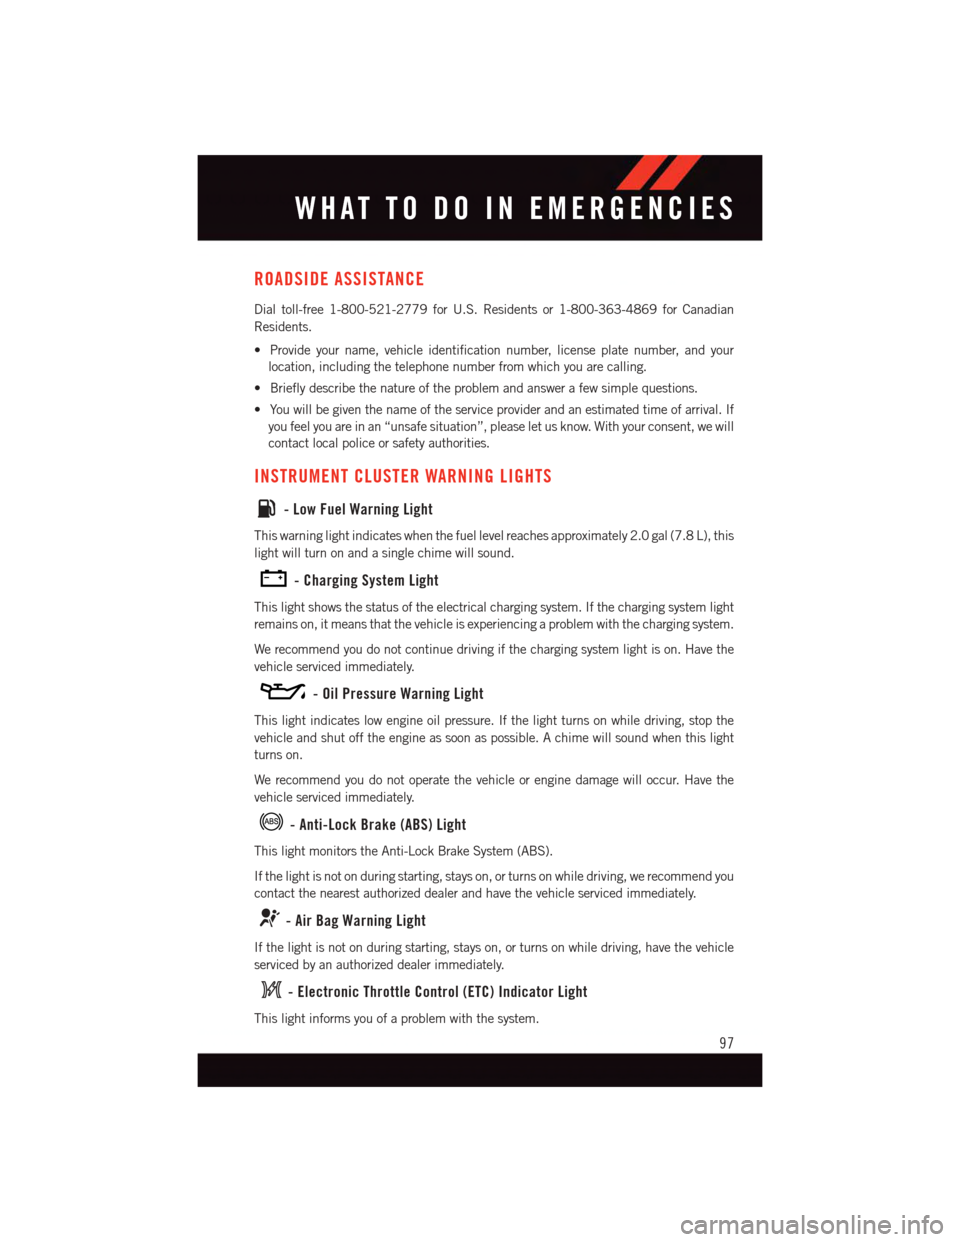
INSTRUMENT CLUSTER WARNING LIGHTS
-LowFuelWarningLight
This warning light indicates when the fuel level reaches approximately 2.0 gal (7.8 L), this
light will turn on and a single chime will sound.
-ChargingSystemLight
This light shows the status of the electrical charging system. If the charging system light
remains on, it means that the vehicle is experiencing a problem with the charging system.
We recommend you do not continue driving if the charging system light is on. Have the
vehicle serviced immediately.
-OilPressureWarningLight
This light indicates low engine oil pressure. If the light turns on while driving, stop the
vehicle and shut off the engine as soon as possible. A chime will sound when this light
turns on.
We recommend you do not operate the vehicle or engine damage will occur. Have the
vehicle serviced immediately.
-Anti-LockBrake(ABS)Light
This light monitors the Anti-Lock Brake System (ABS).
If the light is not on during starting, stays on, or turns on while driving, we recommend you
contact the nearest authorized dealer and have the vehicle serviced immediately.
-AirBagWarningLight
If the light is not on during starting, stays on, or turns on while driving, have the vehicle
serviced by an authorized dealer immediately.
-ElectronicThrottleControl(ETC)IndicatorLight
This light informs you of a problem with the system.
WHAT TO DO IN EMERGENCIES
97