reset DODGE GRAND CARAVAN 2015 5.G User Guide
[x] Cancel search | Manufacturer: DODGE, Model Year: 2015, Model line: GRAND CARAVAN, Model: DODGE GRAND CARAVAN 2015 5.GPages: 164, PDF Size: 22.27 MB
Page 32 of 164

Memory Seat
The memory seat feature allows you to save
two different driver seating positions, driv-
er's outside mirror, adjustable brake and
accelerator pedals, and radio station preset
settings. The memory seat buttons are lo-
cated on the driver's door panel.
To s e t a m e m o r y p o s i t i o n :
1. Cycle the vehicles ignition to the ON
position.
2. Adjust all memory profile settings.
3. Press and release the S (SET) button.
4. Press and release the 1 or 2 button within five seconds.
NOTE:
Before programming your RKE transmitters you must select the select “RKE Linked to
Memory” in the Electronic Vehicle Information Center (EVIC). Refer to “Programmable
Features” in “Electronics” for further information.
To p r o g r a m a K e y F o b t o t h e m e m o r y p o s i t i o n :
1. Cycle the vehicles ignition to the OFF position.
2. Select the desired memory profile 1 or 2.
3. Press and release the S (SET) button on the memory switch, then within five seconds
press and release the 1 or 2 button accordingly.
4. Press and release the LOCK button on the RKE transmitter within 10 seconds.
•Torecallthesavedpositions,press1or2onthememoryswitchorpressUNLOCKon
the programmed RKE transmitter.
CAUTION!
Do not place any article under a power seat or impede its ability to move as it may cause
damage to the seat controls. Seat travel may become limited if movement is stopped
by an obstruction in the seat’s path.
WARNING!
•Adjusting a seat while the vehicle is moving is dangerous. The sudden movement of the
seat could cause you to lose control. The seat belt might not be properly adjusted, and
you could be severely injured or killed. Only adjust a seat while the vehicle is parked.
•Donotridewiththeseatbackreclinedsothattheseatbeltisnolongerresting
against your chest. In a collision, you could slide under the seat belt and be severely
injured or killed. Use the recliner only when the vehicle is parked.
Memory Seat Button Location
GETTING STARTED
30
Page 60 of 164
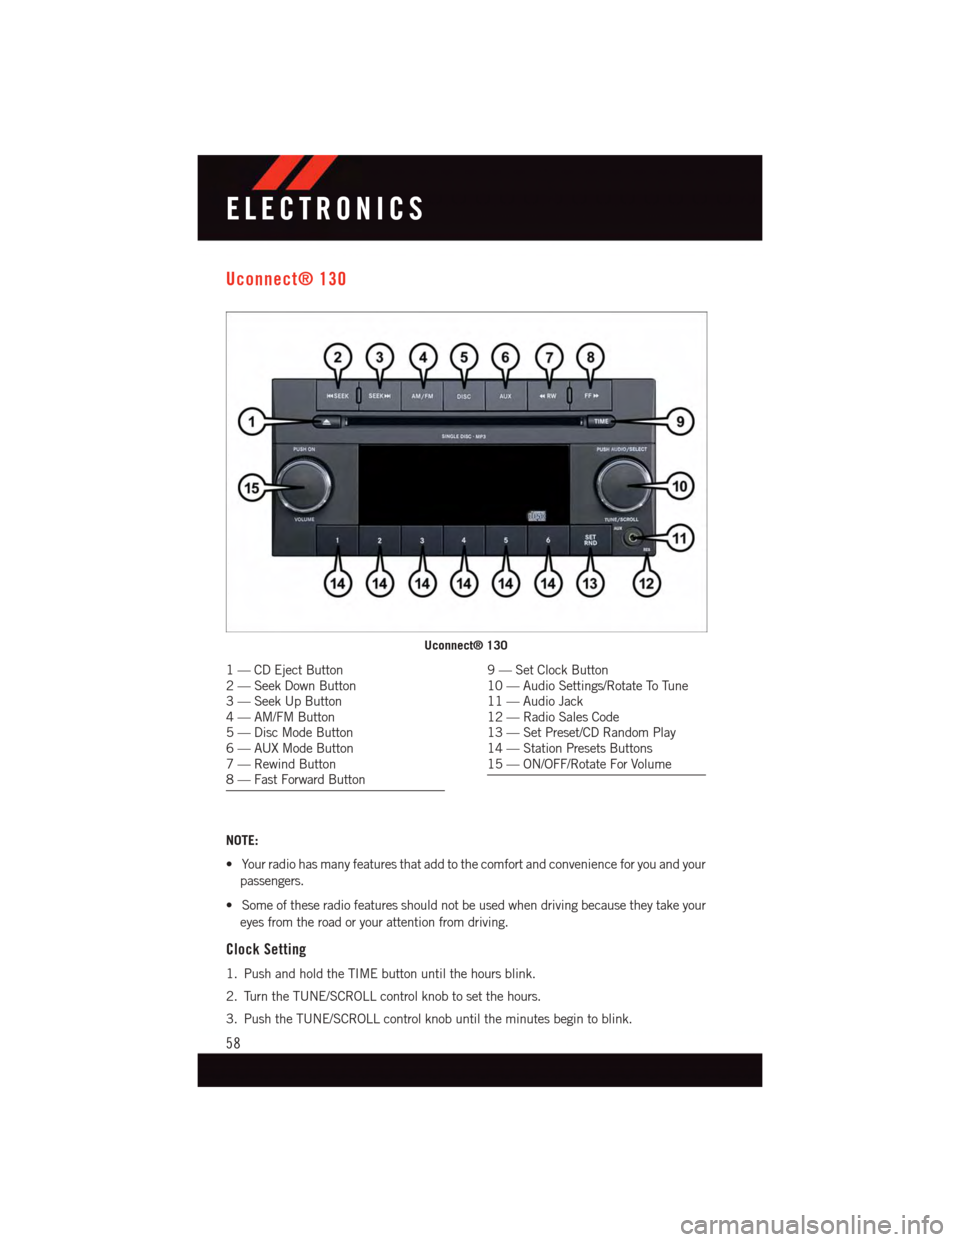
Uconnect® 130
NOTE:
•Yourradiohasmanyfeaturesthataddtothecomfortandconvenienceforyouandyour
passengers.
•Someoftheseradiofeaturesshouldnotbeusedwhendrivingbecausetheytakeyour
eyes from the road or your attention from driving.
Clock Setting
1. Push and hold the TIME button until the hours blink.
2. Turn the TUNE/SCROLL control knob to set the hours.
3. Push the TUNE/SCROLL control knob until the minutes begin to blink.
Uconnect® 130
1—CDEjectButton2—SeekDownButton3—SeekUpButton4—AM/FMButton5—DiscModeButton6—AUXModeButton7—RewindButton8—FastForwardButton
9—SetClockButton10 — Audio Settings/Rotate To Tune11 — Audio Jack12 — Radio Sales Code13 — Set Preset/CD Random Play14 — Station Presets Buttons15 — ON/OFF/Rotate For Volume
ELECTRONICS
58
Page 61 of 164
4. Turn the TUNE/SCROLL control knob to set the minutes.
5. Push the TUNE/SCROLL control knob to save the changes.
6. Push any button/knob or wait five seconds to exit.
Equalizer, Balance And Fade
1. Push the TUNE/SCROLL control knob and “BASS” will display.
2. Rotate the TUNE/SCROLL control knob to select the desired setting.
3. Continue pushing the TUNE/SCROLL control knob to display and set “MID RANGE,”
“TREBLE,” “BALANCE” and “FADE.”
Radio Operation
Seek Up/Down Buttons
•PushtoseekthroughradiostationsinAMorFMbands.
•Holdeitherbuttontobypassstationswithoutstopping.
Store Radio Presets
•PushtheSET/RNDorSET(dependingontheradio)buttononceandSET1willshow
in the display. Then select a preset button (1–6).
•Asecondstationmaybeaddedtoeachpushbutton.PushtheSET/RNDorSET
(depending on the radio) button twice and SET 2 will show in the display. Then select
apresetbutton(1–6).
CD/DISC Operation
Seek Up/Down Buttons
•PushtoseekthroughCDtracks.
•Holdeitherbuttontobypasstrackswithoutstopping.
SET/RND Or RND (Depending On Radio) Button (Random Play)
•PushthisbuttonwhiletheCDisplayingtoactivateRandomPlay.
•ThisfeatureplaystheselectionsontheCDinrandomordertoprovideaninteresting
change of pace.
Audio Jack Operation
The AUX/Audio Jack provides a means to connect a portable audio device, such as an
MP3 player or an iPod®,tothevehicle’ssoundsystem.Thisrequirestheuseofa3.5mm
stereo audio patch cable.
•PushingtheAUXbuttonwillchangethemodetoauxiliarydeviceiftheAudioJackis
connected, allowing the music from your portable device to play through the vehicle's
speakers.
The functions of the portable device are controlled using the device buttons, not the buttons
on the radio. However, the volume may be controlled using the radio or portable device.
ELECTRONICS
59
Page 62 of 164

Uconnect® 130 WITH SiriusXM SATELLITE RADIO
NOTE:
•YourradiomaynotbeequippedwiththeUconnect®Voice Command and Uconnect®
Phone features. To determine if your radio has these features, push the Voice Command
button on the radio. You will hear a voice prompt if you have the feature, or see a
message on the radio stating “Uconnect Phone not available” if you do not.
•Yourradiohasmanyfeaturesthataddtothecomfortandconvenienceofyouandyour
passengers. Some of these radio features should not be used when driving because they
take your eyes from the road or your attention from driving.
Uconnect® 130 With SiriusXM Satellite Radio
1—CDEjectButton2—SeekDownButton3—SeekUpButton4—VoiceCommandButton5—Uconnect®Phone Button6—StationInfoButton7—RewindButton8—FastForwardButton9—SetClockButton10 — Audio Settings/Rotate To Tune11 — Audio Jack
12 — Radio Sales Code13 — Set Preset/CD Random Play14 — Station Preset Buttons15 — ON/OFF/Rotate For Volume16 — AM/FM Mode Button17 — List Folders On A CD18 — Satellite Radio Button19 — Music Type Button20 — Disc Mode Button21 — Set Up Function Button
ELECTRONICS
60
Page 63 of 164
Clock Setting
1. Push and hold the TIME button until the hours blink.
2. Turn the TUNE/SCROLL control knob to set the hours.
3. Push the TUNE/SCROLL control knob until the minutes begin to blink.
4. Turn the TUNE/SCROLL control knob to set the minutes.
5. Push the TUNE/SCROLL control knob to save the changes.
6. Push any button/knob or wait five seconds to exit.
Equalizer, Balance And Fade
1. Push the TUNE/SCROLL control knob and “BASS” will display.
2. Rotate the TUNE/SCROLL control knob to select the desired setting.
3. Continue pushing the TUNE/SCROLL control knob to display and set “MID RANGE,”
“TREBLE,” “BALANCE” and “FADE.”
Radio Operation
Seek Up/Down Buttons
•PushtoseekthroughradiostationsinAM,FM,orSATbands.
•Holdeitherbuttontobypassstationswithoutstopping.
Store Radio Presets
•PushtheSET/RNDorSET(dependingontheradio)buttononceandSET1willshow
in the display. Then select a preset button (1–6).
•Asecondstationmaybeaddedtoeachpushbutton.PushtheSET/RNDorSET
(depending on the radio) button twice and SET 2 will show in the display. Then select
apresetbutton(1–6).
Music Type
NOTE:
The Music Type function only operates when in FM mode.
•PushtheMUSICTYPEbuttontoactivatethismode.PushtheMUSICTYPEbutton
again or turn the TUNE/SCROLL control knob to select the desired music type (Adult
Hits, Country, Jazz, Oldies, Rock, etc.).
•WhenamusictypeischosenandtheMusictypeisdisplayed,PusheitherSEEKbutton
and the radio will only search for stations with the selected music type.
SETUP Button
•PushingtheSETUPbuttonallowsyoutoselectbetweenitemsthatareavailableinthat
particular mode.
•TurntheTUNE/SCROLLcontrolknobtoscrollthroughtheentries.PushtheAUDIO/
SELECT button to select an entry and make changes.
ELECTRONICS
61
Page 67 of 164
•Selectthe“AutoColorMode”buttononthetouchscreentoswitchtoautomatic
daytime/nighttime mode and to control the brightness of the display using the dimmer
switch of the vehicle.
•Pressthe“Exit”buttononthetouchscreentosaveyoursettings.
Radio Operation
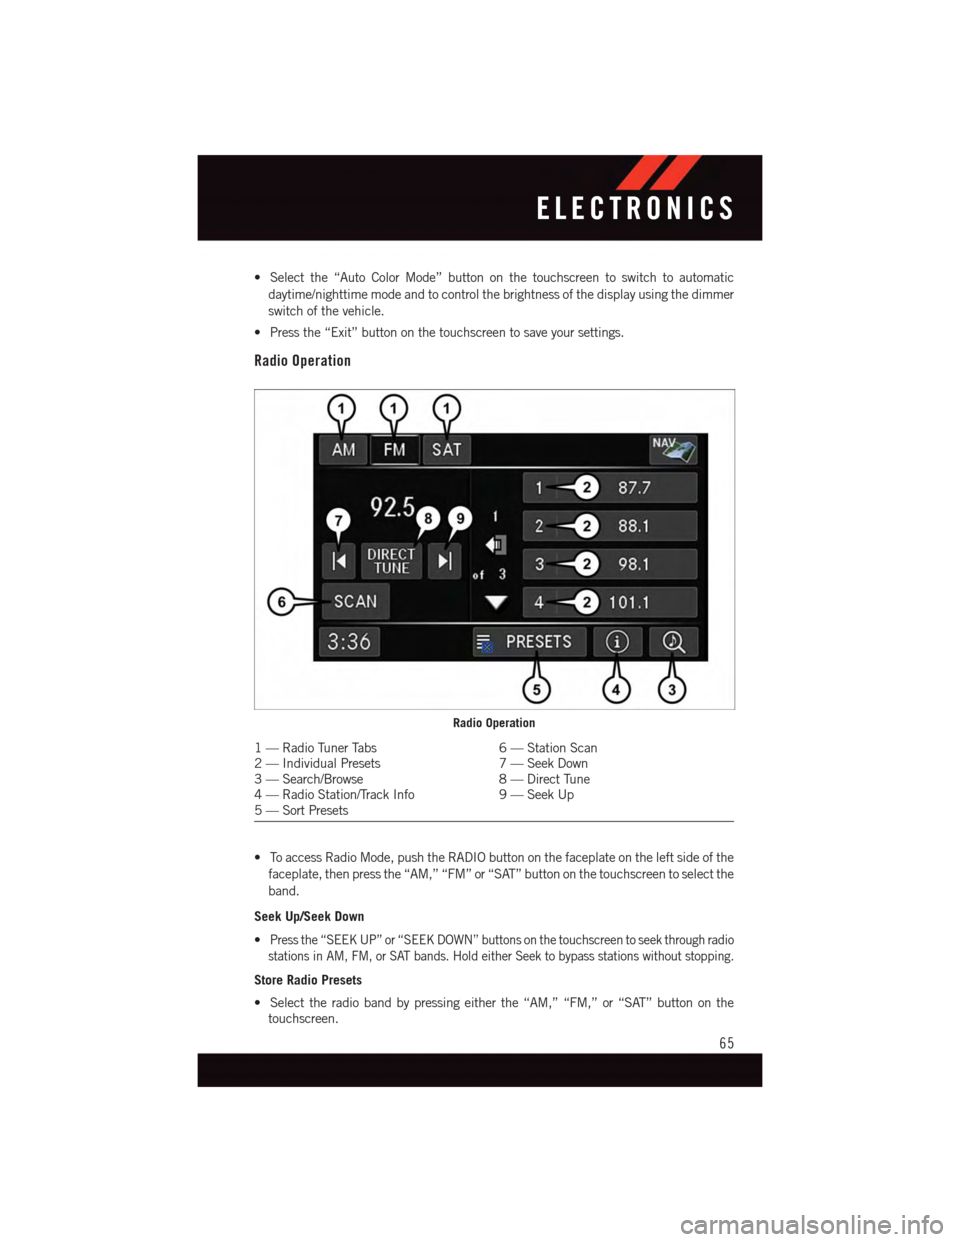
•ToaccessRadioMode,pushtheRADIObuttononthefaceplateontheleftsideofthe
faceplate, then press the “AM,” “FM” or “SAT” button on the touchscreen to select the
band.
Seek Up/Seek Down
•Press the “SEEK UP” or “SEEK DOWN” buttons on the touchscreen to seek through radio
stations in AM, FM, or SAT bands. Hold either Seek to bypass stations without stopping.
Store Radio Presets
•Selecttheradiobandbypressingeitherthe“AM,”“FM,”or“SAT”buttononthe
touchscreen.
Radio Operation
1—RadioTunerTabs6—StationScan2—IndividualPresets7—SeekDown3—Search/Browse8—DirectTune4—RadioStation/TrackInfo9—SeekUp5—SortPresets
ELECTRONICS
65
Page 68 of 164
•Findthestationtostorebyeitherpressingthe“SEEKUP”or“SEEKDOWN”buttonson the touchscreen, pressing the “Scan” button on the touchscreen, or by using the“Direct Tune” button on the touchscreen.
•Oncethestationisfound,pressandholdoneofthe“PRESETS”buttonsonthetouchscreen in the list to the right, until the preset key flashes and the station text onthe button on the touchscreen changes.
NOTE:
If the Presets are not visible on the right side of the screen, press the “PRESETS” button
on the touchscreen.
CD/DVD Disc Operation
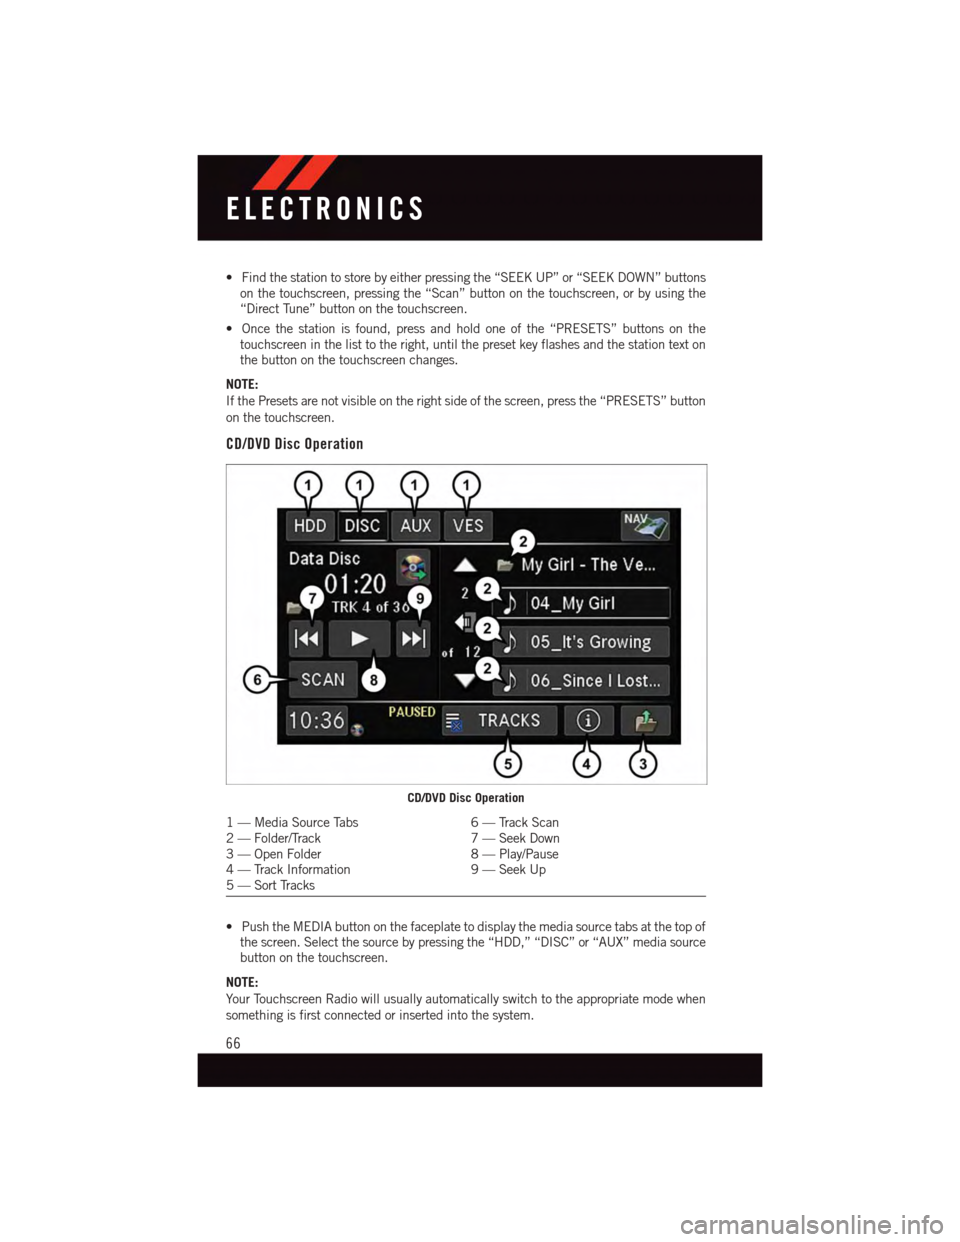
•PushtheMEDIAbuttononthefaceplatetodisplaythemediasourcetabsatthetopofthe screen. Select the source by pressing the “HDD,” “DISC” or “AUX” media sourcebutton on the touchscreen.
NOTE:
Yo u r To u c h s c r e e n R a d i o w i l l u s u a l l y a u t o m a t i c a l l y s w i t c h t o t h e a p p r o p r i a t e m o d e w h e n
something is first connected or inserted into the system.
CD/DVD Disc Operation
1—MediaSourceTabs6—TrackScan2—Folder/Track7—SeekDown3—OpenFolder8—Play/Pause4—TrackInformation9—SeekUp5—SortTracks
ELECTRONICS
66
Page 79 of 164
STEERING WHEEL AUDIO CONTROLS
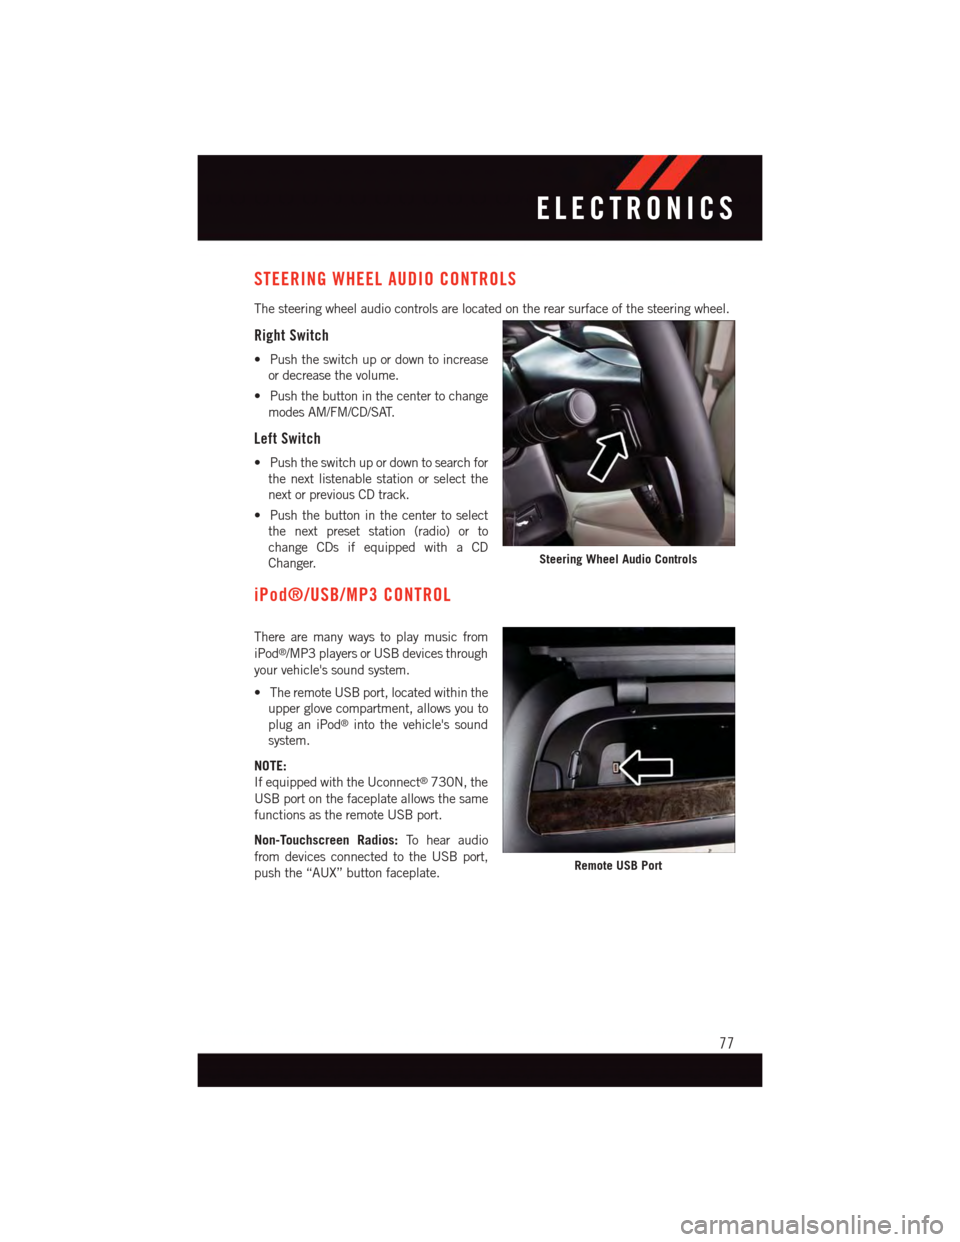
The steering wheel audio controls are located on the rear surface of the steering wheel.
Right Switch
•Pushtheswitchupordowntoincrease
or decrease the volume.
•Pushthebuttoninthecentertochange
modes AM/FM/CD/SAT.
Left Switch
•Pushtheswitchupordowntosearchfor
the next listenable station or select the
next or previous CD track.
•Pushthebuttoninthecentertoselect
the next preset station (radio) or to
change CDs if equipped with a CD
Changer.
iPod®/USB/MP3 CONTROL
There are many ways to play music from
iPod®/MP3 players or USB devices through
your vehicle's sound system.
•TheremoteUSBport,locatedwithinthe
upper glove compartment, allows you to
plug an iPod®into the vehicle's sound
system.
NOTE:
If equipped with the Uconnect®730N, the
USB port on the faceplate allows the same
functions as the remote USB port.
Non-Touchscreen Radios:To h e a r a u d i o
from devices connected to the USB port,
push the “AUX” button faceplate.
Steering Wheel Audio Controls
Remote USB Port
ELECTRONICS
77
Page 93 of 164
Using HomeLink®
To o p e r a t e , p u s h a n d r e l e a s e t h e p r o g r a m m e d H o m e L i n k®button. Activation will now
occur for the programmed device (e.g., garage door opener, gate operator, security system,
entry door lock, home/office lighting, etc.,). The hand-held transmitter of the device may
also be used at any time.
WARNING!
•Yourmotorizeddoororgatewillopenandclosewhileyouareprogrammingthe
universal transceiver. Do not program the transceiver if people or pets are in the
path of the door or gate.
•Donotrunyourvehicleinaclosedgarageorconfinedareawhileprogrammingthe
transceiver. Exhaust gas from your vehicle contains Carbon Monoxide (CO) which is
odorless and colorless. Carbon Monoxide is poisonous when inhaled and can cause
you and others to be severely injured or killed.
POWER INVERTER
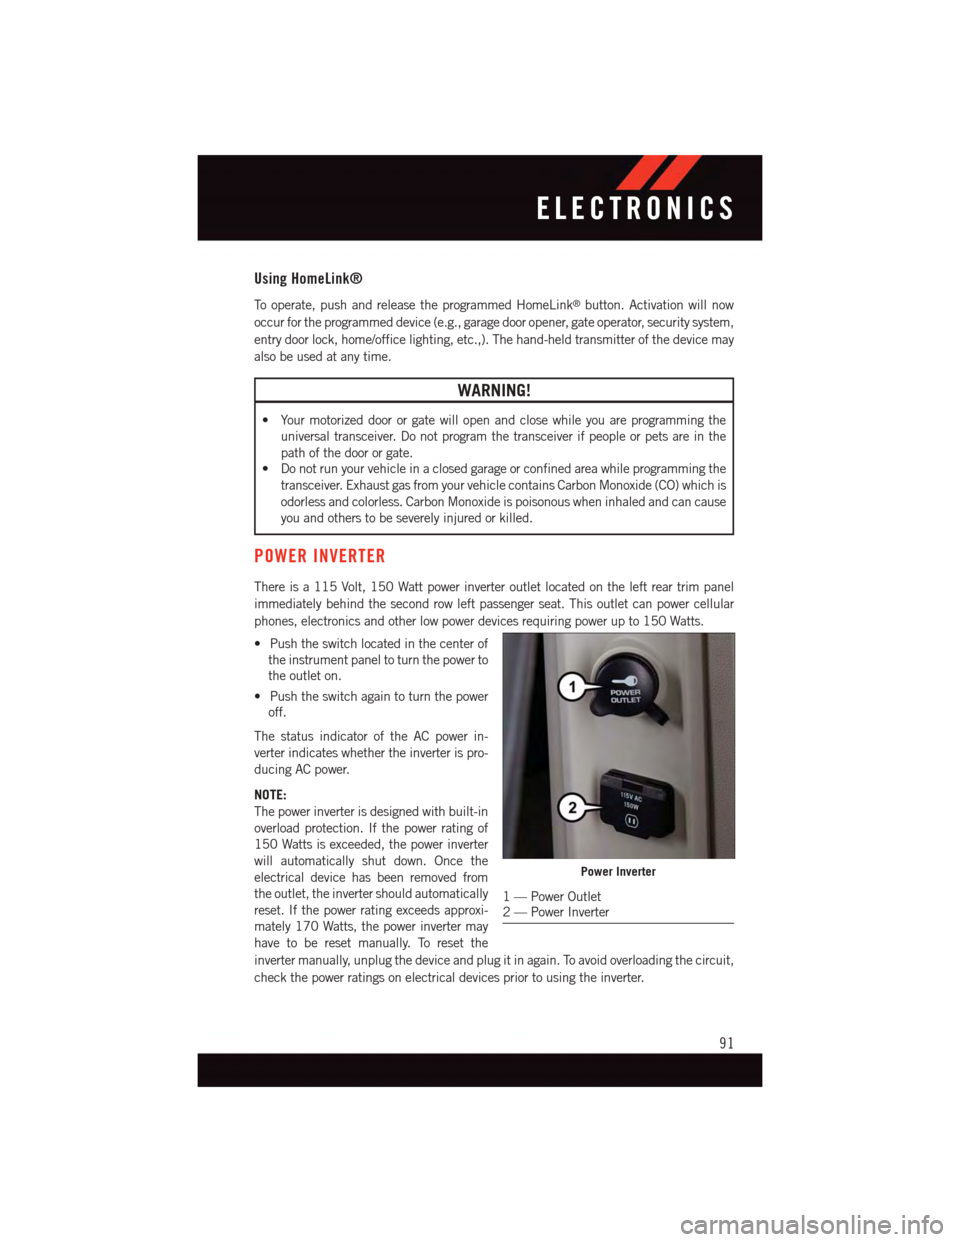
There is a 115 Volt, 150 Watt power inverter outlet located on the left rear trim panel
immediately behind the second row left passenger seat. This outlet can power cellular
phones, electronics and other low power devices requiring power up to 150 Watts.
•Pushtheswitchlocatedinthecenterof
the instrument panel to turn the power to
the outlet on.
•Pushtheswitchagaintoturnthepower
off.
The status indicator of the AC power in-
verter indicates whether the inverter is pro-
ducing AC power.
NOTE:
The power inverter is designed with built-in
overload protection. If the power rating of
150 Watts is exceeded, the power inverter
will automatically shut down. Once the
electrical device has been removed from
the outlet, the inverter should automatically
reset. If the power rating exceeds approxi-
mately 170 Watts, the power inverter may
have to be reset manually. To reset the
inverter manually, unplug the device and plug it in again. To avoid overloading the circuit,
check the power ratings on electrical devices prior to using the inverter.
Power Inverter
1—PowerOutlet2—PowerInverter
ELECTRONICS
91
Page 104 of 164
Unless reset, this message will continue to display each time you turn the ignition switch
to the ON/RUN position or cycle the ignition to the ON/RUN position if equipped with
Keyless Enter-N-Go™. To turn off the message temporarily, press and release the MENU
button. To reset the oil change indicator system (after performing the scheduled mainte-
nance) refer to the following procedure.
Vehicles Equipped With Keyless Enter-N-Go™
1. Without pressing the brake pedal, push the ENGINE START/STOP button and cycle
the ignition to the ON/RUN position (do not start the engine.)
2. Fully depress the accelerator pedal, slowly, three times within 10 seconds.
3. Without pressing the brake pedal, push the ENGINE START/STOP button once to
return the ignition to the OFF/LOCK position.
Vehicles Not Equipped With Keyless Enter-N-Go™
1. Turn the ignition switch to the ON/RUN position (do not start the engine.)
2. Fully depress the accelerator pedal, slowly, three times within 10 seconds.
3. Turn the ignition switch to the OFF/LOCK position.
NOTE:
If the indicator message illuminates when you start the engine, the oil change indicator
system did not reset. If necessary, repeat these steps.
Resetting The Light After Servicing
Vehicles Equipped With Keyless Enter-N-Go™
1. Without pressing the brake pedal, push the ENGINE START/STOP button and cycle
the ignition to the ON/RUN position (do not start the engine.)
2. Fully depress the accelerator pedal, slowly, three times within 10 seconds.
3. Without pressing the brake pedal, push the ENGINE START/STOP button once to
return the ignition to the OFF/LOCK position.
Vehicles Not Equipped With Keyless Enter-N-Go™
1. Turn the ignition switch to the ON/RUN position (do not start the engine.)
2. Fully depress the accelerator pedal, slowly, three times within 10 seconds.
3. Turn the ignition switch to the OFF/LOCK position.
NOTE:
If the indicator message illuminates when you start the vehicle, the oil change indicator
system did not reset. If necessary, repeat this procedure.
WHAT TO DO IN EMERGENCIES
102