instrument cluster DODGE GRAND CARAVAN 2020 Owner's Manual
[x] Cancel search | Manufacturer: DODGE, Model Year: 2020, Model line: GRAND CARAVAN, Model: DODGE GRAND CARAVAN 2020Pages: 380, PDF Size: 14.92 MB
Page 99 of 380
GETTING TO KNOW YOUR INSTRUMENT PANEL97
Vehicle Security Warning Light — If Equipped
This light will flash at a fast rate for
approximately 15 seconds when the
vehicle security alarm is arming, and
then will flash slowly until the vehicle
is disarmed.
Yellow Warning Lights
Anti-Lock Brake (ABS) Warning Light
This warning light monitors the
Anti-Lock Brake System (ABS). The
light will turn on when the ignition is
placed in the ON/RUN or ACC/ON/
RUN position and may stay on for as long as four
seconds.
If the ABS light remains on or turns on while
driving, then the Anti-Lock portion of the brake
system is not functioning and service is
required as soon as possible. However, the
conventional brake system will continue to
operate normally, assuming the Brake Warning
Light is not also on.
If the ABS light does not turn on when the
ignition is placed in the ON/RUN or ACC/ON/
RUN position, have the brake system inspected
by an authorized dealer.
Electronic Stability Control (ESC) Active
Warning Light — If Equipped
This warning light will indicate when
the Electronic Stability Control system
is Active. The “ESC Indicator Light” in
the instrument cluster will come on
when the ignition is placed in the ON/RUN or
ACC/ON/RUN position, and when ESC is
activated. It should go out with the engine
running. If the “ESC Indicator Light” comes on
continuously with the engine running, a
malfunction has been detected in the ESC
system. If this warning light remains on after
several ignition cycles, and the vehicle has been
driven several miles (kilometers) at speeds
greater than 30 mph (48 km/h), see an
authorized dealer as soon as possible to have
the problem diagnosed and corrected.
The “ESC OFF Indicator Light” and the “ESC
Indicator Light” come on momentarily each
time the ignition is placed in the ON/RUN or
ACC/ON/RUN position.
The ESC system will make buzzing or clicking
sounds when it is active. This is normal; the
sounds will stop when ESC becomes inactive.
This light will come on when the vehicle is in
an ESC event.
Electronic Stability Control (ESC) OFF
Warning Light — If Equipped
This warning light indicates the
Electronic Stability Control (ESC) is
off.
Each time the ignition is turned to ON/RUN or
ACC/ON/RUN, the ESC system will be on, even
if it was turned off previously.
Low Fuel Warning Light
When the fuel level reaches approxi -
mately 1.85 gal (7 L) this warning light
will turn on, and remain on until fuel is
added.
A single warning chime will sound with Low Fuel
Warning.
Low Washer Fluid Warning Light — If
Equipped
This warning light will illuminate when
the windshield washer fluid is low.
Refer to “Engine Compartment” in “Servicing
And Maintenance” for further information.
3
20_RT_OM_EN_USC_t.book Page 97
Page 107 of 380

SAFETY105
Electronic Brake Force Distribution (EBD)
The Electronic Brake Force Distribution (EBD)
function manages the distribution of the
braking torque between the front and rear axles
by limiting braking pressure to the rear axle.
This is done to prevent overslip of the rear
wheels to avoid vehicle instability, and to
prevent the rear axle from entering ABS before
the front axle.
Electronic Roll Mitigation (ERM)
The Electronic Roll Mitigation (ERM) system
anticipates the potential for wheel lift by
monitoring the driver’s steering wheel input and
the speed of the vehicle. When ERM determines
that the rate of change of the steering wheel
angle and vehicle’s speed are sufficient to
potentially cause wheel lift, it then applies the
appropriate brake and may also reduce engine
power to lessen the chance that wheel lift will
occur. ERM can only reduce the chance of
wheel lift occurring during severe or evasive
driving maneuvers; it cannot prevent wheel lift
due to other factors, such as road conditions,
leaving the roadway, or striking objects or other
vehicles.
Electronic Stability Control (ESC)
This system enhances directional control and
stability of the vehicle under various driving
conditions. ESC corrects for oversteering or
understeering of the vehicle by applying the
brake of the appropriate wheel(s) to assist in
counteracting the oversteer or understeer
condition. Engine power may also be reduced to
help the vehicle maintain the desired path. ESC uses sensors in the vehicle to determine
the vehicle path intended by the driver and
compares it to the actual path of the vehicle.
When the actual path does not match the
intended path, ESC applies the brake of the
appropriate wheel to assist in counteracting the
oversteer or understeer condition.
Oversteer — when the vehicle is turning more
than appropriate for the steering wheel posi
-
tion.
Understeer — when the vehicle is turning less
than appropriate for the steering wheel
position.
The “ESC Activation/Malfunction Indicator
Light” located in the instrument cluster will start
to flash as soon as the ESC system becomes
active. The “ESC Activation/Malfunction
Indicator Light” also flashes when the TCS is
active. If the “ESC Activation/Malfunction
Indicator Light” begins to flash during
acceleration, ease up on the accelerator and
apply as little throttle as possible. Be sure to
adapt your speed and driving to the prevailing
road conditions.
WARNING!
Many factors, such as vehicle loading, road
conditions and driving conditions, influence
the chance that wheel lift or rollover may
occur. ERM cannot prevent all wheel lift or
rollovers, especially those that involve leaving
the roadway or striking objects or other
vehicles. The capabilities of an
ERM-equipped vehicle must never be
exploited in a reckless or dangerous manner
which could jeopardize the user's safety or
the safety of others.
4
20_RT_OM_EN_USC_t.book Page 105
Page 109 of 380
SAFETY107
To enter the “Partial Off” mode, momentarily
push the “ESC OFF” switch and the “ESC OFF
Indicator Light” will illuminate. To turn the ESC
on again, momentarily push the “ESC OFF”
switch and the “ESC OFF Indicator Light” will
turn off. NOTE:
The Electronic Stability Control (ESC) cannot
prevent the natural laws of physics from acting
on the vehicle, nor can it increase the traction
afforded by prevailing road conditions. ESC
cannot prevent all accidents, including those
resulting from excessive speed in turns, driving
on very slippery surfaces, or hydroplaning. ESC
also cannot prevent collisions.
ESC Activation/Malfunction Indicator Light
And ESC OFF Indicator Light
The “ESC Activation/Malfunction
Indicator Light” in the instrument
cluster will come on when the ignition
is placed in the ON mode. It should go
out with the engine running. If the “ESC
Activation/Malfunction Indicator Light” comes
on continuously with the engine running, a
malfunction has been detected in the ESC
system. If this light remains on after several
ignition cycles, and the vehicle has been driven
several miles (kilometers) at speeds greater
than 30 mph (48 km/h), see an authorized
dealer as soon as possible to have the problem
diagnosed and corrected. The “ESC Activation/Malfunction Indicator
Light” (located in the instrument cluster) starts
to flash as soon as the tires lose traction and
the ESC system becomes active. The “ESC
Activation/Malfunction Indicator Light” also
flashes when TCS is active. If the “ESC
Activation/Malfunction Indicator Light” begins
to flash during acceleration, ease up on the
accelerator and apply as little throttle as
possible. Be sure to adapt your speed and
driving to the prevailing road conditions.
NOTE:
The “ESC Activation/Malfunction Indicator
Light” and the “ESC OFF Indicator Light”
come on momentarily each time the ignition
is placed in the ON position.
Each time the ignition is placed in the ON
position, the ESC system will be on even if it
was turned off previously.
The ESC system will make buzzing or clicking
sounds when it is active. This is normal; the
sounds will stop when ESC becomes inactive
following the maneuver that caused the ESC
activation.
WARNING!
When in “Partial Off” mode, the TCS func
-
tionality of ESC, (except for the limited slip
feature described in the TCS section), has
been disabled and the “ESC OFF Indicator
Light” will be illuminated. When in “Partial
Off” mode, the engine power reduction
feature of TCS is disabled, and the
enhanced vehicle stability offered by the
ESC system is reduced.
Trailer Sway Control (TSC) is disabled when
the ESC system is in the “Partial Off” mode.
4
20_RT_OM_EN_USC_t.book Page 107
Page 111 of 380

SAFETY109
Disabling And Enabling HSA
This feature can be turned on or turned off. To
change the current setting, proceed as follows:
For vehicles equipped with the instrument
cluster display, refer to “Instrument Cluster
Display” in “Getting To Know Your Instrument
Panel” for further information.
For vehicles not equipped with the instrument
cluster display, perform the following steps:
1. Center the steering wheel (front wheels
pointing straight forward).
2. Shift the transmission into PARK.
3. Apply the parking brake.
4. Start the engine.
5. Rotate the steering wheel slightly more than one-half turn to the left.
6. Push the “ESC OFF” button located in the lower switch bank below the climate control
four times within 20 seconds. The “ESC OFF
Indicator Light” should turn on and turn off
two times.
7. Rotate the steering wheel back to center and then an additional slightly more than
one-half turn to the right. 8. Place the ignition switch to the OFF position
and then back to the ON position. If the
sequence was completed properly, the
“ESC OFF Indicator Light” will blink several
times to confirm HSA is disabled.
9. Repeat these steps if you want to return this feature to its previous setting.
Traction Control System (TCS)
The Traction Control System (TCS) monitors the
amount of wheel spin of each of the driven
wheels. If wheel spin is detected, the TCS may
apply brake pressure to the spinning wheel(s)
and/or reduce vehicle power to provide
enhanced acceleration and stability. A feature
of the TCS, Brake Limited Differential (BLD),
functions similar to a limited slip differential
and controls the wheel spin across a driven
axle. If one wheel on a driven axle is spinning
faster than the other, the system will apply the
brake of the spinning wheel. This will allow more
vehicle torque to be applied to the wheel that is
not spinning. BLD may remain enabled even if
TCS and ESC are in a reduced mode.
Trailer Sway Control (TSC)
Trailer Sway Control (TSC) uses sensors in the
vehicle to recognize an excessively swaying
trailer and will take the appropriate actions to
attempt to stop the sway. TSC will become
active automatically once an excessively
swaying trailer is recognized. Note that TSC
cannot stop all trailers from swaying. Always
use caution when towing a trailer and follow the
trailer tongue weight recommendations. Refer
to “Trailer Towing” in “Starting And Operating”
for further information. When TSC is
functioning, the “ESC Activation/Malfunction
Indicator Light” will flash, the engine power may
be reduced and you may feel the brakes being
applied to individual wheels to attempt to stop
the trailer from swaying. TSC is disabled when
the ESC system is in the “Partial Off” mode.
WARNING!
If TSC activates while driving, slow the vehicle
down, stop at the nearest safe location, and
adjust the trailer load to eliminate trailer
sway.
4
20_RT_OM_EN_USC_t.book Page 109
Page 115 of 380
SAFETY113
Rear Cross Path (RCP)
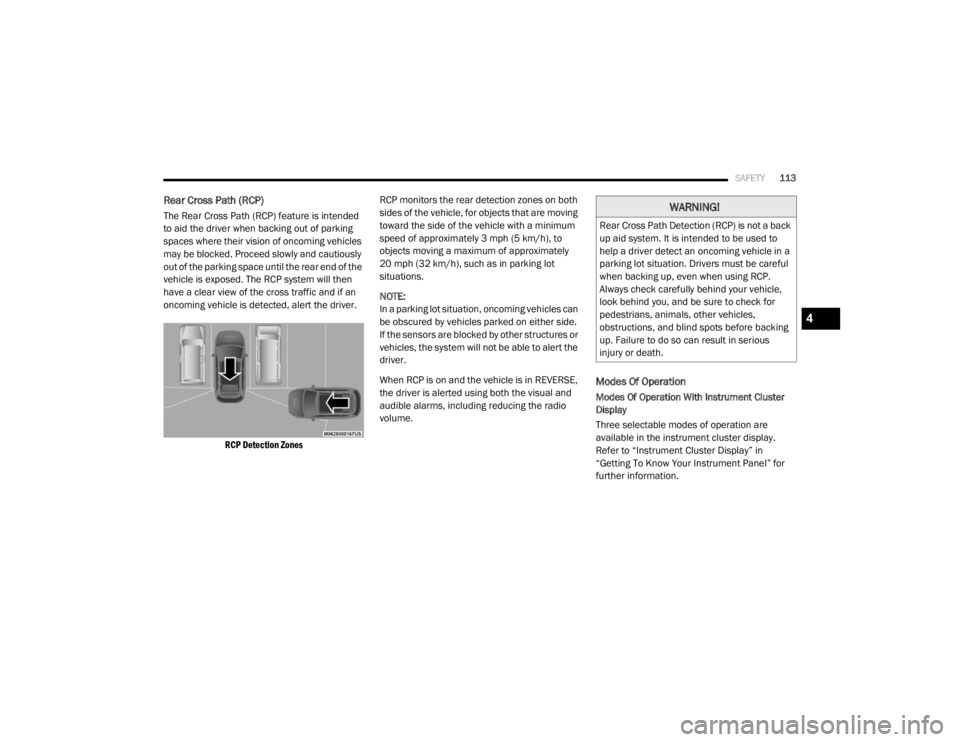
The Rear Cross Path (RCP) feature is intended
to aid the driver when backing out of parking
spaces where their vision of oncoming vehicles
may be blocked. Proceed slowly and cautiously
out of the parking space until the rear end of the
vehicle is exposed. The RCP system will then
have a clear view of the cross traffic and if an
oncoming vehicle is detected, alert the driver.
RCP Detection Zones
RCP monitors the rear detection zones on both
sides of the vehicle, for objects that are moving
toward the side of the vehicle with a minimum
speed of approximately 3 mph (5 km/h), to
objects moving a maximum of approximately
20 mph (32 km/h), such as in parking lot
situations.
NOTE:
In a parking lot situation, oncoming vehicles can
be obscured by vehicles parked on either side.
If the sensors are blocked by other structures or
vehicles, the system will not be able to alert the
driver.
When RCP is on and the vehicle is in REVERSE,
the driver is alerted using both the visual and
audible alarms, including reducing the radio
volume.
Modes Of Operation
Modes Of Operation With Instrument Cluster
Display
Three selectable modes of operation are
available in the instrument cluster display.
Refer to “Instrument Cluster Display” in
“Getting To Know Your Instrument Panel” for
further information.
WARNING!
Rear Cross Path Detection (RCP) is not a back
up aid system. It is intended to be used to
help a driver detect an oncoming vehicle in a
parking lot situation. Drivers must be careful
when backing up, even when using RCP.
Always check carefully behind your vehicle,
look behind you, and be sure to check for
pedestrians, animals, other vehicles,
obstructions, and blind spots before backing
up. Failure to do so can result in serious
injury or death.
4
20_RT_OM_EN_USC_t.book Page 113
Page 117 of 380

SAFETY115
La operación de este equipo está sujeta a las
siguientes dos condiciones:
1. es posible que este equipo o dispositivo no
cause interferencia perjudicial y
2. este equipo o dispositivo debe aceptar cualquier interferencia, incluyendo la que
pueda causar su operación no deseada.
NOTE:
Changes or modifications not expressly
approved by the party responsible for
compliance could void the user’s authority to
operate the equipment.
Tire Pressure Monitoring System (TPMS)
The Tire Pressure Monitoring System (TPMS)
will warn the driver of a low tire pressure based
on the vehicle recommended cold placard
pressure.
NOTE:
The TPMS Warning Light will illuminate in the
instrument cluster and a chime will sound when
tire pressure is low in one or more of the four
active road tires. When this occurs you must
increase the tire pressure to the recommended
cold placard pressure in order for the TPMS
Warning Light to turn off. The tire pressure will vary with temperature by
approximately 1 psi (7 kPa) for every 12°F
(6.5°C). This means that when the outside
temperature decreases, the tire pressure will
decrease. Tire pressure should always be set
based on cold inflation tire pressure. This is
defined as the tire pressure after the vehicle
has not been driven for at least three hours, or
driven less than 1 mile (1.6 km) after a three
hour period. The cold tire inflation pressure
must not exceed the maximum inflation
pressure molded into the tire sidewall. Refer to
“Tires” in “Servicing and Maintenance” for
information on how to properly inflate the
vehicle’s tires. The tire pressure will also
increase as the vehicle is driven. This is normal
and there should be no adjustment for this
increased pressure.
The TPMS will warn the driver of a low tire
pressure if the tire pressure falls below the
low-pressure warning limit for any reason,
including low temperature effects and natural
pressure loss through the tire.
The TPMS will continue to warn the driver of low
tire pressure as long as the condition exists,
and will not turn off until the tire pressure is at
or above the recommended cold placard
pressure. Once the low tire pressure warning (TPMS Warning Light) illuminates, you must
increase the tire pressure to the recommended
cold placard pressure in order for the TPMS
Warning Light to turn off.
The system will automatically update and the
TPMS Warning Light will turn off once the
system receives the updated tire pressures. The
vehicle may need to be driven for up to
20 minutes above 15 mph (24 km/h) in order
for the TPMS to receive this information.
For example, your vehicle may have a
recommended cold (parked for more than three
hours) placard pressure of 33 psi (227 kPa). If
the ambient temperature is 68°F (20°C) and
the measured tire pressure is 28 psi (193 kPa),
a temperature drop to 20°F (-7°C) will
decrease the tire pressure to approximately
24 psi (165 kPa). This tire pressure is low
enough to turn on the “TPMS Warning Light.”
Driving the vehicle may cause the tire pressure
to rise to approximately 28 psi (193 kPa), but
the TPMS Warning Light will still be on. In this
situation, the TPMS Warning Light will turn off
only after the tires are inflated to the vehicle’s
recommended cold placard pressure value.
4
20_RT_OM_EN_USC_t.book Page 115
Page 119 of 380
SAFETY117
The Tire Pressure Monitoring System (TPMS)
consists of the following components:
Receiver Module
Four Tire Pressure Monitoring sensors
Tire Pressure Monitoring System Warning
Light
Tire Pressure Monitoring Low Tire Pressure
Warnings The TPMS Warning Light will
illuminate in the instrument cluster, a
“LOW TIRE PRESSURE” message will
display in the instrument cluster, and
an audible chime will be activated when one or
more of the four active road tire pressures are
low. Should this occur, you should stop as soon
as possible, check the inflation pressure of
each tire on your vehicle, and inflate each tire to
the vehicle's recommended cold tire placard
pressure value (located on the placard label on
the driver's-side B-Pillar).
NOTE:
When filling warm tires, the tire pressure may
need to be increased up to an additional 4 psi
(28 kPa) above the recommended cold placard
pressure in order to turn the TPMS Warning
Light off. The system will automatically update and the
TPMS Warning Light will extinguish once the
updated tire pressures have been received.
NOTE:
The vehicle may need to be driven for up to
20 minutes above 15 mph (24 km/h) to receive
this information.
Service TPMS
The TPMS Warning Light will flash on and off for
75 seconds, and remain on solid when a system
fault is detected. The system fault will also
sound a chime. If the ignition switch is cycled,
this sequence will repeat, providing the system
fault still exists. The TPMS Warning Light will
turn off when the fault condition no longer
exists. A system fault can occur with any of the
following scenarios:
Jamming due to electronic devices or driving
next to facilities emitting the same radio
frequencies as the TPMS sensors.
Installing some form of aftermarket window
tinting that affects radio wave signals.
Accumulation of excessive snow and/or ice
around the wheels or wheel housings.
Using tire chains on the vehicle.
Using wheels/tires not equipped with TPMS
sensors.
Vehicles With Compact Spare
The compact spare tire (if equipped) does not
have a TPMS sensor. Therefore the TPMS will
not monitor the pressure in the compact
spare tire.
If you install the compact spare tire in place
of a road tire that has a pressure below the
low-pressure warning limit, upon the next
ignition switch cycle, a chime will sound, a
“LOW TIRE PRESSURE” message will be
displayed and the TPMS Warning Light will
turn on.
After driving for up to 20 minutes above
15 mph (24 km/h), the TPMS Warning Light
will flash on and off for 75 seconds and then
remain on solid.
For each subsequent ignition switch cycle, a
chime will sound, the TPMS Warning Light will
flash on and off for 75 seconds and then
remain on solid.
4
20_RT_OM_EN_USC_t.book Page 117
Page 166 of 380
164STARTING AND OPERATING
The engine oil installed in the engine at the
factory is a high-quality energy conserving type
lubricant. Oil changes should be consistent with
anticipated climate conditions under which
vehicle operations will occur. For the
recommended viscosity and quality grades,
refer to “Dealer Service” in “Servicing And
Maintenance”.
NOTE:
A new engine may consume some oil during its
first few thousand miles (kilometers) of
operation. This should be considered a normal
part of the break-in and not interpreted as a
problem.
PARK BRAKE
Before leaving the vehicle, make sure that the
parking brake is fully applied and place the gear
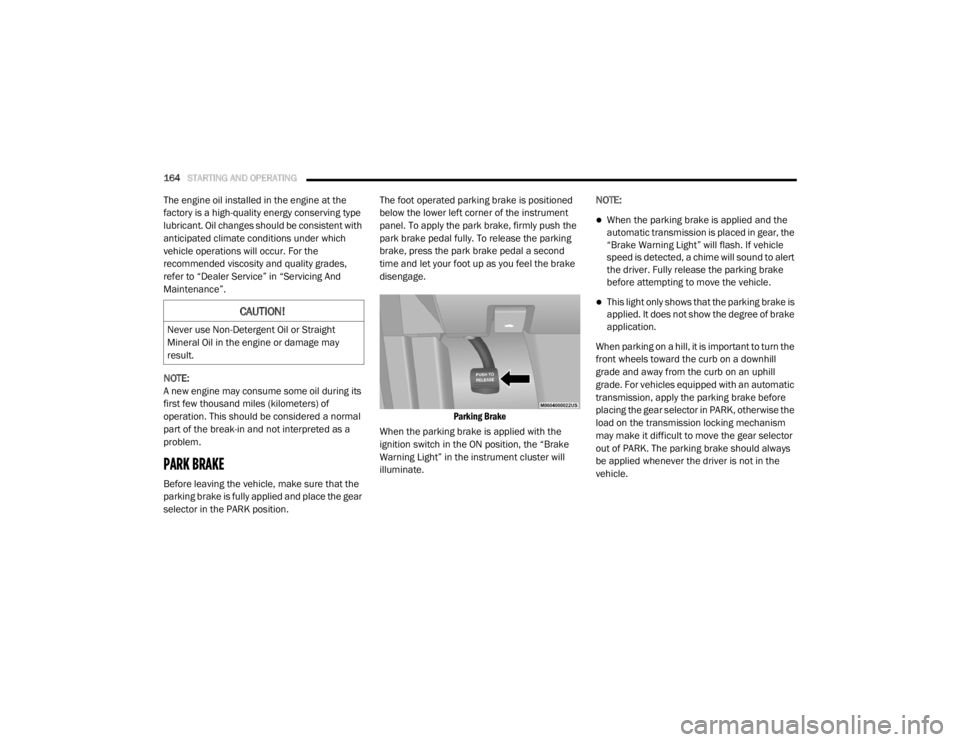
selector in the PARK position. The foot operated parking brake is positioned
below the lower left corner of the instrument
panel. To apply the park brake, firmly push the
park brake pedal fully. To release the parking
brake, press the park brake pedal a second
time and let your foot up as you feel the brake
disengage.
Parking Brake
When the parking brake is applied with the
ignition switch in the ON position, the “Brake
Warning Light” in the instrument cluster will
illuminate. NOTE:
When the parking brake is applied and the
automatic transmission is placed in gear, the
“Brake Warning Light” will flash. If vehicle
speed is detected, a chime will sound to alert
the driver. Fully release the parking brake
before attempting to move the vehicle.
This light only shows that the parking brake is
applied. It does not show the degree of brake
application.
When parking on a hill, it is important to turn the
front wheels toward the curb on a downhill
grade and away from the curb on an uphill
grade. For vehicles equipped with an automatic
transmission, apply the parking brake before
placing the gear selector in PARK, otherwise the
load on the transmission locking mechanism
may make it difficult to move the gear selector
out of PARK. The parking brake should always
be applied whenever the driver is not in the
vehicle.CAUTION!
Never use Non-Detergent Oil or Straight
Mineral Oil in the engine or damage may
result.
20_RT_OM_EN_USC_t.book Page 164
Page 169 of 380
STARTING AND OPERATING167
Fuel Economy (ECON) Mode
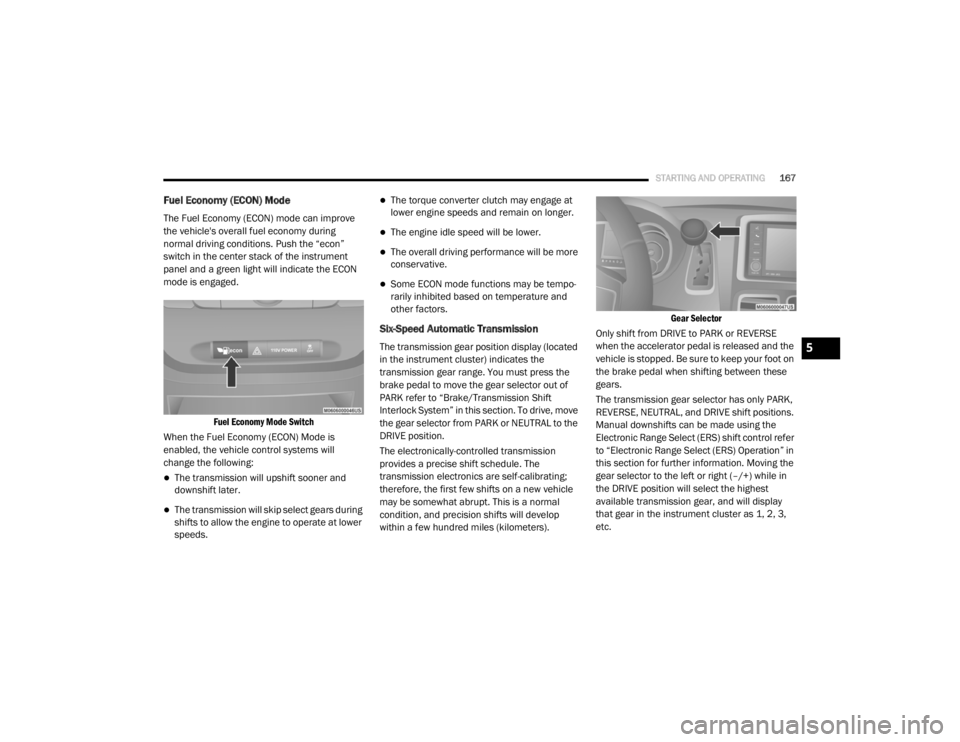
The Fuel Economy (ECON) mode can improve
the vehicle's overall fuel economy during
normal driving conditions. Push the “econ”
switch in the center stack of the instrument
panel and a green light will indicate the ECON
mode is engaged.
Fuel Economy Mode Switch
When the Fuel Economy (ECON) Mode is
enabled, the vehicle control systems will
change the following:
The transmission will upshift sooner and
downshift later.
The transmission will skip select gears during
shifts to allow the engine to operate at lower
speeds.
The torque converter clutch may engage at
lower engine speeds and remain on longer.
The engine idle speed will be lower.
The overall driving performance will be more
conservative.
Some ECON mode functions may be tempo -
rarily inhibited based on temperature and
other factors.
Six-Speed Automatic Transmission
The transmission gear position display (located
in the instrument cluster) indicates the
transmission gear range. You must press the
brake pedal to move the gear selector out of
PARK refer to “Brake/Transmission Shift
Interlock System” in this section. To drive, move
the gear selector from PARK or NEUTRAL to the
DRIVE position.
The electronically-controlled transmission
provides a precise shift schedule. The
transmission electronics are self-calibrating;
therefore, the first few shifts on a new vehicle
may be somewhat abrupt. This is a normal
condition, and precision shifts will develop
within a few hundred miles (kilometers).
Gear Selector
Only shift from DRIVE to PARK or REVERSE
when the accelerator pedal is released and the
vehicle is stopped. Be sure to keep your foot on
the brake pedal when shifting between these
gears.
The transmission gear selector has only PARK,
REVERSE, NEUTRAL, and DRIVE shift positions.
Manual downshifts can be made using the
Electronic Range Select (ERS) shift control refer
to “Electronic Range Select (ERS) Operation” in
this section for further information. Moving the
gear selector to the left or right (–/+) while in
the DRIVE position will select the highest
available transmission gear, and will display
that gear in the instrument cluster as 1, 2, 3,
etc.5
20_RT_OM_EN_USC_t.book Page 167
Page 173 of 380

STARTING AND OPERATING171
Electronic Range Select (ERS) Operation
The Electronic Range Select (ERS) shift control
allows the driver to limit the highest available
gear when the transmission is in DRIVE. For
example, if you set the transmission gear limit
to 4 (FOURTH gear), the transmission will not
shift above FOURTH gear (except to prevent
engine overspeed), but will shift through the
lower gears normally.
You can switch between DRIVE and ERS mode
at any vehicle speed. When the gear selector is in the DRIVE position, the transmission will
operate automatically, shifting between all
available gears. Tapping the gear selector to the
left (-) will activate ERS mode, display the
current gear in the instrument cluster, and set
that gear as the top available gear. Once in ERS
mode, tapping the gear selector to the left (-) or
right (+) will change the top available gear.
To exit ERS mode, simply hold the gear selector
to the right (+) until the gear limit display
disappears from the instrument cluster.
NOTE:
To select the proper gear position for maximum deceleration (engine braking), tap the gear selector to the left (-) repeatedly as the vehicle slows. The
transmission will shift to the range from which the vehicle can best be slowed down.WARNING!
Do not downshift for additional engine
braking on a slippery surface. The drive
wheels could lose their grip and the vehicle
could skid, causing a collision or personal
injury.
Transmission Gear Position Display 1 2 3456D
Actual Gear(s) Allowed 11–2 1–3 1–4 1–5 1–6 1–6
5
20_RT_OM_EN_USC_t.book Page 171