radio DODGE HORNET 2023 User Guide
[x] Cancel search | Manufacturer: DODGE, Model Year: 2023, Model line: HORNET, Model: DODGE HORNET 2023Pages: 288, PDF Size: 14.2 MB
Page 53 of 288
GETTING TO KNOW YOUR VEHICLE51
Console Storage Compartment
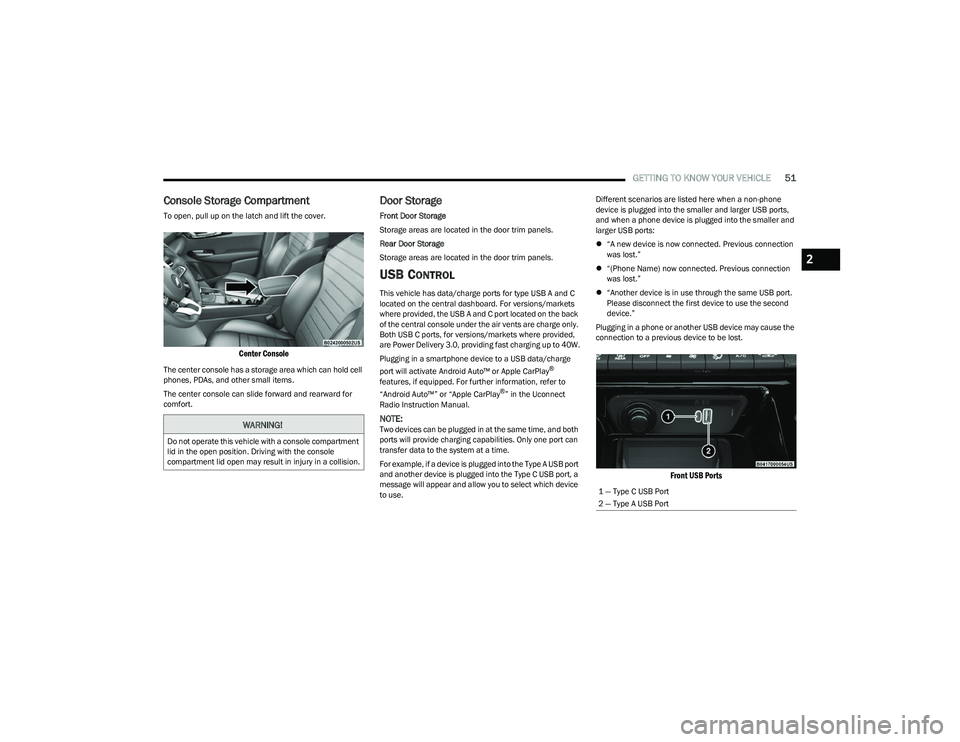
To open, pull up on the latch and lift the cover.
Center Console
The center console has a storage area which can hold cell
phones, PDAs, and other small items.
The center console can slide forward and rearward for
comfort.
Door Storage
Front Door Storage
Storage areas are located in the door trim panels.
Rear Door Storage
Storage areas are located in the door trim panels.
USB CONTROL
This vehicle has data/charge ports for type USB A and C
located on the central dashboard. For versions/markets
where provided, the USB A and C port located on the back
of the central console under the air vents are charge only.
Both USB C ports, for versions/markets where provided,
are Power Delivery 3.0, providing fast charging up to 40W.
Plugging in a smartphone device to a USB data/charge
port will activate Android Auto™ or Apple CarPlay
®
features, if equipped. For further information, refer to
“Android Auto™” or “Apple CarPlay
®” in the Uconnect
Radio Instruction Manual.
NOTE:Two devices can be plugged in at the same time, and both
ports will provide charging capabilities. Only one port can
transfer data to the system at a time.
For example, if a device is plugged into the Type A USB port
and another device is plugged into the Type C USB port, a
message will appear and allow you to select which device
to use. Different scenarios are listed here when a non-phone
device is plugged into the smaller and larger USB ports,
and when a phone device is plugged into the smaller and
larger USB ports:
“A new device is now connected. Previous connection
was lost.”
“(Phone Name) now connected. Previous connection
was lost.”
“Another device is in use through the same USB port.
Please disconnect the first device to use the second
device.”
Plugging in a phone or another USB device may cause the
connection to a previous device to be lost.
Front USB Ports
WARNING!
Do not operate this vehicle with a console compartment
lid in the open position. Driving with the console
compartment lid open may result in injury in a collision.
1 — Type C USB Port
2 — Type A USB Port
2
23_GG_OM_EN_USC_t.book Page 51
Page 54 of 288
52GETTING TO KNOW YOUR VEHICLE
By using a USB cable to connect an external device:
The device can be played on the vehicle’s sound
system, providing the artist, track title, and album infor -
mation on the radio display.
NOTE:Depending on track configuration, track information may
not be present on the radio display.
The device can be controlled using the radio buttons to
play, and browse the contents of the device.
The audio device battery charges when plugged into
the USB port.
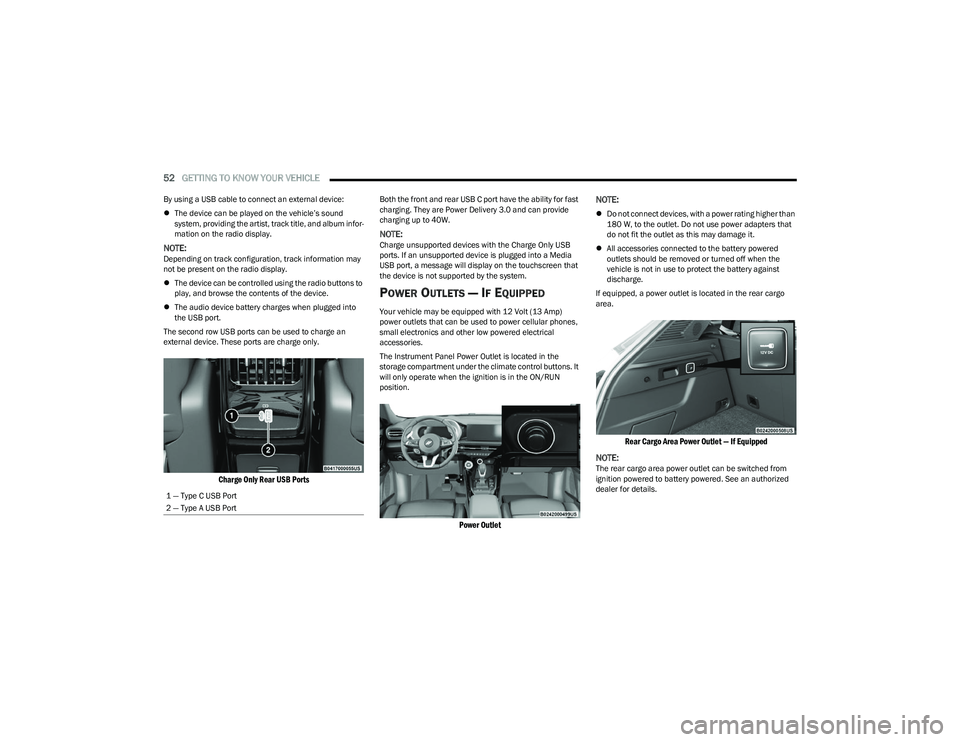
The second row USB ports can be used to charge an
external device. These ports are charge only.
Charge Only Rear USB Ports
Both the front and rear USB C port have the ability for fast
charging. They are Power Delivery 3.0 and can provide
charging up to 40W.
NOTE:Charge unsupported devices with the Charge Only USB
ports. If an unsupported device is plugged into a Media
USB port, a message will display on the touchscreen that
the device is not supported by the system.
POWER OUTLETS — IF EQUIPPED
Your vehicle may be equipped with 12 Volt (13 Amp)
power outlets that can be used to power cellular phones,
small electronics and other low powered electrical
accessories.
The Instrument Panel Power Outlet is located in the
storage compartment under the climate control buttons. It
will only operate when the ignition is in the ON/RUN
position.
Power Outlet
NOTE:
Do not connect devices, with a power rating higher than
180 W, to the outlet. Do not use power adapters that
do not fit the outlet as this may damage it.
All accessories connected to the battery powered
outlets should be removed or turned off when the
vehicle is not in use to protect the battery against
discharge.
If equipped, a power outlet is located in the rear cargo
area.
Rear Cargo Area Power Outlet — If Equipped
NOTE:
The rear cargo area power outlet can be switched from
ignition powered to battery powered. See an authorized
dealer for details.
1 — Type C USB Port
2 — Type A USB Port
23_GG_OM_EN_USC_t.book Page 52
Page 73 of 288
GETTING TO KNOW YOUR INSTRUMENT PANEL71
The battery was recently replaced and was not charged
completely.
The battery was discharged by an electrical load left on
when the vehicle was parked.
The battery was used for an extended period with the
engine not running to supply radio, lights, chargers,
+12 Volts portable appliances like vacuum cleaners,
game consoles and similar devices.
What to do when an electrical load reduction action
message is present (“Battery Saver On” or
“Battery Saver Mode”)
During a trip:
Reduce power to unnecessary loads if possible:
Turn off redundant lights (interior or exterior)
Check what may be plugged into power outlets
+12 Volts, 150W, USB ports
Check HVAC settings (blower, temperature)
Check the audio settings (volume)
After a trip:
Check if any aftermarket equipment was installed
(additional lights, upfitter electrical accessories,
audio systems, alarms) and review specifications if any
(load and Ignition Off Draw currents).
Evaluate the latest driving cycles (distance, driving
time and parking time).
The vehicle should have service performed if the
message is still present during consecutive trips and
the evaluation of the vehicle and driving pattern did not
help to identify the cause.WARNING LIGHTS AND MESSAGES
The warning/indicator lights will illuminate in the
instrument panel together with a dedicated message and/
or acoustic signal when applicable. These indications are
indicative and precautionary and as such must not be
considered as exhaustive and/or alternative to the
information contained in the Owner’s Manual, which you
are advised to read carefully in all cases. Always refer to
the information in this chapter in the event of a failure
indication. All active telltales will display first if applicable.
The system check menu may appear different based upon
equipment options and current vehicle status. Some
telltales are optional and may not appear.
RED WARNING LIGHTS
Air Bag Warning Light
This warning light will illuminate to indicate a
fault with the air bag, and will turn on for four to
eight seconds as a bulb check when the
ignition is placed in the ON/RUN position. This
light will illuminate with a single chime when a fault with
the air bag has been detected, it will stay on until the fault
is cleared. If the light is either not on during startup, stays
on, or turns on while driving, have the system inspected at
an authorized dealer as soon as possible.
Brake Warning Light
This warning light monitors various brake
functions, including brake fluid level and
parking brake application. If the brake light
turns on it may indicate that the parking brake
is applied, that the brake fluid level is low, or that there is
a problem with the Anti-Lock Brake System reservoir. If the light remains on when the parking brake has been
disengaged, and the fluid level is at the full mark on the
master cylinder reservoir, it indicates a possible brake
hydraulic system malfunction or that a problem with the
Brake Booster has been detected by the Anti-Lock Brake
System (ABS) / Electronic Stability Control (ESC) system.
In this case, the light will remain on until the condition has
been corrected. If the problem is related to the brake
booster, the ABS pump will run when applying the brake,
and a brake pedal pulsation may be felt during each stop.
The dual brake system provides a reserve braking capacity
in the event of a failure to a portion of the hydraulic
system. A leak in either half of the dual brake system is
indicated by the Brake Warning Light, which will turn on
when the brake fluid level in the master cylinder has
dropped below a specified level.
The light will remain on until the cause is corrected.
NOTE:The light may flash momentarily during sharp cornering
maneuvers, which change fluid level conditions. The
vehicle should have service performed, and the brake
fluid level checked.
If brake failure is indicated, immediate repair is necessary.
WARNING!
Driving a vehicle with the red brake light on is
dangerous. Part of the brake system may have failed.
It will take longer to stop the vehicle. You could have a
collision. Have the vehicle checked immediately.
3
23_GG_OM_EN_USC_t.book Page 71
Page 101 of 288
STARTING AND OPERATING99
TRAFFIC SIGN RECOGNITION —
IF EQUIPPED
The Traffic Sign Recognition (TSR) system uses a camera
mounted on the windshield, as well as map data when the
vehicle is equipped with Navigation, to detect
recognizable road signs such as:
Speed limits
School zones
No passing zones
NOTE:
The TSR system will automatically display the road sign
detected in the unit of measurement (mph or km/h)
selected within Uconnect Settings, or within the instru -
ment cluster display.
If no speed limit signs are detected, the system will
revert to the speed limit signs that are stored in the
Navigation system.
The system always checks the traffic signs indicating
the current speed limit signs. The system is able to
recognize and display up to two different road signs in
the instrument cluster display.
ACTIVATION/DEACTIVATION
The TSR System can be enabled/disabled within the
Uconnect system Úpage 130. System ON is signaled by
road signs shown on the instrument cluster display.
NOTE:
The TSR system will keep the activated/deactivated
selection in memory between key cycles.
Even if the system is disabled, the speed limit sign will
be displayed when the driver selects it in the Driver
Assist menu.
TRAFFIC SIGN RECOGNITION MODES
TSR has three selectable modes of operation that are
available through the Uconnect system.
Visual
When Visual is selected, the system will alert the driver
when the current speed of the vehicle exceeds the
detected speed limit by showing a graphic in the
instrument cluster display. Visual + Chime
When Visual + Chime is selected, the system will alert the
driver when the current speed of the vehicle exceeds the
detected speed limit by showing a graphic in the
instrument cluster display, and by sounding an audible
alert. The audible alert will last for 10 seconds, and the
visual alert will remain on as long as the vehicle is
exceeding the speed limit.
NOTE:Whenever an audible alert is requested by the TSR
system, the radio is also muted.
TSR Off
When the TSR system is turned off, the system will not
show any traffic signs (unless selected in the Driver Assist
menu, which will show detected speed limit signs), and no
alerts will be issued to the driver.
4
23_GG_OM_EN_USC_t.book Page 99
Page 107 of 288
STARTING AND OPERATING105
PARKSENSE FRONT/REAR PARK ASSIST
SYSTEM — IF EQUIPPED
The ParkSense Park Assist system provides visual and
audible indications of the distance between the rear, and
if equipped, the front fascia/bumper and a detected
obstacle when backing up or moving forward (e.g. during a
parking maneuver).
NOTE:
The system is designed to assist the driver and not to
substitute the driver.
The driver must stay in full control of the vehicle's
acceleration and braking and is responsible for
controlling the vehicle's movements
Úpage 106.
ParkSense will retain the last system state (enabled or
disabled) from the last ignition cycle when the ignition is
changed to the ON/RUN position.
ParkSense is active in DRIVE or REVERSE, as long as the
system is on. The system will remain active until the
vehicle speed is increased to approximately 8 mph
(13 km/h) or above while in DRIVE or NEUTRAL, and
7 mph (11 km/h) or above while in REVERSE. While in
REVERSE and above the system's operating speed, a
warning will appear in the radio touchscreen indicating the
vehicle speed is too fast. The system will become active
again if the vehicle speed is decreased to less than
approximately 6 mph (9 km/h).
PARKSENSE SENSORS
The six ParkSense sensors (four when vehicle is not
equipped with front sensors), located in the rear fascia/
bumper, and the six ParkSense sensors located in the
front fascia/bumper, monitor the area in front and behind
the vehicle that is within the sensors’ field of view.
The front sensors detect obstacles from approximately
12 inches (30 cm) up to 35 inches (90 cm) from the front fascia/bumper. The rear sensors can detect obstacles
from approximately 12 inches (30 cm) up to 59 inches
(150 cm) from the rear fascia/bumper. These distances
depend on the location, type and orientation of the
obstacle in the horizontal direction.
PARKSENSE WARNING DISPLAY
The ParkSense Warning screen will only be displayed if the
settings are selected within the Uconnect system
Úpage 130.
The ParkSense Warning screen is located within the radio
touchscreen, and provides visual warnings to indicate the
distance between the rear fascia/bumper and/or front
fascia/bumper and the detected obstacle.
PARKSENSE DISPLAY
The warning display will turn on indicating the system status
when the vehicle is in REVERSE, or when the vehicle is in
DRIVE or NEUTRAL and an obstacle has been detected.
The system will determine if an obstacle is in course of
collision with the vehicle and will provide a visual warning
to the driver. The system will indicate a detected obstacle
by showing an arc in the left and/or right front or rear
regions based on the object’s distance and location relative to the vehicle. The color of the arc depends on the
distance and position of the obstacle inside or outside the
trajectory.
If the system detects an obstacle outside of the vehicles
trajectory then it will display in grey. When the obstacle
detected is on course of a collision the system will turn
yellow then red. If the obstacle detected is less than
12 inches (30 cm) then a continuous tone will sound and
the corresponding red arc will be displayed.
Front Park Assist Audible Alerts
When an obstacle in course of a collision gets closer to the
vehicle the tone frequency smoothly increases. The
audible alert will remain on until one of the following
conditions occurs:
The vehicle is at a standstill and the gear selector is
moved out of the REVERSE position.
When the obstacle detected is outside of the vehicle
path.
ParkSense will turn off the Front Park Assist audible alert
(chime) after approximately three seconds when an
obstacle has been detected, or if the vehicle is stationary.
NOTE:ParkSense will reduce the volume of the radio, if on, when
the system is sounding an audible tone.
Adjustable Chime Volume Settings
Front and Rear chime volume settings can be selected
from the Uconnect system
Úpage 130.
The chime volume settings include low, medium, and high.
ParkSense will retain its last known configuration state
through ignition cycles.
4
23_GG_OM_EN_USC_t.book Page 105
Page 108 of 288
106STARTING AND OPERATING
(Continued)
ENABLING AND DISABLING PARKSENSE
ParkSense can be enabled and disabled with
the ParkSense switch, located in front of the
center console, to the rear of the gear selector.
When the ParkSense switch is pushed to disable the
system, the LED in the switch will illuminate, and the
display will read “Parksense Off” when the vehicle is
shifted into DRIVE or REVERSE.
NOTE:The ParkSense switch LED will be off when the system is
active.
The ParkSense switch LED will also be illuminated when
ParkSense requires service. If the ParkSense switch is
pushed, and requires service, the ParkSense switch LED
will blink momentarily, and then the LED will be on.
SERVICE THE PARKSENSE PARK ASSIST
S
YSTEM
During vehicle start up, when the ParkSense System has
detected a faulted condition, the instrument cluster will
display a warning message associated with the detected
fault.
If "Sensor Lock" appears in the instrument cluster display,
make sure the outer surface and the underside of the rear
fascia/bumper and/or front fascia/bumper is clean and
clear of snow, ice, mud, dirt or other obstructions and then
cycle the ignition. If the message continues to appear, see
an authorized dealer.
If the "System Not Available" message appears in the
instrument cluster display, see an authorized dealer.
CLEANING THE PARKSENSE SYSTEM
Clean the ParkSense sensors with water, car wash soap
and a soft cloth. Do not use rough or hard cloths. Do not
scratch or poke the sensors. Otherwise, you could damage
the sensors.
PARKSENSE SYSTEM USAGE
P
RECAUTIONS
Ensure that the front and rear fascias/bumpers are
free of snow, ice, mud, dirt and debris to keep the Park -
Sense system operating properly.
Jackhammers, large trucks, and other vibrations could
affect the performance of ParkSense.
When you turn ParkSense off, the display will read
“Parksense Off” when the vehicle is shifted into DRIVE
or REVERSE. Furthermore, once you turn ParkSense
off, it remains off until you turn it on again, even if you
cycle the ignition.
ParkSense, when on, will reduce the volume of the
radio when it is sounding a tone.
Clean the ParkSense sensors regularly, taking care not
to scratch or damage them. The sensors must not be
covered with ice, snow, slush, mud, dirt or debris.
Failure to do so can result in the system not working
properly. The ParkSense system might not detect an
obstacle behind or in front of the fascia/bumper, or it
could provide a false indication that an obstacle is
behind or in front of the fascia/bumper.
Use the ParkSense switch to turn the ParkSense
system off if objects such as bicycle carriers, etc. are
attached to the rear fascia/bumper. Failure to do so
can result in the system misinterpreting a close object
as a sensor problem, causing the “System Not Avail -
able” message to be displayed in the instrument
cluster display.
NOTE:If any objects are attached to the fascia/bumper within a
6.5 ft (2 m) field of view, they will interfere and cause false
alerts and possibly blockage.
There may be a delay in the object detection rate if the
object is moving.
The rear sensors are automatically deactivated when
the trailer’s electric plug is inserted in the vehicle’s tow
socket. The front sensors (if equipped) will stay active
and can provide acoustic and visual warnings. The rear
sensors are automatically reactivated when the
trailer's cable plug is removed.
WARNING!
Drivers must be careful when backing up even when
using ParkSense. Always check carefully behind your
vehicle, look behind you, and be sure to check for
pedestrians, animals, other vehicles, obstructions,
and blind spots before backing up. You are respon -
sible for safety and must continue to pay attention to
your surroundings. Failure to do so can result in
serious injury or death.
23_GG_OM_EN_USC_t.book Page 106
Page 109 of 288
STARTING AND OPERATING107
SIDE DISTANCE WARNING (SDW)
S
YSTEM
The Side Distance Warning system has the function of
detecting the presence of side obstacles near the vehicle
using the parking sensors located in the front and rear
fascias/bumpers.
Side Distance Warning Display
The Side Distance Warning screen will only be displayed if
this feature is enabled within Uconnect Settings
Úpage 130.
The system warns the driver with an acoustic signal, and
when selected, with visual indications on the radio
touchscreen display.
NOTE:ParkSense will reduce the volume of the radio if on when
the system is sounding an audible tone.
Activation/Deactivation
The system can operate only after driving a short distance
and if the vehicle speed is between 0 and 8 mph (0 and
13 km/h) while in DRIVE or NEUTRAL, or 7 mph (11 km/h) in REVERSE. The system can be activated/deactivated via
the Settings menu of the Uconnect system. If the
ParkSense System is deactivated via the ParkSense
switch, then the Side Distance Warning system will
automatically be deactivated.
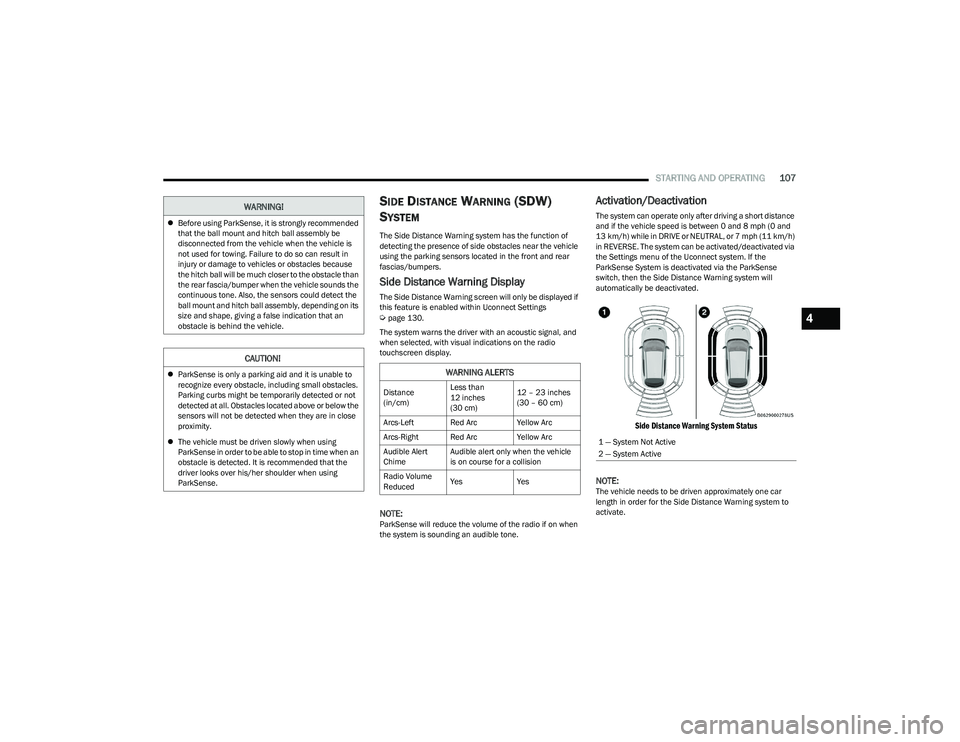
Side Distance Warning System Status
NOTE:
The vehicle needs to be driven approximately one car
length in order for the Side Distance Warning system to
activate.
Before using ParkSense, it is strongly recommended
that the ball mount and hitch ball assembly be
disconnected from the vehicle when the vehicle is
not used for towing. Failure to do so can result in
injury or damage to vehicles or obstacles because
the hitch ball will be much closer to the obstacle than
the rear fascia/bumper when the vehicle sounds the
continuous tone. Also, the sensors could detect the
ball mount and hitch ball assembly, depending on its
size and shape, giving a false indication that an
obstacle is behind the vehicle.
CAUTION!
ParkSense is only a parking aid and it is unable to
recognize every obstacle, including small obstacles.
Parking curbs might be temporarily detected or not
detected at all. Obstacles located above or below the
sensors will not be detected when they are in close
proximity.
The vehicle must be driven slowly when using
ParkSense in order to be able to stop in time when an
obstacle is detected. It is recommended that the
driver looks over his/her shoulder when using
ParkSense.
WARNING!
WARNING ALERTS
Distance
(in/cm) Less than
12 inches
(30 cm)12 – 23 inches
(30 – 60 cm)
Arcs-Left Red Arc Yellow Arc
Arcs-Right Red Arc Yellow Arc
Audible Alert
Chime Audible alert only when the vehicle
is on course for a collision
Radio Volume
Reduced Yes
Yes
1 — System Not Active
2 — System Active
4
23_GG_OM_EN_USC_t.book Page 107
Page 110 of 288
108STARTING AND OPERATING
(Continued)
Side Distance Warning Usage Precautions
Some conditions may influence the performance of the
Side Distance Warning system:
NOTE:
Ensure that the front and rear fascias/bumpers are
free of snow, ice, mud, dirt and debris to keep the
ParkSense system operating properly.
Construction equipment, large trucks, and other vibra -
tions could affect the performance of ParkSense.
ParkSense, when on, will reduce the volume of the
radio when it is sounding a tone.
Clean the ParkSense sensors regularly, taking care not
to scratch or damage them. The sensors must not be
covered with ice, snow, slush, mud, dirt or debris.
Failure to do so can result in the system not working
properly. The ParkSense system might not detect an
obstacle behind or in front of the fascia/bumper, or it
could provide a false indication that an obstacle is
behind or in front of the fascia/bumper.
The presence of a tow hook without a trailer may inter -
fere with the correct operation of the parking sensors.
Before using the ParkSense system, it is recom -
mended to remove the removable tow hook ball
assembly and any attachments from the vehicle when
it is not used for towing operations. If you leave the tow
hook fitted when not towing a trailer, the tow hook
could be detected as an obstacle by the sensors.
Contact your authorized dealer to update the
ParkSense system operations.
PARKSENSE ACTIVE PARK ASSIST SYSTEM —
IF EQUIPPED
The ParkSense Active Park Assist system is intended to
assist the driver during parallel, perpendicular, and
parallel park exit maneuvers by identifying a proper
parking space, providing audible/visual instructions, and
controlling the steering wheel. The ParkSense Active Park
Assist system is defined as “semi-automatic” since the
driver maintains control of the accelerator, gear selector
and brakes. Depending on the driver's parking maneuver
selection, the ParkSense Active Park Assist system is
capable of maneuvering a vehicle into a parallel or a
perpendicular parking space on either side (i.e., driver
side or passenger side), as well as exiting a parallel
parking space.
NOTE:
The driver is always responsible for controlling the
vehicle, responsible for any surrounding objects, and
must intervene as required.
The system is designed to assist the driver and not to
substitute the driver.
WARNING!
Drivers must be careful when backing up even when
using ParkSense. Always check carefully behind your
vehicle, look behind you, and be sure to check for
pedestrians, animals, other vehicles, obstructions,
and blind spots before backing up. You are respon -
sible for safety and must continue to pay attention to
your surroundings. Failure to do so can result in
serious injury or death.
Before using ParkSense, it is strongly recommended
that the ball mount and hitch ball assembly be
disconnected from the vehicle when the vehicle is
not used for towing. Failure to do so can result in
injury or damage to vehicles or obstacles because
the hitch ball will be much closer to the obstacle than
the rear fascia/bumper when the vehicle sounds the
continuous tone. Also, the sensors could detect the
ball mount and hitch ball assembly, depending on its
size and shape, giving a false indication that an
obstacle is behind the vehicle.
CAUTION!
ParkSense is only a parking aid and it is unable to
recognize every obstacle, including small obstacles.
Parking curbs might be temporarily detected or not
detected at all. Obstacles located above or below the
sensors will not be detected when they are in close
proximity.
The vehicle must be driven slowly when using
ParkSense in order to be able to stop in time when
an obstacle is detected. It is recommended that
the driver looks over his/her shoulder when using
ParkSense.
CAUTION!
23_GG_OM_EN_USC_t.book Page 108
Page 111 of 288
STARTING AND OPERATING109
During a semi-automatic maneuver, if the driver
touches the steering wheel after being instructed to
remove their hands from the steering wheel, the
system will cancel, and the driver will be required to
manually complete the parking maneuver.
The system may not work in all conditions (e.g. environ -
mental conditions such as heavy rain, snow, etc., or if
searching for a parking space that has surfaces that
will absorb the ultrasonic sensor waves).
New vehicles from the dealership must have at least
30 miles (48 km) accumulated before the ParkSense
Active Park Assist system is fully calibrated and
performs accurately. This is due to the system’s
dynamic vehicle calibration to improve the perfor -
mance of the feature. The system will also continuously
perform the dynamic vehicle calibration to account for
differences such as over or under inflated tires and
new tires.
ENABLING AND DISABLING THE
P
ARKSENSE ACTIVE PARK ASSIST
S
YSTEM
The ParkSense Active Park Assist system can
be enabled and disabled with the ParkSense
Active Park Assist switch, located in front of the
center console, to the rear of the gear selector. To enable the ParkSense Active Park Assist system, push
the ParkSense Active Park Assist switch once (LED turns
on). Pushing the switch a second time will disable the
system (LED turns off).
The ParkSense Active Park Assist system will turn off
automatically for any of the following conditions:
Parking maneuver is complete.
Vehicle speed is greater than 18 mph (30 km/h) when
searching for a parking space.
Vehicle speed is greater than 5 mph (7 km/h) during
active steering guidance into the parking space.
Steering Wheel is touched during active steering guid -
ance into the parking space.
ParkSense Front and Rear Park Assist switch is
pushed.
Driver's door is opened.
Rear liftgate is opened.
Electronic Stability Control/Anti-lock Braking System
intervention.
The ParkSense Active Park Assist system will allow a
maximum number of shifts between DRIVE and REVERSE.
If the maneuver cannot be completed within the maximum
amount of shifts, the system will cancel and the
instrument cluster display will instruct the driver to
complete the maneuver manually. The ParkSense Active Park Assist system will only operate
and search for a parking space when the following
conditions are present:
Gear selector is in DRIVE.
Ignition is in the RUN position.
ParkSense Active Park Assist switch is activated.
Driver's door is closed.
Rear liftgate is closed.
Vehicle speed is less than 18 mph (30 km/h).
The outer surface and the underside of the front and
rear fascias/bumpers are clean and clear of snow, ice,
mud, dirt or other obstructions.
NOTE:If the vehicle is driven above approximately 15 mph
(25 km/h), the instrument cluster display will instruct the
driver to slow down. If the vehicle is driven above approxi -
mately 18 mph (30 km/h), the system will cancel. The driver must then reactivate the system by pushing the
ParkSense Active Park Assist switch.
When pushed, the LED on the ParkSense Active Park
Assist switch will blink momentarily, and then the LED will
turn off if any of the preceding conditions are not present.
If the vehicle is in any other gear than DRIVE, and an
objected is detected, the system will default to Parallel
Park Exit. A prompt will appear in the radio screen, and the
driver will need to select “Yes” or “No” for a Parallel Park
Exit maneuver. Any other conditions will result in a default
to a Parallel Parking maneuver.
4
23_GG_OM_EN_USC_t.book Page 109
Page 118 of 288
116STARTING AND OPERATING
CHANGING LANESENSE STATUS
The LaneSense system has settings to adjust the intensity
of the torque warning (low/med/high) and the warning
zone sensitivity (early/late) that you can configure through
the Uconnect system
Úpage 130.
NOTE:
When enabled the system operates above 37 mph
(60 km/h) and below 112 mph (180 km/h).
Use of the turn signal suppresses the warnings.
The system will not apply torque to the steering wheel
whenever a safety system engages (Anti-Lock Brakes,
Traction Control System, Electronic Stability Control,
Forward Collision Warning, etc.).
PARKVIEW REAR BACK UP CAMERA
The ParkView Rear Back Up Camera allows you to see an
on-screen image of the rear surroundings of your vehicle
whenever the gear selector is put into REVERSE. The
image will be displayed on the Navigation/Multimedia
radio display screen along with a caution note to
“Check Entire Surroundings” across the top of the screen.
After five seconds this note will disappear. The ParkView
camera is located on the rear of the vehicle above the rear
license plate. When the vehicle is shifted out of REVERSE with camera
delay turned off, the rear camera mode is exited and the
previous screen appears.
Manual Activation Of The Back Up Camera
1. Press the Controls button located in the Vehicle
Controls menu, or within the Apps drawer. This
button can also be configured as a shortcut on the
bottom of the Uconnect display.
2. Press the Back Up Camera button to turn the Rear View Camera system on.
NOTE:The ParkView Rear Back Up Camera has programmable
modes of operation that may be selected through the
Uconnect system
Úpage 130.
When the vehicle is shifted out of REVERSE with camera
delay turned off, the rear camera mode is exited and the
previous screen appears. When the vehicle is shifted out
of REVERSE with camera delay turned on, the camera
image will continue to be displayed for up to 10 seconds
unless the following conditions occur: The vehicle speed
exceeds 8 mph (13 km/h), the vehicle is shifted into PARK, the vehicle’s ignition is placed in the OFF position,
or the user presses the touchscreen X button to exit out of
the camera video display. When enabled, active guidelines are overlaid on the image
to illustrate the width of the vehicle and its projected back
up path based on the steering wheel position. A dashed
center line overlay indicates the center of the vehicle to
assist with parking or aligning to a hitch/receiver.
Different colored zones indicate the distance to the rear of
the vehicle. The following table shows the approximate
distances for each zone:
Zone Distance To The Rear Of
The Vehicle
Red 0 - 1 ft (0 - 30 cm)
Yellow 1 ft - 3 ft (30 cm - 1 m)
Green 3 ft - 9.5 ft (1 m - 3 m)
WARNING!
Drivers must be careful when backing up even when
using the ParkView Rear Back Up Camera. Always
check carefully behind your vehicle, and be sure to
check for pedestrians, animals, other vehicles,
obstructions, or blind spots before backing up. You are
responsible for the safety of your surroundings and
must continue to pay attention while backing up.
Failure to do so can result in serious injury or death.
23_GG_OM_EN_USC_t.book Page 116