fold seats DODGE JOURNEY 2010 1.G User Guide
[x] Cancel search | Manufacturer: DODGE, Model Year: 2010, Model line: JOURNEY, Model: DODGE JOURNEY 2010 1.GPages: 88, PDF Size: 12.49 MB
Page 18 of 88
REAR SEATS
60/40 Split Second-Row Passenger Seats
To Lower The Seatback
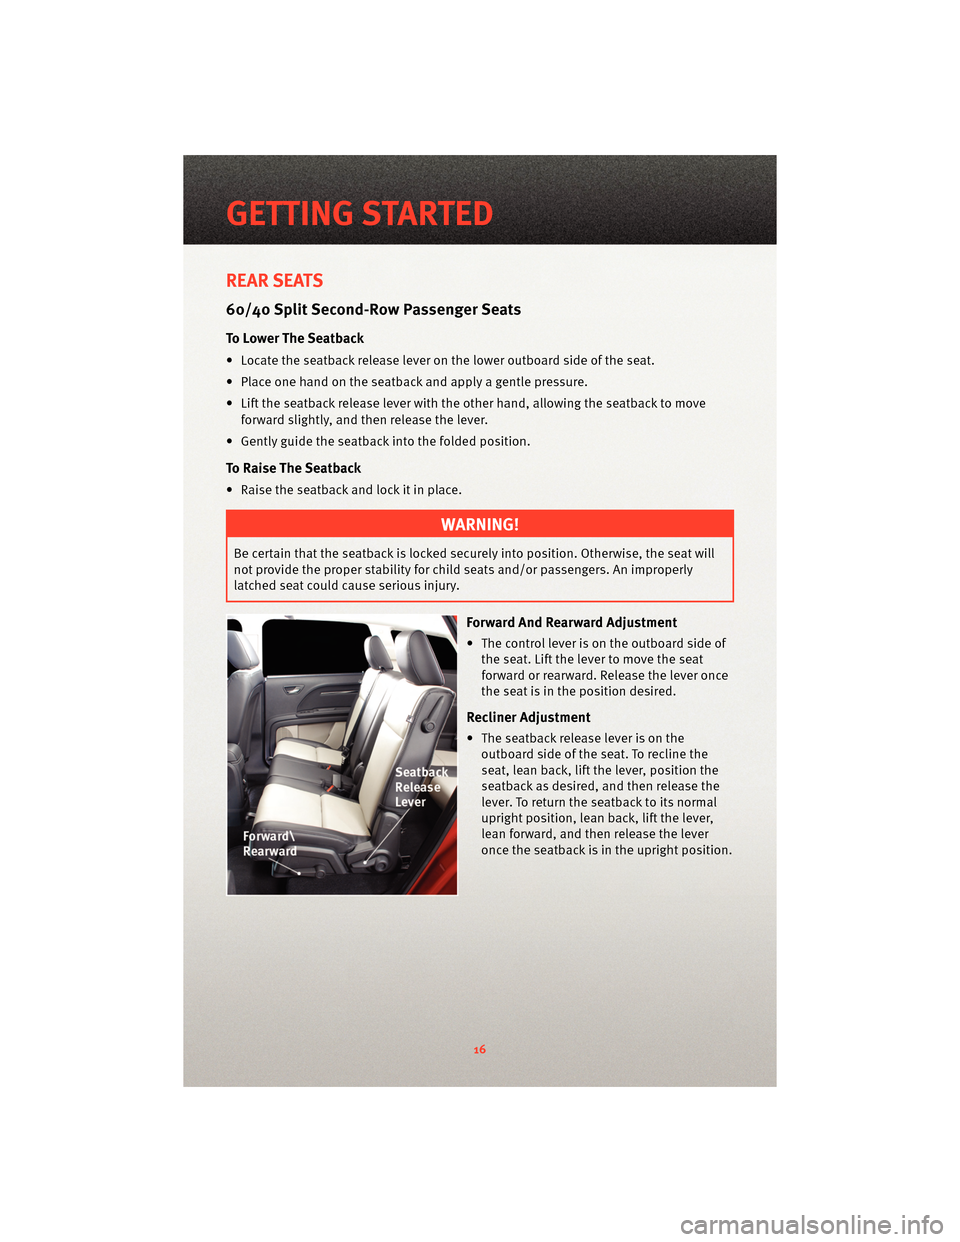
• Locate the seatback release lever on the lower outboard side of the seat.
• Place one hand on the seatback and apply a gentle pressure.
• Lift the seatback release lever with the other hand, allowing the seatback to moveforward slightly, and then release the lever.
• Gently guide the seatback into the folded position.
To Raise The Seatback
• Raise the seatback and lock it in place.
WARNING!
Be certain that the seatback is locked securely into position. Otherwise, the seat will
not provide the proper stability for child seats and/or passengers. An improperly
latched seat could cause serious injury.
Forward And Rearward Adjustment
• The control lever is on the outboard side of the seat. Lift the lever to move the seat
forward or rearward. Release the lever once
the seat is in the position desired.
Recliner Adjustment
• The seatback release lever is on theoutboard side of the seat. To recline the
seat, lean back, lift the lever, position the
seatback as desired, and then release the
lever. To return the seatback to its normal
upright position, lean back, lift the lever,
lean forward, and then release the lever
once the seatback is in the upright position.
GETTING STARTED
16
Page 19 of 88
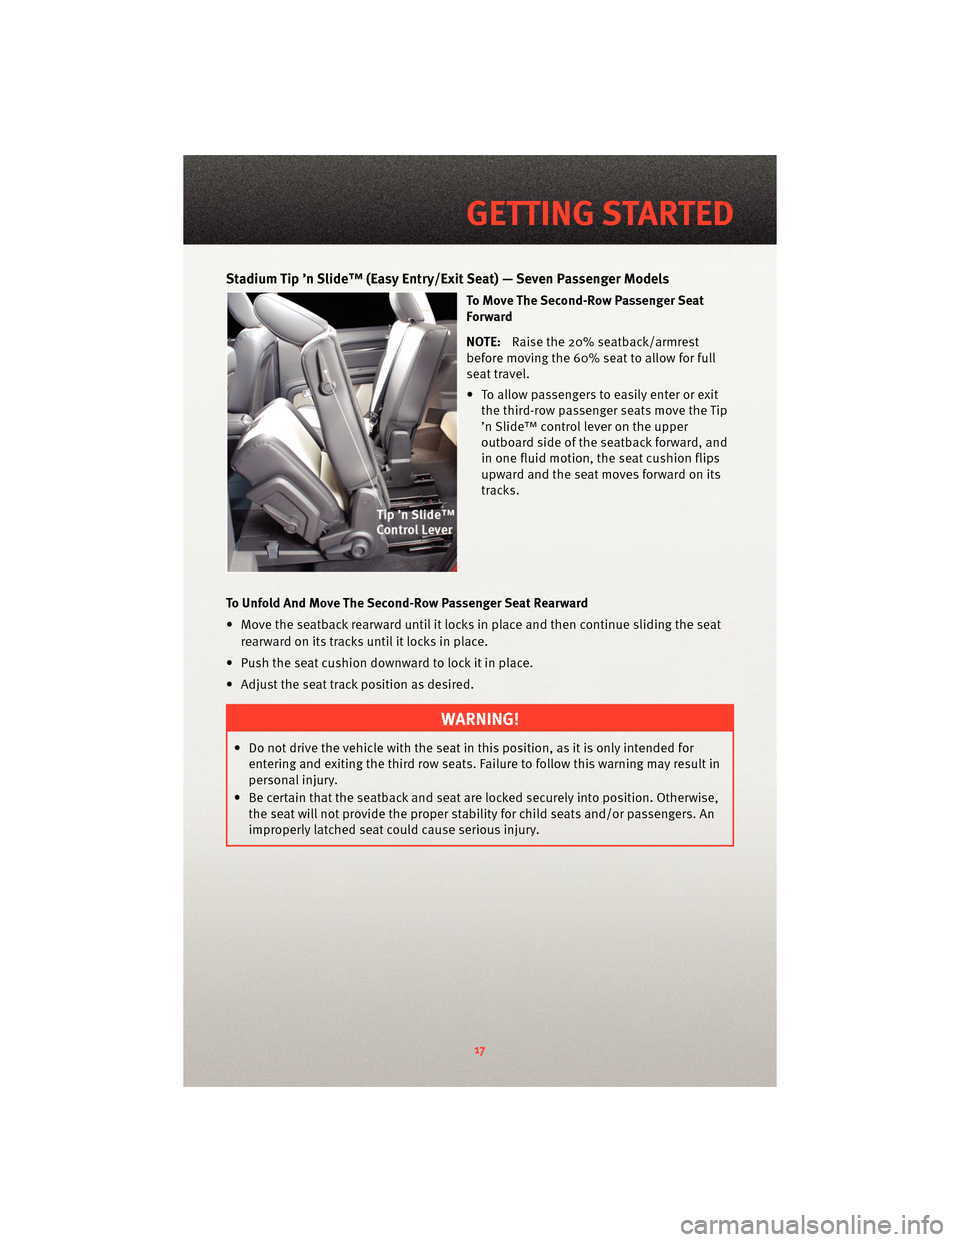
Stadium Tip ’n Slide™ (Easy Entry/ExitSeat) — Seven Passenger Models
To Move The Second-Row Passenger Seat
Forward
NOTE:Raise the 20% seatback/armrest
before moving the 60% seat to allow for full
seat travel.
• To allow passengers to easily enter or exit the third-row passenger seats move the Tip
’n Slide™ control lever on the upper
outboard side of the seatback forward, and
in one fluid motion, the seat cushion flips
upward and the seat moves forward on its
tracks.
To Unfold And Move The Second-Row Passenger Seat Rearward
• Move the seatback rearward until it locks in place and then continue sliding the seat rearward on its tracks until it locks in place.
• Push the seat cushion downward to lock it in place.
• Adjust the seat track position as desired.
WARNING!
• Do not drive the vehicle with the seat in this position, as it is only intended for entering and exiting the third row seats. Failure to follow this warning may result in
personal injury.
• Be certain that the seatback and seat are locked securely into position. Otherwise, the seat will not provide the proper stability for child seats and/or passengers. An
improperly latched seat could cause serious injury.
17
GETTING STARTED
Page 20 of 88
50/50 Split Third-Row Passenger Seats With Fold-Flat Feature
To Fold The Seat
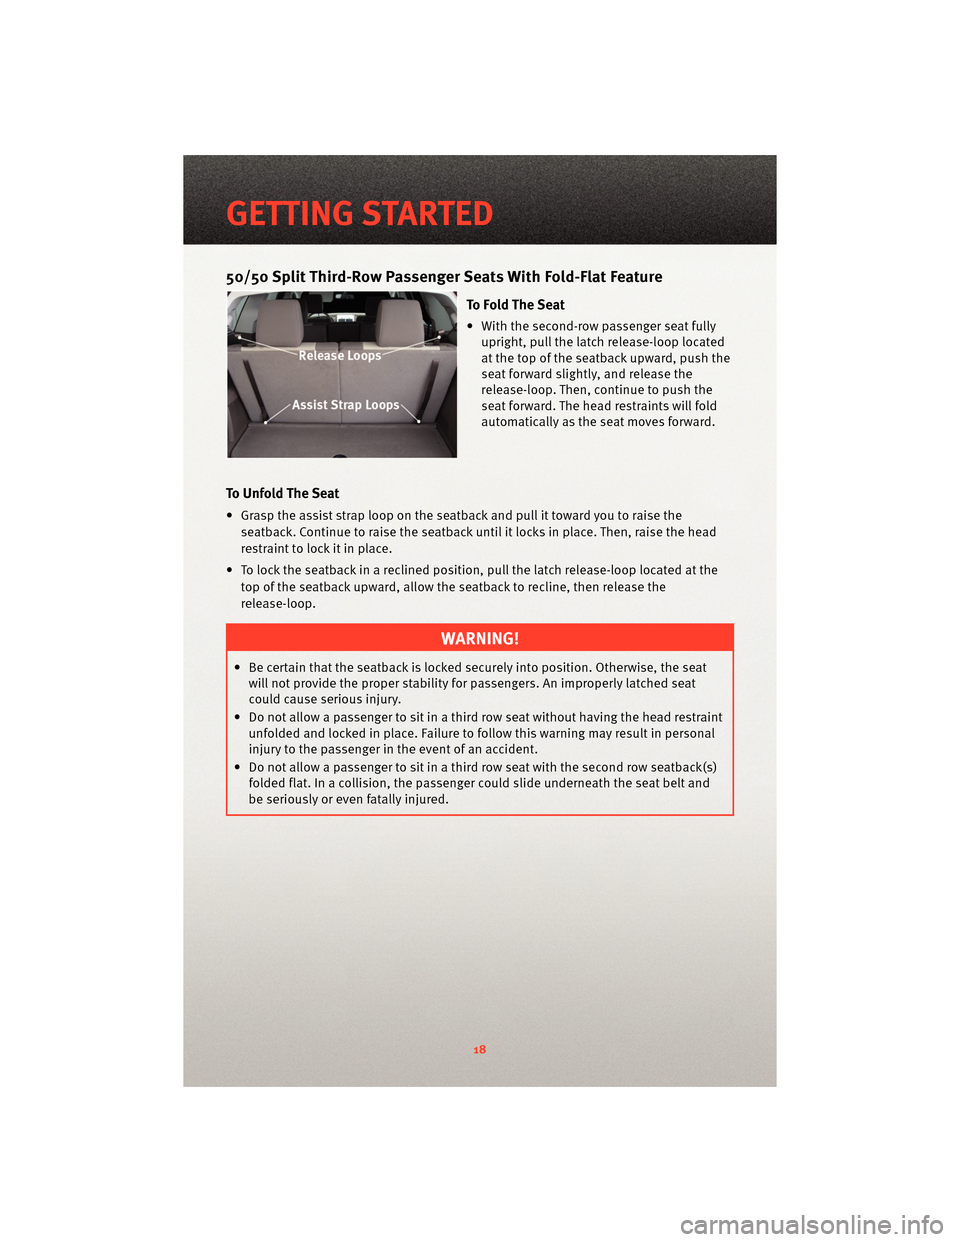
• With the second-row passenger seat fullyupright, pull the latch release-loop located
at the top of the seatback upward, push the
seat forward slightly, and release the
release-loop. Then, continue to push the
seat forward. The head restraints will fold
automatically as the seat moves forward.
To Unfold The Seat
• Grasp the assist s trap loop on the seatback and pull it tow ard you to raise the
seatback. Continue to raise the seatback until it locks in place. Then, raise the head
restraint to lock it in place.
• To lock the seatback in a reclined position, pull the latch release-loop located at the top of the seatback upward, allow the seatback to recline, then release the
release-loop.
WARNING!
• Be certain that the seatback is locked securely into position. Otherwise, the seatwill not provide the proper stability for passengers. An improperly latched seat
could cause serious injury.
• Do not allow a passenger to sit in a third row seat without having the head restraint unfolded and locked in place. Failure to follow this warning may result in personal
injury to the passenger in the event of an accident.
• Do not allow a passenger to sit in a third row seat with the second row seatback(s) folded flat. In a collision, the passenger could slide underneath the seat belt and
be seriously or even fatally injured.
GETTING STARTED
18
Page 58 of 88
Jack Location
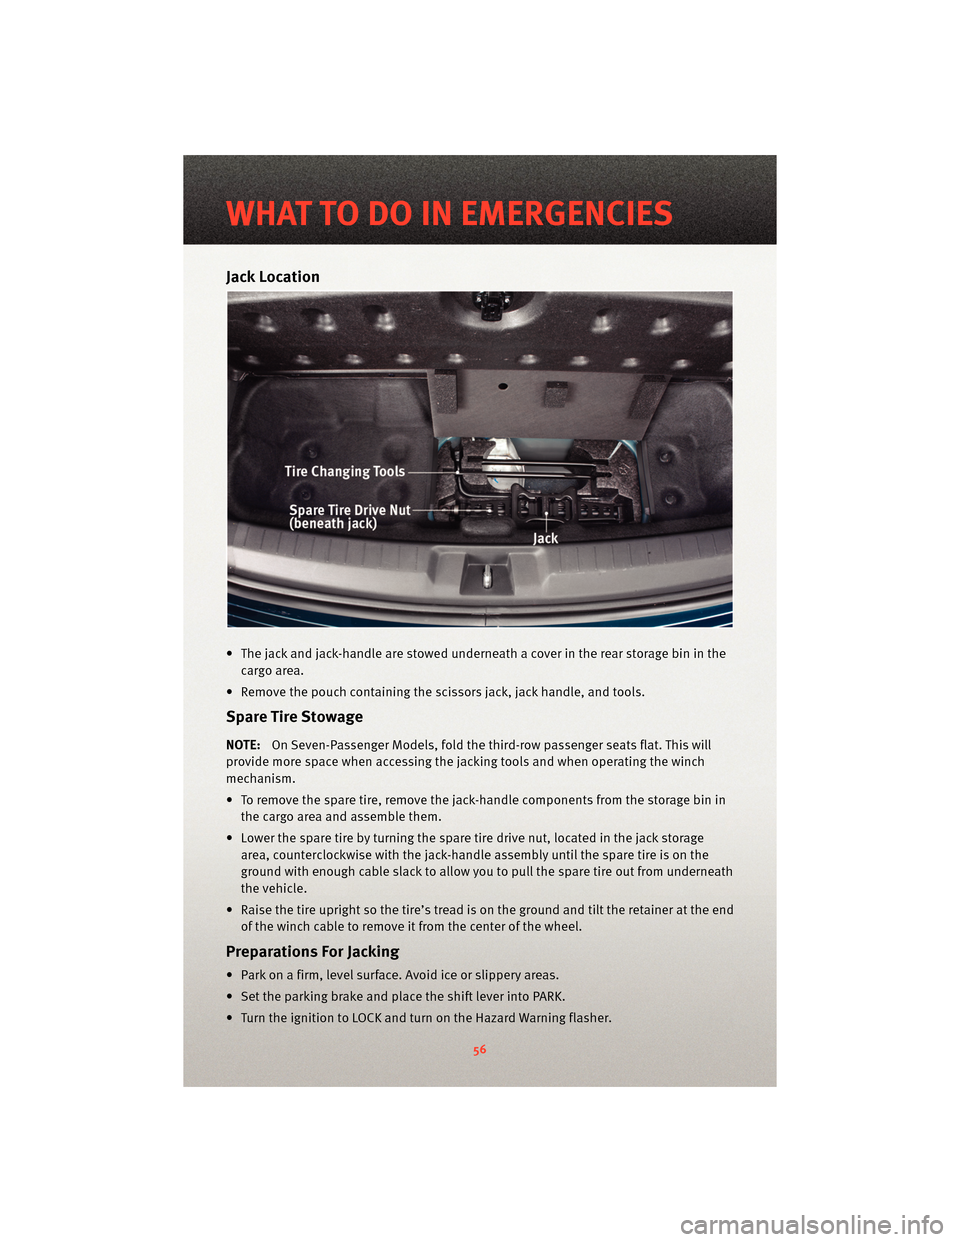
• The jack and jack-handle are stowed underneath a cover in the rear storage bin in thecargo area.
• Remove the pouch containing the scissors jack, jack handle, and tools.
Spare Tire Stowage
NOTE:On Seven-Passenger Models, fold the third-row passenger seats flat. This will
provide more space when accessing the jacking tools and when operating the winch
mechanism.
• To remove the spare tire, remove the jack-handle components from the storage bin in the cargo area and assemble them.
• Lower the spare tire by turning the spare tire drive nut, located in the jack storage area, counterclockwise with the jack-h andle assembly until the spare tire is on the
ground with enough cable slack to allow you to pull the spare tire out from underneath
the vehicle.
• Raise the tire upright so the tire’s tread is o n the ground and tilt the retainer at the end
of the winch cable to remove it from the center of the wheel.
Preparations For Jacking
• Park on a firm, level surface. Avoid ice or slippery areas.
• Set the parking brake and place the shift lever into PARK.
• Turn the ignition to LOCK and turn on the Hazard Warning flasher.
WHAT TO DO IN EMERGENCIES
56
Page 75 of 88
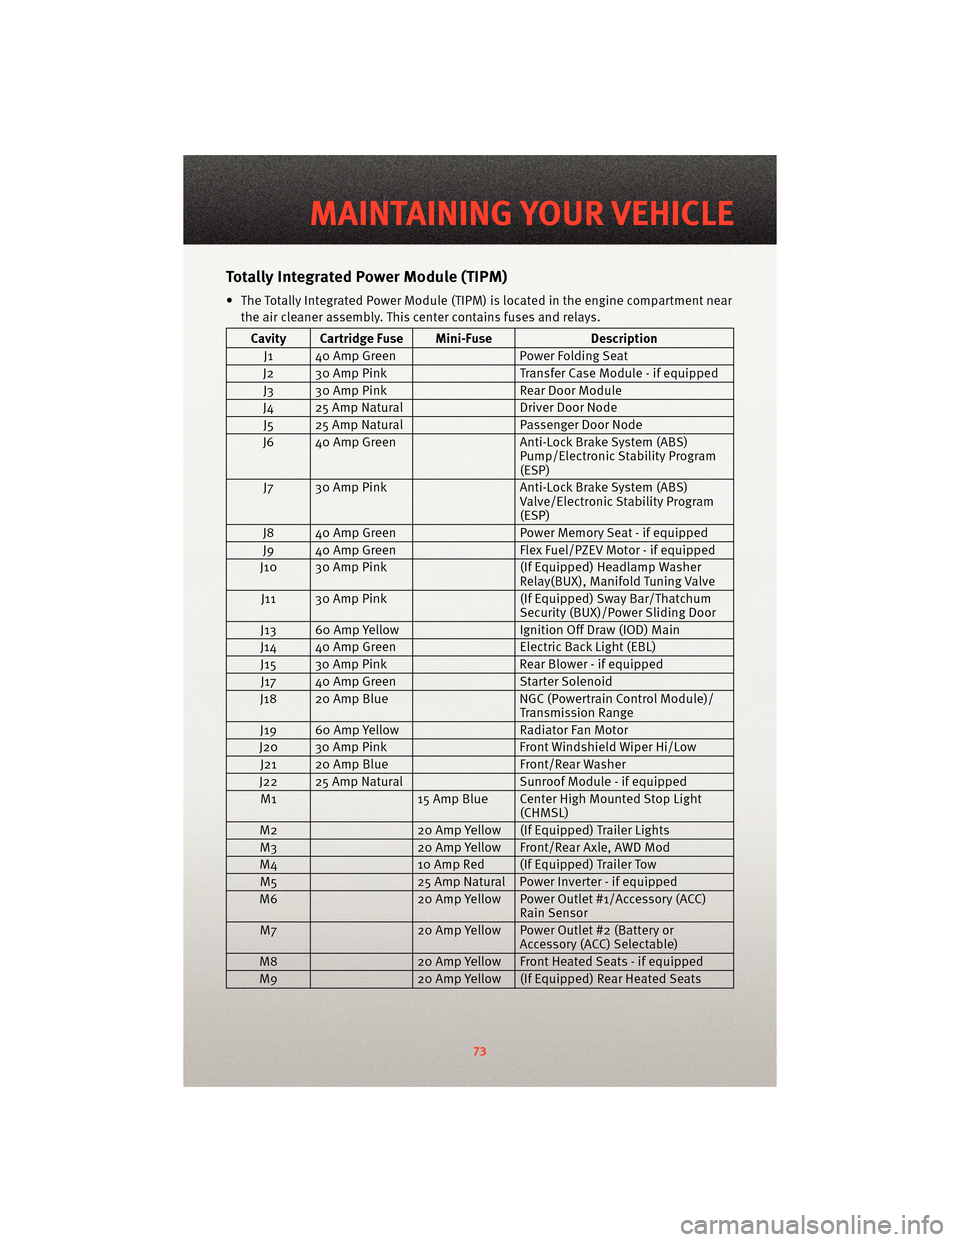
TotallyIntegrated Power Module (TIPM)
• The Totally Integrated Power Module (TIPM) is located in the engine compartment near
the air cleaner assembly. This center contains fuses and relays.
Cavity Cartridge Fuse Mini-Fuse Description
J1 40 Amp Green Power Folding Seat
J2 30 Amp Pink Transfer Case Module - if equipped
J3 30 Amp Pink Rear Door Module
J4 25 Amp Natural Driver Door Node
J5 25 Amp Natural Passenger Door Node
J6 40 Amp Green Anti-Lock Brake System (ABS)
Pump/Electronic Stability Program
(ESP)
J7 30 Amp Pink Anti-Lock Brake System (ABS)
Valve/Electronic Stability Program
(ESP)
J8 40 Amp Green Power Memory Seat - if equipped
J9 40 Amp Green Flex Fuel/PZEV Motor - if equipped
J10 30 Amp Pink (If Equipped) Headlamp Washer
Relay(BUX), Manifold Tuning Valve
J11 30 Amp Pink (If Equipped) Sway Bar/Thatchum
Security (BUX)/Power Sliding Door
J13 60 Amp Yellow Ignition Off Draw (IOD) Main
J14 40 Amp Green Electric Back Light (EBL)
J15 30 Amp Pink Rear Blower - if equipped
J17 40 Amp Green Starter Solenoid
J18 20 Amp Blue NGC (Powertrain Control Module)/
Transmission Range
J19 60 Amp Yellow Radiator Fan Motor
J20 30 Amp Pink Front Windshield Wiper Hi/Low
J21 20 Amp Blue Front/Rear Washer
J22 25 Amp Natural Sunroof Module - if equipped
M1 15 Amp Blue Center High Mounted Stop Light
(CHMSL)
M2 20 Amp Yellow (If Equipped) Trailer Lights
M3 20 Amp Yellow Front/Rear Axle, AWD Mod
M4 10 Amp Red (If Equipped) Trailer Tow
M5 25 Amp Natural Power Inverter - if equipped
M6 20 Amp Yellow Power Outlet #1/Accessory (ACC)
Rain Sensor
M7 20 Amp Yellow Power Outlet #2 (Battery or
Accessory (ACC) Selectable)
M8 20 Amp Yellow Front Heated Seats - if equipped
M9 20 Amp Yellow (If Equipped) Rear Heated Seats
73
MAINTAINING YOUR VEHICLE