tow DODGE JOURNEY 2015 1.G Manual PDF
[x] Cancel search | Manufacturer: DODGE, Model Year: 2015, Model line: JOURNEY, Model: DODGE JOURNEY 2015 1.GPages: 648
Page 560 of 648
4. Install the wiper blade pivot pin into the wiper blade
holder at the end of the wiper arm, and firmly press
the wiper blade until it snaps into place.
5. Lower the wiper blade and snap the pivot cap into
place.
Adding Washer Fluid
The windshield washer and the rear window washer
share the same fluid reservoir. The fluid reservoir is
located in the engine compartment. Be sure to check the
fluid level in the reservoir at regular intervals. Fill the
reservoir with windshield washer solvent (not radiator
antifreeze) and operate the system for a few seconds to
flush out the residual water.
When refilling the washer fluid reservoir, apply some
washer fluid to a cloth or towel and wipe the wiper
blades clean. This will help blade performance.
To prevent freeze-up of your windshield washer system
in cold weather, select a solution or mixture that meets or
exceeds the temperature range of your climate. This
rating information can be found on most washer fluid
containers.
The fluid reservoir will hold nearly 1 gal (4 l) of washer
fluid when the message “LoWASH” appears in the
instrument cluster.
WARNING!
Commercially available windshield washer solvents
are flammable. They could ignite and burn you. Care
must be exercised when filling or working around
the washer solution.
558 MAINTAINING YOUR VEHICLE
Page 563 of 648
To minimize the possibility of catalytic converter dam-
age:
•Do not shut off the engine or interrupt the ignition,
when the transmission is in gear and the vehicle is in
motion.
•Do not try to start the engine by pushing or towing the
vehicle.
•Do not idle the engine with any spark plug wires
disconnected or removed, such as when diagnostic
testing, or for prolonged periods during very rough
idle or malfunctioning operating conditions.
Cooling System
WARNING!
•When working near the radiator cooling fan,
disconnect the fan motor lead or turn the ignition
switch to the LOCK position. The fan is tempera-
ture controlled and can start at any time the igni-
tion switch is in the ON position.
•You or others can be badly burned by hot engine
coolant (antifreeze) or steam from your radiator. If
you see or hear steam coming from under the hood,
do not open the hood until the radiator has had
time to cool. Never try to open a cooling system
pressure cap when the radiator is hot.
Coolant Checks
Check the engine coolant (antifreeze) protection every 12
months (before the onset of freezing weather, where
7
MAINTAINING YOUR VEHICLE 561
Page 580 of 648
CAUTION!
Do not use scouring pads, steel wool, a bristle brush,
or metal polishes. Do not use oven cleaner. These
products may damage the wheel’s protective finish.
Avoid automatic car washes that use acidic solutions
or harsh brushes that may damage the wheel’s pro-
tective finish. Only MOPAR® Wheel Cleaner or
equivalent is recommended.
Stain Repel Fabric Cleaning Procedure — If
Equipped
Stain Repel seats may be cleaned in the following man-
ner:
•Remove as much of the stain as possible by blotting
with a clean, dry towel.
•Blot any remaining stain with a clean, damp towel.
•For tough stains, apply MOPAR® Total Clean, or a
mild soap solution to a clean, damp cloth and remove
stain. Use a fresh, damp towel to remove soap residue.
•For grease stains, apply MOPAR® Multi-Purpose
Cleaner to a clean, damp cloth and remove stain. Use
a fresh, damp towel to remove soap residue.
•Do not use any harsh solvents or any other form of
protectants on Stain Repel products.
Interior Care
Instrument Panel Cover
The instrument panel cover has a low glare surface,
which minimizes reflections in the windshield. Do not
use protectants or other products, which may cause
undesirable reflections. Use soap and warm water to
restore the low glare surface.
578 MAINTAINING YOUR VEHICLE
Page 582 of 648
To minimize the possibility of scratching the lenses and
reducing light output, avoid wiping with a dry cloth. To
remove road dirt, wash with a mild soap solution fol-
lowed by rinsing.
Do not use abrasive cleaning components, solvents, steel
wool or other aggressive material to clean the lenses.
Glass Surfaces
All glass surfaces should be cleaned on a regular basis
with MOPAR® Glass Cleaner, or any commercial
household-type glass cleaner. Never use an abrasive type
cleaner. Use caution when cleaning the inside rear win-
dow equipped with electric defrosters or the right rear
quarter window equipped with the radio antenna. Do
not use scrapers or other sharp instrument that may
scratch the elements.
When cleaning the rear view mirror, spray cleaner on the
towel or rag that you are using. Do not spray cleaner
directly on the mirror.
Cleaning Plastic Instrument Cluster Lenses
The lenses in front of the instruments in this vehicle are
molded in clear plastic. When cleaning the lenses, care
must be taken to avoid scratching the plastic.
1. Clean with a wet soft rag. A mild soap solution may be
used, but do not use high alcohol content or abrasive
cleaners. If soap is used, wipe clean with a clean damp
rag.
2. Dry with a soft cloth.
Seat Belt Maintenance
Do not bleach, dye, or clean the belts with chemical
solvents or abrasive cleaners. This will weaken the fabric.
Sun damage can also weaken the fabric.
580 MAINTAINING YOUR VEHICLE
Page 583 of 648
If the belts need cleaning, use MOPAR® Total Clean, a
mild soap solution, or lukewarm water. Do not remove
the belts from the vehicle to wash them. Dry with a soft
cloth.
Replace the belts if they appear frayed or worn or if the
buckles do not work properly.
WARNING!
A frayed or torn belt could rip apart in a collision and
leave you with no protection. Inspect the belt system
periodically, checking for cuts, frays, or loose parts.
Damaged parts must be replaced immediately. Do
not disassemble or modify the system. Seat belt
assemblies must be replaced after a collision if they
have been damaged (i.e., bent retractor, torn web-
bing, etc.).
Cleaning The Cupholders
Clean with a damp cloth or towel using a mild detergent.
FUSES
WARNING!
•When replacing a blown fuse, always use an ap-
propriate replacement fuse with the same amp
rating as the original fuse. Never replace a fuse
with another fuse of higher amp rating. Never
replace a blown fuse with metal wires or any other
material. Failure to use proper fuses may result in
serious personal injury, fire and/or property dam-
age.
•Before replacing a fuse, make sure that the ignition
is off and that all the other services are switched off
and/or disengaged.
(Continued)
7
MAINTAINING YOUR VEHICLE 581
Page 586 of 648
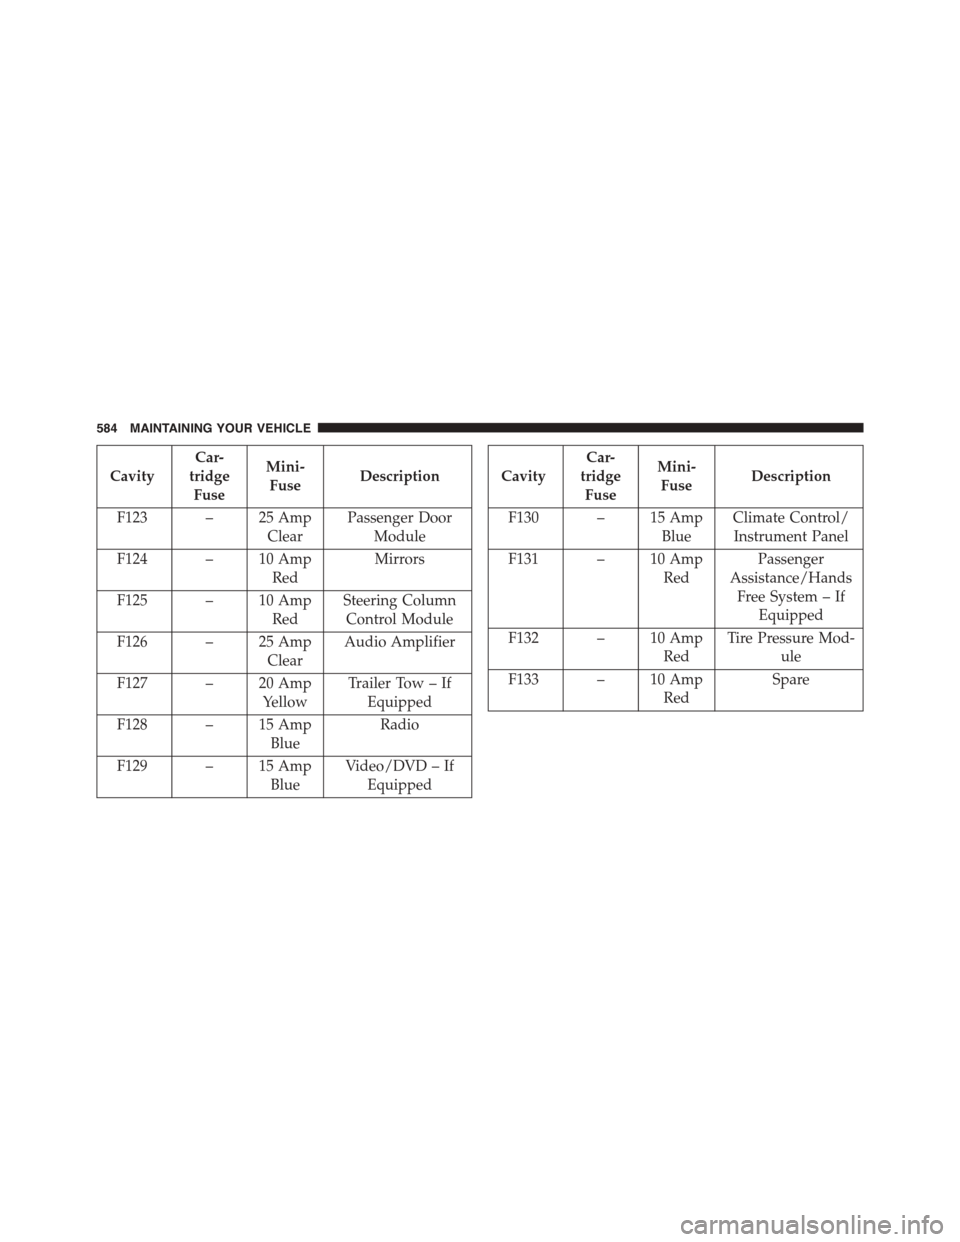
Cavity
Car-
tridge
Fuse
Mini-
FuseDescription
F123 – 25 Amp
Clear
Passenger Door
Module
F124 – 10 Amp
Red
Mirrors
F125 – 10 Amp
Red
Steering Column
Control Module
F126 – 25 Amp
Clear
Audio Amplifier
F127 – 20 Amp
Yellow
Trailer Tow – If
Equipped
F128 – 15 Amp
Blue
Radio
F129 – 15 Amp
Blue
Video/DVD – If
Equipped
Cavity
Car-
tridge
Fuse
Mini-
FuseDescription
F130 – 15 Amp
Blue
Climate Control/
Instrument Panel
F131 – 10 Amp
Red
Passenger
Assistance/Hands
Free System – If
Equipped
F132 – 10 Amp
Red
Tire Pressure Mod-
ule
F133 – 10 Amp
Red
Spare
584 MAINTAINING YOUR VEHICLE
Page 598 of 648
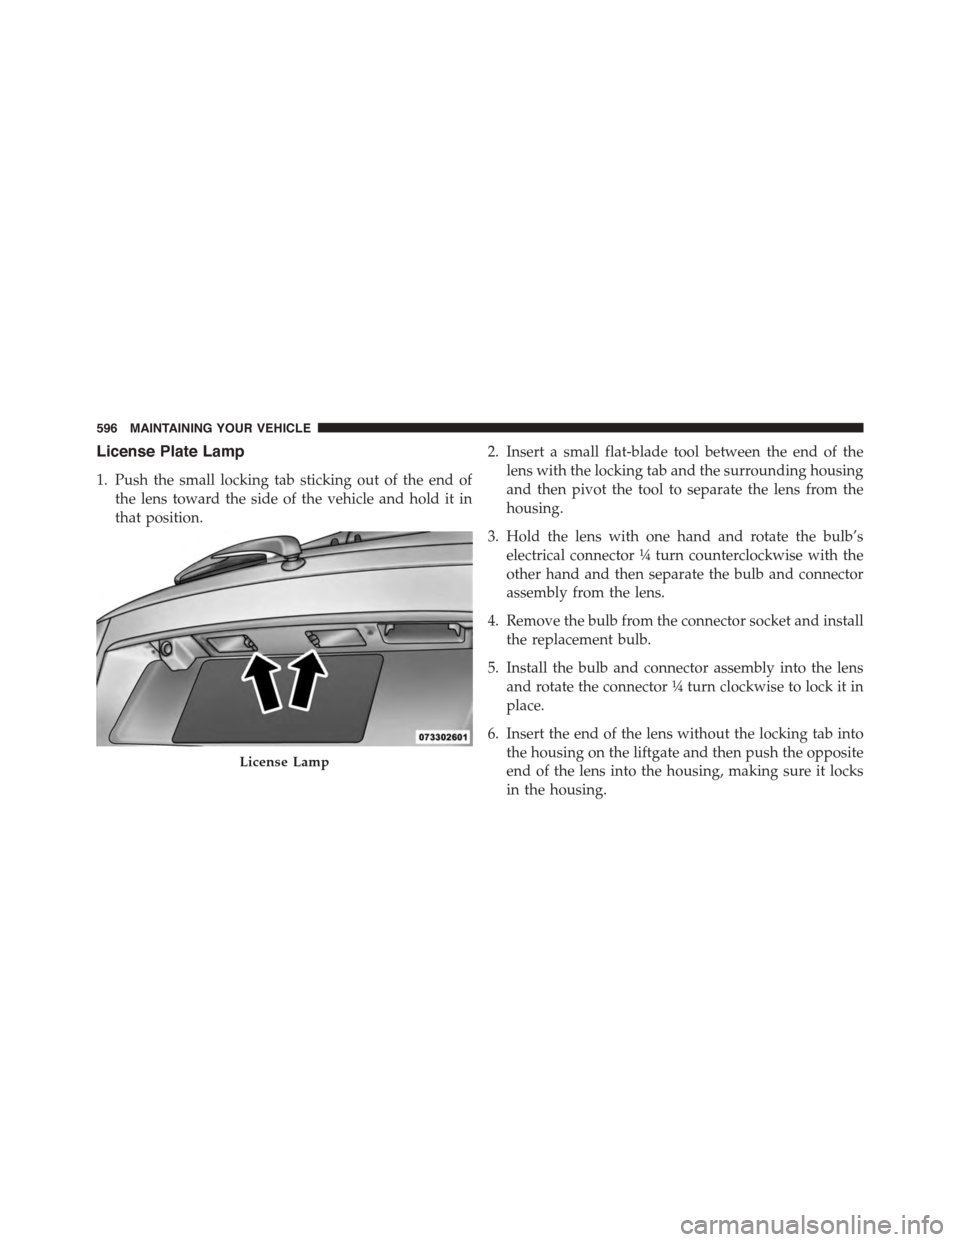
License Plate Lamp
1. Push the small locking tab sticking out of the end of
the lens toward the side of the vehicle and hold it in
that position.
2. Insert a small flat-blade tool between the end of the
lens with the locking tab and the surrounding housing
and then pivot the tool to separate the lens from the
housing.
3. Hold the lens with one hand and rotate the bulb’s
electrical connector¼turn counterclockwise with the
other hand and then separate the bulb and connector
assembly from the lens.
4. Remove the bulb from the connector socket and install
the replacement bulb.
5. Install the bulb and connector assembly into the lens
and rotate the connector¼turn clockwise to lock it in
place.
6. Insert the end of the lens without the locking tab into
the housing on the liftgate and then push the opposite
end of the lens into the housing, making sure it locks
in the housing.
License Lamp
596 MAINTAINING YOUR VEHICLE
Page 606 of 648
MAINTENANCE SCHEDULE
Your vehicle is equipped with an automatic oil change
indicator system. The oil change indicator system will
remind you that it is time to take your vehicle in for
scheduled maintenance.
Based on engine operation conditions, the oil change
indicator message will illuminate. This means that ser-
vice is required for your vehicle. Operating conditions
such as frequent short-trips, trailer tow, extremely hot or
cold ambient temperatures, and E85 fuel usage will
influence when the “Change Oil” or “Oil Change Re-
quired” message is displayed. Severe Operating Condi-
tions can cause the change oil message to illuminate as
early as 3,500 miles (5,600 km) since last reset. Have your
vehicle serviced as soon as possible, within the next 500
miles (805 km).
On Electronic Vehicle Information Center (EVIC)
equipped vehicles, “Oil Change Required” will be dis-
played in the EVIC and a single chime will sound,
indicating that an oil change is necessary.
On Non-EVIC equipped vehicles, “Change Oil” will flash
in the instrument cluster odometer and a single chime
will sound, indicating that an oil change is necessary.
Your authorized dealer will reset the oil change indicator
message after completing the scheduled oil change. If a
scheduled oil change is performed by someone other
than your authorized dealer, the message can be reset by
referring to the steps described under “Electronic Vehicle
Information Center (EVIC)” in “Understanding Your
Instrument Panel” for further information.
NOTE:Under no circumstances should oil change inter-
vals exceed 10,000 miles (16,000 km) or twelve months,
whichever comes first.
8
MAINTENANCE
SCHEDULES
604 MAINTENANCE SCHEDULES
Page 611 of 648
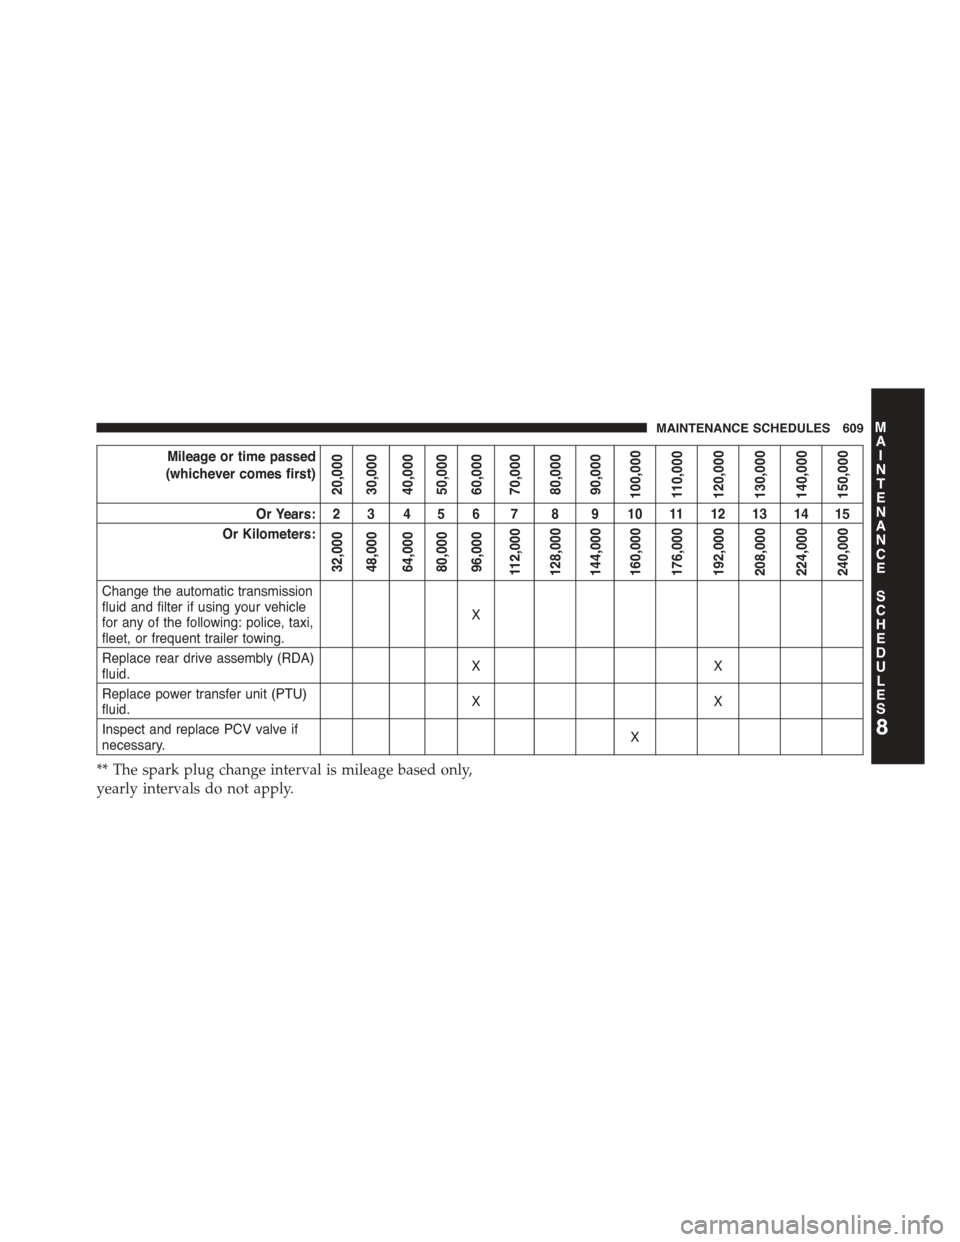
Mileage or time passed
(whichever comes first)
20,00030,00040,00050,00060,00070,00080,00090,000100,000110,000120,000130,000140,000150,000
Or Years: 2 3 4 5 6 7 8 9 10 11 12 13 14 15
Or Kilometers:
32,00048,00064,00080,00096,000112,000128,000144,000160,000176,000192,000208,000224,000240,000
Change the automatic transmissionfluid and filter if using your vehiclefor any of the following: police, taxi,fleet, or frequent trailer towing.
X
Replace rear drive assembly (RDA)fluid.XX
Replace power transfer unit (PTU)fluid.XX
Inspect and replace PCV valve ifnecessary.X
** The spark plug change interval is mileage based only,
yearly intervals do not apply.
8
MAINTENANCE
SCHEDULES
MAINTENANCE SCHEDULES 609
Page 627 of 648
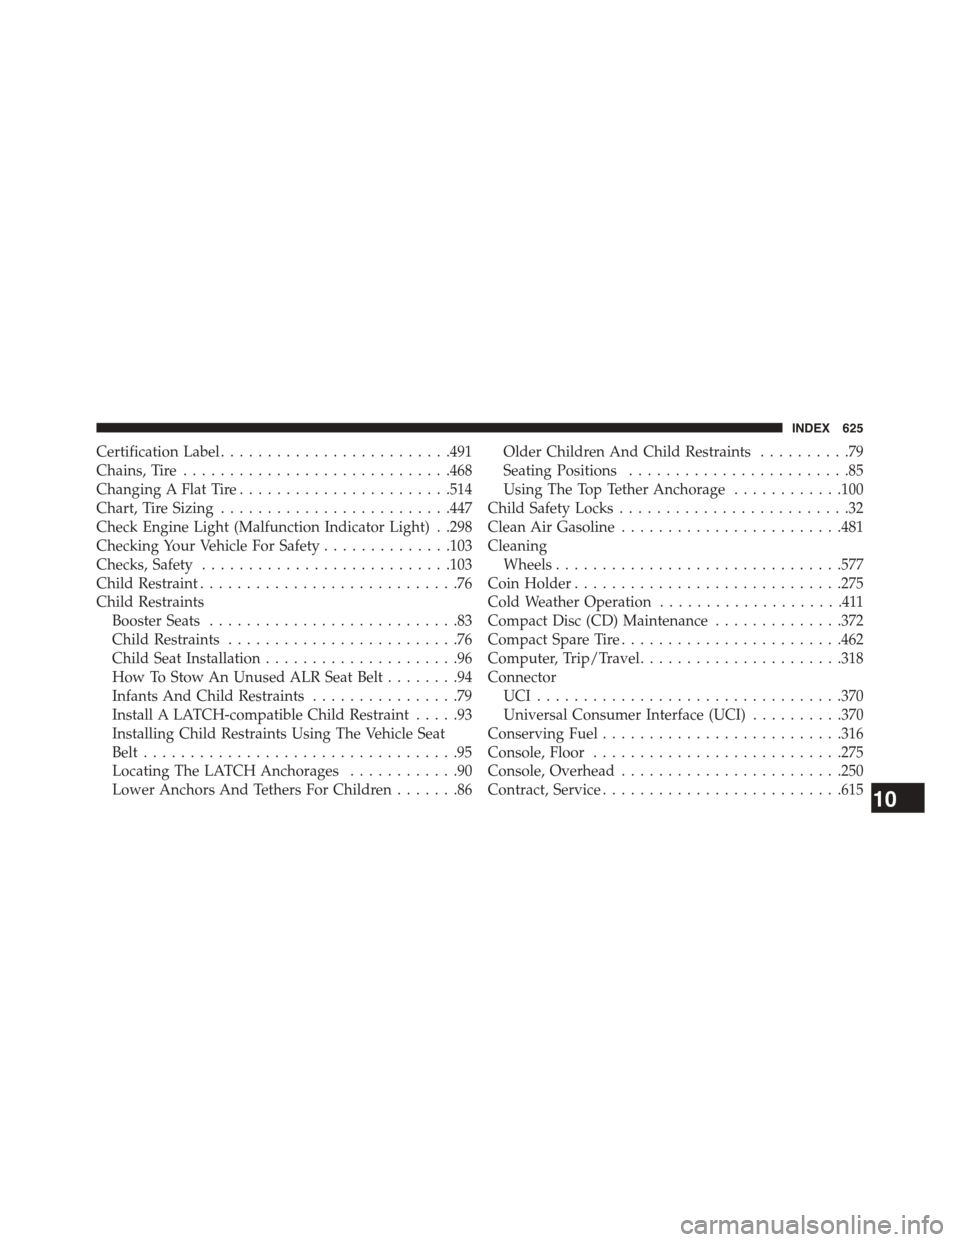
Certification Label.........................491
Chains, Tire.............................468
Changing A Flat Tire.......................514
Chart, Tire Sizing.........................447
Check Engine Light (Malfunction Indicator Light) . .298
Checking Your Vehicle For Safety..............103
Checks, Safety...........................103
Child Restraint............................76
Child Restraints
Booster Seats...........................83
Child Restraints.........................76
Child Seat Installation.....................96
How To Stow An Unused ALR Seat Belt........94
Infants And Child Restraints................79
Install A LATCH-compatible Child Restraint.....93
Installing Child Restraints Using The Vehicle Seat
Belt..................................95
Locating The LATCH Anchorages............90
Lower Anchors And Tethers For Children.......86
Older Children And Child Restraints..........79
Seating Positions........................85
Using The Top Tether Anchorage............100
Child Safety Locks.........................32
Clean Air Gasoline........................481
Cleaning
Wheels...............................577
Coin Holder.............................275
Cold Weather Operation....................411
Compact Disc (CD) Maintenance..............372
Compact Spare Tire........................462
Computer, Trip/Travel......................318
Connector
UCI . . . . . . . . . . . . . . . . . . . . . . . . . . . . . . . ..370
Universal Consumer Interface (UCI)..........370
Conserving Fuel..........................316
Console, Floor...........................275
Console, Overhead........................250
Contract, Service..........................61510
INDEX 625