steering wheel DODGE JOURNEY 2015 1.G Owner's Manual
[x] Cancel search | Manufacturer: DODGE, Model Year: 2015, Model line: JOURNEY, Model: DODGE JOURNEY 2015 1.GPages: 140, PDF Size: 23.09 MB
Page 73 of 140
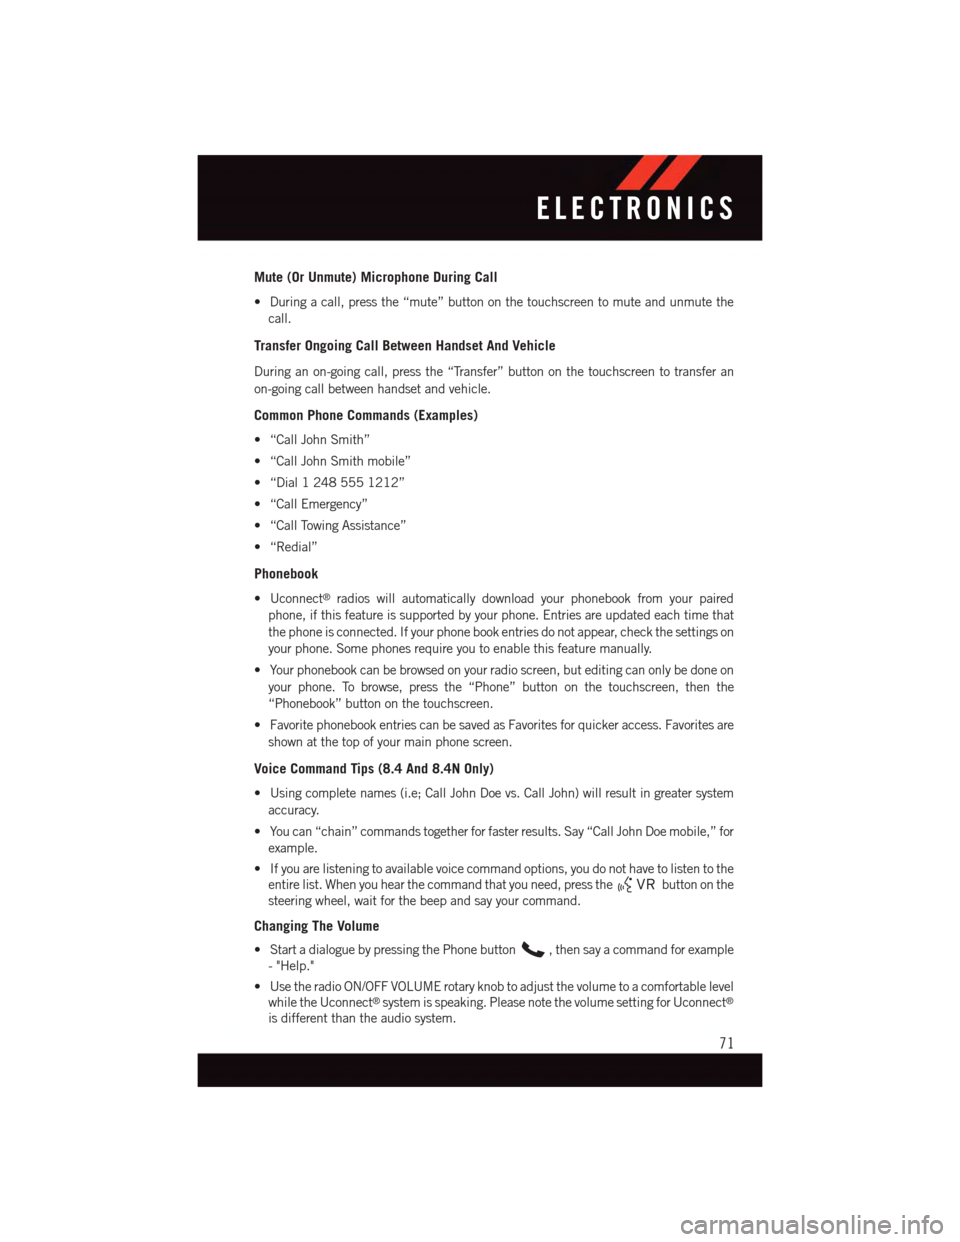
Mute (Or Unmute) Microphone During Call
•Duringacall,pressthe“mute”buttononthetouchscreentomuteandunmutethe
call.
Transfer Ongoing Call Between Handset And Vehicle
During an on-going call, press the “Transfer” button on the touchscreen to transfer an
on-going call between handset and vehicle.
Common Phone Commands (Examples)
•“CallJohnSmith”
•“CallJohnSmithmobile”
•“Dial12485551212”
•“CallEmergency”
•“CallTowingAssistance”
•“Redial”
Phonebook
•Uconnect®radios will automatically download your phonebook from your paired
phone, if this feature is supported by your phone. Entries are updated each time that
the phone is connected. If your phone book entries do not appear, check the settings on
your phone. Some phones require you to enable this feature manually.
•Yourphonebookcanbebrowsedonyourradioscreen,buteditingcanonlybedoneon
your phone. To browse, press the “Phone” button on the touchscreen, then the
“Phonebook” button on the touchscreen.
•FavoritephonebookentriescanbesavedasFavoritesforquickeraccess.Favoritesare
shown at the top of your main phone screen.
Voice Command Tips (8.4 And 8.4N Only)
•Usingcompletenames(i.e;CallJohnDoevs.CallJohn)willresultingreatersystem
accuracy.
•Youcan“chain”commandstogetherforfasterresults.Say“CallJohnDoemobile,”for
example.
•Ifyouarelisteningtoavailablevoicecommandoptions,youdonothavetolistentothe
entire list. When you hear the command that you need, press thebutton on the
steering wheel, wait for the beep and say your command.
Changing The Volume
•StartadialoguebypressingthePhonebutton,thensayacommandforexample
-"Help."
•UsetheradioON/OFFVOLUMErotaryknobtoadjustthevolumetoacomfortablelevel
while the Uconnect®system is speaking. Please note the volume setting for Uconnect®
is different than the audio system.
ELECTRONICS
71
Page 74 of 140
NOTE:
To a c c e s s h e l p , p r e s s t h e U c o n n e c t®Phonebutton on the steering wheel and say
"help." Press the display or push eitherorbutton and say "cancel" to cancel
the help session.
Voice Text Reply
•Uconnect®Phone can read or send new text messages on your mobile phone.
•YourmobilephonemustsupportVoiceTextReplyoverBluetooth®to use this feature.
If the Uconnect®Phone determines your mobile phone is not compatible with Voice
Te x t R e p l y m e s s a g i n g o v e r B l u e t o o t h®,the“Messaging”buttonwillbegreyedoutand
the feature will not be available for use.
NOTE:
•For mobile phone compatibility and pairing instructions, please visit
UconnectPhone.com
•Uconnect®Phone Voice Text Reply is only available when the vehicle is not moving.
WARNING!
•Anyvoicecommandedsystemshouldbeusedonlyinsafedrivingconditions
following applicable laws regarding phone use. Your attention should be focused on
safely operating the vehicle. Failure to do so may result in a collision causing you
and others to be severely injured or killed.
•Inanemergency,touseUconnect®Phone, your mobile phone must be:
•turnedon,
•pairedtoUconnect®Phone,
•andhavenetworkcoverage.
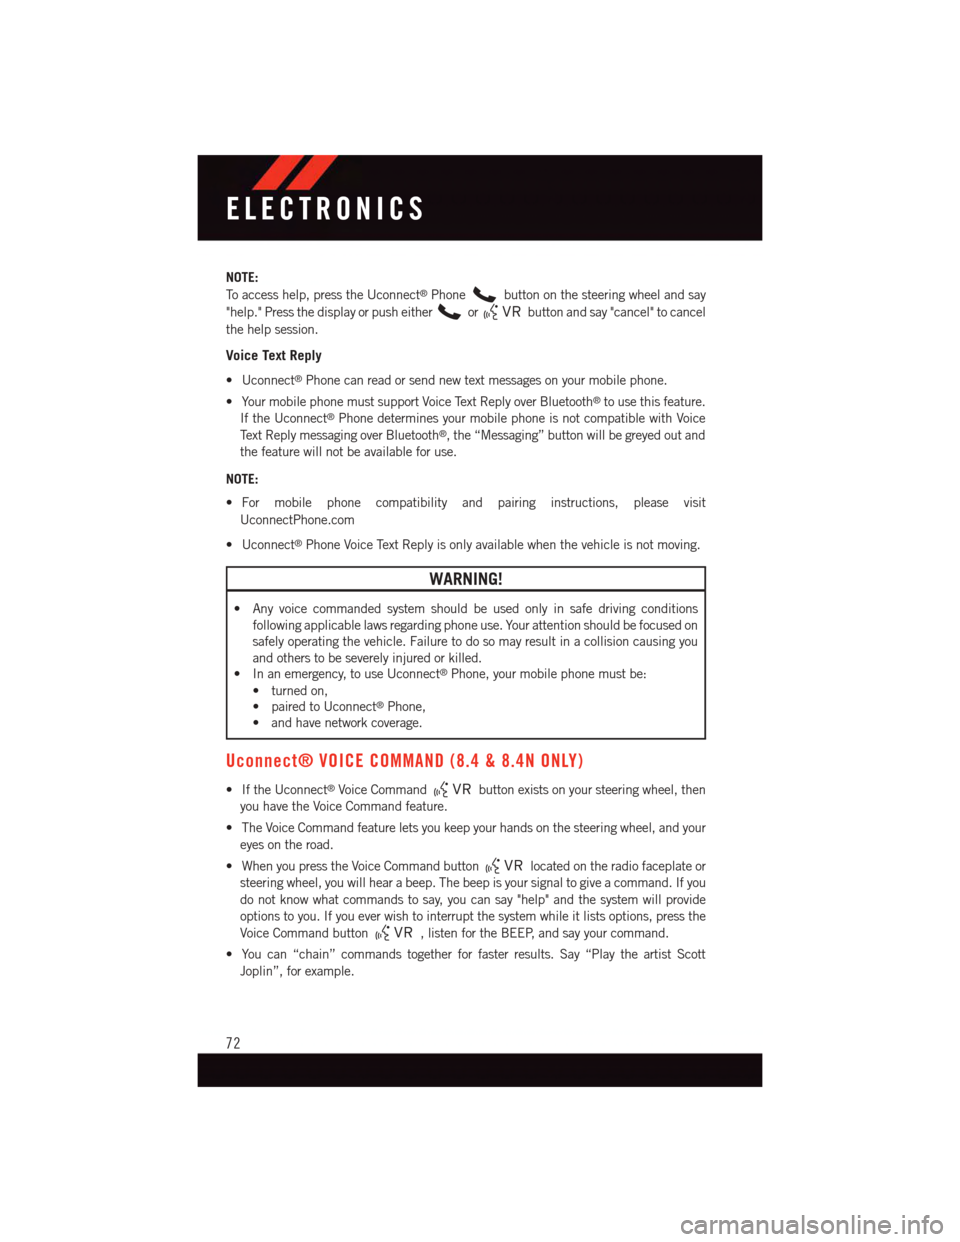
Uconnect® VOICE COMMAND (8.4 & 8.4N ONLY)
•IftheUconnect®Voice Commandbutton exists on your steering wheel, then
you have the Voice Command feature.
•TheVoiceCommandfeatureletsyoukeepyourhandsonthesteeringwheel,andyour
eyes on the road.
•WhenyoupresstheVoiceCommandbuttonlocated on the radio faceplate or
steering wheel, you will hear a beep. The beep is your signal to give a command. If you
do not know what commands to say, you can say "help" and the system will provide
options to you. If you ever wish to interrupt the system while it lists options, press the
Voice Command button,listenfortheBEEP,andsayyourcommand.
•Youcan“chain”commandstogetherforfasterresults.Say“PlaytheartistScott
Joplin”, for example.
ELECTRONICS
72
Page 78 of 140
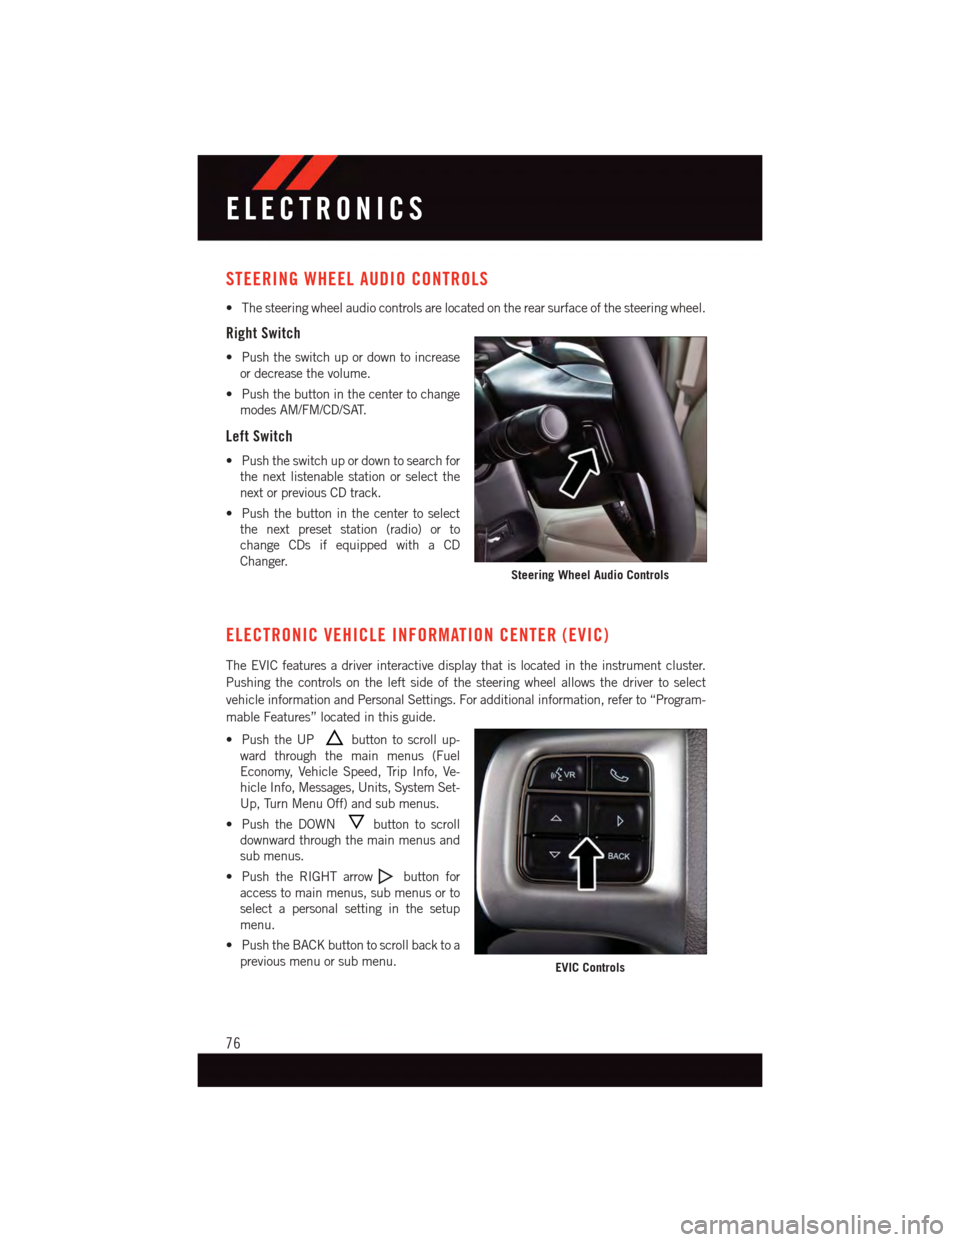
STEERING WHEEL AUDIO CONTROLS
•Thesteeringwheelaudiocontrolsarelocatedontherearsurfaceofthesteeringwheel.
Right Switch
•Pushtheswitchupordowntoincrease
or decrease the volume.
•Pushthebuttoninthecentertochange
modes AM/FM/CD/SAT.
Left Switch
•Pushtheswitchupordowntosearchfor
the next listenable station or select the
next or previous CD track.
•Pushthebuttoninthecentertoselect
the next preset station (radio) or to
change CDs if equipped with a CD
Changer.
ELECTRONIC VEHICLE INFORMATION CENTER (EVIC)
The EVIC features a driver interactive display that is located in the instrument cluster.
Pushing the controls on the left side of the steering wheel allows the driver to select
vehicle information and Personal Settings. For additional information, refer to “Program-
mable Features” located in this guide.
•PushtheUPbutton to scroll up-
ward through the main menus (Fuel
Economy, Vehicle Speed, Trip Info, Ve-
hicle Info, Messages, Units, System Set-
Up, Turn Menu Off) and sub menus.
•PushtheDOWNbutton to scroll
downward through the main menus and
sub menus.
•PushtheRIGHTarrowbutton for
access to main menus, sub menus or to
select a personal setting in the setup
menu.
•PushtheBACKbuttontoscrollbacktoa
previous menu or sub menu.
Steering Wheel Audio Controls
EVIC Controls
ELECTRONICS
76
Page 107 of 140
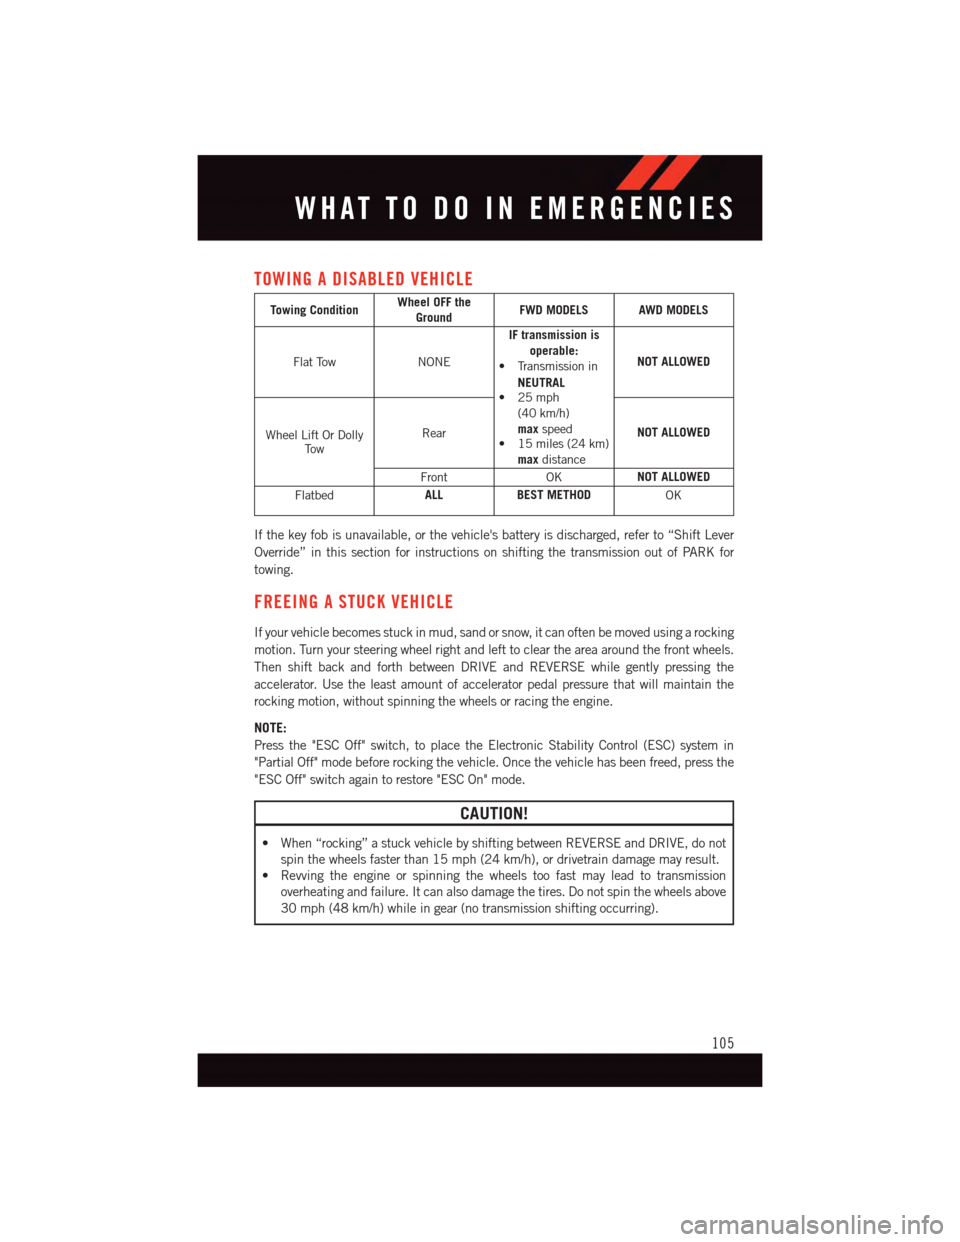
TOWING A DISABLED VEHICLE
Towing ConditionWheel OFF theGroundFWD MODELS AWD MODELS
Flat TowNONE
IF transmission isoperable:•Transmissionin
NEUTRAL•25mph(40 km/h)maxspeed•15miles(24km)maxdistance
NOT ALLOWED
Wheel Lift Or DollyTo w
RearNOT ALLOWED
FrontOKNOT ALLOWED
FlatbedALLBEST METHODOK
If the key fob is unavailable, or the vehicle's battery is discharged, refer to “Shift Lever
Override” in this section for instructions on shifting the transmission out of PARK for
towing.
FREEING A STUCK VEHICLE
If your vehicle becomes stuck in mud, sand or snow, it can often be moved using a rocking
motion. Turn your steering wheel right and left to clear the area around the front wheels.
Then shift back and forth between DRIVE and REVERSE while gently pressing the
accelerator. Use the least amount of accelerator pedal pressure that will maintain the
rocking motion, without spinning the wheels or racing the engine.
NOTE:
Press the "ESC Off" switch, to place the Electronic Stability Control (ESC) system in
"Partial Off" mode before rocking the vehicle. Once the vehicle has been freed, press the
"ESC Off" switch again to restore "ESC On" mode.
CAUTION!
•When“rocking”astuckvehiclebyshiftingbetweenREVERSEandDRIVE,donot
spin the wheels faster than 15 mph (24 km/h), or drivetrain damage may result.
•Revvingtheengineorspinningthewheelstoofastmayleadtotransmission
overheating and failure. It can also damage the tires. Do not spin the wheels above
30 mph (48 km/h) while in gear (no transmission shifting occurring).
WHAT TO DO IN EMERGENCIES
105
Page 121 of 140
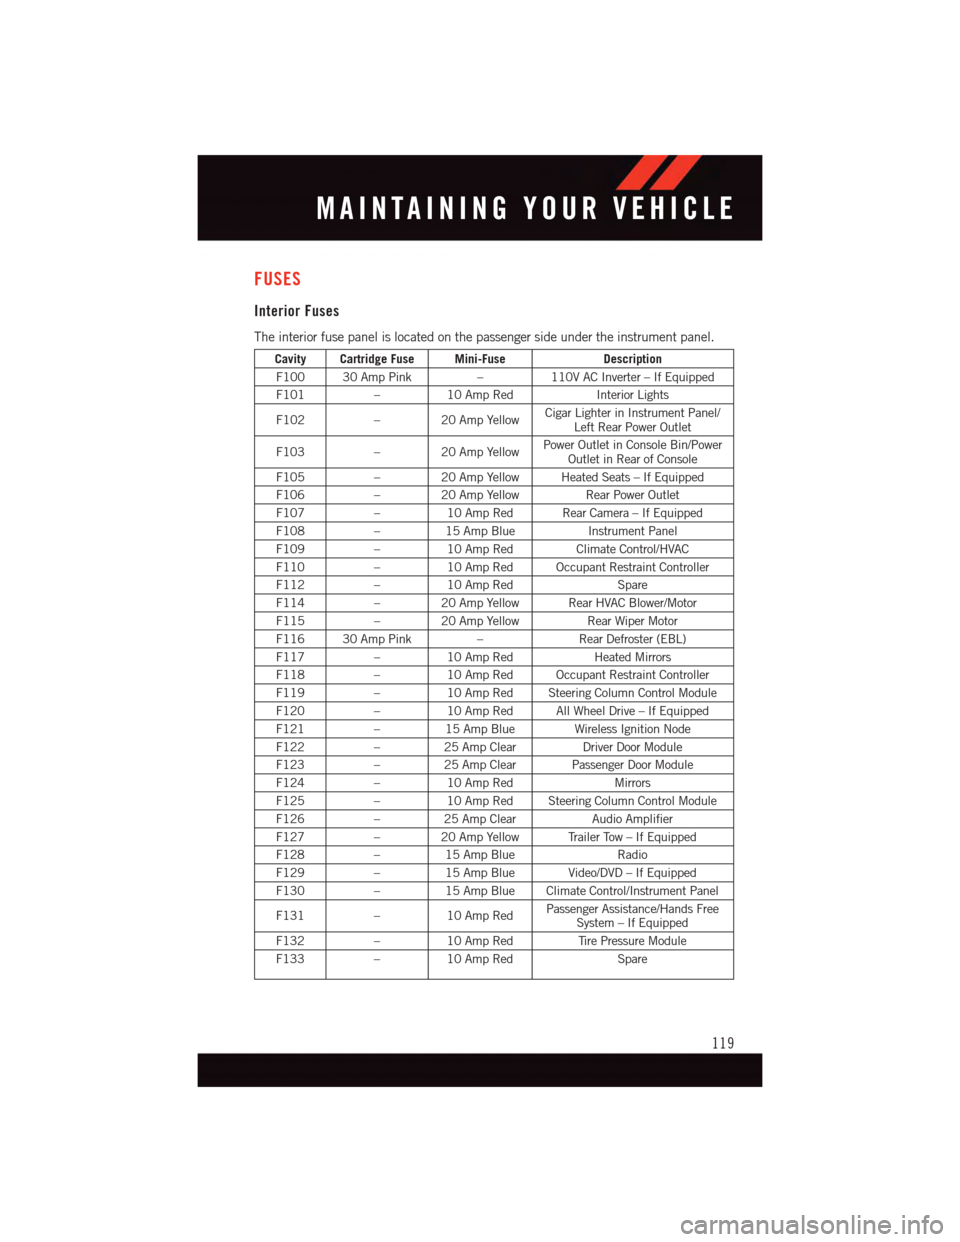
FUSES
Interior Fuses
The interior fuse panel is located on the passenger side under the instrument panel.
Cavity Cartridge Fuse Mini-FuseDescription
F100 30 Amp Pink–110V AC Inverter – If Equipped
F101–10 Amp RedInterior Lights
F102–20AmpYellowCigar Lighter in Instrument Panel/Left Rear Power Outlet
F103–20AmpYellowPower Outlet in Console Bin/PowerOutlet in Rear of Console
F105–20AmpYellowHeatedSeats–IfEquipped
F106–20AmpYellowRear Power Outlet
F107–10 Amp Red Rear Camera – If Equipped
F108–15 Amp BlueInstrument Panel
F109–10 Amp RedClimate Control/HVAC
F110–10 Amp Red Occupant Restraint Controller
F112–10 Amp RedSpare
F114–20AmpYellowRearHVACBlower/Motor
F115–20AmpYellowRear Wiper Motor
F116 30 Amp Pink–Rear Defroster (EBL)
F117–10 Amp RedHeated Mirrors
F118–10 Amp Red Occupant Restraint Controller
F119–10 Amp Red Steering Column Control Module
F120–10 Amp Red All Wheel Drive – If Equipped
F121–15 Amp Blue Wireless Ignition Node
F122–25 Amp ClearDriver Door Module
F123–25 Amp Clear Passenger Door Module
F124–10 Amp RedMirrors
F125–10 Amp Red Steering Column Control Module
F126–25 Amp ClearAudio Amplifier
F127–20AmpYellowTrailerTow–IfEquipped
F128–15 Amp BlueRadio
F129–15 Amp Blue Video/DVD – If Equipped
F130–15 Amp Blue Climate Control/Instrument Panel
F131–10 Amp RedPassenger Assistance/Hands FreeSystem – If Equipped
F132–10 Amp RedTi r e P r e s s u r e M o d u l e
F133–10 Amp RedSpare
MAINTAINING YOUR VEHICLE
119
Page 123 of 140
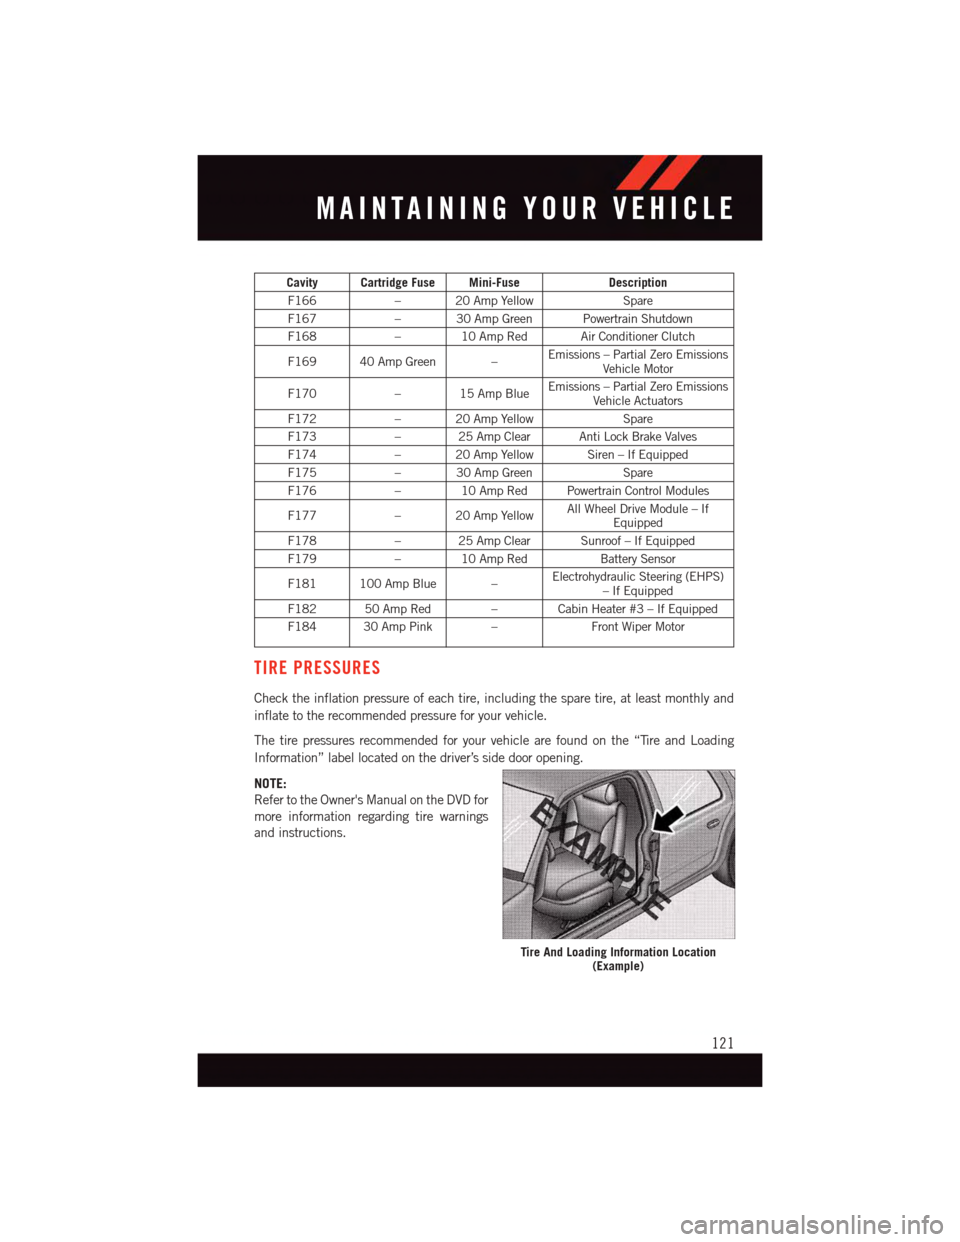
Cavity Cartridge Fuse Mini-FuseDescription
F166–20AmpYellowSpare
F167–30AmpGreenPowertrainShutdown
F168–10AmpRedAirConditionerClutch
F169 40 Amp Green –Emissions – Partial Zero EmissionsVehicle Motor
F170–15AmpBlueEmissions – Partial Zero EmissionsVehicle Actuators
F172–20AmpYellowSpare
F173–25AmpClearAntiLockBrakeValves
F174–20AmpYellowSiren–IfEquipped
F175–30AmpGreenSpare
F176–10AmpRedPowertrainControlModules
F177–20AmpYellowAll Wheel Drive Module – IfEquipped
F178–25AmpClearSunroof–IfEquipped
F179–10AmpRedBattery Sensor
F181 100 Amp Blue –Electrohydraulic Steering (EHPS)–IfEquipped
F182 50 Amp Red – Cabin Heater #3 – If Equipped
F184 30 Amp Pink –Front Wiper Motor
TIRE PRESSURES
Check the inflation pressure of each tire, including the spare tire, at least monthly and
inflate to the recommended pressure for your vehicle.
The tire pressures recommended for your vehicle are found on the “Tire and Loading
Information” label located on the driver’s side door opening.
NOTE:
Refer to the Owner's Manual on the DVD for
more information regarding tire warnings
and instructions.
Tire And Loading Information Location(Example)
MAINTAINING YOUR VEHICLE
121
Page 124 of 140
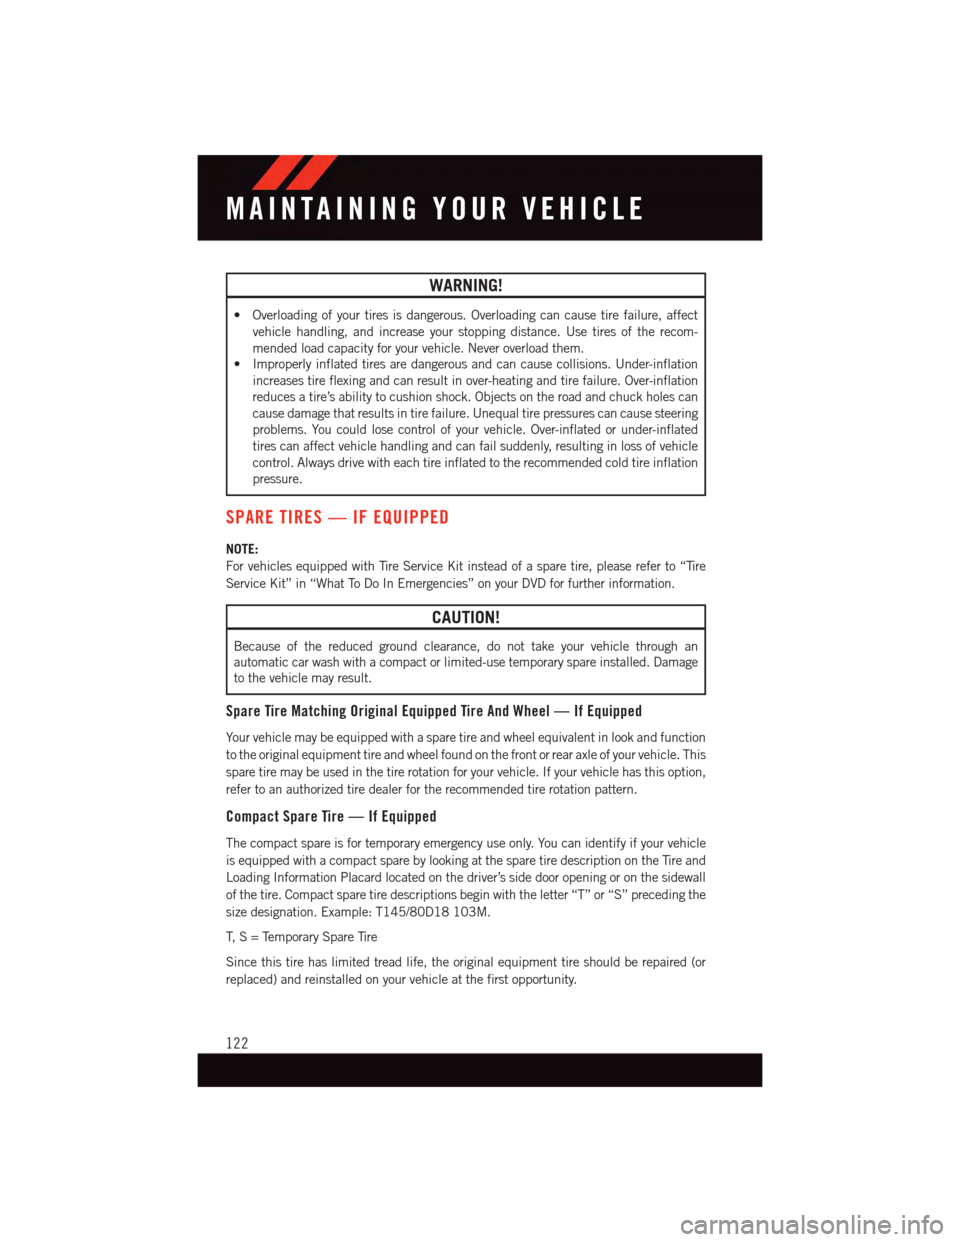
WARNING!
•Overloadingofyourtiresisdangerous.Overloadingcancausetirefailure,affect
vehicle handling, and increase your stopping distance. Use tires of the recom-
mended load capacity for your vehicle. Never overload them.
•Improperlyinflatedtiresaredangerousandcancausecollisions.Under-inflation
increases tire flexing and can result in over-heating and tire failure. Over-inflation
reduces a tire’s ability to cushion shock. Objects on the road and chuck holes can
cause damage that results in tire failure. Unequal tire pressures can cause steering
problems. You could lose control of your vehicle. Over-inflated or under-inflated
tires can affect vehicle handling and can fail suddenly, resulting in loss of vehicle
control. Always drive with each tire inflated to the recommended cold tire inflation
pressure.
SPARE TIRES — IF EQUIPPED
NOTE:
For vehicles equipped with Tire Service Kit instead of a spare tire, please refer to “Tire
Service Kit” in “What To Do In Emergencies” on your DVD for further information.
CAUTION!
Because of the reduced ground clearance, do not take your vehicle through an
automatic car wash with a compact or limited-use temporary spare installed. Damage
to the vehicle may result.
Spare Tire Matching Original Equipped Tire And Wheel — If Equipped
Yo u r v e h i c l e m a y b e e q u i p p e d w i t h a s p a r e t i r e a n d w h e e l e q u i v a l e n t i n l o o k a n d f u n c t i o n
to the original equipment tire and wheel found on the front or rear axle of your vehicle. This
spare tire may be used in the tire rotation for your vehicle. If your vehicle has this option,
refer to an authorized tire dealer for the recommended tire rotation pattern.
Compact Spare Tire — If Equipped
The compact spare is for temporary emergency use only. You can identify if your vehicle
is equipped with a compact spare by looking at the spare tire description on the Tire and
Loading Information Placard located on the driver’s side door opening or on the sidewall
of the tire. Compact spare tire descriptions begin with the letter “T” or “S” preceding the
size designation. Example: T145/80D18 103M.
T, S = Temporary Spare Tire
Since this tire has limited tread life, the original equipment tire should be repaired (or
replaced) and reinstalled on your vehicle at the first opportunity.
MAINTAINING YOUR VEHICLE
122
Page 133 of 140
Disposal
Antifreeze (Engine Coolant)....114
Driver Cockpit..............46
Electronics
Yo u r Ve h i c l e ' s S o u n d S y s t e m....46
Electronic Speed Control (Cruise
Control) . . . . . . . . . . . . . . . .38
Electronic Throttle Control Warning
Light . . . . . . . . . . . . . . . . .87Electronic Vehicle Information Center(EVIC) . . . . . . . . . . . . . .76, 77Electronic Vehicle Information Center(EVIC) Display . . . . . . . . . . . . .6Emergency, In Case ofFreeing Vehicle When Stuck . . .105Jacking . . . . . . . . . . . . . . .93Overheating . . . . . . . . . . . . .92To w i n g . . . . . . . . . . . . . . . . 8 6EngineAir Cleaner.............114Break-In Recommendations....35Checking Oil Level.........114Compartment............108Coolant (Antifreeze)........112Cooling . . . . . . . . . . . . . . .114Malfunction Indicator(Check Engine)...........90Oil . . . . . . . . . . . . . .112, 114Oil Change Interval.........91Oil Filler Cap...........114Oil Selection . . . . . . . . .112, 114Overheating . . . . . . . . . . . . .92Event Data Recorder..........106EVIC Display . . . . . . . . . . . . . . . .6Exhaust System............114
FA Q . . . . . . . . . . . . . . . . . . . 1 2 9FiltersAir Cleaner.............114Engine Oil..........112, 114Engine Oil Disposal........114FlashersTu r n S i g n a l.............91Fluid, Brake . . . . . . . . . . . . . .114Fluid Capacities............112Fluid Level ChecksBrake . . . . . . . . . . . . . . .114
Power Steering..........114
Fluids, Lubricants and Genuine
Parts . . . . . . . . . . . . . . . . .112
Fog Lights . . . . . . . . . . . . . .37, 91
Folding Front Passenger Seat......28
Folding Rear Seat............30
Freeing A Stuck Vehicle . . . . . . . .105
Frequently Asked Questions......129
Front Heated Seats...........32
FuelOctane Rating . . . . . . . . . . .112Specifications...........112Ta n k C a p a c i t y...........112Fuse . . . . . . . . . . . . . . . . . .119Fuses . . . . . . . . . . . . . . . . . .119
Garage Door Opener (HomeLink®)...78GaugesSpeedometer.............6Ta c h o m e t e r..............6General Maintenance.........114Glass Cleaning.............114GPS Navigation (Uconnect®gps)....59
HeadlightsAutomatic . . . . . . . . . . . . . .37Cleaning..............114Head Restraints.............25Heated Mirrors..............43Heated Seats..............32Heated Steering Wheel.........33High Beam Indicator..........91HomeLink®(Garage Door Opener) . . .78Hood Release.............107
Identifying Your Radio..........48Instrument Cluster............6Indicators . . . . . . . . . . . . . . .6Instrument Panel Cover........114Instrument Panel Lens Cleaning . . .114Interior and Instrument Lights......5Interior Appearance Care.......114Interior Fuses..............119Intermittent Wipers (Delay Wipers) . . .36Introduction................2Inverter Outlet (115V)..........81Inverter, Power..............81iPod®/USB/MP3 Control......57,65
INDEX
131
Page 135 of 140
Unlock The Doors...........8Replacement Bulbs..........124Reporting Safety Defects.......127Resetting Oil Change Indicator.....91Restraint, Head.............25Rocking Vehicle When Stuck.....105
Satellite Radio (Uconnect®studios) . .55Seat Belt Maintenance........114Seat BeltsAdjustable Shoulder Belt......15Pretensioners............15Reminder..............89Seats. . . . . . . . . . . . . . . . .27, 28Adjustment.............28Folding Front Passenger......28Heated . . . . . . . . . . . . . . .32Manual................28Power................27Rear Folding............30Security Alarm..............91Security Alarm............14Selection of Coolant (Antifreeze) . . .112Shift Lever Override..........104Signals, Turn . . . . . . . . . . . .36, 91SIRIUS Travel Link . . . . . . . . . . .64Spare Tire . . . . . . . . . .93,122, 123Spark Plugs . . . . . . . . . . . . . .112SpecificationsFuel (Gasoline)..........112Oil . . . . . . . . . . . . . . . . .112Speed ControlAccel/Decel.............38Cancel................39Resume . . . . . . . . . . . . . . .39Set . . . . . . . . . . . . . . . . . .38SteeringTi l t C o l u m n . . . . . . . . . . . . . 3 4Wheel, Heated...........33Steering Wheel Audio Controls.....76Stuck, Freeing . . . . . . . . . . . . .105Supplemental Restraint System -Airbag . . . . . . . . . . . . . . . . .16
Te m p e r a t u r e C o n t r o l ,Automatic (ATC) . . . . . . . . . . .40
Te t h e r A n c h o r, C h i l d R e s t r a i n t . . . 2 1 , 2 3Ti l t S t e e r i n g C o l u m n . . . . . . . . . . . 3 4Ti r e sAir Pressure . . . . . . . . . . . .121Changing..............93Compact Spare..........122Jacking...............93Pressure Warning Light . . . . . . .87Spare Tire..............93To w i n g . . . . . . . . . . . . . . . . . . 8 4Behind a Motorhome........85Disabled Vehicle . . . . . . . . . .105Recreational.............85To w i n g V e h i c l e B e h i n d a M o t o r h o m e . . 8 5Tr a c t i o n C o n t r o l . . . . . . . . . . . . . 9 1Tr a i l e r To w i n gTr a i l e r a n d To n g u e W e i g h t.....84Tr a i l e r W e i g h t . . . . . . . . . . . . . . 8 4Tr a n s m i s s i o nFluid . . . . . . . . . . . . . . . .114Maintenance............114Tu r n S i g n a l s.............36,91
Uconnect®Voice Command.......72Underhood Fuses...........120Universal Garage Door Opener(HomeLink®). . . . . . . . . . . . .78USB Port . . . . . . . . . . . . . . . . .65
Video Entertainment System™ (Rear SeatVideo System) . . . . . . . . . . . .75Voice Command.............72
WasherAdding Fluid............114Rear.................36Washers, Windshield . . . . . . . . . .36Washing Vehicle . . . . . . . . . . . .114Wheel and Wheel Trim.........114Wheel and Wheel Trim Care . . .114, 124Wind Buffeting. . . . . . . . . . . . . .45Windshield Washers...........36Windshield Wiper Blades.......114Windshield Wipers . . . . . . . . . . . .36Wiper Blade Replacement.......114Wiper, Rear................36
INDEX
133