DODGE JOURNEY 2015 1.G Service Manual
Manufacturer: DODGE, Model Year: 2015, Model line: JOURNEY, Model: DODGE JOURNEY 2015 1.GPages: 140, PDF Size: 23.09 MB
Page 41 of 140

To Decrease Speed
When the Electronic Speed Control is set, you can decrease speed by pushing the SET-
button.
The speed decrement shown is dependant on the chosen speed unit of U.S. (MPH) or
Metric (km/h):
U.S. Speed (MPH)
•PushingtheSET-button once will result in a 1 MPH decrease in set speed. Each
subsequent tap of the button results in a decrease of 1 MPH.
•Ifthebuttoniscontinuallypushed,thesetspeedwillcontinuetodecreaseuntilthe
button is released, then the new set speed will be established.
Metric Speed (km/h)
•PushingtheSET-button once will result in a 2 km/h decrease in set speed. Each
subsequent tap of the button results in a decrease of 2 km/h.
•Ifthebuttoniscontinuallypushed,thesetspeedwillcontinuetodecreaseuntilthe
button is released, then the new set speed will be established.
Resume
To r e s u m e a p r e v i o u s l y s e l e c t e d s e t s p e e d i n m e m o r y, p u s h t h e R E S + b u t t o n a n d r e l e a s e .
Cancel
Push the CANCEL button, or apply the brakes to cancel the set speed and maintain the set
speed memory.
Push the ON/OFF button to turn the system off and erase the set speed memory.
WARNING!
•LeavingtheElectronicSpeedControlsystemonwhennotinuseisdangerous.You
could accidentally set the system or cause it to go faster than you want. You could
lose control and have a collision. Always leave the Electronic Speed Control system
off when you are not using it.
•ElectronicSpeedControlcanbedangerouswherethesystemcannotmaintaina
constant speed. Your vehicle could go too fast for the conditions, and you could lose
control. A collision could be the result. Do not use Electronic Speed Control in
heavy traffic or on roads that are winding, icy, snow-covered or slippery.
OPERATING YOUR VEHICLE
39
Page 42 of 140
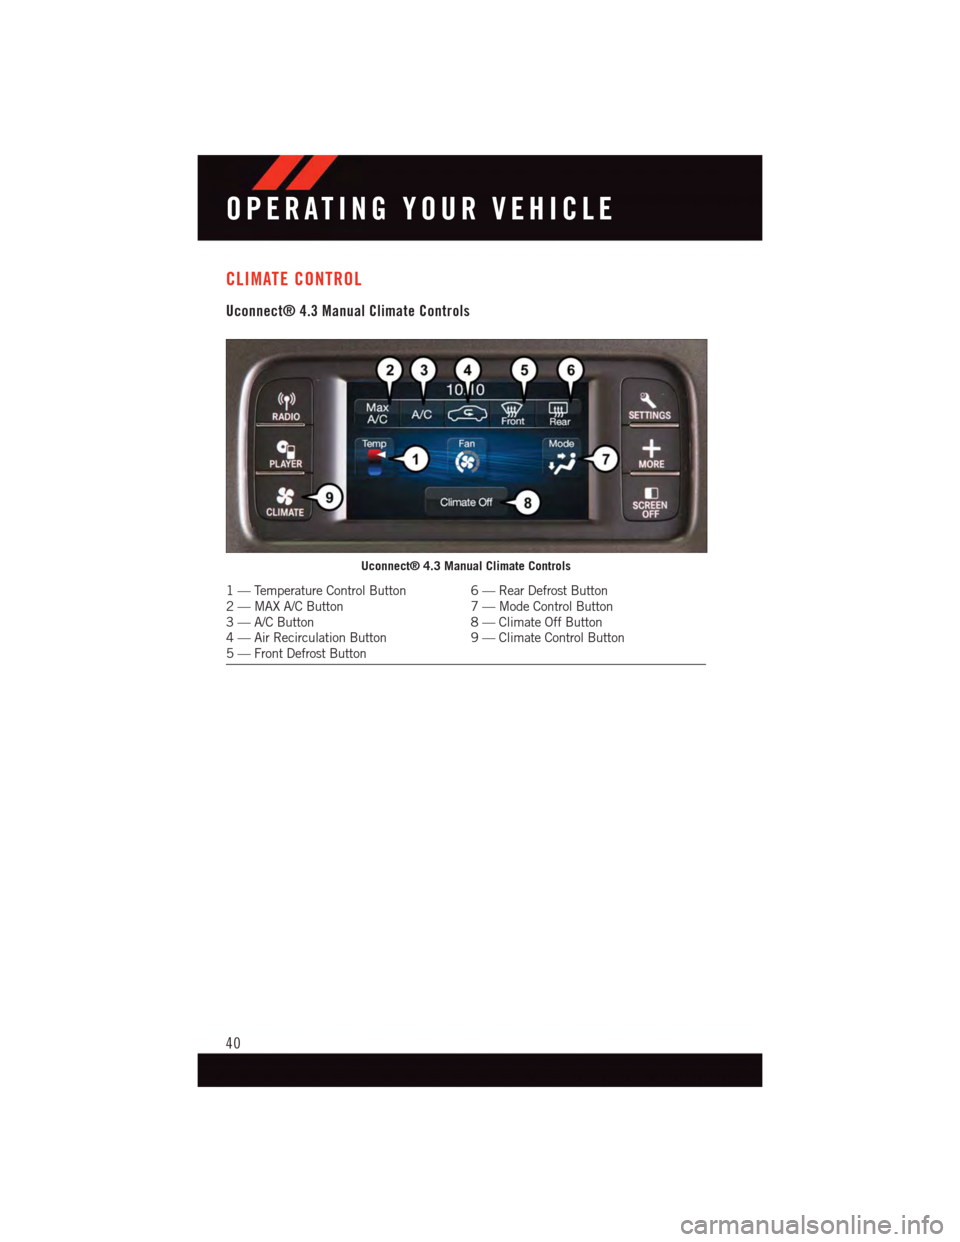
CLIMATE CONTROL
Uconnect® 4.3 Manual Climate Controls
Uconnect® 4.3 Manual Climate Controls
1—TemperatureControlButton 6—RearDefrostButton2—MAXA/CButton 7—ModeControlButton3—A/CButton 8—ClimateOffButton4—AirRecirculationButton 9—ClimateControlButton5—FrontDefrostButton
OPERATING YOUR VEHICLE
40
Page 43 of 140
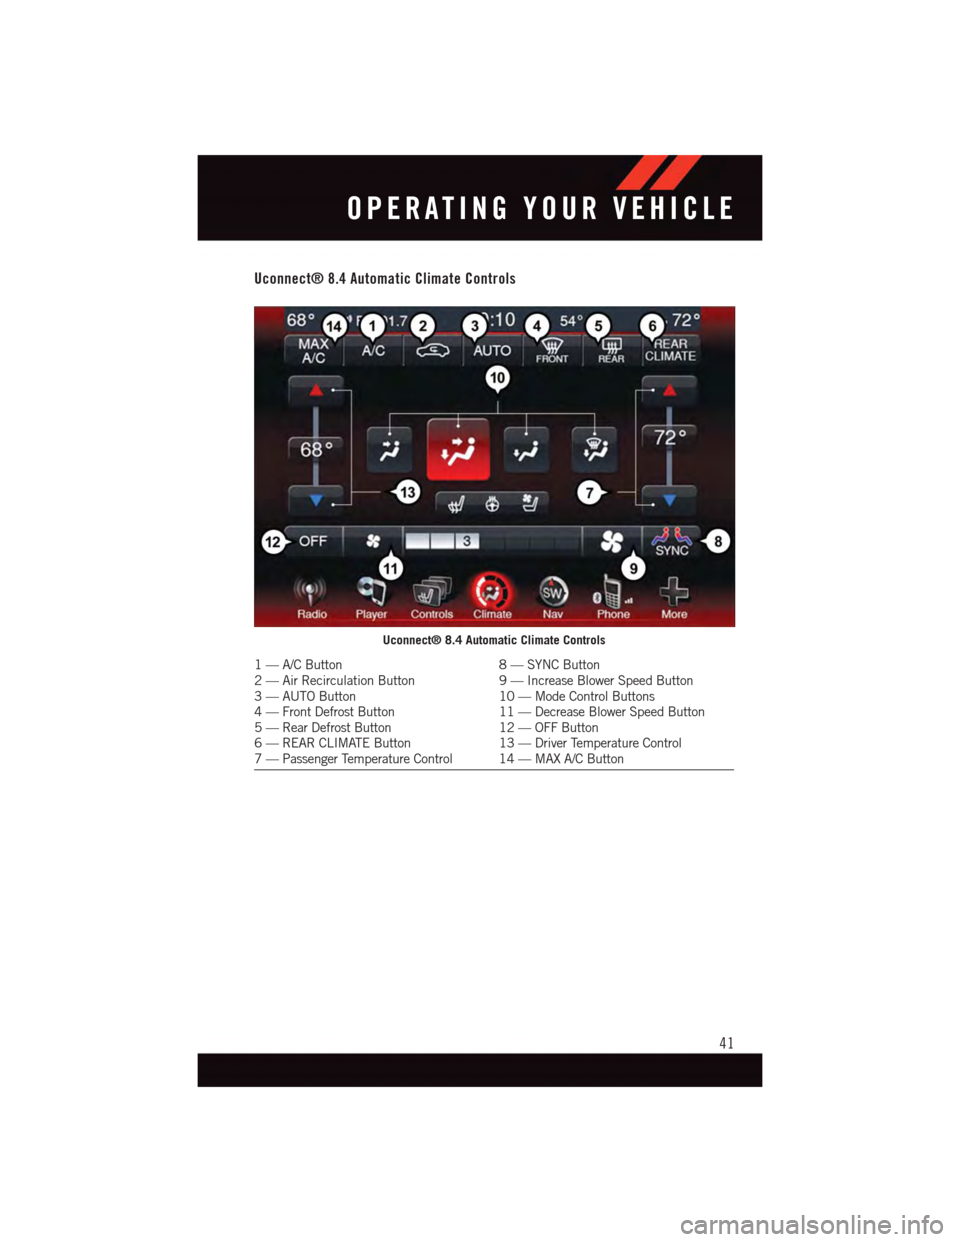
Uconnect® 8.4 Automatic Climate Controls
Uconnect® 8.4 Automatic Climate Controls
1—A/CButton8—SYNCButton2—AirRecirculationButton9—IncreaseBlowerSpeedButton3—AUTOButton10 — Mode Control Buttons4—FrontDefrostButton11 — Decrease Blower Speed Button5—RearDefrostButton12 — OFF Button6—REARCLIMATEButton13 — Driver Temperature Control7—PassengerTemperatureControl 14—MAXA/CButton
OPERATING YOUR VEHICLE
41
Page 44 of 140
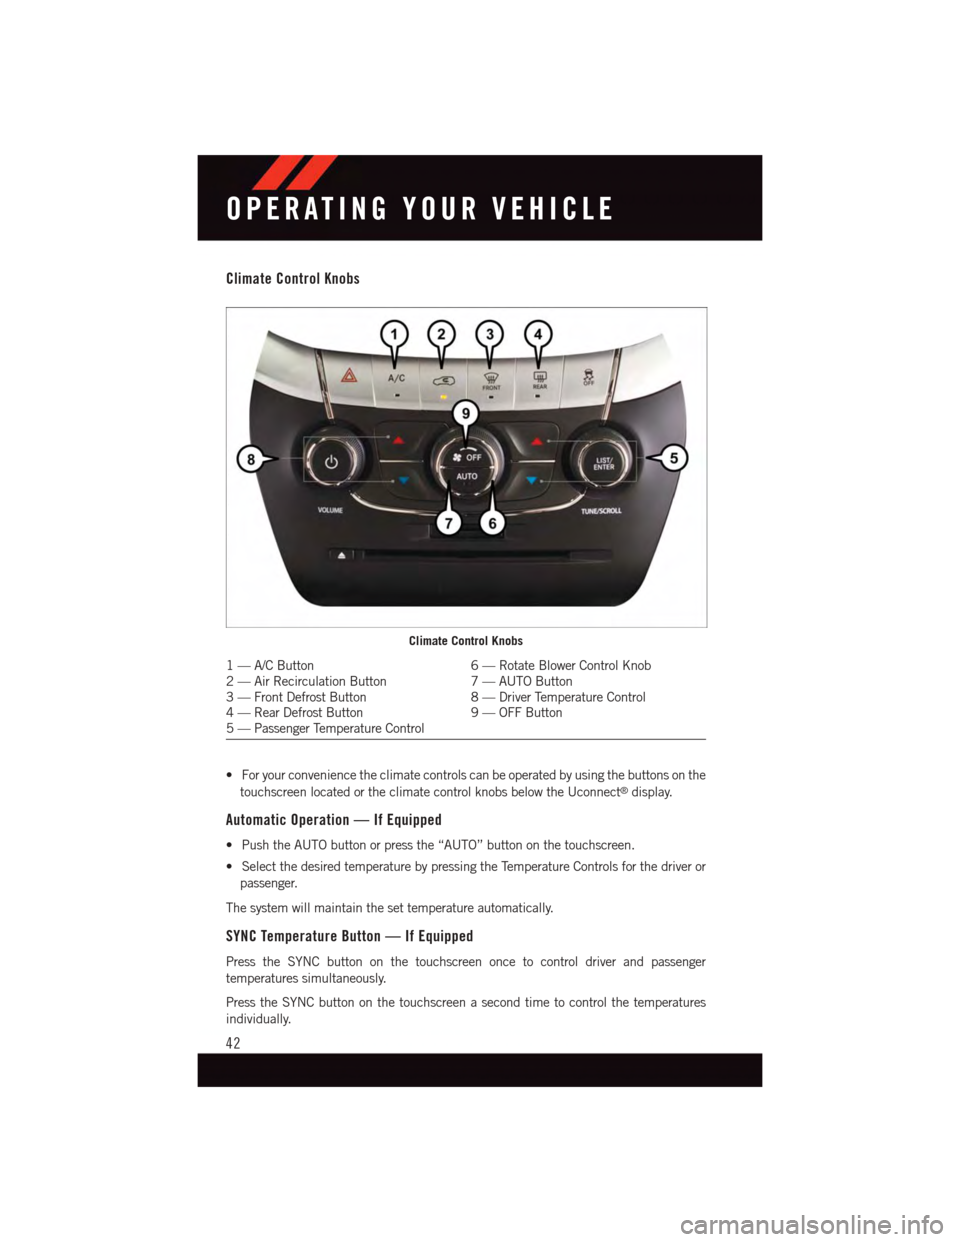
Climate Control Knobs
•Foryourconveniencetheclimatecontrolscanbeoperatedbyusingthebuttonsonthe
touchscreen located or the climate control knobs below the Uconnect®display.
Automatic Operation — If Equipped
•PushtheAUTObuttonorpressthe“AUTO”buttononthetouchscreen.
•SelectthedesiredtemperaturebypressingtheTemperatureControlsforthedriveror
passenger.
The system will maintain the set temperature automatically.
SYNC Temperature Button — If Equipped
Press the SYNC button on the touchscreen once to control driver and passenger
temperatures simultaneously.
Press the SYNC button on the touchscreen a second time to control the temperatures
individually.
Climate Control Knobs
1—A/CButton6—RotateBlowerControlKnob2—AirRecirculationButton7—AUTOButton3—FrontDefrostButton8—DriverTemperatureControl4—RearDefrostButton9—OFFButton5—PassengerTemperatureControl
OPERATING YOUR VEHICLE
42
Page 45 of 140
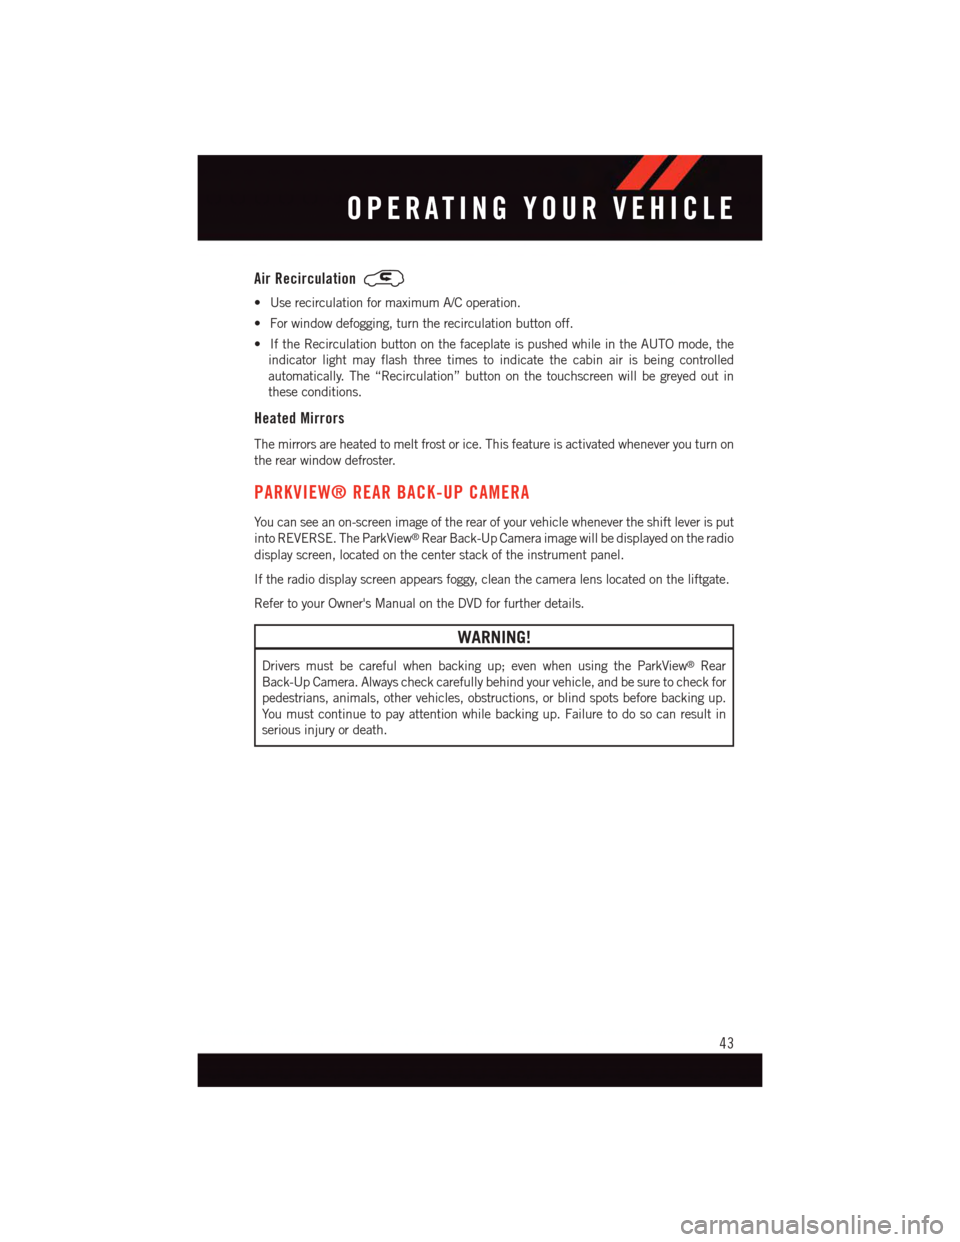
Air Recirculation
•UserecirculationformaximumA/Coperation.
•Forwindowdefogging,turntherecirculationbuttonoff.
•IftheRecirculationbuttononthefaceplateispushedwhileintheAUTOmode,the
indicator light may flash three times to indicate the cabin air is being controlled
automatically. The “Recirculation” button on the touchscreen will be greyed out in
these conditions.
Heated Mirrors
The mirrors are heated to melt frost or ice. This feature is activated whenever you turn on
the rear window defroster.
PARKVIEW® REAR BACK-UP CAMERA
Yo u c a n s e e a n o n - s c r e e n i m a g e o f t h e r e a r o f y o u r v e h i c l e w h e n e v e r t h e s h i f t l e v e r i s p u t
into REVERSE. The ParkView®Rear Back-Up Camera image will be displayed on the radio
display screen, located on the center stack of the instrument panel.
If the radio display screen appears foggy, clean the camera lens located on the liftgate.
Refer to your Owner's Manual on the DVD for further details.
WARNING!
Drivers must be careful when backing up; even when using the ParkView®Rear
Back-Up Camera. Always check carefully behind your vehicle, and be sure to check for
pedestrians, animals, other vehicles, obstructions, or blind spots before backing up.
Yo u m u s t c o n t i n u e t o p a y a t t e n t i o n w h i l e b a c k i n g u p . F a i l u r e t o d o s o c a n r e s u l t i n
serious injury or death.
OPERATING YOUR VEHICLE
43
Page 46 of 140
POWER SUNROOF
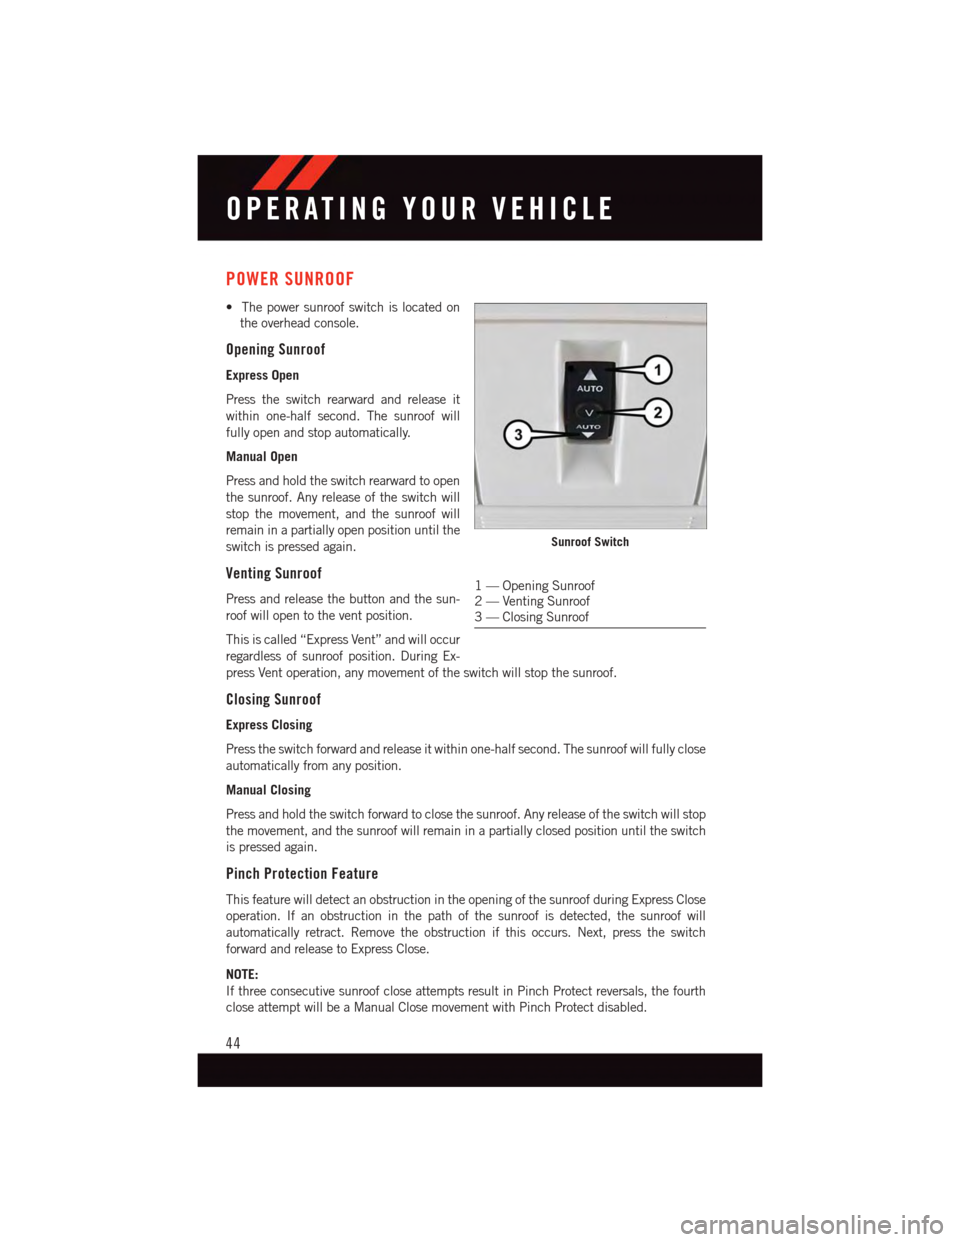
•Thepowersunroofswitchislocatedon
the overhead console.
Opening Sunroof
Express Open
Press the switch rearward and release it
within one-half second. The sunroof will
fully open and stop automatically.
Manual Open
Press and hold the switch rearward to open
the sunroof. Any release of the switch will
stop the movement, and the sunroof will
remain in a partially open position until the
switch is pressed again.
Venting Sunroof
Press and release the button and the sun-
roof will open to the vent position.
This is called “Express Vent” and will occur
regardless of sunroof position. During Ex-
press Vent operation, any movement of the switch will stop the sunroof.
Closing Sunroof
Express Closing
Press the switch forward and release it within one-half second. The sunroof will fully close
automatically from any position.
Manual Closing
Press and hold the switch forward to close the sunroof. Any release of the switch will stop
the movement, and the sunroof will remain in a partially closed position until the switch
is pressed again.
Pinch Protection Feature
This feature will detect an obstruction in the opening of the sunroof during Express Close
operation. If an obstruction in the path of the sunroof is detected, the sunroof will
automatically retract. Remove the obstruction if this occurs. Next, press the switch
forward and release to Express Close.
NOTE:
If three consecutive sunroof close attempts result in Pinch Protect reversals, the fourth
close attempt will be a Manual Close movement with Pinch Protect disabled.
Sunroof Switch
1—OpeningSunroof2—VentingSunroof3—ClosingSunroof
OPERATING YOUR VEHICLE
44
Page 47 of 140
WARNING!
•Donotletchildrenplaywiththesunroof.Neverleavechildrenunattendedina
vehicle, or with access to an unlocked vehicle. Do not leave the Key Fob in or near
the vehicle, and do not leave the ignition of a vehicle equipped with Keyless
Enter-N-Go™ in the ACC or ON/RUN mode. Occupants, particularly unattended
children, can become entrapped by the power sunroof while operating the power
sunroof switch. Such entrapment may result in serious injury or death.
•Inacollision,thereisagreaterriskofbeingthrownfromavehiclewithanopen
sunroof. You could also be severely injured or killed. Always fasten your seat belt
properly and make sure all passengers are properly secured.
•Do not allow small children to operate the sunroof. Never allow your fingers, other body
parts, or any object to project through the sunroof opening. Injury may result.
WIND BUFFETING
Wind buffeting can be described as a helicopter-type percussion sound. If buffeting
occurs with the rear windows open, adjust the front and rear windows together.
If buffeting occurs with the sunroof open, adjust the sunroof opening, or adjust any
window. This will minimize buffeting.
OPERATING YOUR VEHICLE
45
Page 48 of 140
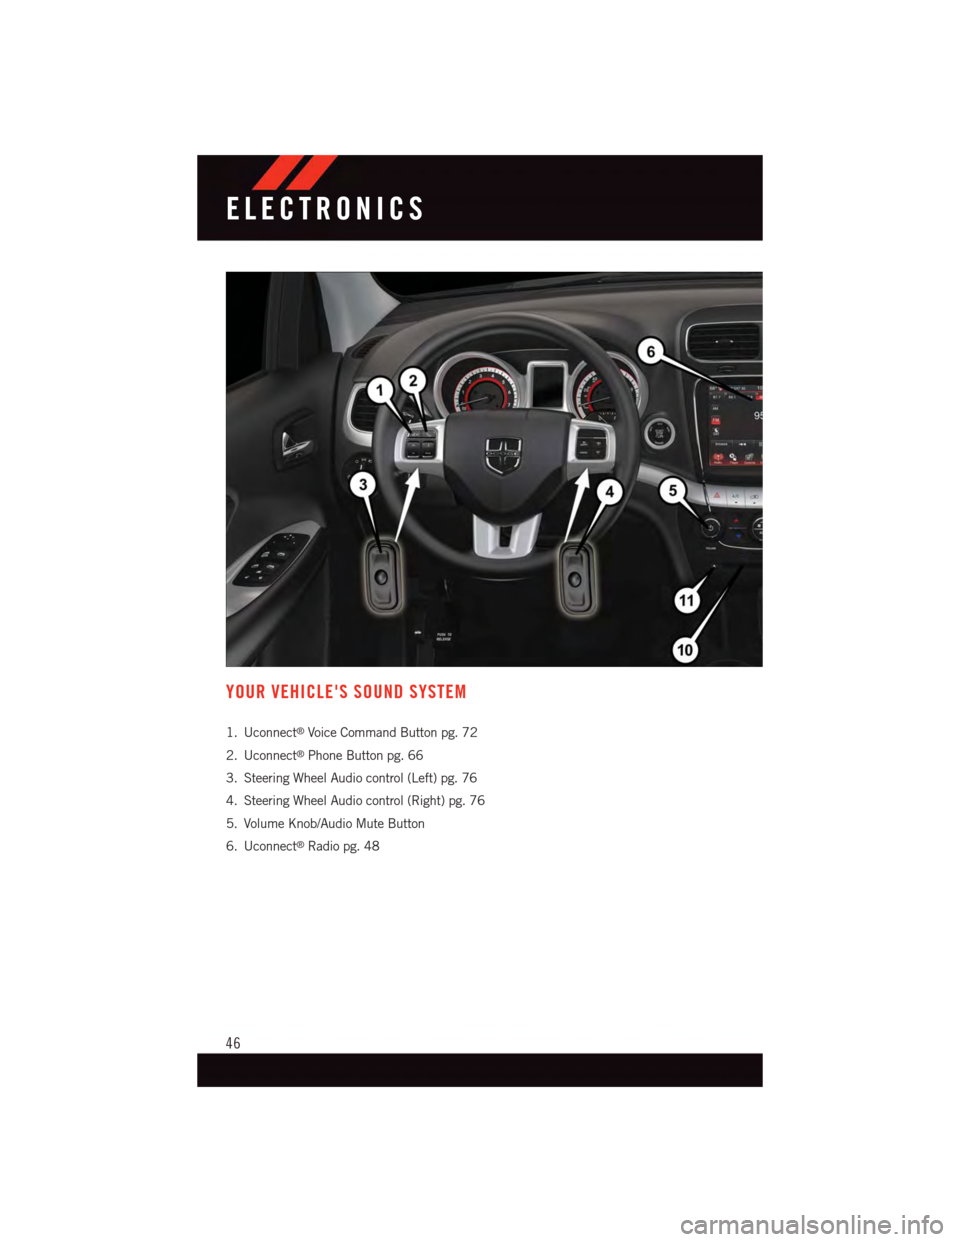
YOUR VEHICLE'S SOUND SYSTEM
1. Uconnect®Voice Command Button pg. 72
2. Uconnect®Phone Button pg. 66
3. Steering Wheel Audio control (Left) pg. 76
4. Steering Wheel Audio control (Right) pg. 76
5. Volume Knob/Audio Mute Button
6. Uconnect®Radio pg. 48
ELECTRONICS
46
Page 49 of 140
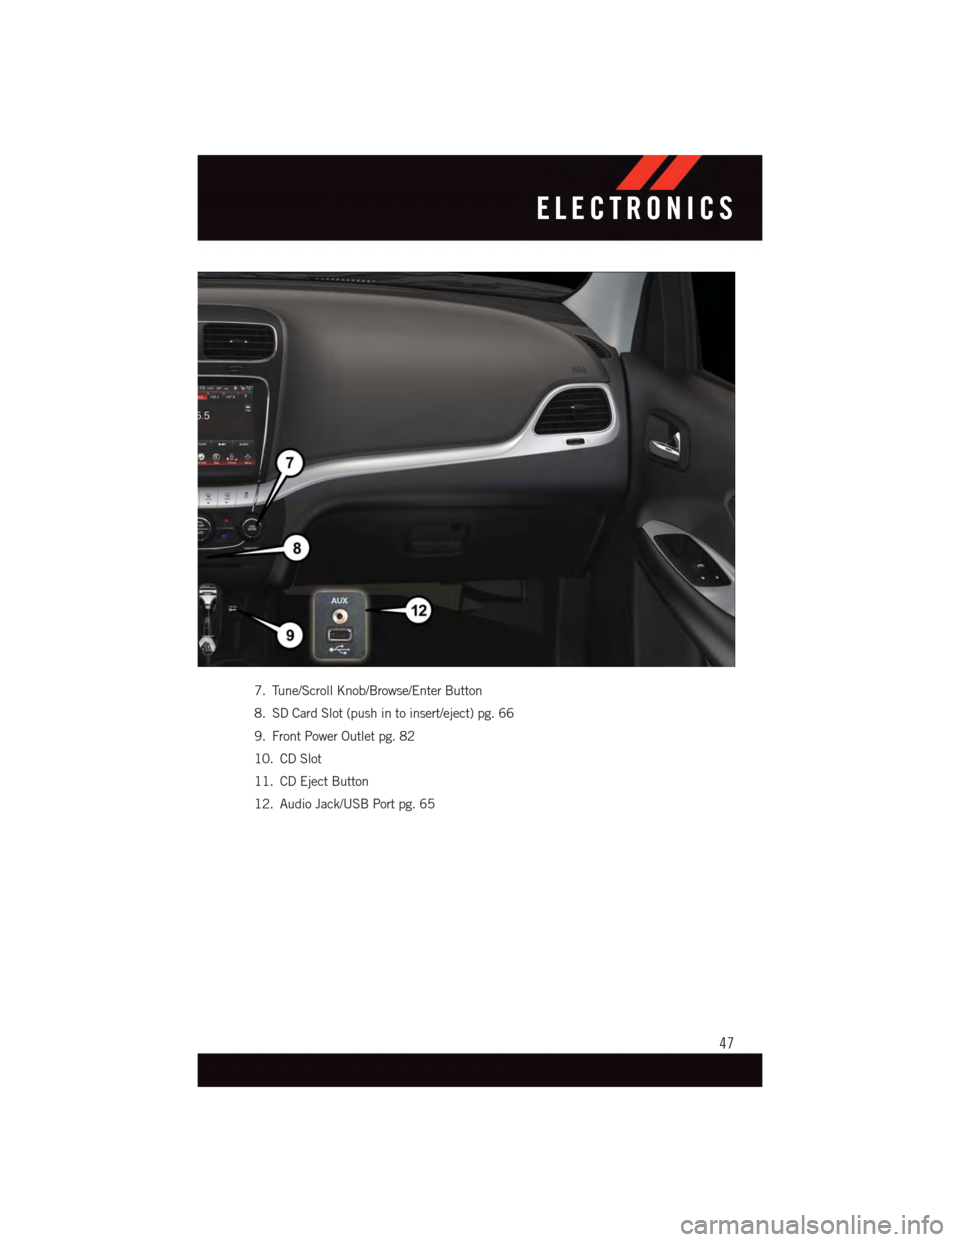
7. Tune/Scroll Knob/Browse/Enter Button
8. SD Card Slot (push in to insert/eject) pg. 66
9. Front Power Outlet pg. 82
10. CD Slot
11. CD Eject Button
12. Audio Jack/USB Port pg. 65
ELECTRONICS
47
Page 50 of 140
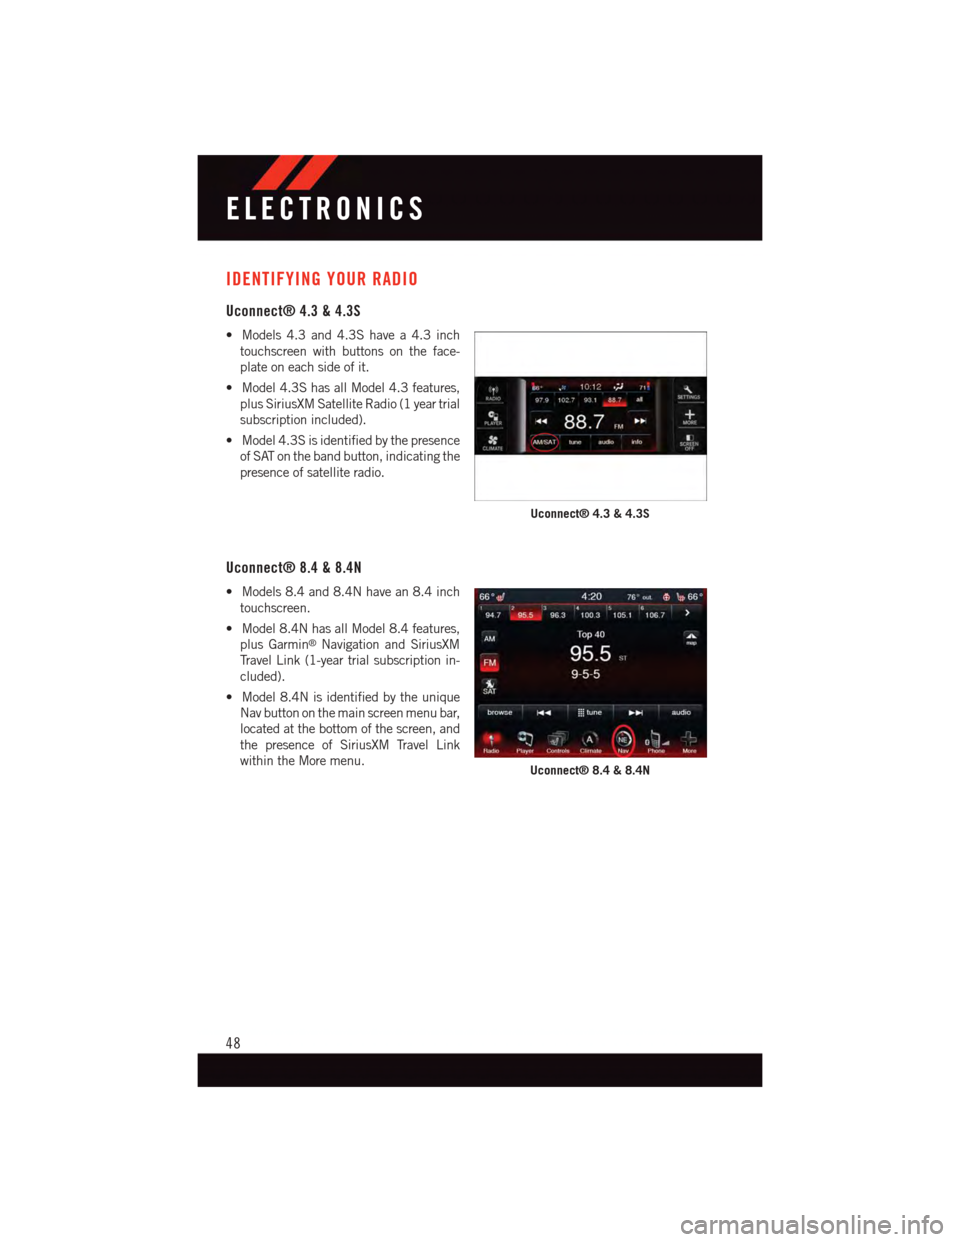
IDENTIFYING YOUR RADIO
Uconnect® 4.3 & 4.3S
•Models4.3and4.3Shavea4.3inch
touchscreen with buttons on the face-
plate on each side of it.
•Model4.3ShasallModel4.3features,
plus SiriusXM Satellite Radio (1 year trial
subscription included).
•Model4.3Sisidentifiedbythepresence
of SAT on the band button, indicating the
presence of satellite radio.
Uconnect® 8.4 & 8.4N
•Models8.4and8.4Nhavean8.4inch
touchscreen.
•Model8.4NhasallModel8.4features,
plus Garmin®Navigation and SiriusXM
Tr a v e l L i n k ( 1 - y e a r t r i a l s u b s c r i p t i o n i n -
cluded).
•Model8.4Nisidentifiedbytheunique
Nav button on the main screen menu bar,
located at the bottom of the screen, and
the presence of SiriusXM Travel Link
within the More menu.
Uconnect® 4.3 & 4.3S
Uconnect® 8.4 & 8.4N
ELECTRONICS
48