clutch DODGE JOURNEY 2017 1.G Owners Manual
[x] Cancel search | Manufacturer: DODGE, Model Year: 2017, Model line: JOURNEY, Model: DODGE JOURNEY 2017 1.GPages: 510
Page 85 of 510
Defroster
Check operation by selecting the defrost mode and place
the blower control on high speed. You should be able to
feel the air directed against the windshield. See your
authorized dealer for service if your defroster is inoper-
able.
Floor Mat Safety Information
Always use floor mats designed to fit the footwell of your
vehicle. Use only floor mats that leave the pedal area
unobstructed and that are firmly secured so that they
cannot slip out of position and interfere with the pedals or
impair safe operation of your vehicle in other ways.
WARNING!
An improperly attached, damaged, folded, or stacked
floor mat, or damaged floor mat fasteners may cause
your floor mat to interfere with the accelerator, brake,
or clutch pedals and cause a loss of vehicle control. To
prevent SERIOUS INJURY or DEATH:
•ALWAYS securely attach
your floor mat using
the floor mat fasteners. DO NOT install your floor
mat upside down or turn your floor mat over.
(Continued)
WARNING! (Continued)
Lightly pull to confirm mat is secured using the
floor mat fasteners on a regular basis.
•ALWAYS REMOVE THE EXISTING FLOOR MAT
FROM THE VEHICLE
before installing any
other floor mat. NEVER install or stack an addi-
tional floor mat on top of an existing floor mat.
• ONLY install floor mats designed to fit your vehicle.
NEVER install a floor mat that cannot be properly
attached and secured to your vehicle. If a floor mat
needs to be replaced, only use a FCA approved floor
mat for the specific make, model, and year of your
vehicle.
• ONLY use the driver ’s side floor mat on the driver ’s
side floor area. To check for interference, with the
vehicle properly parked with the engine off, fully
depress the accelerator, the brake, and the clutch
pedal (if present) to check for interference. If your
floor mat interferes with the operation of any pedal,
or is not secure to the floor, remove the floor mat
from the vehicle and place the floor mat in your
trunk.
(Continued)
2
THINGS TO KNOW BEFORE STARTING YOUR VEHICLE 83
Page 86 of 510
WARNING!(Continued)
•ONLY use the passenger ’s side floor mat on the
passenger ’s side floor area.
• ALWAYS make sure objects cannot fall or slide into
the driver ’s side floor area when the vehicle is
moving. Objects can become trapped under accelera-
tor, brake, or clutch pedals and could cause a loss of
vehicle control.
• NEVER place any objects under the floor mat (e.g.,
towels, keys, etc.). These objects could change the
position of the floor mat and may cause interference
with the accelerator, brake, or clutch pedals.
• If the vehicle carpet has been removed and re-
installed, always properly attach carpet to the floor
and check the floor mat fasteners are secure to the
vehicle carpet. Fully depress each pedal to check for
interference with the accelerator, brake, or clutch
pedals then re-install the floor mats.
• It is recommended to only use mild soap and water
to clean your floor mats. After cleaning, always check
your floor mat has been properly installed and is
secured to your vehicle using the floor mat fasteners
by lightly pulling mat.
Periodic Safety Checks You Should Make Outside
The Vehicle
Tires
Examine tires for excessive tread wear and uneven wear
patterns. Check for stones, nails, glass, or other objects
lodged in the tread or sidewall. Inspect the tread for cuts
and cracks. Inspect sidewalls for cuts, cracks, and bulges.
Check the wheel nuts for tightness. Check the tires (includ-
ing spare) for proper cold inflation pressure.
Lights
Have someone observe the operation of brake lights and
exterior lights while you work the controls. Check turn
signal and high beam indicator lights on the instrument
panel.
Door Latches
Check for proper closing, latching, and locking.
Fluid Leaks
Check area under vehicle after overnight parking for fuel,
engine coolant, oil, or other fluid leaks. Also, if gasoline
fumes are detected or if fuel, power steering fluid (if
equipped), or brake fluid leaks are suspected. The cause
should be located and corrected immediately.
84 THINGS TO KNOW BEFORE STARTING YOUR VEHICLE
Page 336 of 510
DRIVE (D)
This range should be used for most city and highway
driving. It provides the smoothest upshifts and downshifts,
and the best fuel economy. The transmission automatically
upshifts through all forward gears. The DRIVE position
provides optimum driving characteristics under all normal
operating conditions.
When frequent transmission shifting occurs (such as when
operating the vehicle under heavy loading conditions, in
hilly terrain, traveling into strong head winds, or while
towing a heavy trailer), use the AutoStick shift control
(refer to “AutoStick” in this section for further information)
to select a lower gear. Under these conditions, using a
lower gear will improve performance and extend transmis-
sion life by reducing excessive shifting and heat buildup.
If the transmission temperature exceeds normal operating
limits, the powertrain controller will modify the transmis-
sion shift schedule and expand the range of torque con-
verter clutch engagement. This is done to prevent trans-
mission damage due to overheating.
During cold temperatures, transmission operation may be
modified depending on engine and transmission tempera-
ture as well as vehicle speed. This feature improves warmup time of the engine and transmission to achieve maxi-
mum efficiency. Engagement of the torque converter clutch
is inhibited until the transmission fluid is warm (refer to
the “Note” under “Torque Converter Clutch” in this sec-
tion). During extremely cold temperatures (-16°F [-27°C] or
below), operation may briefly be limited to only second
gear (for four-speed transmission) or third gear (for six-
speed transmission). Normal operation will resume once
the transmission temperature has risen to a suitable level.
Transmission Limp Home Mode
Transmission function is monitored electronically for ab-
normal conditions. If a condition is detected that could
result in transmission damage, Transmission Limp Home
Mode is activated. In this mode, the transmission remains
in second gear (for four-speed transmission) or third gear
(for six-speed transmission) regardless of which forward
gear is selected. PARK, REVERSE, and NEUTRAL will
continue to operate. The Malfunction Indicator Light (MIL)
may be illuminated. Limp Home Mode allows the vehicle
to be driven to an authorized dealer for service without
damaging the transmission.
334 STARTING AND OPERATING
Page 337 of 510
In the event of a momentary problem, the transmission can
be reset to regain all forward gears by performing the
following steps:
1. Stop the vehicle.
2. Shift the transmission into PARK.
3. Turn the ignition to the OFF position.
4. Wait approximately 10 seconds.
5. Restart the engine.
6. Shift into the desired gear range. If the problem is nolonger detected, the transmission will return to normal
operation.
NOTE: Even if the transmission can be reset, we recom-
mend that you visit your authorized dealer at your earliest
possible convenience. Your authorized dealer has diagnos-
tic equipment to determine if the problem could recur.
If the transmission cannot be reset, authorized dealer
service is required.Overdrive Operation
The automatic transmission includes an electronically con-
trolled Overdrive (top gear). The transmission will auto-
matically shift into Overdrive if the following conditions
are present:
• The gear selector is in the DRIVE position.
• The transmission fluid has reached an adequate tem-
perature.
• The engine coolant has reached an adequate tempera-
ture.
• The vehicle speed is sufficiently high.
• The driver is not heavily pressing the accelerator.
Torque Converter Clutch
A feature designed to improve fuel economy has been
included in the automatic transmission on your vehicle. A
clutch within the torque converter engages automatically
at calibrated speeds. This may result in a slightly different
feeling or response during normal operation in the upper
gears. When the vehicle speed drops or during some
accelerations, the clutch automatically disengages.
5
STARTING AND OPERATING 335
Page 338 of 510
![DODGE JOURNEY 2017 1.G Owners Manual NOTE:The torque converter clutch will not engage until
the transmission fluid and engine coolant are warm (usu-
ally after 1 to 3 miles [2 to 5 km] of driving). Because the
engine speed is higher when DODGE JOURNEY 2017 1.G Owners Manual NOTE:The torque converter clutch will not engage until
the transmission fluid and engine coolant are warm (usu-
ally after 1 to 3 miles [2 to 5 km] of driving). Because the
engine speed is higher when](/img/12/5653/w960_5653-337.png)
NOTE:The torque converter clutch will not engage until
the transmission fluid and engine coolant are warm (usu-
ally after 1 to 3 miles [2 to 5 km] of driving). Because the
engine speed is higher when the torque converter clutch is
not engaged, it may seem as if the transmission is not
shifting into Overdrive when cold. This is normal. Using
the AutoStick shift control, when the transmission is suffi-
ciently warm, will demonstrate that the transmission is
able to shift into and out of Overdrive.
AUTOSTICK
AutoStick is a driver-interactive transmission feature pro-
viding manual shift control, giving you more control of the
vehicle. AutoStick allows you to maximize engine braking,
eliminate undesirable upshifts and downshifts, and im-
prove overall vehicle performance. This system can also
provide you with more control during passing, city driv-
ing, cold slippery conditions, mountain driving, trailer
towing, and many other situations.
Operation
When the gear selector is in the AutoStick position (below
the DRIVE position), it can be moved from side to side.
This allows the driver to manually select the transmission
gear being used. Moving the gear selector to the left (-) triggers a downshift and to the right (+) an upshift. The
current gear will be displayed in the instrument cluster.
In AutoStick mode, the transmission will shift up or down
when the driver moves the gear selector to the right (+) or
left (-), unless an engine lugging or overspeed condition
would result. It will remain in the selected gear until
another upshift or downshift is chosen, except as described
below.
•
The transmission will automatically upshift when nec-
essary to prevent engine over-speed.
• The transmission will automatically downshift as the
vehicle slows (to prevent engine lugging) and will
display the current gear.
• The transmission will automatically downshift to first
gear when coming to a stop. After a stop, the driver
should manually upshift (+) the transmission as the
vehicle is accelerated.
• You can start out, from a stop, in any gear except top
gear. Tapping (+) (at a stop) will allow starting in second
gear. Starting out in second gear can be helpful in snowy
or icy conditions.
• If a requested downshift would cause the engine to
over-speed, that shift will not occur.
336 STARTING AND OPERATING
Page 348 of 510
optimum pressure to the brakes. This can help reduce
braking distances. The BAS complements the anti-lock
brake system (ABS). Applying the brakes very quickly
results in the best BAS assistance. To receive the benefit of
the system, you must apply continuous braking pressure
during the stopping sequence, (do not “pump” the brakes).
Do not reduce brake pedal pressure unless braking is no
longer desired. Once the brake pedal is released, the BAS is
deactivated.
WARNING!
The Brake Assist System (BAS) cannot prevent the
natural laws of physics from acting on the vehicle, nor
can it increase the traction afforded by prevailing road
conditions. BAS cannot prevent collisions, including
those resulting from excessive speed in turns, driving
on very slippery surfaces, or hydroplaning. The capa-
bilities of a BAS-equipped vehicle must never be
exploited in a reckless or dangerous manner, which
could jeopardize the user’s safety or the safety of
others.
Hill Start Assist (HSA)
The HSA system is designed to mitigate roll back from a
complete stop while on an incline. If the driver releases thebrake while stopped on an incline, HSA will continue to
hold the brake pressure for a short period. If the driver
does not apply the throttle before this time expires, the
system will release brake pressure and the vehicle will roll
down the hill as normal.
The following conditions must be met in order for HSA to
activate:
•
The feature must be enabled.
• The vehicle must be stopped.
• Park brake must be off.
• Driver door must be closed.
• The vehicle must be on a sufficient grade.
• The gear selection must match vehicle uphill direction
(i.e., vehicle facing uphill is in forward gear; vehicle
backing uphill is in REVERSE gear).
• HSA will work in REVERSE gear and all forward gears.
The system will not activate if the transmission is in
PARK or NEUTRAL. For vehicles equipped with a
manual transmission, if the clutch is pressed, HSA will
remain active.
346 STARTING AND OPERATING
Page 466 of 510
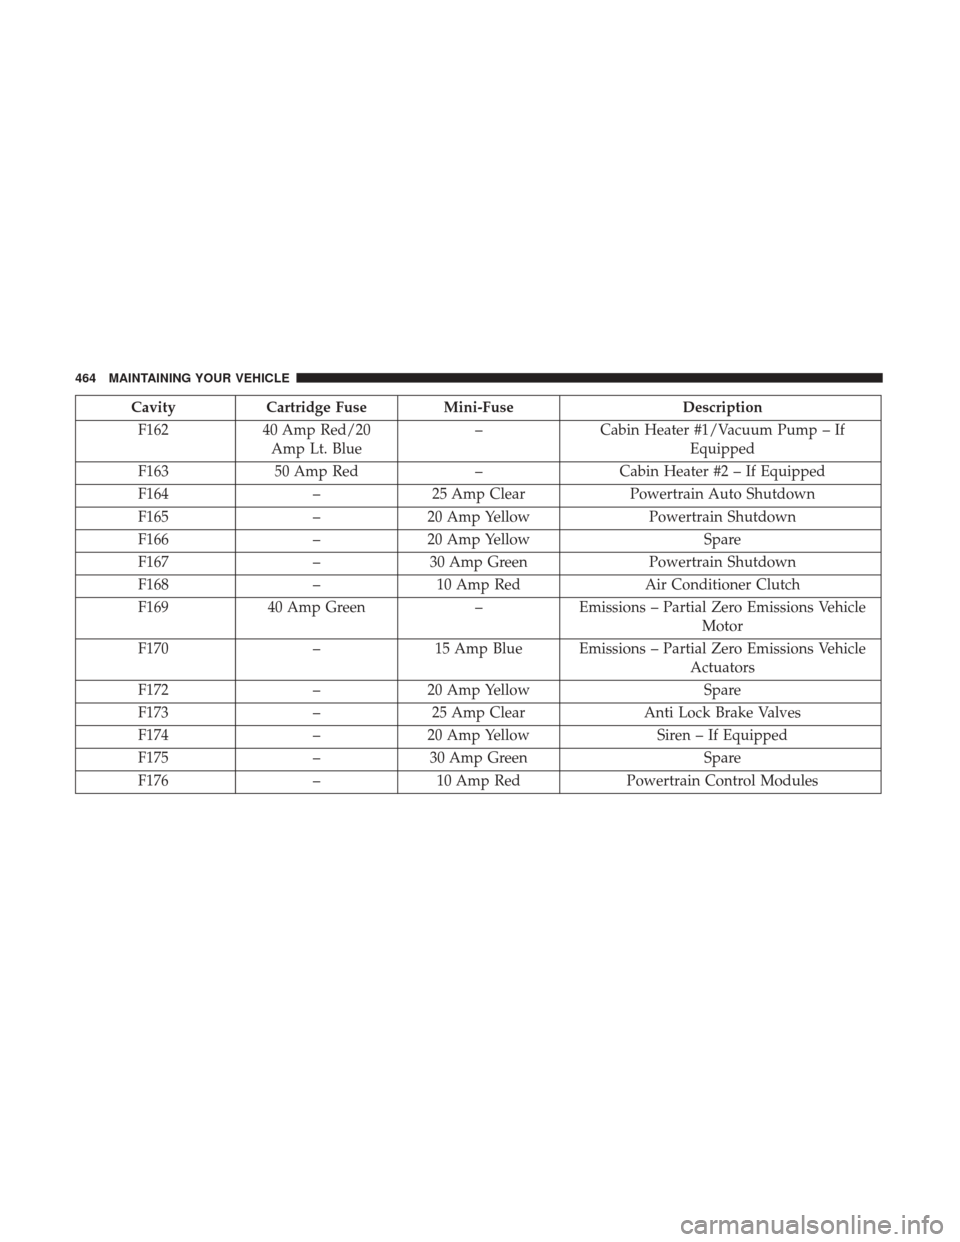
CavityCartridge Fuse Mini-Fuse Description
F162 40 Amp Red/20
Amp Lt. Blue –
Cabin Heater #1/Vacuum Pump – If
Equipped
F163 50 Amp Red –Cabin Heater #2 – If Equipped
F164 –25 Amp Clear Powertrain Auto Shutdown
F165 –20 Amp Yellow Powertrain Shutdown
F166 –20 Amp Yellow Spare
F167 –30 Amp Green Powertrain Shutdown
F168 –10 Amp Red Air Conditioner Clutch
F169 40 Amp Green –Emissions – Partial Zero Emissions Vehicle
Motor
F170 –15 Amp Blue Emissions – Partial Zero Emissions Vehicle
Actuators
F172 –20 Amp Yellow Spare
F173 –25 Amp Clear Anti Lock Brake Valves
F174 –20 Amp Yellow Siren – If Equipped
F175 –30 Amp Green Spare
F176 –10 Amp Red Powertrain Control Modules
464 MAINTAINING YOUR VEHICLE