DODGE JOURNEY 2019 Owners Manual
Manufacturer: DODGE, Model Year: 2019, Model line: JOURNEY, Model: DODGE JOURNEY 2019Pages: 524, PDF Size: 5.29 MB
Page 391 of 524
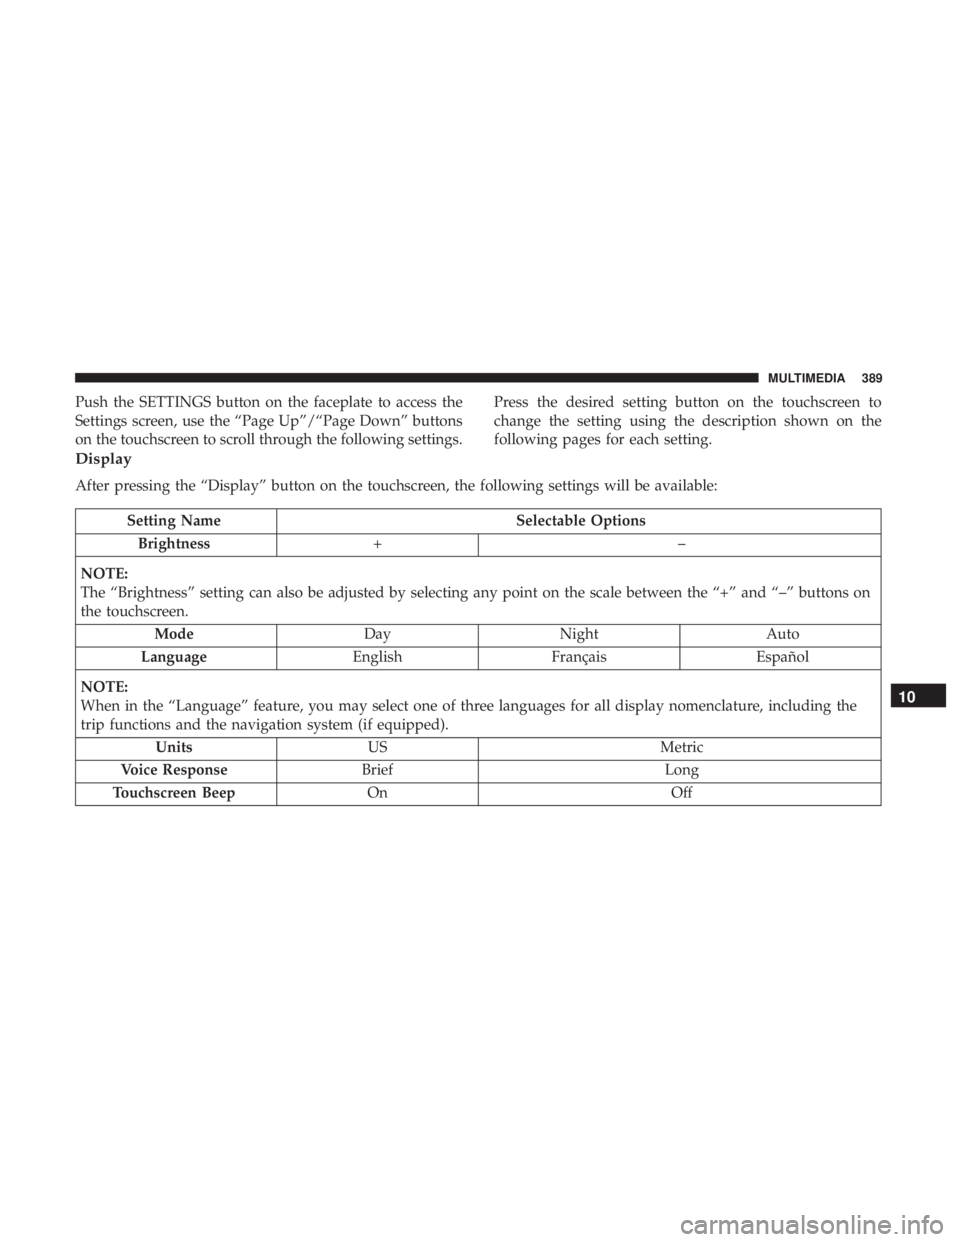
Push the SETTINGS button on the faceplate to access the
Settings screen, use the “Page Up”/“Page Down” buttons
on the touchscreen to scroll through the following settings.Press the desired setting button on the touchscreen to
change the setting using the description shown on the
following pages for each setting.
Display
After pressing the “Display” button on the touchscreen, the following settings will be available:
Setting Name
Selectable Options
Brightness +–
NOTE:
The “Brightness” setting can also be adjusted by selecting any point on the scale between the “+” and “–” buttons on
the touchscreen. Mode DayNight Auto
Language EnglishFrançais Español
NOTE:
When in the “Language” feature, you may select one of three languages for all display nomenclature, including the
trip functions and the navigation system (if equipped). Units US Metric
Voice Response Brief Long
Touchscreen Beep On Off
10
MULTIMEDIA 389
Page 392 of 524
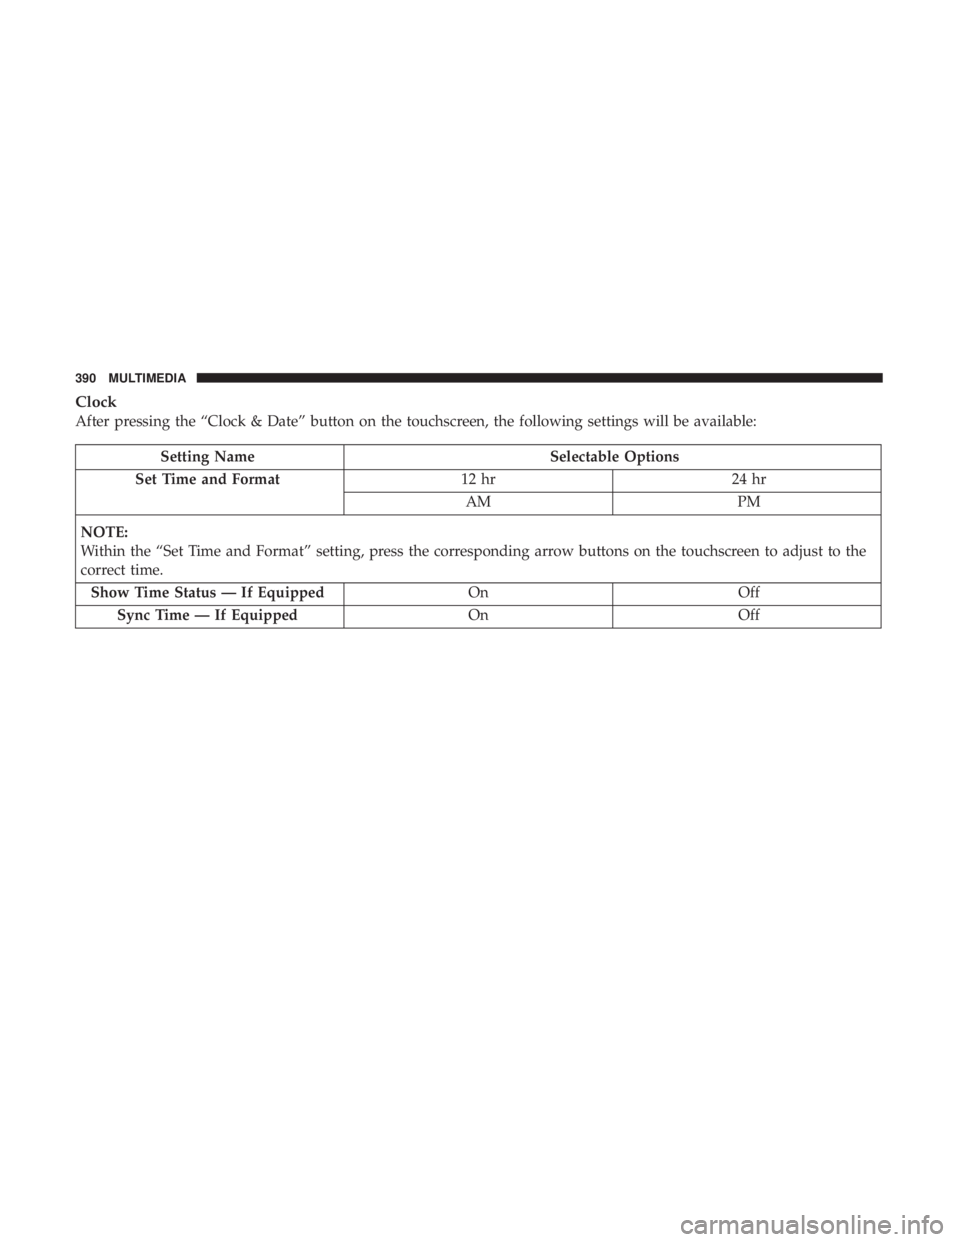
Clock
After pressing the “Clock & Date” button on the touchscreen, the following settings will be available:
Setting NameSelectable Options
Set Time and Format 12 hr24 hr
AM PM
NOTE:
Within the “Set Time and Format” setting, press the corresponding arrow buttons on the touchscreen to adjust to the
correct time. Show Time Status — If Equipped OnOff
Sync Time — If Equipped OnOff
390 MULTIMEDIA
Page 393 of 524
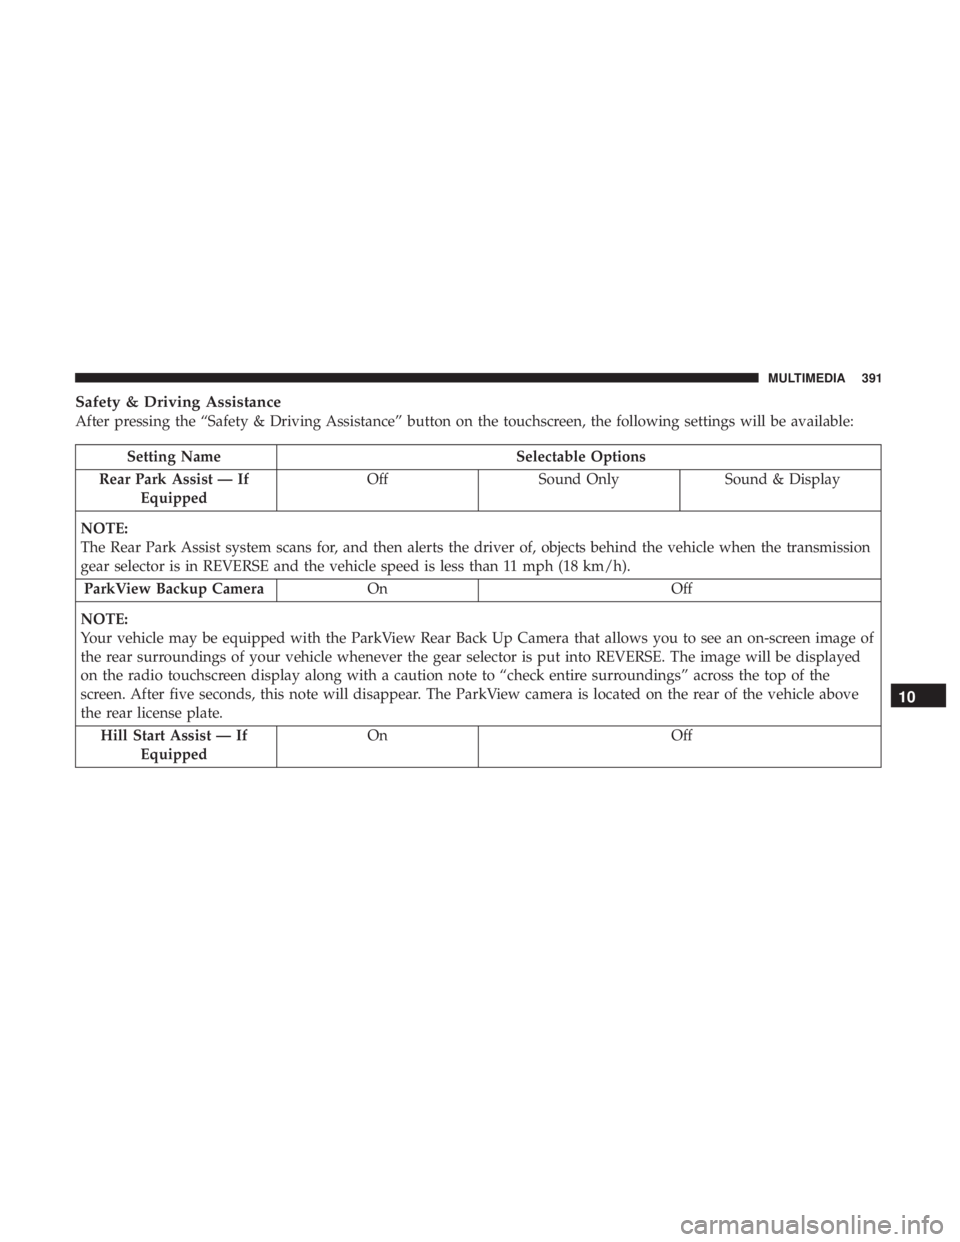
Safety & Driving Assistance
After pressing the “Safety & Driving Assistance” button on the touchscreen, the following settings will be available:
Setting NameSelectable Options
Rear Park Assist — If Equipped Off
Sound Only Sound & Display
NOTE:
The Rear Park Assist system scans for, and then alerts the driver of, objects behind the vehicle when the transmission
gear selector is in REVERSE and the vehicle speed is less than 11 mph (18 km/h). ParkView Backup Camera On Off
NOTE:
Your vehicle may be equipped with the ParkView Rear Back Up Camera that allows you to see an on-screen image of
the rear surroundings of your vehicle whenever the gear selector is put into REVERSE. The image will be displayed
on the radio touchscreen display along with a caution note to “check entire surroundings” across the top of the
screen. After five seconds, this note will disappear. The ParkView camera is located on the rear of the vehicle above
the rear license plate. Hill Start Assist — If Equipped On
Off
10
MULTIMEDIA 391
Page 394 of 524
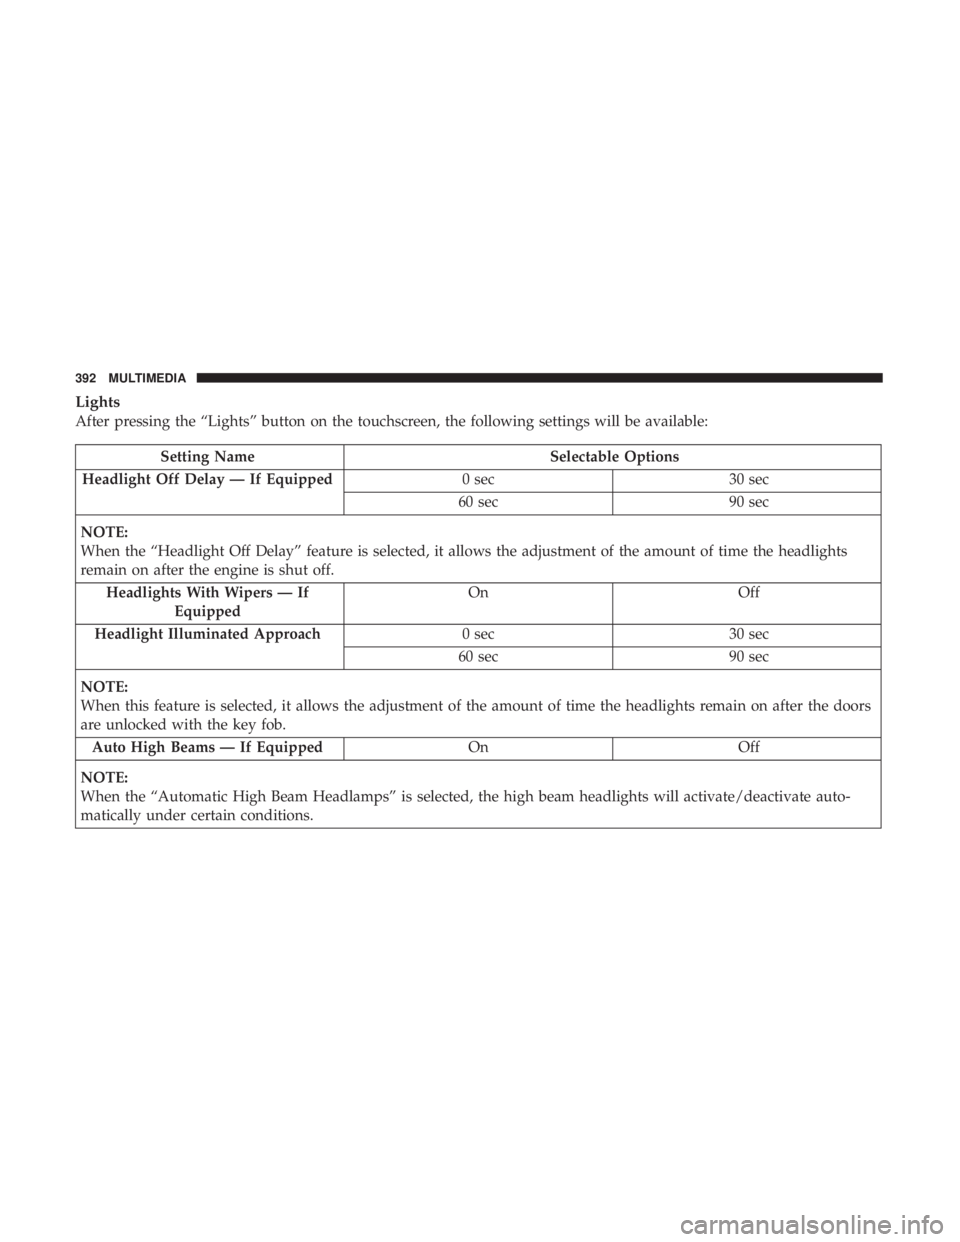
Lights
After pressing the “Lights” button on the touchscreen, the following settings will be available:
Setting NameSelectable Options
Headlight Off Delay — If Equipped 0 sec30 sec
60 sec 90 sec
NOTE:
When the “Headlight Off Delay” feature is selected, it allows the adjustment of the amount of time the headlights
remain on after the engine is shut off. Headlights With Wipers — If Equipped On
Off
Headlight Illuminated Approach 0 sec30 sec
60 sec 90 sec
NOTE:
When this feature is selected, it allows the adjustment of the amount of time the headlights remain on after the doors
are unlocked with the key fob. Auto High Beams — If Equipped OnOff
NOTE:
When the “Automatic High Beam Headlamps” is selected, the high beam headlights will activate/deactivate auto-
matically under certain conditions.
392 MULTIMEDIA
Page 395 of 524
Setting NameSelectable Options
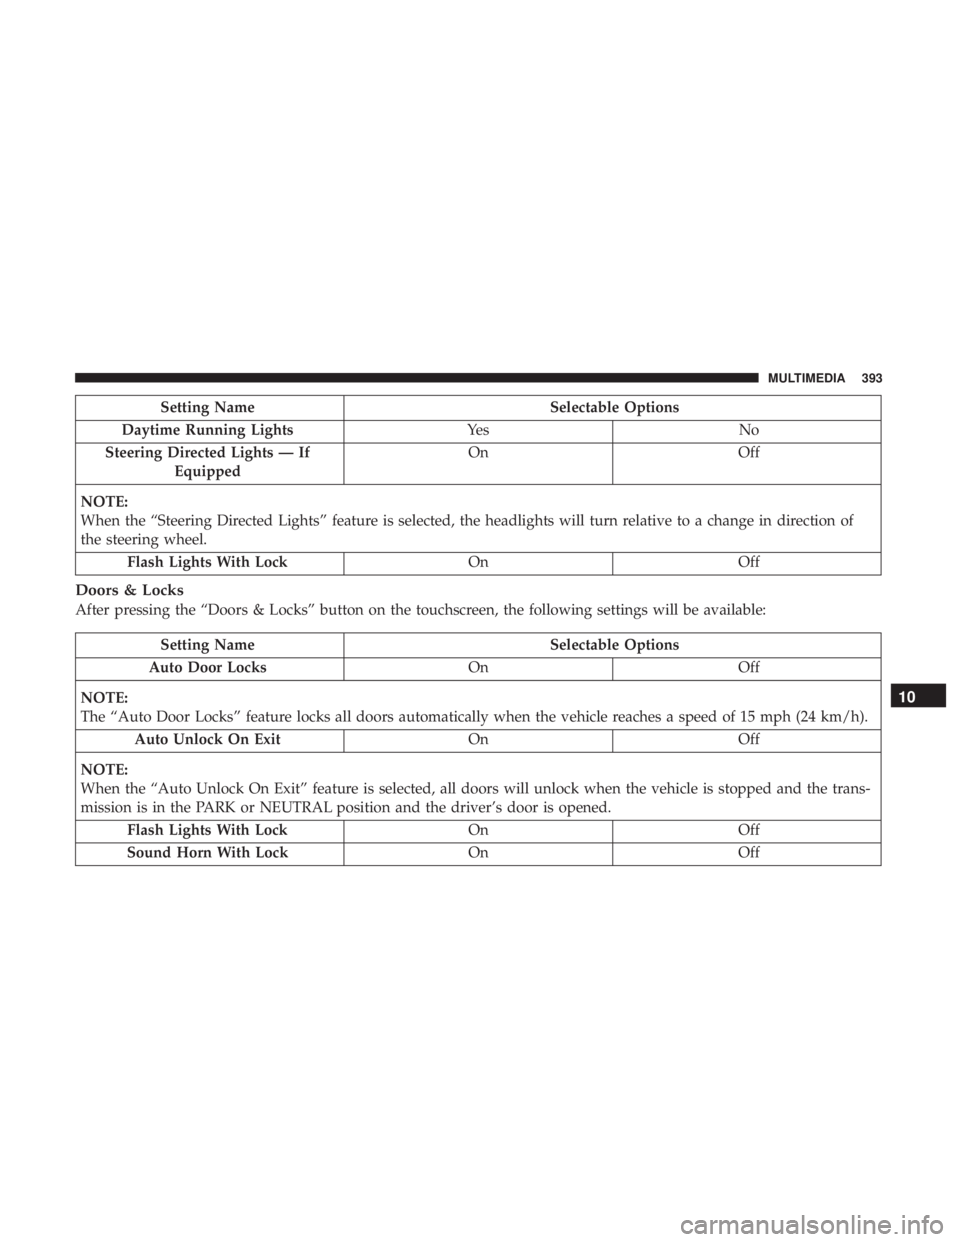
Daytime Running Lights Ye sN o
Steering Directed Lights — If Equipped On
Off
NOTE:
When the “Steering Directed Lights” feature is selected, the headlights will turn relative to a change in direction of
the steering wheel. Flash Lights With Lock OnOff
Doors & Locks
After pressing the “Doors & Locks” button on the touchscreen, the following settings will be available:
Setting Name Selectable Options
Auto Door Locks OnOff
NOTE:
The “Auto Door Locks” feature locks all doors automatically when the vehicle reaches a speed of 15 mph (24 km/h). Auto Unlock On Exit OnOff
NOTE:
When the “Auto Unlock On Exit” feature is selected, all doors will unlock when the vehicle is stopped and the trans-
mission is in the PARK or NEUTRAL position and the driver’s door is opened. Flash Lights With Lock OnOff
Sound Horn With Lock OnOff
10
MULTIMEDIA 393
Page 396 of 524
Setting NameSelectable Options
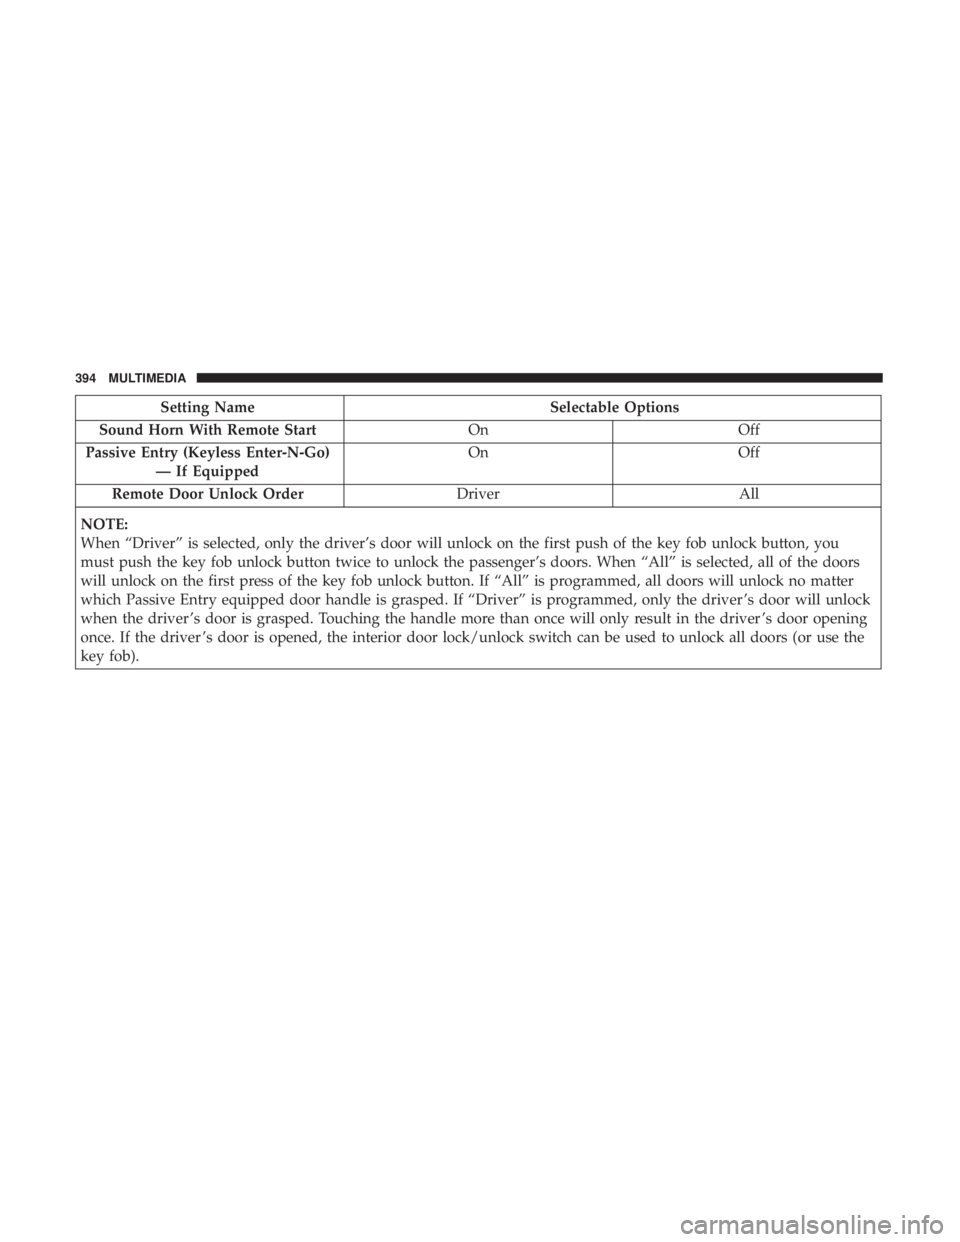
Sound Horn With Remote Start OnOff
Passive Entry (Keyless Enter-N-Go) — If Equipped On
Off
Remote Door Unlock Order DriverAll
NOTE:
When “Driver” is selected, only the driver’s door will unlock on the first push of the key fob unlock button, you
must push the key fob unlock button twice to unlock the passenger’s doors. When “All” is selected, all of the doors
will unlock on the first press of the key fob unlock button. If “All” is programmed, all doors will unlock no matter
which Passive Entry equipped door handle is grasped. If “Driver” is programmed, only the driver ’s door will unlock
when the driver ’s door is grasped. Touching the handle more than once will only result in the driver ’s door opening
once. If the driver ’s door is opened, the interior door lock/unlock switch can be used to unlock all doors (or use the
key fob).
394 MULTIMEDIA
Page 397 of 524
Auto-On Comfort & Remote Start
After pressing the “Auto-On Comfort & Remote Start” button on the touchscreen, the following settings will be available:
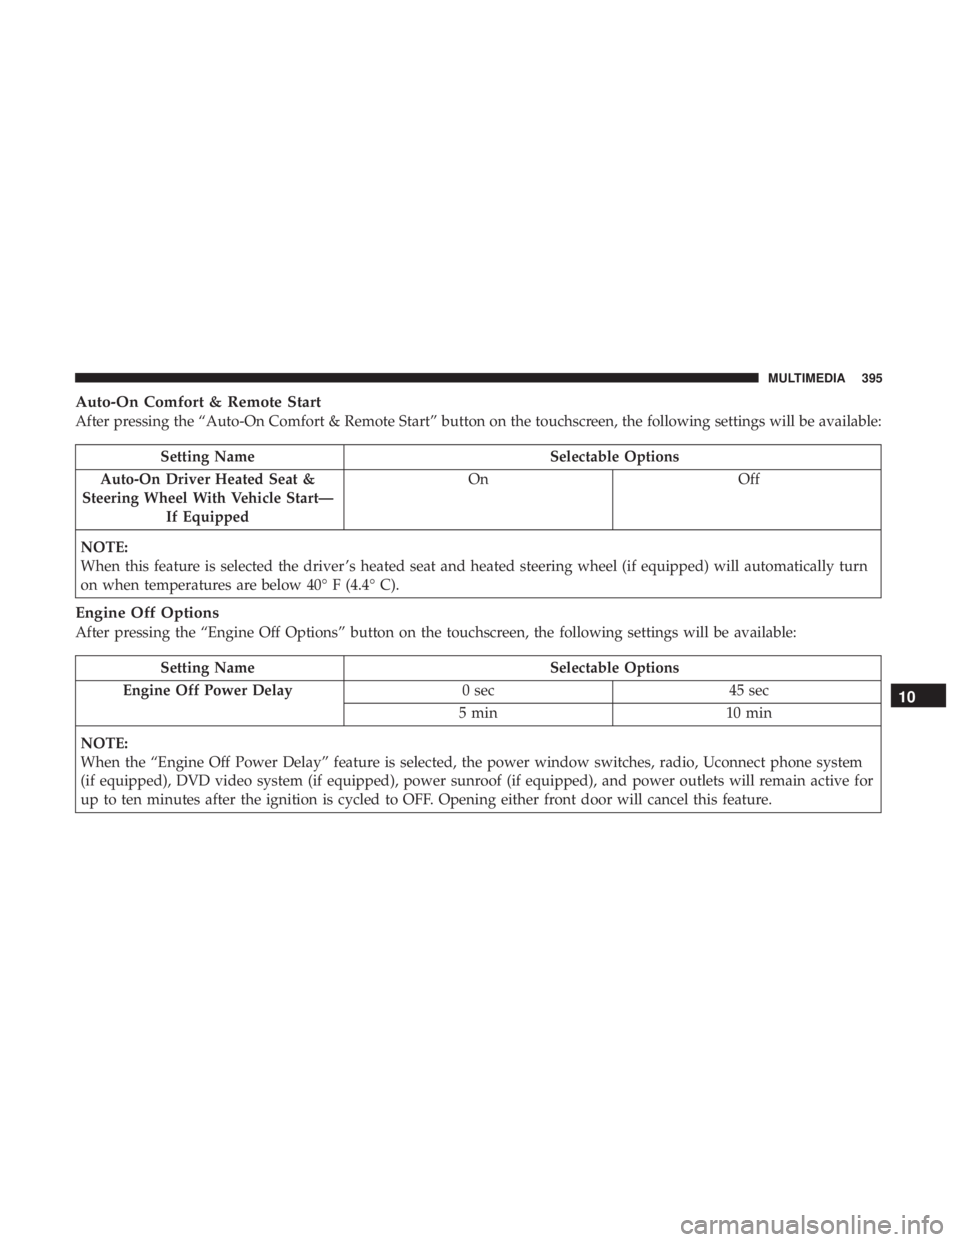
Setting NameSelectable Options
Auto-On Driver Heated Seat &
Steering Wheel With Vehicle Start— If Equipped On
Off
NOTE:
When this feature is selected the driver ’s heated seat and heated steering wheel (if equipped) will automatically turn
on when temperatures are below 40° F (4.4° C).
Engine Off Options
After pressing the “Engine Off Options” button on the touchscreen, the following settings will be available:
Setting Name Selectable Options
Engine Off Power Delay 0 sec45 sec
5 min 10 min
NOTE:
When the “Engine Off Power Delay” feature is selected, the power window switches, radio, Uconnect phone system
(if equipped), DVD video system (if equipped), power sunroof (if equipped), and power outlets will remain active for
up to ten minutes after the ignition is cycled to OFF. Opening either front door will cancel this feature.
10
MULTIMEDIA 395
Page 398 of 524
Setting NameSelectable Options
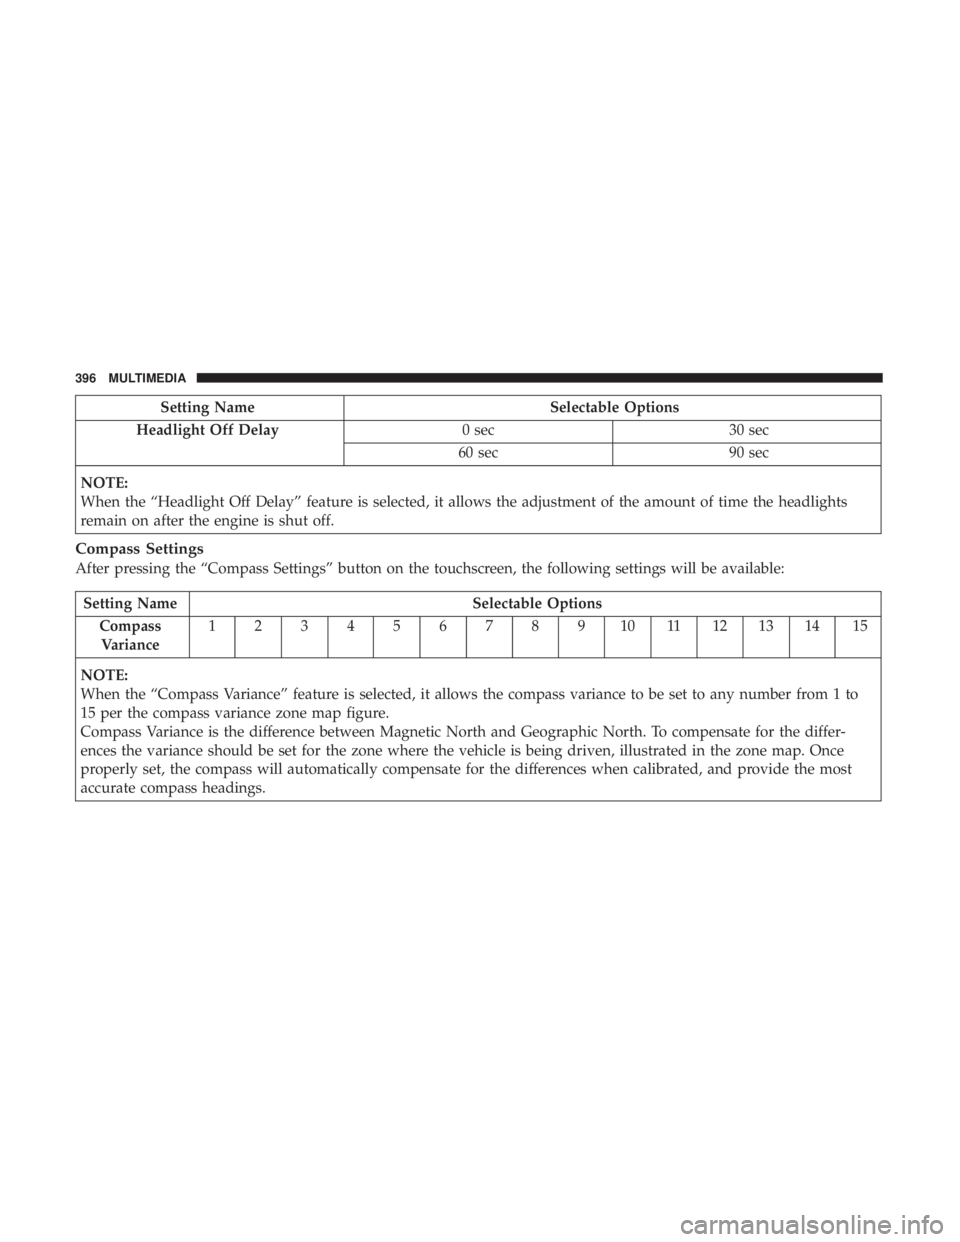
Headlight Off Delay 0 sec30 sec
60 sec 90 sec
NOTE:
When the “Headlight Off Delay” feature is selected, it allows the adjustment of the amount of time the headlights
remain on after the engine is shut off.
Compass Settings
After pressing the “Compass Settings” button on the touchscreen, the following settings will be available:
Setting Name Selectable Options
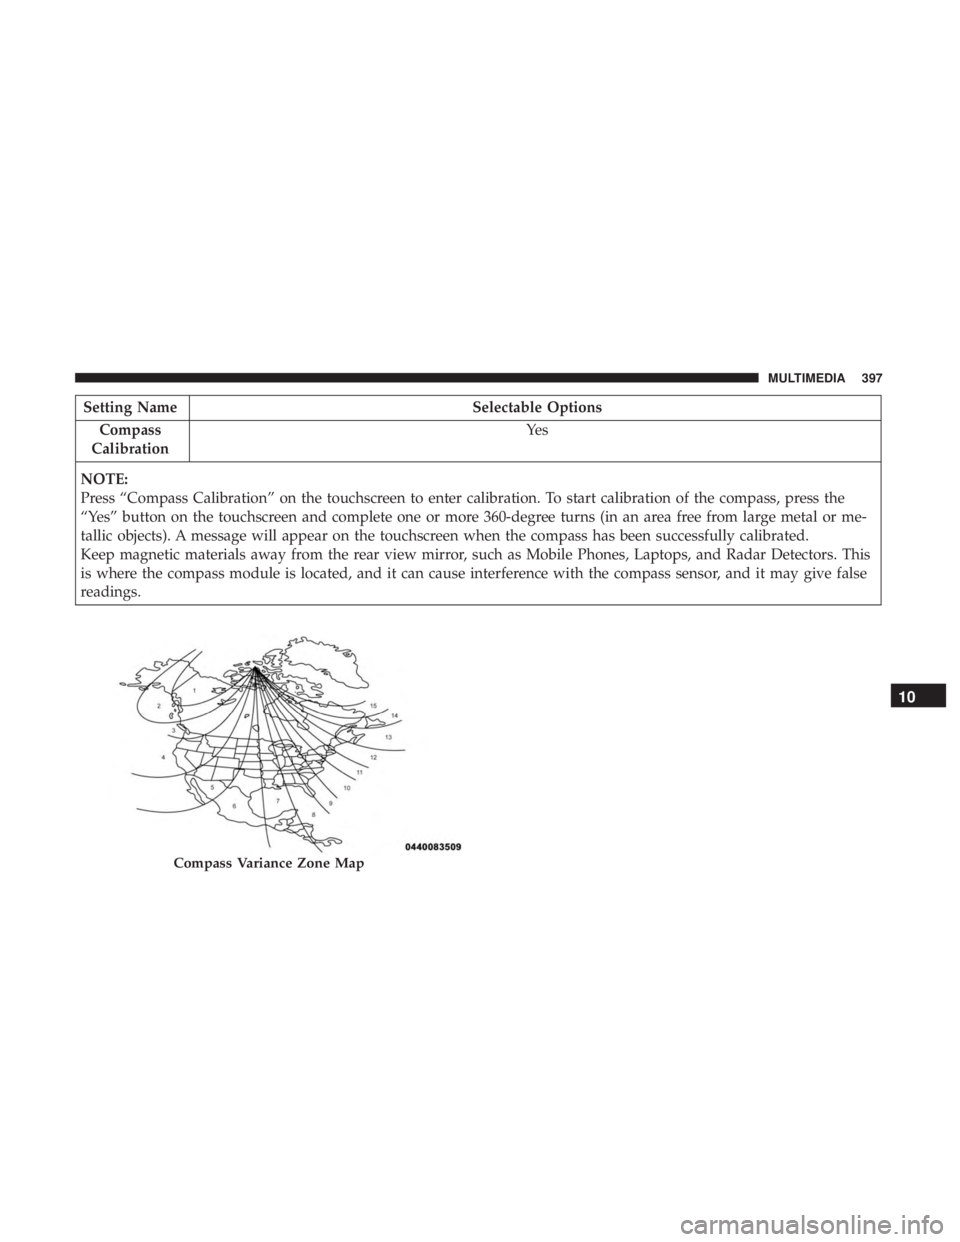
Compass Variance 1 2 3 4 5 6 7 8 9 10 11 12 13 14 15
NOTE:
When the “Compass Variance” feature is selected, it allows the compass variance to be set to any number from 1 to
15 per the compass variance zone map figure.
Compass Variance is the difference between Magnetic North and Geographic North. To compensate for the differ-
ences the variance should be set for the zone where the vehicle is being driven, illustrated in the zone map. Once
properly set, the compass will automatically compensate for the differences when calibrated, and provide the most
accurate compass headings.
396 MULTIMEDIA
Page 399 of 524
Setting NameSelectable Options
Compass
Calibration Ye s
NOTE:
Press “Compass Calibration” on the touchscreen to enter calibration. To start calibration of the compass, press the
“Yes” button on the touchscreen and complete one or more 360-degree turns (in an area free from large metal or me-
tallic objects). A message will appear on the touchscreen when the compass has been successfully calibrated.
Keep magnetic materials away from the rear view mirror, such as Mobile Phones, Laptops, and Radar Detectors. This
is where the compass module is located, and it can cause interference with the compass sensor, and it may give false
readings.
Compass Variance Zone Map
10
MULTIMEDIA 397
Page 400 of 524
Audio
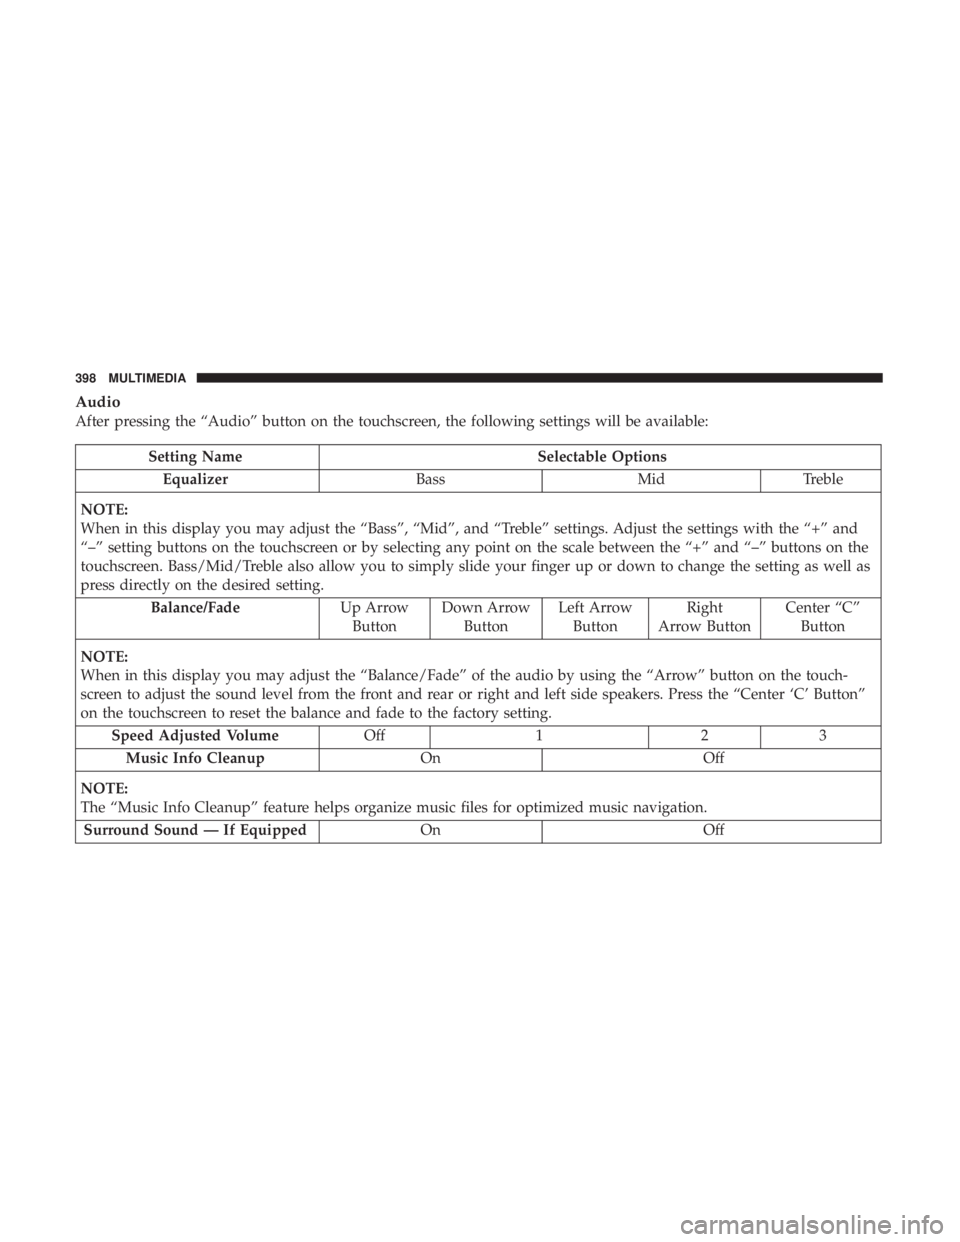
After pressing the “Audio” button on the touchscreen, the following settings will be available:
Setting NameSelectable Options
Equalizer BassMidTreble
NOTE:
When in this display you may adjust the “Bass”, “Mid”, and “Treble” settings. Adjust the settings with the “+” and
“–” setting buttons on the touchscreen or by selecting any point on the scale between the “+” and “–” buttons on the
touchscreen. Bass/Mid/Treble also allow you to simply slide your finger up or down to change the setting as well as
press directly on the desired setting. Balance/Fade Up Arrow
Button Down Arrow
Button Left Arrow
Button Right
Arrow Button Center “C”
Button
NOTE:
When in this display you may adjust the “Balance/Fade” of the audio by using the “Arrow” button on the touch-
screen to adjust the sound level from the front and rear or right and left side speakers. Press the “Center ‘C’ Button”
on the touchscreen to reset the balance and fade to the factory setting. Speed Adjusted Volume Off123
Music Info Cleanup OnOff
NOTE:
The “Music Info Cleanup” feature helps organize music files for optimized music navigation. Surround Sound — If Equipped OnOff
398 MULTIMEDIA