check engine light DODGE JOURNEY 2020 User Guide
[x] Cancel search | Manufacturer: DODGE, Model Year: 2020, Model line: JOURNEY, Model: DODGE JOURNEY 2020Pages: 396, PDF Size: 25.53 MB
Page 162 of 396
160 STARTING AND OPERATING
ENGINE BREAK-IN RECOMMENDATIONS
A long break-in period is not required for the
engine and drivetrain (transmission and axle) in
your vehicle.
Drive moderately during the first 300 miles
( 5
00 km). After the initial 60 miles (100 km),
s p
eeds up to 50 or 55 mph (80 or 90 km/h) are
d e
sirable.
While cruising, brief full-throttle acceleration
w i
thin the limits of local traffic laws contributes
to a good break-in. Wide-open throttle
acceleration in low gear can be detrimental and
should be avoided.
The engine oil installed in the engine at the
fa
ctory is a high-quality energy conserving
type lubricant. Oil changes should be consistent
w i
th anticipated climate conditions under which
vehicle operations will occur. For the
recommended viscosity and quality grades,
refer to “Fluids And Lubricants” in “Technical
Specifications”. NOTE:
A new engine may consume some oil during its
fi
rst few thousand miles (kilometers) of opera -
tion. This should be considered a normal part of
t h
e break-in and not interpreted as a problem.
Please check your oil level with the engine oil
indicator often during the break in period. Add
oil as required.
PARKING BRAKE
Before exiting the vehicle, make sure that the
parking brake is fully applied. Also, be certain to
leave the transmission in PARK.
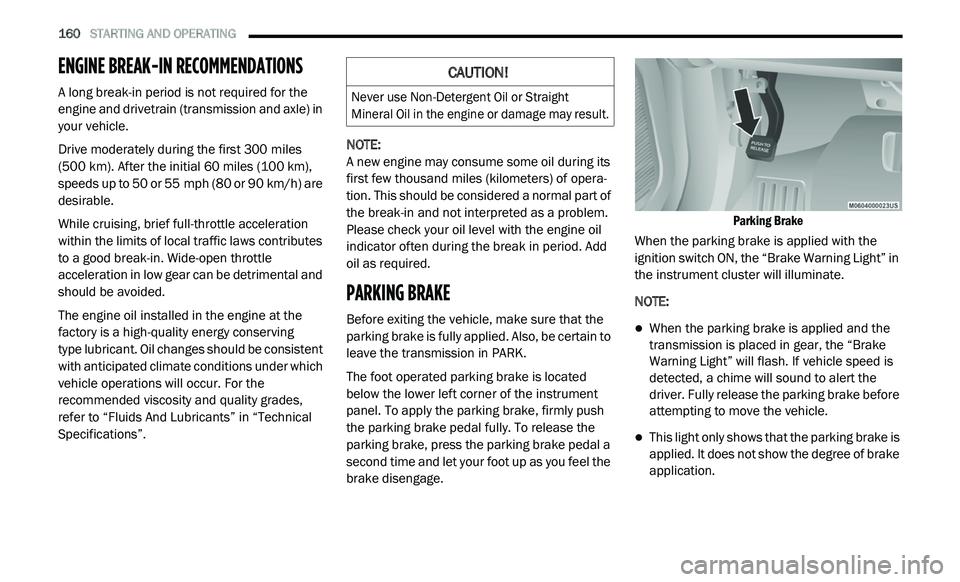
The foot operated parking brake is located
b e
low the lower left corner of the instrument
panel. To apply the parking brake, firmly push
the parking brake pedal fully. To release the
parking brake, press the parking brake pedal a
second time and let your foot up as you feel the
brake disengage.
Parking Brake
When the parking brake is applied with the
i g
nition switch ON, the “Brake Warning Light” in
the instrument cluster will illuminate.
NOTE:
When the parking brake is applied and the
transmission is placed in gear, the “Brake
Warning Light” will flash. If vehicle speed is
detected, a chime will sound to alert the
driver. Fully release the parking brake before
attempting to move the vehicle.
This light only shows that the parking brake is
applied. It does not show the degree of brake
application.
CAUTION!
Never use Non-Detergent Oil or Straight
Mineral Oil in the engine or damage may result.
Page 179 of 396
STARTING AND OPERATING 177
(Continued)
NOTE:
Tighten the gas cap until you hear a “clicking”
s o
und. This is an indication that the gas cap is
tightened properly. The MIL in the instrument
cluster may turn on if the gas cap is not secured
properly. Make sure that the gas cap is tight -
ened each time the vehicle is refueled.
LOOSE FUEL FILLER CAP MESSAGE
If the vehicle diagnostic system determines that
the fuel filler cap is loose, improperly installed,
or damaged, a ”gASCAP” message will display in
the odometer or a “Check Gascap” message will
display in the instrument cluster. If this occurs,
tighten the fuel filler cap properly and press the
Trip Odometer button to turn off the message. If
the problem continues, the message will appear
the next time the vehicle is started.
A loose, improperly installed, or damaged fuel
f i
ller cap may also turn on the MIL.
VEHICLE LOADING
The load carrying capacity of your vehicle is
shown on the “Vehicle Certification Label”. This
information should be used for passenger and
luggage loading as indicated.
Do not exceed the specified Gross Vehicle
W e
ight Rating (GVWR) or the Gross Axle Weight
Rating (GAWR).
VEHICLE CERTIFICATION LABEL
Your vehicle has a Vehicle Certification Label
affixed to the drivers side B-pillar or the rear of
the driver’s door.
The label contains the following information:
Name of manufacturer
Month and year of manufacture
Gross Vehicle Weight Rating (GVWR)
Gross Axle Weight Rating (GAWR) front
Gross Axle Weight Rating (GAWR) rear
Vehicle Identification Number (VIN)
Type of vehicle
Month, Day, and Hour of manufacture (MDH)
WARNING!
Never have any smoking materials lit in or
near the vehicle when the gas cap is
removed or the tank is being filled.
Never add fuel to the vehicle when the
engine is running.
A fire may result if gasoline is pumped into
a portable container that is inside of a
vehicle. You could be burned. Always place
gas containers on the ground while filling.
Failure to follow this warning may result in
serious injury or death.
CAUTION!
Damage to the fuel system or emissions
control system could result from using an
improper fuel tank filler tube cap.
A poorly fitting fuel filler cap could let impu -
rities into the fuel system.
A poorly fitting fuel filler cap may cause the
“Malfunction Indicator Light (MIL)” to turn on.
To avoid fuel spillage and overfilling, do not
“top off” the fuel tank after filling. When the
fuel nozzle “clicks” or shuts off, the fuel
tank is full.
CAUTION! (Continued)
5
Page 187 of 396
STARTING AND OPERATING 185
Automatic Transmission
The DRIVE range can be selected when towing.
However, if frequent shifting occurs while in
DRIVE, use the AutoStick shift control to
manually select a lower gear.
NOTE:
Using a lower gear while operating the vehicle
u n
der heavy loading conditions will improve
performance and extend transmission life by
reducing excessive shifting and heat build up.
This action will also provide better engine
braking.
If you REGULARLY tow a trailer for more than
4 5
minutes of continuous operation, then
c h
ange the transmission fluid and filter as
specified for “police, taxi, fleet, or frequent
trailer towing”. Refer to the “Scheduled
Servicing” in “Servicing And Maintenance” for
the proper maintenance intervals.
NOTE:
Check the automatic transmission fluid level
b e
fore towing. If you notice fluid leakage or
transmission malfunction, see an authorized
dealer immediately for assistance.
Speed Control — If Equipped
Do not use on hilly terrain or with heavy
loads.
When using the Speed Control, if you experi -
ence speed drops greater than 10 mph
( 1
6 km/h), disengage until you can get back
t o
cruising speed.
Use Speed Control in flat terrain and with
light loads to maximize fuel efficiency.
AutoStick
When using the AutoStick shift control, select
the highest gear that allows for adequate
performance and avoids frequent down -
shifts. For example, choose “4” if the desired
s p
eed can be maintained. Choose “3” or “2”
if needed to maintain the desired speed.
To prevent excess heat generation, avoid
continuous driving at high RPM. Reduce
vehicle speed as necessary to avoid
extended driving at high RPM. Return to a
higher gear or vehicle speed when grade and
road conditions allow.
Cooling System
To reduce potential for engine and transmission
overheating, take the following actions:
City Driving
In city traffic — while stopped, place the
tr
ansmission in NEUTRAL, but do not increase
engine idle speed.
Highway Driving
Reduce speed.
Temporarily turn off air conditioning.5
Page 190 of 396
188 STARTING AND OPERATING
(Continued)
Shallow Standing Water
Although your vehicle is capable of driving
through shallow standing water, consider the
following Cautions and Warnings before doing
so.
WARNING!
Driving through standing water limits your
vehicle’s traction capabilities. Do not
exceed 5 mph (8 km/h) when driving
t h
rough standing water.
Driving through standing water limits your
vehicle’s braking capabilities, which
increases stopping distances. Therefore,
after driving through standing water, drive
slowly and lightly press on the brake pedal
several times to dry the brakes.
Failure to follow these warnings may result
in injuries that are serious or fatal to you,
your passengers, and others around you.
CAUTION!
Always check the depth of the standing
water before driving through it. Never drive
through standing water that is deeper than
the bottom of the tire rims mounted on the
vehicle.
Determine the condition of the road or the
path that is under water and if there are any
obstacles in the way before driving through
the standing water.
Do not exceed 5 mph (8 km/h) when
dr
iving through standing water. This will
minimize wave effects.
Driving through standing water may cause
damage to your vehicle’s drivetrain compo -
nents. Always inspect your vehicle’s fluids
( i
.e., engine oil, transmission, axle, etc.) for
signs of contamination (i.e., fluid that is
milky or foamy in appearance) after driving
through standing water. Do not continue to
operate the vehicle if any fluid appears
contaminated, as this may result in further
damage. Such damage is not covered by
the New Vehicle Limited Warranty.
Getting water inside your vehicle’s engine
can cause it to lock up and stall out, and
cause serious internal damage to the
engine. Such damage is not covered by the
New Vehicle Limited Warranty.
CAUTION! (Continued)
Page 218 of 396
216
SERVICING AND MAINTENANCE
SCHEDULED SERVICING
Your vehicle is equipped with an automatic
oil change indicator system. The oil change
i n
dicator system will remind you that it is time to
take your vehicle in for scheduled maintenance.
Based on engine operation conditions, the
oil change indicator message will illuminate.
This means that service is required for your
v e
hicle. Operating conditions such as frequent
short-trips, trailer tow, extremely hot or cold
ambient temperatures, and E-85 fuel usage will
influence when the “Change Oil” or “Oil Change
Required” message is displayed. Severe
operating conditions can cause the change oil
message to illuminate as early as 3,500 miles
(5,600 km) since last reset. Have your vehicle
s e
rviced as soon as possible, within the next
500 miles (805 km).
An authorized dealer will reset the oil change
i
n
dicator message after completing the
scheduled oil change. If a scheduled oil change
is performed by someone other than an
authorized dealer, the message can be reset
by referring to the steps described under
“ I
nstrument Cluster Display” in “Getting To
Know Your Instrument Panel” for further
information.
NOTE:
Under no circumstances should oil change
i n
tervals exceed 10,000 miles (16,000 km),
1 2
months or 350 hours of engine run time,
w h
ichever comes first. The 350 hours of engine
run or idle time is generally only a concern for
fleet customers.
Severe Duty All Models
Change engine oil at 4,000 miles (6,500 km) or
3 5
0 hours of engine run time if the vehicle is
operated in a dusty and off road environment or
is operated predominately at idle or only very
low engine RPM. This type of vehicle use is
considered Severe Duty. Once A Month Or Before A Long Trip:
Check engine oil level.
Check windshield washer fluid level.
Check tire pressure and look for unusual
wear or damage. Rotate tires at the first sign
of irregular wear, even if it occurs before the
oil indicator system turns on.
Check the fluid levels of the coolant reservoir,
brake master cylinder, power steering, and
transmission (4-speed only) and fill as
needed.
Check function of all interior and exterior
lights.
Page 234 of 396

232 SERVICING AND MAINTENANCE
(Continued)
BRAKE SYSTEM
In order to ensure brake system performance, all
brake system components should be inspected
periodically. Refer to the “Maintenance Plan” in
“Servicing and Maintenance” for the proper
maintenance intervals.
Master Cylinder — Brake Fluid Level Check
Check the fluid level in the master cylinder
immediately if the “Brake Warning Light”
indicates system failure.
Check the fluid level in the master cylinder
wh
en performing underhood services.
Clean the top of the master cylinder area before
r e
moving the cap. If necessary, add fluid to
bring the fluid level up to the requirements
described on the brake fluid reservoir. Overfilling of fluid is not recommended because
i
t
may cause leaking in the system.
Fluid level can be expected to fall as the brake
p a
ds wear. Brake fluid level should be checked
when pads are replaced. However, low fluid
level may be caused by a leak and a checkup
may be needed.
Use only manufacturer's recommended brake
fl
uid. Refer to “Fluids And Lubricants” in
“Technical Specifications” for further
information.WARNING!
Riding the brakes can lead to brake failure
and possibly a collision. Driving with your foot
resting or riding on the brake pedal can result
in abnormally high brake temperatures,
excessive lining wear, and possible brake
damage. You would not have your full braking
capacity in an emergency.
WARNING!
Use only manufacturer's recommended
brake fluid. Refer to “Fluids And Lubricants”
in “Technical Specifications” for further infor-
mation. Using the wrong type of brake fluid
c a
n severely damage your brake system
and/or impair its performance. The proper
type of brake fluid for your vehicle is also
identified on the original factory installed
hydraulic master cylinder reservoir.
To avoid contamination from foreign matter
or moisture, use only new brake fluid or
fluid that has been in a tightly closed
container. Keep the master cylinder reser -
voir cap secured at all times. Brake fluid in
a
open container absorbs moisture from
the air resulting in a lower boiling point.
This may cause it to boil unexpectedly
d u
ring hard or prolonged braking, resulting
in sudden brake failure. This could result in
a collision.
Overfilling the brake fluid reservoir can
result in spilling brake fluid on hot engine
parts, causing the brake fluid to catch fire.
Brake fluid can also damage painted and
vinyl surfaces, care should be taken to
avoid its contact with these surfaces.
Do not allow petroleum based fluid to
contaminate the brake fluid. Brake seal
components could be damaged, causing
partial or complete brake failure. This could
result in a collision.
WARNING! (Continued)
Page 258 of 396
256
TECHNICAL SPECIFICATIONS
IDENTIFICATION DATA
VEHICLE IDENTIFICATION NUMBER
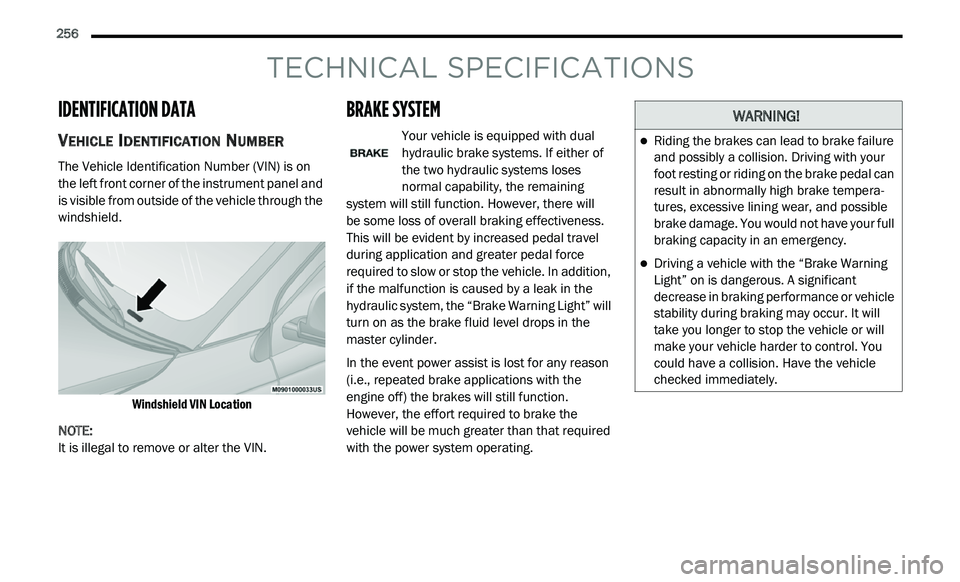
The Vehicle Identification Number (VIN) is on
the left front corner of the instrument panel and
is visible from outside of the vehicle through the
windshield.
Windshield VIN Location
NOTE:
It is illegal to remove or alter the VIN.
BRAKE SYSTEM
Your vehicle is equipped with dual
hydraulic brake systems. If either of
t h
e two hydraulic systems loses
normal capability, the remaining
system will still function. However, there will
be some loss of overall braking effectiveness.
T h
is will be evident by increased pedal travel
during application and greater pedal force
required to slow or stop the vehicle. In addition,
if the malfunction is caused by a leak in the
hydraulic system, the “Brake Warning Light” will
turn on as the brake fluid level drops in the
master cylinder.
In the event power assist is lost for any reason
( i
.e., repeated brake applications with the
engine off) the brakes will still function.
However, the effort required to brake the
vehicle will be much greater than that required
with the power system operating.
WARNING!
Riding the brakes can lead to brake failure
and possibly a collision. Driving with your
foot resting or riding on the brake pedal can
result in abnormally high brake tempera -
tures, excessive lining wear, and possible
b r
ake damage. You would not have your full
braking capacity in an emergency.
Driving a vehicle with the “Brake Warning
Light” on is dangerous. A significant
decrease in braking performance or vehicle
stability during braking may occur. It will
take you longer to stop the vehicle or will
make your vehicle harder to control. You
could have a collision. Have the vehicle
checked immediately.
Page 276 of 396
274 MULTIMEDIA
CUSTOMER PROGRAMMABLE FEATURES —
U
CONNECT 3/ 3 NAV SETTINGS
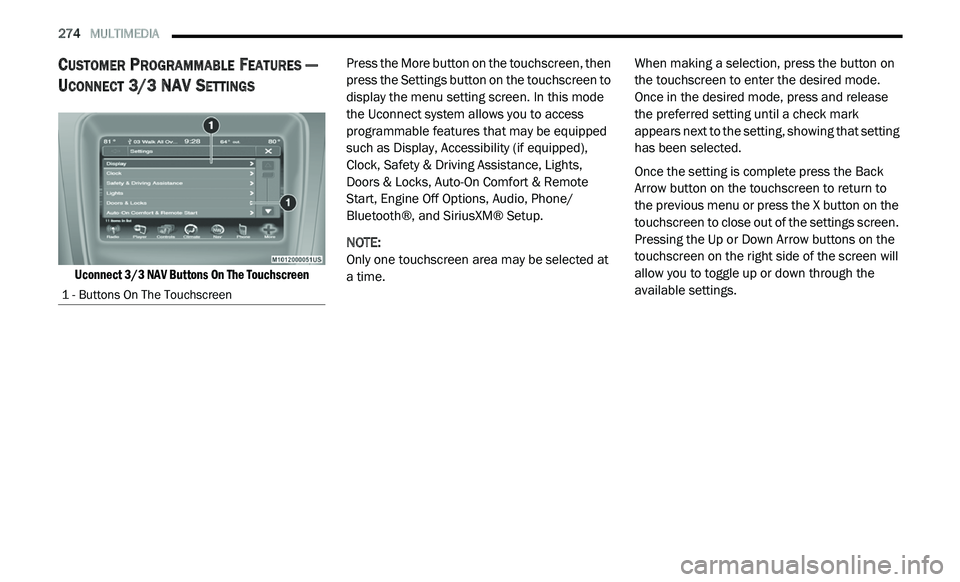
Uconnect 3/3 NAV Buttons On The Touchscreen
Press the More button on the touchscreen, then
p
r
ess the Settings button on the touchscreen to
display the menu setting screen. In this mode
the Uconnect system allows you to access
programmable features that may be equipped
such as Display, Accessibility (if equipped),
Clock, Safety & Driving Assistance, Lights,
Doors & Locks, Auto-On Comfort & Remote
Start, Engine Off Options, Audio, Phone/
Bluetooth®, and SiriusXM® Setup.
NOTE:
Only one touchscreen area may be selected at
a
time. When making a selection, press the button on
t
h
e touchscreen to enter the desired mode.
Once in the desired mode, press and release
the preferred setting until a check mark
appears next to the setting, showing that setting
has been selected.
Once the setting is complete press the Back
A r
row button on the touchscreen to return to
the previous menu or press the X button on the
touchscreen to close out of the settings screen.
Pressing the Up or Down Arrow buttons on the
touchscreen on the right side of the screen will
allow you to toggle up or down through the
available settings.
1 - Buttons On The Touchscreen
Page 280 of 396
278 MULTIMEDIA
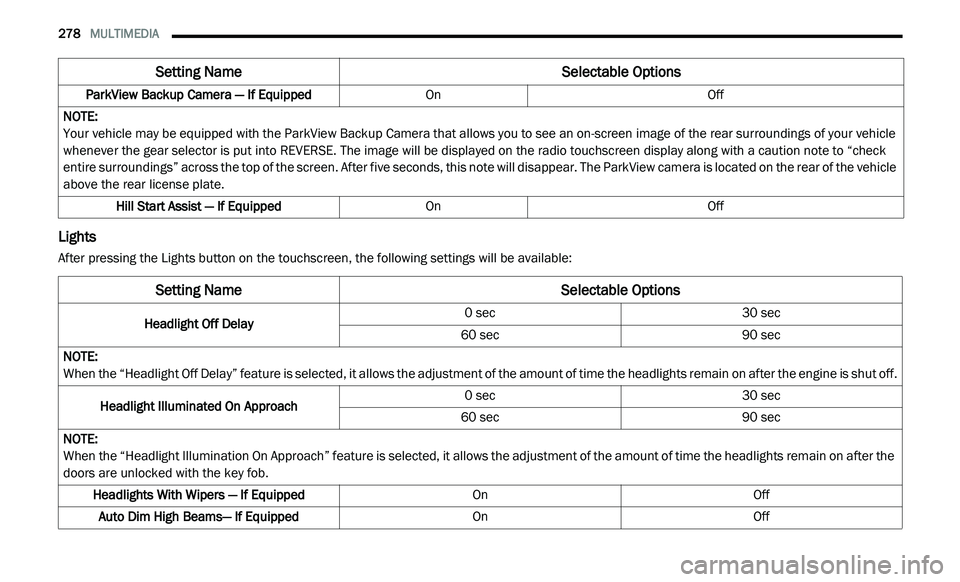
Lights
After pressing the Lights button on the touchscreen, the following settings will be available:ParkView Backup Camera — If Equipped
OnOff
NOTE:
Your vehicle may be equipped with the ParkView Backup Camera that allows you to see an on-screen image of the rear surroundings of your vehicle
w h
enever the gear selector is put into REVERSE. The image will be displayed on the radio touchscreen display along with a caution note to “check
entire surroundings” across the top of the screen. After five seconds, this note will disappear. The ParkView camera is located on the rear of the vehicle
above the rear license plate.
Hill Start Assist — If Equipped OnOff
Setting Name Selectable Options
Setting NameSelectable Options
Headlight Off Delay0 sec
30 sec
60 sec 90 sec
NOTE:
When the “Headlight Off Delay” feature is selected, it allows the adjustment of the amount of time the headlights remain on after the engine is shut off.
Headlight Illuminated On Approach 0 sec
30 sec
60 sec 90 sec
NOTE:
When the “Headlight Illumination On Approach” feature is selected, it allows the adjustment of the amount of time the headlights remain on after the
d o
ors are unlocked with the key fob.
Headlights With Wipers — If Equipped OnOff
Auto Dim High Beams— If Equipped OnOff
Page 386 of 396
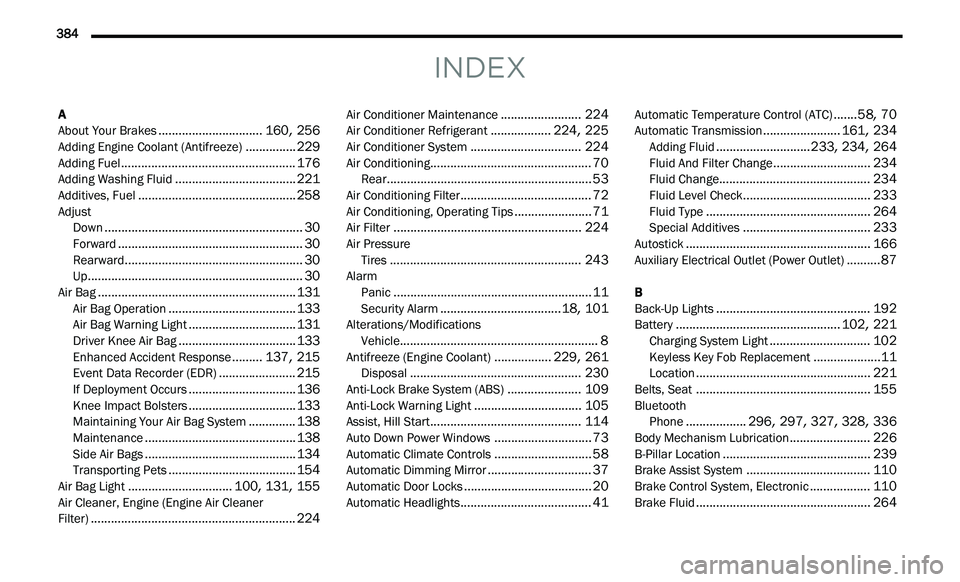
384
INDEX
A
About Your Brakes...............................160, 256Adding Engine Coolant (Antifreeze)...............229Adding Fuel....................................................176Adding Washing Fluid....................................221Additives, Fuel...............................................258Adjust
Down...........................................................30Forward.......................................................30Rearward.....................................................30Up................................................................30Air Bag...........................................................131Air Bag Operation......................................133Air Bag Warning Light................................131Driver Knee Air Bag...................................133Enhanced Accident Response.........137, 215Event Data Recorder (EDR).......................215If Deployment Occurs................................136Knee Impact Bolsters................................133Maintaining Your Air Bag System..............138Maintenance.............................................138Side Air Bags.............................................134Transporting Pets......................................154Air Bag Light...............................100, 131, 155Air Cleaner, Engine (Engine Air Cleaner
Filter).............................................................224
Air Conditioner Maintenance........................224Air Conditioner Refrigerant..................224, 225Air Conditioner System.................................224Air Conditioning................................................70Rear.............................................................53Air Conditioning Filter.......................................72Air Conditioning, Operating Tips.......................71Air Filter........................................................224Air Pressure Tires.........................................................243AlarmPanic...........................................................11Security Alarm....................................18, 101Alterations/ModificationsVehicle...........................................................8Antifreeze (Engine Coolant).................229, 261Disposal...................................................230Anti-Lock Brake System (ABS)......................109Anti-Lock Warning Light................................105Assist, Hill Start.............................................114Auto Down Power Windows.............................73Automatic Climate Controls.............................58Automatic Dimming Mirror...............................37Automatic Door Locks......................................20Automatic Headlights.......................................41
Automatic Temperature Control (ATC).......58, 70Automatic Transmission.......................161, 234Adding Fluid............................233, 234, 264Fluid And Filter Change.............................234Fluid Change.............................................234Fluid Level Check......................................233Fluid Type.................................................264Special Additives......................................233Autostick.......................................................166Auxiliary Electrical Outlet (Power Outlet)..........87
B
Back-Up Lights..............................................192Battery.................................................102, 221Charging System Light..............................102Keyless Key Fob Replacement....................11Location....................................................221Belts, Seat....................................................155BluetoothPhone..................296, 297, 327, 328, 336Body Mechanism Lubrication........................226B-Pillar Location............................................239Brake Assist System.....................................110Brake Control System, Electronic..................110Brake Fluid....................................................264