buttons DODGE JOURNEY 2020 Owner's Manual
[x] Cancel search | Manufacturer: DODGE, Model Year: 2020, Model line: JOURNEY, Model: DODGE JOURNEY 2020Pages: 396, PDF Size: 25.53 MB
Page 97 of 396
GETTING TO KNOW YOUR INSTRUMENT PANEL 95
INSTRUMENT CLUSTER DISPLAY
Your vehicle may be equipped with an
instrument cluster display, which offers useful
information to the driver. With the ignition in
the OFF mode, opening/closing of a door will
a c
tivate the display for viewing, and display
the total miles, or kilometers, in the odometer.
Y o
ur instrument cluster display is designed to
display important information about your
vehicle’s systems and features. Using a driver
interactive display located on the instrument
panel, your instrument cluster display can show
you how systems are working and give you
warnings when they aren’t. The steering wheel
mounted controls allow you to scroll through
and enter the main menus and submenus.
You can access the specific information you
w a
nt and make selections and adjustments.
INSTRUMENT CLUSTER DISPLAY
L
OCATION AND CONTROLS
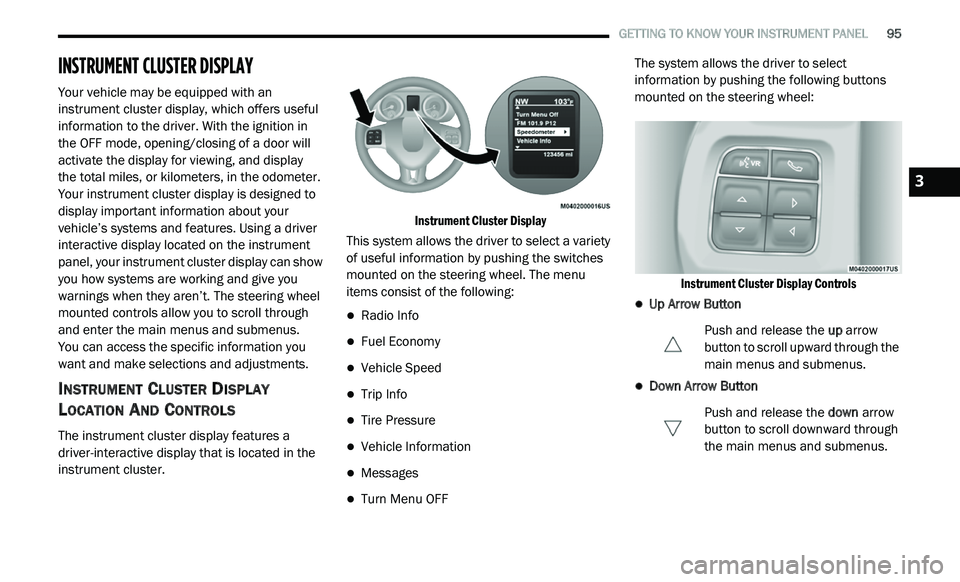
The instrument cluster display features a
driver-interactive display that is located in the
instrument cluster.
Instrument Cluster Display
This system allows the driver to select a variety
o f
useful information by pushing the switches
mounted on the steering wheel. The menu
items consist of the following:
Radio Info
Fuel Economy
Vehicle Speed
Trip Info
Tire Pressure
Vehicle Information
Messages
Turn Menu OFF The system allows the driver to select
i
n
formation by pushing the following buttons
mounted on the steering wheel:
Instrument Cluster Display Controls
Up Arrow Button Push and release the up
arrow
button to scroll upward through the
m a
in menus and submenus.
Down Arrow Button
Push and release the do
wn arrow
button to scroll downward through
t h
e main menus and submenus.
3
Page 100 of 396
98 GETTING TO KNOW YOUR INSTRUMENT PANEL
The Trip Functions mode displays the following
information:
Trip A
Shows the total distance traveled for Trip A
since the last reset.
Shows the elapsed time traveled for Trip A
since the last reset.
Trip B
Shows the total distance traveled for Trip B
since the last reset.
Shows the elapsed time traveled for Trip B
since the last reset.
Elapsed Time
Shows the total elapsed time of travel since the
l a
st reset. Elapsed time will increment when the
ignition is in the ON/RUN position.
To Reset The Display
Reset will only occur while a resettable function
i s
being displayed. Push and release the right
arrow button once to clear the resettable
function.
Tire Pressure
Push and release the up or down arrow button
until “Tire PSI:” displays highlighted in the
instrument cluster display. Push and release
the right arrow button to view a graphic of the
vehicle with a tire pressure value at each corner
of the graphic.
Vehicle Info (Customer Information
Features)
Push and release the up or down arrow button
until “Vehicle Info” displays in the instrument
cluster display and push the right arrow button.
Push the up or down arrow button to scroll
through the available information displays.
Coolant Temperature
Displays the actual coolant temperature.
Oil Temperature
Displays the actual oil temperature.
Oil Pressure - If Equipped
Displays the actual oil pressure.
Transmission Temperature
Displays the actual transmission temperature.
Engine Hours
Displays the number of hours of engine operation.
Messages
Push and release the up or down arrow button
until “Messages: XX” displays highlighted in the
instrument cluster display. If there is more than
one message, pushing the right arrow button
will display a stored warning message. Push
and release the up or down arrow button if there
is more than one message to cycle through the
remaining stored messages. If there are no
messages, pushing the right arrow button will
not change the display.
Turn Menu OFF
Select from the Main Menu using the up or
down arrow button. Pushing the right arrow
button clears the menu display. Pushing any
one of the four Display control buttons will bring
the menu back.
Page 170 of 396
168 STARTING AND OPERATING
POWER STEERING
The standard power steering system will give
you good vehicle response and increased ease
of maneuverability in tight spaces. The system
will provide mechanical steering capability if
power assist is lost.
If for some reason the power assist is
in
terrupted, it will still be possible to steer
your vehicle. Under these conditions, you will
o b
serve a substantial increase in steering
effort, especially at very low vehicle speeds
and during parking maneuvers.
NOTE:
Increased noise levels at the end of the
steering wheel travel are considered normal
and do not indicate that there is a problem
with the power steering system.
Upon initial start-up in cold weather, the
power steering pump may make noise for a
short amount of time. This is due to the cold,
thick fluid in the steering system. This noise
should be considered normal, and it does not
in any way damage the steering system.
POWER STEERING FLUID CHECK
Checking the power steering fluid level at a
defined service interval is not required. The fluid
should only be checked if a leak is suspected,
abnormal noises are apparent, and/or the
system is not functioning as anticipated.
Coordinate inspection efforts through an
authorized dealer. If necessary, add fluid to restore to the proper
in
dicated level. With a clean cloth, wipe any
spilled fluid from all surfaces. Refer to “Fluids
And Lubricants” in “Technical Specifications”
for the correct fluid type.
SPEED CONTROL — IF EQUIPPED
When engaged, the Speed Control takes over
accelerator operations at speeds greater than
25 mph (40 km/h).
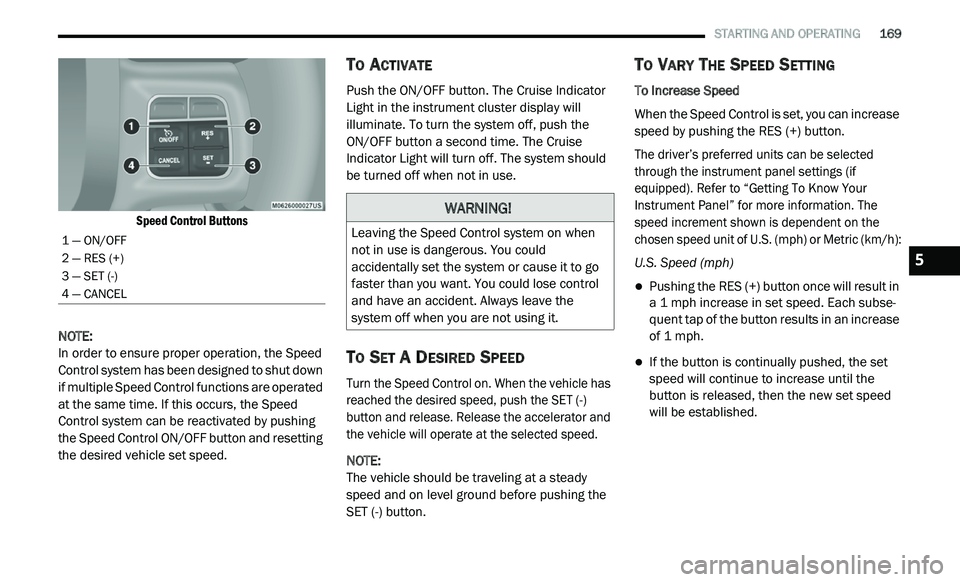
The Speed Control buttons are located on the
r i
ght side of the steering wheel.
CAUTION!
Prolonged operation of the steering system at
the end of the steering wheel travel will
increase the steering fluid temperature and it
should be avoided when possible. Damage to
the power steering pump may occur.
WARNING!
Fluid level should be checked on a level
surface and with the engine off to prevent
injury from moving parts and to ensure
accurate fluid level reading. Do not overfill.
Use only manufacturer's recommended
power steering fluid.
CAUTION!
Do not use chemical flushes in your power
steering system as the chemicals can
damage your power steering components.
Such damage is not covered by the New
Vehicle Limited Warranty.
Page 171 of 396
STARTING AND OPERATING 169
Speed Control Buttons
NOTE:
In order to ensure proper operation, the Speed
Co
ntrol system has been designed to shut down
if multiple Speed Control functions are operated
at the same time. If this occurs, the Speed
Control system can be reactivated by pushing
the Speed Control ON/OFF button and resetting
the desired vehicle set speed.
TO ACTIVATE
Push the ON/OFF button. The Cruise Indicator
Light in the instrument cluster display will
illuminate. To turn the system off, push the
ON/OFF button a second time. The Cruise
I n
dicator Light will turn off. The system should
be turned off when not in use.
TO SET A DESIRED SPEED
Turn the Speed Control on. When the vehicle has
reached the desired speed, push the SET (-)
button and release. Release the accelerator and
the vehicle will operate at the selected speed.
NOTE:
The vehicle should be traveling at a steady
s p
eed and on level ground before pushing the
SET (-) button.
TO VARY THE SPEED SETTING
To Increase Speed
When the Speed Control is set, you can increase
s p
eed by pushing the RES (+) button.
The driver’s preferred units can be selected
t h
rough the instrument panel settings (if
equipped). Refer to “Getting To Know Your
Instrument Panel” for more information. The
speed increment shown is dependent on the
chosen speed unit of U.S. (mph) or Metric (km/h):
U.S. Speed (mph)
Pushing the RES (+) button once will result in
a 1 mph increase in set speed. Each subse -
quent tap of the button results in an increase
o f
1 mph.
If the button is continually pushed, the set
speed will continue to increase until the
button is released, then the new set speed
will be established.
1 — ON/OFF
2 — RES (+)
3 — SET (-)
4 — CANCEL
WARNING!
Leaving the Speed Control system on when
not in use is dangerous. You could
accidentally set the system or cause it to go
faster than you want. You could lose control
and have an accident. Always leave the
system off when you are not using it.
5
Page 268 of 396
266 MULTIMEDIA
UCONNECT SETTINGS
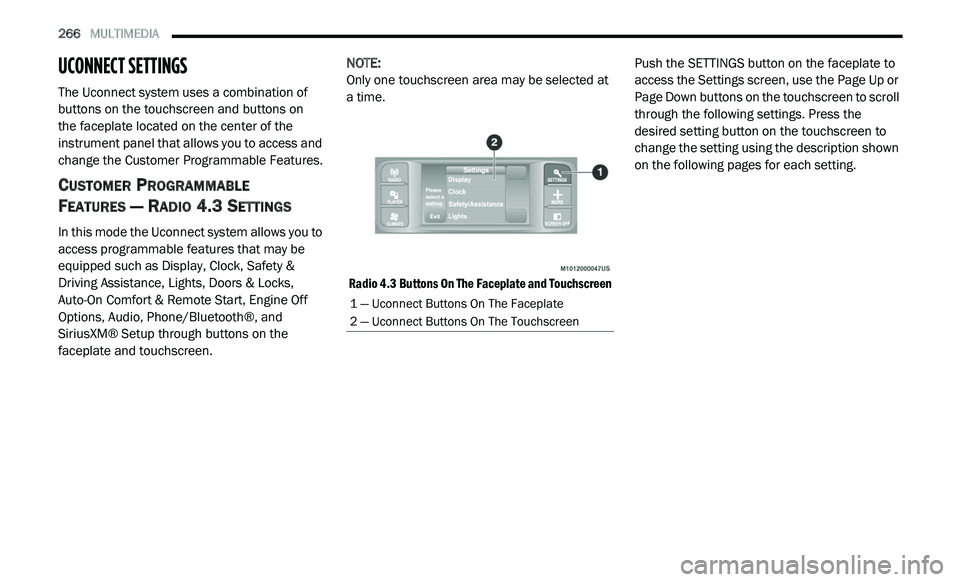
The Uconnect system uses a combination of
buttons on the touchscreen and buttons on
the faceplate located on the center of the
i n
strument panel that allows you to access and
change the Customer Programmable Features.
CUSTOMER PROGRAMMABLE
F
EATURES — RADIO 4.3 SETTINGS
In this mode the Uconnect system allows you to
access programmable features that may be
equipped such as Display, Clock, Safety &
Driving Assistance, Lights, Doors & Locks,
Auto-On Comfort & Remote Start, Engine Off
Options, Audio, Phone/Bluetooth®, and
SiriusXM® Setup through buttons on the
faceplate and touchscreen. NOTE:
Only one touchscreen area may be selected at
a
time.
Radio 4.3 Buttons On The Faceplate and Touchscreen
Push the SETTINGS button on the faceplate to
a
c
cess the Settings screen, use the Page Up or
Page Down buttons on the touchscreen to scroll
through the following settings. Press the
desired setting button on the touchscreen to
change the setting using the description shown
on the following pages for each setting.
1 — Uconnect Buttons On The Faceplate
2 — Uconnect Buttons On The Touchscreen
Page 269 of 396
MULTIMEDIA 267
Display
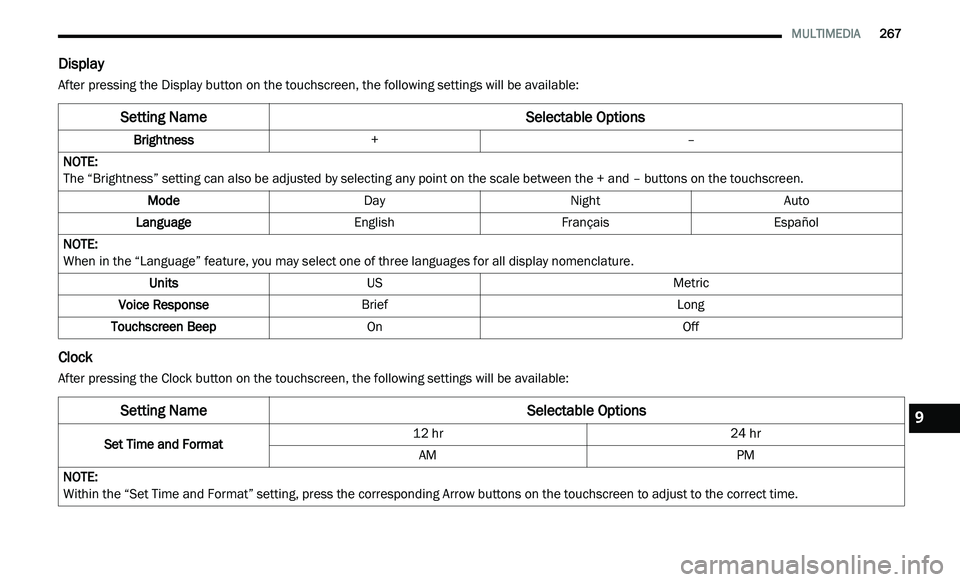
After pressing the Display button on the touchscreen, the following settings will be available:
Clock
After pressing the Clock button on the touchscreen, the following settings will be available:
Setting Name Selectable Options
Brightness+ –
NOTE:
The “Brightness” setting can also be adjusted by selecting any point on the scale between the + and – buttons on the touchscreen.
Mode DayNight Auto
Language EnglishFrançais Español
NOTE:
When in the “Language” feature, you may select one of three languages for all display nomenclature.
Units US Metric
Voice Response Brief Long
Touchscreen Beep On Off
Setting NameSelectable Options
Set Time and Format12 hr
24 hr
AM PM
NOTE:
Within the “Set Time and Format” setting, press the corresponding Arrow buttons on the touchscreen to adjust to the correct time.
9
Page 274 of 396
272 MULTIMEDIA
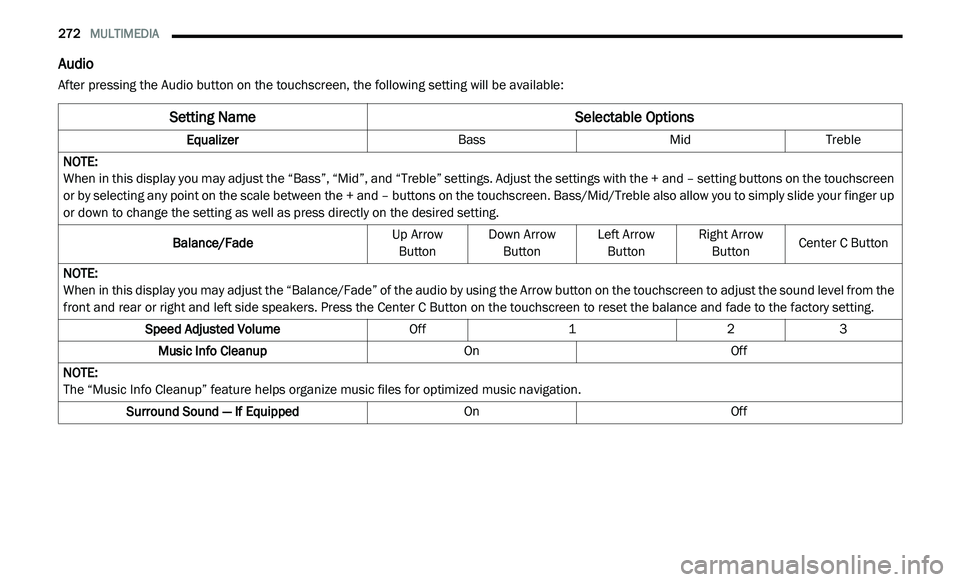
Audio
After pressing the Audio button on the touchscreen, the following setting will be available:
Setting Name Selectable Options
EqualizerBassMidTreble
NOTE:
When in this display you may adjust the “Bass”, “Mid”, and “Treble” settings. Adjust the settings with the + and – setting buttons on the touchscreen
o r
by selecting any point on the scale between the + and – buttons on the touchscreen. Bass/Mid/Treble also allow you to simply slide your finger up
or down to change the setting as well as press directly on the desired setting.
Balance/Fade Up Arrow
B u
tton Down Arrow
Bu tton Left Arrow
Bu tton Right Arrow
Bu tton Center C Button
NOTE:
When in this display you may adjust the “Balance/Fade” of the audio by using the Arrow button on the touchscreen to adjust the sound level from the
f r
ont and rear or right and left side speakers. Press the Center C Button on the touchscreen to reset the balance and fade to the factory setting.
Speed Adjusted Volume Off123
Music Info Cleanup OnOff
NOTE:
The “Music Info Cleanup” feature helps organize music files for optimized music navigation.
Surround Sound — If Equipped OnOff
Page 276 of 396
274 MULTIMEDIA
CUSTOMER PROGRAMMABLE FEATURES —
U
CONNECT 3/ 3 NAV SETTINGS
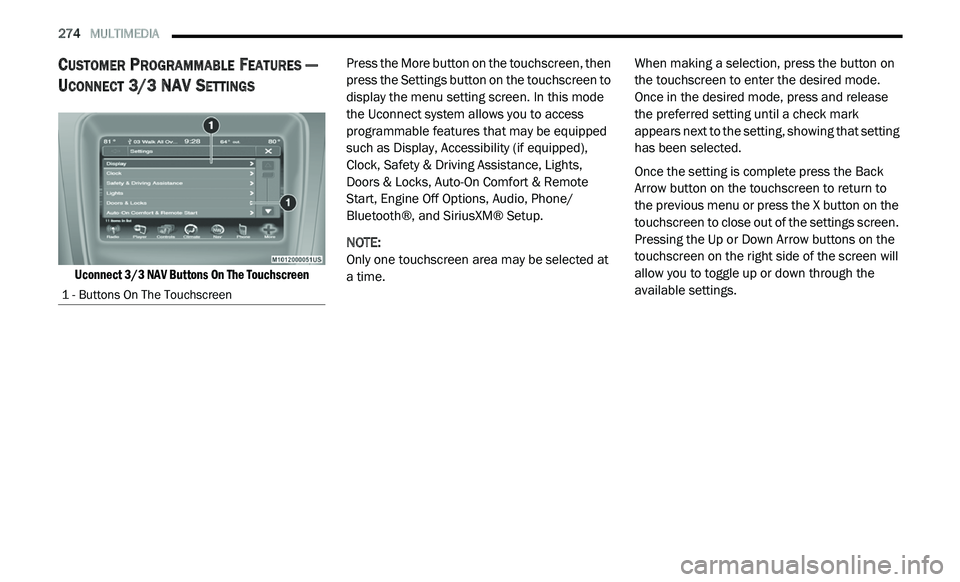
Uconnect 3/3 NAV Buttons On The Touchscreen
Press the More button on the touchscreen, then
p
r
ess the Settings button on the touchscreen to
display the menu setting screen. In this mode
the Uconnect system allows you to access
programmable features that may be equipped
such as Display, Accessibility (if equipped),
Clock, Safety & Driving Assistance, Lights,
Doors & Locks, Auto-On Comfort & Remote
Start, Engine Off Options, Audio, Phone/
Bluetooth®, and SiriusXM® Setup.
NOTE:
Only one touchscreen area may be selected at
a
time. When making a selection, press the button on
t
h
e touchscreen to enter the desired mode.
Once in the desired mode, press and release
the preferred setting until a check mark
appears next to the setting, showing that setting
has been selected.
Once the setting is complete press the Back
A r
row button on the touchscreen to return to
the previous menu or press the X button on the
touchscreen to close out of the settings screen.
Pressing the Up or Down Arrow buttons on the
touchscreen on the right side of the screen will
allow you to toggle up or down through the
available settings.
1 - Buttons On The Touchscreen
Page 282 of 396
280 MULTIMEDIA
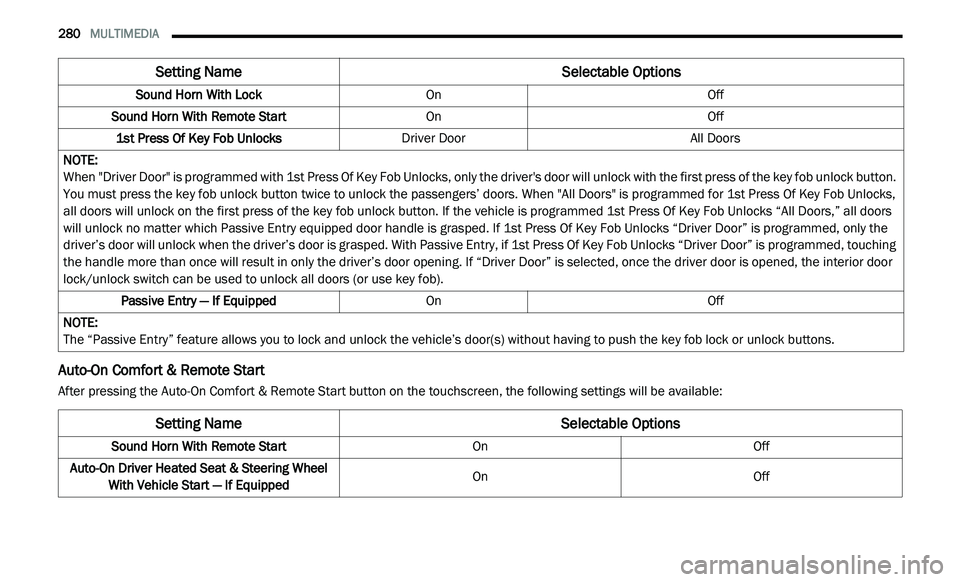
Auto-On Comfort & Remote Start
After pressing the Auto-On Comfort & Remote Start button on the touchscreen, the following settings will be available:Sound Horn With Lock
OnOff
Sound Horn With Remote Start OnOff
1st Press Of Key Fob Unlocks Driver Door All Doors
NOTE:
When "Driver Door" is programmed with 1st Press Of Key Fob Unlocks, only the driver's door will unlock with the first press of the key fob unlock button.
Y o
u must press the key fob unlock button twice to unlock the passengers’ doors. When "All Doors" is programmed for 1st Press Of Key Fob Unlocks,
all doors will unlock on the first press of the key fob unlock button. If the vehicle is programmed 1st Press Of Key Fob Unlocks “All Doors,” all doors
will unlock no matter which Passive Entry equipped door handle is grasped. If 1st Press Of Key Fob Unlocks “Driver Door” is programmed, only the
driver’s door will unlock when the driver’s door is grasped. With Passive Entry, if 1st Press Of Key Fob Unlocks “Driver Door” is programmed, touching
the handle more than once will result in only the driver’s door opening. If “Driver Door” is selected, once the driver door is opened, the interior door
lock/unlock switch can be used to unlock all doors (or use key fob).
Passive Entry — If Equipped OnOff
NOTE:
The “Passive Entry” feature allows you to lock and unlock the vehicle’s door(s) without having to push the key fob lock or unlock buttons.
Setting Name Selectable Options
Setting NameSelectable Options
Sound Horn With Remote StartOnOff
Auto-On Driver Heated Seat & Steering Wheel Wi
th Vehicle Start — If Equipped On
Off
Page 283 of 396
MULTIMEDIA 281
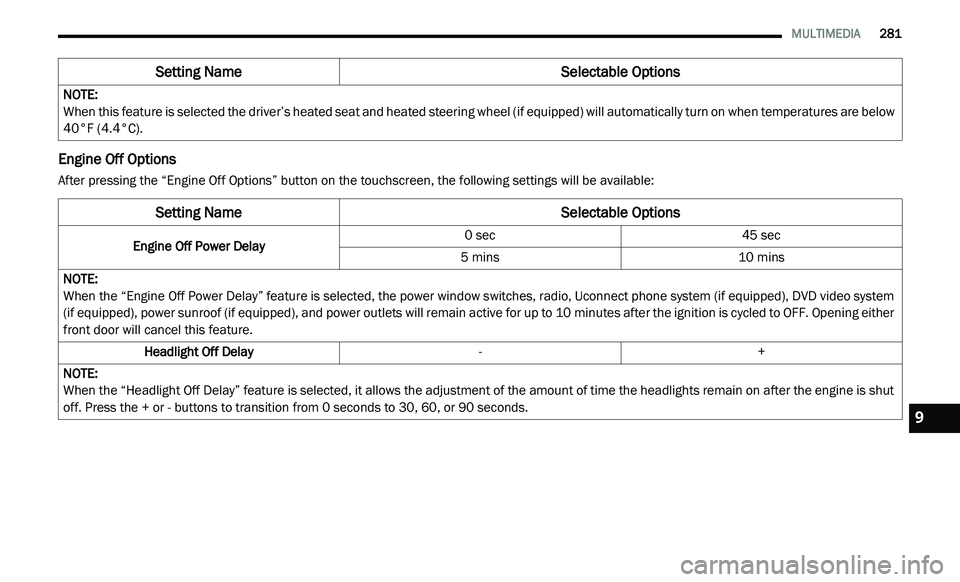
Engine Off Options
After pressing the “Engine Off Options” button on the touchscreen, the following settings will be available:NOTE:
When this feature is selected the driver’s heated seat and heated steering wheel (if equipped) will automatically turn on when temperatures are below
40
°F (4.4°C).
Setting Name Selectable Options
Setting NameSelectable Options
Engine Off Power Delay0 sec
45 sec
5 mins 10 mins
NOTE:
When the “Engine Off Power Delay” feature is selected, the power window switches, radio, Uconnect phone system (if equipped), DVD video system
( i
f equipped), power sunroof (if equipped), and power outlets will remain active for up to 10 minutes after the ignition is cycled to OFF. Opening either
f r
ont door will cancel this feature.
Headlight Off Delay -+
NOTE:
When the “Headlight Off Delay” feature is selected, it allows the adjustment of the amount of time the headlights remain on after the engine is shut
of
f. Press the + or - buttons to transition from 0 seconds to 30, 60, or 90 seconds.
9