buttons DODGE JOURNEY 2020 Service Manual
[x] Cancel search | Manufacturer: DODGE, Model Year: 2020, Model line: JOURNEY, Model: DODGE JOURNEY 2020Pages: 396, PDF Size: 25.53 MB
Page 311 of 396

MULTIMEDIA 309
Direct Tune
Press the available number button on the
t o
uchscreen to begin selecting a desired
station. Once a number has been entered,
any numbers that are no longer possible
( s
tations that cannot be reached) will become
deactivated/grayed out.
Once the last digit of a station has been
e n
tered, the Direct Tune screen will close and
the system will automatically tune to that
station.
The selected Station or Channel number is
d i
splayed in the Direct Tune text box.
Undo
You can backspace an entry by pressing the
bo
ttom left Undo button. GO
When pressed, the GO button allows you to
c
o
mmit an entry, at which time the radio will
tune to the entered station or channel and close
the Direct Tune Screen.
Screen Close
The X button at the top right closes the Direct
T u
ne Screen. The Direct Tune Screen also
automatically closes if no activity occurs within
10 seconds.
Setting Presets
The Presets are available for all Radio Modes,
and are activated by pressing any of the six
Preset buttons, located at the top of the
touchscreen.
When you are receiving a station that you wish
t o
commit into memory, press and hold the
desired numbered button for more than two
seconds or until you hear a confirmation beep.
The Radio stores up to 12 presets in each of the
R a
dio modes. A set of six presets are visible at
the top of the radio touchscreen. You can switch between the two radio presets
b
y
pressing the Arrow button located in the
upper right of the radio screen.
Browse in AM/FM
Browsing In AM And FM
When in either AM or FM, the Browse Screen
p r
ovides a means to edit the Presets List and is
entered by pressing the Browse button on the
touchscreen.
9
Page 312 of 396

310 MULTIMEDIA
Scrolling Preset List
Preset List
Once in the Browse Presets screen, you can
s c
roll the Preset List by rotation of the Tune
Knob, or by pressing the Up and Down arrow
buttons on the touchscreen, located on the right
of the touchscreen.
Preset Selection From List
A Preset can be selected by pressing the listed
“ P
resets”, or by pushing the ENTER/BROWSE
button on the TUNE/SCROLL knob to select the
currently highlighted Preset.
When selected, the radio tunes to the station
s t
ored in the Presets and returns to the main
radio screen. Deleting Presets
A Preset can be deleted in the Presets Browse
sc
reen by pressing the Trash Can icon for the
corresponding Preset.
Return to Main Radio Screen
You can return to the Main Radio Screen, by
p r
essing the X button on the touchscreen when
in the Browse Presets screen.
SiriusXM® Satellite Radio Mode — If
Equipped
SiriusXM® Radio
SiriusXM® Satellite Radio uses direct
s a
tellite-to-receiver broadcasting technology to
provide clear, coast-to-coast radio content.
SiriusXM® is a subscription based service. SiriusXM® Premier has over 160 channels. Get
e
v
ery channel available on your satellite radio,
and enjoy all you want, all in one place. Hear
commercial-free music plus sports, news, talk
and entertainment.
Get all the premium programming, including
Ho
ward Stern, every NFL® game, Oprah Radio,
every MLB® and NHL® game, every NASCAR®
race, Martha Stewart and more. And get 20+
extra channels, including SiriusXM® Latino,
offering 20 channels of commercial-free music,
news, talk, comedy, sports and more dedicated
to Spanish language programming.
SiriusXM® services require subscriptions, sold
s e
parately after the 12-month trial included with the
new vehicle purchase. If you decide to continue your
service at the end of your trial subscription, the plan
you choose will automatically renew and bill at
then-current rates until you call SiriusXM® at
866-635-2349 to cancel. See SiriusXM® Customer
Agreement for complete terms for US residents at
www.siriusxm.com
, and for Canadian residents
at
www.siriusxm.ca
. All fees and programming
subject to change. Our satellite service is available
o n
ly to those at least 18 and older in the
48 contiguous USA and D.C. Our Sirius satellite
s e
rvice is also available in PR (with coverage
Page 313 of 396
MULTIMEDIA 311
limitations). Our Internet radio service is available
throughout our satellite service area and in AK and
HI. © 2020 SiriusXM® Radio Inc. Sirius, XM and all
related marks and logos are trademarks of
SiriusXM® Radio Inc.
This functionality is only available for radios
eq
uipped with a Satellite receiver. To receive
satellite radio, the vehicle needs to be outside
with a clear view to the sky.
If the screen shows Acquiring Signal, you might
h a
ve to change the vehicle’s position to receive
a signal. In most cases, the satellite radio does
not receive a signal in underground parking
garages or tunnels.
No Subscription
Radios equipped with a Satellite receiver
r e
quire a subscription to the SiriusXM® Service.
When the Radio does not have the necessary
subscription, the Radio is able to receive the
Preview channel only.
Acquiring SiriusXM® Subscription
To activate the SiriusXM® Satellite Radio
s u
bscription, call 800-643-2112 (USA
residents) or 888-534-7474 (Canadian
Residents). You will need to provide the Sirius ID (ESN) located at the bottom of the Channel 0
screen.
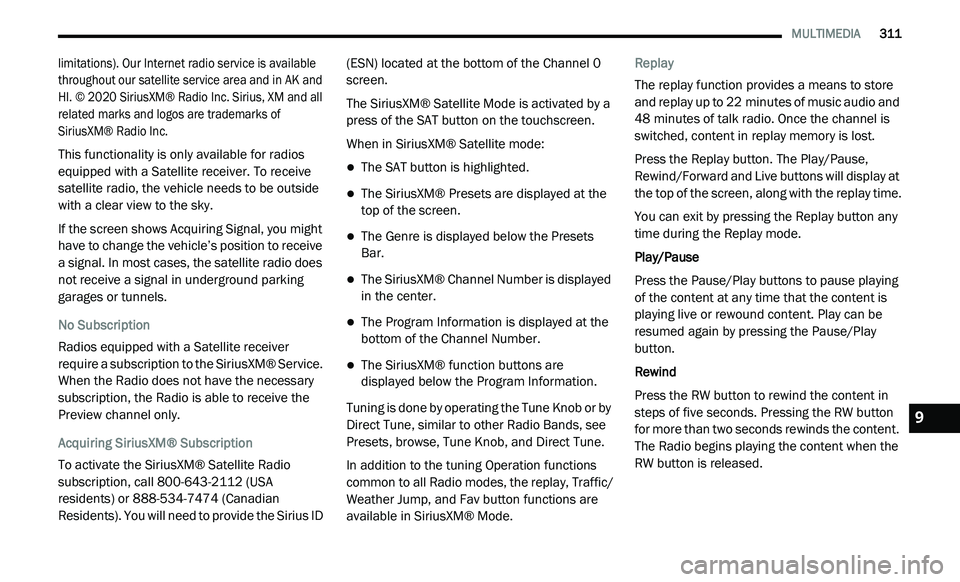
The SiriusXM® Satellite Mode is activated by a
pr
ess of the SAT button on the touchscreen.
When in SiriusXM® Satellite mode:
The SAT button is highlighted.
The SiriusXM® Presets are displayed at the
top of the screen.
The Genre is displayed below the Presets
Bar.
The SiriusXM® Channel Number is displayed
in the center.
The Program Information is displayed at the
bottom of the Channel Number.
The SiriusXM® function buttons are
displayed below the Program Information.
Tuning is done by operating the Tune Knob or by
D i
rect Tune, similar to other Radio Bands, see
Presets, browse, Tune Knob, and Direct Tune.
In addition to the tuning Operation functions
c o
mmon to all Radio modes, the replay, Traffic/
Weather Jump, and Fav button functions are
available in SiriusXM® Mode. Replay
The replay function provides a means to store
a
n
d replay up to 22 minutes of music audio and
4 8
minutes of talk radio. Once the channel is
s w
itched, content in replay memory is lost.
Press the Replay button. The Play/Pause,
R e
wind/Forward and Live buttons will display at
the top of the screen, along with the replay time.
You can exit by pressing the Replay button any
t i
me during the Replay mode.
Play/Pause
Press the Pause/Play buttons to pause playing
of
the content at any time that the content is
playing live or rewound content. Play can be
resumed again by pressing the Pause/Play
button.
Rewind
Press the RW button to rewind the content in
s t
eps of five seconds. Pressing the RW button
for more than two seconds rewinds the content.
The Radio begins playing the content when the
RW button is released.
9
Page 319 of 396
MULTIMEDIA 317
Fast Seek Down
Press and hold the Left Arrow button and the
Di
sc player will begin to rewind through the
current track until the button is released.
Browse
Press the Browse button to display the browse
w i
ndow. The left side of the browse window
displays a list of ways you can browse through
the contents of the Disc. If supported by the
device, you can browse by Folders, Artists,
Playlists, Albums, Songs, etc. Press the desired
button on the left side of the screen. The center
of the browse window shows items and it’s
sub-functions, which can be scrolled by
pressing the Up and Down buttons to the right.
The TUNE/SCROLL knob can also be used to
scroll.
Source
Press the Source button on the touchscreen to
s e
lect the desired audio source: Disc/USB/SD
Card/AUX/Bluetooth®. This screen will time out
after a few seconds and return to the main radio
screen if no selection is made. Repeat
Press the Repeat button to toggle the repeat
f
u
nctionality. The Repeat button is highlighted
when active. The radio will continue to play the
current track, repeatedly, as long as the repeat
is active.
Shuffle
Press the Shuffle button to play the selections
o n
the compact disc in random order to provide
an interesting change of pace. Press the Shuffle
button a second time to turn this feature off.
Info
Press the Info button to display the current
t r
ack information. Press the Info button a
second time to cancel this feature.
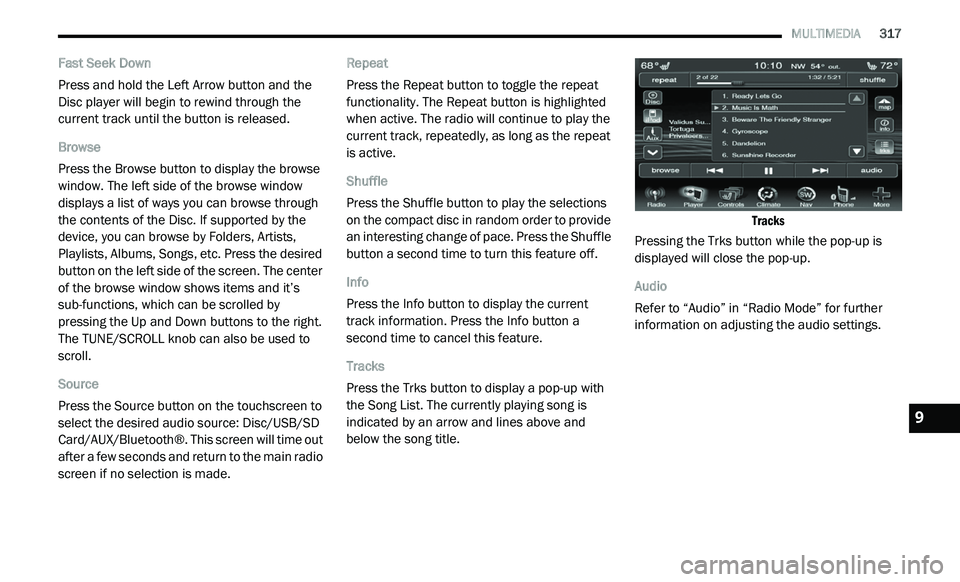
Tracks
Press the Trks button to display a pop-up with
t h
e Song List. The currently playing song is
indicated by an arrow and lines above and
below the song title.
Tracks
Pressing the Trks button while the pop-up is
d i
splayed will close the pop-up.
Audio
Refer to “Audio” in “Radio Mode” for further
i n
formation on adjusting the audio settings.
9
Page 320 of 396
318 MULTIMEDIA
USB Operation
Overview
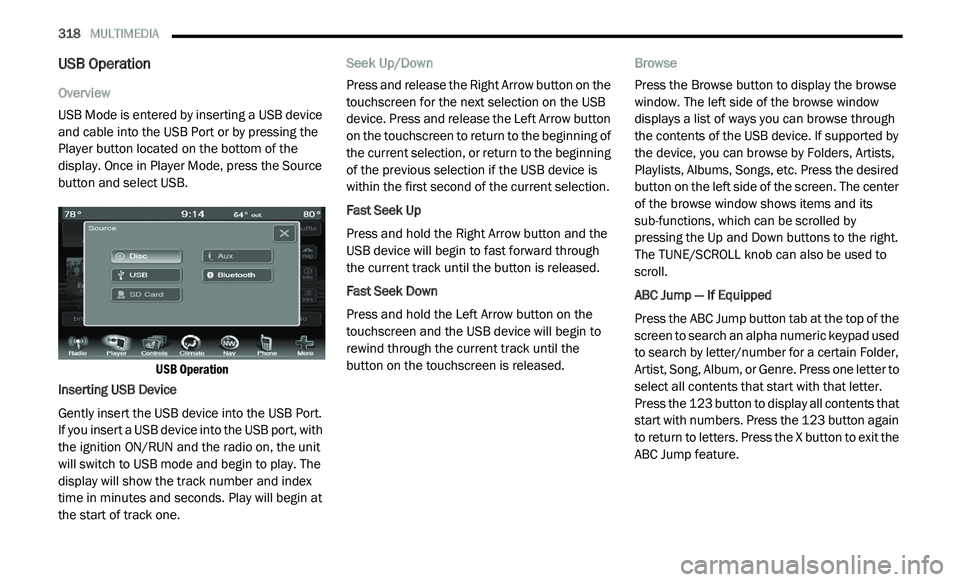
USB Mode is entered by inserting a USB device
an
d cable into the USB Port or by pressing the
Player button located on the bottom of the
display. Once in Player Mode, press the Source
button and select USB.
USB Operation
Inserting USB Device
Gently insert the USB device into the USB Port.
I f
you insert a USB device into the USB port, with
the ignition ON/RUN and the radio on, the unit
will switch to USB mode and begin to play. The
display will show the track number and index
time in minutes and seconds. Play will begin at
the start of track one. Seek Up/Down
Press and release the Right Arrow button on the
t
o
uchscreen for the next selection on the USB
device. Press and release the Left Arrow button
on the touchscreen to return to the beginning of
the current selection, or return to the beginning
of the previous selection if the USB device is
within the first second of the current selection.
Fast Seek Up
Press and hold the Right Arrow button and the
U S
B device will begin to fast forward through
the current track until the button is released.
Fast Seek Down
Press and hold the Left Arrow button on the
t o
uchscreen and the USB device will begin to
rewind through the current track until the
button on the touchscreen is released. Browse
Press the Browse button to display the browse
w
i
ndow. The left side of the browse window
displays a list of ways you can browse through
the contents of the USB device. If supported by
the device, you can browse by Folders, Artists,
Playlists, Albums, Songs, etc. Press the desired
button on the left side of the screen. The center
of the browse window shows items and its
sub-functions, which can be scrolled by
pressing the Up and Down buttons to the right.
The TUNE/SCROLL knob can also be used to
scroll.
ABC Jump — If Equipped
Press the ABC Jump button tab at the top of the
s c
reen to search an alpha numeric keypad used
to search by letter/number for a certain Folder,
Artist, Song, Album, or Genre. Press one letter to
select all contents that start with that letter.
Press the 123 button to display all contents that
start with numbers. Press the 123 button again
to return to letters. Press the X button to exit the
ABC Jump feature.
Page 323 of 396
MULTIMEDIA 321
NOTE:
The vehicle radio unit is acting as the amplifier
f o
r audio output from the Auxiliary device.
Therefore if the volume control on the Auxiliary
device is set too low, there will be insufficient
audio signal for the radio unit to play the music
on the device.
Source
Press the Source button on the touchscreen to
s e
lect the desired audio source, Disc/USB/SD
Card/AUX/ or Bluetooth®. This screen will time
out after a few seconds and return to the main
radio screen if no selection is made.
Audio
Refer to “Audio” in “Radio Mode” for further
i n
formation on adjusting the audio settings.
SD Card Mode
Overview
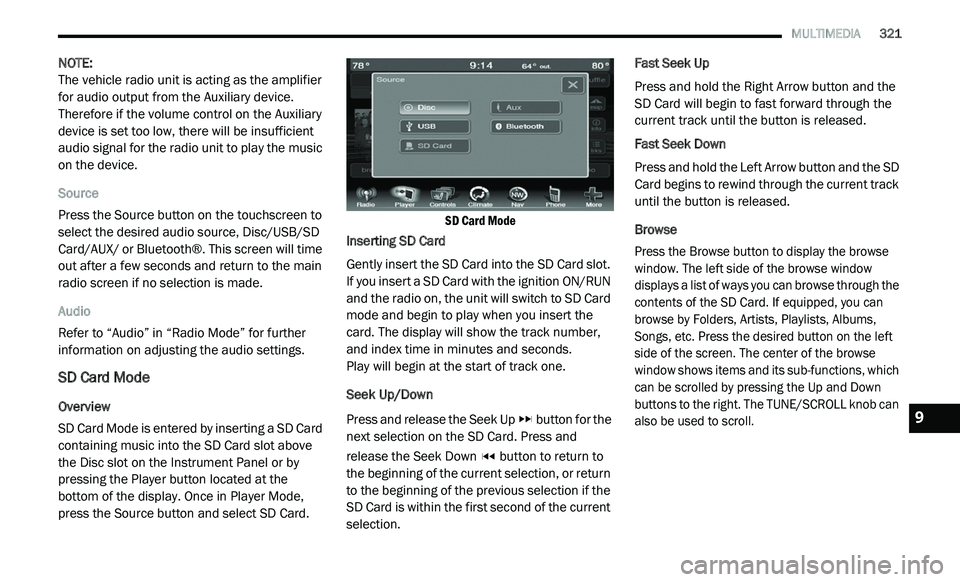
SD Card Mode is entered by inserting a SD Card
co
ntaining music into the SD Card slot above
the Disc slot on the Instrument Panel or by
pressing the Player button located at the
bottom of the display. Once in Player Mode,
press the Source button and select SD Card.
SD Card Mode
Inserting SD Card
Gently insert the SD Card into the SD Card slot.
I f
you insert a SD Card with the ignition ON/RUN
and the radio on, the unit will switch to SD Card
mode and begin to play when you insert the
card. The display will show the track number,
and index time in minutes and seconds.
Play will begin at the start of track one.
Seek Up/Down
Press and release the Seek Up button for the
next selection on the SD Card. Press and
r e
lease the Seek Down button to return to
the beginning of the current selection, or return
t o
the beginning of the previous selection if the
SD Card is within the first second of the current
selection. Fast Seek Up
Press and hold the Right Arrow button and the
S
D
Card will begin to fast forward through the
current track until the button is released.
Fast Seek Down
Press and hold the Left Arrow button and the SD
C a
rd begins to rewind through the current track
until the button is released.
Browse
Press the Browse button to display the browse
w i
ndow. The left side of the browse window
displays a list of ways you can browse through the
contents of the SD Card. If equipped, you can
browse by Folders, Artists, Playlists, Albums,
Songs, etc. Press the desired button on the left
side of the screen. The center of the browse
window shows items and its sub-functions, which
can be scrolled by pressing the Up and Down
buttons to the right. The TUNE/SCROLL knob can
also be used to scroll.
9
Page 335 of 396
MULTIMEDIA 333
Touch-Tone Number Entry
1. Press the Phone button on the
t
ouchscreen.
2. P ress the Dial button on the touchscreen.
3
. T he Touch-Tone screen will be displayed.
4
. U se the numbered buttons on the
t
ouchscreen to enter the number and press
“Call.”
To send a touch-tone using Voice Recognition
(V
R), push the Voice Command button on
your steering wheel while in a call and say
“ S
end 1234#” or you can say “Send Voicemail
Password” if Voicemail password is stored in
your mobile phonebook.
Recent Calls
You may browse up to 34 of the most recent of
e a
ch of the following call types:
Incoming Calls
Outgoing Calls
Missed Calls
All Calls These can be accessed by pressing the Recent
C
a
lls button on the touchscreen on the Phone
main screen.
You can also push the Phone button and say
“Show my incoming calls” from any screen and
t h
e Incoming calls will be displayed.
You can also push the Phone button and say
“Show my recent calls” from any screen and the
A l
l Calls screen will be displayed.
NOTE:
Incoming can also be replaced with “Outgoing,”
“ R
ecent”, or “Missed.”
Answer Or Ignore An Incoming Call — No Call
C u
rrently In Progress
When you receive a call on your mobile phone,
t h
e Uconnect Phone will interrupt the vehicle
audio system. Push the Phone button on the
steering wheel to accept the call. You can also
p r
ess the Answer button on the touchscreen, or
press the caller ID box. Answer Or Ignore An Incoming Call — Call
C
u
rrently In Progress
If a call is currently in progress and you have
a n
other incoming call, you will hear the same
network tones for call waiting that you normally
hear when using your mobile phone. Push the
Phone button on the steering wheel, or press
the Answer button on the touchscreen, or caller
I D
box, to place the current call on hold and
answer the incoming call.
NOTE:
The Uconnect Phone-compatible phones in
the market today do not support rejecting an
i n
coming call when another call is in progress.
Therefore, the user can only answer an
incoming call or ignore it.
Making A Second Call While Current Call Is In
P r
ogress
You can place a call on hold by pressing the
H o
ld button on the Phone main screen, then
dial a number from the dialpad, recent calls,
SMS Inbox or from the phonebooks. To go back
to the first call, refer to “Toggling Between Calls”
in this section. To combine two calls, refer to
“Join Calls” in this section.
9
Page 340 of 396
338 MULTIMEDIA
Voice Text Reply
Uconnect Phone can read or send new
me
ssages on your phone.
Your phone must support SMS over Bluetooth®
t o
use this feature. If the Uconnect Phone
determines your phone is not compatible
with SMS messaging over Bluetooth®, the
M e
ssaging button will be grayed out and the
feature will not be available for use.
NOTE:
Uconnect Phone SMS is only available when the
ve
hicle is not moving.
Read Messages:
If you receive a new text message while your
p h
one is connected to Uconnect Phone, an
announcement will be made to notify you that
you have a new text message.
Once a message is received and viewed or
l i
stened to, you will have the following options:
Send a Reply
Forward
Call
Send Messages Using Buttons On The Touchscreen:
You can send messages using Uconnect Phone.
T
o
send a new message:
1. P ress the Phone button on the
t
ouchscreen.
2. P ress the Messaging button on the
t
ouchscreen then “New Message.”
3. P ress one of the 18 preset messages and the
p
erson you wish to send the message to.
4. I f multiple numbers are available for the
c
ontact, select which number you would like
to have the message sent.
5. P ress “Send” or “Cancel.”
S
end Messages Using Voice Commands:
1. P ush the Phone
button.
2. A fter the “Listening” prompt and the
f
ollowing beep, say “Send message to John
Smith mobile.”
3. A fter the system prompts you for what
m
essage you want to send, say the
message you wish to send or say “List.”
There are 18 preset messages. While the list of defined messages are being
re
ad, you can interrupt the system by pushing
the Voice Command button and saying the
message you want to send.
After the system confirms that you want to send
y o
ur message to John Smith, your message will
be sent.
List of Preset Messages:
1. Y es.
2
. N o.
3
. O kay.
4
. I can't talk right now.
5
. C all me.
6
. I 'll call you later.
7
. I 'm on my way.
8
. T hanks.
9
. I 'll be late.
1
0. I will be
1
1. S ee you in
1
2. S tuck in traffic.
Page 343 of 396
MULTIMEDIA 341
Using The On-Screen Buttons
Press and hold to quickly return to the
main menu.
Press and to see more choices.
Press and hold and to scroll faster.
Finding A Point Of Interest
The detailed maps loaded in your navigation
s y
stem contain points of interest, such as
restaurants, hotels and auto services.
1. Fr om the main menu, press
W
here To? >
Points of Interest
.
2. S elect a category.
3
. I f necessary, select a subcategory.
4
. S elect a destination.
5
. P ress Go!
F
inding A Location By Spelling The Name
1. Fr om the main menu, press
W
here To? >
Points of Interest > Spell Name
.
2. E nter all or part of the name.
3
. P ress Done . 4
. S
elect a destination.
5
. P ress Go!
U
sing The On-screen Keyboard
Press a character on the keyboard to enter a
letter or number.
Press “Space” to add a space.
Press to delete a character.
Press and hold to erase the entire entry.
Press to select the keyboard language
mode.
Press to enter special characters, such as
punctuation marks.
Adding Points To The Active Route
1. W hile navigating a route, press
to return
to the main menu.
2. F rom the main menu, press W
here To?
3. S elect a category.
4
. I f necessary, select a subcategory.
5
. S elect a destination. 6
. P
ress Go!
7
. P ress Add as a Via Point .
C
hanging The Destination Of The Active Route
Before you can change destinations you must
b e
navigating a route.
1. P ress
to return to the main menu.
2. P ress Where To?
3
. S earch for the location.
4
. P ress Go!
5
. P ress Set as a New Destination .
T
aking A Detour
While navigating a route, you can use detours to
a v
oid obstacles ahead of you, such as
construction zones.
NOTE:
If the route you are currently taking is the only
re
asonable option, the navigation system might
not calculate a detour.
1. W hile navigating a route, press .
2
. F rom the main menu, press D
etour.
9
Page 346 of 396
344 MULTIMEDIA
3. Select a favorite.
4. Press the information box.
5
. P ress
> Edit.
6. S elect an option:
Name
Phone Number
Categories
Change Map Symbol
7. E dit the information.
8
. P ress Done .
P
lanning A Trip
You can use Trip Planner to create and save a
t r
ip with multiple destinations.
1. Fr om the main menu, press
W
here
To? > Trip Planner
.
2. P ress .
3
. P ress Select Start Location .
4
. S earch for a location.
5
. P ress Select . 6
. P
ress
to add an additional location.
7. P ress Select .
8
. R epeat steps 4-6 to add additional
l
ocations to your trip.
9. P ress Next .
1
0. E nter a name.
1
1. P ress Done .
N
avigating To A Saved Trip
1. Fr om the main menu, press
W
here
To? > Trip Planner
.
2. S elect a saved trip.
3
. P ress Go!
E
diting A Saved Trip
1. Fr om the main menu, press
W
here
To? > Trip Planner
.
2. S elect a saved trip.
3
. Press 4
. S
elect an option:
Press Rename Trip to edit the trip name.
Press Edit Destinations to add or delete
locations.
Press Delete Trip to delete the entire trip.
Press Optimize Order to arrange your trip
locations in the most efficient order.
Using The Map Buttons
1. Fr om the main menu, press
W
here
To? > Browse Map
.
2. P ress anywhere on the map.
Press and to zoom in and out.
Press to switch between 2D and 3D
views.
Press to rotate the view.