lug pattern DODGE JOURNEY 2020 Owners Manual
[x] Cancel search | Manufacturer: DODGE, Model Year: 2020, Model line: JOURNEY, Model: DODGE JOURNEY 2020Pages: 396, PDF Size: 25.53 MB
Page 206 of 396
204 IN CASE OF EMERGENCY
NOTE:
’ü¼For vehicles so equipped, do not attempt to
install a center cap or wheel cover on the
compact spare.
’ü¼Refer to ŌĆ£Compact Spare TireŌĆØ and to
ŌĆ£Limited Use SpareŌĆØ under ŌĆ£TiresŌĆØ in
ŌĆ£Servicing And MaintenanceŌĆØ for additional
warnings, cautions, and information about
the spare tire, its use, and operation.
7. I nstall the wheel nuts with the cone-shaped
e
nd of the nut toward the wheel. Lightly
tighten the wheel nuts.
8. Lo wer the vehicle by turning the jack screw
c
ounterclockwise with the jack handle.
9. F
inish tightening the lug nuts. Push down on
t
he wrench while at the end of the handle for
increased leverage. Tighten the lug nuts in
a star pattern until each nut has been
t i
ghtened twice. For the correct lug nut
torque, refer to ŌĆ£Wheel And Tire Torque
SpecificationsŌĆØ in ŌĆ£Technical SpecificationsŌĆØ.
If in doubt about the correct tightness, have
them checked with a torque wrench by an
authorized dealer or service station.
10. Lo wer the jack to its fully closed position.
1
1. P lace the deflated (flat) tire in the cargo
a
rea. Do not stow the deflated tire in the
spare tire stowage location. Have the
deflated (flat) tire repaired or replaced as
soon as possible.
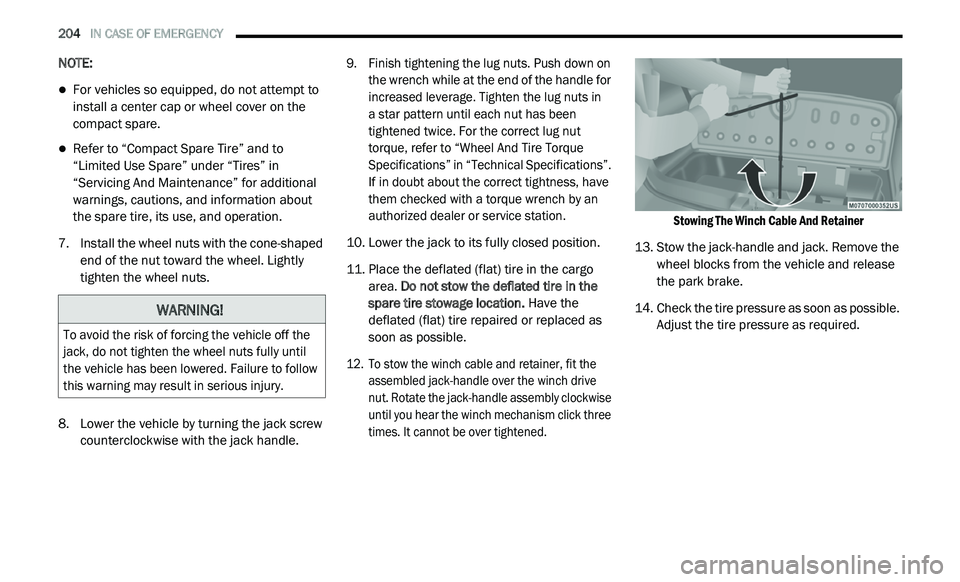
12. T o stow the winch cable and retainer, fit the
a
ssembled jack-handle over the winch drive
nut. Rotate the jack-handle assembly clockwise
until you hear the winch mechanism click three
times. It cannot be over tightened.
Stowing The Winch Cable And Retainer
13. S tow the jack-handle and jack. Remove the
w
heel blocks from the vehicle and release
the park brake.
14. C heck the tire pressure as soon as possible.
A
djust the tire pressure as required.WARNING!
To avoid the risk of forcing the vehicle off the
jack, do not tighten the wheel nuts fully until
the vehicle has been lowered. Failure to follow
this warning may result in serious injury.
Page 207 of 396
IN CASE OF EMERGENCY 205
ROAD TIRE INSTALLATION
Vehicles Equipped With Wheel Covers
1. Mount the road tire on the axle.
2. T o ease the installation process for steel
w
heels with wheel covers, install two lug nuts
on the mounting studs which are on each
side of the valve stem. Install the lug nuts
with the cone shaped end of the nut toward
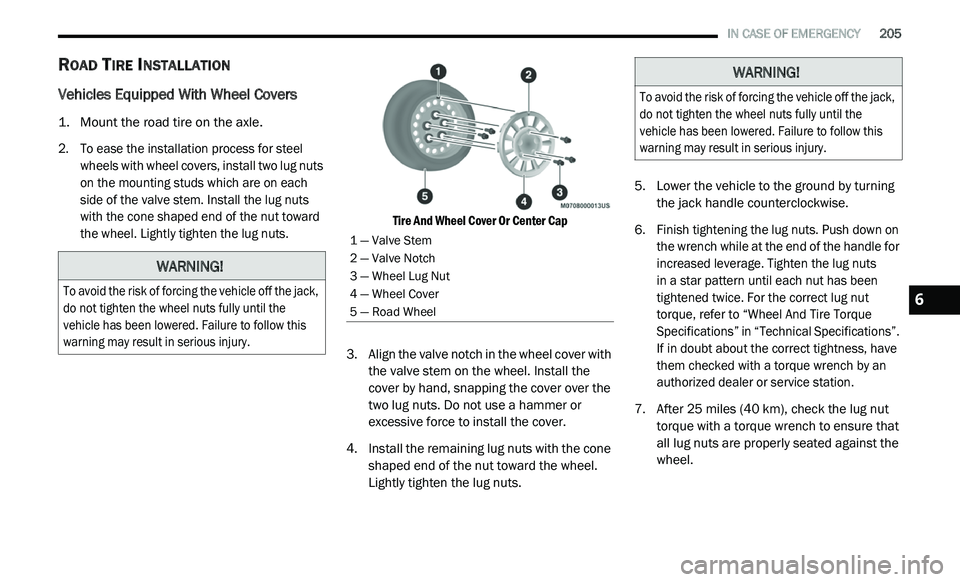
the wheel. Lightly tighten the lug nuts. Tire And Wheel Cover Or Center Cap
3. A lign the valve notch in the wheel cover with
t
he valve stem on the wheel. Install the
cover by hand, snapping the cover over the
two lug nuts. Do not use a hammer or
excessive force to install the cover.
4. I nstall the remaining lug nuts with the cone
s
haped end of the nut toward the wheel.
Lightly tighten the lug nuts. 5. Lo
wer the vehicle to the ground by turning
t
he jack handle counterclockwise.
6. F inish tightening the lug nuts. Push down on
t
he wrench while at the end of the handle for
increased leverage. Tighten the lug nuts
in a star pattern until each nut has been
t i
ghtened twice. For the correct lug nut
torque, refer to ŌĆ£Wheel And Tire Torque
SpecificationsŌĆØ in ŌĆ£Technical SpecificationsŌĆØ.
If in doubt about the correct tightness, have
them checked with a torque wrench by an
authorized dealer or service station.
7. A fter 25
miles (40 km), check the lug nut
to
rque with a torque wrench to ensure that
all lug nuts are properly seated against the
wheel.
WARNING!
To avoid the risk of forcing the vehicle off the jack,
do not tighten the wheel nuts fully until the
vehicle has been lowered. Failure to follow this
warning may result in serious injury.
1 ŌĆö Valve Stem
2 ŌĆö Valve Notch
3 ŌĆö Wheel Lug Nut
4 ŌĆö Wheel Cover
5 ŌĆö Road Wheel
WARNING!
To avoid the risk of forcing the vehicle off the jack,
do not tighten the wheel nuts fully until the
vehicle has been lowered. Failure to follow this
warning may result in serious injury.
6
Page 208 of 396
206 IN CASE OF EMERGENCY
Vehicles Without Wheel Covers
1. Mount the road tire on the axle.
2. I nstall the remaining lug nuts with the cone
s
haped end of the nut toward the wheel.
Lightly tighten the lug nuts.
3. Lo wer the vehicle to the ground by turning
t
he jack handle counterclockwise.
4. F inish tightening the lug nuts. Push down on
t
he wrench while at the end of the handle
for increased leverage. Tighten the lug nuts
in a star pattern until each nut has been
tightened twice. For proper lug nut torque,
refer to ŌĆ£Wheel And Tire Torque Specifi -
cationsŌĆØ in ŌĆ£Technical SpecificationsŌĆØ. If in
d o
ubt about the correct tightness, have
them checked with a torque wrench by an
authorized dealer or service station.
5. A
fter 25
miles (40 km), check the lug nut torque
wi
th a torque wrench to ensure that all lug nuts
are properly seated against the wheel.
SPARE TIRE STOWAGE
NOTE:
Refer to ŌĆ£Spare Tire Location And RemovalŌĆØ in
t h
is section, for information on assembling the
winch tools.
1. P lace the spare tire near the winch cable.
H
old the spare upright so that the tire's
tread is on the ground and the valve stem
is at the top of the wheel facing away from
the rear of the vehicle.
2. T ilt the retainer at the end of the winch
c
able and drop it through the center of the
wheel. Then place the spare tire with the
cable and retainer underneath the vehicle.
3. Fit the assembled jack-handle over the winch d
rive nut. Rotate the jack-handle assembly
clockwise to raise the spare tire into the storage
area. Continue to rotate the jack-handle
assembly until you hear the winch mechanism
click three times. It cannot be over tightened.
Push against the tire several times to be sure it
is held securely in place.
JUMP STARTING
If your vehicle has a discharged battery, it can
be jump started using a set of jumper cables
and a battery in another vehicle, or by using a
portable battery booster pack. Jump starting
can be dangerous if done improperly, so please
follow the procedures in this section carefully.
NOTE:
When using a portable battery booster pack,
f o
llow the manufacturer's operating instruc -
tions and precautions.
WARNING!
To avoid the risk of forcing the vehicle off the
jack, do not tighten the wheel nuts fully until
the vehicle has been lowered. Failure to follow
this warning may result in serious injury.
WARNING!
Do not attempt jump starting if the battery is
frozen. It could rupture or explode and cause
personal injury.
CAUTION!
Do not use a portable battery booster pack or
any other booster source with a system
voltage greater than 12 Volts or damage to
the battery, starter motor, alternator or
electrical system may occur.
Page 244 of 396
242 SERVICING AND MAINTENANCE
TIRES ŌĆö GENERAL INFORMATION
Tire Pressure
Proper tire inflation pressure is essential to the
safe and satisfactory operation of your vehicle.
Four primary areas are affected by improper tire
pressure:
’ü¼Safety
’ü¼Fuel Economy
’ü¼Tread Wear
’ü¼Ride Comfort and Vehicle Stability Safety
Both underinflation and overinflation affect the
st
ability of the vehicle and can produce a feeling
of sluggish response or over responsiveness in
the steering.
NOTE:
’ü¼Unequal tire pressures from side to side may
cause erratic and unpredictable steering
response.
’ü¼Unequal tire pressure from side to side may
cause the vehicle to drift left or right.
Fuel Economy
Underinflated tires will increase tire rolling
r e
sistance resulting in higher fuel consumption.
Tread Wear
Improper cold tire inflation pressures can cause
ab
normal wear patterns and reduced tread life,
resulting in the need for earlier tire replacement.
Ride Comfort And Vehicle Stability
Proper tire inflation contributes to a
c o
mfortable ride. Overinflation produces a
jarring and uncomfortable ride.
WARNING!
Overloading of your tires is dangerous.
Overloading can cause tire failure, affect
vehicle handling, and increase your stopping
distance. Use tires of the recommended load
capacity for your vehicle. Never overload them.
WARNING!
’ü¼Improperly inflated tires are dangerous and
can cause collisions.
’ü¼Underinflation increases tire flexing and
can result in overheating and tire failure.
’ü¼Overinflation reduces a tire's ability to
cushion shock. Objects on the road and
chuckholes can cause damage that result
in tire failure.
’ü¼Overinflated or underinflated tires can
affect vehicle handling and can fail
suddenly, resulting in loss of vehicle
control.
’ü¼Unequal tire pressures can cause steering
problems. You could lose control of your
vehicle.
’ü¼Unequal tire pressures from one side of the
vehicle to the other can cause the vehicle
to drift to the right or left.
’ü¼Always drive with each tire inflated to the
recommended cold tire inflation pressure.
Page 259 of 396
TECHNICAL SPECIFICATIONS 257
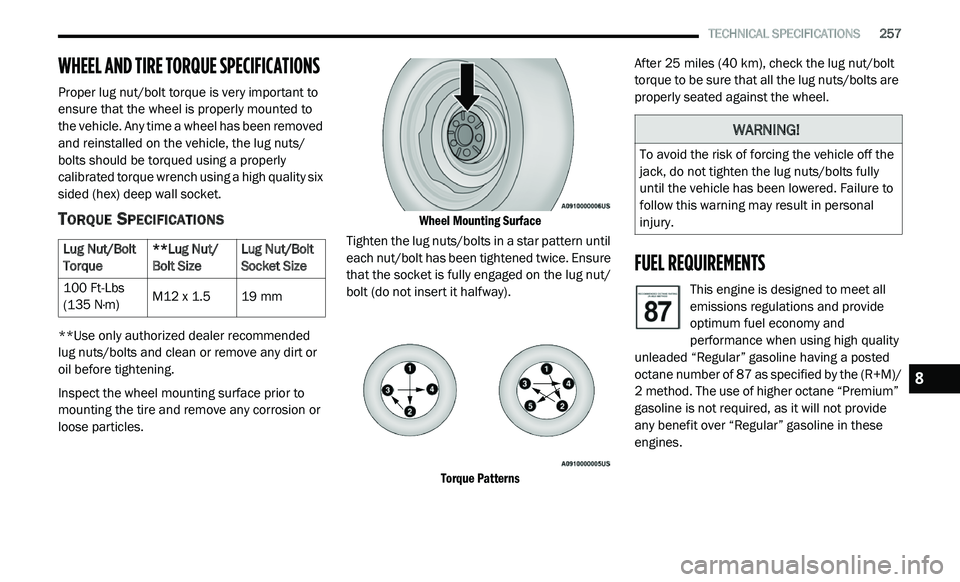
WHEEL AND TIRE TORQUE SPECIFICATIONS
Proper lug nut/bolt torque is very important to
ensure that the wheel is properly mounted to
the vehicle. Any time a wheel has been removed
and reinstalled on the vehicle, the lug nuts/
bolts should be torqued using a properly
calibrated torque wrench using a high quality six
sided (hex) deep wall socket.
TORQUE SPECIFICATIONS
**Use only authorized dealer recommended
lug nuts/bolts and clean or remove any dirt or
oil before tightening.
Inspect the wheel mounting surface prior to
mo
unting the tire and remove any corrosion or
loose particles.
Wheel Mounting Surface
Tighten the lug nuts/bolts in a star pattern until
ea
ch nut/bolt has been tightened twice. Ensure
that the socket is fully engaged on the lug nut/
bolt (do not insert it halfway).
Torque Patterns
After 25
miles (40 km), check the lug nut/bolt
t o
rque to be sure that all the lug nuts/bolts are
properly seated against the wheel.
FUEL REQUIREMENTS
This engine is designed to meet all
emissions regulations and provide
o p
timum fuel economy and
performance when using high quality
unleaded ŌĆ£RegularŌĆØ gasoline having a posted
octane number of 87 as specified by the (R+M)/
2 method. The use of higher octane ŌĆ£PremiumŌĆØ
g a
soline is not required, as it will not provide
any benefit over ŌĆ£RegularŌĆØ gasoline in these
engines.
Lug Nut/Bolt
T
o
rque **Lug Nut/
Bo
lt Size Lug Nut/Bolt
So
cket Size
100 Ft-Lbs
( 1
35 N┬Ęm) M12 x 1.5
19 mm
WARNING!
To avoid the risk of forcing the vehicle off the
jack, do not tighten the lug nuts/bolts fully
until the vehicle has been lowered. Failure to
follow this warning may result in personal
injury.
8